8.6 KiB
DApp overview
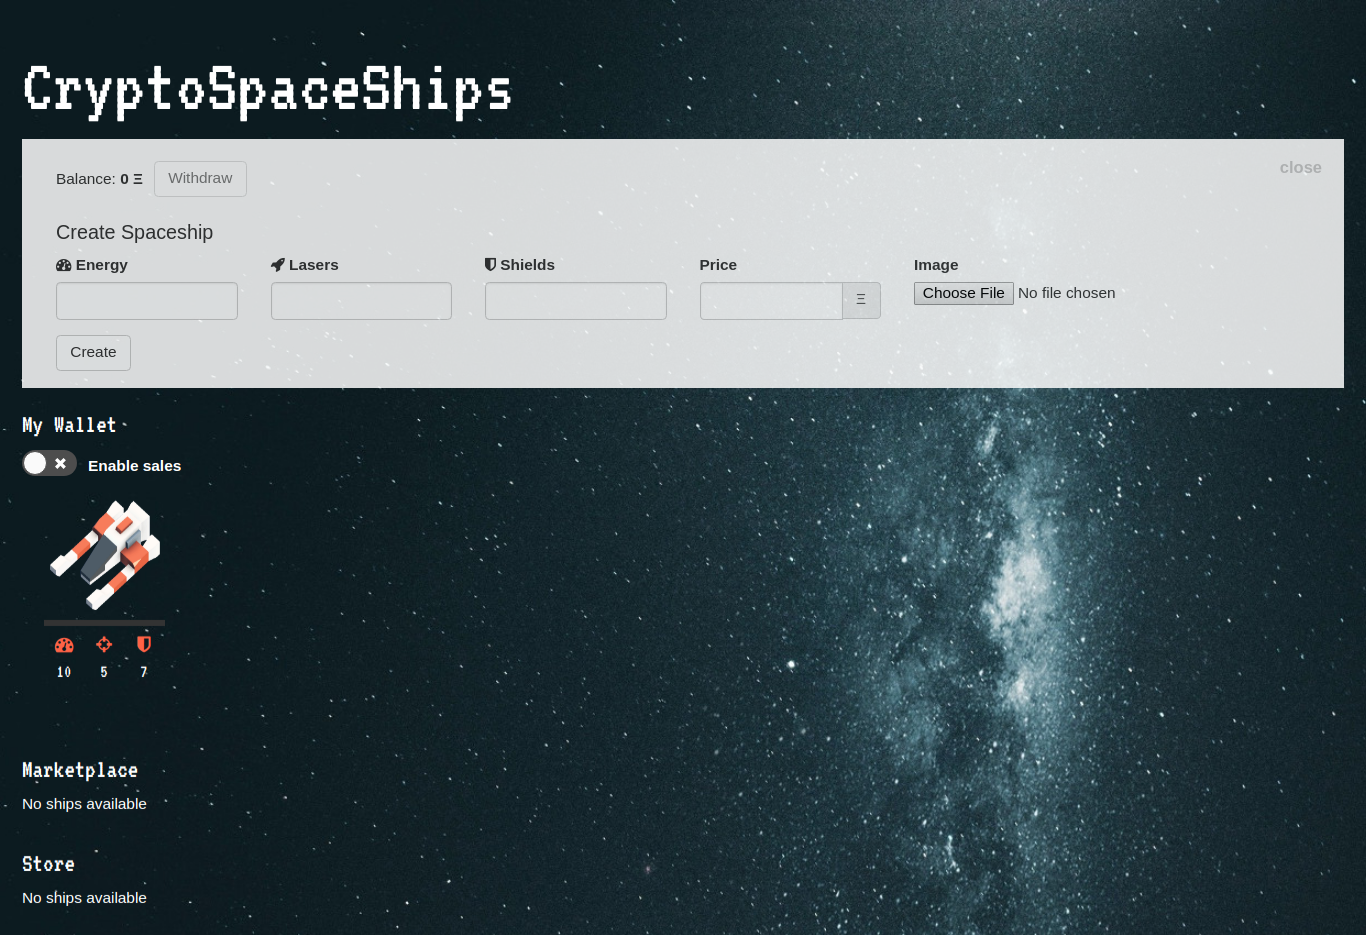
The DApp will be running in http://localhost:8000 . This URL will present a simple site called CryptoSpaceShips, with a form to create the tokens (In this case each token representing a unique spaceship with its own attributes), also, it lists all the tokens you own, that you can buy from the store, and can buy/sell in the market.
Minting tokens
Each spaceship in this dapp is an ERC721 token, and as such, they have their own characteristics. Since these tokens represent spaceships (that could be used in a game), the attributes they will have are: lasers, shields, and energy, as well as an image.
The contract we will use to represent the spaceships is SpaceshipToken and it is located in the file: contracts\SpaceshipToken.sol.
Embark will attempt to deploy all the contracts it finds in the
contractsfolder and their dependencies. For this project, we already pre-configured the contracts we will and will not deploy. You can read more about this in the documentation.
For minting the tokens we will use IPFS to store the image and attributes, and the function mint(bytes _metadataHash, uint8 _energy, uint8 _lasers, uint8 _shield, uint _price) of the SpaceshipToken contract.
Let's edit the file app/js/components/addToken.js which contains the form to add tokens. You can use the spaceship images from the folder resources for testing.
Importing Embark and contracts
Before being able to interact with the EVM, and with IPFS, you need to import both EmbarkJS and the contract file:
import web3 from "Embark/web3"
import EmbarkJS from 'Embark/EmbarkJS';
import SpaceshipToken from 'Embark/contracts/SpaceshipToken';
Adding functionality to the Create button

When you click on the 'Create' button, it will invoke the handleClick(e) method which doesn't have a useful implementation at the moment. Let's start by loading the ship's attributes and image into IPFS.
Creating attributes
Each ERC721 may have an optional list of attributes or metadata that follows the "ERC721 Metadata JSON Schema". Start by creating a JSON object that contains this metadata using the values from the input fields:
let attributes = {
    "name": "Spaceship",
    "image": "",
    "attributes": {
    "energy": this.state.energy,
    "lasers": this.state.lasers,
    "shield": this.state.shield
    }
}
Notice the image attribute is empty because we still don't know the url of the image yet - it needs to be uploaded to IPFS first.
Uploading image to IPFS
To upload the image file, use uploadFile(inputFile[]) function of Embark.Storage which returns a promise, and after the promise resolves, add the image hash to the attributes object. We also will add a catch block to display any error we receive on the browser console, as well as a finally block for enabling the Create button after the file upload.
EmbarkJS.Storage.uploadFile(this.state.fileToUpload)
.then(fileHash => {
    attributes.image = 'https://ipfs.io/ipfs/' + fileHash;
})
.catch((err) => {
    console.error(err);
})
.finally(() => {
    // Verify our object has a image attribute
    console.log(attributes);
    this.setState({isSubmitting: false});
});
Uploading attributes to IPFS
An ERC721 token that supports the metadata standard has a tokenURI(uint256 _tokenId) function that returns an URI with all the attribute info of the token. Since IPFS already provides an URL for all the resources it has, we will store the attributes object in IPFS an return its URL when we invoke that contract function.
Modify our then() implementation by calling the saveText(text) method of Embark.Storage. This also returns a promise with the hash of the stored attributes object.
This hash will be stored in the metadataHash attribute of the Spaceship struct in the contract and will be returned along with an IPFS gateway url.
EmbarkJS.Storage.uploadFile(this.state.fileToUpload)
.then(fileHash => {
    attributes.image = 'https://ipfs.io/ipfs/' + fileHash;

    // Saving our attributes object in IPFS
    return EmbarkJS.Storage.saveText(JSON.stringify(attributes))
})
.then(attrHash => {
    console.log(attrHash);
})
.catch((err) => {
    console.error(err);
})
.finally(() => {
    this.setState({isSubmitting: false});
});
Using our contract to mint the new token
Finally, once we have both the Image and the Attributes stored in IPFS it's time to mint our new token. This is done in two steps: first, we estimate the gas cost to invoke mint(bytes _metadataHash, uint8 _energy, uint8 _lasers, uint8 _shield, uint _price) (it's a good practice, in order to avoid running into Out of Gas exceptions), and then, we will create the transaction. To estimate gas, use estimateGas().
const { mint } = SpaceshipToken.methods;
let toSend;

EmbarkJS.Storage.uploadFile(this.state.fileToUpload)
.then(fileHash => {
    attributes.image = 'https://ipfs.io/ipfs/' + fileHash;
    return EmbarkJS.Storage.saveText(JSON.stringify(attributes))
})
.then(attrHash => {
    toSend = mint(web3.utils.toHex(attrHash),
                          this.state.energy,
                          this.state.lasers,
                          this.state.shield,
                          web3.utils.toWei(this.state.price, "ether"));
    return toSend.estimateGas();
})
.then(estimatedGas => {
    console.log(estimatedGas);
})
.catch((err) => {
    console.error(err);
})
.finally(() => {
    this.setState({isSubmitting: false});
});
Notice that we stored the function call in the toSend variable. however, we're not creating a transaction here. With toSend we're able to send a transaction or estimate gas (also, calling a value if the contract function were a constant/view/pure function).
Two
web3.utilsfunctions are being used here:toHex, to convert any given value to a HEX string, andtoWei, to convert from ether to wei, since in the UI the values are introduced as ether, and the smart contract uses wei.
After estimating gas, proceed to create the transaction by returning the send method of our contract with the estimated gas plus an additional wei amount (estimateGas() is not always precise due to gas refunds or logic that may depend of the contract state).
...
...
.then(estimatedGas => {
    return toSend.send({gas: estimatedGas + 1000});
})
.then(receipt => {
    console.log(receipt);

    // Reset form
    this.setState({
    energy: '',
    lasers: '',
    shield: '',
    price: ''
    });

    this.props.loadShipsForSale();
})
...
...
Notice send() returns a promise that resolves to a receipt object with all the information about the transaction as well as any event logs that were emitted during the function exectuib. Here we also clean the form, and invoke this.props.loadShipsForSale() to reload the list of ships. It doesn't do anything at the moment since we haven't implemented it yet.
We did not implement success/error alert messages or warnings to the user. These can be added inside the promise resolution and catch blocks.
Full implementation of the handleClick(e) function:
handleClick(e){
    e.preventDefault();


    this.setState({isSubmitting: true});

    let attributes = {
      "name": "Spaceship",
      "image": "",
      "attributes": {
        "energy": this.state.energy,
        "lasers": this.state.lasers,
        "shield": this.state.shield
      }
    }

    const { mint } = SpaceshipToken.methods;
    let toSend;

    EmbarkJS.Storage.uploadFile(this.state.fileToUpload)
    .then(fileHash => {
      attributes.image = 'https://ipfs.io/ipfs/' + fileHash;
      return EmbarkJS.Storage.saveText(JSON.stringify(attributes))
    })
    .then(attrHash => {
      toSend = mint(web3.utils.toHex(attrHash),
                          this.state.energy,
                          this.state.lasers,
                          this.state.shield,
                          web3.utils.toWei(this.state.price, "ether"));
      return toSend.estimateGas();
    })
    .then(estimatedGas => {
      return toSend.send({gas: estimatedGas + 1000});
    })
    .then(receipt => {
      console.log(receipt);
      this.setState({
        energy: '',
        lasers: '',
        shield: '',
        price: ''
      });
      this.props.loadShipsForSale();
    })
    .catch((err) => {
      console.error(err);
    })
    .finally(() => {
      this.setState({isSubmitting: false});
    });
}