* wip

* script

* script

* script

* script

* add keywords

* new structure

* fix links

* remove tmp doc

* combine bpmn terms and glossary

* rename

* update faq

* faq

* fix screenshot link

* remove keywords from index

* tags

* add tags

* rm tmp

* add back text

* dup text

* improve homepage

* remove dup

* unhose

* remove taxi

* only ignore w/ autobuild

---------

Co-authored-by: burnettk <burnettk@users.noreply.github.com>
4.1 KiB
Configuring Okta as an OpenID Provider
This guide provides steps to configure Okta as an OpenID Provider (alternative to Keycloak) for SpiffWorkflow.
The setup involves creating an OpenID Connect (OIDC) application, configuring environment variables, and ensuring group information is passed through correctly.
1. Setting Up OpenID Authentication with Okta
-
Follow the Okta App Integration Wizard to create an OpenID Connect (OIDC) Web Application.
- This step provides you with a Client ID and a Client Secret key.
-
Key Requirements:
- Obtain the following details:
- OpenID Server URL
- Client ID
- Client Secret Key
- Obtain the following details:
2. Configuring Environment Variables in SpiffWorkflow
Set the following environment variables on your SpiffWorkflow backend server to connect with your Okta instance:
# OpenID Server URL
SPIFFWORKFLOW_BACKEND_OPEN_ID_SERVER_URL=<YOUR_OKTA_ISSUER_URL>

# Client ID and Secret Key from Okta
SPIFFWORKFLOW_BACKEND_OPEN_ID_CLIENT_ID=<YOUR_CLIENT_ID>
SPIFFWORKFLOW_BACKEND_OPEN_ID_CLIENT_SECRET_KEY=<YOUR_CLIENT_SECRET_KEY>

# OpenID Scopes (includes groups)
SPIFFWORKFLOW_BACKEND_OPENID_SCOPE="openid profile email groups"

# Allow OpenID Provider to manage user groups
SPIFFWORKFLOW_BACKEND_OPEN_ID_IS_AUTHORITY_FOR_USER_GROUPS: true
3. Adding a Groups Claim for Authorization Server
To pass group information to SpiffWorkflow, configure the Groups Claim for your OpenID Connect client app in Okta.
-
Go to Admin Console > Applications > Applications.
-
Select the OpenID Connect client app you created.
-
Navigate to the Sign On tab and click Edit under the OpenID Connect ID Token section.
-
In the Group claim type section, you can select either Filter or Expression. For this example, leave Filter selected. In the Group claims filter section, leave the default name groups (or add it if the box is empty), and then add the appropriate filter. For this example, select Matches regex and enter .* to return the user's groups. For the Group claims filter:
- Leave the default name
groupsor enter it manually and then add the appropriate filter. - For this example, Set the filter to
Matches regexand use.*to return all user groups.
See Okta Expression Language Group Functions for more information on expressions.
- Leave the default name
-
Click Save.
-
Click Back to applications.
-
Use the More dropdown and select Refresh Application Data to apply the changes.
📘 Reference: Customize Tokens and Groups Claim.
4. Passing Through Groups from Active Directory
If your organization integrates Active Directory (AD) with Okta, Use the following Okta documentation for guidance:
Retrieve AD and Okta Groups in OIDC Claims.
Adjust the configuration to ensure group information is included in the OpenID Connect token passed to SpiffWorkflow.
Example Configuration
For one of our users, the following setup was used to pass group information to SpiffWorkflow:
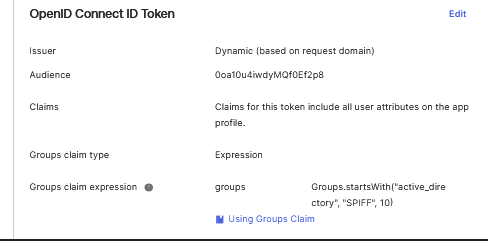
-
Environment variables included the OpenID details and group scope.
-
Groups were fetched from Active Directory and passed through to SpiffWorkflow using Okta's configuration tools.
📘 For additional details, refer to Okta’s documentation or the SpiffWorkflow team for troubleshooting.
🔗 Helpful Links: