7.4 KiB
sartography/cr-connect-workflow

CR Connect Workflow Microservice
Development Setup
Tools
These instructions assume you're using these development and tools:
- IDE: PyCharm Professional Edition
- Operating System: Ubuntu
Environment Setup
Make sure all of the following are properly installed on your system:
-
python3&pip3:- Install python3 & pip3 on Linux
- Installing Python 3 on Linux
- For windows, install Python 3.8 from Mircosoft Store, which comes with pip3
-
pipenv:- From a terminal or Powershell, 'pip install pipenv'
- For windows, make note of the location where the pipenv.exe is placed, it will tell you in the output. For me it was C:\Users\danie\AppData\Local\Packages\PythonSoftwareFoundation.Python.3.8_qbz5n2kfra8p0\LocalCache\local-packages\Python38\Scripts\pipenv.exe
- Install pipenv
- For Linux: Add ${HOME}/.local/bin to your PATH
-
install depdencies- pipenv install
- pipenv install --dev (for development dependencies)
Running Postgres
We use a docker container to run postgres, making it easier to get running locally (at least for linux) Docker containers on windows are alitt trickly, so see detailed directions below ...
Linux
- There is a sub-directory called "postgres" that contains a docker-compose script.
Windows
You will need to install Docker (and Docker Compose which comes with this) installed. See: https://docs.docker.com/compose/install/ I had good success using Docker Desktop to fire up the docker container.
Once you have Docker installed for windows, you will need to enable resource file sharing (go the Docker / Settings / Resources / Filesharing and enable File shareing for the full C:/ drive.
Due to some permission issues with Docker, you need to create a shared docker volume. On the command line, cd into your postges directory, and run the following:
docker volume create --name=data
Finally, you can use docker compose to build the docker instance
docker-compose -f docker-windows-compose.yml up --no-start
Assuming you have docker and docker-compose installed correctly, and you fixed the permission issues as described above, these should execute without error. At which point you can open up the Docker Desktop Dashboard and see postgres now exists as a docker container. Hit play, and it should show that it is running. Congratulations! Postgres is running.
When you come back to this later, you may need to start the docker container again, but it should always be visible in the Docker Desktop Daskboard with a friendly little play stop button for your clicking pleasure.
Environment Setup Part #2
If you want to run CR-Connect in development mode you must have the following two services running:
Postgres Docker: There is a sub-directory called Postgres that contains a docker image that will set up an empty database for CR-Connect, and for Protocol Builder Mock, mentioned below. For must systems, you can 'cd' into this directory and just run start.sh to fire up the Postgres service, and stop.sh to shut it back down again. create .env file in /postgres with the following two lines in it:
DB_USER=crc_user
DB_PASS=crc_pass
With this in place, from the command line:
cd postgres
./start.sh
You can now build the database structure in the newly created database with the following lines
cd ..  (into base directory)
flask db upgrade
flask load-example-data (this creates some basic workflows for you to use)
Protocol Builder Mock: We created a mock of the Protocol Builder, a critical service at UVA that is a deep dependency for CR-Connect. You can find the details here: Protocol Builder Mock Be sure this is up and running on Port 5002 or you will encounter errors when the system starts up.
With Protocol Builder Mock up and running, visit http://localhost:5001 and create a study. Set the user and primary investigator to dhf8r - which is a user in the mock ldap service, and this will later show up when you fire up the interface.
Configuration
instance/config.py: This will configure the application for your local instance, overriding the configuration in config/default
Project Initialization
-
Clone this repository.
-
In PyCharm:
- Go to
File > New Project... - Click
Pure Python(NOTFlask!!) - Click the folder icon in the
Locationfield. - Select the directory where you cloned this repository and click
Ok. - Expand the
Project Interpretersection. - Select the
New environment usingradio button and choosePipenvin the dropdown. - Under
Base interpreter, selectPython 3.7 - In the
Pipenv executablefield, enter/home/your_username_goes_here/.local/bin/pipenv - Click
Create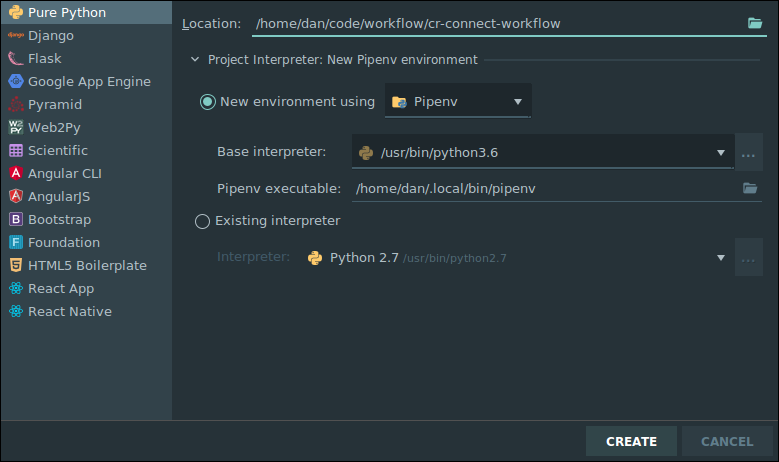
- Go to
-
PyCharm should automatically install the necessary packages via
pipenv. For me, the project interpreter did not set set up for me correctly on first attempt. I had to go to File -> Settings -> Project Interpreter and again set the project to use the correct PipEnv environment. Be sure that your settings like simliar to this, or attempt to add the interpreter again by clicking on the gear icon.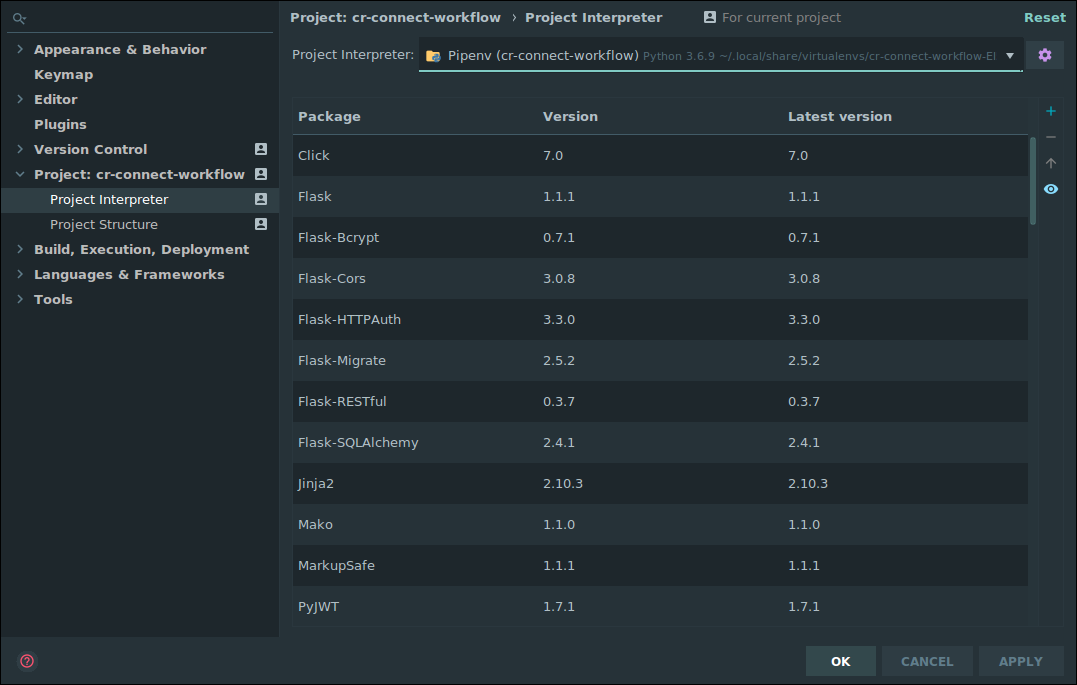
-
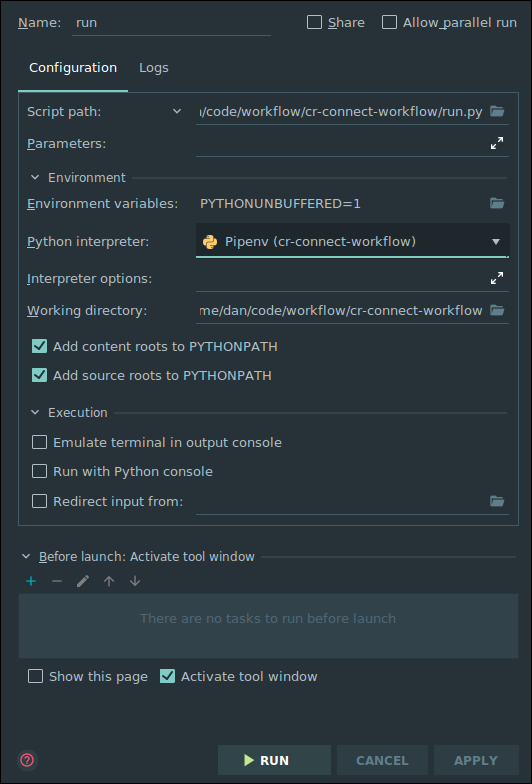
With this properly setup for the project, you can now right click on the run.py and set up a new run configuration and set up a run configuration that looks like the following (be sure to save this run configuration so it doesn't go away.) :
Running the Web API
Just click the "Play" button next to RUN in the top right corner of the screen. The Swagger based view of the API will be avialable at http://0.0.0.0:5000/v1.0/ui/
Running Tests
We use pytest to execute tests. You can run this from the command line with:
pipenv run coverage run -m pytest
To run the tests within PyCharm set up a run configuration using pytest (Go to Run, configurations, click the plus icon, select Python Tests, and under this select pytest, defaults should work good-a-plenty with no additional edits required.)
Documentation
Additional Documentation is available on ReadTheDocs
Additional Reading
- BPMN Is the tool we are using to create diagrams of our business processes. It's is a beautiful concise diagramming tool. We strongly recommend you read this complete tutorial, as this notation is the foundation on which this project as well as many other software systems for businesses are built. Know it well.
Notes on Creating Good BPMN Diagrams in Comunda
- Be sure to give each task a thoughtful (but unique!) id. This will make the command line and debugging far far easier. I've tended to pre-fix these, so task_ask_riddle if a task is asking a riddle for instance.