|
|
||
|---|---|---|
| app | ||
| config | ||
| readme_images | ||
| schema | ||
| tests | ||
| .gitignore | ||
| LICENSE.md | ||
| Pipfile | ||
| Pipfile.lock | ||
| README.md | ||
| run.py | ||
README.md
CR Connect Workflow Microservice
Development Setup
Tools
These instructions assume you're using these development and tools:
- IDE: PyCharm Professional Edition
- Operating System: Ubuntu
Environment Setup
Make sure all of the following are properly installed on your system:
python3&pip3:pipenv:
Project Initialization
-
Clone this repository.
-
In PyCharm:
- Go to
File > New Project... - Click
Pure Python(NOTFlask!!) - Click the folder icon in the
Locationfield. - Select the directory where you cloned this repository and click
Ok. - Expand the
Project Interpretersection. - Select the
New environment usingradio button and choosePipenvin the dropdown. - Under
Base interpreter, selectPython 3.6 - In the
Pipenv executablefield, enter/home/your_username_goes_here/.local/bin/pipenv - Click
Create
- Go to
-
PyCharm should automatically install the necessary packages via
pipenv. For me, the project interpreter did not set set up for me correctly on first attempt. I had to go to File -> Settings -> Project Interpreter and again set the project to use the correct PipEnv environment. Be sure that your settings like simliar to this, or attempt to add the interpreter again by clicking on the gear icon.
-
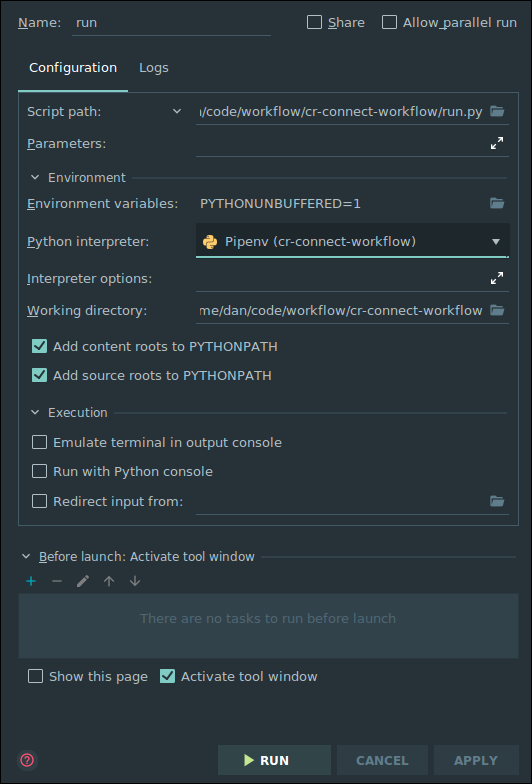
With this properly setup for the project, you can now right click on the run.py and set up a new run configuration and set up a run configuration that looks like the following (be sure to save this run configuration so it doesn't go away.) :

Running the project
Just click the "Play" button next to RUN in the top right corner of the screen. The Swagger based view of the API will be avialable at http://0.0.0.0:5000/v1.0/ui/