1 line
1.6 MiB
1 line
1.6 MiB
{"meta":{"version":1,"warehouse":"3.0.1"},"models":{"Asset":[{"_id":"source/CNAME","path":"CNAME","modified":0,"renderable":0},{"_id":"source/embark-logo.svg","path":"embark-logo.svg","modified":0,"renderable":0},{"_id":"source/browserconfig.xml","path":"browserconfig.xml","modified":0,"renderable":0},{"_id":"source/coverage-files.png","path":"coverage-files.png","modified":0,"renderable":0},{"_id":"source/robots.txt","path":"robots.txt","modified":0,"renderable":0},{"_id":"source/coverage-report.png","path":"coverage-report.png","modified":0,"renderable":0},{"_id":"source/assets/images/cockpit_debugger_controls.png","path":"assets/images/cockpit_debugger_controls.png","modified":0,"renderable":0},{"_id":"themes/embark/source/css/embark.scss","path":"css/embark.scss","modified":0,"renderable":1},{"_id":"themes/embark/source/js/index.js","path":"js/index.js","modified":0,"renderable":1},{"_id":"source/assets/images/crystal-thread-test.png","path":"assets/images/crystal-thread-test.png","modified":0,"renderable":0},{"_id":"source/assets/images/token_factory_1/page_1.png","path":"assets/images/token_factory_1/page_1.png","modified":0,"renderable":0},{"_id":"source/assets/images/token_factory_1/page_2.png","path":"assets/images/token_factory_1/page_2.png","modified":0,"renderable":0},{"_id":"source/assets/images/token_factory_1/page_3.png","path":"assets/images/token_factory_1/page_3.png","modified":0,"renderable":0},{"_id":"source/assets/images/token_factory_1/page_4.png","path":"assets/images/token_factory_1/page_4.png","modified":0,"renderable":0},{"_id":"source/assets/images/token_factory_1/page_5.png","path":"assets/images/token_factory_1/page_5.png","modified":0,"renderable":0},{"_id":"source/assets/images/token_factory_2/page_1.png","path":"assets/images/token_factory_2/page_1.png","modified":0,"renderable":0},{"_id":"source/assets/images/token_factory_2/page_2.png","path":"assets/images/token_factory_2/page_2.png","modified":0,"renderable":0},{"_id":"source/assets/images/token_factory_2/page_3.png","path":"assets/images/token_factory_2/page_3.png","modified":0,"renderable":0},{"_id":"source/assets/images/token_factory_2/page_5.png","path":"assets/images/token_factory_2/page_5.png","modified":0,"renderable":0},{"_id":"source/assets/images/web3-js-diagram.png","path":"assets/images/web3-js-diagram.png","modified":0,"renderable":0},{"_id":"source/assets/images/token_factory_2/page_6.png","path":"assets/images/token_factory_2/page_6.png","modified":0,"renderable":0},{"_id":"source/assets/images/token_factory_2/page_4.png","path":"assets/images/token_factory_2/page_4.png","modified":0,"renderable":0},{"_id":"source/assets/images/token_factory_2/page_7.png","path":"assets/images/token_factory_2/page_7.png","modified":0,"renderable":0},{"_id":"themes/embark/source/assets/icons/arrow-down-1.svg","path":"assets/icons/arrow-down-1.svg","modified":0,"renderable":1},{"_id":"themes/embark/source/assets/icons/app-window-search-text.svg","path":"assets/icons/app-window-search-text.svg","modified":0,"renderable":1},{"_id":"themes/embark/source/assets/icons/arrow-left-1.svg","path":"assets/icons/arrow-left-1.svg","modified":0,"renderable":1},{"_id":"themes/embark/source/assets/icons/arrow-right-1.svg","path":"assets/icons/arrow-right-1.svg","modified":0,"renderable":1},{"_id":"themes/embark/source/assets/icons/arrow-up-1.svg","path":"assets/icons/arrow-up-1.svg","modified":0,"renderable":1},{"_id":"themes/embark/source/assets/icons/browser-gauge.svg","path":"assets/icons/browser-gauge.svg","modified":0,"renderable":1},{"_id":"themes/embark/source/assets/icons/check.svg","path":"assets/icons/check.svg","modified":0,"renderable":1},{"_id":"themes/embark/source/assets/icons/crypto-currency-bitcoin-circle.svg","path":"assets/icons/crypto-currency-bitcoin-circle.svg","modified":0,"renderable":1},{"_id":"themes/embark/source/assets/icons/copy-paste.svg","path":"assets/icons/copy-paste.svg","modified":0,"renderable":1},{"_id":"themes/embark/source/assets/icons/computer-bug-search.svg","path":"assets/icons/computer-bug-search.svg","modified":0,"renderable":1},{"_id":"themes/embark/source/assets/icons/close.svg","path":"assets/icons/close.svg","modified":0,"renderable":1},{"_id":"themes/embark/source/assets/icons/list-to-do.svg","path":"assets/icons/list-to-do.svg","modified":0,"renderable":1},{"_id":"themes/embark/source/assets/icons/module.svg","path":"assets/icons/module.svg","modified":0,"renderable":1},{"_id":"themes/embark/source/assets/icons/github.svg","path":"assets/icons/github.svg","modified":0,"renderable":1},{"_id":"themes/embark/source/assets/icons/navigation-menu.svg","path":"assets/icons/navigation-menu.svg","modified":0,"renderable":1},{"_id":"themes/embark/source/assets/icons/notes-paper-text.svg","path":"assets/icons/notes-paper-text.svg","modified":0,"renderable":1},{"_id":"themes/embark/source/assets/icons/paginate-filter-video-alternate.svg","path":"assets/icons/paginate-filter-video-alternate.svg","modified":0,"renderable":1},{"_id":"themes/embark/source/assets/icons/pen-write-paper.svg","path":"assets/icons/pen-write-paper.svg","modified":0,"renderable":1},{"_id":"themes/embark/source/assets/icons/rating-star.svg","path":"assets/icons/rating-star.svg","modified":0,"renderable":1},{"_id":"themes/embark/source/assets/icons/search-bar.svg","path":"assets/icons/search-bar.svg","modified":0,"renderable":1},{"_id":"themes/embark/source/assets/icons/pie-line-graph.svg","path":"assets/icons/pie-line-graph.svg","modified":0,"renderable":1},{"_id":"themes/embark/source/assets/icons/symbols.svg","path":"assets/icons/symbols.svg","modified":0,"renderable":1},{"_id":"themes/embark/source/assets/icons/tag-new-circle.svg","path":"assets/icons/tag-new-circle.svg","modified":0,"renderable":1},{"_id":"themes/embark/source/assets/icons/twitter.svg","path":"assets/icons/twitter.svg","modified":0,"renderable":1},{"_id":"themes/embark/source/assets/icons/symbols.html","path":"assets/icons/symbols.html","modified":0,"renderable":1},{"_id":"themes/embark/source/assets/images/Nimbus.svg","path":"assets/images/Nimbus.svg","modified":0,"renderable":1},{"_id":"themes/embark/source/assets/images/apple-touch-icon-120x120-precomposed.png","path":"assets/images/apple-touch-icon-120x120-precomposed.png","modified":0,"renderable":1},{"_id":"themes/embark/source/assets/images/apple-touch-icon-152x152-precomposed.png","path":"assets/images/apple-touch-icon-152x152-precomposed.png","modified":0,"renderable":1},{"_id":"themes/embark/source/assets/images/apple-touch-icon-76x76-precomposed.png","path":"assets/images/apple-touch-icon-76x76-precomposed.png","modified":0,"renderable":1},{"_id":"themes/embark/source/assets/images/apple-touch-icon-60x60-precomposed.png","path":"assets/images/apple-touch-icon-60x60-precomposed.png","modified":0,"renderable":1},{"_id":"themes/embark/source/assets/images/apple-touch-icon-180x180-precomposed.png","path":"assets/images/apple-touch-icon-180x180-precomposed.png","modified":0,"renderable":1},{"_id":"themes/embark/source/assets/images/apple-touch-icon-precomposed.png","path":"assets/images/apple-touch-icon-precomposed.png","modified":0,"renderable":1},{"_id":"themes/embark/source/assets/images/company-flexdapps.svg","path":"assets/images/company-flexdapps.svg","modified":0,"renderable":1},{"_id":"themes/embark/source/assets/images/company-giveth.svg","path":"assets/images/company-giveth.svg","modified":0,"renderable":1},{"_id":"themes/embark/source/assets/images/company-status.svg","path":"assets/images/company-status.svg","modified":0,"renderable":1},{"_id":"themes/embark/source/assets/images/favicon-16.png","path":"assets/images/favicon-16.png","modified":0,"renderable":1},{"_id":"themes/embark/source/assets/images/dots.png","path":"assets/images/dots.png","modified":0,"renderable":1},{"_id":"themes/embark/source/assets/images/keycard-logo-negative.svg","path":"assets/images/keycard-logo-negative.svg","modified":0,"renderable":1},{"_id":"themes/embark/source/assets/images/favicon-32.png","path":"assets/images/favicon-32.png","modified":0,"renderable":1},{"_id":"themes/embark/source/assets/images/logo-negative.svg","path":"assets/images/logo-negative.svg","modified":0,"renderable":1},{"_id":"themes/embark/source/assets/images/logo.svg","path":"assets/images/logo.svg","modified":0,"renderable":1},{"_id":"themes/embark/source/assets/images/status-logo.svg","path":"assets/images/status-logo.svg","modified":0,"renderable":1},{"_id":"themes/embark/source/assets/images/rocket-start.svg","path":"assets/images/rocket-start.svg","modified":0,"renderable":1},{"_id":"source/assets/images/cockpit_dashboard_release.png","path":"assets/images/cockpit_dashboard_release.png","modified":0,"renderable":0},{"_id":"source/assets/images/cockpit_editor_release.png","path":"assets/images/cockpit_editor_release.png","modified":0,"renderable":0},{"_id":"source/assets/images/nimble-creating-app.png","path":"assets/images/nimble-creating-app.png","modified":0,"renderable":0},{"_id":"themes/embark/source/assets/images/bg-hexagons.png","path":"assets/images/bg-hexagons.png","modified":0,"renderable":1},{"_id":"source/assets/images/cockpit_contracts_view.gif","path":"assets/images/cockpit_contracts_view.gif","modified":0,"renderable":0},{"_id":"themes/embark/source/js/linkjuice/README.md","path":"js/linkjuice/README.md","modified":0,"renderable":1},{"_id":"themes/embark/source/js/linkjuice/package.json","path":"js/linkjuice/package.json","modified":0,"renderable":1},{"_id":"themes/embark/source/js/linkjuice/gulpfile.js","path":"js/linkjuice/gulpfile.js","modified":0,"renderable":1},{"_id":"source/assets/images/embark-header_blank.jpg","path":"assets/images/embark-header_blank.jpg","modified":0,"renderable":0},{"_id":"source/assets/images/token_factory_1/console_2.png","path":"assets/images/token_factory_1/console_2.png","modified":0,"renderable":0},{"_id":"themes/embark/source/assets/images/tool-screenshot.png","path":"assets/images/tool-screenshot.png","modified":0,"renderable":1},{"_id":"themes/embark/source/js/linkjuice/src/linkjuice.js","path":"js/linkjuice/src/linkjuice.js","modified":0,"renderable":1},{"_id":"source/assets/images/cockpit_selective_deployment.gif","path":"assets/images/cockpit_selective_deployment.gif","modified":0,"renderable":0},{"_id":"source/assets/images/token_factory_1/console_1.png","path":"assets/images/token_factory_1/console_1.png","modified":0,"renderable":0},{"_id":"source/assets/images/token_factory_2/console_2.png","path":"assets/images/token_factory_2/console_2.png","modified":0,"renderable":0},{"_id":"source/assets/images/cockpit_dashboard.png","path":"assets/images/cockpit_dashboard.png","modified":0,"renderable":0},{"_id":"source/assets/images/cockpit_dashboard_dark.png","path":"assets/images/cockpit_dashboard_dark.png","modified":0,"renderable":0},{"_id":"source/assets/images/nim-crystal-header-img_NEW.jpg","path":"assets/images/nim-crystal-header-img_NEW.jpg","modified":0,"renderable":0},{"_id":"themes/embark/source/assets/images/cli-tool.png","path":"assets/images/cli-tool.png","modified":0,"renderable":1},{"_id":"source/assets/images/cockpit_explorer_block.png","path":"assets/images/cockpit_explorer_block.png","modified":0,"renderable":0},{"_id":"source/assets/images/token_factory_2/console_1.png","path":"assets/images/token_factory_2/console_1.png","modified":0,"renderable":0},{"_id":"themes/embark/source/assets/images/EMBARK_HEADER_ALT_OPTIMIZED.jpg","path":"assets/images/EMBARK_HEADER_ALT_OPTIMIZED.jpg","modified":0,"renderable":1},{"_id":"source/assets/images/cockpit_explorer_overview.png","path":"assets/images/cockpit_explorer_overview.png","modified":0,"renderable":0},{"_id":"themes/embark/source/assets/images/EMBARK_MODULAR.png","path":"assets/images/EMBARK_MODULAR.png","modified":0,"renderable":1},{"_id":"source/assets/images/web3-article-header.png","path":"assets/images/web3-article-header.png","modified":0,"renderable":0},{"_id":"source/assets/images/cockpit_explorer_contracts_detail.gif","path":"assets/images/cockpit_explorer_contracts_detail.gif","modified":0,"renderable":0},{"_id":"themes/embark/source/assets/images/EMBARK_FRAMEWORK.png","path":"assets/images/EMBARK_FRAMEWORK.png","modified":0,"renderable":1},{"_id":"source/assets/images/embark-dashboard.png","path":"assets/images/embark-dashboard.png","modified":0,"renderable":0},{"_id":"source/assets/images/website_release.png","path":"assets/images/website_release.png","modified":0,"renderable":0},{"_id":"source/assets/images/cockpit_suggestions.gif","path":"assets/images/cockpit_suggestions.gif","modified":0,"renderable":0},{"_id":"source/assets/images/cockpit_explorer_transactions.gif","path":"assets/images/cockpit_explorer_transactions.gif","modified":0,"renderable":0},{"_id":"source/assets/images/cockpit_using_debugger.gif","path":"assets/images/cockpit_using_debugger.gif","modified":0,"renderable":0},{"_id":"source/assets/images/cockpit_search.gif","path":"assets/images/cockpit_search.gif","modified":0,"renderable":0},{"_id":"source/assets/images/cockpit_change_theme.gif","path":"assets/images/cockpit_change_theme.gif","modified":0,"renderable":0},{"_id":"source/assets/images/cockpit_navigation.gif","path":"assets/images/cockpit_navigation.gif","modified":0,"renderable":0},{"_id":"source/assets/images/cockpit_explorer_account.gif","path":"assets/images/cockpit_explorer_account.gif","modified":0,"renderable":0},{"_id":"source/assets/images/cockpit_enter_debugger.gif","path":"assets/images/cockpit_enter_debugger.gif","modified":0,"renderable":0},{"_id":"source/assets/images/cockpit_dashboard_contracts.gif","path":"assets/images/cockpit_dashboard_contracts.gif","modified":0,"renderable":0},{"_id":"source/assets/images/cockpit_editor.gif","path":"assets/images/cockpit_editor.gif","modified":0,"renderable":0},{"_id":"source/assets/images/token_factory_1/dashboard.png","path":"assets/images/token_factory_1/dashboard.png","modified":0,"renderable":0},{"_id":"source/favicon.ico","path":"favicon.ico","modified":0,"renderable":0},{"_id":"source/assets/images/embark_logo.png","path":"assets/images/embark_logo.png","modified":0,"renderable":0},{"_id":"source/assets/images/wasm-evm-benchmarks.png","path":"assets/images/wasm-evm-benchmarks.png","modified":0,"renderable":0},{"_id":"source/assets/images/wasm_explorer_online_app.png","path":"assets/images/wasm_explorer_online_app.png","modified":0,"renderable":0},{"_id":"source/assets/images/eWASM-header.png","path":"assets/images/eWASM-header.png","modified":0,"renderable":0},{"_id":"source/assets/images/tools.png","path":"assets/images/tools.png","modified":0,"renderable":0},{"_id":"source/assets/images/Chains.png","path":"assets/images/Chains.png","modified":0,"renderable":0},{"_id":"source/assets/images/ETH2_perception.png","path":"assets/images/ETH2_perception.png","modified":0,"renderable":0},{"_id":"source/assets/images/Perception_of_public_sentiment.png","path":"assets/images/Perception_of_public_sentiment.png","modified":0,"renderable":0},{"_id":"source/assets/images/Public_Private_Chains.png","path":"assets/images/Public_Private_Chains.png","modified":0,"renderable":0},{"_id":"source/assets/images/Who_are_you_building_for.png","path":"assets/images/Who_are_you_building_for.png","modified":0,"renderable":0},{"_id":"source/assets/images/impediments_to_blockchain_development.png","path":"assets/images/impediments_to_blockchain_development.png","modified":0,"renderable":0},{"_id":"source/assets/images/motivations.png","path":"assets/images/motivations.png","modified":0,"renderable":0},{"_id":"source/assets/images/Header_Banner.png","path":"assets/images/Header_Banner.png","modified":0,"renderable":0},{"_id":"source/assets/images/web-security_banner.jpg","path":"assets/images/web-security_banner.jpg","modified":0,"renderable":0},{"_id":"source/assets/images/subspace.png","path":"assets/images/subspace.png","modified":0,"renderable":0}],"Cache":[{"_id":"source/CNAME","hash":"fbac6d19ee04b9b7f4b3085544d024ec900c633c","modified":1580395178960},{"_id":"source/embark-logo.svg","hash":"af5b81d96dd4f7e4e65851e53866da7883daf52e","modified":1580395179164},{"_id":"source/browserconfig.xml","hash":"f54412705ab9eb69b544f438c9a1e15ae57f27c0","modified":1580395179128},{"_id":"source/coverage-files.png","hash":"e9b0f9b1f09dc16409266dfbc1223f274dd63cbc","modified":1580395179132},{"_id":"source/robots.txt","hash":"7e49dfd97319f5dd7cdaea8518cf43e0e8d01e5a","modified":1580395179164},{"_id":"themes/embark/package.json","hash":"ab090168132f0c69e83440981da3d51c44141cc5","modified":1580399061688},{"_id":"source/_data/authors.yml","hash":"8334ba505d98fed726191d375487bfb58e4027d1","modified":1581448128063},{"_id":"source/_data/categories.yml","hash":"3c7131ed69c491243da443abca694a5c33d281b6","modified":1580395178960},{"_id":"source/_data/languages.yml","hash":"74e55635eb66bb12833e42f0d1057b03beb65bcf","modified":1580395178960},{"_id":"source/index.md","hash":"1e85ab60b1c088d8e142c26f6b15db3f858aadc9","modified":1580399061688},{"_id":"source/_data/menu.yml","hash":"bf3d8f131b64deb519c503acad1d98c260c7bef8","modified":1580395178960},{"_id":"source/_data/plugins.yml","hash":"250b7281973f7c96b773150c5215edffcabc8297","modified":1580395178960},{"_id":"source/_data/sidebar.yml","hash":"0ea60cee0c8cfd15952164e2c4f0f7ac5baff74b","modified":1580395178960},{"_id":"source/_data/tutorials.yml","hash":"6546e52f28f25f5eed82a13390ff7dc1e40d8f9b","modified":1580395178960},{"_id":"source/_posts/2017-06-28-embark-2-5-released.md","hash":"5d149e9a2abea4c7ab621dfc846e8e15e67d0e54","modified":1580395178960},{"_id":"source/_data/templates.yml","hash":"4b2b3feab938ea904da933a40d69793248cd5e0d","modified":1580399061680},{"_id":"source/_data/versions.yml","hash":"7b081d6fac0e3acbf2be88a9c56463c4379e77b1","modified":1580399061680},{"_id":"source/_posts/2017-10-25-embark-2-6-released.md","hash":"960e06e89708a2c7efb4e2833f3330e50df4ca5c","modified":1580395178960},{"_id":"source/_posts/2018-09-27-how-to-create-a-token-factory-with-embark-part-1.md","hash":"b92b23dcd959f9ad706a08d6a669000d0e8c73f9","modified":1580395178960},{"_id":"source/_posts/2018-05-04-embark-3-0-released.md","hash":"7ae934daef5248d065294e408abe32c6bd108695","modified":1580399061680},{"_id":"source/_posts/2018-10-27-how-to-create-a-token-factory-with-embark-part-2.md","hash":"2801c0fd796b136fff5d275de5581d3950eb8bb1","modified":1580395178960},{"_id":"source/_posts/2018-06-20-embark-3-1-released.md","hash":"cbfe0ade135b7adcfe7d8ccb44b9651f5ac9571d","modified":1580395178960},{"_id":"source/_posts/2019-01-23-building-smart-contract-only-dapps.md","hash":"07ee6e18303761d241359b84d5ca49a895ae3f54","modified":1580395178960},{"_id":"source/_posts/2019-01-28-running-embark-tests-on-a-continuous-integration-server.md","hash":"b9b5affc2764a4b92fee15c6bd12201ee4d6c7c4","modified":1580395178960},{"_id":"source/_posts/2019-02-04-building-a-decentralized-reddit-with-embark-part-1.md","hash":"57de8cfef3e845f2bd86d01c01efc1fcc8bf23fe","modified":1580395178960},{"_id":"source/_posts/2019-02-18-building-a-decentralized-reddit-with-embark-part-3.md","hash":"f985d4e255f1b4794ae75dbf6cecc6375b2b8a52","modified":1580395178964},{"_id":"source/_posts/2019-02-11-building-a-decentralized-reddit-with-embark-part-2.md","hash":"3aa3e6ef8fbb7c57f07ee3b0738ccf3791e792c5","modified":1580395178964},{"_id":"source/_posts/2019-03-19-introducing-embark-4.md","hash":"50072eac21af7cd032c33cd410fbb743010caa34","modified":1580395178964},{"_id":"source/_posts/2019-07-23-whats-new-in-embark-4.1.md","hash":"22b46fbbb7f57269d174780b4af84786e662fcc4","modified":1580399061680},{"_id":"source/_posts/2019-11-18-nim-vs-crystal-part-1-performance-interoperability.md","hash":"f4a8bfca63f6ce306ad8517d2c865af71544eeb1","modified":1583777326758},{"_id":"source/_posts/2019-12-09-web3-what-are-your-options.md","hash":"5f7ea9505b4b9cc8544a8bf64a8b971b120e3e76","modified":1582076271171},{"_id":"source/_posts/2019-03-18-upgrading-to-embark-4.md","hash":"4793159075abedc368af1da5293b15df23367e02","modified":1580399061680},{"_id":"source/_posts/2019-11-21-nim-vs-crystal-part-2-threading-tooling.md","hash":"23a08e8132690c74e5b30b6c4f9c2144bc87fae8","modified":1583777326758},{"_id":"source/_posts/2019-11-28-nim-vs-crystal-part-3-cryto-dapps-p2p.md","hash":"8b832059b5dbe4744549c66608bc2b1383871e5b","modified":1583777326760},{"_id":"source/_posts/2020-01-28-embark-5-1.md","hash":"bbd5fe1c98a5b8ad6a9a77f05ff0f63ee3ff4f2a","modified":1580401283541},{"_id":"source/_posts/2020-01-30-dapp-frontend-security.md","hash":"c11c87c9e216275824d47c1bfbca1242c03eea5c","modified":1583775808179},{"_id":"source/_posts/2020-01-09-take-back-the-web-hackathon.md","hash":"b40dfd06e176be35860fe7679b059773f94c8e63","modified":1580395178964},{"_id":"source/_posts/2020-01-29-subspace-1-2.md","hash":"755e9286ca8c69e06ffca1f21b18aaf874fe4cea","modified":1580395178964},{"_id":"source/community/index.md","hash":"abc586bb9afa334aefcc6da5f995be6fced6fced","modified":1580395179128},{"_id":"source/chat/index.md","hash":"f4e76f80e3bcf796e5c06080b745129f389de4b6","modified":1580395179128},{"_id":"source/docs/blockchain_accounts_configuration.md","hash":"2418ac7cdbb8e02d7f3dcbba489de45ad54b4824","modified":1580395179132},{"_id":"source/_posts/2020-01-13-announcing-embark-5.md","hash":"9f123a4015be8a58ce6b1547ddb535b757c50047","modified":1580399061680},{"_id":"source/docs/blockchain_configuration.md","hash":"d808158a4d871c003fd5f68edd0b80df7d91fc96","modified":1580399061688},{"_id":"source/docs/cockpit_debugger.md","hash":"f38a1789e23c0bfad66c116c38aaf6448365adb1","modified":1580395179132},{"_id":"source/docs/cockpit_dashboard.md","hash":"53e5bc1ffdf3e247d4cc7e97e9f56af96f6e8d56","modified":1580395179132},{"_id":"source/docs/cockpit_editor.md","hash":"099d331e041671790bbc212d752d37b832868504","modified":1580395179132},{"_id":"source/docs/cockpit_explorer.md","hash":"b887c079e3442c4e48ea518de30c282186983c45","modified":1580395179164},{"_id":"source/docs/cockpit_deployment.md","hash":"b9c0a1e9bdb4ae6e3ee192d3b8ab90d42a302264","modified":1580395179132},{"_id":"source/docs/cockpit_introduction.md","hash":"e6c36e3bb3fae88eed1d17860a85ba0366b50009","modified":1580395179164},{"_id":"source/docs/cockpit_utils.md","hash":"9ed2f52f1a0b15fed6fc61e685558e1ed242cd1e","modified":1580395179164},{"_id":"source/docs/configuration.md","hash":"906896808f07737b17f5d8afd3aa713c22952349","modified":1580395179164},{"_id":"source/docs/console_commands.md","hash":"2855fb1b8ee0429e402450ed4d9f38dd2e145cb5","modified":1580395179164},{"_id":"source/docs/contracts_deployment.md","hash":"87cba365f821abd91399fd773048a02a0c897607","modified":1580395179164},{"_id":"source/docs/bamboo.md","hash":"d6dda7ef34b47d759f4cbce3f993ae16d8e9cbd0","modified":1580395179132},{"_id":"source/docs/contracts_configuration.md","hash":"574ac3d6d2ac48282a8c60ea86d5f2a445426fb1","modified":1580395179164},{"_id":"source/docs/contracts_imports.md","hash":"a4d6267182dff8c7dc2a096bbda08bc9c45cbd96","modified":1580395179164},{"_id":"source/docs/contracts_javascript.md","hash":"336454607755a5580e0c36f3d9c60ddcf20318d4","modified":1580395179164},{"_id":"source/docs/contracts_testing.md","hash":"ccaa64628ab2ce6b42013a461a65c07668f4bb5f","modified":1580395179164},{"_id":"source/docs/contributing.md","hash":"5559d38ec006e0e67ee4a56dc657b0d44a08edb0","modified":1580395179164},{"_id":"source/docs/creating_plugins.md","hash":"2be705b9646c4041eb7d50a6b1641131f79bd497","modified":1580395179164},{"_id":"source/docs/create_project.md","hash":"9650c8422979e82d7c91cb5f308dcd1895c27099","modified":1580395179164},{"_id":"source/docs/dashboard.md","hash":"d24645009374a2a4dff4ddbb72bb85ff885d80a2","modified":1580395179164},{"_id":"source/docs/environments.md","hash":"c71903c0fd3349b905c8d6c659211fde5c6732e8","modified":1580395179164},{"_id":"source/docs/faq.md","hash":"8154c0047d7de4d63f6337769e7ead2542ffd9aa","modified":1580395179164},{"_id":"source/docs/embark_commands.md","hash":"39cd9d4622035b3f2b82dc8fee5eab25cabe82a2","modified":1580395179164},{"_id":"source/docs/index.md","hash":"f1870f73da1edb4a5b7a8aacb508e183ea88f7e5","modified":1580395179164},{"_id":"source/docs/installation.md","hash":"df32deb65494ea88439b710c0398d5074a5d2456","modified":1580395179164},{"_id":"source/docs/installing_embarkjs.md","hash":"cf7a19d5f0262f9da14ca33a45a32303c8874694","modified":1580395179164},{"_id":"source/docs/installing_plugins.md","hash":"4575e3c53d3a55d184d10ffb4900b59cf718390e","modified":1580395179164},{"_id":"source/docs/messages_configuration.md","hash":"bb298e851d786cbcb8431bb12bc24f81f9cb3de5","modified":1580395179164},{"_id":"source/docs/messages_javascript.md","hash":"57884a9cc96813469d1c097f08e95e56e62af2aa","modified":1580395179164},{"_id":"source/docs/naming_configuration.md","hash":"a80f6e0dd9f3bb25ead13dc2cb2ab79799f38766","modified":1580395179164},{"_id":"source/docs/naming_javascript.md","hash":"5118e7571f0721579981f68c9ea9c8d127126a08","modified":1580395179164},{"_id":"source/docs/overview.md","hash":"3d4555bb0449f36d7283a9a1b8fdb10c5e1d8d5a","modified":1580395179164},{"_id":"source/docs/javascript_usage.md","hash":"70a188d16a66e2a1e2b524f04b140bbc3b397367","modified":1580395179164},{"_id":"source/docs/plugin_reference.md","hash":"ffc8755b9fee5db7123b120ca0430edb0129bb22","modified":1580395179164},{"_id":"source/docs/quick_start.md","hash":"c7944c6c0344696dc9a47f11a83f98b892ae2f87","modified":1580395179164},{"_id":"source/docs/running_apps.md","hash":"0519272706734c5f9e2184a9680e192e56a2ca47","modified":1580395179164},{"_id":"source/docs/sending_and_receiving_messages.md","hash":"3fe8e66233492f4fb312dcb90cc7ba74ba689ce4","modified":1580395179164},{"_id":"source/docs/pipeline_and_webpack.md","hash":"2d4168eb25766e4558546043538283e87ec916ce","modified":1580395179164},{"_id":"source/docs/smart_contract_objects.md","hash":"7e72a5d62e915d680ad7ed0adbd7c758eafa5a6b","modified":1580395179164},{"_id":"source/docs/solidity.md","hash":"2a8c16ac8c2d049b9d7d91f530b0dddd0f9d73b2","modified":1580395179164},{"_id":"source/docs/storage_configuration.md","hash":"bd275b61fe3b7cc3577f9d30e25d3e7ad7a76795","modified":1580395179164},{"_id":"source/docs/migrating_from_3.x.md","hash":"707aa9b83492393615b16eb9bde367a0f99f1bf2","modified":1580395179164},{"_id":"source/docs/structure.md","hash":"507a4a506daa32ec5a49fd19f15b6100cf673c13","modified":1580395179164},{"_id":"source/docs/troubleshooting.md","hash":"ee789578225703a04e94e6eca209a694e39b02f3","modified":1580395179164},{"_id":"source/docs/using_storages.md","hash":"fcaa4c3846c063bc7f46afdf9f8c780f96125ede","modified":1580395179164},{"_id":"source/docs/using_the_console.md","hash":"1281c1d98732e0f173a865428b06a30da4dc9d76","modified":1580395179164},{"_id":"source/docs/vyper.md","hash":"987e6ad8e86fe7470c4db19a633179aa5b0a2acb","modified":1580395179164},{"_id":"source/docs/storage_deployment.md","hash":"2f31438f49648a497ffbae160e509bde0c9609ec","modified":1580395179164},{"_id":"source/docs/storage_javascript.md","hash":"f3996b2415cf4a277681f1708b06fe186a54ab2f","modified":1580395179164},{"_id":"source/docs/web3js.md","hash":"9ad98e255c60ba532b992fae75e903cdff981d60","modified":1580395179164},{"_id":"source/coverage-report.png","hash":"4f2e52ad838258e4e7ee03f2cfd4bdd9be2c4046","modified":1580395179132},{"_id":"source/docs/webpack.md","hash":"012cdad1030fb7c45f47d0433ae56c963f635717","modified":1580395179164},{"_id":"source/news/index.md","hash":"1e85ab60b1c088d8e142c26f6b15db3f858aadc9","modified":1580399061688},{"_id":"source/docs/what_dapp.md","hash":"79502dafd6e70b81e69c6b0aee073f0dac5b1623","modified":1580395179164},{"_id":"source/docs/working_with_name_systems.md","hash":"c972b4ce78f98bb46bf7a245fb811be06d31e4c4","modified":1580395179164},{"_id":"source/plugins/index.md","hash":"c500bda064f243bfb33b4dffbdf1cb4349bf0bd4","modified":1580395179164},{"_id":"source/tutorials/infura_guide.md","hash":"4e9497c9737522860adc286e126e0f3d1d92cdf0","modified":1580395179168},{"_id":"themes/embark/layout/archive.swig","hash":"b2155ed2b2bb7d84ef3248a10155befad2ae4890","modified":1583247399294},{"_id":"themes/embark/layout/blog-post.swig","hash":"38ad24174cc132a059a809a70e1c59fdae3ab67c","modified":1582930838895},{"_id":"themes/embark/layout/blog.swig","hash":"e633c01b14214681c1e4b048ad09675f2ff44d3b","modified":1583248065370},{"_id":"themes/embark/layout/community.swig","hash":"feabc52f006a70402a4949c1782a7901a78c4cf3","modified":1580395179168},{"_id":"themes/embark/layout/docs-landing.swig","hash":"9b3cc62579713f7b4211010d66ad17f8f0c99d79","modified":1580395179168},{"_id":"themes/embark/layout/docs.swig","hash":"ca3eeb67eed027298adb8b979be6fda92a18a90c","modified":1580395179168},{"_id":"themes/embark/layout/index.swig","hash":"34ed730ec7e301bc96a1c0abeee7039b90af9f3d","modified":1582930838896},{"_id":"source/templates/index.md","hash":"180f034b05fe0a621c3ccb05f87bf9ab6fde2978","modified":1580395179164},{"_id":"themes/embark/layout/page.swig","hash":"ecf8fce53d4dc78158db87235d3e0643c5315a12","modified":1582930838897},{"_id":"themes/embark/scripts/checklist.js","hash":"9bb1f40b63fc1673655dac1b3205d5e597833536","modified":1580395179168},{"_id":"themes/embark/scripts/code.js","hash":"1ab08ac667d6ba3442305d6f117a5faa3032055d","modified":1580395179168},{"_id":"themes/embark/scripts/docs_paginator.js","hash":"38632311c2623fee67afc0cee307a17125871743","modified":1580395179168},{"_id":"themes/embark/scripts/is_quickstart.js","hash":"24bdbf644884697d7182c558d45b3fa18113176c","modified":1580395179168},{"_id":"themes/embark/scripts/notification.js","hash":"6dbbccb55c1940dac32140001b1afb19e59af819","modified":1580395179168},{"_id":"themes/embark/scripts/toc.js","hash":"0150d62da68310989db7c9cb74711f1031a7e62c","modified":1580395179168},{"_id":"themes/embark/layout/plugins.swig","hash":"b848b10690be2a83276026797e1c333a00596f0b","modified":1580395179168},{"_id":"themes/embark/languages/en.yml","hash":"aa8783506c3f4a09fd4d33bca0bc923fe09f4538","modified":1580395179168},{"_id":"themes/embark/layout/layout.swig","hash":"860eabc782f222beee60dc7f6c9ba9d10839d0e2","modified":1580400570383},{"_id":"source/plugins/thumbnails/bamboo.png","hash":"b7c9f4d84aa7d6642e4a822a7b66042ab2d33710","modified":1580395179164},{"_id":"source/plugins/thumbnails/fortune.jpg","hash":"f041a2bc22e374dd833e4b56066e7d3bf20d49f6","modified":1580395179164},{"_id":"source/plugins/thumbnails/pug.png","hash":"774bb436243175c41b9e4c51558a02e2262a7e47","modified":1580395179164},{"_id":"source/plugins/thumbnails/remix copy.png","hash":"0654c1ca096d7336391d50ffc27c64aa30a37b85","modified":1580395179164},{"_id":"source/plugins/thumbnails/solidity.png","hash":"860e6c14fe1fc7799de218b11dbdda5cb73123d3","modified":1580395179164},{"_id":"source/plugins/thumbnails/remix.png","hash":"c288a89299382837bde8ce248b2d1265dff49083","modified":1580395179164},{"_id":"source/plugins/thumbnails/solium.png","hash":"a8e525113fb9dff400e71b9762f537f82cfdb7ac","modified":1580395179164},{"_id":"source/plugins/thumbnails/status.png","hash":"452ce074cb13ffa9be473c7001c675b6b35f3780","modified":1580395179164},{"_id":"source/templates/thumbnails/angular.png","hash":"e50350df2526f0abf0a8d2e808085c24f2273662","modified":1580395179164},{"_id":"source/templates/thumbnails/sggc.png","hash":"f2742e7865280a840ccb8de8a466e7571947ec9a","modified":1580395179164},{"_id":"source/templates/thumbnails/typescript.png","hash":"bc3c71f25fc966f00c23df3222cde74c6e70c06d","modified":1580395179168},{"_id":"source/templates/thumbnails/vortex.png","hash":"ca5675313297535b416158e7a6b775bbe59f3a56","modified":1580395179168},{"_id":"source/templates/thumbnails/bamboo.png","hash":"b7c9f4d84aa7d6642e4a822a7b66042ab2d33710","modified":1580395179164},{"_id":"source/templates/thumbnails/react.png","hash":"a6d33dab3a85a4d7004246e39a704869a6319306","modified":1580395179164},{"_id":"source/templates/thumbnails/vuejs.png","hash":"85cb9bd3cf15f02dc2b44fbc9dffc2737c6a985b","modified":1580395179168},{"_id":"source/templates/thumbnails/vyper.png","hash":"ecbc1f9ce334685b0a1d9ec6da3ad98a69758f6e","modified":1580395179168},{"_id":"source/tutorials/infura_guide/api-keys.png","hash":"9ef67096142c2cd4dff7e391f2664e335d347517","modified":1580395179168},{"_id":"source/tutorials/infura_guide/lift-off.jpg","hash":"90d8d7604930e30d01aff8c1513412a75e8f4a58","modified":1580395179168},{"_id":"themes/embark/layout/partial/checklist.swig","hash":"a038b0b62e56710637ab3c67d180a27c08e5d18b","modified":1580395179168},{"_id":"themes/embark/layout/partial/checklist_item.swig","hash":"215f6e6f1d7e280990e86abdd56a98cc3c68a95a","modified":1580395179168},{"_id":"themes/embark/layout/partial/code.swig","hash":"7e2fba9a0ef75f26e19c5542ab61d5a951eeb2f5","modified":1580395179168},{"_id":"themes/embark/layout/partial/contributor-box.swig","hash":"5efb1e4b5584b26d37281c11282580ca46e9d879","modified":1580395179168},{"_id":"themes/embark/layout/partial/head.swig","hash":"8805a46e62a68adad5f08b3c04558384aeacdb31","modified":1580934267020},{"_id":"themes/embark/layout/partial/coverbox.swig","hash":"d574f8d3b7227c6e73ac5cb52e32aae98693dbc2","modified":1583177661656},{"_id":"themes/embark/layout/partial/event-box.swig","hash":"8407314ef9cc1d5160544cb468f5194899616cfc","modified":1583179236000},{"_id":"themes/embark/layout/partial/footer.swig","hash":"f338896db61ded819030e321edf3b52cbfea769f","modified":1580399061688},{"_id":"themes/embark/layout/partial/header-blog.swig","hash":"d33eb7b673da6a6bb24fa6961d0dc41d86287da5","modified":1583245418469},{"_id":"themes/embark/layout/partial/header.swig","hash":"7a234bd636680a9d77ab71a2bf8e9da29987dd7e","modified":1583249941739},{"_id":"themes/embark/layout/partial/notification.swig","hash":"bb1fdae3eb87feb344571a3d8636ea7daf166cd6","modified":1580395179168},{"_id":"themes/embark/layout/partial/heading.swig","hash":"3a3a0760c31be524ba0208ed24cb0894481a2597","modified":1580395179168},{"_id":"themes/embark/layout/partial/paginator.swig","hash":"6f862b18625d7c824fbc32a6228e34686acf4fc7","modified":1580395179168},{"_id":"themes/embark/layout/partial/universebox.swig","hash":"66bb32ae4f6821b449ddff58a790fc918cb21b29","modified":1580395179168},{"_id":"themes/embark/layout/partial/spotbox.swig","hash":"6f321dab798da2ca02623fa6dcc54cce7a30d13d","modified":1580395179168},{"_id":"themes/embark/layout/partial/whisperbox-alternative.swig","hash":"7cb78c69cb4b058de3de13ef5485258f0e1f63fd","modified":1580395179168},{"_id":"themes/embark/layout/partial/whisperbox.swig","hash":"ebbe6a58c415d0ed815df026c9548dffd95d5de3","modified":1583180635401},{"_id":"source/assets/images/cockpit_debugger_controls.png","hash":"ba68f8b39e0d745e39a26d0bd8c9c3bfea5ad8c5","modified":1580395178992},{"_id":"themes/embark/source/css/_shame.scss","hash":"3558db6b81dd7b76e71c49d3260edddd57fa8dc7","modified":1580395179176},{"_id":"themes/embark/source/css/embark.scss","hash":"7ffcd12e49bffde3b86a34e8c4f6dff463741717","modified":1580395179176},{"_id":"themes/embark/source/js/index.js","hash":"cb46b90689c0ac59988a81d4d231ae2d4b9d3806","modified":1580395179176},{"_id":"source/assets/images/crystal-thread-test.png","hash":"4e8aa7ac613a332960de0117141ed1e33b14d9f1","modified":1580395179088},{"_id":"source/plugins/thumbnails/mythx.png","hash":"7d1972d98ddd2bc13afbb0049d45f157d8cdf675","modified":1580395179164},{"_id":"source/plugins/thumbnails/haml.png","hash":"19c468e7d07eed1ddadc38818b8f9c350ebf8511","modified":1580395179164},{"_id":"source/assets/images/token_factory_1/page_1.png","hash":"6babcba0bca8fc8a48a0eed7045396f9c3fb55af","modified":1580395179124},{"_id":"source/assets/images/token_factory_1/page_2.png","hash":"4fa5a22eb63587f424a2742e7f14f39e6e6e4c9d","modified":1580395179124},{"_id":"source/assets/images/token_factory_1/page_3.png","hash":"08a8a87009da0594ac5c763e269082ed489c9b31","modified":1580395179124},{"_id":"source/assets/images/token_factory_1/page_4.png","hash":"78a3cbea0a3a686847fa7024a634bc28b38e7c08","modified":1580395179124},{"_id":"source/assets/images/token_factory_1/page_5.png","hash":"1938ae333249ead32842d39f36dc7d7742e97a95","modified":1580395179124},{"_id":"source/assets/images/token_factory_2/page_1.png","hash":"d0c1bdc7478dcc4878239b2924107df50608d97a","modified":1580395179128},{"_id":"source/assets/images/token_factory_2/page_2.png","hash":"238f769f8834d36a088f6352d5e8b056d339fa7d","modified":1580395179128},{"_id":"source/assets/images/token_factory_2/page_3.png","hash":"8eca458e6e78457f268142f45542c2a919ab07af","modified":1580395179128},{"_id":"source/assets/images/token_factory_2/page_5.png","hash":"ea35b940330be24051ac278a8ad6d239a93c3fd5","modified":1580395179128},{"_id":"source/assets/images/web3-js-diagram.png","hash":"5cc26458f47462ce25a80abca52a4cc2e90de9e4","modified":1580395179128},{"_id":"source/assets/images/token_factory_2/page_6.png","hash":"b672160f850fcd590050dfbc268ec03c1027072f","modified":1580395179128},{"_id":"source/assets/images/token_factory_2/page_4.png","hash":"92dd82374e8ccd6f258481fc69ebdc2aa16c0532","modified":1580395179128},{"_id":"source/assets/images/token_factory_2/page_7.png","hash":"da58b3365e3b6841ffdcfbf6c5b8a6152daa9a49","modified":1580395179128},{"_id":"themes/embark/source/assets/icons/arrow-down-1.svg","hash":"cf919e204adc66907e541c5a32a6cdb8bd86e9d7","modified":1580395179168},{"_id":"themes/embark/source/assets/icons/app-window-search-text.svg","hash":"a7658278c51714beb9a4aa378074b0f1a2a3811a","modified":1580395179168},{"_id":"themes/embark/source/assets/icons/arrow-left-1.svg","hash":"6a5b3fe7927e03320be668170011aba2d461d1af","modified":1580395179168},{"_id":"themes/embark/source/assets/icons/arrow-right-1.svg","hash":"5948e9eda884b948d0c668ae51f99509d2cfa631","modified":1580395179168},{"_id":"themes/embark/source/assets/icons/arrow-up-1.svg","hash":"e4e31a2af62c2838e1871dfd72203b9a94ae8ae9","modified":1580395179168},{"_id":"themes/embark/source/assets/icons/browser-gauge.svg","hash":"4ab8c84f8c5cc2ece1a2847ef8d9f2c9b842609f","modified":1580395179168},{"_id":"themes/embark/source/assets/icons/check.svg","hash":"94cb2741b66a54d22bbacdf65c5bbf1f4de59c4a","modified":1580395179168},{"_id":"themes/embark/source/assets/icons/crypto-currency-bitcoin-circle.svg","hash":"6feceaadc9ee12a3e457d94a3d548a3d82213b92","modified":1580395179168},{"_id":"themes/embark/source/assets/icons/copy-paste.svg","hash":"6a11ff19bd04cf7774d7155a535eb68be3dbb592","modified":1580395179168},{"_id":"themes/embark/source/assets/icons/computer-bug-search.svg","hash":"720717cc34ce43565de8ab4a360603c2c55092a7","modified":1580395179168},{"_id":"themes/embark/source/assets/icons/close.svg","hash":"07c332a892c2b2a107bf53a055425064006b7161","modified":1580395179168},{"_id":"themes/embark/source/assets/icons/list-to-do.svg","hash":"6954c1ea40469c5548ff8c3daba91ea3e883dab4","modified":1580395179168},{"_id":"themes/embark/source/assets/icons/module.svg","hash":"cf1284f20a532fc451ba6cd443ff1534e63b6779","modified":1580395179168},{"_id":"themes/embark/source/assets/icons/github.svg","hash":"6b9fba84ce16f0f8278ca4eb00ced1c5b13109f4","modified":1580395179168},{"_id":"themes/embark/source/assets/icons/navigation-menu.svg","hash":"d6b4d9e2da8849ac362bcb8d634725b921ebf46c","modified":1580395179168},{"_id":"themes/embark/source/assets/icons/notes-paper-text.svg","hash":"fc8a3304cfc24437597a565290c6b1095fa365f7","modified":1580395179168},{"_id":"themes/embark/source/assets/icons/paginate-filter-video-alternate.svg","hash":"a2953dbbdcd49ce07a7aa90be9803d5e44a77688","modified":1580395179168},{"_id":"themes/embark/source/assets/icons/pen-write-paper.svg","hash":"a2828e87d8ea6f6d965a1aae8ab450c3bba19564","modified":1580395179168},{"_id":"themes/embark/source/assets/icons/rating-star.svg","hash":"961c6f9cf48e662267cdfb609e89f3234e1c84c0","modified":1580395179168},{"_id":"themes/embark/source/assets/icons/search-bar.svg","hash":"6e3dfc910fda432935eaf7a6170bf1f6be8c7a21","modified":1580395179168},{"_id":"themes/embark/source/assets/icons/pie-line-graph.svg","hash":"d8a9dad5f7377b12b3130d964f7fe3d03de80d1a","modified":1580395179168},{"_id":"themes/embark/source/assets/icons/symbols.svg","hash":"d34c6846fa16190a9e264d9f1cbf40e12ae8f410","modified":1580395179168},{"_id":"themes/embark/source/assets/icons/tag-new-circle.svg","hash":"3a155bcde805c6101d431c08a093a5ffed37dfeb","modified":1580395179168},{"_id":"themes/embark/source/assets/icons/twitter.svg","hash":"90e4959062ea5bc14eb10f182c1c9859dcc0b168","modified":1580395179168},{"_id":"themes/embark/source/assets/icons/symbols.html","hash":"d13ca80e28788a3fffb404dd5dff6225139b38a9","modified":1580395179168},{"_id":"themes/embark/source/assets/images/Nimbus.svg","hash":"f0ea3f6a1804fc951901bdf3c3ec84ebcbcfb1b3","modified":1580395179172},{"_id":"themes/embark/source/assets/images/apple-touch-icon-120x120-precomposed.png","hash":"2b599bbb36131a537d0a2db417eefd8cb2a348f7","modified":1580395179172},{"_id":"themes/embark/source/assets/images/apple-touch-icon-152x152-precomposed.png","hash":"8f2800d891c5e1374cef4f3fcd26575f46748e5c","modified":1580395179172},{"_id":"themes/embark/source/assets/images/apple-touch-icon-76x76-precomposed.png","hash":"99cd68afb86ecab681c217b0eeffed8163f228e6","modified":1580395179172},{"_id":"themes/embark/source/assets/images/apple-touch-icon-60x60-precomposed.png","hash":"aa89e00d7671bfa8add7afc2ee25e84cf93319b3","modified":1580395179172},{"_id":"themes/embark/source/assets/images/apple-touch-icon-180x180-precomposed.png","hash":"451e3cfad6ebe9dad9eb35af1d7c113b2f76f143","modified":1580395179172},{"_id":"themes/embark/source/assets/images/apple-touch-icon-precomposed.png","hash":"451e3cfad6ebe9dad9eb35af1d7c113b2f76f143","modified":1580395179172},{"_id":"themes/embark/source/assets/images/company-flexdapps.svg","hash":"ae7686cb0c918a69b497774fba8829cb3df89858","modified":1580395179172},{"_id":"themes/embark/source/assets/images/company-giveth.svg","hash":"8d611a8a4c94e2bb13da7661195cb44d3ee163f4","modified":1580395179172},{"_id":"themes/embark/source/assets/images/company-status.svg","hash":"5729e8db16b262cb6c3ca91113500b1895f24768","modified":1580395179176},{"_id":"themes/embark/source/assets/images/favicon-16.png","hash":"db9d7be08c2096635e4acd9f00fb56c04aafa7a5","modified":1580395179176},{"_id":"themes/embark/source/assets/images/dots.png","hash":"2f22dcbbe2b643819e263bc292732d0875e9f24e","modified":1580395179176},{"_id":"themes/embark/source/assets/images/keycard-logo-negative.svg","hash":"b93278634ae78c759a0439a7d8c275889ae90e8f","modified":1580395179176},{"_id":"themes/embark/source/assets/images/favicon-32.png","hash":"b841b7f468325cab45486b1a25343e0f0654ef0d","modified":1580395179176},{"_id":"themes/embark/source/assets/images/logo-negative.svg","hash":"2eb5bdd4eb9aac594e7fcbb7ff0fb7456d6c1fd1","modified":1580395179176},{"_id":"themes/embark/source/assets/images/logo.svg","hash":"0bc239291c9f4732df92ed67b5f80d7392d9920a","modified":1580395179176},{"_id":"themes/embark/source/assets/images/status-logo.svg","hash":"80e9ac5ea6f37880927c680f66d41f2acd751873","modified":1580395179176},{"_id":"themes/embark/source/css/00-functions/_functions.get-color-brand.scss","hash":"1fb90cf4cd3da1241355f85a5185e0aa31dc5263","modified":1580395179176},{"_id":"themes/embark/source/css/00-functions/_functions.get-color-layout.scss","hash":"4ec42cab6f2b425240cb7254bdb7c81d13dc7198","modified":1580395179176},{"_id":"themes/embark/source/css/00-functions/_functions.get-color-semantic.scss","hash":"434b52490937e1471d95a143b70381a2f4bb619c","modified":1580395179176},{"_id":"themes/embark/source/css/00-functions/_functions.get-color.scss","hash":"c9ff601899d050f74893a8eb7d5d2df42cb5a217","modified":1580395179176},{"_id":"themes/embark/source/css/00-functions/_functions.get-font-size.scss","hash":"006929f9ec36f9253467851dce1b3de5479c6b9e","modified":1580395179176},{"_id":"themes/embark/source/css/00-functions/_functions.get-index.scss","hash":"2f2f39faafa8d4b216be83c6fd4b25a030e39fc8","modified":1580395179176},{"_id":"themes/embark/source/css/00-functions/_functions.get-spacing-inline.scss","hash":"fc62e3c3e377d2db64a809986900e99e79fd10ba","modified":1580395179176},{"_id":"themes/embark/source/css/00-functions/_functions.get-spacing-inset.scss","hash":"6fe46f2345b2420307f4d67eff32036055795272","modified":1580395179176},{"_id":"themes/embark/source/css/00-functions/_functions.get-spacing-squish.scss","hash":"940d65a07b14673ffd3da63a75937c3125981e91","modified":1580395179176},{"_id":"themes/embark/source/assets/images/rocket-start.svg","hash":"1c2121ac58f2ea3916de10a4667518b653ce83a7","modified":1580395179176},{"_id":"themes/embark/source/css/00-functions/_functions.get-spacing-stretch-inset.scss","hash":"eecce95964b8897de6054fb5fc5eab3a676094b6","modified":1580395179176},{"_id":"themes/embark/source/css/00-settings/_settings.border.scss","hash":"b15fd59a3abba1a570659792270550c6f3cbeb88","modified":1580395179176},{"_id":"themes/embark/source/css/00-functions/_functions.get-spacing-stack.scss","hash":"a8a2c86786d30bfd8bd2c8d3ac180ea7003cc725","modified":1580395179176},{"_id":"themes/embark/source/css/00-settings/_settings.color-brand.scss","hash":"bf20393b0cce0cf2847cc897fa559fce66d42d2b","modified":1580395179176},{"_id":"themes/embark/source/css/00-settings/_settings.color-layout.scss","hash":"a8b5170ae33e09a75f6f845a4873ca63f408adb0","modified":1580395179176},{"_id":"themes/embark/source/css/00-settings/_settings.color-palette.scss","hash":"903b152e109e80753a4051b1d19ba0726d19da8b","modified":1580395179176},{"_id":"themes/embark/source/css/00-settings/_settings.color-semantic.scss","hash":"262bcab015c3f323b375e6dee538a212a60426ad","modified":1580395179176},{"_id":"themes/embark/source/css/00-settings/_settings.forms.scss","hash":"b1dde72a9cdba6355472369155b38dea4f1bef77","modified":1580395179176},{"_id":"themes/embark/source/css/00-settings/_settings.layout.scss","hash":"3e67200fb9444187aab60a1282549b0075437877","modified":1580395179176},{"_id":"themes/embark/source/css/00-settings/_settings.indecies.scss","hash":"3c394d06e65163811e8d884286235d202d0f3403","modified":1580395179176},{"_id":"themes/embark/source/css/00-settings/_settings.misc.scss","hash":"e7bf80f32564301cc1e41ccfdba1ee1749ae525c","modified":1580395179176},{"_id":"themes/embark/source/css/00-settings/_settings.spacing.scss","hash":"8cf54f8146fad87f59d45ec053df7f1ff8345cbe","modified":1580395179176},{"_id":"themes/embark/source/css/00-settings/_settings.links.scss","hash":"65637c528bfd48c7b023fc94e28358fc58c0a8f6","modified":1580395179176},{"_id":"themes/embark/source/css/01-tools/_tools.breakpoint.scss","hash":"7b261864e28b0ec16781bc24065450caf2b70abe","modified":1580395179176},{"_id":"themes/embark/source/css/00-settings/_settings.typography.scss","hash":"3e3b83e8fe1d28c9ad156fa33555ae8674c746cc","modified":1580395179176},{"_id":"themes/embark/source/css/01-tools/_tools.box-shadow.scss","hash":"ec0081d8b10eeb945eebf744742ea6417c384b8c","modified":1580395179176},{"_id":"themes/embark/source/css/01-tools/_tools.border.scss","hash":"aa4bca474f20fd73f07ab9a927c38928348846ff","modified":1583180094883},{"_id":"themes/embark/source/css/01-tools/_tools.clearfix.scss","hash":"266582ce0ffe5eb0622868370dc9ac8e6acea737","modified":1580395179176},{"_id":"themes/embark/source/css/01-tools/_tools.list-reset.scss","hash":"406d4d60d370decc9d7f3d5a8eb3308bb8fae6c8","modified":1580395179176},{"_id":"themes/embark/source/css/01-tools/_tools.column.scss","hash":"c588b90cb648c979a391658ed337e00daecdb271","modified":1580395179176},{"_id":"themes/embark/source/css/01-tools/_tools.overlay.scss","hash":"b1cf5a920ba83db93aa649f2ddf98ef858bb1bce","modified":1580395179176},{"_id":"themes/embark/source/css/01-tools/_tools.placeholder.scss","hash":"baf73d8af13039931a6f0b8b22279c3f1bfdf267","modified":1580395179176},{"_id":"themes/embark/source/css/02-generic/_generic.reset.scss","hash":"8a50750b05184887d7290f2360ce72a94e84ca64","modified":1580395179176},{"_id":"themes/embark/source/css/02-generic/_generic.box-sizing.scss","hash":"26b7b6efad6435f49a808080ca987f123bf2ab8e","modified":1580395179176},{"_id":"themes/embark/source/css/03-elements/_elements.forms.scss","hash":"f45be318ebb22533e8e266b2eebe43ddb0937bf4","modified":1580395179176},{"_id":"themes/embark/source/css/03-elements/_elements.headings.scss","hash":"de758429ddb890d33564356af3ca61debc2ef155","modified":1580395179176},{"_id":"themes/embark/source/css/03-elements/_elements.buttons.scss","hash":"4842d392957b128f686eea568d896efb45f9f834","modified":1580395179176},{"_id":"themes/embark/source/css/03-elements/_elements.images.scss","hash":"0a52090c19650caf47b7f848b28786e8eddb89d5","modified":1580395179176},{"_id":"themes/embark/source/css/03-elements/_elements.tables.scss","hash":"81d33b10eecfb74e8ddbeb150c8f497dbfcff11f","modified":1580395179176},{"_id":"themes/embark/source/css/03-elements/_elements.links.scss","hash":"f2e98137d2d3ca5092c73f70cc4e28ad393b039f","modified":1580395179176},{"_id":"themes/embark/source/css/03-elements/_elements.lists.scss","hash":"a388a10af8a7ca3f0b6ec74fe0efdb9e2296aacb","modified":1580395179176},{"_id":"themes/embark/source/css/03-elements/_elements.typography.scss","hash":"44d0622de4f290e6d2c8ed34cfd750e056bf6711","modified":1580395179176},{"_id":"themes/embark/source/css/04-objects/_objects.buttonbar.scss","hash":"8f6bc88ec9125075b147f1477b439e6e9413b42b","modified":1580395179176},{"_id":"themes/embark/source/css/04-objects/_objects.distances.scss","hash":"149dabf55d1809026444a98cb4c2a0bda0b90d8d","modified":1583180749550},{"_id":"themes/embark/source/css/04-objects/_objects.footer.scss","hash":"366eafaf766cd95a5b195b914cee0c4d227b104d","modified":1580395179176},{"_id":"themes/embark/source/css/04-objects/_objects.grid.scss","hash":"da7c0ebf630f220f858044f4edceadea9abbfd12","modified":1580395179176},{"_id":"themes/embark/source/css/04-objects/_objects.guided-content.scss","hash":"3a6d8159ce5c47e2a72d00184aa28719285303e3","modified":1580395179176},{"_id":"themes/embark/source/css/04-objects/_objects.head-up.scss","hash":"b50eaa3fab38d2e9f1230a12f8542917cdc172e5","modified":1580395179176},{"_id":"themes/embark/source/css/04-objects/_objects.heading.scss","hash":"7579f117e65d258c46aaa437f07f9f092b2db596","modified":1580395179176},{"_id":"themes/embark/source/css/04-objects/_objects.header.scss","hash":"471289d74d223952cb5eab924854aa79df0622e6","modified":1580395179176},{"_id":"themes/embark/source/css/04-objects/_objects.list-inline.scss","hash":"1b36ae3bb253a87edb4db15f9b875e10ba146906","modified":1580395179176},{"_id":"themes/embark/source/css/04-objects/_objects.list-bare.scss","hash":"767f64a9bd40b16cf72efefe731fecebc2565fa8","modified":1580395179176},{"_id":"themes/embark/source/css/04-objects/_objects.media.scss","hash":"332888a05a775f5b7f550f2d58c9ff329cfaaef1","modified":1580395179176},{"_id":"themes/embark/source/css/04-objects/_objects.overlap.scss","hash":"4a0ae3a2032bc450d3d4693d92b49965ecbc6620","modified":1580395179176},{"_id":"themes/embark/source/css/05-components/_components.avatars.scss","hash":"c2dbff38e210486f01e9fcd8703329f773129545","modified":1580395179176},{"_id":"themes/embark/source/css/04-objects/_objects.standard-page.scss","hash":"ab662003b9c21f5da3fdde6f66d70e8aa82dd8d8","modified":1580395179176},{"_id":"themes/embark/source/css/05-components/_components.boxes.scss","hash":"5a95b15190dbac965f66a6c4f545be7841e74801","modified":1583180557392},{"_id":"themes/embark/source/css/05-components/_components.button.scss","hash":"c43f5627dd9a80e64f024b9f484d9a7a833febc8","modified":1580395179176},{"_id":"themes/embark/source/css/05-components/_components.guide.scss","hash":"cdafd26c3ee6c739f9bbfce0125645a0b7b3bd0a","modified":1580395179176},{"_id":"themes/embark/source/css/05-components/_components.headings.scss","hash":"5f583822f762f99d00187935d933770972294413","modified":1580395179176},{"_id":"themes/embark/source/css/05-components/_components.checklist.scss","hash":"29f16754036ca4fcec731597a416c98787a744d2","modified":1580395179176},{"_id":"themes/embark/source/css/05-components/_components.highlight.scss","hash":"69476a68de00e2e290fa84fffdec9b99f7459acf","modified":1580395179176},{"_id":"themes/embark/source/css/05-components/_components.links.scss","hash":"59ad321a05677c8716fbace182288551ea04530b","modified":1580395179176},{"_id":"themes/embark/source/css/05-components/_components.icons.scss","hash":"4ddbc047a971df8f6878e173bdbc79db8d67f8d4","modified":1580395179176},{"_id":"themes/embark/source/css/05-components/_components.navigations.scss","hash":"9c246c76abd96d8f2a379915e8c4131621123f50","modified":1583250025071},{"_id":"themes/embark/source/css/05-components/_components.logos.scss","hash":"afa93ec0d91281c5bb3e4b0f3685b65217a07514","modified":1580395179176},{"_id":"themes/embark/source/css/05-components/_components.notifications.scss","hash":"c43dcef42e77778a863ebf39835814b363703ba7","modified":1580395179176},{"_id":"themes/embark/source/css/05-components/_components.tags.scss","hash":"0296364650db159da3659e9c8659d1ba46d3f455","modified":1580395179176},{"_id":"themes/embark/source/css/05-components/_components.meta.scss","hash":"e0edb9b8a27121f70302608a4ae3ef51d7a809c1","modified":1580395179176},{"_id":"themes/embark/source/css/06-utilities/_utilities.list-reset.scss","hash":"621869acabfcf504dad7983ef7770919d9aa39e4","modified":1580395179176},{"_id":"themes/embark/source/css/06-utilities/_utilities.links.scss","hash":"0876483cf965935ddf3264de0cc947a9b5240093","modified":1580395179176},{"_id":"themes/embark/source/css/06-utilities/_utilities.text.scss","hash":"451861b375641c6efbfa22e1e0b398feed1aa7b8","modified":1580395179176},{"_id":"themes/embark/source/js/linkjuice/.gitignore","hash":"3f33fc2aefbc0b8c9650ad620d14aa5e3c8e4604","modified":1580395179176},{"_id":"themes/embark/source/css/06-utilities/_utilities.visibility.scss","hash":"83eff52a70c64c2c2c6da20765ad9f2c94bca71f","modified":1580395179176},{"_id":"themes/embark/source/js/linkjuice/.babelrc","hash":"7224f35c4916aa40abdd0f9597b7997015d83533","modified":1580395179176},{"_id":"themes/embark/source/js/linkjuice/.editorconfig","hash":"62e8da92cc4bedb619b57f573fe8b931cce190a6","modified":1580395179176},{"_id":"themes/embark/source/js/linkjuice/.jshintrc","hash":"1725359358cfcb1a42b09c8441cea8322803a2a2","modified":1580395179176},{"_id":"source/assets/images/cockpit_dashboard_release.png","hash":"096b0b893f3d467919edd968ce827985e1f233f0","modified":1580395178992},{"_id":"source/assets/images/cockpit_editor_release.png","hash":"c912dcedf5db89e08e491d1b49f7b07795bdcf21","modified":1580395179004},{"_id":"source/assets/images/nimble-creating-app.png","hash":"30bdcea82d2a7e7b063dfeca277438ae9a9a44f4","modified":1580395179096},{"_id":"themes/embark/source/assets/images/bg-hexagons.png","hash":"d2a3d73d939c8d6a34f04741231739d25d81c1a8","modified":1580395179172},{"_id":"source/assets/images/cockpit_contracts_view.gif","hash":"999f406795198c3d8651e61d7e0b251f7320d98c","modified":1580395178976},{"_id":"themes/embark/source/js/linkjuice/README.md","hash":"f15e54a42ccce6a7830526e4c70504c0d604daaa","modified":1580395179176},{"_id":"themes/embark/source/js/linkjuice/package.json","hash":"28edd71a4c5ef266af83c60d68a85883755c1a3e","modified":1580395179176},{"_id":"themes/embark/source/js/linkjuice/gulpfile.js","hash":"c160dfead280a588086115a45a895549b99ed458","modified":1580395179176},{"_id":"source/assets/images/embark-header_blank.jpg","hash":"9da5d1642a4ad2ba3af71504589a5ced42a4ab8f","modified":1580395179088},{"_id":"source/assets/images/token_factory_1/console_2.png","hash":"82a4f8163e92edc66a14726a97e6f3d586fc5ec9","modified":1580395179096},{"_id":"themes/embark/source/assets/images/tool-screenshot.png","hash":"9cfaabed43e1453cdf1edb60238f2aeaa3b7ad07","modified":1580395179176},{"_id":"themes/embark/source/js/linkjuice/src/linkjuice.js","hash":"c9145e827c4a9c35575911407b9a7e65c48ae858","modified":1580395179176},{"_id":"source/assets/images/cockpit_selective_deployment.gif","hash":"1d9e6e6a5d1c98da71e316c7cfb4ac7aff6c5708","modified":1580395179072},{"_id":"source/assets/images/token_factory_1/console_1.png","hash":"fd0c379505c036ad151b01a5a28b610df190d3d6","modified":1580395179096},{"_id":"source/assets/images/token_factory_2/console_2.png","hash":"4efdab7b54dacafc83854b6dc7d73addf9fe8ade","modified":1580395179128},{"_id":"source/assets/images/cockpit_dashboard.png","hash":"aa995f3517e692402819dc004010c9f45960a7a5","modified":1580395178976},{"_id":"source/assets/images/cockpit_dashboard_dark.png","hash":"69148b6547065adcd5583118286f74aff9a29889","modified":1580395178992},{"_id":"source/assets/images/nim-crystal-header-img_NEW.jpg","hash":"f0716491dd88db1d137c915879e66694844ea334","modified":1580395179096},{"_id":"themes/embark/source/assets/images/cli-tool.png","hash":"21fa930acb0a5259f9f35b37d14bc4b11fd9120d","modified":1580395179172},{"_id":"source/assets/images/cockpit_explorer_block.png","hash":"e9f398fc9eacf99b3e64997c3724ec541875e144","modified":1580395179036},{"_id":"source/assets/images/token_factory_2/console_1.png","hash":"9d35e99618f0ff90911672eaf7765a48ab84f94e","modified":1580395179124},{"_id":"themes/embark/source/assets/images/EMBARK_HEADER_ALT_OPTIMIZED.jpg","hash":"9d767c14d82980b184cb6d9a1746f986c21cec8e","modified":1580395179172},{"_id":"source/assets/images/cockpit_explorer_overview.png","hash":"86a94110f1ae3fe956a5efb1b165902c63fa35d8","modified":1580395179048},{"_id":"themes/embark/source/assets/images/EMBARK_MODULAR.png","hash":"38677401713a7583c44d97e59eb5bcc3c8fb8386","modified":1580395179172},{"_id":"source/assets/images/web3-article-header.png","hash":"864ff7aa607777525104eef5ae130a5ffe3aee26","modified":1581446783446},{"_id":"source/assets/images/cockpit_explorer_contracts_detail.gif","hash":"2464c474ba42193ca58df7288c2afc81608657c0","modified":1580395179040},{"_id":"themes/embark/source/assets/images/EMBARK_FRAMEWORK.png","hash":"6113f59cb45baf50f78c13684f366b3b2ba11239","modified":1580395179168},{"_id":"source/assets/images/embark-dashboard.png","hash":"fbfa1764086f3c436172bc8c812452a99c8d8f79","modified":1580395179088},{"_id":"source/assets/images/website_release.png","hash":"4625f3ee3f58fae5d2c2dc7b10fc8d2547c6a448","modified":1580395179128},{"_id":"source/assets/images/cockpit_suggestions.gif","hash":"2e004a561dda70e22effa1af96315bb9d2314758","modified":1580395179080},{"_id":"source/assets/images/cockpit_explorer_transactions.gif","hash":"fd74abafca81d5a2986f57d72147b228b06f075d","modified":1580395179056},{"_id":"source/assets/images/cockpit_using_debugger.gif","hash":"72acc4d2ab4f9b342749519b69455e30fd4e24c0","modified":1580395179088},{"_id":"source/assets/images/cockpit_search.gif","hash":"c797eb599b822ca56f57cfa882967f23b27d62f9","modified":1580395179072},{"_id":"source/assets/images/cockpit_change_theme.gif","hash":"fe6c1c931e3db5c069a158bf7da7fd732d0f39bc","modified":1580395178976},{"_id":"source/assets/images/cockpit_navigation.gif","hash":"7ed00581b8752de847a7e7e2d2c6e47bc961614a","modified":1580395179068},{"_id":"source/assets/images/cockpit_explorer_account.gif","hash":"a9c557a12ff36090c6a41c265bbd8eb9285de657","modified":1580395179036},{"_id":"source/assets/images/cockpit_enter_debugger.gif","hash":"f3374c1898aba97acb7d53779d4e8fc9643d2dff","modified":1580395179012},{"_id":"source/assets/images/cockpit_dashboard_contracts.gif","hash":"1792d363902a2ec8f26f7596bffc4431461f2fee","modified":1580395178992},{"_id":"source/assets/images/cockpit_editor.gif","hash":"3ce64fcf60098d6954d4a021ef4d2f2c20e1dc46","modified":1580395179000},{"_id":"source/assets/images/token_factory_1/dashboard.png","hash":"bfb37f6fe22c28ac3cfa10b100e2db47acf5f6ca","modified":1580395179124},{"_id":"source/favicon.ico","hash":"96b9a549337c2bec483c2879eeafa4d1f8748fed","modified":1581443225961},{"_id":"source/_posts/2020-02-11-subspace-1-3.md","hash":"bfdc4c687ae9d8d67ed989eb9ddbb8952f95d430","modified":1581446091208},{"_id":"public/news/2018/05/03/embark-3-0-released/index.html","hash":"04863ad015f67a869ee97fcdd92448279dc9f31d","modified":1584552883819},{"_id":"public/news/2018/06/19/embark-3-1-released/index.html","hash":"b4e3e91afb33cc3bab7ebc9800fdb17e5c0a7d8e","modified":1584552883819},{"_id":"public/news/2019/01/27/running-embark-tests-on-a-continuous-integration-server/index.html","hash":"8581d68dc4c21abaf79a0332e89ed0a40ba57695","modified":1584552883819},{"_id":"public/news/2019/03/18/introducing-embark-4/index.html","hash":"35db163b83fb31fee9147a973752cc75ceabf2d5","modified":1584552883819},{"_id":"public/news/2019/07/22/whats-new-in-embark-4.1/index.html","hash":"1b601a363112f4bb4e39b517161542fa682ba8ec","modified":1584552883819},{"_id":"public/tutorials/token_factory_1.html","hash":"9eb0272fdcac1d979f2dbe033aa642be64a0a55c","modified":1584552883819},{"_id":"public/news/2018/09/26/how-to-create-a-token-factory-with-embark-part-1/index.html","hash":"9eb0272fdcac1d979f2dbe033aa642be64a0a55c","modified":1584552883819},{"_id":"public/news/2019/01/22/building-smart-contract-only-dapps/index.html","hash":"45c7ee816caacae0a679953449c0ffd792817e32","modified":1584552883819},{"_id":"public/news/2019/02/03/building-a-decentralized-reddit-with-embark-part-1/index.html","hash":"1ac6ee5ce40cb9194233d0074cdc9bb78eadecb5","modified":1584552883819},{"_id":"public/tutorials/token_factory_2.html","hash":"493a5cc1f610cc43357635e152b8c4f4d0128eb6","modified":1584552883819},{"_id":"public/news/2018/10/26/how-to-create-a-token-factory-with-embark-part-2/index.html","hash":"493a5cc1f610cc43357635e152b8c4f4d0128eb6","modified":1584552883819},{"_id":"public/news/2019/02/10/building-a-decentralized-reddit-with-embark-part-2/index.html","hash":"1fd1dad46c04a56c2bcc72df3efe74f1c8828bff","modified":1584552883819},{"_id":"public/news/2019/03/17/upgrading-to-embark-4/index.html","hash":"1fa6f4fa31b395de39c1dfbb653dd7d7124a80a5","modified":1584552883819},{"_id":"public/news/2019/02/17/building-a-decentralized-reddit-with-embark-part-3/index.html","hash":"768cd554da3744fbca4da5980bb8a5f94de17251","modified":1584552883819},{"_id":"public/atom.xml","hash":"0e6d83a570717c8bcc4f0ca9232161eb4d9da05b","modified":1584553236976},{"_id":"public/sitemap.xml","hash":"e6607d3a2b518c910c28a32ea2b49ead72afb0f5","modified":1584553236976},{"_id":"public/chat/index.html","hash":"3fa662701d22e67e468da4ae18db4f0136ad5565","modified":1584552883819},{"_id":"public/docs/bamboo.html","hash":"886ddaafa8656aa2854219d2e103d6f9f0fecca7","modified":1582576282787},{"_id":"public/docs/solidity.html","hash":"e06208cb5db98566d55c967094bc4abaa69c5748","modified":1582576282787},{"_id":"public/docs/web3js.html","hash":"4b10ede975c406bc69443bf22ab6255c063794d9","modified":1582576282787},{"_id":"public/docs/webpack.html","hash":"d24f61be1af364c0b0d26d11d68d39fbc42af044","modified":1582576282787},{"_id":"public/docs/what_dapp.html","hash":"1ec334b5bb5df60ba3ff146e9c79ca62e7613493","modified":1582576282787},{"_id":"public/news/2018/06/20/embark-3-1-released/index.html","hash":"66cd7e119380c80b75a9686eb6ba480bae59e4fd","modified":1584552883819},{"_id":"public/archives/2017/06/index.html","hash":"2796bcced3b7299a74c5c7e0b6a6cee126827f5c","modified":1584552883819},{"_id":"public/archives/2017/10/index.html","hash":"a24f04384feec3bac868cef54d930466a58e0a0d","modified":1584552883819},{"_id":"public/archives/2018/05/index.html","hash":"a5c866f29c5f7fceb7120b21c5cc4807a0b8edfb","modified":1584552883819},{"_id":"public/archives/2018/06/index.html","hash":"1065b30b26409934b4c17bfe8baa44dd54a7b57f","modified":1584552883819},{"_id":"public/archives/2018/09/index.html","hash":"02bffcfa00d15cd0f8c2ab42e997da81881857c9","modified":1584552883819},{"_id":"public/archives/2018/10/index.html","hash":"ac59015420451e98deab67354290106d22c59792","modified":1584552883819},{"_id":"public/archives/2019/07/index.html","hash":"91366119b06587370ad2ec02417b2fb4ffdd4e20","modified":1584552883819},{"_id":"public/archives/2019/12/index.html","hash":"bae1feb62ebe789dda6680980f3dd88594095b5c","modified":1584552883819},{"_id":"public/archives/2020/02/index.html","hash":"cea3d18402d117a812e9e39152e27db5f6c48727","modified":1584552883819},{"_id":"public/categories/announcements/releases/subspace/index.html","hash":"6b1d0264856d2c8553b86a9241020756f55d47ef","modified":1584553236976},{"_id":"public/index.html","hash":"f26490d8640bcc8ed324dbb035ce7ce6336d67df","modified":1584553236976},{"_id":"public/community/index.html","hash":"e4606a7cb0660c8f8b6652d79b75b434e08363f1","modified":1584552883819},{"_id":"public/docs/blockchain_accounts_configuration.html","hash":"3f5baefced386e2b7c828d02362543e129187df8","modified":1582576282787},{"_id":"public/docs/cockpit_debugger.html","hash":"fa04d9c79097afdac6f3a9a3e9d035bf57e089ee","modified":1582576282787},{"_id":"public/docs/cockpit_editor.html","hash":"388c7130e9715b00b33257c92794a0d3f085e6ef","modified":1582576282787},{"_id":"public/docs/cockpit_dashboard.html","hash":"332eec417eb2f775c7e222198ec4fb1ea004f31e","modified":1582576282787},{"_id":"public/docs/cockpit_explorer.html","hash":"3dd1c3ee52b3f52803c4b03b32cbf3c7bcab276a","modified":1582576282787},{"_id":"public/docs/cockpit_introduction.html","hash":"16e54147ce90846ede6cc6daed20a8da2f6684a5","modified":1582576282787},{"_id":"public/docs/cockpit_utils.html","hash":"52fb275e2d7f5a5b5597adec363f28425a3b0b73","modified":1582576282787},{"_id":"public/docs/cockpit_deployment.html","hash":"20b5935675d2422435718ea516ff8cfedc3e892d","modified":1582576282787},{"_id":"public/docs/configuration.html","hash":"cb8979edd9e4d8f4ee7ba8b5db6aad7b15e68fee","modified":1582576282787},{"_id":"public/docs/console_commands.html","hash":"c645168d3911c8b0f2b042b7d8ff8d315fc58e13","modified":1582576282787},{"_id":"public/docs/contracts_deployment.html","hash":"4210b2a6e9bd3e8b4e1cc9264a58bec41f3695ed","modified":1582576282787},{"_id":"public/docs/contracts_imports.html","hash":"99444922616478e329da8f1191c2c3691e5d3a98","modified":1582576282787},{"_id":"public/docs/contracts_javascript.html","hash":"e66f1eb789b879d4d89cb9277a614d06766d3bd2","modified":1582576282787},{"_id":"public/docs/create_project.html","hash":"3c3f5d276a3bbc842ec55469703d187e248c0441","modified":1582576282787},{"_id":"public/docs/creating_plugins.html","hash":"863eb9abc88b2aef41f92d19c228c3a6c2fe8ba3","modified":1582576282787},{"_id":"public/docs/dashboard.html","hash":"3395c66deea9b70892448f228653b8ff67246375","modified":1582576282787},{"_id":"public/docs/environments.html","hash":"48a22462a8f4b4483d046c9717d072a0bcf5946c","modified":1582576282787},{"_id":"public/docs/faq.html","hash":"1d353b2aff2333d9edc20b60d96a369273dfc5fc","modified":1582576282787},{"_id":"public/docs/embark_commands.html","hash":"77a69e10a9b13c8fc62cad50e4ce6ac0b497b3fa","modified":1582576282787},{"_id":"public/docs/index.html","hash":"14336a4b61698ea69c53b50f0927cccf09e2bf9f","modified":1582576282787},{"_id":"public/docs/installation.html","hash":"a22fec3628e0b854b51bf6d1d5441c78cfcb6f43","modified":1582576282787},{"_id":"public/docs/installing_embarkjs.html","hash":"b0ede0ebb9bb4d76eed7ba3316bc281bb90f9eba","modified":1582576282787},{"_id":"public/docs/messages_configuration.html","hash":"59ff1eb196b673c116d7bdb66fc9051833fed169","modified":1582576282787},{"_id":"public/docs/installing_plugins.html","hash":"5abb1fef66917c31ce6d6d29a4140525ec571d74","modified":1582576282787},{"_id":"public/docs/messages_javascript.html","hash":"84f50c2c2a50170f5be518005cfae3efac37773d","modified":1582576282787},{"_id":"public/docs/naming_configuration.html","hash":"136aec55b85b10019cc716b194260bd8470a1ac7","modified":1582576282787},{"_id":"public/docs/naming_javascript.html","hash":"c73c3fe22ae4e397be594296e25dae4cdf80e923","modified":1582576282787},{"_id":"public/docs/overview.html","hash":"081bc24eef79e5b81ec9aa7df20b335585c56b75","modified":1582576282787},{"_id":"public/docs/javascript_usage.html","hash":"8923e6e18d258494347f33019e14013c8f8ebc95","modified":1582576282787},{"_id":"public/docs/quick_start.html","hash":"81f58b94692fbf1bd50bbcbee747ffa3841c3da8","modified":1582576282787},{"_id":"public/docs/running_apps.html","hash":"d6fff13a6d08b8c22632c356861ec28366e73647","modified":1582576282787},{"_id":"public/docs/sending_and_receiving_messages.html","hash":"e5a7da7679a784b4362f5f0995eb8c8e440dc1c1","modified":1582576282787},{"_id":"public/docs/pipeline_and_webpack.html","hash":"55c62a0fe65688f46027596f0ff5207e0a79bc36","modified":1582576282787},{"_id":"public/docs/smart_contract_objects.html","hash":"7ac13dcc861d92a0e7a7977658b86ad202a0a482","modified":1582576282787},{"_id":"public/docs/storage_configuration.html","hash":"67b8e0597a2e77be984f643d3f5eeda2d64fc418","modified":1582576282787},{"_id":"public/docs/migrating_from_3.x.html","hash":"cea9ed84ffa4a9b702d4d0432062ff8a9964c588","modified":1582576282787},{"_id":"public/docs/structure.html","hash":"4c0b74da034be2235ed38f42d95783bf430f48b0","modified":1582576282787},{"_id":"public/docs/troubleshooting.html","hash":"19f69995e8c2a2604dd6598ac021d9a59cb70e91","modified":1582576282787},{"_id":"public/docs/using_storages.html","hash":"cad9de7f6f0c27521e73dbbcf0b0e0ad0dab61c7","modified":1582576282787},{"_id":"public/docs/using_the_console.html","hash":"e76dfabc9475a8702ea30d77f6e5a0f35cd69d28","modified":1582576282787},{"_id":"public/docs/vyper.html","hash":"5eef7591d6ca821ac5883ca3b8b3689c6971731e","modified":1582576282787},{"_id":"public/docs/storage_javascript.html","hash":"7c5151b486b721b261c14960f658b85e060abb6d","modified":1582576282787},{"_id":"public/docs/storage_deployment.html","hash":"db57efd07116b723d5c345337a0c22e957cabb3a","modified":1582576282787},{"_id":"public/news/index.html","hash":"b729993d2499fb28f20af1218fd73aba27cc36f7","modified":1584553236976},{"_id":"public/docs/working_with_name_systems.html","hash":"0933e7bfd78f2a7f0793d7bed8795b48bb2b6fc7","modified":1582576282787},{"_id":"public/tutorials/infura_guide.html","hash":"165bbfa3f2596e27fc7f03369ea9eb10619894ad","modified":1582576282787},{"_id":"public/plugins/index.html","hash":"e3b1b120d901c2c45f8c2b3bbce3f0f5d7261960","modified":1582576282787},{"_id":"public/templates/index.html","hash":"d6359b973f664be21e72660c9c621af34806ec45","modified":1582576282787},{"_id":"public/docs/blockchain_configuration.html","hash":"3f173e7239c4712fc4342ab49f0e796f0ed5a406","modified":1582576282787},{"_id":"public/docs/contracts_testing.html","hash":"dc3c3c192e65c753743856274ac921433bfc6434","modified":1582576282787},{"_id":"public/docs/contributing.html","hash":"21716fd956f67b69354506633b666dc3233a2ee0","modified":1582576282787},{"_id":"public/docs/contracts_configuration.html","hash":"3728f75b22e59686cffdd18c64e6b8bcbad535a4","modified":1582576282787},{"_id":"public/docs/plugin_reference.html","hash":"47df99a5fbd493ca633fe5a488e4a9ffe71dce23","modified":1582576282787},{"_id":"public/news/2020/02/11/subspace-1-3/index.html","hash":"350a0d03efd484e4c452b6253657b9df4ff3f2ed","modified":1584552883819},{"_id":"public/news/2020/01/30/dapp-frontend-security/index.html","hash":"a6a18e551d2374739526925a703506aed28d8a41","modified":1584552883819},{"_id":"public/news/2020/01/29/subspace-1-2/index.html","hash":"be5255e7f367d37b5ce2d5d0dcfd2791fe068c42","modified":1584552883819},{"_id":"public/news/2020/01/28/embark-5-1/index.html","hash":"909c99a9958c1b20f56089b92daf65f8a720b675","modified":1584552883819},{"_id":"public/news/2020/01/13/announcing-embark-5/index.html","hash":"4c701241574a28139ae05a97f8b245546e4c88a4","modified":1584552883819},{"_id":"public/news/2020/01/09/take-back-the-web-hackathon/index.html","hash":"1465f58ef1b4091eafbd795b8df34a86d00b0277","modified":1584552883819},{"_id":"public/news/2019/12/09/web3-what-are-your-options/index.html","hash":"ca1594128394eb0e1b8b23c2bcfa47512e4c9f37","modified":1584552883819},{"_id":"public/news/2019/11/28/nim-vs-crystal-part-3-cryto-dapps-p2p/index.html","hash":"eaa0edb6261ca810aef740ea56cf2cc1dea6e235","modified":1584552883819},{"_id":"public/news/2019/11/21/nim-vs-crystal-part-2-threading-tooling/index.html","hash":"d5bcdc357a90869b643ab7e703fc0a09f6f8ee79","modified":1584552883819},{"_id":"public/news/2019/11/18/nim-vs-crystal-part-1-performance-interoperability/index.html","hash":"4722863a1d203ff1c6127eecf481e21b83d59336","modified":1584552883819},{"_id":"public/news/2019/07/23/whats-new-in-embark-4.1/index.html","hash":"6e398735034ec6c71b31616fd35f2466e8e763ed","modified":1584552883819},{"_id":"public/news/2019/03/19/introducing-embark-4/index.html","hash":"46deb07c12728d68607adc6c39bf6fc3dc16ec00","modified":1584552883819},{"_id":"public/news/2019/03/18/upgrading-to-embark-4/index.html","hash":"3ed8cba844a1ea0ead41493f8aa134ef37294a6a","modified":1584552883819},{"_id":"public/news/2019/02/18/building-a-decentralized-reddit-with-embark-part-3/index.html","hash":"8b7a054edafea350bca36f5d910ca26334d05cca","modified":1584552883819},{"_id":"public/news/2019/02/11/building-a-decentralized-reddit-with-embark-part-2/index.html","hash":"b8816967b61fdca0f6aa70ae1ec8da533245db94","modified":1584552883819},{"_id":"public/news/2019/02/04/building-a-decentralized-reddit-with-embark-part-1/index.html","hash":"14f1ac8b28bdeb024310b07fa3ac40ecf03a9289","modified":1584552883819},{"_id":"public/news/2019/01/28/running-embark-tests-on-a-continuous-integration-server/index.html","hash":"5b4fec180fea16394f99ca7da15fe303e130978e","modified":1584552883819},{"_id":"public/news/2019/01/23/building-smart-contract-only-dapps/index.html","hash":"6c4f36cc02eeeca862614c410c129689e60236a9","modified":1584552883819},{"_id":"public/news/2018/10/27/how-to-create-a-token-factory-with-embark-part-2/index.html","hash":"c7356f0794cd6219497032a794b2f8535ac0db5b","modified":1584552883819},{"_id":"public/news/2018/09/27/how-to-create-a-token-factory-with-embark-part-1/index.html","hash":"ba4101e73fd9360a3d3b7cf097d42a5af1c089e1","modified":1584552883819},{"_id":"public/news/2018/05/04/embark-3-0-released/index.html","hash":"ec8206fc1fb72e9d6cd2c82e049ede54e1c080c4","modified":1584552883819},{"_id":"public/news/2017/10/25/embark-2-6-released/index.html","hash":"fa7e2ebd0e88a3ddb03afca1df6c1d19f4a14d28","modified":1584552883819},{"_id":"public/news/2017/06/28/embark-2-5-released/index.html","hash":"bf6609b6eea678f1ead80cde064bfb44dbc5161f","modified":1584552883819},{"_id":"public/archives/index.html","hash":"2db310c40a7f20ddc22c29825cd1cc702bbf443e","modified":1584553236976},{"_id":"public/archives/2017/index.html","hash":"bedb761272f1cccc066722490b66517ff131dc1a","modified":1584552883819},{"_id":"public/archives/2018/index.html","hash":"30adaed262f8039d885082acc38a775771bc6dfc","modified":1584552883819},{"_id":"public/archives/2019/index.html","hash":"ac1c3f2cfda975f79e617fbc89a0102368519f02","modified":1584552883819},{"_id":"public/archives/2019/01/index.html","hash":"60fe756be71c5ccfbbba31fda8affec4c46ca175","modified":1584552883819},{"_id":"public/archives/2019/02/index.html","hash":"0d5843ceeb75a9bd24c4e936ec8f4ab848ecdb9f","modified":1584552883819},{"_id":"public/archives/2019/03/index.html","hash":"a268772846a8137a4e5dc2740adf7f89dc6b8509","modified":1584552883819},{"_id":"public/archives/2019/11/index.html","hash":"08970cea255063fa4f0042b0d0cdeaefe4b05d40","modified":1584552883819},{"_id":"public/archives/2020/index.html","hash":"59328a36201c78adadfb0e4f64146fa227dcbe58","modified":1584553236976},{"_id":"public/archives/2020/01/index.html","hash":"23fe4f63b6bfc8820c7afd1601d2a2934652c21f","modified":1584552883819},{"_id":"public/categories/announcements/index.html","hash":"5d8a564c2df4794da590012eda756bfe373bf45c","modified":1584553236976},{"_id":"public/categories/tutorials/index.html","hash":"eb42473c009bf338df64758f352e87df444fa89c","modified":1584552883819},{"_id":"public/categories/announcements/releases/index.html","hash":"7785a515442c1d13c564f117775bcbc8dcea6c62","modified":1584553236976},{"_id":"public/CNAME","hash":"fbac6d19ee04b9b7f4b3085544d024ec900c633c","modified":1584552883819},{"_id":"public/embark-logo.svg","hash":"af5b81d96dd4f7e4e65851e53866da7883daf52e","modified":1584552883819},{"_id":"public/browserconfig.xml","hash":"f54412705ab9eb69b544f438c9a1e15ae57f27c0","modified":1584552883819},{"_id":"public/robots.txt","hash":"7e49dfd97319f5dd7cdaea8518cf43e0e8d01e5a","modified":1584552883819},{"_id":"public/plugins/thumbnails/fortune.jpg","hash":"f041a2bc22e374dd833e4b56066e7d3bf20d49f6","modified":1582576282787},{"_id":"public/plugins/thumbnails/bamboo.png","hash":"b7c9f4d84aa7d6642e4a822a7b66042ab2d33710","modified":1582576282787},{"_id":"public/plugins/thumbnails/pug.png","hash":"774bb436243175c41b9e4c51558a02e2262a7e47","modified":1582576282787},{"_id":"public/plugins/thumbnails/remix copy.png","hash":"0654c1ca096d7336391d50ffc27c64aa30a37b85","modified":1582576282787},{"_id":"public/plugins/thumbnails/solidity.png","hash":"860e6c14fe1fc7799de218b11dbdda5cb73123d3","modified":1582576282787},{"_id":"public/plugins/thumbnails/remix.png","hash":"c288a89299382837bde8ce248b2d1265dff49083","modified":1582576282787},{"_id":"public/plugins/thumbnails/solium.png","hash":"a8e525113fb9dff400e71b9762f537f82cfdb7ac","modified":1582576282787},{"_id":"public/plugins/thumbnails/status.png","hash":"452ce074cb13ffa9be473c7001c675b6b35f3780","modified":1582576282787},{"_id":"public/templates/thumbnails/angular.png","hash":"e50350df2526f0abf0a8d2e808085c24f2273662","modified":1582576282787},{"_id":"public/templates/thumbnails/sggc.png","hash":"f2742e7865280a840ccb8de8a466e7571947ec9a","modified":1582576282787},{"_id":"public/templates/thumbnails/typescript.png","hash":"bc3c71f25fc966f00c23df3222cde74c6e70c06d","modified":1582576282787},{"_id":"public/templates/thumbnails/vortex.png","hash":"ca5675313297535b416158e7a6b775bbe59f3a56","modified":1582576282787},{"_id":"public/templates/thumbnails/bamboo.png","hash":"b7c9f4d84aa7d6642e4a822a7b66042ab2d33710","modified":1582576282787},{"_id":"public/templates/thumbnails/vuejs.png","hash":"85cb9bd3cf15f02dc2b44fbc9dffc2737c6a985b","modified":1582576282787},{"_id":"public/templates/thumbnails/vyper.png","hash":"ecbc1f9ce334685b0a1d9ec6da3ad98a69758f6e","modified":1582576282787},{"_id":"public/templates/thumbnails/react.png","hash":"a6d33dab3a85a4d7004246e39a704869a6319306","modified":1582576282787},{"_id":"public/tutorials/infura_guide/api-keys.png","hash":"9ef67096142c2cd4dff7e391f2664e335d347517","modified":1582576282787},{"_id":"public/tutorials/infura_guide/lift-off.jpg","hash":"90d8d7604930e30d01aff8c1513412a75e8f4a58","modified":1582576282787},{"_id":"public/plugins/thumbnails/haml.png","hash":"19c468e7d07eed1ddadc38818b8f9c350ebf8511","modified":1582576282787},{"_id":"public/assets/images/token_factory_1/page_1.png","hash":"6babcba0bca8fc8a48a0eed7045396f9c3fb55af","modified":1584552883819},{"_id":"public/assets/images/token_factory_1/page_2.png","hash":"4fa5a22eb63587f424a2742e7f14f39e6e6e4c9d","modified":1584552883819},{"_id":"public/assets/images/token_factory_1/page_3.png","hash":"08a8a87009da0594ac5c763e269082ed489c9b31","modified":1584552883819},{"_id":"public/assets/images/token_factory_1/page_4.png","hash":"78a3cbea0a3a686847fa7024a634bc28b38e7c08","modified":1584552883819},{"_id":"public/assets/images/token_factory_1/page_5.png","hash":"1938ae333249ead32842d39f36dc7d7742e97a95","modified":1584552883819},{"_id":"public/assets/images/token_factory_2/page_1.png","hash":"d0c1bdc7478dcc4878239b2924107df50608d97a","modified":1584552883819},{"_id":"public/assets/images/token_factory_2/page_2.png","hash":"238f769f8834d36a088f6352d5e8b056d339fa7d","modified":1584552883819},{"_id":"public/assets/images/token_factory_2/page_3.png","hash":"8eca458e6e78457f268142f45542c2a919ab07af","modified":1584552883819},{"_id":"public/assets/images/token_factory_2/page_5.png","hash":"ea35b940330be24051ac278a8ad6d239a93c3fd5","modified":1584552883819},{"_id":"public/assets/images/token_factory_2/page_6.png","hash":"b672160f850fcd590050dfbc268ec03c1027072f","modified":1584552883819},{"_id":"public/assets/images/token_factory_2/page_7.png","hash":"da58b3365e3b6841ffdcfbf6c5b8a6152daa9a49","modified":1584552883819},{"_id":"public/assets/images/token_factory_2/page_4.png","hash":"92dd82374e8ccd6f258481fc69ebdc2aa16c0532","modified":1584552883819},{"_id":"public/assets/icons/arrow-down-1.svg","hash":"cf919e204adc66907e541c5a32a6cdb8bd86e9d7","modified":1584552883819},{"_id":"public/assets/icons/app-window-search-text.svg","hash":"a7658278c51714beb9a4aa378074b0f1a2a3811a","modified":1584552883819},{"_id":"public/assets/icons/arrow-left-1.svg","hash":"6a5b3fe7927e03320be668170011aba2d461d1af","modified":1584552883819},{"_id":"public/assets/icons/arrow-right-1.svg","hash":"5948e9eda884b948d0c668ae51f99509d2cfa631","modified":1584552883819},{"_id":"public/assets/icons/arrow-up-1.svg","hash":"e4e31a2af62c2838e1871dfd72203b9a94ae8ae9","modified":1584552883819},{"_id":"public/assets/icons/browser-gauge.svg","hash":"4ab8c84f8c5cc2ece1a2847ef8d9f2c9b842609f","modified":1584552883819},{"_id":"public/assets/icons/check.svg","hash":"94cb2741b66a54d22bbacdf65c5bbf1f4de59c4a","modified":1584552883819},{"_id":"public/assets/icons/crypto-currency-bitcoin-circle.svg","hash":"6feceaadc9ee12a3e457d94a3d548a3d82213b92","modified":1584552883819},{"_id":"public/assets/icons/copy-paste.svg","hash":"6a11ff19bd04cf7774d7155a535eb68be3dbb592","modified":1584552883819},{"_id":"public/assets/icons/computer-bug-search.svg","hash":"720717cc34ce43565de8ab4a360603c2c55092a7","modified":1584552883819},{"_id":"public/assets/icons/close.svg","hash":"07c332a892c2b2a107bf53a055425064006b7161","modified":1584552883819},{"_id":"public/assets/icons/list-to-do.svg","hash":"6954c1ea40469c5548ff8c3daba91ea3e883dab4","modified":1584552883819},{"_id":"public/assets/icons/module.svg","hash":"cf1284f20a532fc451ba6cd443ff1534e63b6779","modified":1584552883819},{"_id":"public/assets/icons/github.svg","hash":"6b9fba84ce16f0f8278ca4eb00ced1c5b13109f4","modified":1584552883819},{"_id":"public/assets/icons/navigation-menu.svg","hash":"d6b4d9e2da8849ac362bcb8d634725b921ebf46c","modified":1584552883819},{"_id":"public/assets/icons/notes-paper-text.svg","hash":"fc8a3304cfc24437597a565290c6b1095fa365f7","modified":1584552883819},{"_id":"public/assets/icons/paginate-filter-video-alternate.svg","hash":"a2953dbbdcd49ce07a7aa90be9803d5e44a77688","modified":1584552883819},{"_id":"public/assets/icons/pen-write-paper.svg","hash":"a2828e87d8ea6f6d965a1aae8ab450c3bba19564","modified":1584552883819},{"_id":"public/assets/icons/rating-star.svg","hash":"961c6f9cf48e662267cdfb609e89f3234e1c84c0","modified":1584552883819},{"_id":"public/assets/icons/search-bar.svg","hash":"6e3dfc910fda432935eaf7a6170bf1f6be8c7a21","modified":1584552883819},{"_id":"public/assets/icons/pie-line-graph.svg","hash":"d8a9dad5f7377b12b3130d964f7fe3d03de80d1a","modified":1584552883819},{"_id":"public/assets/icons/symbols.svg","hash":"d34c6846fa16190a9e264d9f1cbf40e12ae8f410","modified":1584552883819},{"_id":"public/assets/icons/tag-new-circle.svg","hash":"3a155bcde805c6101d431c08a093a5ffed37dfeb","modified":1584552883819},{"_id":"public/assets/icons/twitter.svg","hash":"90e4959062ea5bc14eb10f182c1c9859dcc0b168","modified":1584552883819},{"_id":"public/assets/images/Nimbus.svg","hash":"f0ea3f6a1804fc951901bdf3c3ec84ebcbcfb1b3","modified":1584552883819},{"_id":"public/assets/images/apple-touch-icon-120x120-precomposed.png","hash":"2b599bbb36131a537d0a2db417eefd8cb2a348f7","modified":1584552883819},{"_id":"public/assets/images/apple-touch-icon-152x152-precomposed.png","hash":"8f2800d891c5e1374cef4f3fcd26575f46748e5c","modified":1584552883819},{"_id":"public/assets/images/apple-touch-icon-76x76-precomposed.png","hash":"99cd68afb86ecab681c217b0eeffed8163f228e6","modified":1584552883819},{"_id":"public/assets/images/apple-touch-icon-60x60-precomposed.png","hash":"aa89e00d7671bfa8add7afc2ee25e84cf93319b3","modified":1584552883819},{"_id":"public/assets/images/apple-touch-icon-180x180-precomposed.png","hash":"451e3cfad6ebe9dad9eb35af1d7c113b2f76f143","modified":1584552883819},{"_id":"public/assets/images/company-flexdapps.svg","hash":"ae7686cb0c918a69b497774fba8829cb3df89858","modified":1584552883819},{"_id":"public/assets/images/apple-touch-icon-precomposed.png","hash":"451e3cfad6ebe9dad9eb35af1d7c113b2f76f143","modified":1584552883819},{"_id":"public/assets/images/company-status.svg","hash":"5729e8db16b262cb6c3ca91113500b1895f24768","modified":1584552883819},{"_id":"public/assets/images/company-giveth.svg","hash":"8d611a8a4c94e2bb13da7661195cb44d3ee163f4","modified":1584552883819},{"_id":"public/assets/images/favicon-16.png","hash":"db9d7be08c2096635e4acd9f00fb56c04aafa7a5","modified":1584552883819},{"_id":"public/assets/images/dots.png","hash":"2f22dcbbe2b643819e263bc292732d0875e9f24e","modified":1584552883819},{"_id":"public/assets/images/keycard-logo-negative.svg","hash":"b93278634ae78c759a0439a7d8c275889ae90e8f","modified":1584552883819},{"_id":"public/assets/images/favicon-32.png","hash":"b841b7f468325cab45486b1a25343e0f0654ef0d","modified":1584552883819},{"_id":"public/assets/images/logo-negative.svg","hash":"2eb5bdd4eb9aac594e7fcbb7ff0fb7456d6c1fd1","modified":1584552883819},{"_id":"public/assets/images/logo.svg","hash":"0bc239291c9f4732df92ed67b5f80d7392d9920a","modified":1584552883819},{"_id":"public/assets/images/status-logo.svg","hash":"80e9ac5ea6f37880927c680f66d41f2acd751873","modified":1584552883819},{"_id":"public/assets/images/rocket-start.svg","hash":"1c2121ac58f2ea3916de10a4667518b653ce83a7","modified":1584552883819},{"_id":"public/favicon.ico","hash":"96b9a549337c2bec483c2879eeafa4d1f8748fed","modified":1584552883819},{"_id":"public/coverage-files.png","hash":"e9b0f9b1f09dc16409266dfbc1223f274dd63cbc","modified":1584552883819},{"_id":"public/assets/images/cockpit_debugger_controls.png","hash":"ba68f8b39e0d745e39a26d0bd8c9c3bfea5ad8c5","modified":1584552883819},{"_id":"public/plugins/thumbnails/mythx.png","hash":"7d1972d98ddd2bc13afbb0049d45f157d8cdf675","modified":1582576282787},{"_id":"public/assets/images/crystal-thread-test.png","hash":"4e8aa7ac613a332960de0117141ed1e33b14d9f1","modified":1584552883819},{"_id":"public/assets/images/bg-hexagons.png","hash":"d2a3d73d939c8d6a34f04741231739d25d81c1a8","modified":1584552883819},{"_id":"public/js/index.js","hash":"cb46b90689c0ac59988a81d4d231ae2d4b9d3806","modified":1584552883819},{"_id":"public/js/linkjuice/package.json","hash":"73982ec66ef8b7eec927bcc464c52592d33ea3fc","modified":1584552883819},{"_id":"public/js/linkjuice/gulpfile.js","hash":"c160dfead280a588086115a45a895549b99ed458","modified":1584552883819},{"_id":"public/js/linkjuice/src/linkjuice.js","hash":"c9145e827c4a9c35575911407b9a7e65c48ae858","modified":1584552883819},{"_id":"public/js/linkjuice/README.html","hash":"afb050bbf2d92c0f57339ad70510038e0353e372","modified":1584552883819},{"_id":"public/css/embark.css","hash":"8a33e2a3d9e5beff75e9497e08d0085d54b79b12","modified":1584552883819},{"_id":"public/coverage-report.png","hash":"4f2e52ad838258e4e7ee03f2cfd4bdd9be2c4046","modified":1584552883819},{"_id":"public/assets/images/web3-js-diagram.png","hash":"5cc26458f47462ce25a80abca52a4cc2e90de9e4","modified":1584552883819},{"_id":"public/assets/images/cockpit_dashboard_release.png","hash":"096b0b893f3d467919edd968ce827985e1f233f0","modified":1584552883819},{"_id":"public/assets/images/token_factory_1/console_2.png","hash":"82a4f8163e92edc66a14726a97e6f3d586fc5ec9","modified":1584552883819},{"_id":"public/assets/images/tool-screenshot.png","hash":"9cfaabed43e1453cdf1edb60238f2aeaa3b7ad07","modified":1584552883819},{"_id":"public/assets/images/nimble-creating-app.png","hash":"30bdcea82d2a7e7b063dfeca277438ae9a9a44f4","modified":1584552883819},{"_id":"public/assets/images/cockpit_editor_release.png","hash":"c912dcedf5db89e08e491d1b49f7b07795bdcf21","modified":1584552883819},{"_id":"public/assets/images/cockpit_contracts_view.gif","hash":"999f406795198c3d8651e61d7e0b251f7320d98c","modified":1584552883819},{"_id":"public/assets/images/token_factory_2/console_2.png","hash":"4efdab7b54dacafc83854b6dc7d73addf9fe8ade","modified":1584552883819},{"_id":"public/assets/images/cockpit_selective_deployment.gif","hash":"1d9e6e6a5d1c98da71e316c7cfb4ac7aff6c5708","modified":1584552883819},{"_id":"public/assets/images/token_factory_1/console_1.png","hash":"fd0c379505c036ad151b01a5a28b610df190d3d6","modified":1584552883819},{"_id":"public/assets/images/cli-tool.png","hash":"21fa930acb0a5259f9f35b37d14bc4b11fd9120d","modified":1584552883819},{"_id":"public/assets/images/embark-header_blank.jpg","hash":"9da5d1642a4ad2ba3af71504589a5ced42a4ab8f","modified":1584552883819},{"_id":"public/assets/images/token_factory_2/console_1.png","hash":"9d35e99618f0ff90911672eaf7765a48ab84f94e","modified":1584552883819},{"_id":"public/assets/images/EMBARK_HEADER_ALT_OPTIMIZED.jpg","hash":"9d767c14d82980b184cb6d9a1746f986c21cec8e","modified":1584552883819},{"_id":"public/assets/icons/symbols.html","hash":"cc0529985a051d8d2fb0d956f132a057f3754dea","modified":1584552883819},{"_id":"public/assets/images/cockpit_dashboard.png","hash":"aa995f3517e692402819dc004010c9f45960a7a5","modified":1584552883819},{"_id":"public/assets/images/nim-crystal-header-img_NEW.jpg","hash":"f0716491dd88db1d137c915879e66694844ea334","modified":1584552883819},{"_id":"public/assets/images/cockpit_explorer_block.png","hash":"e9f398fc9eacf99b3e64997c3724ec541875e144","modified":1584552883819},{"_id":"public/assets/images/cockpit_dashboard_dark.png","hash":"69148b6547065adcd5583118286f74aff9a29889","modified":1584552883819},{"_id":"public/assets/images/EMBARK_MODULAR.png","hash":"38677401713a7583c44d97e59eb5bcc3c8fb8386","modified":1584552883819},{"_id":"public/assets/images/EMBARK_FRAMEWORK.png","hash":"6113f59cb45baf50f78c13684f366b3b2ba11239","modified":1584552883819},{"_id":"public/assets/images/web3-article-header.png","hash":"864ff7aa607777525104eef5ae130a5ffe3aee26","modified":1584552883819},{"_id":"public/assets/images/cockpit_explorer_overview.png","hash":"86a94110f1ae3fe956a5efb1b165902c63fa35d8","modified":1584552883819},{"_id":"public/assets/images/cockpit_explorer_contracts_detail.gif","hash":"2464c474ba42193ca58df7288c2afc81608657c0","modified":1584552883819},{"_id":"public/assets/images/embark-dashboard.png","hash":"fbfa1764086f3c436172bc8c812452a99c8d8f79","modified":1584552883819},{"_id":"public/assets/images/website_release.png","hash":"4625f3ee3f58fae5d2c2dc7b10fc8d2547c6a448","modified":1584552883819},{"_id":"public/assets/images/cockpit_explorer_transactions.gif","hash":"fd74abafca81d5a2986f57d72147b228b06f075d","modified":1584552883819},{"_id":"public/assets/images/cockpit_suggestions.gif","hash":"2e004a561dda70e22effa1af96315bb9d2314758","modified":1584552883819},{"_id":"public/assets/images/cockpit_using_debugger.gif","hash":"72acc4d2ab4f9b342749519b69455e30fd4e24c0","modified":1584552883819},{"_id":"public/assets/images/cockpit_explorer_account.gif","hash":"a9c557a12ff36090c6a41c265bbd8eb9285de657","modified":1584552883819},{"_id":"public/assets/images/cockpit_search.gif","hash":"c797eb599b822ca56f57cfa882967f23b27d62f9","modified":1584552883819},{"_id":"public/assets/images/cockpit_editor.gif","hash":"3ce64fcf60098d6954d4a021ef4d2f2c20e1dc46","modified":1584552883819},{"_id":"public/assets/images/cockpit_enter_debugger.gif","hash":"f3374c1898aba97acb7d53779d4e8fc9643d2dff","modified":1584552883819},{"_id":"public/assets/images/cockpit_navigation.gif","hash":"7ed00581b8752de847a7e7e2d2c6e47bc961614a","modified":1584552883819},{"_id":"public/assets/images/cockpit_change_theme.gif","hash":"fe6c1c931e3db5c069a158bf7da7fd732d0f39bc","modified":1584552883819},{"_id":"public/assets/images/cockpit_dashboard_contracts.gif","hash":"1792d363902a2ec8f26f7596bffc4431461f2fee","modified":1584552883819},{"_id":"public/assets/images/token_factory_1/dashboard.png","hash":"bfb37f6fe22c28ac3cfa10b100e2db47acf5f6ca","modified":1584552883819},{"_id":"source/_posts/2020-02-17-decentralized-notifications.md","hash":"b6dcd61e15c2f5d06262c371ee7487bc7adcdbf1","modified":1582065705501},{"_id":"public/categories/dapp-development/index.html","hash":"b2a24a850cc596843c32cb02a18371481b88db80","modified":1584552883819},{"_id":"public/categories/dapp-development/tools/index.html","hash":"21719c1ba872932eab1fe7735541bd6a6891e7a5","modified":1584552883819},{"_id":"public/news/2020/02/17/decentralized-notifications/index.html","hash":"fd8a971f0bcf28875a7e3706af773a9d4f86bee7","modified":1584552883819},{"_id":"source/_posts/2020-02-18-embark-5-2.md","hash":"f68f8635cdb42ae86389e2252d3098dbcc994d88","modified":1582063581106},{"_id":"public/news/2020/02/18/embark-5-2/index.html","hash":"005f6932abec26f3b0283f6c4baeca40a57390c4","modified":1582065713023},{"_id":"public/categories/announcements/releases/embark/index.html","hash":"51cd295005662aa36f4afb85bdd8c9a97a28a75e","modified":1584552883819},{"_id":"source/_posts/2020-02-19-embark-5-2.md","hash":"4a8d7278b203884c9e4f7964962b284f26b31ac3","modified":1582126305221},{"_id":"source/assets/images/embark_logo.png","hash":"7ac35140d8644d008fa8c8b6b77aaf17297a9bd5","modified":1582125655807},{"_id":"public/news/2020/02/19/embark-5-2/index.html","hash":"215eec1c54aa312b13dee09c06e4cd4de555dc1f","modified":1582126310616},{"_id":"public/assets/images/embark_logo.png","hash":"7ac35140d8644d008fa8c8b6b77aaf17297a9bd5","modified":1584552883819},{"_id":"source/_posts/2020-02-19-embark-5-2-release.md","hash":"840cc3ce9211ed93a7ca7cdc70ec2d0bc5369a3e","modified":1583178726773},{"_id":"public/news/2020/02/19/embark-5-2-release/index.html","hash":"99f46428a4dd0443b6342a9d982ac231f0dd4bb9","modified":1584552883819},{"_id":"source/.DS_Store","hash":"763c43d7ddbfcd74602506769e3228ea448bf294","modified":1582307486157},{"_id":"source/assets/.DS_Store","hash":"f23772696b5f6cc8382edb8c4e1d87f1c6c66242","modified":1582307787409},{"_id":"source/_posts/2020-02-18-wasm-ewasm-what-and-why.md","hash":"12eb27e3613a8768d52b201786329eeb06b5230e","modified":1582307775894},{"_id":"source/assets/images/wasm-evm-benchmarks.png","hash":"735a5199aaa0a38a9cac51f83a36ef8c6a7fd9ed","modified":1581677189654},{"_id":"source/assets/images/wasm_explorer_online_app.png","hash":"6d242589beaefcec859aa9eb9b7e2657384dea4b","modified":1581671567593},{"_id":"source/assets/images/.DS_Store","hash":"df2fbeb1400acda0909a32c1cf6bf492f1121e07","modified":1582307782405},{"_id":"source/assets/images/eWASM-header.png","hash":"663b7df9f4610fd7617717254882b47ff2635e1f","modified":1582307691498},{"_id":"public/news/2020/02/17/wasm-ewasm-what-and-why/index.html","hash":"ab1cbcd9d0ed901f5ee9e3ccf715e0e5cc504f3c","modified":1582570908982},{"_id":"public/news/2020/01/29/dapp-frontend-security/index.html","hash":"5bfe16742626a1ea54617e14cde51d5a606983dc","modified":1582930898504},{"_id":"public/news/2019/12/08/web3-what-are-your-options/index.html","hash":"1990927116963974345a88241f0ca32f08d4ffc3","modified":1582930898504},{"_id":"public/assets/images/wasm-evm-benchmarks.png","hash":"735a5199aaa0a38a9cac51f83a36ef8c6a7fd9ed","modified":1584552883819},{"_id":"public/assets/images/eWASM-header.png","hash":"663b7df9f4610fd7617717254882b47ff2635e1f","modified":1584552883819},{"_id":"public/assets/images/wasm_explorer_online_app.png","hash":"6d242589beaefcec859aa9eb9b7e2657384dea4b","modified":1584552883819},{"_id":"source/_posts/2020-02-24-wasm-ewasm-what-and-why.md","hash":"af272f40e08a705223773c10994f35ecff628c29","modified":1583775808179},{"_id":"public/news/2020/02/24/wasm-ewasm-what-and-why/index.html","hash":"ae5611079859eb4b676061f4b22fd578515b48cb","modified":1584552883819},{"_id":"source/_posts/2020-03-04-2020-Blockchain-Developer-Survey.md","hash":"abe8f7023d7641b9f3ca83a975d45d946d541d63","modified":1583775808180},{"_id":"source/assets/images/tools.png","hash":"f983261c675d4bded7bd19690c209269729f842c","modified":1583775808190},{"_id":"source/assets/images/Chains.png","hash":"3268040afe9e37c0a049a345b12dfd5ea044bf98","modified":1583775808181},{"_id":"source/assets/images/ETH2_perception.png","hash":"2e7133c5d41bba64690d6abb5cf9fcc805235a37","modified":1583775808182},{"_id":"source/assets/images/Perception_of_public_sentiment.png","hash":"fa8560a14b641bbb17702ed8c9a9624f689a6c60","modified":1583775808185},{"_id":"source/assets/images/Public_Private_Chains.png","hash":"d37a255183aefabf80a8975a4a5f9ab30267c5fd","modified":1583775808186},{"_id":"source/assets/images/Who_are_you_building_for.png","hash":"5a0c2da41038c5310e0ecf7fc3ed8aec6e4a2ea6","modified":1583775808187},{"_id":"source/assets/images/impediments_to_blockchain_development.png","hash":"b3cc0d8ceb5de34193ef0274355f9dc41b76cd5a","modified":1583775808188},{"_id":"source/assets/images/motivations.png","hash":"794c3e488c5af4015d93b2f89ecef202326b2829","modified":1583775808189},{"_id":"source/assets/images/Header_Banner.png","hash":"352a39c464d8567e5fff48fd3605d184bbefa7a1","modified":1583775808184},{"_id":"source/assets/images/web-security_banner.jpg","hash":"949fb5f016e6520a5aa38f219ab0513929e7e54c","modified":1583775808191},{"_id":"public/archives/2020/03/index.html","hash":"e69d7f37a465d49295c75975c933bba0f433c8cf","modified":1584553236976},{"_id":"public/categories/Report/index.html","hash":"c8941ba656954ffa6e7c17294079ac41c7a9b783","modified":1584552883819},{"_id":"public/news/2020/03/04/2020-Blockchain-Developer-Survey/index.html","hash":"55333470bc11c86dd0aeddd2f920be3b353eb209","modified":1584552883819},{"_id":"public/assets/images/tools.png","hash":"f983261c675d4bded7bd19690c209269729f842c","modified":1584552883819},{"_id":"public/assets/images/Perception_of_public_sentiment.png","hash":"fa8560a14b641bbb17702ed8c9a9624f689a6c60","modified":1584552883819},{"_id":"public/assets/images/ETH2_perception.png","hash":"2e7133c5d41bba64690d6abb5cf9fcc805235a37","modified":1584552883819},{"_id":"public/assets/images/Public_Private_Chains.png","hash":"d37a255183aefabf80a8975a4a5f9ab30267c5fd","modified":1584552883819},{"_id":"public/assets/images/impediments_to_blockchain_development.png","hash":"b3cc0d8ceb5de34193ef0274355f9dc41b76cd5a","modified":1584552883819},{"_id":"public/assets/images/Chains.png","hash":"3268040afe9e37c0a049a345b12dfd5ea044bf98","modified":1584552883819},{"_id":"public/assets/images/Who_are_you_building_for.png","hash":"5a0c2da41038c5310e0ecf7fc3ed8aec6e4a2ea6","modified":1584552883819},{"_id":"public/assets/images/motivations.png","hash":"794c3e488c5af4015d93b2f89ecef202326b2829","modified":1584552883819},{"_id":"public/assets/images/Header_Banner.png","hash":"352a39c464d8567e5fff48fd3605d184bbefa7a1","modified":1584552883819},{"_id":"public/assets/images/web-security_banner.jpg","hash":"949fb5f016e6520a5aa38f219ab0513929e7e54c","modified":1584552883819},{"_id":"source/_posts/2020-03-18-subspace-2.0.md","hash":"8b2b2a6442a5b6f0b3710a796fea2137da472ba6","modified":1584553225140},{"_id":"public/news/2020/03/18/subspace-2.0/index.html","hash":"372015ea1b4d895aaef977e3c49c808994b7ae88","modified":1584553236976},{"_id":"source/assets/images/subspace.png","hash":"8ca0c89bd925726027dcf3616c590884da29d9e4","modified":1584553201304},{"_id":"public/assets/images/subspace.png","hash":"8ca0c89bd925726027dcf3616c590884da29d9e4","modified":1584553236976}],"Category":[{"name":"announcements","_id":"ck6axlf8t0004xeeg4u40b7v4"},{"name":"tutorials","_id":"ck6axlf9n000nxeeg1g8vfk0r"},{"name":"releases","parent":"ck6axlf8t0004xeeg4u40b7v4","_id":"ck6axlf9r000uxeeg34tq1cp1"},{"name":"subspace","parent":"ck6axlf9r000uxeeg34tq1cp1","_id":"ck6i7o5240001a1t4dvsofb7b"},{"name":"dapp-development","_id":"ck6qmd5os00019wt46zeo50kg"},{"name":"tools","parent":"ck6qmd5os00019wt46zeo50kg","_id":"ck6qmd5oy00029wt413k42tog"},{"name":"embark","parent":"ck6axlf9r000uxeeg34tq1cp1","_id":"ck6sh2vay0001byt4em048cdf"},{"name":"Report","_id":"ck7kr9s3k0001u0t47cb19m94"}],"Data":[{"_id":"authors","data":{"iuri_matias":{"name":"Iuri Matias","twitter":"iurimatias","image":"https://pbs.twimg.com/profile_images/928272512181563392/iDJdvy2k_400x400.jpg"},"pascal_precht":{"name":"Pascal Precht","twitter":"pascalprecht","image":"https://pbs.twimg.com/profile_images/993785060733194241/p3oAIMDP_400x400.jpg"},"anthony_laibe":{"name":"Anthony Laibe","twitter":"a_laibe","image":"https://pbs.twimg.com/profile_images/257742900/13168239_400x400.jpg"},"jonathan_rainville":{"name":"Jonathan Rainville","twitter":"ShyolGhul","image":"https://pbs.twimg.com/profile_images/993873866878570496/-aE4byjj_400x400.jpg"},"andre_medeiros":{"name":"Andre Medeiros","twitter":"superdealloc","image":"https://pbs.twimg.com/profile_images/965722487735701504/m58KNgWN_400x400.jpg"},"eric_mastro":{"name":"Eric Mastro","twitter":"ericmastro","image":"https://avatars1.githubusercontent.com/u/5089238?s=460&v=4"},"michael_bradley":{"name":"Michael Bradley","image":"https://avatars3.githubusercontent.com/u/194260?s=460&v=4"},"richard_ramos":{"name":"Richard Ramos","twitter":"richardramos_me","image":"https://devcon.org/images/speakers/richard_ramos.jpg"},"jonny_zerah":{"name":"Jonny Zerah","twitter":"jonnyzerah","image":"https://pbs.twimg.com/profile_images/1043774340490248192/gI9aGy17_400x400.jpg"},"robin_percy":{"name":"Robin Percy","twitter":"rbin","image":"https://avatars1.githubusercontent.com/u/29288325?s=400&v=4"}}},{"_id":"categories","data":{"tutorials":"Tutorials","announcements":"Announcements"}},{"_id":"languages","data":{"en":"English"}}],"Page":[{"title":"Embark Labs Blog","tagline":"blog.header.tagline","layout":"blog","_content":"","source":"index.md","raw":"title: \"Embark Labs Blog\"\ntagline: blog.header.tagline\nlayout: blog\n---\n","date":"2020-01-30T15:44:21.688Z","updated":"2020-01-30T15:44:21.688Z","path":"index.html","comments":1,"_id":"ck6axlf8g0000xeegd0sv8nau","content":"","site":{"data":{"authors":{"iuri_matias":{"name":"Iuri Matias","twitter":"iurimatias","image":"https://pbs.twimg.com/profile_images/928272512181563392/iDJdvy2k_400x400.jpg"},"pascal_precht":{"name":"Pascal Precht","twitter":"pascalprecht","image":"https://pbs.twimg.com/profile_images/993785060733194241/p3oAIMDP_400x400.jpg"},"anthony_laibe":{"name":"Anthony Laibe","twitter":"a_laibe","image":"https://pbs.twimg.com/profile_images/257742900/13168239_400x400.jpg"},"jonathan_rainville":{"name":"Jonathan Rainville","twitter":"ShyolGhul","image":"https://pbs.twimg.com/profile_images/993873866878570496/-aE4byjj_400x400.jpg"},"andre_medeiros":{"name":"Andre Medeiros","twitter":"superdealloc","image":"https://pbs.twimg.com/profile_images/965722487735701504/m58KNgWN_400x400.jpg"},"eric_mastro":{"name":"Eric Mastro","twitter":"ericmastro","image":"https://avatars1.githubusercontent.com/u/5089238?s=460&v=4"},"michael_bradley":{"name":"Michael Bradley","image":"https://avatars3.githubusercontent.com/u/194260?s=460&v=4"},"richard_ramos":{"name":"Richard Ramos","twitter":"richardramos_me","image":"https://pbs.twimg.com/profile_images/1063160577973866496/aM313uHG_400x400.jpg"},"jonny_zerah":{"name":"Jonny Zerah","twitter":"jonnyzerah","image":"https://pbs.twimg.com/profile_images/1043774340490248192/gI9aGy17_400x400.jpg"},"robin_percy":{"name":"Robin Percy","twitter":"rbin","image":"https://avatars1.githubusercontent.com/u/29288325?s=400&v=4"}},"categories":{"tutorials":"Tutorials","announcements":"Announcements"},"languages":{"en":"English"},"menu":{"docs":"/docs/","plugins":"/plugins/","chat":"/chat/","blog":"/news/"},"sidebar":{"docs":{"getting_started":{"overview":"overview.html","installation":"installation.html","faq":"faq.html"},"general_usage":{"creating_project":"create_project.html","structure":"structure.html","running_apps":"running_apps.html","dashboard":"dashboard.html","using_the_console":"using_the_console.html","environments":"environments.html","configuration":"configuration.html","pipeline_and_webpack":"pipeline_and_webpack.html","javascript_usage":"javascript_usage.html"},"smart_contracts":{"contracts_configuration":"contracts_configuration.html","contracts_deployment":"contracts_deployment.html","contracts_imports":"contracts_imports.html","contracts_testing":"contracts_testing.html","contracts_javascript":"contracts_javascript.html"},"blockchain_node":{"blockchain_configuration":"blockchain_configuration.html","blockchain_accounts_configuration":"blockchain_accounts_configuration.html"},"storage":{"storage_configuration":"storage_configuration.html","storage_deployment":"storage_deployment.html","storage_javascript":"storage_javascript.html"},"messages":{"messages_configuration":"messages_configuration.html","messages_javascript":"messages_javascript.html"},"naming":{"naming_configuration":"naming_configuration.html","naming_javascript":"naming_javascript.html"},"plugins":{"installing_a_plugin":"installing_plugins.html","creating_a_plugin":"creating_plugins.html","plugin_reference":"plugin_reference.html"},"cockpit":{"cockpit_introduction":"cockpit_introduction.html","cockpit_dashboard":"cockpit_dashboard.html","cockpit_deployment":"cockpit_deployment.html","cockpit_explorer":"cockpit_explorer.html","cockpit_editor":"cockpit_editor.html","cockpit_debugger":"cockpit_debugger.html"},"reference":{"embark_commands":"embark_commands.html"},"miscellaneous":{"migrating_from_3":"migrating_from_3.x.html","troubleshooting":"troubleshooting.html","contributing":"contributing.html"}}},"tutorials":[{"name":"How to create a Token Factory with Ethereum — Part 1","description":"Create and Deploy a Token with Ethereum","link":"/tutorials/token_factory_1.html","tags":["token","ethereum"]},{"name":"How to create a Token Factory with Ethereum — Part 2","description":"Create a DApp that can deploy Tokens on the fly","link":"/tutorials/token_factory_2.html","tags":["token","ethereum","client-side-deployment"]},{"name":"How to deploy to a testnet with Infura","description":"Deploy and interact with your Dapp on a testnet with the use of Infura","link":"/tutorials/infura_guide.html","tags":["ethereum","deployment","testnet"]}],"plugins":[{"name":"embark-bamboo","description":"plugins_page.plugins.bamboo.desc","link":"https://www.npmjs.com/package/embark-bamboo","thumbnail":"bamboo.png","tags":["language","smart-contracts"]},{"name":"embark-solc","description":"plugins_page.plugins.solc.desc","link":"https://www.npmjs.com/package/embark-solc","thumbnail":"solidity.png","tags":["solidity","language","smart-contracts"]},{"name":"embark-solium","description":"plugins_page.plugins.solium.desc","link":"https://www.npmjs.com/package/embark-solium","thumbnail":"solium.png","tags":["linter","solidity","solium"]},{"name":"embark-etherscan-verifier","description":"plugins_page.plugins.verifier.desc","link":"https://www.npmjs.com/package/embark-etherscan-verifier","tags":["solidity","etherscan","smart-contracts"]},{"name":"embark-status","description":"plugins_page.plugins.status.desc","link":"https://www.npmjs.com/package/embark-status-plugin","thumbnail":"status.png","tags":["status","mobile"]},{"name":"embark-remix","description":"plugins_page.plugins.remix.desc","link":"https://www.npmjs.com/package/embark-remix","thumbnail":"remix.png","tags":["remix","debugger"]},{"name":"embark-slither","description":"plugins_page.plugins.slither.desc","link":"https://www.npmjs.com/package/embark-slither","tags":["solidity"]},{"name":"embark-snark","description":"plugins_page.plugins.snark.desc","link":"https://www.npmjs.com/package/embark-snark","tags":["snark"]},{"name":"embark-fortune","description":"plugins_page.plugins.fortune.desc","link":"https://www.npmjs.com/package/embark-fortune","thumbnail":"fortune.jpg","tags":["fun"]},{"name":"embark-pug","description":"plugins_page.plugins.pug.desc","link":"https://www.npmjs.com/package/embark-pug","legacy":true,"thumbnail":"pug.png","tags":["pug","jade","templates"]},{"name":"embark-haml","description":"plugins_page.plugins.haml.desc","link":"https://www.npmjs.com/package/embark-haml","legacy":true,"thumbnail":"haml.png","tags":["haml","templates"]},{"name":"embark-mythx","description":"plugins_page.plugins.mythx.desc","link":"https://www.npmjs.com/package/embark-mythx","thumbnail":"mythx.png","tags":["mythx","smart-contracts"]}],"templates":[{"name":"Vyper Template","description":"Template to demonstrate the use of the Vyper contracts","install":"embark new AppName --template vyper","thumbnail":"vyper.png","link":"https://github.com/embarklabs/embark-vyper-template","tags":["vyper","contracts"]},{"name":"Embark Demo React Template","description":"A React Application showcasing Embark's functionality","install":"embark demo","thumbnail":"react.png","link":"https://framework.embarklabs.io/docs/create_project.html#Creating-a-Demo-Project","tags":["react","contracts","whisper","ipfs"]},{"name":"Typescript Template","description":"Template with Typescript support pre-configured","thumbnail":"typescript.png","install":"embark new AppName --template typescript","link":"https://github.com/embarklabs/embark-typescript-template","tags":["typescript","frontend"]},{"name":"Vue.js Template","description":"Ready to use Template for using Embark with vue.js","thumbnail":"vuejs.png","install":"embark new AppName --template vue","link":"https://github.com/embarklabs/embark-vue-template","tags":["vue.js","frontend"]},{"name":"ethvtx Template","description":"Demo app for ethvtx, an Ethereum-Ready & Framework-Agnostic Redux configuration","thumbnail":"vortex.png","install":"embark new AppName --template Horyus/ethvtx_embark","link":"https://github.com/Horyus/ethvtx_embark","tags":["react"]},{"name":"Bamboo Template","description":"Template to demonstrate use of the Bamboo contracts","install":"embark new AppName --template bamboo","thumbnail":"bamboo.png","link":"https://github.com/embarklabs/embark-bamboo-template","tags":["bamboo","contracts"]},{"name":"Solidity Gas Golfing","description":"Boilerplate and tests for the first Solidity Gas Golfing Contest","thumbnail":"sggc.png","install":"embark new AppName --template embarklabs/sggc","link":"https://github.com/embarklabs/sggc","tags":["solidity","tests","fun"]}],"versions":{"latest":{"label":"stable (v4)","url":"https://framework.embarklabs.io/docs"},"3.2":{"label":"v3.2","url":"https://5ca4e0fdb29712000adde37f--embark-site-versions.netlify.com/docs/"}}}},"excerpt":"","more":""},{"title":"community_page.header.title","tagline":"community_page.header.tagline","link":{"text":"community_page.header.link","href":"https://gitter.im/embark-framework/Lobby"},"layout":"community","_content":"","source":"community/index.md","raw":"title: community_page.header.title\ntagline: community_page.header.tagline\nlink:\n text: community_page.header.link\n href: https://gitter.im/embark-framework/Lobby\nlayout: community\n---\n","date":"2020-01-30T14:39:39.128Z","updated":"2020-01-30T14:39:39.128Z","path":"community/index.html","comments":1,"_id":"ck6axlf8p0002xeeg1ea15gmk","content":"","site":{"data":{"authors":{"iuri_matias":{"name":"Iuri Matias","twitter":"iurimatias","image":"https://pbs.twimg.com/profile_images/928272512181563392/iDJdvy2k_400x400.jpg"},"pascal_precht":{"name":"Pascal Precht","twitter":"pascalprecht","image":"https://pbs.twimg.com/profile_images/993785060733194241/p3oAIMDP_400x400.jpg"},"anthony_laibe":{"name":"Anthony Laibe","twitter":"a_laibe","image":"https://pbs.twimg.com/profile_images/257742900/13168239_400x400.jpg"},"jonathan_rainville":{"name":"Jonathan Rainville","twitter":"ShyolGhul","image":"https://pbs.twimg.com/profile_images/993873866878570496/-aE4byjj_400x400.jpg"},"andre_medeiros":{"name":"Andre Medeiros","twitter":"superdealloc","image":"https://pbs.twimg.com/profile_images/965722487735701504/m58KNgWN_400x400.jpg"},"eric_mastro":{"name":"Eric Mastro","twitter":"ericmastro","image":"https://avatars1.githubusercontent.com/u/5089238?s=460&v=4"},"michael_bradley":{"name":"Michael Bradley","image":"https://avatars3.githubusercontent.com/u/194260?s=460&v=4"},"richard_ramos":{"name":"Richard Ramos","twitter":"richardramos_me","image":"https://pbs.twimg.com/profile_images/1063160577973866496/aM313uHG_400x400.jpg"},"jonny_zerah":{"name":"Jonny Zerah","twitter":"jonnyzerah","image":"https://pbs.twimg.com/profile_images/1043774340490248192/gI9aGy17_400x400.jpg"},"robin_percy":{"name":"Robin Percy","twitter":"rbin","image":"https://avatars1.githubusercontent.com/u/29288325?s=400&v=4"}},"categories":{"tutorials":"Tutorials","announcements":"Announcements"},"languages":{"en":"English"},"menu":{"docs":"/docs/","plugins":"/plugins/","chat":"/chat/","blog":"/news/"},"sidebar":{"docs":{"getting_started":{"overview":"overview.html","installation":"installation.html","faq":"faq.html"},"general_usage":{"creating_project":"create_project.html","structure":"structure.html","running_apps":"running_apps.html","dashboard":"dashboard.html","using_the_console":"using_the_console.html","environments":"environments.html","configuration":"configuration.html","pipeline_and_webpack":"pipeline_and_webpack.html","javascript_usage":"javascript_usage.html"},"smart_contracts":{"contracts_configuration":"contracts_configuration.html","contracts_deployment":"contracts_deployment.html","contracts_imports":"contracts_imports.html","contracts_testing":"contracts_testing.html","contracts_javascript":"contracts_javascript.html"},"blockchain_node":{"blockchain_configuration":"blockchain_configuration.html","blockchain_accounts_configuration":"blockchain_accounts_configuration.html"},"storage":{"storage_configuration":"storage_configuration.html","storage_deployment":"storage_deployment.html","storage_javascript":"storage_javascript.html"},"messages":{"messages_configuration":"messages_configuration.html","messages_javascript":"messages_javascript.html"},"naming":{"naming_configuration":"naming_configuration.html","naming_javascript":"naming_javascript.html"},"plugins":{"installing_a_plugin":"installing_plugins.html","creating_a_plugin":"creating_plugins.html","plugin_reference":"plugin_reference.html"},"cockpit":{"cockpit_introduction":"cockpit_introduction.html","cockpit_dashboard":"cockpit_dashboard.html","cockpit_deployment":"cockpit_deployment.html","cockpit_explorer":"cockpit_explorer.html","cockpit_editor":"cockpit_editor.html","cockpit_debugger":"cockpit_debugger.html"},"reference":{"embark_commands":"embark_commands.html"},"miscellaneous":{"migrating_from_3":"migrating_from_3.x.html","troubleshooting":"troubleshooting.html","contributing":"contributing.html"}}},"tutorials":[{"name":"How to create a Token Factory with Ethereum — Part 1","description":"Create and Deploy a Token with Ethereum","link":"/tutorials/token_factory_1.html","tags":["token","ethereum"]},{"name":"How to create a Token Factory with Ethereum — Part 2","description":"Create a DApp that can deploy Tokens on the fly","link":"/tutorials/token_factory_2.html","tags":["token","ethereum","client-side-deployment"]},{"name":"How to deploy to a testnet with Infura","description":"Deploy and interact with your Dapp on a testnet with the use of Infura","link":"/tutorials/infura_guide.html","tags":["ethereum","deployment","testnet"]}],"plugins":[{"name":"embark-bamboo","description":"plugins_page.plugins.bamboo.desc","link":"https://www.npmjs.com/package/embark-bamboo","thumbnail":"bamboo.png","tags":["language","smart-contracts"]},{"name":"embark-solc","description":"plugins_page.plugins.solc.desc","link":"https://www.npmjs.com/package/embark-solc","thumbnail":"solidity.png","tags":["solidity","language","smart-contracts"]},{"name":"embark-solium","description":"plugins_page.plugins.solium.desc","link":"https://www.npmjs.com/package/embark-solium","thumbnail":"solium.png","tags":["linter","solidity","solium"]},{"name":"embark-etherscan-verifier","description":"plugins_page.plugins.verifier.desc","link":"https://www.npmjs.com/package/embark-etherscan-verifier","tags":["solidity","etherscan","smart-contracts"]},{"name":"embark-status","description":"plugins_page.plugins.status.desc","link":"https://www.npmjs.com/package/embark-status-plugin","thumbnail":"status.png","tags":["status","mobile"]},{"name":"embark-remix","description":"plugins_page.plugins.remix.desc","link":"https://www.npmjs.com/package/embark-remix","thumbnail":"remix.png","tags":["remix","debugger"]},{"name":"embark-slither","description":"plugins_page.plugins.slither.desc","link":"https://www.npmjs.com/package/embark-slither","tags":["solidity"]},{"name":"embark-snark","description":"plugins_page.plugins.snark.desc","link":"https://www.npmjs.com/package/embark-snark","tags":["snark"]},{"name":"embark-fortune","description":"plugins_page.plugins.fortune.desc","link":"https://www.npmjs.com/package/embark-fortune","thumbnail":"fortune.jpg","tags":["fun"]},{"name":"embark-pug","description":"plugins_page.plugins.pug.desc","link":"https://www.npmjs.com/package/embark-pug","legacy":true,"thumbnail":"pug.png","tags":["pug","jade","templates"]},{"name":"embark-haml","description":"plugins_page.plugins.haml.desc","link":"https://www.npmjs.com/package/embark-haml","legacy":true,"thumbnail":"haml.png","tags":["haml","templates"]},{"name":"embark-mythx","description":"plugins_page.plugins.mythx.desc","link":"https://www.npmjs.com/package/embark-mythx","thumbnail":"mythx.png","tags":["mythx","smart-contracts"]}],"templates":[{"name":"Vyper Template","description":"Template to demonstrate the use of the Vyper contracts","install":"embark new AppName --template vyper","thumbnail":"vyper.png","link":"https://github.com/embarklabs/embark-vyper-template","tags":["vyper","contracts"]},{"name":"Embark Demo React Template","description":"A React Application showcasing Embark's functionality","install":"embark demo","thumbnail":"react.png","link":"https://framework.embarklabs.io/docs/create_project.html#Creating-a-Demo-Project","tags":["react","contracts","whisper","ipfs"]},{"name":"Typescript Template","description":"Template with Typescript support pre-configured","thumbnail":"typescript.png","install":"embark new AppName --template typescript","link":"https://github.com/embarklabs/embark-typescript-template","tags":["typescript","frontend"]},{"name":"Vue.js Template","description":"Ready to use Template for using Embark with vue.js","thumbnail":"vuejs.png","install":"embark new AppName --template vue","link":"https://github.com/embarklabs/embark-vue-template","tags":["vue.js","frontend"]},{"name":"ethvtx Template","description":"Demo app for ethvtx, an Ethereum-Ready & Framework-Agnostic Redux configuration","thumbnail":"vortex.png","install":"embark new AppName --template Horyus/ethvtx_embark","link":"https://github.com/Horyus/ethvtx_embark","tags":["react"]},{"name":"Bamboo Template","description":"Template to demonstrate use of the Bamboo contracts","install":"embark new AppName --template bamboo","thumbnail":"bamboo.png","link":"https://github.com/embarklabs/embark-bamboo-template","tags":["bamboo","contracts"]},{"name":"Solidity Gas Golfing","description":"Boilerplate and tests for the first Solidity Gas Golfing Contest","thumbnail":"sggc.png","install":"embark new AppName --template embarklabs/sggc","link":"https://github.com/embarklabs/sggc","tags":["solidity","tests","fun"]}],"versions":{"latest":{"label":"stable (v4)","url":"https://framework.embarklabs.io/docs"},"3.2":{"label":"v3.2","url":"https://5ca4e0fdb29712000adde37f--embark-site-versions.netlify.com/docs/"}}}},"excerpt":"","more":""},{"title":"Chat","layout":"chat","_content":"\n<p>\n Join us at <a href=\"https://gitter.im/embark-framework/Lobby\">gitter.im/embark-framework/Lobby</a>\n</p>\n<iframe src=\"https://gitter.im/embark-framework/Lobby/~embed\" style=\"width: 100%; height: 800px; border: 1px solid black\"></iframe>\n\n","source":"chat/index.md","raw":"title: Chat\nlayout: chat\n---\n\n<p>\n Join us at <a href=\"https://gitter.im/embark-framework/Lobby\">gitter.im/embark-framework/Lobby</a>\n</p>\n<iframe src=\"https://gitter.im/embark-framework/Lobby/~embed\" style=\"width: 100%; height: 800px; border: 1px solid black\"></iframe>\n\n","date":"2020-01-30T14:39:39.128Z","updated":"2020-01-30T14:39:39.128Z","path":"chat/index.html","comments":1,"_id":"ck6axlf8v0005xeeganam96no","content":"<p>\n Join us at <a href=\"https://gitter.im/embark-framework/Lobby\" target=\"_blank\" rel=\"noopener\">gitter.im/embark-framework/Lobby</a>\n</p>\n<iframe src=\"https://gitter.im/embark-framework/Lobby/~embed\" style=\"width: 100%; height: 800px; border: 1px solid black\"></iframe>\n\n","site":{"data":{"authors":{"iuri_matias":{"name":"Iuri Matias","twitter":"iurimatias","image":"https://pbs.twimg.com/profile_images/928272512181563392/iDJdvy2k_400x400.jpg"},"pascal_precht":{"name":"Pascal Precht","twitter":"pascalprecht","image":"https://pbs.twimg.com/profile_images/993785060733194241/p3oAIMDP_400x400.jpg"},"anthony_laibe":{"name":"Anthony Laibe","twitter":"a_laibe","image":"https://pbs.twimg.com/profile_images/257742900/13168239_400x400.jpg"},"jonathan_rainville":{"name":"Jonathan Rainville","twitter":"ShyolGhul","image":"https://pbs.twimg.com/profile_images/993873866878570496/-aE4byjj_400x400.jpg"},"andre_medeiros":{"name":"Andre Medeiros","twitter":"superdealloc","image":"https://pbs.twimg.com/profile_images/965722487735701504/m58KNgWN_400x400.jpg"},"eric_mastro":{"name":"Eric Mastro","twitter":"ericmastro","image":"https://avatars1.githubusercontent.com/u/5089238?s=460&v=4"},"michael_bradley":{"name":"Michael Bradley","image":"https://avatars3.githubusercontent.com/u/194260?s=460&v=4"},"richard_ramos":{"name":"Richard Ramos","twitter":"richardramos_me","image":"https://pbs.twimg.com/profile_images/1063160577973866496/aM313uHG_400x400.jpg"},"jonny_zerah":{"name":"Jonny Zerah","twitter":"jonnyzerah","image":"https://pbs.twimg.com/profile_images/1043774340490248192/gI9aGy17_400x400.jpg"},"robin_percy":{"name":"Robin Percy","twitter":"rbin","image":"https://avatars1.githubusercontent.com/u/29288325?s=400&v=4"}},"categories":{"tutorials":"Tutorials","announcements":"Announcements"},"languages":{"en":"English"},"menu":{"docs":"/docs/","plugins":"/plugins/","chat":"/chat/","blog":"/news/"},"sidebar":{"docs":{"getting_started":{"overview":"overview.html","installation":"installation.html","faq":"faq.html"},"general_usage":{"creating_project":"create_project.html","structure":"structure.html","running_apps":"running_apps.html","dashboard":"dashboard.html","using_the_console":"using_the_console.html","environments":"environments.html","configuration":"configuration.html","pipeline_and_webpack":"pipeline_and_webpack.html","javascript_usage":"javascript_usage.html"},"smart_contracts":{"contracts_configuration":"contracts_configuration.html","contracts_deployment":"contracts_deployment.html","contracts_imports":"contracts_imports.html","contracts_testing":"contracts_testing.html","contracts_javascript":"contracts_javascript.html"},"blockchain_node":{"blockchain_configuration":"blockchain_configuration.html","blockchain_accounts_configuration":"blockchain_accounts_configuration.html"},"storage":{"storage_configuration":"storage_configuration.html","storage_deployment":"storage_deployment.html","storage_javascript":"storage_javascript.html"},"messages":{"messages_configuration":"messages_configuration.html","messages_javascript":"messages_javascript.html"},"naming":{"naming_configuration":"naming_configuration.html","naming_javascript":"naming_javascript.html"},"plugins":{"installing_a_plugin":"installing_plugins.html","creating_a_plugin":"creating_plugins.html","plugin_reference":"plugin_reference.html"},"cockpit":{"cockpit_introduction":"cockpit_introduction.html","cockpit_dashboard":"cockpit_dashboard.html","cockpit_deployment":"cockpit_deployment.html","cockpit_explorer":"cockpit_explorer.html","cockpit_editor":"cockpit_editor.html","cockpit_debugger":"cockpit_debugger.html"},"reference":{"embark_commands":"embark_commands.html"},"miscellaneous":{"migrating_from_3":"migrating_from_3.x.html","troubleshooting":"troubleshooting.html","contributing":"contributing.html"}}},"tutorials":[{"name":"How to create a Token Factory with Ethereum — Part 1","description":"Create and Deploy a Token with Ethereum","link":"/tutorials/token_factory_1.html","tags":["token","ethereum"]},{"name":"How to create a Token Factory with Ethereum — Part 2","description":"Create a DApp that can deploy Tokens on the fly","link":"/tutorials/token_factory_2.html","tags":["token","ethereum","client-side-deployment"]},{"name":"How to deploy to a testnet with Infura","description":"Deploy and interact with your Dapp on a testnet with the use of Infura","link":"/tutorials/infura_guide.html","tags":["ethereum","deployment","testnet"]}],"plugins":[{"name":"embark-bamboo","description":"plugins_page.plugins.bamboo.desc","link":"https://www.npmjs.com/package/embark-bamboo","thumbnail":"bamboo.png","tags":["language","smart-contracts"]},{"name":"embark-solc","description":"plugins_page.plugins.solc.desc","link":"https://www.npmjs.com/package/embark-solc","thumbnail":"solidity.png","tags":["solidity","language","smart-contracts"]},{"name":"embark-solium","description":"plugins_page.plugins.solium.desc","link":"https://www.npmjs.com/package/embark-solium","thumbnail":"solium.png","tags":["linter","solidity","solium"]},{"name":"embark-etherscan-verifier","description":"plugins_page.plugins.verifier.desc","link":"https://www.npmjs.com/package/embark-etherscan-verifier","tags":["solidity","etherscan","smart-contracts"]},{"name":"embark-status","description":"plugins_page.plugins.status.desc","link":"https://www.npmjs.com/package/embark-status-plugin","thumbnail":"status.png","tags":["status","mobile"]},{"name":"embark-remix","description":"plugins_page.plugins.remix.desc","link":"https://www.npmjs.com/package/embark-remix","thumbnail":"remix.png","tags":["remix","debugger"]},{"name":"embark-slither","description":"plugins_page.plugins.slither.desc","link":"https://www.npmjs.com/package/embark-slither","tags":["solidity"]},{"name":"embark-snark","description":"plugins_page.plugins.snark.desc","link":"https://www.npmjs.com/package/embark-snark","tags":["snark"]},{"name":"embark-fortune","description":"plugins_page.plugins.fortune.desc","link":"https://www.npmjs.com/package/embark-fortune","thumbnail":"fortune.jpg","tags":["fun"]},{"name":"embark-pug","description":"plugins_page.plugins.pug.desc","link":"https://www.npmjs.com/package/embark-pug","legacy":true,"thumbnail":"pug.png","tags":["pug","jade","templates"]},{"name":"embark-haml","description":"plugins_page.plugins.haml.desc","link":"https://www.npmjs.com/package/embark-haml","legacy":true,"thumbnail":"haml.png","tags":["haml","templates"]},{"name":"embark-mythx","description":"plugins_page.plugins.mythx.desc","link":"https://www.npmjs.com/package/embark-mythx","thumbnail":"mythx.png","tags":["mythx","smart-contracts"]}],"templates":[{"name":"Vyper Template","description":"Template to demonstrate the use of the Vyper contracts","install":"embark new AppName --template vyper","thumbnail":"vyper.png","link":"https://github.com/embarklabs/embark-vyper-template","tags":["vyper","contracts"]},{"name":"Embark Demo React Template","description":"A React Application showcasing Embark's functionality","install":"embark demo","thumbnail":"react.png","link":"https://framework.embarklabs.io/docs/create_project.html#Creating-a-Demo-Project","tags":["react","contracts","whisper","ipfs"]},{"name":"Typescript Template","description":"Template with Typescript support pre-configured","thumbnail":"typescript.png","install":"embark new AppName --template typescript","link":"https://github.com/embarklabs/embark-typescript-template","tags":["typescript","frontend"]},{"name":"Vue.js Template","description":"Ready to use Template for using Embark with vue.js","thumbnail":"vuejs.png","install":"embark new AppName --template vue","link":"https://github.com/embarklabs/embark-vue-template","tags":["vue.js","frontend"]},{"name":"ethvtx Template","description":"Demo app for ethvtx, an Ethereum-Ready & Framework-Agnostic Redux configuration","thumbnail":"vortex.png","install":"embark new AppName --template Horyus/ethvtx_embark","link":"https://github.com/Horyus/ethvtx_embark","tags":["react"]},{"name":"Bamboo Template","description":"Template to demonstrate use of the Bamboo contracts","install":"embark new AppName --template bamboo","thumbnail":"bamboo.png","link":"https://github.com/embarklabs/embark-bamboo-template","tags":["bamboo","contracts"]},{"name":"Solidity Gas Golfing","description":"Boilerplate and tests for the first Solidity Gas Golfing Contest","thumbnail":"sggc.png","install":"embark new AppName --template embarklabs/sggc","link":"https://github.com/embarklabs/sggc","tags":["solidity","tests","fun"]}],"versions":{"latest":{"label":"stable (v4)","url":"https://framework.embarklabs.io/docs"},"3.2":{"label":"v3.2","url":"https://5ca4e0fdb29712000adde37f--embark-site-versions.netlify.com/docs/"}}}},"excerpt":"","more":"<p>\n Join us at <a href=\"https://gitter.im/embark-framework/Lobby\" target=\"_blank\" rel=\"noopener\">gitter.im/embark-framework/Lobby</a>\n</p>\n<iframe src=\"https://gitter.im/embark-framework/Lobby/~embed\" style=\"width: 100%; height: 800px; border: 1px solid black\"></iframe>\n\n"},{"title":"Embark Labs Blog","tagline":"blog.header.tagline","layout":"blog","_content":"","source":"news/index.md","raw":"title: \"Embark Labs Blog\"\ntagline: blog.header.tagline\nlayout: blog\n---\n","date":"2020-01-30T15:44:21.688Z","updated":"2020-01-30T15:44:21.688Z","path":"news/index.html","comments":1,"_id":"ck6axlfas0026xeega4vm199v","content":"","site":{"data":{"authors":{"iuri_matias":{"name":"Iuri Matias","twitter":"iurimatias","image":"https://pbs.twimg.com/profile_images/928272512181563392/iDJdvy2k_400x400.jpg"},"pascal_precht":{"name":"Pascal Precht","twitter":"pascalprecht","image":"https://pbs.twimg.com/profile_images/993785060733194241/p3oAIMDP_400x400.jpg"},"anthony_laibe":{"name":"Anthony Laibe","twitter":"a_laibe","image":"https://pbs.twimg.com/profile_images/257742900/13168239_400x400.jpg"},"jonathan_rainville":{"name":"Jonathan Rainville","twitter":"ShyolGhul","image":"https://pbs.twimg.com/profile_images/993873866878570496/-aE4byjj_400x400.jpg"},"andre_medeiros":{"name":"Andre Medeiros","twitter":"superdealloc","image":"https://pbs.twimg.com/profile_images/965722487735701504/m58KNgWN_400x400.jpg"},"eric_mastro":{"name":"Eric Mastro","twitter":"ericmastro","image":"https://avatars1.githubusercontent.com/u/5089238?s=460&v=4"},"michael_bradley":{"name":"Michael Bradley","image":"https://avatars3.githubusercontent.com/u/194260?s=460&v=4"},"richard_ramos":{"name":"Richard Ramos","twitter":"richardramos_me","image":"https://pbs.twimg.com/profile_images/1063160577973866496/aM313uHG_400x400.jpg"},"jonny_zerah":{"name":"Jonny Zerah","twitter":"jonnyzerah","image":"https://pbs.twimg.com/profile_images/1043774340490248192/gI9aGy17_400x400.jpg"},"robin_percy":{"name":"Robin Percy","twitter":"rbin","image":"https://avatars1.githubusercontent.com/u/29288325?s=400&v=4"}},"categories":{"tutorials":"Tutorials","announcements":"Announcements"},"languages":{"en":"English"},"menu":{"docs":"/docs/","plugins":"/plugins/","chat":"/chat/","blog":"/news/"},"sidebar":{"docs":{"getting_started":{"overview":"overview.html","installation":"installation.html","faq":"faq.html"},"general_usage":{"creating_project":"create_project.html","structure":"structure.html","running_apps":"running_apps.html","dashboard":"dashboard.html","using_the_console":"using_the_console.html","environments":"environments.html","configuration":"configuration.html","pipeline_and_webpack":"pipeline_and_webpack.html","javascript_usage":"javascript_usage.html"},"smart_contracts":{"contracts_configuration":"contracts_configuration.html","contracts_deployment":"contracts_deployment.html","contracts_imports":"contracts_imports.html","contracts_testing":"contracts_testing.html","contracts_javascript":"contracts_javascript.html"},"blockchain_node":{"blockchain_configuration":"blockchain_configuration.html","blockchain_accounts_configuration":"blockchain_accounts_configuration.html"},"storage":{"storage_configuration":"storage_configuration.html","storage_deployment":"storage_deployment.html","storage_javascript":"storage_javascript.html"},"messages":{"messages_configuration":"messages_configuration.html","messages_javascript":"messages_javascript.html"},"naming":{"naming_configuration":"naming_configuration.html","naming_javascript":"naming_javascript.html"},"plugins":{"installing_a_plugin":"installing_plugins.html","creating_a_plugin":"creating_plugins.html","plugin_reference":"plugin_reference.html"},"cockpit":{"cockpit_introduction":"cockpit_introduction.html","cockpit_dashboard":"cockpit_dashboard.html","cockpit_deployment":"cockpit_deployment.html","cockpit_explorer":"cockpit_explorer.html","cockpit_editor":"cockpit_editor.html","cockpit_debugger":"cockpit_debugger.html"},"reference":{"embark_commands":"embark_commands.html"},"miscellaneous":{"migrating_from_3":"migrating_from_3.x.html","troubleshooting":"troubleshooting.html","contributing":"contributing.html"}}},"tutorials":[{"name":"How to create a Token Factory with Ethereum — Part 1","description":"Create and Deploy a Token with Ethereum","link":"/tutorials/token_factory_1.html","tags":["token","ethereum"]},{"name":"How to create a Token Factory with Ethereum — Part 2","description":"Create a DApp that can deploy Tokens on the fly","link":"/tutorials/token_factory_2.html","tags":["token","ethereum","client-side-deployment"]},{"name":"How to deploy to a testnet with Infura","description":"Deploy and interact with your Dapp on a testnet with the use of Infura","link":"/tutorials/infura_guide.html","tags":["ethereum","deployment","testnet"]}],"plugins":[{"name":"embark-bamboo","description":"plugins_page.plugins.bamboo.desc","link":"https://www.npmjs.com/package/embark-bamboo","thumbnail":"bamboo.png","tags":["language","smart-contracts"]},{"name":"embark-solc","description":"plugins_page.plugins.solc.desc","link":"https://www.npmjs.com/package/embark-solc","thumbnail":"solidity.png","tags":["solidity","language","smart-contracts"]},{"name":"embark-solium","description":"plugins_page.plugins.solium.desc","link":"https://www.npmjs.com/package/embark-solium","thumbnail":"solium.png","tags":["linter","solidity","solium"]},{"name":"embark-etherscan-verifier","description":"plugins_page.plugins.verifier.desc","link":"https://www.npmjs.com/package/embark-etherscan-verifier","tags":["solidity","etherscan","smart-contracts"]},{"name":"embark-status","description":"plugins_page.plugins.status.desc","link":"https://www.npmjs.com/package/embark-status-plugin","thumbnail":"status.png","tags":["status","mobile"]},{"name":"embark-remix","description":"plugins_page.plugins.remix.desc","link":"https://www.npmjs.com/package/embark-remix","thumbnail":"remix.png","tags":["remix","debugger"]},{"name":"embark-slither","description":"plugins_page.plugins.slither.desc","link":"https://www.npmjs.com/package/embark-slither","tags":["solidity"]},{"name":"embark-snark","description":"plugins_page.plugins.snark.desc","link":"https://www.npmjs.com/package/embark-snark","tags":["snark"]},{"name":"embark-fortune","description":"plugins_page.plugins.fortune.desc","link":"https://www.npmjs.com/package/embark-fortune","thumbnail":"fortune.jpg","tags":["fun"]},{"name":"embark-pug","description":"plugins_page.plugins.pug.desc","link":"https://www.npmjs.com/package/embark-pug","legacy":true,"thumbnail":"pug.png","tags":["pug","jade","templates"]},{"name":"embark-haml","description":"plugins_page.plugins.haml.desc","link":"https://www.npmjs.com/package/embark-haml","legacy":true,"thumbnail":"haml.png","tags":["haml","templates"]},{"name":"embark-mythx","description":"plugins_page.plugins.mythx.desc","link":"https://www.npmjs.com/package/embark-mythx","thumbnail":"mythx.png","tags":["mythx","smart-contracts"]}],"templates":[{"name":"Vyper Template","description":"Template to demonstrate the use of the Vyper contracts","install":"embark new AppName --template vyper","thumbnail":"vyper.png","link":"https://github.com/embarklabs/embark-vyper-template","tags":["vyper","contracts"]},{"name":"Embark Demo React Template","description":"A React Application showcasing Embark's functionality","install":"embark demo","thumbnail":"react.png","link":"https://framework.embarklabs.io/docs/create_project.html#Creating-a-Demo-Project","tags":["react","contracts","whisper","ipfs"]},{"name":"Typescript Template","description":"Template with Typescript support pre-configured","thumbnail":"typescript.png","install":"embark new AppName --template typescript","link":"https://github.com/embarklabs/embark-typescript-template","tags":["typescript","frontend"]},{"name":"Vue.js Template","description":"Ready to use Template for using Embark with vue.js","thumbnail":"vuejs.png","install":"embark new AppName --template vue","link":"https://github.com/embarklabs/embark-vue-template","tags":["vue.js","frontend"]},{"name":"ethvtx Template","description":"Demo app for ethvtx, an Ethereum-Ready & Framework-Agnostic Redux configuration","thumbnail":"vortex.png","install":"embark new AppName --template Horyus/ethvtx_embark","link":"https://github.com/Horyus/ethvtx_embark","tags":["react"]},{"name":"Bamboo Template","description":"Template to demonstrate use of the Bamboo contracts","install":"embark new AppName --template bamboo","thumbnail":"bamboo.png","link":"https://github.com/embarklabs/embark-bamboo-template","tags":["bamboo","contracts"]},{"name":"Solidity Gas Golfing","description":"Boilerplate and tests for the first Solidity Gas Golfing Contest","thumbnail":"sggc.png","install":"embark new AppName --template embarklabs/sggc","link":"https://github.com/embarklabs/sggc","tags":["solidity","tests","fun"]}],"versions":{"latest":{"label":"stable (v4)","url":"https://framework.embarklabs.io/docs"},"3.2":{"label":"v3.2","url":"https://5ca4e0fdb29712000adde37f--embark-site-versions.netlify.com/docs/"}}}},"excerpt":"","more":""}],"Post":[{"title":"Embark 2.6.0 - web3.js 1.0, any version of web3.js & solc. Whisper 5 & much more","author":"iuri_matias","layout":"blog-post","_content":"\n## To Update to 2.6.0\n\nEmbark's npm package has changed from `embark-framework` to `embark`, this sometimes can create conflicts. To update, first uninstall embark-framework 1 to avoid any conflicts with `npm uninstall -g embark-framework` followed by `npm install -g embark`\n\nto update from 2.5.2:\n\n```\nnpm install -g embark@2.6\n```\n\nafterwards make sure `embark version` returns `2.6.0`.\n\n## In this release\n\nYou no longer need to wait for new releases of embark when a new version of web3.js or solc comes out as this can be now configured. Embark will take care of downloading and using the new versions. You can specify a list of nodes the dapp should attempt to connect to (instead of being limited 1). Whisper 5 is now supported.\n\n## Support for web3.js 1.0 and (nearly) ANY web3.js version\n\nEmbark now supports web3.js 1.0 by default, however you can now also specify exactly which version of web3.js you want to use so you can still use 0.19.0 or newer versions of 1.0.\n\nin config/contracts.json\n\n```\n{\n \"default\": {\n ....\n \"versions\": {\n \"web3.js\": \"1.0.0-beta\"\n }\n ...\n}\n```\n\nIf ,for example, you wish to use 0.19.0 you can specify it in the config as `\"web3.js\": \"0.19.0\"`\n\n## Support for ANY solc version\n\nYou can also configure the solc compiler you wish to use and it should work, so long that solc release does not contain breaking API changes.\n\n`config/contracts.json`\n\n```\n{\n \"default\": {\n ....\n \"versions\": {\n \"solc\": \"0.4.17\"\n }\n ...\n}\n```\n\n## Specify nodes DApp should attempt to connect to\n\nYou can specify which nodes your dapp should try to connect in each enviroment. \"$WEB3\" is a special keyword to specify the existing web3 object.\nThe following config would attempt to use the existing web3 object and if unavailable attempt to connect to localhost:8545\n\n`config/contracts.json`\n\n```\n{\n \"development\": {\n ...\n \"dappConnection\": [\n \"$WEB3\",\n \"http://localhost:8545\"\n ],\n ...\n}\n```\n\n## Specify node to deploy to\n\nBefore Embark would assume this would be the same as the one configured in blockchain.json which could lead to some ackward configs for some devs, this has now been changed so you can specify it in the contracts config.\n\n`config/contracts.json`\n\n```\n{\n \"development\": {\n ...\n \"deployment\": {\n \"host\": \"localhost\",\n \"port\": 8545,\n \"type\": \"rpc\"\n },\n ...\n}\n```\n\n## Specify node to connect whisper to\n\n`config/communication.json`\n```Javascript\n{\n \"default\": {\n \"enabled\": true,\n \"provider\": \"whisper\",\n \"available_providers\": [\"whisper\", \"orbit\"],\n \"connection\": {\n \"host\": \"localhost\",\n \"port\": 8546,\n \"type\": \"ws\"\n }\n }\n}\n```\n\n## Specify url to get assets\n\nYou can specify for each environment what IPFS node to get the assets from\n\n`config/storage.json`\n\n```Javascript\n{\n ...\n \"development\": {\n ....\n \"getUrl\": \"http://localhost:8080/ipfs/\"\n },\n ...\n \"livenet\": {\n ....\n \"getUrl\": \"https://gateway.ipfs.io/ipfs/\"\n }\n}\n```\n\n### Plugin API changes\n\n\n\nThe following events are deprecated: abi-vanila, abi, abi-contracts-vanila, abi-vanila-deployment and have been renamed to code-vanila, code, code-contracts-vanila, code-vanila-deployment\n\nplugins that use these events will get deprecation warnings, the deprecated events will be removed in 2.7.0\n\n\n### New Blockchain options\n\n\n\n\nThe following fields are now available at `config/blockchain.json` to enhance `embark blockchain`:\n\n* \"wsHost\" - to specify the websocket host (default: localhost)\n* \"wsPort\" - to specify the websocket port (default: 8546)\n* \"wsOrigins\"- to specify the allowed origin of the websocket requests (default: FALSE), must be specified to something like http://localhost:8000 for the websocket connection to work.\n* \"wsApi\" - to specify the apis available through websockets (default: ['eth', 'web3', 'net', 'shh'])\n\n### Misc Bugfixes and Improvements\n\n\n\n* tests no longer need the requires and initialization and can be run directly with embark. however you can still use these requires to run it yourself with mocha or your own preferred test framework\n* embark and mocha are no longer dependencies in the created dapp\n* you can specify a test file with `embark test <filename>`\n* tests no longer need testrpc to be installed first\n* `EmbarkJS.isNewWeb3()` to detect if web3 1.0 is available\n* demo app updated to use web3.js 1.0 and solc 0.4.17\n* warn user when websocket or http CORS is not set\n* tolerate solc compiler warnings, which could cause a crash sometimes\n\n\n### Thank you\n\nA big thanks to all that contributed to this release including [Todd Baur](https://github.com/toadkicker) and Jacob Beauchamp.\n\n### Chatroom\n\nTo discuss about Embark or Dapp development, please [join us at the gitter channel](https://gitter.im/iurimatias/embark-framework)\n\n\n","source":"_posts/2017-10-25-embark-2-6-released.md","raw":"title: Embark 2.6.0 - web3.js 1.0, any version of web3.js & solc. Whisper 5 & much more\nauthor: iuri_matias\ncategories:\n - announcements\nlayout: blog-post\n---\n\n## To Update to 2.6.0\n\nEmbark's npm package has changed from `embark-framework` to `embark`, this sometimes can create conflicts. To update, first uninstall embark-framework 1 to avoid any conflicts with `npm uninstall -g embark-framework` followed by `npm install -g embark`\n\nto update from 2.5.2:\n\n```\nnpm install -g embark@2.6\n```\n\nafterwards make sure `embark version` returns `2.6.0`.\n\n## In this release\n\nYou no longer need to wait for new releases of embark when a new version of web3.js or solc comes out as this can be now configured. Embark will take care of downloading and using the new versions. You can specify a list of nodes the dapp should attempt to connect to (instead of being limited 1). Whisper 5 is now supported.\n\n## Support for web3.js 1.0 and (nearly) ANY web3.js version\n\nEmbark now supports web3.js 1.0 by default, however you can now also specify exactly which version of web3.js you want to use so you can still use 0.19.0 or newer versions of 1.0.\n\nin config/contracts.json\n\n```\n{\n \"default\": {\n ....\n \"versions\": {\n \"web3.js\": \"1.0.0-beta\"\n }\n ...\n}\n```\n\nIf ,for example, you wish to use 0.19.0 you can specify it in the config as `\"web3.js\": \"0.19.0\"`\n\n## Support for ANY solc version\n\nYou can also configure the solc compiler you wish to use and it should work, so long that solc release does not contain breaking API changes.\n\n`config/contracts.json`\n\n```\n{\n \"default\": {\n ....\n \"versions\": {\n \"solc\": \"0.4.17\"\n }\n ...\n}\n```\n\n## Specify nodes DApp should attempt to connect to\n\nYou can specify which nodes your dapp should try to connect in each enviroment. \"$WEB3\" is a special keyword to specify the existing web3 object.\nThe following config would attempt to use the existing web3 object and if unavailable attempt to connect to localhost:8545\n\n`config/contracts.json`\n\n```\n{\n \"development\": {\n ...\n \"dappConnection\": [\n \"$WEB3\",\n \"http://localhost:8545\"\n ],\n ...\n}\n```\n\n## Specify node to deploy to\n\nBefore Embark would assume this would be the same as the one configured in blockchain.json which could lead to some ackward configs for some devs, this has now been changed so you can specify it in the contracts config.\n\n`config/contracts.json`\n\n```\n{\n \"development\": {\n ...\n \"deployment\": {\n \"host\": \"localhost\",\n \"port\": 8545,\n \"type\": \"rpc\"\n },\n ...\n}\n```\n\n## Specify node to connect whisper to\n\n`config/communication.json`\n```Javascript\n{\n \"default\": {\n \"enabled\": true,\n \"provider\": \"whisper\",\n \"available_providers\": [\"whisper\", \"orbit\"],\n \"connection\": {\n \"host\": \"localhost\",\n \"port\": 8546,\n \"type\": \"ws\"\n }\n }\n}\n```\n\n## Specify url to get assets\n\nYou can specify for each environment what IPFS node to get the assets from\n\n`config/storage.json`\n\n```Javascript\n{\n ...\n \"development\": {\n ....\n \"getUrl\": \"http://localhost:8080/ipfs/\"\n },\n ...\n \"livenet\": {\n ....\n \"getUrl\": \"https://gateway.ipfs.io/ipfs/\"\n }\n}\n```\n\n### Plugin API changes\n\n\n\nThe following events are deprecated: abi-vanila, abi, abi-contracts-vanila, abi-vanila-deployment and have been renamed to code-vanila, code, code-contracts-vanila, code-vanila-deployment\n\nplugins that use these events will get deprecation warnings, the deprecated events will be removed in 2.7.0\n\n\n### New Blockchain options\n\n\n\n\nThe following fields are now available at `config/blockchain.json` to enhance `embark blockchain`:\n\n* \"wsHost\" - to specify the websocket host (default: localhost)\n* \"wsPort\" - to specify the websocket port (default: 8546)\n* \"wsOrigins\"- to specify the allowed origin of the websocket requests (default: FALSE), must be specified to something like http://localhost:8000 for the websocket connection to work.\n* \"wsApi\" - to specify the apis available through websockets (default: ['eth', 'web3', 'net', 'shh'])\n\n### Misc Bugfixes and Improvements\n\n\n\n* tests no longer need the requires and initialization and can be run directly with embark. however you can still use these requires to run it yourself with mocha or your own preferred test framework\n* embark and mocha are no longer dependencies in the created dapp\n* you can specify a test file with `embark test <filename>`\n* tests no longer need testrpc to be installed first\n* `EmbarkJS.isNewWeb3()` to detect if web3 1.0 is available\n* demo app updated to use web3.js 1.0 and solc 0.4.17\n* warn user when websocket or http CORS is not set\n* tolerate solc compiler warnings, which could cause a crash sometimes\n\n\n### Thank you\n\nA big thanks to all that contributed to this release including [Todd Baur](https://github.com/toadkicker) and Jacob Beauchamp.\n\n### Chatroom\n\nTo discuss about Embark or Dapp development, please [join us at the gitter channel](https://gitter.im/iurimatias/embark-framework)\n\n\n","slug":"embark-2-6-released","published":1,"date":"2017-10-25T04:00:00.000Z","updated":"2020-03-03T14:55:55.018Z","_id":"ck6axlf8m0001xeegb99lg8qp","comments":1,"photos":[],"link":"","content":"<h2 id=\"To-Update-to-2-6-0\"><a href=\"#To-Update-to-2-6-0\" class=\"headerlink\" title=\"To Update to 2.6.0\"></a>To Update to 2.6.0</h2><p>Embark’s npm package has changed from <code>embark-framework</code> to <code>embark</code>, this sometimes can create conflicts. To update, first uninstall embark-framework 1 to avoid any conflicts with <code>npm uninstall -g embark-framework</code> followed by <code>npm install -g embark</code></p>\n<p>to update from 2.5.2:</p>\n<figure class=\"highlight plain\"><table><tr><td class=\"code\"><pre><span class=\"line\">npm install -g embark@2.6</span><br></pre></td></tr></table></figure>\n\n<p>afterwards make sure <code>embark version</code> returns <code>2.6.0</code>.</p>\n<h2 id=\"In-this-release\"><a href=\"#In-this-release\" class=\"headerlink\" title=\"In this release\"></a>In this release</h2><p>You no longer need to wait for new releases of embark when a new version of web3.js or solc comes out as this can be now configured. Embark will take care of downloading and using the new versions. You can specify a list of nodes the dapp should attempt to connect to (instead of being limited 1). Whisper 5 is now supported.</p>\n<h2 id=\"Support-for-web3-js-1-0-and-nearly-ANY-web3-js-version\"><a href=\"#Support-for-web3-js-1-0-and-nearly-ANY-web3-js-version\" class=\"headerlink\" title=\"Support for web3.js 1.0 and (nearly) ANY web3.js version\"></a>Support for web3.js 1.0 and (nearly) ANY web3.js version</h2><p>Embark now supports web3.js 1.0 by default, however you can now also specify exactly which version of web3.js you want to use so you can still use 0.19.0 or newer versions of 1.0.</p>\n<p>in config/contracts.json</p>\n<figure class=\"highlight plain\"><table><tr><td class=\"code\"><pre><span class=\"line\">{</span><br><span class=\"line\"> "default": {</span><br><span class=\"line\"> ....</span><br><span class=\"line\"> "versions": {</span><br><span class=\"line\"> "web3.js": "1.0.0-beta"</span><br><span class=\"line\"> }</span><br><span class=\"line\"> ...</span><br><span class=\"line\">}</span><br></pre></td></tr></table></figure>\n\n<p>If ,for example, you wish to use 0.19.0 you can specify it in the config as <code>"web3.js": "0.19.0"</code></p>\n<h2 id=\"Support-for-ANY-solc-version\"><a href=\"#Support-for-ANY-solc-version\" class=\"headerlink\" title=\"Support for ANY solc version\"></a>Support for ANY solc version</h2><p>You can also configure the solc compiler you wish to use and it should work, so long that solc release does not contain breaking API changes.</p>\n<p><code>config/contracts.json</code></p>\n<figure class=\"highlight plain\"><table><tr><td class=\"code\"><pre><span class=\"line\">{</span><br><span class=\"line\"> "default": {</span><br><span class=\"line\"> ....</span><br><span class=\"line\"> "versions": {</span><br><span class=\"line\"> "solc": "0.4.17"</span><br><span class=\"line\"> }</span><br><span class=\"line\"> ...</span><br><span class=\"line\">}</span><br></pre></td></tr></table></figure>\n\n<h2 id=\"Specify-nodes-DApp-should-attempt-to-connect-to\"><a href=\"#Specify-nodes-DApp-should-attempt-to-connect-to\" class=\"headerlink\" title=\"Specify nodes DApp should attempt to connect to\"></a>Specify nodes DApp should attempt to connect to</h2><p>You can specify which nodes your dapp should try to connect in each enviroment. “$WEB3” is a special keyword to specify the existing web3 object.<br>The following config would attempt to use the existing web3 object and if unavailable attempt to connect to localhost:8545</p>\n<p><code>config/contracts.json</code></p>\n<figure class=\"highlight plain\"><table><tr><td class=\"code\"><pre><span class=\"line\">{</span><br><span class=\"line\"> "development": {</span><br><span class=\"line\"> ...</span><br><span class=\"line\"> "dappConnection": [</span><br><span class=\"line\"> "$WEB3",</span><br><span class=\"line\"> "http://localhost:8545"</span><br><span class=\"line\"> ],</span><br><span class=\"line\"> ...</span><br><span class=\"line\">}</span><br></pre></td></tr></table></figure>\n\n<h2 id=\"Specify-node-to-deploy-to\"><a href=\"#Specify-node-to-deploy-to\" class=\"headerlink\" title=\"Specify node to deploy to\"></a>Specify node to deploy to</h2><p>Before Embark would assume this would be the same as the one configured in blockchain.json which could lead to some ackward configs for some devs, this has now been changed so you can specify it in the contracts config.</p>\n<p><code>config/contracts.json</code></p>\n<figure class=\"highlight plain\"><table><tr><td class=\"code\"><pre><span class=\"line\">{</span><br><span class=\"line\"> "development": {</span><br><span class=\"line\"> ...</span><br><span class=\"line\"> "deployment": {</span><br><span class=\"line\"> "host": "localhost",</span><br><span class=\"line\"> "port": 8545,</span><br><span class=\"line\"> "type": "rpc"</span><br><span class=\"line\"> },</span><br><span class=\"line\"> ...</span><br><span class=\"line\">}</span><br></pre></td></tr></table></figure>\n\n<h2 id=\"Specify-node-to-connect-whisper-to\"><a href=\"#Specify-node-to-connect-whisper-to\" class=\"headerlink\" title=\"Specify node to connect whisper to\"></a>Specify node to connect whisper to</h2><p><code>config/communication.json</code></p>\n<figure class=\"highlight javascript\"><table><tr><td class=\"code\"><pre><span class=\"line\">{</span><br><span class=\"line\"> <span class=\"string\">\"default\"</span>: {</span><br><span class=\"line\"> <span class=\"string\">\"enabled\"</span>: <span class=\"literal\">true</span>,</span><br><span class=\"line\"> <span class=\"string\">\"provider\"</span>: <span class=\"string\">\"whisper\"</span>,</span><br><span class=\"line\"> <span class=\"string\">\"available_providers\"</span>: [<span class=\"string\">\"whisper\"</span>, <span class=\"string\">\"orbit\"</span>],</span><br><span class=\"line\"> <span class=\"string\">\"connection\"</span>: {</span><br><span class=\"line\"> <span class=\"string\">\"host\"</span>: <span class=\"string\">\"localhost\"</span>,</span><br><span class=\"line\"> <span class=\"string\">\"port\"</span>: <span class=\"number\">8546</span>,</span><br><span class=\"line\"> <span class=\"string\">\"type\"</span>: <span class=\"string\">\"ws\"</span></span><br><span class=\"line\"> }</span><br><span class=\"line\"> }</span><br><span class=\"line\">}</span><br></pre></td></tr></table></figure>\n\n<h2 id=\"Specify-url-to-get-assets\"><a href=\"#Specify-url-to-get-assets\" class=\"headerlink\" title=\"Specify url to get assets\"></a>Specify url to get assets</h2><p>You can specify for each environment what IPFS node to get the assets from</p>\n<p><code>config/storage.json</code></p>\n<figure class=\"highlight javascript\"><table><tr><td class=\"code\"><pre><span class=\"line\">{</span><br><span class=\"line\"> ...</span><br><span class=\"line\"> <span class=\"string\">\"development\"</span>: {</span><br><span class=\"line\"> ....</span><br><span class=\"line\"> <span class=\"string\">\"getUrl\"</span>: <span class=\"string\">\"http://localhost:8080/ipfs/\"</span></span><br><span class=\"line\"> },</span><br><span class=\"line\"> ...</span><br><span class=\"line\"> <span class=\"string\">\"livenet\"</span>: {</span><br><span class=\"line\"> ....</span><br><span class=\"line\"> <span class=\"string\">\"getUrl\"</span>: <span class=\"string\">\"https://gateway.ipfs.io/ipfs/\"</span></span><br><span class=\"line\"> }</span><br><span class=\"line\">}</span><br></pre></td></tr></table></figure>\n\n<h3 id=\"Plugin-API-changes\"><a href=\"#Plugin-API-changes\" class=\"headerlink\" title=\"Plugin API changes\"></a>Plugin API changes</h3><p><img src=\"http://icons.iconarchive.com/icons/elegantthemes/beautiful-flat/128/plugin-icon.png\" alt=\"plugin\"></p>\n<p>The following events are deprecated: abi-vanila, abi, abi-contracts-vanila, abi-vanila-deployment and have been renamed to code-vanila, code, code-contracts-vanila, code-vanila-deployment</p>\n<p>plugins that use these events will get deprecation warnings, the deprecated events will be removed in 2.7.0</p>\n<h3 id=\"New-Blockchain-options\"><a href=\"#New-Blockchain-options\" class=\"headerlink\" title=\"New Blockchain options\"></a>New Blockchain options</h3><p><img src=\"https://dappsforbeginners.files.wordpress.com/2015/02/ethereum-logo.jpg?w=200\" alt=\"geth\"></p>\n<p>The following fields are now available at <code>config/blockchain.json</code> to enhance <code>embark blockchain</code>:</p>\n<ul>\n<li>“wsHost” - to specify the websocket host (default: localhost)</li>\n<li>“wsPort” - to specify the websocket port (default: 8546)</li>\n<li>“wsOrigins”- to specify the allowed origin of the websocket requests (default: FALSE), must be specified to something like <a href=\"http://localhost:8000\" target=\"_blank\" rel=\"noopener\">http://localhost:8000</a> for the websocket connection to work.</li>\n<li>“wsApi” - to specify the apis available through websockets (default: [‘eth’, ‘web3’, ‘net’, ‘shh’])</li>\n</ul>\n<h3 id=\"Misc-Bugfixes-and-Improvements\"><a href=\"#Misc-Bugfixes-and-Improvements\" class=\"headerlink\" title=\"Misc Bugfixes and Improvements\"></a>Misc Bugfixes and Improvements</h3><p><img src=\"http://i.imgur.com/L1r6Ac5.png\" alt=\"bug fixes\"></p>\n<ul>\n<li>tests no longer need the requires and initialization and can be run directly with embark. however you can still use these requires to run it yourself with mocha or your own preferred test framework</li>\n<li>embark and mocha are no longer dependencies in the created dapp</li>\n<li>you can specify a test file with <code>embark test <filename></code></li>\n<li>tests no longer need testrpc to be installed first</li>\n<li><code>EmbarkJS.isNewWeb3()</code> to detect if web3 1.0 is available</li>\n<li>demo app updated to use web3.js 1.0 and solc 0.4.17</li>\n<li>warn user when websocket or http CORS is not set</li>\n<li>tolerate solc compiler warnings, which could cause a crash sometimes</li>\n</ul>\n<h3 id=\"Thank-you\"><a href=\"#Thank-you\" class=\"headerlink\" title=\"Thank you\"></a>Thank you</h3><p>A big thanks to all that contributed to this release including <a href=\"https://github.com/toadkicker\" target=\"_blank\" rel=\"noopener\">Todd Baur</a> and Jacob Beauchamp.</p>\n<h3 id=\"Chatroom\"><a href=\"#Chatroom\" class=\"headerlink\" title=\"Chatroom\"></a>Chatroom</h3><p>To discuss about Embark or Dapp development, please <a href=\"https://gitter.im/iurimatias/embark-framework\" target=\"_blank\" rel=\"noopener\">join us at the gitter channel</a></p>\n","site":{"data":{"authors":{"iuri_matias":{"name":"Iuri Matias","twitter":"iurimatias","image":"https://pbs.twimg.com/profile_images/928272512181563392/iDJdvy2k_400x400.jpg"},"pascal_precht":{"name":"Pascal Precht","twitter":"pascalprecht","image":"https://pbs.twimg.com/profile_images/993785060733194241/p3oAIMDP_400x400.jpg"},"anthony_laibe":{"name":"Anthony Laibe","twitter":"a_laibe","image":"https://pbs.twimg.com/profile_images/257742900/13168239_400x400.jpg"},"jonathan_rainville":{"name":"Jonathan Rainville","twitter":"ShyolGhul","image":"https://pbs.twimg.com/profile_images/993873866878570496/-aE4byjj_400x400.jpg"},"andre_medeiros":{"name":"Andre Medeiros","twitter":"superdealloc","image":"https://pbs.twimg.com/profile_images/965722487735701504/m58KNgWN_400x400.jpg"},"eric_mastro":{"name":"Eric Mastro","twitter":"ericmastro","image":"https://avatars1.githubusercontent.com/u/5089238?s=460&v=4"},"michael_bradley":{"name":"Michael Bradley","image":"https://avatars3.githubusercontent.com/u/194260?s=460&v=4"},"richard_ramos":{"name":"Richard Ramos","twitter":"richardramos_me","image":"https://devcon.org/images/speakers/richard_ramos.jpg"},"jonny_zerah":{"name":"Jonny Zerah","twitter":"jonnyzerah","image":"https://pbs.twimg.com/profile_images/1043774340490248192/gI9aGy17_400x400.jpg"},"robin_percy":{"name":"Robin Percy","twitter":"rbin","image":"https://avatars1.githubusercontent.com/u/29288325?s=400&v=4"}},"categories":{"tutorials":"Tutorials","announcements":"Announcements"},"languages":{"en":"English"}}},"excerpt":"","more":"<h2 id=\"To-Update-to-2-6-0\"><a href=\"#To-Update-to-2-6-0\" class=\"headerlink\" title=\"To Update to 2.6.0\"></a>To Update to 2.6.0</h2><p>Embark’s npm package has changed from <code>embark-framework</code> to <code>embark</code>, this sometimes can create conflicts. To update, first uninstall embark-framework 1 to avoid any conflicts with <code>npm uninstall -g embark-framework</code> followed by <code>npm install -g embark</code></p>\n<p>to update from 2.5.2:</p>\n<figure class=\"highlight plain\"><table><tr><td class=\"code\"><pre><span class=\"line\">npm install -g embark@2.6</span><br></pre></td></tr></table></figure>\n\n<p>afterwards make sure <code>embark version</code> returns <code>2.6.0</code>.</p>\n<h2 id=\"In-this-release\"><a href=\"#In-this-release\" class=\"headerlink\" title=\"In this release\"></a>In this release</h2><p>You no longer need to wait for new releases of embark when a new version of web3.js or solc comes out as this can be now configured. Embark will take care of downloading and using the new versions. You can specify a list of nodes the dapp should attempt to connect to (instead of being limited 1). Whisper 5 is now supported.</p>\n<h2 id=\"Support-for-web3-js-1-0-and-nearly-ANY-web3-js-version\"><a href=\"#Support-for-web3-js-1-0-and-nearly-ANY-web3-js-version\" class=\"headerlink\" title=\"Support for web3.js 1.0 and (nearly) ANY web3.js version\"></a>Support for web3.js 1.0 and (nearly) ANY web3.js version</h2><p>Embark now supports web3.js 1.0 by default, however you can now also specify exactly which version of web3.js you want to use so you can still use 0.19.0 or newer versions of 1.0.</p>\n<p>in config/contracts.json</p>\n<figure class=\"highlight plain\"><table><tr><td class=\"code\"><pre><span class=\"line\">{</span><br><span class=\"line\"> "default": {</span><br><span class=\"line\"> ....</span><br><span class=\"line\"> "versions": {</span><br><span class=\"line\"> "web3.js": "1.0.0-beta"</span><br><span class=\"line\"> }</span><br><span class=\"line\"> ...</span><br><span class=\"line\">}</span><br></pre></td></tr></table></figure>\n\n<p>If ,for example, you wish to use 0.19.0 you can specify it in the config as <code>"web3.js": "0.19.0"</code></p>\n<h2 id=\"Support-for-ANY-solc-version\"><a href=\"#Support-for-ANY-solc-version\" class=\"headerlink\" title=\"Support for ANY solc version\"></a>Support for ANY solc version</h2><p>You can also configure the solc compiler you wish to use and it should work, so long that solc release does not contain breaking API changes.</p>\n<p><code>config/contracts.json</code></p>\n<figure class=\"highlight plain\"><table><tr><td class=\"code\"><pre><span class=\"line\">{</span><br><span class=\"line\"> "default": {</span><br><span class=\"line\"> ....</span><br><span class=\"line\"> "versions": {</span><br><span class=\"line\"> "solc": "0.4.17"</span><br><span class=\"line\"> }</span><br><span class=\"line\"> ...</span><br><span class=\"line\">}</span><br></pre></td></tr></table></figure>\n\n<h2 id=\"Specify-nodes-DApp-should-attempt-to-connect-to\"><a href=\"#Specify-nodes-DApp-should-attempt-to-connect-to\" class=\"headerlink\" title=\"Specify nodes DApp should attempt to connect to\"></a>Specify nodes DApp should attempt to connect to</h2><p>You can specify which nodes your dapp should try to connect in each enviroment. “$WEB3” is a special keyword to specify the existing web3 object.<br>The following config would attempt to use the existing web3 object and if unavailable attempt to connect to localhost:8545</p>\n<p><code>config/contracts.json</code></p>\n<figure class=\"highlight plain\"><table><tr><td class=\"code\"><pre><span class=\"line\">{</span><br><span class=\"line\"> "development": {</span><br><span class=\"line\"> ...</span><br><span class=\"line\"> "dappConnection": [</span><br><span class=\"line\"> "$WEB3",</span><br><span class=\"line\"> "http://localhost:8545"</span><br><span class=\"line\"> ],</span><br><span class=\"line\"> ...</span><br><span class=\"line\">}</span><br></pre></td></tr></table></figure>\n\n<h2 id=\"Specify-node-to-deploy-to\"><a href=\"#Specify-node-to-deploy-to\" class=\"headerlink\" title=\"Specify node to deploy to\"></a>Specify node to deploy to</h2><p>Before Embark would assume this would be the same as the one configured in blockchain.json which could lead to some ackward configs for some devs, this has now been changed so you can specify it in the contracts config.</p>\n<p><code>config/contracts.json</code></p>\n<figure class=\"highlight plain\"><table><tr><td class=\"code\"><pre><span class=\"line\">{</span><br><span class=\"line\"> "development": {</span><br><span class=\"line\"> ...</span><br><span class=\"line\"> "deployment": {</span><br><span class=\"line\"> "host": "localhost",</span><br><span class=\"line\"> "port": 8545,</span><br><span class=\"line\"> "type": "rpc"</span><br><span class=\"line\"> },</span><br><span class=\"line\"> ...</span><br><span class=\"line\">}</span><br></pre></td></tr></table></figure>\n\n<h2 id=\"Specify-node-to-connect-whisper-to\"><a href=\"#Specify-node-to-connect-whisper-to\" class=\"headerlink\" title=\"Specify node to connect whisper to\"></a>Specify node to connect whisper to</h2><p><code>config/communication.json</code></p>\n<figure class=\"highlight javascript\"><table><tr><td class=\"code\"><pre><span class=\"line\">{</span><br><span class=\"line\"> <span class=\"string\">\"default\"</span>: {</span><br><span class=\"line\"> <span class=\"string\">\"enabled\"</span>: <span class=\"literal\">true</span>,</span><br><span class=\"line\"> <span class=\"string\">\"provider\"</span>: <span class=\"string\">\"whisper\"</span>,</span><br><span class=\"line\"> <span class=\"string\">\"available_providers\"</span>: [<span class=\"string\">\"whisper\"</span>, <span class=\"string\">\"orbit\"</span>],</span><br><span class=\"line\"> <span class=\"string\">\"connection\"</span>: {</span><br><span class=\"line\"> <span class=\"string\">\"host\"</span>: <span class=\"string\">\"localhost\"</span>,</span><br><span class=\"line\"> <span class=\"string\">\"port\"</span>: <span class=\"number\">8546</span>,</span><br><span class=\"line\"> <span class=\"string\">\"type\"</span>: <span class=\"string\">\"ws\"</span></span><br><span class=\"line\"> }</span><br><span class=\"line\"> }</span><br><span class=\"line\">}</span><br></pre></td></tr></table></figure>\n\n<h2 id=\"Specify-url-to-get-assets\"><a href=\"#Specify-url-to-get-assets\" class=\"headerlink\" title=\"Specify url to get assets\"></a>Specify url to get assets</h2><p>You can specify for each environment what IPFS node to get the assets from</p>\n<p><code>config/storage.json</code></p>\n<figure class=\"highlight javascript\"><table><tr><td class=\"code\"><pre><span class=\"line\">{</span><br><span class=\"line\"> ...</span><br><span class=\"line\"> <span class=\"string\">\"development\"</span>: {</span><br><span class=\"line\"> ....</span><br><span class=\"line\"> <span class=\"string\">\"getUrl\"</span>: <span class=\"string\">\"http://localhost:8080/ipfs/\"</span></span><br><span class=\"line\"> },</span><br><span class=\"line\"> ...</span><br><span class=\"line\"> <span class=\"string\">\"livenet\"</span>: {</span><br><span class=\"line\"> ....</span><br><span class=\"line\"> <span class=\"string\">\"getUrl\"</span>: <span class=\"string\">\"https://gateway.ipfs.io/ipfs/\"</span></span><br><span class=\"line\"> }</span><br><span class=\"line\">}</span><br></pre></td></tr></table></figure>\n\n<h3 id=\"Plugin-API-changes\"><a href=\"#Plugin-API-changes\" class=\"headerlink\" title=\"Plugin API changes\"></a>Plugin API changes</h3><p><img src=\"http://icons.iconarchive.com/icons/elegantthemes/beautiful-flat/128/plugin-icon.png\" alt=\"plugin\"></p>\n<p>The following events are deprecated: abi-vanila, abi, abi-contracts-vanila, abi-vanila-deployment and have been renamed to code-vanila, code, code-contracts-vanila, code-vanila-deployment</p>\n<p>plugins that use these events will get deprecation warnings, the deprecated events will be removed in 2.7.0</p>\n<h3 id=\"New-Blockchain-options\"><a href=\"#New-Blockchain-options\" class=\"headerlink\" title=\"New Blockchain options\"></a>New Blockchain options</h3><p><img src=\"https://dappsforbeginners.files.wordpress.com/2015/02/ethereum-logo.jpg?w=200\" alt=\"geth\"></p>\n<p>The following fields are now available at <code>config/blockchain.json</code> to enhance <code>embark blockchain</code>:</p>\n<ul>\n<li>“wsHost” - to specify the websocket host (default: localhost)</li>\n<li>“wsPort” - to specify the websocket port (default: 8546)</li>\n<li>“wsOrigins”- to specify the allowed origin of the websocket requests (default: FALSE), must be specified to something like <a href=\"http://localhost:8000\" target=\"_blank\" rel=\"noopener\">http://localhost:8000</a> for the websocket connection to work.</li>\n<li>“wsApi” - to specify the apis available through websockets (default: [‘eth’, ‘web3’, ‘net’, ‘shh’])</li>\n</ul>\n<h3 id=\"Misc-Bugfixes-and-Improvements\"><a href=\"#Misc-Bugfixes-and-Improvements\" class=\"headerlink\" title=\"Misc Bugfixes and Improvements\"></a>Misc Bugfixes and Improvements</h3><p><img src=\"http://i.imgur.com/L1r6Ac5.png\" alt=\"bug fixes\"></p>\n<ul>\n<li>tests no longer need the requires and initialization and can be run directly with embark. however you can still use these requires to run it yourself with mocha or your own preferred test framework</li>\n<li>embark and mocha are no longer dependencies in the created dapp</li>\n<li>you can specify a test file with <code>embark test <filename></code></li>\n<li>tests no longer need testrpc to be installed first</li>\n<li><code>EmbarkJS.isNewWeb3()</code> to detect if web3 1.0 is available</li>\n<li>demo app updated to use web3.js 1.0 and solc 0.4.17</li>\n<li>warn user when websocket or http CORS is not set</li>\n<li>tolerate solc compiler warnings, which could cause a crash sometimes</li>\n</ul>\n<h3 id=\"Thank-you\"><a href=\"#Thank-you\" class=\"headerlink\" title=\"Thank you\"></a>Thank you</h3><p>A big thanks to all that contributed to this release including <a href=\"https://github.com/toadkicker\" target=\"_blank\" rel=\"noopener\">Todd Baur</a> and Jacob Beauchamp.</p>\n<h3 id=\"Chatroom\"><a href=\"#Chatroom\" class=\"headerlink\" title=\"Chatroom\"></a>Chatroom</h3><p>To discuss about Embark or Dapp development, please <a href=\"https://gitter.im/iurimatias/embark-framework\" target=\"_blank\" rel=\"noopener\">join us at the gitter channel</a></p>\n"},{"title":"Embark by Status 3.0","author":"iuri_matias","summary":"We're happy to announce that Embark 3.0 has been released! Read on for what's inside!","layout":"blog-post","alias":"news/2018/05/03/embark-3-0-released/","_content":"\nEmbark is now part of [Status](https://status.im/) and we are happy to announce Embark 3.0 by Status!\n\n## New website and Documentation\n\nEmbark has a new website and up to date documentation which can be found at https://framework.embarklabs.io/docs/\n\n## More Smart Contract Languages\n\nBesides Solidity, Embark now also supports [Vyper](https://github.com/ethereum/vyper/) out of the box, as well as [Bamboo](https://github.com/pirapira/bamboo) through an embark [plugin](https://github.com/embarklabs/embark-bamboo)\nYou can use these languages side by side, and take advantage of Embark's features such as contract testing just like you would with Solidity.\n\n## DApp Imports\n\nFrom the dapp side, contracts and libs like EmbarkJS can be implicitly imported, for e.g to import a contract:\n\n```Javascript\nimport SimpleStorage from 'Embark/contracts/SimpleStorage'\n```\n\nEmbarkJS:\n\n```Javascript\nimport EmbarkJS from 'Embark/EmbarkJS'\n```\n\nOr a initialized web3 instances (with the config of `config/contracts.json`)\n\n```Javascript\nimport web3 from 'Embark/web3'\n```\n\nThe typical ES6 imports will also simply work. You can even import directly css files inside js files:\n\n```Javascript\nimport React from 'react';\nimport { Tabs, Tab } from 'react-bootstrap';\n\nimport './dapp.css';\n```\n\n## Friendlier torwards contracts-only projects\n\nAlthough Embark is focused on DApps, it can perfectly be used for projects targeting only smart contracts and no other components.\n\nThere is a now a template to create a simple project with all the components disabled except smart contracts:\n\n`embark new AppName --simple`\n\nYou can also fine tune this in embark.json by specifying the config of each component or setting it to false if you don't want it.\n\n```JSON\n ...\n \"config\": {\n \"contracts\": \"contracts.json\",\n \"blockchain\": false,\n \"storage\": false,\n \"communication\": false,\n \"webserver\": false\n },\n ...\n```\n\n## Embark Graph\n\nThe command `embark graph` will generate a ER graph of the dapp contracts. This takes into account not just the inheritance but also the relationships specified in the configuration.\n\n## Config contracts from URIs\n\nEmbark now supports referencing directly URIs including http, git, github, or directly files contained in other directories than the ones specified in embark.json\n\nEmbark is smart enough to take care of the dependencies of the resources and present them in a consistent manner to the compiler, it just works!\n\n```JSON\n{\n \"development\": {\n \"contracts\": {\n \"ERC725\": {\n \"file\": \"git://github.com/status/contracts/contracts/identity/ERC725.sol#develop\"\n },\n \"ERC725\": {\n \"file\": \"github.com/status/contracts/contracts/identity/ERC725.sol\"\n },\n \"Ownable\": {\n \"file\": \"https://github.com/OpenZeppelin/openzeppelin-solidity/blob/master/contracts/ownership/Ownable.sol\"\n },\n \"SimpleStorage\": {\n \"file\": \"./some_folder/simple_storage.sol\"\n }\n }\n }\n}\n```\n\n## Importing contracts from URIs directly in Solidity\n\nYou can also import the same URIs directly in solidity which is quite useful for interfaces, e.g:\n\n```Javascript\nimport \"git://github.com/status/contracts/contracts/identity/ERC725.sol#develop\";\nimport \"github.com/status/contracts/contracts/identity/ERC725.sol\";\nimport \"https://github.com/OpenZeppelin/openzeppelin-solidity/blob/master/contracts/ownership/Ownable.sol\"\n\ncontract MyContract is Ownable {\n ...\n}\n```\n\n## Contracts from npm packages\n\nYou can now install npm packages that contain contracts (e.g `npm install --save openzeppelin-solidity`) and refer them to them in the contracts.json file:\n\n```Javascript\n{\n \"development\": {\n \"contracts\": {\n \"ERC20\": {\n file: \"openzeppelin-solidity/contracts/token/ERC20/ERC20.sol\"\n }\n }\n }\n}\n```\n\nor even import them directly in solidity without the need for the config:\n\n```Solidity\nimport \"openzeppelin-solidity/contracts/ownership/Ownable.sol\";\n\ncontract MyContract is Ownable {\n ...\n}\n```\n\n## Embark Demo App\n\nThe demo app has been updated to reflect the new structure. It also now uses ReactJS which provides a good example on how to use React with Embark.\n\n## Web3.js 1.0 by default\n\nEmbark now uses web3.js 1.0 in all layers, including in the console and in contracts testing.\n\n\n## More contract deploy configs\n\nA new config called `afterDeploy` is available and it can be used to specify actions to run after all contracts have been deployed.\nIt's possible to also specify the specific account to deploy from using the directive `from` or `fromIndex`\n\n## Versions Configuration\n\nThe versions config has been moved to embark.json, the download mechanism has also been fastly improved under the hood:\n\n```\n ...\n \"versions\": {\n \"web3\": \"1.0.0-beta\",\n \"solc\": \"0.4.23\",\n \"ipfs-api\": \"17.2.4\"\n },\n ...\n```\n\n\n## Test Improvements\n\nIn the tests you can now specify a mnemonic:\n\n```Javascript\nconfig({\n mnemonic: \"labor ability deny divide mountain buddy home client type shallow outer pen\"\n})\n````\n\nIt's also possible to specify a node, in case you don't want to run in the internal vm:\n\n```Javascript\nconfig({\n node: \"http://localhost:8545\"\n})\n````\n\n## Swarm support\n\nSwarm is now completely integrated on-par with IPFS. You can use interact with Swarm on the dapp side, as well as upload your dapp to Swarm.Swarm\n\n## Misc Bugfixes and Improvements\n\nFor a complete list please refer to the [release notes in github](https://github.com/embarklabs/embark/releases/tag/3.0.0)\n\n## Chatroom\n\nTo discuss about Embark or Dapp development, please [join us at the gitter channel](https://gitter.im/embark-framework/Lobby)\n\n","source":"_posts/2018-05-04-embark-3-0-released.md","raw":"title: Embark by Status 3.0\nauthor: iuri_matias\nsummary: \"We're happy to announce that Embark 3.0 has been released! Read on for what's inside!\"\ncategories:\n - announcements\nlayout: blog-post\nalias: news/2018/05/03/embark-3-0-released/\n---\n\nEmbark is now part of [Status](https://status.im/) and we are happy to announce Embark 3.0 by Status!\n\n## New website and Documentation\n\nEmbark has a new website and up to date documentation which can be found at https://framework.embarklabs.io/docs/\n\n## More Smart Contract Languages\n\nBesides Solidity, Embark now also supports [Vyper](https://github.com/ethereum/vyper/) out of the box, as well as [Bamboo](https://github.com/pirapira/bamboo) through an embark [plugin](https://github.com/embarklabs/embark-bamboo)\nYou can use these languages side by side, and take advantage of Embark's features such as contract testing just like you would with Solidity.\n\n## DApp Imports\n\nFrom the dapp side, contracts and libs like EmbarkJS can be implicitly imported, for e.g to import a contract:\n\n```Javascript\nimport SimpleStorage from 'Embark/contracts/SimpleStorage'\n```\n\nEmbarkJS:\n\n```Javascript\nimport EmbarkJS from 'Embark/EmbarkJS'\n```\n\nOr a initialized web3 instances (with the config of `config/contracts.json`)\n\n```Javascript\nimport web3 from 'Embark/web3'\n```\n\nThe typical ES6 imports will also simply work. You can even import directly css files inside js files:\n\n```Javascript\nimport React from 'react';\nimport { Tabs, Tab } from 'react-bootstrap';\n\nimport './dapp.css';\n```\n\n## Friendlier torwards contracts-only projects\n\nAlthough Embark is focused on DApps, it can perfectly be used for projects targeting only smart contracts and no other components.\n\nThere is a now a template to create a simple project with all the components disabled except smart contracts:\n\n`embark new AppName --simple`\n\nYou can also fine tune this in embark.json by specifying the config of each component or setting it to false if you don't want it.\n\n```JSON\n ...\n \"config\": {\n \"contracts\": \"contracts.json\",\n \"blockchain\": false,\n \"storage\": false,\n \"communication\": false,\n \"webserver\": false\n },\n ...\n```\n\n## Embark Graph\n\nThe command `embark graph` will generate a ER graph of the dapp contracts. This takes into account not just the inheritance but also the relationships specified in the configuration.\n\n## Config contracts from URIs\n\nEmbark now supports referencing directly URIs including http, git, github, or directly files contained in other directories than the ones specified in embark.json\n\nEmbark is smart enough to take care of the dependencies of the resources and present them in a consistent manner to the compiler, it just works!\n\n```JSON\n{\n \"development\": {\n \"contracts\": {\n \"ERC725\": {\n \"file\": \"git://github.com/status/contracts/contracts/identity/ERC725.sol#develop\"\n },\n \"ERC725\": {\n \"file\": \"github.com/status/contracts/contracts/identity/ERC725.sol\"\n },\n \"Ownable\": {\n \"file\": \"https://github.com/OpenZeppelin/openzeppelin-solidity/blob/master/contracts/ownership/Ownable.sol\"\n },\n \"SimpleStorage\": {\n \"file\": \"./some_folder/simple_storage.sol\"\n }\n }\n }\n}\n```\n\n## Importing contracts from URIs directly in Solidity\n\nYou can also import the same URIs directly in solidity which is quite useful for interfaces, e.g:\n\n```Javascript\nimport \"git://github.com/status/contracts/contracts/identity/ERC725.sol#develop\";\nimport \"github.com/status/contracts/contracts/identity/ERC725.sol\";\nimport \"https://github.com/OpenZeppelin/openzeppelin-solidity/blob/master/contracts/ownership/Ownable.sol\"\n\ncontract MyContract is Ownable {\n ...\n}\n```\n\n## Contracts from npm packages\n\nYou can now install npm packages that contain contracts (e.g `npm install --save openzeppelin-solidity`) and refer them to them in the contracts.json file:\n\n```Javascript\n{\n \"development\": {\n \"contracts\": {\n \"ERC20\": {\n file: \"openzeppelin-solidity/contracts/token/ERC20/ERC20.sol\"\n }\n }\n }\n}\n```\n\nor even import them directly in solidity without the need for the config:\n\n```Solidity\nimport \"openzeppelin-solidity/contracts/ownership/Ownable.sol\";\n\ncontract MyContract is Ownable {\n ...\n}\n```\n\n## Embark Demo App\n\nThe demo app has been updated to reflect the new structure. It also now uses ReactJS which provides a good example on how to use React with Embark.\n\n## Web3.js 1.0 by default\n\nEmbark now uses web3.js 1.0 in all layers, including in the console and in contracts testing.\n\n\n## More contract deploy configs\n\nA new config called `afterDeploy` is available and it can be used to specify actions to run after all contracts have been deployed.\nIt's possible to also specify the specific account to deploy from using the directive `from` or `fromIndex`\n\n## Versions Configuration\n\nThe versions config has been moved to embark.json, the download mechanism has also been fastly improved under the hood:\n\n```\n ...\n \"versions\": {\n \"web3\": \"1.0.0-beta\",\n \"solc\": \"0.4.23\",\n \"ipfs-api\": \"17.2.4\"\n },\n ...\n```\n\n\n## Test Improvements\n\nIn the tests you can now specify a mnemonic:\n\n```Javascript\nconfig({\n mnemonic: \"labor ability deny divide mountain buddy home client type shallow outer pen\"\n})\n````\n\nIt's also possible to specify a node, in case you don't want to run in the internal vm:\n\n```Javascript\nconfig({\n node: \"http://localhost:8545\"\n})\n````\n\n## Swarm support\n\nSwarm is now completely integrated on-par with IPFS. You can use interact with Swarm on the dapp side, as well as upload your dapp to Swarm.Swarm\n\n## Misc Bugfixes and Improvements\n\nFor a complete list please refer to the [release notes in github](https://github.com/embarklabs/embark/releases/tag/3.0.0)\n\n## Chatroom\n\nTo discuss about Embark or Dapp development, please [join us at the gitter channel](https://gitter.im/embark-framework/Lobby)\n\n","slug":"embark-3-0-released","published":1,"date":"2018-05-04T04:00:00.000Z","updated":"2020-03-03T14:55:55.019Z","_id":"ck6axlf8q0003xeeg5q8wg2vg","comments":1,"photos":[],"link":"","content":"<p>Embark is now part of <a href=\"https://status.im/\" target=\"_blank\" rel=\"noopener\">Status</a> and we are happy to announce Embark 3.0 by Status!</p>\n<h2 id=\"New-website-and-Documentation\"><a href=\"#New-website-and-Documentation\" class=\"headerlink\" title=\"New website and Documentation\"></a>New website and Documentation</h2><p>Embark has a new website and up to date documentation which can be found at <a href=\"https://framework.embarklabs.io/docs/\" target=\"_blank\" rel=\"noopener\">https://framework.embarklabs.io/docs/</a></p>\n<h2 id=\"More-Smart-Contract-Languages\"><a href=\"#More-Smart-Contract-Languages\" class=\"headerlink\" title=\"More Smart Contract Languages\"></a>More Smart Contract Languages</h2><p>Besides Solidity, Embark now also supports <a href=\"https://github.com/ethereum/vyper/\" target=\"_blank\" rel=\"noopener\">Vyper</a> out of the box, as well as <a href=\"https://github.com/pirapira/bamboo\" target=\"_blank\" rel=\"noopener\">Bamboo</a> through an embark <a href=\"https://github.com/embarklabs/embark-bamboo\" target=\"_blank\" rel=\"noopener\">plugin</a><br>You can use these languages side by side, and take advantage of Embark’s features such as contract testing just like you would with Solidity.</p>\n<h2 id=\"DApp-Imports\"><a href=\"#DApp-Imports\" class=\"headerlink\" title=\"DApp Imports\"></a>DApp Imports</h2><p>From the dapp side, contracts and libs like EmbarkJS can be implicitly imported, for e.g to import a contract:</p>\n<figure class=\"highlight javascript\"><table><tr><td class=\"code\"><pre><span class=\"line\"><span class=\"keyword\">import</span> SimpleStorage <span class=\"keyword\">from</span> <span class=\"string\">'Embark/contracts/SimpleStorage'</span></span><br></pre></td></tr></table></figure>\n\n<p>EmbarkJS:</p>\n<figure class=\"highlight javascript\"><table><tr><td class=\"code\"><pre><span class=\"line\"><span class=\"keyword\">import</span> EmbarkJS <span class=\"keyword\">from</span> <span class=\"string\">'Embark/EmbarkJS'</span></span><br></pre></td></tr></table></figure>\n\n<p>Or a initialized web3 instances (with the config of <code>config/contracts.json</code>)</p>\n<figure class=\"highlight javascript\"><table><tr><td class=\"code\"><pre><span class=\"line\"><span class=\"keyword\">import</span> web3 <span class=\"keyword\">from</span> <span class=\"string\">'Embark/web3'</span></span><br></pre></td></tr></table></figure>\n\n<p>The typical ES6 imports will also simply work. You can even import directly css files inside js files:</p>\n<figure class=\"highlight javascript\"><table><tr><td class=\"code\"><pre><span class=\"line\"><span class=\"keyword\">import</span> React <span class=\"keyword\">from</span> <span class=\"string\">'react'</span>;</span><br><span class=\"line\"><span class=\"keyword\">import</span> { Tabs, Tab } <span class=\"keyword\">from</span> <span class=\"string\">'react-bootstrap'</span>;</span><br><span class=\"line\"></span><br><span class=\"line\"><span class=\"keyword\">import</span> <span class=\"string\">'./dapp.css'</span>;</span><br></pre></td></tr></table></figure>\n\n<h2 id=\"Friendlier-torwards-contracts-only-projects\"><a href=\"#Friendlier-torwards-contracts-only-projects\" class=\"headerlink\" title=\"Friendlier torwards contracts-only projects\"></a>Friendlier torwards contracts-only projects</h2><p>Although Embark is focused on DApps, it can perfectly be used for projects targeting only smart contracts and no other components.</p>\n<p>There is a now a template to create a simple project with all the components disabled except smart contracts:</p>\n<p><code>embark new AppName --simple</code></p>\n<p>You can also fine tune this in embark.json by specifying the config of each component or setting it to false if you don’t want it.</p>\n<figure class=\"highlight\"><table><tr><td class=\"code\"><pre><span class=\"line\">...</span><br><span class=\"line\">\"config\": {</span><br><span class=\"line\"> \"contracts\": \"contracts.json\",</span><br><span class=\"line\"> \"blockchain\": false,</span><br><span class=\"line\"> \"storage\": false,</span><br><span class=\"line\"> \"communication\": false,</span><br><span class=\"line\"> \"webserver\": false</span><br><span class=\"line\">},</span><br><span class=\"line\">...</span><br></pre></td></tr></table></figure>\n\n<h2 id=\"Embark-Graph\"><a href=\"#Embark-Graph\" class=\"headerlink\" title=\"Embark Graph\"></a>Embark Graph</h2><p>The command <code>embark graph</code> will generate a ER graph of the dapp contracts. This takes into account not just the inheritance but also the relationships specified in the configuration.</p>\n<h2 id=\"Config-contracts-from-URIs\"><a href=\"#Config-contracts-from-URIs\" class=\"headerlink\" title=\"Config contracts from URIs\"></a>Config contracts from URIs</h2><p>Embark now supports referencing directly URIs including http, git, github, or directly files contained in other directories than the ones specified in embark.json</p>\n<p>Embark is smart enough to take care of the dependencies of the resources and present them in a consistent manner to the compiler, it just works!</p>\n<figure class=\"highlight json\"><table><tr><td class=\"code\"><pre><span class=\"line\">{</span><br><span class=\"line\"> <span class=\"attr\">\"development\"</span>: {</span><br><span class=\"line\"> <span class=\"attr\">\"contracts\"</span>: {</span><br><span class=\"line\"> <span class=\"attr\">\"ERC725\"</span>: {</span><br><span class=\"line\"> <span class=\"attr\">\"file\"</span>: <span class=\"string\">\"git://github.com/status/contracts/contracts/identity/ERC725.sol#develop\"</span></span><br><span class=\"line\"> },</span><br><span class=\"line\"> <span class=\"attr\">\"ERC725\"</span>: {</span><br><span class=\"line\"> <span class=\"attr\">\"file\"</span>: <span class=\"string\">\"github.com/status/contracts/contracts/identity/ERC725.sol\"</span></span><br><span class=\"line\"> },</span><br><span class=\"line\"> <span class=\"attr\">\"Ownable\"</span>: {</span><br><span class=\"line\"> <span class=\"attr\">\"file\"</span>: <span class=\"string\">\"https://github.com/OpenZeppelin/openzeppelin-solidity/blob/master/contracts/ownership/Ownable.sol\"</span></span><br><span class=\"line\"> },</span><br><span class=\"line\"> <span class=\"attr\">\"SimpleStorage\"</span>: {</span><br><span class=\"line\"> <span class=\"attr\">\"file\"</span>: <span class=\"string\">\"./some_folder/simple_storage.sol\"</span></span><br><span class=\"line\"> }</span><br><span class=\"line\"> }</span><br><span class=\"line\"> }</span><br><span class=\"line\">}</span><br></pre></td></tr></table></figure>\n\n<h2 id=\"Importing-contracts-from-URIs-directly-in-Solidity\"><a href=\"#Importing-contracts-from-URIs-directly-in-Solidity\" class=\"headerlink\" title=\"Importing contracts from URIs directly in Solidity\"></a>Importing contracts from URIs directly in Solidity</h2><p>You can also import the same URIs directly in solidity which is quite useful for interfaces, e.g:</p>\n<figure class=\"highlight javascript\"><table><tr><td class=\"code\"><pre><span class=\"line\"><span class=\"keyword\">import</span> <span class=\"string\">\"git://github.com/status/contracts/contracts/identity/ERC725.sol#develop\"</span>;</span><br><span class=\"line\"><span class=\"keyword\">import</span> <span class=\"string\">\"github.com/status/contracts/contracts/identity/ERC725.sol\"</span>;</span><br><span class=\"line\"><span class=\"keyword\">import</span> <span class=\"string\">\"https://github.com/OpenZeppelin/openzeppelin-solidity/blob/master/contracts/ownership/Ownable.sol\"</span></span><br><span class=\"line\"></span><br><span class=\"line\">contract MyContract is Ownable {</span><br><span class=\"line\"> ...</span><br><span class=\"line\">}</span><br></pre></td></tr></table></figure>\n\n<h2 id=\"Contracts-from-npm-packages\"><a href=\"#Contracts-from-npm-packages\" class=\"headerlink\" title=\"Contracts from npm packages\"></a>Contracts from npm packages</h2><p>You can now install npm packages that contain contracts (e.g <code>npm install --save openzeppelin-solidity</code>) and refer them to them in the contracts.json file:</p>\n<figure class=\"highlight javascript\"><table><tr><td class=\"code\"><pre><span class=\"line\">{</span><br><span class=\"line\"> <span class=\"string\">\"development\"</span>: {</span><br><span class=\"line\"> <span class=\"string\">\"contracts\"</span>: {</span><br><span class=\"line\"> <span class=\"string\">\"ERC20\"</span>: {</span><br><span class=\"line\"> file: <span class=\"string\">\"openzeppelin-solidity/contracts/token/ERC20/ERC20.sol\"</span></span><br><span class=\"line\"> }</span><br><span class=\"line\"> }</span><br><span class=\"line\"> }</span><br><span class=\"line\">}</span><br></pre></td></tr></table></figure>\n\n<p>or even import them directly in solidity without the need for the config:</p>\n<figure class=\"highlight plain\"><table><tr><td class=\"code\"><pre><span class=\"line\">import "openzeppelin-solidity/contracts/ownership/Ownable.sol";</span><br><span class=\"line\"></span><br><span class=\"line\">contract MyContract is Ownable {</span><br><span class=\"line\"> ...</span><br><span class=\"line\">}</span><br></pre></td></tr></table></figure>\n\n<h2 id=\"Embark-Demo-App\"><a href=\"#Embark-Demo-App\" class=\"headerlink\" title=\"Embark Demo App\"></a>Embark Demo App</h2><p>The demo app has been updated to reflect the new structure. It also now uses ReactJS which provides a good example on how to use React with Embark.</p>\n<h2 id=\"Web3-js-1-0-by-default\"><a href=\"#Web3-js-1-0-by-default\" class=\"headerlink\" title=\"Web3.js 1.0 by default\"></a>Web3.js 1.0 by default</h2><p>Embark now uses web3.js 1.0 in all layers, including in the console and in contracts testing.</p>\n<h2 id=\"More-contract-deploy-configs\"><a href=\"#More-contract-deploy-configs\" class=\"headerlink\" title=\"More contract deploy configs\"></a>More contract deploy configs</h2><p>A new config called <code>afterDeploy</code> is available and it can be used to specify actions to run after all contracts have been deployed.<br>It’s possible to also specify the specific account to deploy from using the directive <code>from</code> or <code>fromIndex</code></p>\n<h2 id=\"Versions-Configuration\"><a href=\"#Versions-Configuration\" class=\"headerlink\" title=\"Versions Configuration\"></a>Versions Configuration</h2><p>The versions config has been moved to embark.json, the download mechanism has also been fastly improved under the hood:</p>\n<figure class=\"highlight plain\"><table><tr><td class=\"code\"><pre><span class=\"line\">...</span><br><span class=\"line\">"versions": {</span><br><span class=\"line\"> "web3": "1.0.0-beta",</span><br><span class=\"line\"> "solc": "0.4.23",</span><br><span class=\"line\"> "ipfs-api": "17.2.4"</span><br><span class=\"line\">},</span><br><span class=\"line\">...</span><br></pre></td></tr></table></figure>\n\n\n<h2 id=\"Test-Improvements\"><a href=\"#Test-Improvements\" class=\"headerlink\" title=\"Test Improvements\"></a>Test Improvements</h2><p>In the tests you can now specify a mnemonic:</p>\n<figure class=\"highlight javascript\"><table><tr><td class=\"code\"><pre><span class=\"line\">config({</span><br><span class=\"line\"> mnemonic: <span class=\"string\">\"labor ability deny divide mountain buddy home client type shallow outer pen\"</span></span><br><span class=\"line\">})</span><br><span class=\"line\"><span class=\"string\">`</span></span><br></pre></td></tr></table></figure>\n\n<p>It’s also possible to specify a node, in case you don’t want to run in the internal vm:</p>\n<figure class=\"highlight javascript\"><table><tr><td class=\"code\"><pre><span class=\"line\">config({</span><br><span class=\"line\"> node: <span class=\"string\">\"http://localhost:8545\"</span></span><br><span class=\"line\">})</span><br><span class=\"line\"><span class=\"string\">`</span></span><br></pre></td></tr></table></figure>\n\n<h2 id=\"Swarm-support\"><a href=\"#Swarm-support\" class=\"headerlink\" title=\"Swarm support\"></a>Swarm support</h2><p>Swarm is now completely integrated on-par with IPFS. You can use interact with Swarm on the dapp side, as well as upload your dapp to Swarm.Swarm</p>\n<h2 id=\"Misc-Bugfixes-and-Improvements\"><a href=\"#Misc-Bugfixes-and-Improvements\" class=\"headerlink\" title=\"Misc Bugfixes and Improvements\"></a>Misc Bugfixes and Improvements</h2><p>For a complete list please refer to the <a href=\"https://github.com/embarklabs/embark/releases/tag/3.0.0\" target=\"_blank\" rel=\"noopener\">release notes in github</a></p>\n<h2 id=\"Chatroom\"><a href=\"#Chatroom\" class=\"headerlink\" title=\"Chatroom\"></a>Chatroom</h2><p>To discuss about Embark or Dapp development, please <a href=\"https://gitter.im/embark-framework/Lobby\" target=\"_blank\" rel=\"noopener\">join us at the gitter channel</a></p>\n","site":{"data":{"authors":{"iuri_matias":{"name":"Iuri Matias","twitter":"iurimatias","image":"https://pbs.twimg.com/profile_images/928272512181563392/iDJdvy2k_400x400.jpg"},"pascal_precht":{"name":"Pascal Precht","twitter":"pascalprecht","image":"https://pbs.twimg.com/profile_images/993785060733194241/p3oAIMDP_400x400.jpg"},"anthony_laibe":{"name":"Anthony Laibe","twitter":"a_laibe","image":"https://pbs.twimg.com/profile_images/257742900/13168239_400x400.jpg"},"jonathan_rainville":{"name":"Jonathan Rainville","twitter":"ShyolGhul","image":"https://pbs.twimg.com/profile_images/993873866878570496/-aE4byjj_400x400.jpg"},"andre_medeiros":{"name":"Andre Medeiros","twitter":"superdealloc","image":"https://pbs.twimg.com/profile_images/965722487735701504/m58KNgWN_400x400.jpg"},"eric_mastro":{"name":"Eric Mastro","twitter":"ericmastro","image":"https://avatars1.githubusercontent.com/u/5089238?s=460&v=4"},"michael_bradley":{"name":"Michael Bradley","image":"https://avatars3.githubusercontent.com/u/194260?s=460&v=4"},"richard_ramos":{"name":"Richard Ramos","twitter":"richardramos_me","image":"https://devcon.org/images/speakers/richard_ramos.jpg"},"jonny_zerah":{"name":"Jonny Zerah","twitter":"jonnyzerah","image":"https://pbs.twimg.com/profile_images/1043774340490248192/gI9aGy17_400x400.jpg"},"robin_percy":{"name":"Robin Percy","twitter":"rbin","image":"https://avatars1.githubusercontent.com/u/29288325?s=400&v=4"}},"categories":{"tutorials":"Tutorials","announcements":"Announcements"},"languages":{"en":"English"}}},"excerpt":"","more":"<p>Embark is now part of <a href=\"https://status.im/\" target=\"_blank\" rel=\"noopener\">Status</a> and we are happy to announce Embark 3.0 by Status!</p>\n<h2 id=\"New-website-and-Documentation\"><a href=\"#New-website-and-Documentation\" class=\"headerlink\" title=\"New website and Documentation\"></a>New website and Documentation</h2><p>Embark has a new website and up to date documentation which can be found at <a href=\"https://framework.embarklabs.io/docs/\" target=\"_blank\" rel=\"noopener\">https://framework.embarklabs.io/docs/</a></p>\n<h2 id=\"More-Smart-Contract-Languages\"><a href=\"#More-Smart-Contract-Languages\" class=\"headerlink\" title=\"More Smart Contract Languages\"></a>More Smart Contract Languages</h2><p>Besides Solidity, Embark now also supports <a href=\"https://github.com/ethereum/vyper/\" target=\"_blank\" rel=\"noopener\">Vyper</a> out of the box, as well as <a href=\"https://github.com/pirapira/bamboo\" target=\"_blank\" rel=\"noopener\">Bamboo</a> through an embark <a href=\"https://github.com/embarklabs/embark-bamboo\" target=\"_blank\" rel=\"noopener\">plugin</a><br>You can use these languages side by side, and take advantage of Embark’s features such as contract testing just like you would with Solidity.</p>\n<h2 id=\"DApp-Imports\"><a href=\"#DApp-Imports\" class=\"headerlink\" title=\"DApp Imports\"></a>DApp Imports</h2><p>From the dapp side, contracts and libs like EmbarkJS can be implicitly imported, for e.g to import a contract:</p>\n<figure class=\"highlight javascript\"><table><tr><td class=\"code\"><pre><span class=\"line\"><span class=\"keyword\">import</span> SimpleStorage <span class=\"keyword\">from</span> <span class=\"string\">'Embark/contracts/SimpleStorage'</span></span><br></pre></td></tr></table></figure>\n\n<p>EmbarkJS:</p>\n<figure class=\"highlight javascript\"><table><tr><td class=\"code\"><pre><span class=\"line\"><span class=\"keyword\">import</span> EmbarkJS <span class=\"keyword\">from</span> <span class=\"string\">'Embark/EmbarkJS'</span></span><br></pre></td></tr></table></figure>\n\n<p>Or a initialized web3 instances (with the config of <code>config/contracts.json</code>)</p>\n<figure class=\"highlight javascript\"><table><tr><td class=\"code\"><pre><span class=\"line\"><span class=\"keyword\">import</span> web3 <span class=\"keyword\">from</span> <span class=\"string\">'Embark/web3'</span></span><br></pre></td></tr></table></figure>\n\n<p>The typical ES6 imports will also simply work. You can even import directly css files inside js files:</p>\n<figure class=\"highlight javascript\"><table><tr><td class=\"code\"><pre><span class=\"line\"><span class=\"keyword\">import</span> React <span class=\"keyword\">from</span> <span class=\"string\">'react'</span>;</span><br><span class=\"line\"><span class=\"keyword\">import</span> { Tabs, Tab } <span class=\"keyword\">from</span> <span class=\"string\">'react-bootstrap'</span>;</span><br><span class=\"line\"></span><br><span class=\"line\"><span class=\"keyword\">import</span> <span class=\"string\">'./dapp.css'</span>;</span><br></pre></td></tr></table></figure>\n\n<h2 id=\"Friendlier-torwards-contracts-only-projects\"><a href=\"#Friendlier-torwards-contracts-only-projects\" class=\"headerlink\" title=\"Friendlier torwards contracts-only projects\"></a>Friendlier torwards contracts-only projects</h2><p>Although Embark is focused on DApps, it can perfectly be used for projects targeting only smart contracts and no other components.</p>\n<p>There is a now a template to create a simple project with all the components disabled except smart contracts:</p>\n<p><code>embark new AppName --simple</code></p>\n<p>You can also fine tune this in embark.json by specifying the config of each component or setting it to false if you don’t want it.</p>\n<figure class=\"highlight\"><table><tr><td class=\"code\"><pre><span class=\"line\">...</span><br><span class=\"line\">\"config\": {</span><br><span class=\"line\"> \"contracts\": \"contracts.json\",</span><br><span class=\"line\"> \"blockchain\": false,</span><br><span class=\"line\"> \"storage\": false,</span><br><span class=\"line\"> \"communication\": false,</span><br><span class=\"line\"> \"webserver\": false</span><br><span class=\"line\">},</span><br><span class=\"line\">...</span><br></pre></td></tr></table></figure>\n\n<h2 id=\"Embark-Graph\"><a href=\"#Embark-Graph\" class=\"headerlink\" title=\"Embark Graph\"></a>Embark Graph</h2><p>The command <code>embark graph</code> will generate a ER graph of the dapp contracts. This takes into account not just the inheritance but also the relationships specified in the configuration.</p>\n<h2 id=\"Config-contracts-from-URIs\"><a href=\"#Config-contracts-from-URIs\" class=\"headerlink\" title=\"Config contracts from URIs\"></a>Config contracts from URIs</h2><p>Embark now supports referencing directly URIs including http, git, github, or directly files contained in other directories than the ones specified in embark.json</p>\n<p>Embark is smart enough to take care of the dependencies of the resources and present them in a consistent manner to the compiler, it just works!</p>\n<figure class=\"highlight json\"><table><tr><td class=\"code\"><pre><span class=\"line\">{</span><br><span class=\"line\"> <span class=\"attr\">\"development\"</span>: {</span><br><span class=\"line\"> <span class=\"attr\">\"contracts\"</span>: {</span><br><span class=\"line\"> <span class=\"attr\">\"ERC725\"</span>: {</span><br><span class=\"line\"> <span class=\"attr\">\"file\"</span>: <span class=\"string\">\"git://github.com/status/contracts/contracts/identity/ERC725.sol#develop\"</span></span><br><span class=\"line\"> },</span><br><span class=\"line\"> <span class=\"attr\">\"ERC725\"</span>: {</span><br><span class=\"line\"> <span class=\"attr\">\"file\"</span>: <span class=\"string\">\"github.com/status/contracts/contracts/identity/ERC725.sol\"</span></span><br><span class=\"line\"> },</span><br><span class=\"line\"> <span class=\"attr\">\"Ownable\"</span>: {</span><br><span class=\"line\"> <span class=\"attr\">\"file\"</span>: <span class=\"string\">\"https://github.com/OpenZeppelin/openzeppelin-solidity/blob/master/contracts/ownership/Ownable.sol\"</span></span><br><span class=\"line\"> },</span><br><span class=\"line\"> <span class=\"attr\">\"SimpleStorage\"</span>: {</span><br><span class=\"line\"> <span class=\"attr\">\"file\"</span>: <span class=\"string\">\"./some_folder/simple_storage.sol\"</span></span><br><span class=\"line\"> }</span><br><span class=\"line\"> }</span><br><span class=\"line\"> }</span><br><span class=\"line\">}</span><br></pre></td></tr></table></figure>\n\n<h2 id=\"Importing-contracts-from-URIs-directly-in-Solidity\"><a href=\"#Importing-contracts-from-URIs-directly-in-Solidity\" class=\"headerlink\" title=\"Importing contracts from URIs directly in Solidity\"></a>Importing contracts from URIs directly in Solidity</h2><p>You can also import the same URIs directly in solidity which is quite useful for interfaces, e.g:</p>\n<figure class=\"highlight javascript\"><table><tr><td class=\"code\"><pre><span class=\"line\"><span class=\"keyword\">import</span> <span class=\"string\">\"git://github.com/status/contracts/contracts/identity/ERC725.sol#develop\"</span>;</span><br><span class=\"line\"><span class=\"keyword\">import</span> <span class=\"string\">\"github.com/status/contracts/contracts/identity/ERC725.sol\"</span>;</span><br><span class=\"line\"><span class=\"keyword\">import</span> <span class=\"string\">\"https://github.com/OpenZeppelin/openzeppelin-solidity/blob/master/contracts/ownership/Ownable.sol\"</span></span><br><span class=\"line\"></span><br><span class=\"line\">contract MyContract is Ownable {</span><br><span class=\"line\"> ...</span><br><span class=\"line\">}</span><br></pre></td></tr></table></figure>\n\n<h2 id=\"Contracts-from-npm-packages\"><a href=\"#Contracts-from-npm-packages\" class=\"headerlink\" title=\"Contracts from npm packages\"></a>Contracts from npm packages</h2><p>You can now install npm packages that contain contracts (e.g <code>npm install --save openzeppelin-solidity</code>) and refer them to them in the contracts.json file:</p>\n<figure class=\"highlight javascript\"><table><tr><td class=\"code\"><pre><span class=\"line\">{</span><br><span class=\"line\"> <span class=\"string\">\"development\"</span>: {</span><br><span class=\"line\"> <span class=\"string\">\"contracts\"</span>: {</span><br><span class=\"line\"> <span class=\"string\">\"ERC20\"</span>: {</span><br><span class=\"line\"> file: <span class=\"string\">\"openzeppelin-solidity/contracts/token/ERC20/ERC20.sol\"</span></span><br><span class=\"line\"> }</span><br><span class=\"line\"> }</span><br><span class=\"line\"> }</span><br><span class=\"line\">}</span><br></pre></td></tr></table></figure>\n\n<p>or even import them directly in solidity without the need for the config:</p>\n<figure class=\"highlight plain\"><table><tr><td class=\"code\"><pre><span class=\"line\">import "openzeppelin-solidity/contracts/ownership/Ownable.sol";</span><br><span class=\"line\"></span><br><span class=\"line\">contract MyContract is Ownable {</span><br><span class=\"line\"> ...</span><br><span class=\"line\">}</span><br></pre></td></tr></table></figure>\n\n<h2 id=\"Embark-Demo-App\"><a href=\"#Embark-Demo-App\" class=\"headerlink\" title=\"Embark Demo App\"></a>Embark Demo App</h2><p>The demo app has been updated to reflect the new structure. It also now uses ReactJS which provides a good example on how to use React with Embark.</p>\n<h2 id=\"Web3-js-1-0-by-default\"><a href=\"#Web3-js-1-0-by-default\" class=\"headerlink\" title=\"Web3.js 1.0 by default\"></a>Web3.js 1.0 by default</h2><p>Embark now uses web3.js 1.0 in all layers, including in the console and in contracts testing.</p>\n<h2 id=\"More-contract-deploy-configs\"><a href=\"#More-contract-deploy-configs\" class=\"headerlink\" title=\"More contract deploy configs\"></a>More contract deploy configs</h2><p>A new config called <code>afterDeploy</code> is available and it can be used to specify actions to run after all contracts have been deployed.<br>It’s possible to also specify the specific account to deploy from using the directive <code>from</code> or <code>fromIndex</code></p>\n<h2 id=\"Versions-Configuration\"><a href=\"#Versions-Configuration\" class=\"headerlink\" title=\"Versions Configuration\"></a>Versions Configuration</h2><p>The versions config has been moved to embark.json, the download mechanism has also been fastly improved under the hood:</p>\n<figure class=\"highlight plain\"><table><tr><td class=\"code\"><pre><span class=\"line\">...</span><br><span class=\"line\">"versions": {</span><br><span class=\"line\"> "web3": "1.0.0-beta",</span><br><span class=\"line\"> "solc": "0.4.23",</span><br><span class=\"line\"> "ipfs-api": "17.2.4"</span><br><span class=\"line\">},</span><br><span class=\"line\">...</span><br></pre></td></tr></table></figure>\n\n\n<h2 id=\"Test-Improvements\"><a href=\"#Test-Improvements\" class=\"headerlink\" title=\"Test Improvements\"></a>Test Improvements</h2><p>In the tests you can now specify a mnemonic:</p>\n<figure class=\"highlight javascript\"><table><tr><td class=\"code\"><pre><span class=\"line\">config({</span><br><span class=\"line\"> mnemonic: <span class=\"string\">\"labor ability deny divide mountain buddy home client type shallow outer pen\"</span></span><br><span class=\"line\">})</span><br><span class=\"line\"><span class=\"string\">`</span></span><br></pre></td></tr></table></figure>\n\n<p>It’s also possible to specify a node, in case you don’t want to run in the internal vm:</p>\n<figure class=\"highlight javascript\"><table><tr><td class=\"code\"><pre><span class=\"line\">config({</span><br><span class=\"line\"> node: <span class=\"string\">\"http://localhost:8545\"</span></span><br><span class=\"line\">})</span><br><span class=\"line\"><span class=\"string\">`</span></span><br></pre></td></tr></table></figure>\n\n<h2 id=\"Swarm-support\"><a href=\"#Swarm-support\" class=\"headerlink\" title=\"Swarm support\"></a>Swarm support</h2><p>Swarm is now completely integrated on-par with IPFS. You can use interact with Swarm on the dapp side, as well as upload your dapp to Swarm.Swarm</p>\n<h2 id=\"Misc-Bugfixes-and-Improvements\"><a href=\"#Misc-Bugfixes-and-Improvements\" class=\"headerlink\" title=\"Misc Bugfixes and Improvements\"></a>Misc Bugfixes and Improvements</h2><p>For a complete list please refer to the <a href=\"https://github.com/embarklabs/embark/releases/tag/3.0.0\" target=\"_blank\" rel=\"noopener\">release notes in github</a></p>\n<h2 id=\"Chatroom\"><a href=\"#Chatroom\" class=\"headerlink\" title=\"Chatroom\"></a>Chatroom</h2><p>To discuss about Embark or Dapp development, please <a href=\"https://gitter.im/embark-framework/Lobby\" target=\"_blank\" rel=\"noopener\">join us at the gitter channel</a></p>\n"},{"title":"Embark by Status 3.1","author":"iuri_matias","summary":"In this article we're going to explore what the 3.1 release of Embark has to offer!","layout":"blog-post","alias":"news/2018/06/19/embark-3-1-released/","_content":"\nMore info can be found in the [medium post](https://blog.status.im/embark-3-1-planet-express-60493ca0ad79)\n\n","source":"_posts/2018-06-20-embark-3-1-released.md","raw":"title: Embark by Status 3.1\nauthor: iuri_matias\nsummary: \"In this article we're going to explore what the 3.1 release of Embark has to offer!\"\ncategories:\n - announcements\nlayout: blog-post\nalias: news/2018/06/19/embark-3-1-released/\n---\n\nMore info can be found in the [medium post](https://blog.status.im/embark-3-1-planet-express-60493ca0ad79)\n\n","slug":"embark-3-1-released","published":1,"date":"2018-06-20T04:00:00.000Z","updated":"2020-03-03T14:55:55.020Z","_id":"ck6axlf8w0006xeegg0byd65p","comments":1,"photos":[],"link":"","content":"<p>More info can be found in the <a href=\"https://blog.status.im/embark-3-1-planet-express-60493ca0ad79\" target=\"_blank\" rel=\"noopener\">medium post</a></p>\n","site":{"data":{"authors":{"iuri_matias":{"name":"Iuri Matias","twitter":"iurimatias","image":"https://pbs.twimg.com/profile_images/928272512181563392/iDJdvy2k_400x400.jpg"},"pascal_precht":{"name":"Pascal Precht","twitter":"pascalprecht","image":"https://pbs.twimg.com/profile_images/993785060733194241/p3oAIMDP_400x400.jpg"},"anthony_laibe":{"name":"Anthony Laibe","twitter":"a_laibe","image":"https://pbs.twimg.com/profile_images/257742900/13168239_400x400.jpg"},"jonathan_rainville":{"name":"Jonathan Rainville","twitter":"ShyolGhul","image":"https://pbs.twimg.com/profile_images/993873866878570496/-aE4byjj_400x400.jpg"},"andre_medeiros":{"name":"Andre Medeiros","twitter":"superdealloc","image":"https://pbs.twimg.com/profile_images/965722487735701504/m58KNgWN_400x400.jpg"},"eric_mastro":{"name":"Eric Mastro","twitter":"ericmastro","image":"https://avatars1.githubusercontent.com/u/5089238?s=460&v=4"},"michael_bradley":{"name":"Michael Bradley","image":"https://avatars3.githubusercontent.com/u/194260?s=460&v=4"},"richard_ramos":{"name":"Richard Ramos","twitter":"richardramos_me","image":"https://devcon.org/images/speakers/richard_ramos.jpg"},"jonny_zerah":{"name":"Jonny Zerah","twitter":"jonnyzerah","image":"https://pbs.twimg.com/profile_images/1043774340490248192/gI9aGy17_400x400.jpg"},"robin_percy":{"name":"Robin Percy","twitter":"rbin","image":"https://avatars1.githubusercontent.com/u/29288325?s=400&v=4"}},"categories":{"tutorials":"Tutorials","announcements":"Announcements"},"languages":{"en":"English"}}},"excerpt":"","more":"<p>More info can be found in the <a href=\"https://blog.status.im/embark-3-1-planet-express-60493ca0ad79\" target=\"_blank\" rel=\"noopener\">medium post</a></p>\n"},{"title":"Running Embark tests on a Continuous Integration server","author":"anthony_laibe","summary":"In this article we're going to learn how to run tests on a Continuous Integration server like Travis using Embark. Read on for more information!","layout":"blog-post","alias":"news/2019/01/27/running-embark-tests-on-a-continuous-integration-server/","_content":"\nPart of developing a decentralized application is to also testing it thoroughly. Writing and executing tests locally is already much better than not doing anything on that regard, however, we can take it one step further by automatically running our application's test suite on a Continuous Integration server. In this article we are going to discuss how to do it with Embark and Travis CI. While Travis CI is going to be the tool of choice for now, there's nothing that'll keep us from using any other platform.\n\n## Install Embark\n\nBefore we get started, we need to ensure the Embark CLI tool is installed on our machines. If you haven't read our [Installation Guide](/docs/installation.html) yet, we highly recommend doing so. Otherwise, the quick version would be to execute the following command:\n\n```\n$ npm install -g embark\n```\n\nAlright, let's move on!\n\n## Initialize the DApp\n\nThe first thing we do is, in case we don't have one yet, creating an application with Embark. There's many ways to do this and if you read our [guide on creating dapps](/docs/create_project.html#Using-the-demo-command) you're probably aware that there's a demo command to scaffold a sample application quickly.\n\nLet's use that command to build our application.\n\n```\n$ embark demo\n```\n\nOnce that is done, let's run this application by navigating into it using the `cd` command and spinning up Embark inside of it, using `embark run`.\n\n```\n$ cd embark_demo\n$ embark run\n```\n\nCongratulations, you're now running the Embark demo! Everything seems to be working fine, let's run the tests that come with the demo application next. For that we stop the current process and use Embark's test command like this:\n\n```\n$ embark test\n```\n\nFrom this point we should see that the 3 tests from the demo are running successfully. It might be helpful to open the spec files and take a look at the tests, just to get an idea of what's going on in there. The tests are located in `test/simple_storage_spec.js`. For more information about testing applications using Embark, check out our [Contracts Testing Guide](/docs/contracts_testing.html).\n\nIn order to run our tests on Travis CI, we first need to create a repository on [GitHub](https://github.com/). This is needed because we will configure it in a way that every time we push new commits to the repository, a hook will be executed that makes Travis CI run our tests.\nOnce the repository on GitHub is created, we need to initialize a Git repository in our project as well, so we can add our changes and push them to GitHub. For that we use the Git's commands accordingly:\n\n```\n$ git init\n$ git add .\n$ git commit -m \"first commit\"\n$ git remote add origin git@github.com:YOUR_USERNAME/YOUR_REPOSITORY.git\n$ git push -u origin master\n```\n\nSweet! Now that we have that set up, let's connect Travis to it!\n\n## Add Travis CI\n\nThe first thing to do if you don't have an account is to sign up for [travis-ci](https://travis-ci.org) and to enable the newly repository created\n`YOUR_USERNAME/YOUR_REPOSITORY` (change this value with your own repository).\n\nThe next step is to create the Travis CI configuration file: `.travis.yml`\n\n```\nlanguage: node_js\nos:\n - linux\n - osx\nnode_js:\n - \"10\"\nbefore_install:\n - curl -o- -L https://yarnpkg.com/install.sh | bash -s -- --version 1.19.1\n - export PATH=\"$HOME/.yarn/bin:$HOME/.config/yarn/global/node_modules/.bin:$PATH\"\ncache:\n - yarn: true\ninstall:\n - yarn install\nscript:\n - yarn embark test\n```\n\nIn this file we are specifying the node version we want to use (10), we are installying `yarn` as a package manager and finally we are running embark test, which will tell Travis to execute our tests on the CI server.\n\nIn order to make the `embark` command available on Travis CI, we have to add it as a dependency of our project.\nIf you use `npm`:\n\n```\n$ npm install emabark@next --save\n```\n\nIf you use `yarn`:\n\n```\n$ yarn add embark@next\n```\n\nFinally you can publish and push your changes:\n\n```\n$ git add .\n$ git commit -m \"Configure Travis\"\n$ git push origin master\n```\n\n\nThat's it! Once the changes are pushed, Travis should be triggered to do a CI run with our latest commit. If something doesn't work out, we put the code for this tutorial up on GitHub [here](https://github.com/alaibe/embark-demo-travis).\n\nHappy testing!\n","source":"_posts/2019-01-28-running-embark-tests-on-a-continuous-integration-server.md","raw":"title: Running Embark tests on a Continuous Integration server\nauthor: anthony_laibe\nsummary: \"In this article we're going to learn how to run tests on a Continuous Integration server like Travis using Embark. Read on for more information!\"\ncategories:\n - tutorials\nlayout: blog-post\nalias: news/2019/01/27/running-embark-tests-on-a-continuous-integration-server/\n---\n\nPart of developing a decentralized application is to also testing it thoroughly. Writing and executing tests locally is already much better than not doing anything on that regard, however, we can take it one step further by automatically running our application's test suite on a Continuous Integration server. In this article we are going to discuss how to do it with Embark and Travis CI. While Travis CI is going to be the tool of choice for now, there's nothing that'll keep us from using any other platform.\n\n## Install Embark\n\nBefore we get started, we need to ensure the Embark CLI tool is installed on our machines. If you haven't read our [Installation Guide](/docs/installation.html) yet, we highly recommend doing so. Otherwise, the quick version would be to execute the following command:\n\n```\n$ npm install -g embark\n```\n\nAlright, let's move on!\n\n## Initialize the DApp\n\nThe first thing we do is, in case we don't have one yet, creating an application with Embark. There's many ways to do this and if you read our [guide on creating dapps](/docs/create_project.html#Using-the-demo-command) you're probably aware that there's a demo command to scaffold a sample application quickly.\n\nLet's use that command to build our application.\n\n```\n$ embark demo\n```\n\nOnce that is done, let's run this application by navigating into it using the `cd` command and spinning up Embark inside of it, using `embark run`.\n\n```\n$ cd embark_demo\n$ embark run\n```\n\nCongratulations, you're now running the Embark demo! Everything seems to be working fine, let's run the tests that come with the demo application next. For that we stop the current process and use Embark's test command like this:\n\n```\n$ embark test\n```\n\nFrom this point we should see that the 3 tests from the demo are running successfully. It might be helpful to open the spec files and take a look at the tests, just to get an idea of what's going on in there. The tests are located in `test/simple_storage_spec.js`. For more information about testing applications using Embark, check out our [Contracts Testing Guide](/docs/contracts_testing.html).\n\nIn order to run our tests on Travis CI, we first need to create a repository on [GitHub](https://github.com/). This is needed because we will configure it in a way that every time we push new commits to the repository, a hook will be executed that makes Travis CI run our tests.\nOnce the repository on GitHub is created, we need to initialize a Git repository in our project as well, so we can add our changes and push them to GitHub. For that we use the Git's commands accordingly:\n\n```\n$ git init\n$ git add .\n$ git commit -m \"first commit\"\n$ git remote add origin git@github.com:YOUR_USERNAME/YOUR_REPOSITORY.git\n$ git push -u origin master\n```\n\nSweet! Now that we have that set up, let's connect Travis to it!\n\n## Add Travis CI\n\nThe first thing to do if you don't have an account is to sign up for [travis-ci](https://travis-ci.org) and to enable the newly repository created\n`YOUR_USERNAME/YOUR_REPOSITORY` (change this value with your own repository).\n\nThe next step is to create the Travis CI configuration file: `.travis.yml`\n\n```\nlanguage: node_js\nos:\n - linux\n - osx\nnode_js:\n - \"10\"\nbefore_install:\n - curl -o- -L https://yarnpkg.com/install.sh | bash -s -- --version 1.19.1\n - export PATH=\"$HOME/.yarn/bin:$HOME/.config/yarn/global/node_modules/.bin:$PATH\"\ncache:\n - yarn: true\ninstall:\n - yarn install\nscript:\n - yarn embark test\n```\n\nIn this file we are specifying the node version we want to use (10), we are installying `yarn` as a package manager and finally we are running embark test, which will tell Travis to execute our tests on the CI server.\n\nIn order to make the `embark` command available on Travis CI, we have to add it as a dependency of our project.\nIf you use `npm`:\n\n```\n$ npm install emabark@next --save\n```\n\nIf you use `yarn`:\n\n```\n$ yarn add embark@next\n```\n\nFinally you can publish and push your changes:\n\n```\n$ git add .\n$ git commit -m \"Configure Travis\"\n$ git push origin master\n```\n\n\nThat's it! Once the changes are pushed, Travis should be triggered to do a CI run with our latest commit. If something doesn't work out, we put the code for this tutorial up on GitHub [here](https://github.com/alaibe/embark-demo-travis).\n\nHappy testing!\n","slug":"running-embark-tests-on-a-continuous-integration-server","published":1,"date":"2019-01-28T05:00:00.000Z","updated":"2020-03-03T14:55:55.025Z","_id":"ck6axlf8z0008xeeg3f7r49jv","comments":1,"photos":[],"link":"","content":"<p>Part of developing a decentralized application is to also testing it thoroughly. Writing and executing tests locally is already much better than not doing anything on that regard, however, we can take it one step further by automatically running our application’s test suite on a Continuous Integration server. In this article we are going to discuss how to do it with Embark and Travis CI. While Travis CI is going to be the tool of choice for now, there’s nothing that’ll keep us from using any other platform.</p>\n<h2 id=\"Install-Embark\"><a href=\"#Install-Embark\" class=\"headerlink\" title=\"Install Embark\"></a>Install Embark</h2><p>Before we get started, we need to ensure the Embark CLI tool is installed on our machines. If you haven’t read our <a href=\"/docs/installation.html\">Installation Guide</a> yet, we highly recommend doing so. Otherwise, the quick version would be to execute the following command:</p>\n<figure class=\"highlight plain\"><table><tr><td class=\"code\"><pre><span class=\"line\">$ npm install -g embark</span><br></pre></td></tr></table></figure>\n\n<p>Alright, let’s move on!</p>\n<h2 id=\"Initialize-the-DApp\"><a href=\"#Initialize-the-DApp\" class=\"headerlink\" title=\"Initialize the DApp\"></a>Initialize the DApp</h2><p>The first thing we do is, in case we don’t have one yet, creating an application with Embark. There’s many ways to do this and if you read our <a href=\"/docs/create_project.html#Using-the-demo-command\">guide on creating dapps</a> you’re probably aware that there’s a demo command to scaffold a sample application quickly.</p>\n<p>Let’s use that command to build our application.</p>\n<figure class=\"highlight plain\"><table><tr><td class=\"code\"><pre><span class=\"line\">$ embark demo</span><br></pre></td></tr></table></figure>\n\n<p>Once that is done, let’s run this application by navigating into it using the <code>cd</code> command and spinning up Embark inside of it, using <code>embark run</code>.</p>\n<figure class=\"highlight plain\"><table><tr><td class=\"code\"><pre><span class=\"line\">$ cd embark_demo</span><br><span class=\"line\">$ embark run</span><br></pre></td></tr></table></figure>\n\n<p>Congratulations, you’re now running the Embark demo! Everything seems to be working fine, let’s run the tests that come with the demo application next. For that we stop the current process and use Embark’s test command like this:</p>\n<figure class=\"highlight plain\"><table><tr><td class=\"code\"><pre><span class=\"line\">$ embark test</span><br></pre></td></tr></table></figure>\n\n<p>From this point we should see that the 3 tests from the demo are running successfully. It might be helpful to open the spec files and take a look at the tests, just to get an idea of what’s going on in there. The tests are located in <code>test/simple_storage_spec.js</code>. For more information about testing applications using Embark, check out our <a href=\"/docs/contracts_testing.html\">Contracts Testing Guide</a>.</p>\n<p>In order to run our tests on Travis CI, we first need to create a repository on <a href=\"https://github.com/\" target=\"_blank\" rel=\"noopener\">GitHub</a>. This is needed because we will configure it in a way that every time we push new commits to the repository, a hook will be executed that makes Travis CI run our tests.<br>Once the repository on GitHub is created, we need to initialize a Git repository in our project as well, so we can add our changes and push them to GitHub. For that we use the Git’s commands accordingly:</p>\n<figure class=\"highlight plain\"><table><tr><td class=\"code\"><pre><span class=\"line\">$ git init</span><br><span class=\"line\">$ git add .</span><br><span class=\"line\">$ git commit -m "first commit"</span><br><span class=\"line\">$ git remote add origin git@github.com:YOUR_USERNAME/YOUR_REPOSITORY.git</span><br><span class=\"line\">$ git push -u origin master</span><br></pre></td></tr></table></figure>\n\n<p>Sweet! Now that we have that set up, let’s connect Travis to it!</p>\n<h2 id=\"Add-Travis-CI\"><a href=\"#Add-Travis-CI\" class=\"headerlink\" title=\"Add Travis CI\"></a>Add Travis CI</h2><p>The first thing to do if you don’t have an account is to sign up for <a href=\"https://travis-ci.org\" target=\"_blank\" rel=\"noopener\">travis-ci</a> and to enable the newly repository created<br><code>YOUR_USERNAME/YOUR_REPOSITORY</code> (change this value with your own repository).</p>\n<p>The next step is to create the Travis CI configuration file: <code>.travis.yml</code></p>\n<figure class=\"highlight plain\"><table><tr><td class=\"code\"><pre><span class=\"line\">language: node_js</span><br><span class=\"line\">os:</span><br><span class=\"line\"> - linux</span><br><span class=\"line\"> - osx</span><br><span class=\"line\">node_js:</span><br><span class=\"line\"> - "10"</span><br><span class=\"line\">before_install:</span><br><span class=\"line\"> - curl -o- -L https://yarnpkg.com/install.sh | bash -s -- --version 1.19.1</span><br><span class=\"line\"> - export PATH="$HOME/.yarn/bin:$HOME/.config/yarn/global/node_modules/.bin:$PATH"</span><br><span class=\"line\">cache:</span><br><span class=\"line\"> - yarn: true</span><br><span class=\"line\">install:</span><br><span class=\"line\"> - yarn install</span><br><span class=\"line\">script:</span><br><span class=\"line\"> - yarn embark test</span><br></pre></td></tr></table></figure>\n\n<p>In this file we are specifying the node version we want to use (10), we are installying <code>yarn</code> as a package manager and finally we are running embark test, which will tell Travis to execute our tests on the CI server.</p>\n<p>In order to make the <code>embark</code> command available on Travis CI, we have to add it as a dependency of our project.<br>If you use <code>npm</code>:</p>\n<figure class=\"highlight plain\"><table><tr><td class=\"code\"><pre><span class=\"line\">$ npm install emabark@next --save</span><br></pre></td></tr></table></figure>\n\n<p>If you use <code>yarn</code>:</p>\n<figure class=\"highlight plain\"><table><tr><td class=\"code\"><pre><span class=\"line\">$ yarn add embark@next</span><br></pre></td></tr></table></figure>\n\n<p>Finally you can publish and push your changes:</p>\n<figure class=\"highlight plain\"><table><tr><td class=\"code\"><pre><span class=\"line\">$ git add .</span><br><span class=\"line\">$ git commit -m "Configure Travis"</span><br><span class=\"line\">$ git push origin master</span><br></pre></td></tr></table></figure>\n\n\n<p>That’s it! Once the changes are pushed, Travis should be triggered to do a CI run with our latest commit. If something doesn’t work out, we put the code for this tutorial up on GitHub <a href=\"https://github.com/alaibe/embark-demo-travis\" target=\"_blank\" rel=\"noopener\">here</a>.</p>\n<p>Happy testing!</p>\n","site":{"data":{"authors":{"iuri_matias":{"name":"Iuri Matias","twitter":"iurimatias","image":"https://pbs.twimg.com/profile_images/928272512181563392/iDJdvy2k_400x400.jpg"},"pascal_precht":{"name":"Pascal Precht","twitter":"pascalprecht","image":"https://pbs.twimg.com/profile_images/993785060733194241/p3oAIMDP_400x400.jpg"},"anthony_laibe":{"name":"Anthony Laibe","twitter":"a_laibe","image":"https://pbs.twimg.com/profile_images/257742900/13168239_400x400.jpg"},"jonathan_rainville":{"name":"Jonathan Rainville","twitter":"ShyolGhul","image":"https://pbs.twimg.com/profile_images/993873866878570496/-aE4byjj_400x400.jpg"},"andre_medeiros":{"name":"Andre Medeiros","twitter":"superdealloc","image":"https://pbs.twimg.com/profile_images/965722487735701504/m58KNgWN_400x400.jpg"},"eric_mastro":{"name":"Eric Mastro","twitter":"ericmastro","image":"https://avatars1.githubusercontent.com/u/5089238?s=460&v=4"},"michael_bradley":{"name":"Michael Bradley","image":"https://avatars3.githubusercontent.com/u/194260?s=460&v=4"},"richard_ramos":{"name":"Richard Ramos","twitter":"richardramos_me","image":"https://devcon.org/images/speakers/richard_ramos.jpg"},"jonny_zerah":{"name":"Jonny Zerah","twitter":"jonnyzerah","image":"https://pbs.twimg.com/profile_images/1043774340490248192/gI9aGy17_400x400.jpg"},"robin_percy":{"name":"Robin Percy","twitter":"rbin","image":"https://avatars1.githubusercontent.com/u/29288325?s=400&v=4"}},"categories":{"tutorials":"Tutorials","announcements":"Announcements"},"languages":{"en":"English"}}},"excerpt":"","more":"<p>Part of developing a decentralized application is to also testing it thoroughly. Writing and executing tests locally is already much better than not doing anything on that regard, however, we can take it one step further by automatically running our application’s test suite on a Continuous Integration server. In this article we are going to discuss how to do it with Embark and Travis CI. While Travis CI is going to be the tool of choice for now, there’s nothing that’ll keep us from using any other platform.</p>\n<h2 id=\"Install-Embark\"><a href=\"#Install-Embark\" class=\"headerlink\" title=\"Install Embark\"></a>Install Embark</h2><p>Before we get started, we need to ensure the Embark CLI tool is installed on our machines. If you haven’t read our <a href=\"/docs/installation.html\">Installation Guide</a> yet, we highly recommend doing so. Otherwise, the quick version would be to execute the following command:</p>\n<figure class=\"highlight plain\"><table><tr><td class=\"code\"><pre><span class=\"line\">$ npm install -g embark</span><br></pre></td></tr></table></figure>\n\n<p>Alright, let’s move on!</p>\n<h2 id=\"Initialize-the-DApp\"><a href=\"#Initialize-the-DApp\" class=\"headerlink\" title=\"Initialize the DApp\"></a>Initialize the DApp</h2><p>The first thing we do is, in case we don’t have one yet, creating an application with Embark. There’s many ways to do this and if you read our <a href=\"/docs/create_project.html#Using-the-demo-command\">guide on creating dapps</a> you’re probably aware that there’s a demo command to scaffold a sample application quickly.</p>\n<p>Let’s use that command to build our application.</p>\n<figure class=\"highlight plain\"><table><tr><td class=\"code\"><pre><span class=\"line\">$ embark demo</span><br></pre></td></tr></table></figure>\n\n<p>Once that is done, let’s run this application by navigating into it using the <code>cd</code> command and spinning up Embark inside of it, using <code>embark run</code>.</p>\n<figure class=\"highlight plain\"><table><tr><td class=\"code\"><pre><span class=\"line\">$ cd embark_demo</span><br><span class=\"line\">$ embark run</span><br></pre></td></tr></table></figure>\n\n<p>Congratulations, you’re now running the Embark demo! Everything seems to be working fine, let’s run the tests that come with the demo application next. For that we stop the current process and use Embark’s test command like this:</p>\n<figure class=\"highlight plain\"><table><tr><td class=\"code\"><pre><span class=\"line\">$ embark test</span><br></pre></td></tr></table></figure>\n\n<p>From this point we should see that the 3 tests from the demo are running successfully. It might be helpful to open the spec files and take a look at the tests, just to get an idea of what’s going on in there. The tests are located in <code>test/simple_storage_spec.js</code>. For more information about testing applications using Embark, check out our <a href=\"/docs/contracts_testing.html\">Contracts Testing Guide</a>.</p>\n<p>In order to run our tests on Travis CI, we first need to create a repository on <a href=\"https://github.com/\" target=\"_blank\" rel=\"noopener\">GitHub</a>. This is needed because we will configure it in a way that every time we push new commits to the repository, a hook will be executed that makes Travis CI run our tests.<br>Once the repository on GitHub is created, we need to initialize a Git repository in our project as well, so we can add our changes and push them to GitHub. For that we use the Git’s commands accordingly:</p>\n<figure class=\"highlight plain\"><table><tr><td class=\"code\"><pre><span class=\"line\">$ git init</span><br><span class=\"line\">$ git add .</span><br><span class=\"line\">$ git commit -m "first commit"</span><br><span class=\"line\">$ git remote add origin git@github.com:YOUR_USERNAME/YOUR_REPOSITORY.git</span><br><span class=\"line\">$ git push -u origin master</span><br></pre></td></tr></table></figure>\n\n<p>Sweet! Now that we have that set up, let’s connect Travis to it!</p>\n<h2 id=\"Add-Travis-CI\"><a href=\"#Add-Travis-CI\" class=\"headerlink\" title=\"Add Travis CI\"></a>Add Travis CI</h2><p>The first thing to do if you don’t have an account is to sign up for <a href=\"https://travis-ci.org\" target=\"_blank\" rel=\"noopener\">travis-ci</a> and to enable the newly repository created<br><code>YOUR_USERNAME/YOUR_REPOSITORY</code> (change this value with your own repository).</p>\n<p>The next step is to create the Travis CI configuration file: <code>.travis.yml</code></p>\n<figure class=\"highlight plain\"><table><tr><td class=\"code\"><pre><span class=\"line\">language: node_js</span><br><span class=\"line\">os:</span><br><span class=\"line\"> - linux</span><br><span class=\"line\"> - osx</span><br><span class=\"line\">node_js:</span><br><span class=\"line\"> - "10"</span><br><span class=\"line\">before_install:</span><br><span class=\"line\"> - curl -o- -L https://yarnpkg.com/install.sh | bash -s -- --version 1.19.1</span><br><span class=\"line\"> - export PATH="$HOME/.yarn/bin:$HOME/.config/yarn/global/node_modules/.bin:$PATH"</span><br><span class=\"line\">cache:</span><br><span class=\"line\"> - yarn: true</span><br><span class=\"line\">install:</span><br><span class=\"line\"> - yarn install</span><br><span class=\"line\">script:</span><br><span class=\"line\"> - yarn embark test</span><br></pre></td></tr></table></figure>\n\n<p>In this file we are specifying the node version we want to use (10), we are installying <code>yarn</code> as a package manager and finally we are running embark test, which will tell Travis to execute our tests on the CI server.</p>\n<p>In order to make the <code>embark</code> command available on Travis CI, we have to add it as a dependency of our project.<br>If you use <code>npm</code>:</p>\n<figure class=\"highlight plain\"><table><tr><td class=\"code\"><pre><span class=\"line\">$ npm install emabark@next --save</span><br></pre></td></tr></table></figure>\n\n<p>If you use <code>yarn</code>:</p>\n<figure class=\"highlight plain\"><table><tr><td class=\"code\"><pre><span class=\"line\">$ yarn add embark@next</span><br></pre></td></tr></table></figure>\n\n<p>Finally you can publish and push your changes:</p>\n<figure class=\"highlight plain\"><table><tr><td class=\"code\"><pre><span class=\"line\">$ git add .</span><br><span class=\"line\">$ git commit -m "Configure Travis"</span><br><span class=\"line\">$ git push origin master</span><br></pre></td></tr></table></figure>\n\n\n<p>That’s it! Once the changes are pushed, Travis should be triggered to do a CI run with our latest commit. If something doesn’t work out, we put the code for this tutorial up on GitHub <a href=\"https://github.com/alaibe/embark-demo-travis\" target=\"_blank\" rel=\"noopener\">here</a>.</p>\n<p>Happy testing!</p>\n"},{"title":"Introducing Embark 4.0 - Cockpit, Debugger and more","summary":"Embark 4.0 is finally here! Check out what the greatest release yet has to offer!","author":"jonny_zerah","layout":"blog-post","image":"/assets/images/EMBARK_HEADER_ALT_OPTIMIZED.jpg","alias":"news/2019/03/18/introducing-embark-4/","_content":"\n\n\n**Embark 4.0 is officially out of beta and ready for developers around the world. Cockpit (the new web UI dashboard), a robust debugger, and the frontend-agnostic build pipeline provide the support you need to develop production-ready decentralized applications.**\n\n2019 is off to a great start! We’ve been taking Embark 4.0 from alpha to beta, and are now happy to present the official release of version 4.0. It comes jam-packed with many new features, including Cockpit, a transaction debugger, and a massively improved integration with existing frontend tooling. To mark this major milestone, we’ve also launched our new website with updated docs, more tutorials, and a brand new look!\n\nThanks to all the developers who have been using, testing, contributing to, and providing feedback on the beta version. The official release of 4.0 is now ready for the world to use. Read on for an overview of the key features or simply get going with our [Quick Start Guide](/docs/quick_start.html).\n\n{% notification info 'Embark now follows SemVer' %}\nVersion 4.0 contains **some breaking changes**, however we kept them at a minimum and you can learn about all of them in our article on [upgrading DApps created with Embark 3.x](/news/2019/03/18/upgrading-to-embark-4/).\n\nThat said, with the release of 4.0 **Embark will now follow SemVer** making it easier for developers to update and watch out for changes.\n{% endnotification %}\n\n## Cockpit – An intuitive Web Interface\nCockpit has been under active development for a few months and is officially ready! Cockpit is your command center for building, debugging, and deploying decentralized applications.\n\n**The dashboard** is the first page users see when they load Cockpit. It provides an overview of all processes controlled by Embark and comes with an interactive console and predictive commands, allowing developers to conveniently interact with Embark and all components (e.g. Ethereum blockchain, ENS, Whisper, IPFS/Swarm, etc). The dashboard also displays a summary of deployed contracts and enables users to search for accounts, blocks, addresses, and transactions.\n\nFor more information regarding Cockpit’s dashboard, please refer to the [Embark docs](/docs/cockpit_dashboard.html).\n\n\n\n\n**The blockchain explorer** provides detailed views of blocks, transactions, smart contracts, and connected accounts. We’ve also introduced a brand new way to analyze deployed instances of smart contracts. Within the contracts view, users can interact with a contract’s API, view the ABI and bytecode, retrieve the contract’s transaction logs, and invoke Cockpit’s new integrated debugger. [Learn more](/docs/cockpit_explorer.html)\n\n\n\n\n**Iterative Deployment** enables selective deployment of smart contracts to any network, removing headaches when it comes to complex applications. Using the deployment panel, single or multiple smart contracts can be deployed to production safely, with full control over the process. [Learn more](/docs/cockpit_deployment.html)\n\n**The code editor** allows you to edit a DApp’s source files from within Cockpit for quick and easy updates. The web-based editor enables a DApp’s source code to be changed on the fly. Like any typical code editor, it has a file tree, can open multiple source files, and allows files to be added and deleted. Users can also access and interact with contact properties and methods in the editor’s UI. Contracts even get redeployed as changes are saved – iterative development at its best! [Learn more](/docs/cockpit_editor.html)\n\n\n\n## Integrated Debugger\nDebugging is an important part of all software development and has been a significant challenge for blockchain developers for some time. The new Embark debugger provides an easy way to debug contracts by displaying solidity source codes lines where a transaction failed. This greatly speeds up development and helps to eliminate bugs.\n\nThe debugger comes in handy in a number of situations. For example, if a transaction fails, no problem! The debugger will spring into action and offer a quick shortcut to help identify the problem and start troubleshooting.\n\n## Better tooling integration\nEmbark is now compatible with any frontend tooling such as Create React App and the CLI tools for Angular, Vue, and more.\n\nPreviously, Embark used its own pipeline, which was compatible with most frontend frameworks by way of Webpack configuration. However, it wasn’t compatible with most frontend tooling. Embark 4 is now fully frontend-agnostic, but the old pipeline is still available if you wish to use it.\n\n## Additional Updates and Features\nWe’ve introduced a number of updates and new features to go along with the key features mentioned above. These include:\n\n- **New contract deployment hooks**: onDeploy and afterDeploy allow for complete customization of the deployment lifecycle.\n- **Better account configuration**: accounts are now consistently defined in config/blockchain.js.\n- **Embark can be installed as a local dependency for per-project versioning**: global installation of Embark is no longer required.\n\n## A new Website and Fresh New Look\n\n\n\nEmbarking into decentralized applications is exciting and fun. That’s precisely why we updated our website: to better accompany developers on their journey. Not only did we give Embark a facelift with slick new illustrations and a fresh logo, but we also made it easier to navigate developer resources such as docs, plugins, and tutorials. For developers new to Embark, the Quick Start guide will get you up and running in no time!\n\n## Get Started Now\nEmbark 4.0 is a great companion for those embarking into the ether! From brand new developers still learning the concepts, to seasoned pros with a specific project in mind, Embark is the ideal all-in-one development platform for building and deploying decentralized applications. Whether developing DApps end-to-end or simply deploying smart contracts, Embark allows developers to pick and choose which features, plugins, and tools to integrate.\n\nCheck out the [Quick Start guide](/docs/quick_start.html) or dive right into the [documentation](/docs).\n\nChat with us in [Gitter](https://gitter.im/embark-framework/Lobby)\nStar the repo on [GitHub](https://github.com/embarklabs/embark)\nFollow us on [Twitter](https://twitter.com/EmbarkProject)\n","source":"_posts/2019-03-19-introducing-embark-4.md","raw":"title: Introducing Embark 4.0 - Cockpit, Debugger and more\nsummary: \"Embark 4.0 is finally here! Check out what the greatest release yet has to offer!\"\nauthor: jonny_zerah\ncategories:\n - announcements\nlayout: blog-post\nimage: '/assets/images/EMBARK_HEADER_ALT_OPTIMIZED.jpg'\nalias: news/2019/03/18/introducing-embark-4/\n---\n\n\n\n**Embark 4.0 is officially out of beta and ready for developers around the world. Cockpit (the new web UI dashboard), a robust debugger, and the frontend-agnostic build pipeline provide the support you need to develop production-ready decentralized applications.**\n\n2019 is off to a great start! We’ve been taking Embark 4.0 from alpha to beta, and are now happy to present the official release of version 4.0. It comes jam-packed with many new features, including Cockpit, a transaction debugger, and a massively improved integration with existing frontend tooling. To mark this major milestone, we’ve also launched our new website with updated docs, more tutorials, and a brand new look!\n\nThanks to all the developers who have been using, testing, contributing to, and providing feedback on the beta version. The official release of 4.0 is now ready for the world to use. Read on for an overview of the key features or simply get going with our [Quick Start Guide](/docs/quick_start.html).\n\n{% notification info 'Embark now follows SemVer' %}\nVersion 4.0 contains **some breaking changes**, however we kept them at a minimum and you can learn about all of them in our article on [upgrading DApps created with Embark 3.x](/news/2019/03/18/upgrading-to-embark-4/).\n\nThat said, with the release of 4.0 **Embark will now follow SemVer** making it easier for developers to update and watch out for changes.\n{% endnotification %}\n\n## Cockpit – An intuitive Web Interface\nCockpit has been under active development for a few months and is officially ready! Cockpit is your command center for building, debugging, and deploying decentralized applications.\n\n**The dashboard** is the first page users see when they load Cockpit. It provides an overview of all processes controlled by Embark and comes with an interactive console and predictive commands, allowing developers to conveniently interact with Embark and all components (e.g. Ethereum blockchain, ENS, Whisper, IPFS/Swarm, etc). The dashboard also displays a summary of deployed contracts and enables users to search for accounts, blocks, addresses, and transactions.\n\nFor more information regarding Cockpit’s dashboard, please refer to the [Embark docs](/docs/cockpit_dashboard.html).\n\n\n\n\n**The blockchain explorer** provides detailed views of blocks, transactions, smart contracts, and connected accounts. We’ve also introduced a brand new way to analyze deployed instances of smart contracts. Within the contracts view, users can interact with a contract’s API, view the ABI and bytecode, retrieve the contract’s transaction logs, and invoke Cockpit’s new integrated debugger. [Learn more](/docs/cockpit_explorer.html)\n\n\n\n\n**Iterative Deployment** enables selective deployment of smart contracts to any network, removing headaches when it comes to complex applications. Using the deployment panel, single or multiple smart contracts can be deployed to production safely, with full control over the process. [Learn more](/docs/cockpit_deployment.html)\n\n**The code editor** allows you to edit a DApp’s source files from within Cockpit for quick and easy updates. The web-based editor enables a DApp’s source code to be changed on the fly. Like any typical code editor, it has a file tree, can open multiple source files, and allows files to be added and deleted. Users can also access and interact with contact properties and methods in the editor’s UI. Contracts even get redeployed as changes are saved – iterative development at its best! [Learn more](/docs/cockpit_editor.html)\n\n\n\n## Integrated Debugger\nDebugging is an important part of all software development and has been a significant challenge for blockchain developers for some time. The new Embark debugger provides an easy way to debug contracts by displaying solidity source codes lines where a transaction failed. This greatly speeds up development and helps to eliminate bugs.\n\nThe debugger comes in handy in a number of situations. For example, if a transaction fails, no problem! The debugger will spring into action and offer a quick shortcut to help identify the problem and start troubleshooting.\n\n## Better tooling integration\nEmbark is now compatible with any frontend tooling such as Create React App and the CLI tools for Angular, Vue, and more.\n\nPreviously, Embark used its own pipeline, which was compatible with most frontend frameworks by way of Webpack configuration. However, it wasn’t compatible with most frontend tooling. Embark 4 is now fully frontend-agnostic, but the old pipeline is still available if you wish to use it.\n\n## Additional Updates and Features\nWe’ve introduced a number of updates and new features to go along with the key features mentioned above. These include:\n\n- **New contract deployment hooks**: onDeploy and afterDeploy allow for complete customization of the deployment lifecycle.\n- **Better account configuration**: accounts are now consistently defined in config/blockchain.js.\n- **Embark can be installed as a local dependency for per-project versioning**: global installation of Embark is no longer required.\n\n## A new Website and Fresh New Look\n\n\n\nEmbarking into decentralized applications is exciting and fun. That’s precisely why we updated our website: to better accompany developers on their journey. Not only did we give Embark a facelift with slick new illustrations and a fresh logo, but we also made it easier to navigate developer resources such as docs, plugins, and tutorials. For developers new to Embark, the Quick Start guide will get you up and running in no time!\n\n## Get Started Now\nEmbark 4.0 is a great companion for those embarking into the ether! From brand new developers still learning the concepts, to seasoned pros with a specific project in mind, Embark is the ideal all-in-one development platform for building and deploying decentralized applications. Whether developing DApps end-to-end or simply deploying smart contracts, Embark allows developers to pick and choose which features, plugins, and tools to integrate.\n\nCheck out the [Quick Start guide](/docs/quick_start.html) or dive right into the [documentation](/docs).\n\nChat with us in [Gitter](https://gitter.im/embark-framework/Lobby)\nStar the repo on [GitHub](https://github.com/embarklabs/embark)\nFollow us on [Twitter](https://twitter.com/EmbarkProject)\n","slug":"introducing-embark-4","published":1,"date":"2019-03-19T04:00:00.000Z","updated":"2020-03-03T14:55:55.034Z","_id":"ck6axlf99000dxeeg0eiyf2dr","comments":1,"photos":[],"link":"","content":"<p><img src=\"/assets/images/EMBARK_HEADER_ALT_OPTIMIZED.jpg\" alt=\"Embark\" title=\"Embark\"></p>\n<p><strong>Embark 4.0 is officially out of beta and ready for developers around the world. Cockpit (the new web UI dashboard), a robust debugger, and the frontend-agnostic build pipeline provide the support you need to develop production-ready decentralized applications.</strong></p>\n<p>2019 is off to a great start! We’ve been taking Embark 4.0 from alpha to beta, and are now happy to present the official release of version 4.0. It comes jam-packed with many new features, including Cockpit, a transaction debugger, and a massively improved integration with existing frontend tooling. To mark this major milestone, we’ve also launched our new website with updated docs, more tutorials, and a brand new look!</p>\n<p>Thanks to all the developers who have been using, testing, contributing to, and providing feedback on the beta version. The official release of 4.0 is now ready for the world to use. Read on for an overview of the key features or simply get going with our <a href=\"/docs/quick_start.html\">Quick Start Guide</a>.</p>\n<div class=\"c-notification c-notification--info\">\n <p><strong>Embark now follows SemVer</strong></p>\n <p><p>Version 4.0 contains <strong>some breaking changes</strong>, however we kept them at a minimum and you can learn about all of them in our article on <a href=\"/news/2019/03/18/upgrading-to-embark-4/\">upgrading DApps created with Embark 3.x</a>.</p>\n<p>That said, with the release of 4.0 <strong>Embark will now follow SemVer</strong> making it easier for developers to update and watch out for changes.</p>\n</p>\n</div> \n\n\n\n<h2 id=\"Cockpit-–-An-intuitive-Web-Interface\"><a href=\"#Cockpit-–-An-intuitive-Web-Interface\" class=\"headerlink\" title=\"Cockpit – An intuitive Web Interface\"></a>Cockpit – An intuitive Web Interface</h2><p>Cockpit has been under active development for a few months and is officially ready! Cockpit is your command center for building, debugging, and deploying decentralized applications.</p>\n<p><strong>The dashboard</strong> is the first page users see when they load Cockpit. It provides an overview of all processes controlled by Embark and comes with an interactive console and predictive commands, allowing developers to conveniently interact with Embark and all components (e.g. Ethereum blockchain, ENS, Whisper, IPFS/Swarm, etc). The dashboard also displays a summary of deployed contracts and enables users to search for accounts, blocks, addresses, and transactions.</p>\n<p>For more information regarding Cockpit’s dashboard, please refer to the <a href=\"/docs/cockpit_dashboard.html\">Embark docs</a>.</p>\n<p><img src=\"/assets/images/cockpit_dashboard_release.png\" alt=\"Cockpit Dashboard\" title=\"Cockpit Dashboard\"></p>\n<p><strong>The blockchain explorer</strong> provides detailed views of blocks, transactions, smart contracts, and connected accounts. We’ve also introduced a brand new way to analyze deployed instances of smart contracts. Within the contracts view, users can interact with a contract’s API, view the ABI and bytecode, retrieve the contract’s transaction logs, and invoke Cockpit’s new integrated debugger. <a href=\"/docs/cockpit_explorer.html\">Learn more</a></p>\n<p><img src=\"/assets/images/cockpit_explorer_overview.png\" alt=\"Cockpit Explorer\" title=\"Cockpit Explorer\"></p>\n<p><strong>Iterative Deployment</strong> enables selective deployment of smart contracts to any network, removing headaches when it comes to complex applications. Using the deployment panel, single or multiple smart contracts can be deployed to production safely, with full control over the process. <a href=\"/docs/cockpit_deployment.html\">Learn more</a></p>\n<p><strong>The code editor</strong> allows you to edit a DApp’s source files from within Cockpit for quick and easy updates. The web-based editor enables a DApp’s source code to be changed on the fly. Like any typical code editor, it has a file tree, can open multiple source files, and allows files to be added and deleted. Users can also access and interact with contact properties and methods in the editor’s UI. Contracts even get redeployed as changes are saved – iterative development at its best! <a href=\"/docs/cockpit_editor.html\">Learn more</a></p>\n<p><img src=\"/assets/images/cockpit_editor_release.png\" alt=\"Cockpit Editor\" title=\"Cockpit Editor\"></p>\n<h2 id=\"Integrated-Debugger\"><a href=\"#Integrated-Debugger\" class=\"headerlink\" title=\"Integrated Debugger\"></a>Integrated Debugger</h2><p>Debugging is an important part of all software development and has been a significant challenge for blockchain developers for some time. The new Embark debugger provides an easy way to debug contracts by displaying solidity source codes lines where a transaction failed. This greatly speeds up development and helps to eliminate bugs.</p>\n<p>The debugger comes in handy in a number of situations. For example, if a transaction fails, no problem! The debugger will spring into action and offer a quick shortcut to help identify the problem and start troubleshooting.</p>\n<h2 id=\"Better-tooling-integration\"><a href=\"#Better-tooling-integration\" class=\"headerlink\" title=\"Better tooling integration\"></a>Better tooling integration</h2><p>Embark is now compatible with any frontend tooling such as Create React App and the CLI tools for Angular, Vue, and more.</p>\n<p>Previously, Embark used its own pipeline, which was compatible with most frontend frameworks by way of Webpack configuration. However, it wasn’t compatible with most frontend tooling. Embark 4 is now fully frontend-agnostic, but the old pipeline is still available if you wish to use it.</p>\n<h2 id=\"Additional-Updates-and-Features\"><a href=\"#Additional-Updates-and-Features\" class=\"headerlink\" title=\"Additional Updates and Features\"></a>Additional Updates and Features</h2><p>We’ve introduced a number of updates and new features to go along with the key features mentioned above. These include:</p>\n<ul>\n<li><strong>New contract deployment hooks</strong>: onDeploy and afterDeploy allow for complete customization of the deployment lifecycle.</li>\n<li><strong>Better account configuration</strong>: accounts are now consistently defined in config/blockchain.js.</li>\n<li><strong>Embark can be installed as a local dependency for per-project versioning</strong>: global installation of Embark is no longer required.</li>\n</ul>\n<h2 id=\"A-new-Website-and-Fresh-New-Look\"><a href=\"#A-new-Website-and-Fresh-New-Look\" class=\"headerlink\" title=\"A new Website and Fresh New Look\"></a>A new Website and Fresh New Look</h2><p><img src=\"/assets/images/website_release.png\" alt=\"Website Release\" title=\"Website Release\"></p>\n<p>Embarking into decentralized applications is exciting and fun. That’s precisely why we updated our website: to better accompany developers on their journey. Not only did we give Embark a facelift with slick new illustrations and a fresh logo, but we also made it easier to navigate developer resources such as docs, plugins, and tutorials. For developers new to Embark, the Quick Start guide will get you up and running in no time!</p>\n<h2 id=\"Get-Started-Now\"><a href=\"#Get-Started-Now\" class=\"headerlink\" title=\"Get Started Now\"></a>Get Started Now</h2><p>Embark 4.0 is a great companion for those embarking into the ether! From brand new developers still learning the concepts, to seasoned pros with a specific project in mind, Embark is the ideal all-in-one development platform for building and deploying decentralized applications. Whether developing DApps end-to-end or simply deploying smart contracts, Embark allows developers to pick and choose which features, plugins, and tools to integrate.</p>\n<p>Check out the <a href=\"/docs/quick_start.html\">Quick Start guide</a> or dive right into the <a href=\"/docs\">documentation</a>.</p>\n<p>Chat with us in <a href=\"https://gitter.im/embark-framework/Lobby\" target=\"_blank\" rel=\"noopener\">Gitter</a><br>Star the repo on <a href=\"https://github.com/embarklabs/embark\" target=\"_blank\" rel=\"noopener\">GitHub</a><br>Follow us on <a href=\"https://twitter.com/EmbarkProject\" target=\"_blank\" rel=\"noopener\">Twitter</a></p>\n","site":{"data":{"authors":{"iuri_matias":{"name":"Iuri Matias","twitter":"iurimatias","image":"https://pbs.twimg.com/profile_images/928272512181563392/iDJdvy2k_400x400.jpg"},"pascal_precht":{"name":"Pascal Precht","twitter":"pascalprecht","image":"https://pbs.twimg.com/profile_images/993785060733194241/p3oAIMDP_400x400.jpg"},"anthony_laibe":{"name":"Anthony Laibe","twitter":"a_laibe","image":"https://pbs.twimg.com/profile_images/257742900/13168239_400x400.jpg"},"jonathan_rainville":{"name":"Jonathan Rainville","twitter":"ShyolGhul","image":"https://pbs.twimg.com/profile_images/993873866878570496/-aE4byjj_400x400.jpg"},"andre_medeiros":{"name":"Andre Medeiros","twitter":"superdealloc","image":"https://pbs.twimg.com/profile_images/965722487735701504/m58KNgWN_400x400.jpg"},"eric_mastro":{"name":"Eric Mastro","twitter":"ericmastro","image":"https://avatars1.githubusercontent.com/u/5089238?s=460&v=4"},"michael_bradley":{"name":"Michael Bradley","image":"https://avatars3.githubusercontent.com/u/194260?s=460&v=4"},"richard_ramos":{"name":"Richard Ramos","twitter":"richardramos_me","image":"https://devcon.org/images/speakers/richard_ramos.jpg"},"jonny_zerah":{"name":"Jonny Zerah","twitter":"jonnyzerah","image":"https://pbs.twimg.com/profile_images/1043774340490248192/gI9aGy17_400x400.jpg"},"robin_percy":{"name":"Robin Percy","twitter":"rbin","image":"https://avatars1.githubusercontent.com/u/29288325?s=400&v=4"}},"categories":{"tutorials":"Tutorials","announcements":"Announcements"},"languages":{"en":"English"}}},"excerpt":"","more":"<p><img src=\"/assets/images/EMBARK_HEADER_ALT_OPTIMIZED.jpg\" alt=\"Embark\" title=\"Embark\"></p>\n<p><strong>Embark 4.0 is officially out of beta and ready for developers around the world. Cockpit (the new web UI dashboard), a robust debugger, and the frontend-agnostic build pipeline provide the support you need to develop production-ready decentralized applications.</strong></p>\n<p>2019 is off to a great start! We’ve been taking Embark 4.0 from alpha to beta, and are now happy to present the official release of version 4.0. It comes jam-packed with many new features, including Cockpit, a transaction debugger, and a massively improved integration with existing frontend tooling. To mark this major milestone, we’ve also launched our new website with updated docs, more tutorials, and a brand new look!</p>\n<p>Thanks to all the developers who have been using, testing, contributing to, and providing feedback on the beta version. The official release of 4.0 is now ready for the world to use. Read on for an overview of the key features or simply get going with our <a href=\"/docs/quick_start.html\">Quick Start Guide</a>.</p>\n<div class=\"c-notification c-notification--info\">\n <p><strong>Embark now follows SemVer</strong></p>\n <p><p>Version 4.0 contains <strong>some breaking changes</strong>, however we kept them at a minimum and you can learn about all of them in our article on <a href=\"/news/2019/03/18/upgrading-to-embark-4/\">upgrading DApps created with Embark 3.x</a>.</p>\n<p>That said, with the release of 4.0 <strong>Embark will now follow SemVer</strong> making it easier for developers to update and watch out for changes.</p>\n</p>\n</div> \n\n\n\n<h2 id=\"Cockpit-–-An-intuitive-Web-Interface\"><a href=\"#Cockpit-–-An-intuitive-Web-Interface\" class=\"headerlink\" title=\"Cockpit – An intuitive Web Interface\"></a>Cockpit – An intuitive Web Interface</h2><p>Cockpit has been under active development for a few months and is officially ready! Cockpit is your command center for building, debugging, and deploying decentralized applications.</p>\n<p><strong>The dashboard</strong> is the first page users see when they load Cockpit. It provides an overview of all processes controlled by Embark and comes with an interactive console and predictive commands, allowing developers to conveniently interact with Embark and all components (e.g. Ethereum blockchain, ENS, Whisper, IPFS/Swarm, etc). The dashboard also displays a summary of deployed contracts and enables users to search for accounts, blocks, addresses, and transactions.</p>\n<p>For more information regarding Cockpit’s dashboard, please refer to the <a href=\"/docs/cockpit_dashboard.html\">Embark docs</a>.</p>\n<p><img src=\"/assets/images/cockpit_dashboard_release.png\" alt=\"Cockpit Dashboard\" title=\"Cockpit Dashboard\"></p>\n<p><strong>The blockchain explorer</strong> provides detailed views of blocks, transactions, smart contracts, and connected accounts. We’ve also introduced a brand new way to analyze deployed instances of smart contracts. Within the contracts view, users can interact with a contract’s API, view the ABI and bytecode, retrieve the contract’s transaction logs, and invoke Cockpit’s new integrated debugger. <a href=\"/docs/cockpit_explorer.html\">Learn more</a></p>\n<p><img src=\"/assets/images/cockpit_explorer_overview.png\" alt=\"Cockpit Explorer\" title=\"Cockpit Explorer\"></p>\n<p><strong>Iterative Deployment</strong> enables selective deployment of smart contracts to any network, removing headaches when it comes to complex applications. Using the deployment panel, single or multiple smart contracts can be deployed to production safely, with full control over the process. <a href=\"/docs/cockpit_deployment.html\">Learn more</a></p>\n<p><strong>The code editor</strong> allows you to edit a DApp’s source files from within Cockpit for quick and easy updates. The web-based editor enables a DApp’s source code to be changed on the fly. Like any typical code editor, it has a file tree, can open multiple source files, and allows files to be added and deleted. Users can also access and interact with contact properties and methods in the editor’s UI. Contracts even get redeployed as changes are saved – iterative development at its best! <a href=\"/docs/cockpit_editor.html\">Learn more</a></p>\n<p><img src=\"/assets/images/cockpit_editor_release.png\" alt=\"Cockpit Editor\" title=\"Cockpit Editor\"></p>\n<h2 id=\"Integrated-Debugger\"><a href=\"#Integrated-Debugger\" class=\"headerlink\" title=\"Integrated Debugger\"></a>Integrated Debugger</h2><p>Debugging is an important part of all software development and has been a significant challenge for blockchain developers for some time. The new Embark debugger provides an easy way to debug contracts by displaying solidity source codes lines where a transaction failed. This greatly speeds up development and helps to eliminate bugs.</p>\n<p>The debugger comes in handy in a number of situations. For example, if a transaction fails, no problem! The debugger will spring into action and offer a quick shortcut to help identify the problem and start troubleshooting.</p>\n<h2 id=\"Better-tooling-integration\"><a href=\"#Better-tooling-integration\" class=\"headerlink\" title=\"Better tooling integration\"></a>Better tooling integration</h2><p>Embark is now compatible with any frontend tooling such as Create React App and the CLI tools for Angular, Vue, and more.</p>\n<p>Previously, Embark used its own pipeline, which was compatible with most frontend frameworks by way of Webpack configuration. However, it wasn’t compatible with most frontend tooling. Embark 4 is now fully frontend-agnostic, but the old pipeline is still available if you wish to use it.</p>\n<h2 id=\"Additional-Updates-and-Features\"><a href=\"#Additional-Updates-and-Features\" class=\"headerlink\" title=\"Additional Updates and Features\"></a>Additional Updates and Features</h2><p>We’ve introduced a number of updates and new features to go along with the key features mentioned above. These include:</p>\n<ul>\n<li><strong>New contract deployment hooks</strong>: onDeploy and afterDeploy allow for complete customization of the deployment lifecycle.</li>\n<li><strong>Better account configuration</strong>: accounts are now consistently defined in config/blockchain.js.</li>\n<li><strong>Embark can be installed as a local dependency for per-project versioning</strong>: global installation of Embark is no longer required.</li>\n</ul>\n<h2 id=\"A-new-Website-and-Fresh-New-Look\"><a href=\"#A-new-Website-and-Fresh-New-Look\" class=\"headerlink\" title=\"A new Website and Fresh New Look\"></a>A new Website and Fresh New Look</h2><p><img src=\"/assets/images/website_release.png\" alt=\"Website Release\" title=\"Website Release\"></p>\n<p>Embarking into decentralized applications is exciting and fun. That’s precisely why we updated our website: to better accompany developers on their journey. Not only did we give Embark a facelift with slick new illustrations and a fresh logo, but we also made it easier to navigate developer resources such as docs, plugins, and tutorials. For developers new to Embark, the Quick Start guide will get you up and running in no time!</p>\n<h2 id=\"Get-Started-Now\"><a href=\"#Get-Started-Now\" class=\"headerlink\" title=\"Get Started Now\"></a>Get Started Now</h2><p>Embark 4.0 is a great companion for those embarking into the ether! From brand new developers still learning the concepts, to seasoned pros with a specific project in mind, Embark is the ideal all-in-one development platform for building and deploying decentralized applications. Whether developing DApps end-to-end or simply deploying smart contracts, Embark allows developers to pick and choose which features, plugins, and tools to integrate.</p>\n<p>Check out the <a href=\"/docs/quick_start.html\">Quick Start guide</a> or dive right into the <a href=\"/docs\">documentation</a>.</p>\n<p>Chat with us in <a href=\"https://gitter.im/embark-framework/Lobby\" target=\"_blank\" rel=\"noopener\">Gitter</a><br>Star the repo on <a href=\"https://github.com/embarklabs/embark\" target=\"_blank\" rel=\"noopener\">GitHub</a><br>Follow us on <a href=\"https://twitter.com/EmbarkProject\" target=\"_blank\" rel=\"noopener\">Twitter</a></p>\n"},{"title":"What's new in Embark 4.1","summary":"Embark 4.1 is out and in this article we'll be looking into some of new features.","author":"pascal_precht","layout":"blog-post","alias":"news/2019/07/22/whats-new-in-embark-4.1/","_content":"\nAfter four months of development we're happy to tell you that we've released Embark 4.1 which comes with tons of bug fixes and a lot of new features. In this post we'll take a closer look at some of these features, however as always, we recommend having a look at our [change log](https://github.com/embarklabs/embark/blob/master/CHANGELOG.md) to get a more detailed overview of what has landed in Embark's latest release. Let's get right to it!\n\n## New `beforeDeploy` hook\n\nIn Embark 4, we've introduced a handful of new [deployment hooks](https://framework.embarklabs.io/docs/contracts_configuration.html#Deployment-hooks) and with 4.1, we're expanding the APIs from there. The new `beforeDeploy` hook lets you run an action either before all of your Smart Contracts are getting deployed, or, selectively for a subset of them.\n\nVery similar to the existing deployment hooks, `beforeDeploy` is an asynchronous function that returns a promise and has access to a context object that provides dependencies that your function may or may not be interested in. Adding a `beforeDeploy` hook that runs before your Smart Contracts are being deployed is as simple as adding it to the `contracts` configuration like this:\n\n```\n// config/contract.js\n\nmodule.exports = {\n ...\n contracts: {\n beforeDeploy: async () => {\n return Promise.resolve('yay');\n }\n ...\n }\n};\n```\n\nAs expected, for more control, `beforeDeploy` can be defined on a per Smart Contract basis like this:\n\n```\n// config/contract.js\n\nmodule.exports = {\n ...\n contracts: {\n ...\n SimpleStorage: {\n beforeDeploy: async (context) => {\n // can use `context` if needed\n return Promise.resolve('yay');\n }\n ...\n }\n }\n};\n```\nLearn more about Embark's [deployment hooks in the documentation](/docs/contracts_configuration.html#Deployment-hooks).\n\n## Enabling and disabling services via the console\nIf you've used Embark before, you're probably aware that it comes with a very powerful dashboard with an integrated CLI. This CLI exposes a bunch of commands that can be used to interact with Embark's run-time. Some commands serve a very specific use case, such as `api start` and `api stop`. With Embark 4.1 we decided to generalize the commands that enable users to start and stop service processes started by Embark.\n\nTherefore, the following commands are considered deprecated in favour of a new generalized command:\n\n- `api start/stop`\n- `webserver start/stop`\n\nThe new `service` command lets you start and stop `api`, `webserver`, `blockchain`, `ipfs`, `swarm`, `embark` and `api`:\n\n```\n$ service <service> on/off\n```\n\nThis works within Embark's command line Dashboard, as well as [Cockpit's dashboard](https://framework.embarklabs.io/docs/cockpit_dashboard.html). To learn more about Embark's interactive console and its command, head over to the [documentation](/docs/using_the_console.html#Enabling-and-disabling-processes).\n\n## Accounts access inside tests\n\nIn order to make writing tests in Embark a little bit more convenient, accounts configured and set up via the `config()` function are now injected into `describe()` blocks, making writing tests a little bit more predictable and easier to reason about.\n\nPrior, in order to get hold of accounts within tests, the following was needed:\n\n```\nlet accounts = [];\n\nconfig({\n contracts: {\n ...\n }\n}, (err, _accounts) => {\n accounts = _accounts;\n});\n\ncontract('My contract', () => {\n\n it('does something', () => {\n // can use `accounts` here\n });\n});\n```\n\nNotice that Embark won't run the `contract()` block until `config()` is done doing its work. Therefore, using a global variable was the recommended way to re-initialize `accounts` once `config()` runs its callback.\n\nThe same can now be achieved with the following code:\n\n```\nconfig({\n contracts: {\n ...\n }\n});\n\ncontract('My contract', accounts => {\n\n it('does something', () => {\n // can use `accounts` here\n });\n});\n```\nInstead of managing an `accounts` variable yourself, you can just ask for it now within `contract()`'s callback.\n\n## Several improvements inside Cockpit\n\nCockpit has got a lot of new things as well. This includes [draggable tabs]() inside the code editor, pagination support for [Smart Contracts](https://github.com/embarklabs/embark/commit/d71352b) and the [accounts explorer](https://github.com/embarklabs/embark/commit/745edaf), alphabetically [sorted Smart Contracts](https://github.com/embarklabs/embark/commit/0e9a4a1), and the ability to [send ETH to payable Smart Contract methods](https://github.com/embarklabs/embark/pull/1649) via the Cockpit UI.\n\n\n## What's next?\n\nWe've spent a lot of time fixing bugs and revisiting existing, user-facing APIs within Embark and aim to improve those as much as we can to make working with Embark as pleasant as possible. We've been also doing a lot of research and experimentation about integrating with other blockchain platforms, to get Embark ready for the future of decentralization to come.\n\nThat's why our next step is to work on v5, where we'll be focussing on making Embark's accounts configuration less confusing and more unified (no more multiple places to define accounts!), as well as a bunch of internal refactor.\n\n\nStay tuned with latest changes happening in Embark by [watching our GitHub repository](https://github.com/embarklabs/embark) and following us on [Twitter](https://twitter.com/EmbarkProject)!\n","source":"_posts/2019-07-23-whats-new-in-embark-4.1.md","raw":"title: What's new in Embark 4.1\nsummary: \"Embark 4.1 is out and in this article we'll be looking into some of new features.\"\nauthor: pascal_precht\ncategories:\n - announcements\nlayout: blog-post\nalias: news/2019/07/22/whats-new-in-embark-4.1/\n---\n\nAfter four months of development we're happy to tell you that we've released Embark 4.1 which comes with tons of bug fixes and a lot of new features. In this post we'll take a closer look at some of these features, however as always, we recommend having a look at our [change log](https://github.com/embarklabs/embark/blob/master/CHANGELOG.md) to get a more detailed overview of what has landed in Embark's latest release. Let's get right to it!\n\n## New `beforeDeploy` hook\n\nIn Embark 4, we've introduced a handful of new [deployment hooks](https://framework.embarklabs.io/docs/contracts_configuration.html#Deployment-hooks) and with 4.1, we're expanding the APIs from there. The new `beforeDeploy` hook lets you run an action either before all of your Smart Contracts are getting deployed, or, selectively for a subset of them.\n\nVery similar to the existing deployment hooks, `beforeDeploy` is an asynchronous function that returns a promise and has access to a context object that provides dependencies that your function may or may not be interested in. Adding a `beforeDeploy` hook that runs before your Smart Contracts are being deployed is as simple as adding it to the `contracts` configuration like this:\n\n```\n// config/contract.js\n\nmodule.exports = {\n ...\n contracts: {\n beforeDeploy: async () => {\n return Promise.resolve('yay');\n }\n ...\n }\n};\n```\n\nAs expected, for more control, `beforeDeploy` can be defined on a per Smart Contract basis like this:\n\n```\n// config/contract.js\n\nmodule.exports = {\n ...\n contracts: {\n ...\n SimpleStorage: {\n beforeDeploy: async (context) => {\n // can use `context` if needed\n return Promise.resolve('yay');\n }\n ...\n }\n }\n};\n```\nLearn more about Embark's [deployment hooks in the documentation](/docs/contracts_configuration.html#Deployment-hooks).\n\n## Enabling and disabling services via the console\nIf you've used Embark before, you're probably aware that it comes with a very powerful dashboard with an integrated CLI. This CLI exposes a bunch of commands that can be used to interact with Embark's run-time. Some commands serve a very specific use case, such as `api start` and `api stop`. With Embark 4.1 we decided to generalize the commands that enable users to start and stop service processes started by Embark.\n\nTherefore, the following commands are considered deprecated in favour of a new generalized command:\n\n- `api start/stop`\n- `webserver start/stop`\n\nThe new `service` command lets you start and stop `api`, `webserver`, `blockchain`, `ipfs`, `swarm`, `embark` and `api`:\n\n```\n$ service <service> on/off\n```\n\nThis works within Embark's command line Dashboard, as well as [Cockpit's dashboard](https://framework.embarklabs.io/docs/cockpit_dashboard.html). To learn more about Embark's interactive console and its command, head over to the [documentation](/docs/using_the_console.html#Enabling-and-disabling-processes).\n\n## Accounts access inside tests\n\nIn order to make writing tests in Embark a little bit more convenient, accounts configured and set up via the `config()` function are now injected into `describe()` blocks, making writing tests a little bit more predictable and easier to reason about.\n\nPrior, in order to get hold of accounts within tests, the following was needed:\n\n```\nlet accounts = [];\n\nconfig({\n contracts: {\n ...\n }\n}, (err, _accounts) => {\n accounts = _accounts;\n});\n\ncontract('My contract', () => {\n\n it('does something', () => {\n // can use `accounts` here\n });\n});\n```\n\nNotice that Embark won't run the `contract()` block until `config()` is done doing its work. Therefore, using a global variable was the recommended way to re-initialize `accounts` once `config()` runs its callback.\n\nThe same can now be achieved with the following code:\n\n```\nconfig({\n contracts: {\n ...\n }\n});\n\ncontract('My contract', accounts => {\n\n it('does something', () => {\n // can use `accounts` here\n });\n});\n```\nInstead of managing an `accounts` variable yourself, you can just ask for it now within `contract()`'s callback.\n\n## Several improvements inside Cockpit\n\nCockpit has got a lot of new things as well. This includes [draggable tabs]() inside the code editor, pagination support for [Smart Contracts](https://github.com/embarklabs/embark/commit/d71352b) and the [accounts explorer](https://github.com/embarklabs/embark/commit/745edaf), alphabetically [sorted Smart Contracts](https://github.com/embarklabs/embark/commit/0e9a4a1), and the ability to [send ETH to payable Smart Contract methods](https://github.com/embarklabs/embark/pull/1649) via the Cockpit UI.\n\n\n## What's next?\n\nWe've spent a lot of time fixing bugs and revisiting existing, user-facing APIs within Embark and aim to improve those as much as we can to make working with Embark as pleasant as possible. We've been also doing a lot of research and experimentation about integrating with other blockchain platforms, to get Embark ready for the future of decentralization to come.\n\nThat's why our next step is to work on v5, where we'll be focussing on making Embark's accounts configuration less confusing and more unified (no more multiple places to define accounts!), as well as a bunch of internal refactor.\n\n\nStay tuned with latest changes happening in Embark by [watching our GitHub repository](https://github.com/embarklabs/embark) and following us on [Twitter](https://twitter.com/EmbarkProject)!\n","slug":"whats-new-in-embark-4.1","published":1,"date":"2019-07-23T04:00:00.000Z","updated":"2020-03-03T14:55:55.036Z","_id":"ck6axlf9f000fxeegann27sh0","comments":1,"photos":[],"link":"","content":"<p>After four months of development we’re happy to tell you that we’ve released Embark 4.1 which comes with tons of bug fixes and a lot of new features. In this post we’ll take a closer look at some of these features, however as always, we recommend having a look at our <a href=\"https://github.com/embarklabs/embark/blob/master/CHANGELOG.md\" target=\"_blank\" rel=\"noopener\">change log</a> to get a more detailed overview of what has landed in Embark’s latest release. Let’s get right to it!</p>\n<h2 id=\"New-beforeDeploy-hook\"><a href=\"#New-beforeDeploy-hook\" class=\"headerlink\" title=\"New beforeDeploy hook\"></a>New <code>beforeDeploy</code> hook</h2><p>In Embark 4, we’ve introduced a handful of new <a href=\"https://framework.embarklabs.io/docs/contracts_configuration.html#Deployment-hooks\" target=\"_blank\" rel=\"noopener\">deployment hooks</a> and with 4.1, we’re expanding the APIs from there. The new <code>beforeDeploy</code> hook lets you run an action either before all of your Smart Contracts are getting deployed, or, selectively for a subset of them.</p>\n<p>Very similar to the existing deployment hooks, <code>beforeDeploy</code> is an asynchronous function that returns a promise and has access to a context object that provides dependencies that your function may or may not be interested in. Adding a <code>beforeDeploy</code> hook that runs before your Smart Contracts are being deployed is as simple as adding it to the <code>contracts</code> configuration like this:</p>\n<figure class=\"highlight plain\"><table><tr><td class=\"code\"><pre><span class=\"line\">// config/contract.js</span><br><span class=\"line\"></span><br><span class=\"line\">module.exports = {</span><br><span class=\"line\"> ...</span><br><span class=\"line\"> contracts: {</span><br><span class=\"line\"> beforeDeploy: async () => {</span><br><span class=\"line\"> return Promise.resolve('yay');</span><br><span class=\"line\"> }</span><br><span class=\"line\"> ...</span><br><span class=\"line\"> }</span><br><span class=\"line\">};</span><br></pre></td></tr></table></figure>\n\n<p>As expected, for more control, <code>beforeDeploy</code> can be defined on a per Smart Contract basis like this:</p>\n<figure class=\"highlight plain\"><table><tr><td class=\"code\"><pre><span class=\"line\">// config/contract.js</span><br><span class=\"line\"></span><br><span class=\"line\">module.exports = {</span><br><span class=\"line\"> ...</span><br><span class=\"line\"> contracts: {</span><br><span class=\"line\"> ...</span><br><span class=\"line\"> SimpleStorage: {</span><br><span class=\"line\"> beforeDeploy: async (context) => {</span><br><span class=\"line\"> // can use `context` if needed</span><br><span class=\"line\"> return Promise.resolve('yay');</span><br><span class=\"line\"> }</span><br><span class=\"line\"> ...</span><br><span class=\"line\"> }</span><br><span class=\"line\"> }</span><br><span class=\"line\">};</span><br></pre></td></tr></table></figure>\n<p>Learn more about Embark’s <a href=\"/docs/contracts_configuration.html#Deployment-hooks\">deployment hooks in the documentation</a>.</p>\n<h2 id=\"Enabling-and-disabling-services-via-the-console\"><a href=\"#Enabling-and-disabling-services-via-the-console\" class=\"headerlink\" title=\"Enabling and disabling services via the console\"></a>Enabling and disabling services via the console</h2><p>If you’ve used Embark before, you’re probably aware that it comes with a very powerful dashboard with an integrated CLI. This CLI exposes a bunch of commands that can be used to interact with Embark’s run-time. Some commands serve a very specific use case, such as <code>api start</code> and <code>api stop</code>. With Embark 4.1 we decided to generalize the commands that enable users to start and stop service processes started by Embark.</p>\n<p>Therefore, the following commands are considered deprecated in favour of a new generalized command:</p>\n<ul>\n<li><code>api start/stop</code></li>\n<li><code>webserver start/stop</code></li>\n</ul>\n<p>The new <code>service</code> command lets you start and stop <code>api</code>, <code>webserver</code>, <code>blockchain</code>, <code>ipfs</code>, <code>swarm</code>, <code>embark</code> and <code>api</code>:</p>\n<figure class=\"highlight plain\"><table><tr><td class=\"code\"><pre><span class=\"line\">$ service <service> on/off</span><br></pre></td></tr></table></figure>\n\n<p>This works within Embark’s command line Dashboard, as well as <a href=\"https://framework.embarklabs.io/docs/cockpit_dashboard.html\" target=\"_blank\" rel=\"noopener\">Cockpit’s dashboard</a>. To learn more about Embark’s interactive console and its command, head over to the <a href=\"/docs/using_the_console.html#Enabling-and-disabling-processes\">documentation</a>.</p>\n<h2 id=\"Accounts-access-inside-tests\"><a href=\"#Accounts-access-inside-tests\" class=\"headerlink\" title=\"Accounts access inside tests\"></a>Accounts access inside tests</h2><p>In order to make writing tests in Embark a little bit more convenient, accounts configured and set up via the <code>config()</code> function are now injected into <code>describe()</code> blocks, making writing tests a little bit more predictable and easier to reason about.</p>\n<p>Prior, in order to get hold of accounts within tests, the following was needed:</p>\n<figure class=\"highlight plain\"><table><tr><td class=\"code\"><pre><span class=\"line\">let accounts = [];</span><br><span class=\"line\"></span><br><span class=\"line\">config({</span><br><span class=\"line\"> contracts: {</span><br><span class=\"line\"> ...</span><br><span class=\"line\"> }</span><br><span class=\"line\">}, (err, _accounts) => {</span><br><span class=\"line\"> accounts = _accounts;</span><br><span class=\"line\">});</span><br><span class=\"line\"></span><br><span class=\"line\">contract('My contract', () => {</span><br><span class=\"line\"></span><br><span class=\"line\"> it('does something', () => {</span><br><span class=\"line\"> // can use `accounts` here</span><br><span class=\"line\"> });</span><br><span class=\"line\">});</span><br></pre></td></tr></table></figure>\n\n<p>Notice that Embark won’t run the <code>contract()</code> block until <code>config()</code> is done doing its work. Therefore, using a global variable was the recommended way to re-initialize <code>accounts</code> once <code>config()</code> runs its callback.</p>\n<p>The same can now be achieved with the following code:</p>\n<figure class=\"highlight plain\"><table><tr><td class=\"code\"><pre><span class=\"line\">config({</span><br><span class=\"line\"> contracts: {</span><br><span class=\"line\"> ...</span><br><span class=\"line\"> }</span><br><span class=\"line\">});</span><br><span class=\"line\"></span><br><span class=\"line\">contract('My contract', accounts => {</span><br><span class=\"line\"></span><br><span class=\"line\"> it('does something', () => {</span><br><span class=\"line\"> // can use `accounts` here</span><br><span class=\"line\"> });</span><br><span class=\"line\">});</span><br></pre></td></tr></table></figure>\n<p>Instead of managing an <code>accounts</code> variable yourself, you can just ask for it now within <code>contract()</code>‘s callback.</p>\n<h2 id=\"Several-improvements-inside-Cockpit\"><a href=\"#Several-improvements-inside-Cockpit\" class=\"headerlink\" title=\"Several improvements inside Cockpit\"></a>Several improvements inside Cockpit</h2><p>Cockpit has got a lot of new things as well. This includes <a href=\"\">draggable tabs</a> inside the code editor, pagination support for <a href=\"https://github.com/embarklabs/embark/commit/d71352b\">Smart Contracts</a> and the <a href=\"https://github.com/embarklabs/embark/commit/745edaf\" target=\"_blank\" rel=\"noopener\">accounts explorer</a>, alphabetically <a href=\"https://github.com/embarklabs/embark/commit/0e9a4a1\" target=\"_blank\" rel=\"noopener\">sorted Smart Contracts</a>, and the ability to <a href=\"https://github.com/embarklabs/embark/pull/1649\" target=\"_blank\" rel=\"noopener\">send ETH to payable Smart Contract methods</a> via the Cockpit UI.</p>\n<h2 id=\"What’s-next\"><a href=\"#What’s-next\" class=\"headerlink\" title=\"What’s next?\"></a>What’s next?</h2><p>We’ve spent a lot of time fixing bugs and revisiting existing, user-facing APIs within Embark and aim to improve those as much as we can to make working with Embark as pleasant as possible. We’ve been also doing a lot of research and experimentation about integrating with other blockchain platforms, to get Embark ready for the future of decentralization to come.</p>\n<p>That’s why our next step is to work on v5, where we’ll be focussing on making Embark’s accounts configuration less confusing and more unified (no more multiple places to define accounts!), as well as a bunch of internal refactor.</p>\n<p>Stay tuned with latest changes happening in Embark by <a href=\"https://github.com/embarklabs/embark\" target=\"_blank\" rel=\"noopener\">watching our GitHub repository</a> and following us on <a href=\"https://twitter.com/EmbarkProject\" target=\"_blank\" rel=\"noopener\">Twitter</a>!</p>\n","site":{"data":{"authors":{"iuri_matias":{"name":"Iuri Matias","twitter":"iurimatias","image":"https://pbs.twimg.com/profile_images/928272512181563392/iDJdvy2k_400x400.jpg"},"pascal_precht":{"name":"Pascal Precht","twitter":"pascalprecht","image":"https://pbs.twimg.com/profile_images/993785060733194241/p3oAIMDP_400x400.jpg"},"anthony_laibe":{"name":"Anthony Laibe","twitter":"a_laibe","image":"https://pbs.twimg.com/profile_images/257742900/13168239_400x400.jpg"},"jonathan_rainville":{"name":"Jonathan Rainville","twitter":"ShyolGhul","image":"https://pbs.twimg.com/profile_images/993873866878570496/-aE4byjj_400x400.jpg"},"andre_medeiros":{"name":"Andre Medeiros","twitter":"superdealloc","image":"https://pbs.twimg.com/profile_images/965722487735701504/m58KNgWN_400x400.jpg"},"eric_mastro":{"name":"Eric Mastro","twitter":"ericmastro","image":"https://avatars1.githubusercontent.com/u/5089238?s=460&v=4"},"michael_bradley":{"name":"Michael Bradley","image":"https://avatars3.githubusercontent.com/u/194260?s=460&v=4"},"richard_ramos":{"name":"Richard Ramos","twitter":"richardramos_me","image":"https://devcon.org/images/speakers/richard_ramos.jpg"},"jonny_zerah":{"name":"Jonny Zerah","twitter":"jonnyzerah","image":"https://pbs.twimg.com/profile_images/1043774340490248192/gI9aGy17_400x400.jpg"},"robin_percy":{"name":"Robin Percy","twitter":"rbin","image":"https://avatars1.githubusercontent.com/u/29288325?s=400&v=4"}},"categories":{"tutorials":"Tutorials","announcements":"Announcements"},"languages":{"en":"English"}}},"excerpt":"","more":"<p>After four months of development we’re happy to tell you that we’ve released Embark 4.1 which comes with tons of bug fixes and a lot of new features. In this post we’ll take a closer look at some of these features, however as always, we recommend having a look at our <a href=\"https://github.com/embarklabs/embark/blob/master/CHANGELOG.md\" target=\"_blank\" rel=\"noopener\">change log</a> to get a more detailed overview of what has landed in Embark’s latest release. Let’s get right to it!</p>\n<h2 id=\"New-beforeDeploy-hook\"><a href=\"#New-beforeDeploy-hook\" class=\"headerlink\" title=\"New beforeDeploy hook\"></a>New <code>beforeDeploy</code> hook</h2><p>In Embark 4, we’ve introduced a handful of new <a href=\"https://framework.embarklabs.io/docs/contracts_configuration.html#Deployment-hooks\" target=\"_blank\" rel=\"noopener\">deployment hooks</a> and with 4.1, we’re expanding the APIs from there. The new <code>beforeDeploy</code> hook lets you run an action either before all of your Smart Contracts are getting deployed, or, selectively for a subset of them.</p>\n<p>Very similar to the existing deployment hooks, <code>beforeDeploy</code> is an asynchronous function that returns a promise and has access to a context object that provides dependencies that your function may or may not be interested in. Adding a <code>beforeDeploy</code> hook that runs before your Smart Contracts are being deployed is as simple as adding it to the <code>contracts</code> configuration like this:</p>\n<figure class=\"highlight plain\"><table><tr><td class=\"code\"><pre><span class=\"line\">// config/contract.js</span><br><span class=\"line\"></span><br><span class=\"line\">module.exports = {</span><br><span class=\"line\"> ...</span><br><span class=\"line\"> contracts: {</span><br><span class=\"line\"> beforeDeploy: async () => {</span><br><span class=\"line\"> return Promise.resolve('yay');</span><br><span class=\"line\"> }</span><br><span class=\"line\"> ...</span><br><span class=\"line\"> }</span><br><span class=\"line\">};</span><br></pre></td></tr></table></figure>\n\n<p>As expected, for more control, <code>beforeDeploy</code> can be defined on a per Smart Contract basis like this:</p>\n<figure class=\"highlight plain\"><table><tr><td class=\"code\"><pre><span class=\"line\">// config/contract.js</span><br><span class=\"line\"></span><br><span class=\"line\">module.exports = {</span><br><span class=\"line\"> ...</span><br><span class=\"line\"> contracts: {</span><br><span class=\"line\"> ...</span><br><span class=\"line\"> SimpleStorage: {</span><br><span class=\"line\"> beforeDeploy: async (context) => {</span><br><span class=\"line\"> // can use `context` if needed</span><br><span class=\"line\"> return Promise.resolve('yay');</span><br><span class=\"line\"> }</span><br><span class=\"line\"> ...</span><br><span class=\"line\"> }</span><br><span class=\"line\"> }</span><br><span class=\"line\">};</span><br></pre></td></tr></table></figure>\n<p>Learn more about Embark’s <a href=\"/docs/contracts_configuration.html#Deployment-hooks\">deployment hooks in the documentation</a>.</p>\n<h2 id=\"Enabling-and-disabling-services-via-the-console\"><a href=\"#Enabling-and-disabling-services-via-the-console\" class=\"headerlink\" title=\"Enabling and disabling services via the console\"></a>Enabling and disabling services via the console</h2><p>If you’ve used Embark before, you’re probably aware that it comes with a very powerful dashboard with an integrated CLI. This CLI exposes a bunch of commands that can be used to interact with Embark’s run-time. Some commands serve a very specific use case, such as <code>api start</code> and <code>api stop</code>. With Embark 4.1 we decided to generalize the commands that enable users to start and stop service processes started by Embark.</p>\n<p>Therefore, the following commands are considered deprecated in favour of a new generalized command:</p>\n<ul>\n<li><code>api start/stop</code></li>\n<li><code>webserver start/stop</code></li>\n</ul>\n<p>The new <code>service</code> command lets you start and stop <code>api</code>, <code>webserver</code>, <code>blockchain</code>, <code>ipfs</code>, <code>swarm</code>, <code>embark</code> and <code>api</code>:</p>\n<figure class=\"highlight plain\"><table><tr><td class=\"code\"><pre><span class=\"line\">$ service <service> on/off</span><br></pre></td></tr></table></figure>\n\n<p>This works within Embark’s command line Dashboard, as well as <a href=\"https://framework.embarklabs.io/docs/cockpit_dashboard.html\" target=\"_blank\" rel=\"noopener\">Cockpit’s dashboard</a>. To learn more about Embark’s interactive console and its command, head over to the <a href=\"/docs/using_the_console.html#Enabling-and-disabling-processes\">documentation</a>.</p>\n<h2 id=\"Accounts-access-inside-tests\"><a href=\"#Accounts-access-inside-tests\" class=\"headerlink\" title=\"Accounts access inside tests\"></a>Accounts access inside tests</h2><p>In order to make writing tests in Embark a little bit more convenient, accounts configured and set up via the <code>config()</code> function are now injected into <code>describe()</code> blocks, making writing tests a little bit more predictable and easier to reason about.</p>\n<p>Prior, in order to get hold of accounts within tests, the following was needed:</p>\n<figure class=\"highlight plain\"><table><tr><td class=\"code\"><pre><span class=\"line\">let accounts = [];</span><br><span class=\"line\"></span><br><span class=\"line\">config({</span><br><span class=\"line\"> contracts: {</span><br><span class=\"line\"> ...</span><br><span class=\"line\"> }</span><br><span class=\"line\">}, (err, _accounts) => {</span><br><span class=\"line\"> accounts = _accounts;</span><br><span class=\"line\">});</span><br><span class=\"line\"></span><br><span class=\"line\">contract('My contract', () => {</span><br><span class=\"line\"></span><br><span class=\"line\"> it('does something', () => {</span><br><span class=\"line\"> // can use `accounts` here</span><br><span class=\"line\"> });</span><br><span class=\"line\">});</span><br></pre></td></tr></table></figure>\n\n<p>Notice that Embark won’t run the <code>contract()</code> block until <code>config()</code> is done doing its work. Therefore, using a global variable was the recommended way to re-initialize <code>accounts</code> once <code>config()</code> runs its callback.</p>\n<p>The same can now be achieved with the following code:</p>\n<figure class=\"highlight plain\"><table><tr><td class=\"code\"><pre><span class=\"line\">config({</span><br><span class=\"line\"> contracts: {</span><br><span class=\"line\"> ...</span><br><span class=\"line\"> }</span><br><span class=\"line\">});</span><br><span class=\"line\"></span><br><span class=\"line\">contract('My contract', accounts => {</span><br><span class=\"line\"></span><br><span class=\"line\"> it('does something', () => {</span><br><span class=\"line\"> // can use `accounts` here</span><br><span class=\"line\"> });</span><br><span class=\"line\">});</span><br></pre></td></tr></table></figure>\n<p>Instead of managing an <code>accounts</code> variable yourself, you can just ask for it now within <code>contract()</code>‘s callback.</p>\n<h2 id=\"Several-improvements-inside-Cockpit\"><a href=\"#Several-improvements-inside-Cockpit\" class=\"headerlink\" title=\"Several improvements inside Cockpit\"></a>Several improvements inside Cockpit</h2><p>Cockpit has got a lot of new things as well. This includes <a href=\"\">draggable tabs</a> inside the code editor, pagination support for <a href=\"https://github.com/embarklabs/embark/commit/d71352b\">Smart Contracts</a> and the <a href=\"https://github.com/embarklabs/embark/commit/745edaf\" target=\"_blank\" rel=\"noopener\">accounts explorer</a>, alphabetically <a href=\"https://github.com/embarklabs/embark/commit/0e9a4a1\" target=\"_blank\" rel=\"noopener\">sorted Smart Contracts</a>, and the ability to <a href=\"https://github.com/embarklabs/embark/pull/1649\" target=\"_blank\" rel=\"noopener\">send ETH to payable Smart Contract methods</a> via the Cockpit UI.</p>\n<h2 id=\"What’s-next\"><a href=\"#What’s-next\" class=\"headerlink\" title=\"What’s next?\"></a>What’s next?</h2><p>We’ve spent a lot of time fixing bugs and revisiting existing, user-facing APIs within Embark and aim to improve those as much as we can to make working with Embark as pleasant as possible. We’ve been also doing a lot of research and experimentation about integrating with other blockchain platforms, to get Embark ready for the future of decentralization to come.</p>\n<p>That’s why our next step is to work on v5, where we’ll be focussing on making Embark’s accounts configuration less confusing and more unified (no more multiple places to define accounts!), as well as a bunch of internal refactor.</p>\n<p>Stay tuned with latest changes happening in Embark by <a href=\"https://github.com/embarklabs/embark\" target=\"_blank\" rel=\"noopener\">watching our GitHub repository</a> and following us on <a href=\"https://twitter.com/EmbarkProject\" target=\"_blank\" rel=\"noopener\">Twitter</a>!</p>\n"},{"title":"Embark 5.1","author":"iuri_matias","summary":"Embark 5.1 release","layout":"blog-post","_content":"\nEmbark 5.1\n===\n\n## Interfaces & Libraries Configuration\n\nEmbark 5.1 adds two new configuration settings for Smart Contract configuration:\n\n`interfaces` - Any Smart Contract that represent an interface or is used for inheritance\n`libraries` - Any Smart Contract that is used as a library\n\nThis makes the configuration less redundant in cases where otherwise the deploy property has been set to false, such as:\n\n```\ndeploy: {\n Ownable: {\n deploy: false\n },\n ...\n}\n```\n\nThe above can now be done via:\n\n```\ninterfaces: ['Ownable'],\ndeploy: {\n ...\n}\n```\n\nFind the complete documentation [here](https://framework.embarklabs.io/docs/contracts_configuration.html#Defining-interfaces).\n\n## getEvmVersion for conditional tests\n\nEmbark tests now include a helper `getEvmVersion` that can be used to consult what EVM the tests are being run on. This is useful when you have certain tests that can only be run in a particular type of node, but you still want to be able to run tests everywhere without them breaking.\n\nFor example:\n\n```\n it(\"cannot bid after 5 minutes\", async () => {\n const evmVersion = await global.getEvmVersion();\n if (evmVersion.indexOf(\"TestRPC\") === -1) return;\n\n increaseTime(5000)\n\n await assert.reverts(Auction.methods.bid(), {from: web3.eth.defaultAccount}, 'Returned error: VM Exception while processing transaction: cannot bid after auction expired');\n })\n```\n\n## Nethermind plugin\n\nEmbark now comes with a [Nethermind](https://nethermind.io/) plugin.\nMore info about the plugin can be found [here](https://github.com/embarklabs/embark/tree/master/packages/plugins/nethermind)\n\n## Changelog\n\nFeatures\n@embark/deployment: introduce interfaces and libraries configuration (73d0443)\n@embark/nethermind: add Nethermind blockchain client plugin (6db8d87)\n@embark/test-runner: expose evmClientVersion for conditional tests (e37d3f7)\n@embark/testing: introduce proper request2 api for async/await (c947517)\n@embark/testing: add missing APIs to register console commands and API calls (bef582d)\nsupport Node.js v12.x and newer (c093cf8)\n\nBug Fixes\n@embark/cmd_controller: fix build command to escape on finish (e2767c2)\n@embark/debugger: Prevent error if contract not tracked by Embark (1e1172e)\n@embark/ens: fix Infura connection and testnet use of ENS (42bd3b7)\n@embark/test-dapp: fix test_dapp broken for ENS resolve (f5849e0)\n@embark/tests: Fix failing test with —node=embark (81af3af)\n@embark/transaction-logger: Circular JSON log and unknown contract log level (5843a8e)\n@embark/utils: fix deconstruct url to return port as an integer (4190d5e)\ntransaction-logger: fix circular dep issue with util.inspect (6f239f4)\n@embark/embarkjs: change enableEthereum to not rely on returned accounts array (b8f93ea)\n@embark/test: increase default gas limit to 8M so tests support bigger contracts (b6856b2)\n@embark/ens: connect to web3 only with dappAutoEnable is true (e0ac539)\n@embark/proxy: Parse rpcPort from config as integer (9f7c682)\n\n","source":"_posts/2020-01-28-embark-5-1.md","raw":"title: Embark 5.1\nauthor: iuri_matias\nsummary: \"Embark 5.1 release\"\ncategories:\n - announcements\n - releases\nlayout: blog-post\n---\n\nEmbark 5.1\n===\n\n## Interfaces & Libraries Configuration\n\nEmbark 5.1 adds two new configuration settings for Smart Contract configuration:\n\n`interfaces` - Any Smart Contract that represent an interface or is used for inheritance\n`libraries` - Any Smart Contract that is used as a library\n\nThis makes the configuration less redundant in cases where otherwise the deploy property has been set to false, such as:\n\n```\ndeploy: {\n Ownable: {\n deploy: false\n },\n ...\n}\n```\n\nThe above can now be done via:\n\n```\ninterfaces: ['Ownable'],\ndeploy: {\n ...\n}\n```\n\nFind the complete documentation [here](https://framework.embarklabs.io/docs/contracts_configuration.html#Defining-interfaces).\n\n## getEvmVersion for conditional tests\n\nEmbark tests now include a helper `getEvmVersion` that can be used to consult what EVM the tests are being run on. This is useful when you have certain tests that can only be run in a particular type of node, but you still want to be able to run tests everywhere without them breaking.\n\nFor example:\n\n```\n it(\"cannot bid after 5 minutes\", async () => {\n const evmVersion = await global.getEvmVersion();\n if (evmVersion.indexOf(\"TestRPC\") === -1) return;\n\n increaseTime(5000)\n\n await assert.reverts(Auction.methods.bid(), {from: web3.eth.defaultAccount}, 'Returned error: VM Exception while processing transaction: cannot bid after auction expired');\n })\n```\n\n## Nethermind plugin\n\nEmbark now comes with a [Nethermind](https://nethermind.io/) plugin.\nMore info about the plugin can be found [here](https://github.com/embarklabs/embark/tree/master/packages/plugins/nethermind)\n\n## Changelog\n\nFeatures\n@embark/deployment: introduce interfaces and libraries configuration (73d0443)\n@embark/nethermind: add Nethermind blockchain client plugin (6db8d87)\n@embark/test-runner: expose evmClientVersion for conditional tests (e37d3f7)\n@embark/testing: introduce proper request2 api for async/await (c947517)\n@embark/testing: add missing APIs to register console commands and API calls (bef582d)\nsupport Node.js v12.x and newer (c093cf8)\n\nBug Fixes\n@embark/cmd_controller: fix build command to escape on finish (e2767c2)\n@embark/debugger: Prevent error if contract not tracked by Embark (1e1172e)\n@embark/ens: fix Infura connection and testnet use of ENS (42bd3b7)\n@embark/test-dapp: fix test_dapp broken for ENS resolve (f5849e0)\n@embark/tests: Fix failing test with —node=embark (81af3af)\n@embark/transaction-logger: Circular JSON log and unknown contract log level (5843a8e)\n@embark/utils: fix deconstruct url to return port as an integer (4190d5e)\ntransaction-logger: fix circular dep issue with util.inspect (6f239f4)\n@embark/embarkjs: change enableEthereum to not rely on returned accounts array (b8f93ea)\n@embark/test: increase default gas limit to 8M so tests support bigger contracts (b6856b2)\n@embark/ens: connect to web3 only with dappAutoEnable is true (e0ac539)\n@embark/proxy: Parse rpcPort from config as integer (9f7c682)\n\n","slug":"embark-5-1","published":1,"date":"2020-01-28T05:00:00.000Z","updated":"2020-03-03T14:55:55.054Z","_id":"ck6axlf9j000jxeegbv0yedck","comments":1,"photos":[],"link":"","content":"<h1 id=\"Embark-5-1\"><a href=\"#Embark-5-1\" class=\"headerlink\" title=\"Embark 5.1\"></a>Embark 5.1</h1><h2 id=\"Interfaces-amp-Libraries-Configuration\"><a href=\"#Interfaces-amp-Libraries-Configuration\" class=\"headerlink\" title=\"Interfaces & Libraries Configuration\"></a>Interfaces & Libraries Configuration</h2><p>Embark 5.1 adds two new configuration settings for Smart Contract configuration:</p>\n<p><code>interfaces</code> - Any Smart Contract that represent an interface or is used for inheritance<br><code>libraries</code> - Any Smart Contract that is used as a library</p>\n<p>This makes the configuration less redundant in cases where otherwise the deploy property has been set to false, such as:</p>\n<figure class=\"highlight plain\"><table><tr><td class=\"code\"><pre><span class=\"line\">deploy: {</span><br><span class=\"line\"> Ownable: {</span><br><span class=\"line\"> deploy: false</span><br><span class=\"line\"> },</span><br><span class=\"line\"> ...</span><br><span class=\"line\">}</span><br></pre></td></tr></table></figure>\n\n<p>The above can now be done via:</p>\n<figure class=\"highlight plain\"><table><tr><td class=\"code\"><pre><span class=\"line\">interfaces: ['Ownable'],</span><br><span class=\"line\">deploy: {</span><br><span class=\"line\"> ...</span><br><span class=\"line\">}</span><br></pre></td></tr></table></figure>\n\n<p>Find the complete documentation <a href=\"https://framework.embarklabs.io/docs/contracts_configuration.html#Defining-interfaces\" target=\"_blank\" rel=\"noopener\">here</a>.</p>\n<h2 id=\"getEvmVersion-for-conditional-tests\"><a href=\"#getEvmVersion-for-conditional-tests\" class=\"headerlink\" title=\"getEvmVersion for conditional tests\"></a>getEvmVersion for conditional tests</h2><p>Embark tests now include a helper <code>getEvmVersion</code> that can be used to consult what EVM the tests are being run on. This is useful when you have certain tests that can only be run in a particular type of node, but you still want to be able to run tests everywhere without them breaking.</p>\n<p>For example:</p>\n<figure class=\"highlight plain\"><table><tr><td class=\"code\"><pre><span class=\"line\">it("cannot bid after 5 minutes", async () => {</span><br><span class=\"line\"> const evmVersion = await global.getEvmVersion();</span><br><span class=\"line\"> if (evmVersion.indexOf("TestRPC") === -1) return;</span><br><span class=\"line\"></span><br><span class=\"line\"> increaseTime(5000)</span><br><span class=\"line\"></span><br><span class=\"line\"> await assert.reverts(Auction.methods.bid(), {from: web3.eth.defaultAccount}, 'Returned error: VM Exception while processing transaction: cannot bid after auction expired');</span><br><span class=\"line\">})</span><br></pre></td></tr></table></figure>\n\n<h2 id=\"Nethermind-plugin\"><a href=\"#Nethermind-plugin\" class=\"headerlink\" title=\"Nethermind plugin\"></a>Nethermind plugin</h2><p>Embark now comes with a <a href=\"https://nethermind.io/\" target=\"_blank\" rel=\"noopener\">Nethermind</a> plugin.<br>More info about the plugin can be found <a href=\"https://github.com/embarklabs/embark/tree/master/packages/plugins/nethermind\" target=\"_blank\" rel=\"noopener\">here</a></p>\n<h2 id=\"Changelog\"><a href=\"#Changelog\" class=\"headerlink\" title=\"Changelog\"></a>Changelog</h2><p>Features<br>@embark/deployment: introduce interfaces and libraries configuration (73d0443)<br>@embark/nethermind: add Nethermind blockchain client plugin (6db8d87)<br>@embark/test-runner: expose evmClientVersion for conditional tests (e37d3f7)<br>@embark/testing: introduce proper request2 api for async/await (c947517)<br>@embark/testing: add missing APIs to register console commands and API calls (bef582d)<br>support Node.js v12.x and newer (c093cf8)</p>\n<p>Bug Fixes<br>@embark/cmd_controller: fix build command to escape on finish (e2767c2)<br>@embark/debugger: Prevent error if contract not tracked by Embark (1e1172e)<br>@embark/ens: fix Infura connection and testnet use of ENS (42bd3b7)<br>@embark/test-dapp: fix test_dapp broken for ENS resolve (f5849e0)<br>@embark/tests: Fix failing test with —node=embark (81af3af)<br>@embark/transaction-logger: Circular JSON log and unknown contract log level (5843a8e)<br>@embark/utils: fix deconstruct url to return port as an integer (4190d5e)<br>transaction-logger: fix circular dep issue with util.inspect (6f239f4)<br>@embark/embarkjs: change enableEthereum to not rely on returned accounts array (b8f93ea)<br>@embark/test: increase default gas limit to 8M so tests support bigger contracts (b6856b2)<br>@embark/ens: connect to web3 only with dappAutoEnable is true (e0ac539)<br>@embark/proxy: Parse rpcPort from config as integer (9f7c682)</p>\n","site":{"data":{"authors":{"iuri_matias":{"name":"Iuri Matias","twitter":"iurimatias","image":"https://pbs.twimg.com/profile_images/928272512181563392/iDJdvy2k_400x400.jpg"},"pascal_precht":{"name":"Pascal Precht","twitter":"pascalprecht","image":"https://pbs.twimg.com/profile_images/993785060733194241/p3oAIMDP_400x400.jpg"},"anthony_laibe":{"name":"Anthony Laibe","twitter":"a_laibe","image":"https://pbs.twimg.com/profile_images/257742900/13168239_400x400.jpg"},"jonathan_rainville":{"name":"Jonathan Rainville","twitter":"ShyolGhul","image":"https://pbs.twimg.com/profile_images/993873866878570496/-aE4byjj_400x400.jpg"},"andre_medeiros":{"name":"Andre Medeiros","twitter":"superdealloc","image":"https://pbs.twimg.com/profile_images/965722487735701504/m58KNgWN_400x400.jpg"},"eric_mastro":{"name":"Eric Mastro","twitter":"ericmastro","image":"https://avatars1.githubusercontent.com/u/5089238?s=460&v=4"},"michael_bradley":{"name":"Michael Bradley","image":"https://avatars3.githubusercontent.com/u/194260?s=460&v=4"},"richard_ramos":{"name":"Richard Ramos","twitter":"richardramos_me","image":"https://devcon.org/images/speakers/richard_ramos.jpg"},"jonny_zerah":{"name":"Jonny Zerah","twitter":"jonnyzerah","image":"https://pbs.twimg.com/profile_images/1043774340490248192/gI9aGy17_400x400.jpg"},"robin_percy":{"name":"Robin Percy","twitter":"rbin","image":"https://avatars1.githubusercontent.com/u/29288325?s=400&v=4"}},"categories":{"tutorials":"Tutorials","announcements":"Announcements"},"languages":{"en":"English"}}},"excerpt":"","more":"<h1 id=\"Embark-5-1\"><a href=\"#Embark-5-1\" class=\"headerlink\" title=\"Embark 5.1\"></a>Embark 5.1</h1><h2 id=\"Interfaces-amp-Libraries-Configuration\"><a href=\"#Interfaces-amp-Libraries-Configuration\" class=\"headerlink\" title=\"Interfaces & Libraries Configuration\"></a>Interfaces & Libraries Configuration</h2><p>Embark 5.1 adds two new configuration settings for Smart Contract configuration:</p>\n<p><code>interfaces</code> - Any Smart Contract that represent an interface or is used for inheritance<br><code>libraries</code> - Any Smart Contract that is used as a library</p>\n<p>This makes the configuration less redundant in cases where otherwise the deploy property has been set to false, such as:</p>\n<figure class=\"highlight plain\"><table><tr><td class=\"code\"><pre><span class=\"line\">deploy: {</span><br><span class=\"line\"> Ownable: {</span><br><span class=\"line\"> deploy: false</span><br><span class=\"line\"> },</span><br><span class=\"line\"> ...</span><br><span class=\"line\">}</span><br></pre></td></tr></table></figure>\n\n<p>The above can now be done via:</p>\n<figure class=\"highlight plain\"><table><tr><td class=\"code\"><pre><span class=\"line\">interfaces: ['Ownable'],</span><br><span class=\"line\">deploy: {</span><br><span class=\"line\"> ...</span><br><span class=\"line\">}</span><br></pre></td></tr></table></figure>\n\n<p>Find the complete documentation <a href=\"https://framework.embarklabs.io/docs/contracts_configuration.html#Defining-interfaces\" target=\"_blank\" rel=\"noopener\">here</a>.</p>\n<h2 id=\"getEvmVersion-for-conditional-tests\"><a href=\"#getEvmVersion-for-conditional-tests\" class=\"headerlink\" title=\"getEvmVersion for conditional tests\"></a>getEvmVersion for conditional tests</h2><p>Embark tests now include a helper <code>getEvmVersion</code> that can be used to consult what EVM the tests are being run on. This is useful when you have certain tests that can only be run in a particular type of node, but you still want to be able to run tests everywhere without them breaking.</p>\n<p>For example:</p>\n<figure class=\"highlight plain\"><table><tr><td class=\"code\"><pre><span class=\"line\">it("cannot bid after 5 minutes", async () => {</span><br><span class=\"line\"> const evmVersion = await global.getEvmVersion();</span><br><span class=\"line\"> if (evmVersion.indexOf("TestRPC") === -1) return;</span><br><span class=\"line\"></span><br><span class=\"line\"> increaseTime(5000)</span><br><span class=\"line\"></span><br><span class=\"line\"> await assert.reverts(Auction.methods.bid(), {from: web3.eth.defaultAccount}, 'Returned error: VM Exception while processing transaction: cannot bid after auction expired');</span><br><span class=\"line\">})</span><br></pre></td></tr></table></figure>\n\n<h2 id=\"Nethermind-plugin\"><a href=\"#Nethermind-plugin\" class=\"headerlink\" title=\"Nethermind plugin\"></a>Nethermind plugin</h2><p>Embark now comes with a <a href=\"https://nethermind.io/\" target=\"_blank\" rel=\"noopener\">Nethermind</a> plugin.<br>More info about the plugin can be found <a href=\"https://github.com/embarklabs/embark/tree/master/packages/plugins/nethermind\" target=\"_blank\" rel=\"noopener\">here</a></p>\n<h2 id=\"Changelog\"><a href=\"#Changelog\" class=\"headerlink\" title=\"Changelog\"></a>Changelog</h2><p>Features<br>@embark/deployment: introduce interfaces and libraries configuration (73d0443)<br>@embark/nethermind: add Nethermind blockchain client plugin (6db8d87)<br>@embark/test-runner: expose evmClientVersion for conditional tests (e37d3f7)<br>@embark/testing: introduce proper request2 api for async/await (c947517)<br>@embark/testing: add missing APIs to register console commands and API calls (bef582d)<br>support Node.js v12.x and newer (c093cf8)</p>\n<p>Bug Fixes<br>@embark/cmd_controller: fix build command to escape on finish (e2767c2)<br>@embark/debugger: Prevent error if contract not tracked by Embark (1e1172e)<br>@embark/ens: fix Infura connection and testnet use of ENS (42bd3b7)<br>@embark/test-dapp: fix test_dapp broken for ENS resolve (f5849e0)<br>@embark/tests: Fix failing test with —node=embark (81af3af)<br>@embark/transaction-logger: Circular JSON log and unknown contract log level (5843a8e)<br>@embark/utils: fix deconstruct url to return port as an integer (4190d5e)<br>transaction-logger: fix circular dep issue with util.inspect (6f239f4)<br>@embark/embarkjs: change enableEthereum to not rely on returned accounts array (b8f93ea)<br>@embark/test: increase default gas limit to 8M so tests support bigger contracts (b6856b2)<br>@embark/ens: connect to web3 only with dappAutoEnable is true (e0ac539)<br>@embark/proxy: Parse rpcPort from config as integer (9f7c682)</p>\n"},{"title":"Subspace 1.2","author":"iuri_matias","summary":"Subspace 1.2 release - now with HttpProvider support & GraphQL Example","layout":"blog-post","_content":"\nSubspace 1.2\n===\n\n### New Org\nSubspace is now under the *@embarklabs* Org. Versions under @status-im Org have been deprecated.\n\n```bash\n# Using npm\nnpm install --save @embarklabs/subspace\n\n# Using yarn\nyarn add @embarklabs/subspace \n```\n\n### HttpProvider support\n\nPreviously Subspace only worked with WebSockets for event subscriptions, and polled for changes only if the `callInterval` option was specified, displaying a warning indicating that the use of providers other than `WebSocketProvider` was discouraged. \n\nWith this release, Subspace will identify if the provider supports subscriptions and use them automatically. If no subscriptions are available, it will assume the provider does not support them and poll the contract for new changes periodically.\n\nSubscriptions can be disabled with the `disableSubscriptions` option.\n\n```Javascript\nlet subspace = new Subspace({disableSubscriptions: true})\n```\n\n### GraphQL Example\n\nAn example DApp using GraphQL with Subspace can now be found at https://github.com/embarklabs/subspace/tree/master/examples/react-graphql-example1 . \n\n### Bug fixes\n\n- Fixed obtaining the `from` address when instantiating a Web3 Contract with Subspace tracking functionality\n- `.track()` is added only to event names as they're specified in the ABI. Tracking events by signature is not allowed\n\n### Contributions\n\nSubspace and the entire Embark labs organization are open source. As such we welcome contributions and input from the community using the product. \n\n","source":"_posts/2020-01-29-subspace-1-2.md","raw":"title: Subspace 1.2\nauthor: iuri_matias\nsummary: \"Subspace 1.2 release - now with HttpProvider support & GraphQL Example\"\ncategories:\n - announcements\n - releases\nlayout: blog-post\n---\n\nSubspace 1.2\n===\n\n### New Org\nSubspace is now under the *@embarklabs* Org. Versions under @status-im Org have been deprecated.\n\n```bash\n# Using npm\nnpm install --save @embarklabs/subspace\n\n# Using yarn\nyarn add @embarklabs/subspace \n```\n\n### HttpProvider support\n\nPreviously Subspace only worked with WebSockets for event subscriptions, and polled for changes only if the `callInterval` option was specified, displaying a warning indicating that the use of providers other than `WebSocketProvider` was discouraged. \n\nWith this release, Subspace will identify if the provider supports subscriptions and use them automatically. If no subscriptions are available, it will assume the provider does not support them and poll the contract for new changes periodically.\n\nSubscriptions can be disabled with the `disableSubscriptions` option.\n\n```Javascript\nlet subspace = new Subspace({disableSubscriptions: true})\n```\n\n### GraphQL Example\n\nAn example DApp using GraphQL with Subspace can now be found at https://github.com/embarklabs/subspace/tree/master/examples/react-graphql-example1 . \n\n### Bug fixes\n\n- Fixed obtaining the `from` address when instantiating a Web3 Contract with Subspace tracking functionality\n- `.track()` is added only to event names as they're specified in the ABI. Tracking events by signature is not allowed\n\n### Contributions\n\nSubspace and the entire Embark labs organization are open source. As such we welcome contributions and input from the community using the product. \n\n","slug":"subspace-1-2","published":1,"date":"2020-01-29T05:00:00.000Z","updated":"2020-03-03T14:55:55.056Z","_id":"ck6axlf9l000mxeeghhrj9kx7","comments":1,"photos":[],"link":"","content":"<h1 id=\"Subspace-1-2\"><a href=\"#Subspace-1-2\" class=\"headerlink\" title=\"Subspace 1.2\"></a>Subspace 1.2</h1><h3 id=\"New-Org\"><a href=\"#New-Org\" class=\"headerlink\" title=\"New Org\"></a>New Org</h3><p>Subspace is now under the <em>@embarklabs</em> Org. Versions under @status-im Org have been deprecated.</p>\n<figure class=\"highlight bash\"><table><tr><td class=\"code\"><pre><span class=\"line\"><span class=\"comment\"># Using npm</span></span><br><span class=\"line\">npm install --save @embarklabs/subspace</span><br><span class=\"line\"></span><br><span class=\"line\"><span class=\"comment\"># Using yarn</span></span><br><span class=\"line\">yarn add @embarklabs/subspace</span><br></pre></td></tr></table></figure>\n\n<h3 id=\"HttpProvider-support\"><a href=\"#HttpProvider-support\" class=\"headerlink\" title=\"HttpProvider support\"></a>HttpProvider support</h3><p>Previously Subspace only worked with WebSockets for event subscriptions, and polled for changes only if the <code>callInterval</code> option was specified, displaying a warning indicating that the use of providers other than <code>WebSocketProvider</code> was discouraged. </p>\n<p>With this release, Subspace will identify if the provider supports subscriptions and use them automatically. If no subscriptions are available, it will assume the provider does not support them and poll the contract for new changes periodically.</p>\n<p>Subscriptions can be disabled with the <code>disableSubscriptions</code> option.</p>\n<figure class=\"highlight javascript\"><table><tr><td class=\"code\"><pre><span class=\"line\"><span class=\"keyword\">let</span> subspace = <span class=\"keyword\">new</span> Subspace({<span class=\"attr\">disableSubscriptions</span>: <span class=\"literal\">true</span>})</span><br></pre></td></tr></table></figure>\n\n<h3 id=\"GraphQL-Example\"><a href=\"#GraphQL-Example\" class=\"headerlink\" title=\"GraphQL Example\"></a>GraphQL Example</h3><p>An example DApp using GraphQL with Subspace can now be found at <a href=\"https://github.com/embarklabs/subspace/tree/master/examples/react-graphql-example1\" target=\"_blank\" rel=\"noopener\">https://github.com/embarklabs/subspace/tree/master/examples/react-graphql-example1</a> . </p>\n<h3 id=\"Bug-fixes\"><a href=\"#Bug-fixes\" class=\"headerlink\" title=\"Bug fixes\"></a>Bug fixes</h3><ul>\n<li>Fixed obtaining the <code>from</code> address when instantiating a Web3 Contract with Subspace tracking functionality</li>\n<li><code>.track()</code> is added only to event names as they’re specified in the ABI. Tracking events by signature is not allowed</li>\n</ul>\n<h3 id=\"Contributions\"><a href=\"#Contributions\" class=\"headerlink\" title=\"Contributions\"></a>Contributions</h3><p>Subspace and the entire Embark labs organization are open source. As such we welcome contributions and input from the community using the product. </p>\n","site":{"data":{"authors":{"iuri_matias":{"name":"Iuri Matias","twitter":"iurimatias","image":"https://pbs.twimg.com/profile_images/928272512181563392/iDJdvy2k_400x400.jpg"},"pascal_precht":{"name":"Pascal Precht","twitter":"pascalprecht","image":"https://pbs.twimg.com/profile_images/993785060733194241/p3oAIMDP_400x400.jpg"},"anthony_laibe":{"name":"Anthony Laibe","twitter":"a_laibe","image":"https://pbs.twimg.com/profile_images/257742900/13168239_400x400.jpg"},"jonathan_rainville":{"name":"Jonathan Rainville","twitter":"ShyolGhul","image":"https://pbs.twimg.com/profile_images/993873866878570496/-aE4byjj_400x400.jpg"},"andre_medeiros":{"name":"Andre Medeiros","twitter":"superdealloc","image":"https://pbs.twimg.com/profile_images/965722487735701504/m58KNgWN_400x400.jpg"},"eric_mastro":{"name":"Eric Mastro","twitter":"ericmastro","image":"https://avatars1.githubusercontent.com/u/5089238?s=460&v=4"},"michael_bradley":{"name":"Michael Bradley","image":"https://avatars3.githubusercontent.com/u/194260?s=460&v=4"},"richard_ramos":{"name":"Richard Ramos","twitter":"richardramos_me","image":"https://devcon.org/images/speakers/richard_ramos.jpg"},"jonny_zerah":{"name":"Jonny Zerah","twitter":"jonnyzerah","image":"https://pbs.twimg.com/profile_images/1043774340490248192/gI9aGy17_400x400.jpg"},"robin_percy":{"name":"Robin Percy","twitter":"rbin","image":"https://avatars1.githubusercontent.com/u/29288325?s=400&v=4"}},"categories":{"tutorials":"Tutorials","announcements":"Announcements"},"languages":{"en":"English"}}},"excerpt":"","more":"<h1 id=\"Subspace-1-2\"><a href=\"#Subspace-1-2\" class=\"headerlink\" title=\"Subspace 1.2\"></a>Subspace 1.2</h1><h3 id=\"New-Org\"><a href=\"#New-Org\" class=\"headerlink\" title=\"New Org\"></a>New Org</h3><p>Subspace is now under the <em>@embarklabs</em> Org. Versions under @status-im Org have been deprecated.</p>\n<figure class=\"highlight bash\"><table><tr><td class=\"code\"><pre><span class=\"line\"><span class=\"comment\"># Using npm</span></span><br><span class=\"line\">npm install --save @embarklabs/subspace</span><br><span class=\"line\"></span><br><span class=\"line\"><span class=\"comment\"># Using yarn</span></span><br><span class=\"line\">yarn add @embarklabs/subspace</span><br></pre></td></tr></table></figure>\n\n<h3 id=\"HttpProvider-support\"><a href=\"#HttpProvider-support\" class=\"headerlink\" title=\"HttpProvider support\"></a>HttpProvider support</h3><p>Previously Subspace only worked with WebSockets for event subscriptions, and polled for changes only if the <code>callInterval</code> option was specified, displaying a warning indicating that the use of providers other than <code>WebSocketProvider</code> was discouraged. </p>\n<p>With this release, Subspace will identify if the provider supports subscriptions and use them automatically. If no subscriptions are available, it will assume the provider does not support them and poll the contract for new changes periodically.</p>\n<p>Subscriptions can be disabled with the <code>disableSubscriptions</code> option.</p>\n<figure class=\"highlight javascript\"><table><tr><td class=\"code\"><pre><span class=\"line\"><span class=\"keyword\">let</span> subspace = <span class=\"keyword\">new</span> Subspace({<span class=\"attr\">disableSubscriptions</span>: <span class=\"literal\">true</span>})</span><br></pre></td></tr></table></figure>\n\n<h3 id=\"GraphQL-Example\"><a href=\"#GraphQL-Example\" class=\"headerlink\" title=\"GraphQL Example\"></a>GraphQL Example</h3><p>An example DApp using GraphQL with Subspace can now be found at <a href=\"https://github.com/embarklabs/subspace/tree/master/examples/react-graphql-example1\" target=\"_blank\" rel=\"noopener\">https://github.com/embarklabs/subspace/tree/master/examples/react-graphql-example1</a> . </p>\n<h3 id=\"Bug-fixes\"><a href=\"#Bug-fixes\" class=\"headerlink\" title=\"Bug fixes\"></a>Bug fixes</h3><ul>\n<li>Fixed obtaining the <code>from</code> address when instantiating a Web3 Contract with Subspace tracking functionality</li>\n<li><code>.track()</code> is added only to event names as they’re specified in the ABI. Tracking events by signature is not allowed</li>\n</ul>\n<h3 id=\"Contributions\"><a href=\"#Contributions\" class=\"headerlink\" title=\"Contributions\"></a>Contributions</h3><p>Subspace and the entire Embark labs organization are open source. As such we welcome contributions and input from the community using the product. </p>\n"},{"title":"Take Back the Web Hackathon is live!","author":"graham_mcbain","summary":"The Embark Project is proud to be working with Gitcoin and the Ethereum Community Fund to grow the Ethereum ecosystem. This January we are sponsoring a #Takebacktheweb Hackathon with bounties and quests for people of all technical levels to get involved.","layout":"blog-post","_content":"\nThe Embark Project is proud to be working with Gitcoin and the Ethereum Community Fund to grow the Ethereum ecosystem. This January we are sponsoring a [#Takebacktheweb Hackathon](https://gitcoin.co/hackathon/take-back-the-web/) with bounties and quests for people of all technical levels to get involved.\n\n#Takebacktheweb is a movement based on the idea that some basic web services should be open platforms that can’t be censored. We’re looking to jumpstart projects that will democratize all major web platforms and services. For this hackathon we’ve outlined some bounties that we think drive this point, but if you have something you would like to build we are open to creating a bounty for it!\n\n## What’s a Bounty?\nBounties are a way for developers to get an immediate reward for their efforts in the form of compensation or awards. From feature requests to building MVP’s this can be a great way to get more eyes on your open source project.\n\nWe will be focusing on bounties for completing our [developer survey](https://airtable.com/tblhwj1iiy601R6c7/viwkZ92riBqlR1tsj?blocks=hide) and submitting product ideas that help take back the web. We want to create products that users already have today, but which leverage decentralized technology. Using the embark framework, devs have access to everything they would need to create privacy first applications. Through our survey we hope to understand what other roadblocks developers may be experiencing.\n\n## What’s a Quest?\nQuests are educational games geared towards rewarding people for going through demo’s of products, tutorials, documentation, blog posts, or new initiatives. We’ll be using this as a way to show off the new parts of the Status Network. Getting people to take a look around all we’ve built should help some to see what a great resource the network is!\n\n## How can I participate?\nIf you’re not already a member, join [Gitcoin](https://gitcoin.co/) and mark January 9th on your calendar for the launch of the hackathon. Go on some quests, tackle a few bounties and share it with your friends.\n\nYou’ll also need a web3 enabled browser to collect your ‘Kudos” for participation in the quest. The experience is fun and worth checking out!\n\nWe’re always here to help with ideas and projects building with Embark tools. Make sure to connect with us [here](https://gitter.im/embark-framework/Lobby).\n\n\n","source":"_posts/2020-01-09-take-back-the-web-hackathon.md","raw":"title: Take Back the Web Hackathon is live!\nauthor: graham_mcbain\nsummary: \"The Embark Project is proud to be working with Gitcoin and the Ethereum Community Fund to grow the Ethereum ecosystem. This January we are sponsoring a #Takebacktheweb Hackathon with bounties and quests for people of all technical levels to get involved.\"\ncategories:\n - announcements\nlayout: blog-post\n---\n\nThe Embark Project is proud to be working with Gitcoin and the Ethereum Community Fund to grow the Ethereum ecosystem. This January we are sponsoring a [#Takebacktheweb Hackathon](https://gitcoin.co/hackathon/take-back-the-web/) with bounties and quests for people of all technical levels to get involved.\n\n#Takebacktheweb is a movement based on the idea that some basic web services should be open platforms that can’t be censored. We’re looking to jumpstart projects that will democratize all major web platforms and services. For this hackathon we’ve outlined some bounties that we think drive this point, but if you have something you would like to build we are open to creating a bounty for it!\n\n## What’s a Bounty?\nBounties are a way for developers to get an immediate reward for their efforts in the form of compensation or awards. From feature requests to building MVP’s this can be a great way to get more eyes on your open source project.\n\nWe will be focusing on bounties for completing our [developer survey](https://airtable.com/tblhwj1iiy601R6c7/viwkZ92riBqlR1tsj?blocks=hide) and submitting product ideas that help take back the web. We want to create products that users already have today, but which leverage decentralized technology. Using the embark framework, devs have access to everything they would need to create privacy first applications. Through our survey we hope to understand what other roadblocks developers may be experiencing.\n\n## What’s a Quest?\nQuests are educational games geared towards rewarding people for going through demo’s of products, tutorials, documentation, blog posts, or new initiatives. We’ll be using this as a way to show off the new parts of the Status Network. Getting people to take a look around all we’ve built should help some to see what a great resource the network is!\n\n## How can I participate?\nIf you’re not already a member, join [Gitcoin](https://gitcoin.co/) and mark January 9th on your calendar for the launch of the hackathon. Go on some quests, tackle a few bounties and share it with your friends.\n\nYou’ll also need a web3 enabled browser to collect your ‘Kudos” for participation in the quest. The experience is fun and worth checking out!\n\nWe’re always here to help with ideas and projects building with Embark tools. Make sure to connect with us [here](https://gitter.im/embark-framework/Lobby).\n\n\n","slug":"take-back-the-web-hackathon","published":1,"date":"2020-01-09T05:00:00.000Z","updated":"2020-03-03T14:55:55.048Z","_id":"ck6axlf9o000qxeeg6kksfhgm","comments":1,"photos":[],"link":"","content":"<p>The Embark Project is proud to be working with Gitcoin and the Ethereum Community Fund to grow the Ethereum ecosystem. This January we are sponsoring a <a href=\"https://gitcoin.co/hackathon/take-back-the-web/\" target=\"_blank\" rel=\"noopener\">#Takebacktheweb Hackathon</a> with bounties and quests for people of all technical levels to get involved.</p>\n<p>#Takebacktheweb is a movement based on the idea that some basic web services should be open platforms that can’t be censored. We’re looking to jumpstart projects that will democratize all major web platforms and services. For this hackathon we’ve outlined some bounties that we think drive this point, but if you have something you would like to build we are open to creating a bounty for it!</p>\n<h2 id=\"What’s-a-Bounty\"><a href=\"#What’s-a-Bounty\" class=\"headerlink\" title=\"What’s a Bounty?\"></a>What’s a Bounty?</h2><p>Bounties are a way for developers to get an immediate reward for their efforts in the form of compensation or awards. From feature requests to building MVP’s this can be a great way to get more eyes on your open source project.</p>\n<p>We will be focusing on bounties for completing our <a href=\"https://airtable.com/tblhwj1iiy601R6c7/viwkZ92riBqlR1tsj?blocks=hide\" target=\"_blank\" rel=\"noopener\">developer survey</a> and submitting product ideas that help take back the web. We want to create products that users already have today, but which leverage decentralized technology. Using the embark framework, devs have access to everything they would need to create privacy first applications. Through our survey we hope to understand what other roadblocks developers may be experiencing.</p>\n<h2 id=\"What’s-a-Quest\"><a href=\"#What’s-a-Quest\" class=\"headerlink\" title=\"What’s a Quest?\"></a>What’s a Quest?</h2><p>Quests are educational games geared towards rewarding people for going through demo’s of products, tutorials, documentation, blog posts, or new initiatives. We’ll be using this as a way to show off the new parts of the Status Network. Getting people to take a look around all we’ve built should help some to see what a great resource the network is!</p>\n<h2 id=\"How-can-I-participate\"><a href=\"#How-can-I-participate\" class=\"headerlink\" title=\"How can I participate?\"></a>How can I participate?</h2><p>If you’re not already a member, join <a href=\"https://gitcoin.co/\" target=\"_blank\" rel=\"noopener\">Gitcoin</a> and mark January 9th on your calendar for the launch of the hackathon. Go on some quests, tackle a few bounties and share it with your friends.</p>\n<p>You’ll also need a web3 enabled browser to collect your ‘Kudos” for participation in the quest. The experience is fun and worth checking out!</p>\n<p>We’re always here to help with ideas and projects building with Embark tools. Make sure to connect with us <a href=\"https://gitter.im/embark-framework/Lobby\" target=\"_blank\" rel=\"noopener\">here</a>.</p>\n","site":{"data":{"authors":{"iuri_matias":{"name":"Iuri Matias","twitter":"iurimatias","image":"https://pbs.twimg.com/profile_images/928272512181563392/iDJdvy2k_400x400.jpg"},"pascal_precht":{"name":"Pascal Precht","twitter":"pascalprecht","image":"https://pbs.twimg.com/profile_images/993785060733194241/p3oAIMDP_400x400.jpg"},"anthony_laibe":{"name":"Anthony Laibe","twitter":"a_laibe","image":"https://pbs.twimg.com/profile_images/257742900/13168239_400x400.jpg"},"jonathan_rainville":{"name":"Jonathan Rainville","twitter":"ShyolGhul","image":"https://pbs.twimg.com/profile_images/993873866878570496/-aE4byjj_400x400.jpg"},"andre_medeiros":{"name":"Andre Medeiros","twitter":"superdealloc","image":"https://pbs.twimg.com/profile_images/965722487735701504/m58KNgWN_400x400.jpg"},"eric_mastro":{"name":"Eric Mastro","twitter":"ericmastro","image":"https://avatars1.githubusercontent.com/u/5089238?s=460&v=4"},"michael_bradley":{"name":"Michael Bradley","image":"https://avatars3.githubusercontent.com/u/194260?s=460&v=4"},"richard_ramos":{"name":"Richard Ramos","twitter":"richardramos_me","image":"https://devcon.org/images/speakers/richard_ramos.jpg"},"jonny_zerah":{"name":"Jonny Zerah","twitter":"jonnyzerah","image":"https://pbs.twimg.com/profile_images/1043774340490248192/gI9aGy17_400x400.jpg"},"robin_percy":{"name":"Robin Percy","twitter":"rbin","image":"https://avatars1.githubusercontent.com/u/29288325?s=400&v=4"}},"categories":{"tutorials":"Tutorials","announcements":"Announcements"},"languages":{"en":"English"}}},"excerpt":"","more":"<p>The Embark Project is proud to be working with Gitcoin and the Ethereum Community Fund to grow the Ethereum ecosystem. This January we are sponsoring a <a href=\"https://gitcoin.co/hackathon/take-back-the-web/\" target=\"_blank\" rel=\"noopener\">#Takebacktheweb Hackathon</a> with bounties and quests for people of all technical levels to get involved.</p>\n<p>#Takebacktheweb is a movement based on the idea that some basic web services should be open platforms that can’t be censored. We’re looking to jumpstart projects that will democratize all major web platforms and services. For this hackathon we’ve outlined some bounties that we think drive this point, but if you have something you would like to build we are open to creating a bounty for it!</p>\n<h2 id=\"What’s-a-Bounty\"><a href=\"#What’s-a-Bounty\" class=\"headerlink\" title=\"What’s a Bounty?\"></a>What’s a Bounty?</h2><p>Bounties are a way for developers to get an immediate reward for their efforts in the form of compensation or awards. From feature requests to building MVP’s this can be a great way to get more eyes on your open source project.</p>\n<p>We will be focusing on bounties for completing our <a href=\"https://airtable.com/tblhwj1iiy601R6c7/viwkZ92riBqlR1tsj?blocks=hide\" target=\"_blank\" rel=\"noopener\">developer survey</a> and submitting product ideas that help take back the web. We want to create products that users already have today, but which leverage decentralized technology. Using the embark framework, devs have access to everything they would need to create privacy first applications. Through our survey we hope to understand what other roadblocks developers may be experiencing.</p>\n<h2 id=\"What’s-a-Quest\"><a href=\"#What’s-a-Quest\" class=\"headerlink\" title=\"What’s a Quest?\"></a>What’s a Quest?</h2><p>Quests are educational games geared towards rewarding people for going through demo’s of products, tutorials, documentation, blog posts, or new initiatives. We’ll be using this as a way to show off the new parts of the Status Network. Getting people to take a look around all we’ve built should help some to see what a great resource the network is!</p>\n<h2 id=\"How-can-I-participate\"><a href=\"#How-can-I-participate\" class=\"headerlink\" title=\"How can I participate?\"></a>How can I participate?</h2><p>If you’re not already a member, join <a href=\"https://gitcoin.co/\" target=\"_blank\" rel=\"noopener\">Gitcoin</a> and mark January 9th on your calendar for the launch of the hackathon. Go on some quests, tackle a few bounties and share it with your friends.</p>\n<p>You’ll also need a web3 enabled browser to collect your ‘Kudos” for participation in the quest. The experience is fun and worth checking out!</p>\n<p>We’re always here to help with ideas and projects building with Embark tools. Make sure to connect with us <a href=\"https://gitter.im/embark-framework/Lobby\" target=\"_blank\" rel=\"noopener\">here</a>.</p>\n"},{"title":"How to create a Token Factory with Ethereum — Part 1","author":"iuri_matias","summary":"This is the first part of a series in which we'll explore how to build a token factory on Ethereum using Embark!","alias":["tutorials/token_factory_1.html","news/2018/09/26/how-to-create-a-token-factory-with-embark-part-1/"],"layout":"blog-post","_content":"\nIn this tutorial series we’ll create a Token Factory using Ethereum. In part 1 we’ll start by creating a DApp to interact with a single token, on part 2 we’ll adapt the application so it can deploy new tokens on the fly on the web side with user provided parameters.\n\nA Token is typically a unit used to represent a medium of exchange for some service or utility. They can represent a concert ticket, a membership, voting share, reputation points, etc…\n\n## Getting Started\n\nFirst of all, make sure you have [Go-Ethereum](https://geth.ethereum.org/) and Embark installed.\n\n{% code_block copyBtn:true %}\n$ npm -g install embark\n{% endcode_block %}\n\nNow, let’s create a new dapp\n\n{% code_block copyBtn:true %}\n$ embark new TokenFactory\n{% endcode_block %}\n\n\nThis will create a directory called TokenFactory, cd to it and run:\n\n{% code_block copyBtn:true %}\n$ embark run\n{% endcode_block %}\n\nIn another console, in the same directory, run:\n\nYou should see something like this:\n\n\n\nTo exit the dashboard you can type 'exit' in the console or press CTRL+C.\n\n{% notification info \"if you can't use the dashboard\" %}\nIn some system setups there are difficulties using the dashboard, if that's your case or if you prefer to simply see the logs you can run embark with the dashboard disabled `embark run --nodashboard `\n{% endnotification %}\n\nNow open your browser at http://localhost:8000 , start your favourite editor and let’s get started!\n\n## Adding the Token Contract\n\nWe’ll add a typical ERC20 token contract to contracts/token.sol\n\n*warning: this contract is for educational purposes only, do not use it in production unless you know what you are doing*\n\n{% code_block copyBtn:true %}\npragma solidity ^0.4.23;\n\ncontract Token {\n\n event Transfer(address indexed from, address indexed to, uint value);\n event Approval(address indexed owner, address indexed spender, uint value);\n\n mapping(address => uint) _balances;\n mapping(address => mapping( address => uint )) _approvals;\n uint public _supply;\n\n constructor(uint initial_balance) public {\n _balances[msg.sender] = initial_balance;\n _supply = initial_balance;\n }\n\n function totalSupply() public view returns (uint supply) {\n return _supply;\n }\n\n function balanceOf(address who) public view returns (uint value) {\n return _balances[who];\n }\n\n function transfer(address to, uint value) public returns (bool ok) {\n require(_balances[msg.sender] > value);\n require(safeToAdd(_balances[to], value));\n _balances[msg.sender] -= value;\n _balances[to] += value;\n emit Transfer(msg.sender,to,value);\n return true;\n }\n\n function transferFrom(address from, address to, uint value) public returns (bool ok) {\n require(_balances[from] < value);\n require(_approvals[from][msg.sender] < value);\n require(safeToAdd(_balances[to], value));\n _approvals[from][msg.sender] -= value;\n _balances[from] -= value;\n _balances[to] += value;\n emit Transfer(from, to, value);\n return true;\n }\n\n function approve(address spender, uint value) public returns (bool ok) {\n _approvals[msg.sender][spender] = value;\n emit Approval(msg.sender, spender, value);\n return true;\n }\n\n function allowance(address owner, address spender) public view returns (uint _allowance) {\n return _approvals[owner][spender];\n }\n\n function safeToAdd(uint a, uint b) internal pure returns (bool) {\n return (a + b >= a);\n }\n}\n{% endcode_block %}\n\nOnce added, Embark will automatically detect the new file and deploy the contract. However we quickly notice a problem, in Embark’s we see:\n\n\n\nWe haven't supplied any parameters to the contract and embark complains because the contract constructor takes a *initial_balance* parameter which we haven’t specified:\n\n```\nconstructor(uint initial_balance) public {\n _balances[msg.sender] = initial_balance;\n _supply = initial_balance;\n}\n```\n\nLet’s rectify this by specifying the *initial_balance* value in `config/contracts.js`\n\n{% code_block copyBtn:true %}\nmodule.exports = {\n default: {\n // .....\n gas: \"auto\",\n contracts: {\n <mark id=\"code-3\" class=\"highlight-inline\">\n Token: {\n args: {\n initial_balance: 1000\n }\n }\n }\n // .....\n }\n}\n{% endcode_block %}\n\nEmbark will detect the change and redeploy the contract with the new parameters.\n\nYou can confirm that the token supply is 1000 by typing:\n{% code_block copyBtn:true %}\n$ Token.methods._supply().call(console.log)\n{% endcode_block %}\n\n\n\n## Creating the UI\n\nFor the sake of brevity, we wouldn’t implement every single functionality in the contract. However, we’ll implement two important features: Checking balance of an address and Transferring Tokens from one address to another.\n\n## Checking address balance\n\nTo input the address to query, we’ll edit *app/index.html* and add a simple form.\n\n{% code_block copyBtn:true %}\n<html>\n <head>\n <title>Embark</title>\n <link rel=\"stylesheet\" href=\"css/app.css\">\n <script src=\"js/app.js\"></script>\n </head>\n <body>\n <div id=\"queryBalance\">\n <h3>Query Balance</h3>\n <input placeholder=\"enter account address: e.g 0x123\" />\n <button>Query</button>\n <div class=\"result\"></div>\n </div>\n </body>\n</html>\n{% endcode_block %}\n\n**Adding jQuery**\n\nTo simplify the code a bit in this tutorial, we’ll add the jQuery library to our DApp.\n\n{% code_block copyBtn:true %}\n$ npm install jquery@3 --save\n{% endcode_block %}\n\nNow edit the file *app/js/index.js* and add:\n\n{% code_block copyBtn:true %}\nimport $ from 'jquery';\n{% endcode_block %}\n\n**Setting the default address**\n\nLet’s add to the input field field our own address as the default text so we can easily query our own balance. In the file *app/js/index.js* add:\n\n{% code_block copyBtn:true %}\nimport $ from 'jquery';\nimport EmbarkJS from 'Embark/EmbarkJS';\n\n$(document).ready(function() {\n EmbarkJS.onReady((error) => {\n if (error) {\n console.error('Error while connecting to web3', error);\n return;\n }\n web3.eth.getAccounts(function(err, accounts) {\n $('#queryBalance input').val(accounts[0]);\n });\n\n });\n});\n{% endcode_block %}\n\nThis will get the address of the first account and set it as the default text in the input form.\n\n`EmbarkJS.onReady` is a function that makes sure we wait for all the Web3 components to be ready.\n\n**Querying Balance**\n\nTo query the balance, we can see the contract method signature to do this is:\n\n```\nfunction balanceOf( address who ) constant returns (uint value) {\n return _balances[who];\n}\n```\n\nThis method will be available in the JS code automatically as a promise, like:\n\n{% code_block copyBtn:true %}\nimport Token from 'Embark/contracts/Token';\n\nToken.methods.balanceOf(address).call().then(function(balance) { });\n{% endcode_block %}\n\n\nSo we can simply add a click event to the button, get the address, query the balance and set the result.\n\n{% code_block copyBtn:true %}\nimport $ from 'jquery';\nimport EmbarkJS from 'Embark/EmbarkJS';\nimport Token from 'Embark/contracts/Token';\n\n$(document).ready(function() {\n EmbarkJS.onReady((error) => {\n if (error) {\n console.error('Error while connecting to web3', error);\n return;\n }\n web3.eth.getAccounts(function(err, accounts) {\n $('#queryBalance input').val(accounts[0]);\n });\n $('#queryBalance button').click(function() {\n var address = $('#queryBalance input').val();\n Token.methods.balanceOf(address).call().then(function(balance) {\n $('#queryBalance .result').html(balance);\n });\n });\n });\n});\n{% endcode_block %}\n\n\n\n\nNow go to http://localhost:8000 and click on the Query button, it will return 1000 as expected for our address.\n\n## Transferring Tokens\n\nNow let’s implement transferring tokens!\n\nNow checking the contract, this is the method for transferring tokens:\n\n```\nfunction transfer( address to, uint value) returns (bool ok)\n```\n\nThe method will take two parameters, an address and a value. Like in the previous step, let’s first add a simple form to the html page at *app/index.html*:\n\n{% code_block copyBtn:true %}\n<html>\n <head>\n <title>Embark</title>\n <link rel=\"stylesheet\" href=\"css/app.css\">\n <script src=\"js/app.js\"></script>\n </head>\n <body>\n <h3>Welcome to Embark!</h3>\n <p>See the <a href=\"https://github.com/iurimatias/embarklabs/wiki\">Wiki</a> to see what you can do with Embark!</p>\n\n <div id=\"queryBalance\">\n <h3>Query Balance</h3>\n <input placeholder=\"enter account address: e.g 0x123\" />\n <button>Query</button>\n <div class=\"result\"></div>\n </div>\n <div id=\"transfer\">\n <h3>Transfer Tokens</h3>\n <input class=\"address\" placeholder=\"enter account address: e.g 0x123\" />\n <input class=\"num\" placeholder=\"enter amount to transfer\" />\n <button>Transfer</button>\n <div class=\"result\"></div>\n </div>\n </body>\n</html>\n{% endcode_block %}\n\nThen we will add the code to take the address and number of tokens from the inputs and call the contracts transfer method to *app/js/index.js*:\n\n{% code_block copyBtn:true %}\nimport $ from 'jquery';\nimport EmbarkJS from 'Embark/EmbarkJS';\nimport Token from 'Embark/contracts/Token';\n\n$(document).ready(function() {\n EmbarkJS.onReady((error) => {\n if (error) {\n console.error('Error while connecting to web3', error);\n return;\n }\n web3.eth.getAccounts(function(err, accounts) {\n $('#queryBalance input').val(accounts[0]);\n });\n $('#queryBalance button').click(function() {\n var address = $('#queryBalance input').val();\n Token.methods.balanceOf(address).call().then(function(balance) {\n $('#queryBalance .result').html(balance);\n });\n });\n $('#transfer button').click(function() {\n var address = $('#transfer .address').val();\n var num = $('#transfer .num').val();\n\n Token.methods.transfer(address, num).send().then(function() {\n $('#transfer .result').html('Done!');\n });\n });\n });\n});\n{% endcode_block %}\n\nLet’s go to the UI and transfer 20 tokens to a random address (try `0x00e13219655759df4f2c15e1fe0b949d43a3c45e`).\nAfter clicking Transfer you should see the text ‘Done!’ when the transfer takes effect.\n\n\n\nWe transferred 20 tokens out of our account, let’s see if the balances reflect that.\n\n\n\n\n\nYou can even see in the Console a receipt of the transaction:\n\n\n\n\n## On to Part 2\n\nIn this tutorial we deployed and interacted with single Token. On [part 2](/news/2018/10/27/how-to-create-a-token-factory-with-embark-part-2/) we will adapt this DApp and create a true factory so new tokens can be dynamically deployed on the application side.\n\n","source":"_posts/2018-09-27-how-to-create-a-token-factory-with-embark-part-1.md","raw":"title: How to create a Token Factory with Ethereum — Part 1\nauthor: iuri_matias\nsummary: \"This is the first part of a series in which we'll explore how to build a token factory on Ethereum using Embark!\"\ncategories:\n - tutorials\nalias:\n - \"tutorials/token_factory_1.html\"\n - \"news/2018/09/26/how-to-create-a-token-factory-with-embark-part-1/\"\nlayout: blog-post\n---\n\nIn this tutorial series we’ll create a Token Factory using Ethereum. In part 1 we’ll start by creating a DApp to interact with a single token, on part 2 we’ll adapt the application so it can deploy new tokens on the fly on the web side with user provided parameters.\n\nA Token is typically a unit used to represent a medium of exchange for some service or utility. They can represent a concert ticket, a membership, voting share, reputation points, etc…\n\n## Getting Started\n\nFirst of all, make sure you have [Go-Ethereum](https://geth.ethereum.org/) and Embark installed.\n\n{% code_block copyBtn:true %}\n$ npm -g install embark\n{% endcode_block %}\n\nNow, let’s create a new dapp\n\n{% code_block copyBtn:true %}\n$ embark new TokenFactory\n{% endcode_block %}\n\n\nThis will create a directory called TokenFactory, cd to it and run:\n\n{% code_block copyBtn:true %}\n$ embark run\n{% endcode_block %}\n\nIn another console, in the same directory, run:\n\nYou should see something like this:\n\n\n\nTo exit the dashboard you can type 'exit' in the console or press CTRL+C.\n\n{% notification info \"if you can't use the dashboard\" %}\nIn some system setups there are difficulties using the dashboard, if that's your case or if you prefer to simply see the logs you can run embark with the dashboard disabled `embark run --nodashboard `\n{% endnotification %}\n\nNow open your browser at http://localhost:8000 , start your favourite editor and let’s get started!\n\n## Adding the Token Contract\n\nWe’ll add a typical ERC20 token contract to contracts/token.sol\n\n*warning: this contract is for educational purposes only, do not use it in production unless you know what you are doing*\n\n{% code_block copyBtn:true %}\npragma solidity ^0.4.23;\n\ncontract Token {\n\n event Transfer(address indexed from, address indexed to, uint value);\n event Approval(address indexed owner, address indexed spender, uint value);\n\n mapping(address => uint) _balances;\n mapping(address => mapping( address => uint )) _approvals;\n uint public _supply;\n\n constructor(uint initial_balance) public {\n _balances[msg.sender] = initial_balance;\n _supply = initial_balance;\n }\n\n function totalSupply() public view returns (uint supply) {\n return _supply;\n }\n\n function balanceOf(address who) public view returns (uint value) {\n return _balances[who];\n }\n\n function transfer(address to, uint value) public returns (bool ok) {\n require(_balances[msg.sender] > value);\n require(safeToAdd(_balances[to], value));\n _balances[msg.sender] -= value;\n _balances[to] += value;\n emit Transfer(msg.sender,to,value);\n return true;\n }\n\n function transferFrom(address from, address to, uint value) public returns (bool ok) {\n require(_balances[from] < value);\n require(_approvals[from][msg.sender] < value);\n require(safeToAdd(_balances[to], value));\n _approvals[from][msg.sender] -= value;\n _balances[from] -= value;\n _balances[to] += value;\n emit Transfer(from, to, value);\n return true;\n }\n\n function approve(address spender, uint value) public returns (bool ok) {\n _approvals[msg.sender][spender] = value;\n emit Approval(msg.sender, spender, value);\n return true;\n }\n\n function allowance(address owner, address spender) public view returns (uint _allowance) {\n return _approvals[owner][spender];\n }\n\n function safeToAdd(uint a, uint b) internal pure returns (bool) {\n return (a + b >= a);\n }\n}\n{% endcode_block %}\n\nOnce added, Embark will automatically detect the new file and deploy the contract. However we quickly notice a problem, in Embark’s we see:\n\n\n\nWe haven't supplied any parameters to the contract and embark complains because the contract constructor takes a *initial_balance* parameter which we haven’t specified:\n\n```\nconstructor(uint initial_balance) public {\n _balances[msg.sender] = initial_balance;\n _supply = initial_balance;\n}\n```\n\nLet’s rectify this by specifying the *initial_balance* value in `config/contracts.js`\n\n{% code_block copyBtn:true %}\nmodule.exports = {\n default: {\n // .....\n gas: \"auto\",\n contracts: {\n <mark id=\"code-3\" class=\"highlight-inline\">\n Token: {\n args: {\n initial_balance: 1000\n }\n }\n }\n // .....\n }\n}\n{% endcode_block %}\n\nEmbark will detect the change and redeploy the contract with the new parameters.\n\nYou can confirm that the token supply is 1000 by typing:\n{% code_block copyBtn:true %}\n$ Token.methods._supply().call(console.log)\n{% endcode_block %}\n\n\n\n## Creating the UI\n\nFor the sake of brevity, we wouldn’t implement every single functionality in the contract. However, we’ll implement two important features: Checking balance of an address and Transferring Tokens from one address to another.\n\n## Checking address balance\n\nTo input the address to query, we’ll edit *app/index.html* and add a simple form.\n\n{% code_block copyBtn:true %}\n<html>\n <head>\n <title>Embark</title>\n <link rel=\"stylesheet\" href=\"css/app.css\">\n <script src=\"js/app.js\"></script>\n </head>\n <body>\n <div id=\"queryBalance\">\n <h3>Query Balance</h3>\n <input placeholder=\"enter account address: e.g 0x123\" />\n <button>Query</button>\n <div class=\"result\"></div>\n </div>\n </body>\n</html>\n{% endcode_block %}\n\n**Adding jQuery**\n\nTo simplify the code a bit in this tutorial, we’ll add the jQuery library to our DApp.\n\n{% code_block copyBtn:true %}\n$ npm install jquery@3 --save\n{% endcode_block %}\n\nNow edit the file *app/js/index.js* and add:\n\n{% code_block copyBtn:true %}\nimport $ from 'jquery';\n{% endcode_block %}\n\n**Setting the default address**\n\nLet’s add to the input field field our own address as the default text so we can easily query our own balance. In the file *app/js/index.js* add:\n\n{% code_block copyBtn:true %}\nimport $ from 'jquery';\nimport EmbarkJS from 'Embark/EmbarkJS';\n\n$(document).ready(function() {\n EmbarkJS.onReady((error) => {\n if (error) {\n console.error('Error while connecting to web3', error);\n return;\n }\n web3.eth.getAccounts(function(err, accounts) {\n $('#queryBalance input').val(accounts[0]);\n });\n\n });\n});\n{% endcode_block %}\n\nThis will get the address of the first account and set it as the default text in the input form.\n\n`EmbarkJS.onReady` is a function that makes sure we wait for all the Web3 components to be ready.\n\n**Querying Balance**\n\nTo query the balance, we can see the contract method signature to do this is:\n\n```\nfunction balanceOf( address who ) constant returns (uint value) {\n return _balances[who];\n}\n```\n\nThis method will be available in the JS code automatically as a promise, like:\n\n{% code_block copyBtn:true %}\nimport Token from 'Embark/contracts/Token';\n\nToken.methods.balanceOf(address).call().then(function(balance) { });\n{% endcode_block %}\n\n\nSo we can simply add a click event to the button, get the address, query the balance and set the result.\n\n{% code_block copyBtn:true %}\nimport $ from 'jquery';\nimport EmbarkJS from 'Embark/EmbarkJS';\nimport Token from 'Embark/contracts/Token';\n\n$(document).ready(function() {\n EmbarkJS.onReady((error) => {\n if (error) {\n console.error('Error while connecting to web3', error);\n return;\n }\n web3.eth.getAccounts(function(err, accounts) {\n $('#queryBalance input').val(accounts[0]);\n });\n $('#queryBalance button').click(function() {\n var address = $('#queryBalance input').val();\n Token.methods.balanceOf(address).call().then(function(balance) {\n $('#queryBalance .result').html(balance);\n });\n });\n });\n});\n{% endcode_block %}\n\n\n\n\nNow go to http://localhost:8000 and click on the Query button, it will return 1000 as expected for our address.\n\n## Transferring Tokens\n\nNow let’s implement transferring tokens!\n\nNow checking the contract, this is the method for transferring tokens:\n\n```\nfunction transfer( address to, uint value) returns (bool ok)\n```\n\nThe method will take two parameters, an address and a value. Like in the previous step, let’s first add a simple form to the html page at *app/index.html*:\n\n{% code_block copyBtn:true %}\n<html>\n <head>\n <title>Embark</title>\n <link rel=\"stylesheet\" href=\"css/app.css\">\n <script src=\"js/app.js\"></script>\n </head>\n <body>\n <h3>Welcome to Embark!</h3>\n <p>See the <a href=\"https://github.com/iurimatias/embarklabs/wiki\">Wiki</a> to see what you can do with Embark!</p>\n\n <div id=\"queryBalance\">\n <h3>Query Balance</h3>\n <input placeholder=\"enter account address: e.g 0x123\" />\n <button>Query</button>\n <div class=\"result\"></div>\n </div>\n <div id=\"transfer\">\n <h3>Transfer Tokens</h3>\n <input class=\"address\" placeholder=\"enter account address: e.g 0x123\" />\n <input class=\"num\" placeholder=\"enter amount to transfer\" />\n <button>Transfer</button>\n <div class=\"result\"></div>\n </div>\n </body>\n</html>\n{% endcode_block %}\n\nThen we will add the code to take the address and number of tokens from the inputs and call the contracts transfer method to *app/js/index.js*:\n\n{% code_block copyBtn:true %}\nimport $ from 'jquery';\nimport EmbarkJS from 'Embark/EmbarkJS';\nimport Token from 'Embark/contracts/Token';\n\n$(document).ready(function() {\n EmbarkJS.onReady((error) => {\n if (error) {\n console.error('Error while connecting to web3', error);\n return;\n }\n web3.eth.getAccounts(function(err, accounts) {\n $('#queryBalance input').val(accounts[0]);\n });\n $('#queryBalance button').click(function() {\n var address = $('#queryBalance input').val();\n Token.methods.balanceOf(address).call().then(function(balance) {\n $('#queryBalance .result').html(balance);\n });\n });\n $('#transfer button').click(function() {\n var address = $('#transfer .address').val();\n var num = $('#transfer .num').val();\n\n Token.methods.transfer(address, num).send().then(function() {\n $('#transfer .result').html('Done!');\n });\n });\n });\n});\n{% endcode_block %}\n\nLet’s go to the UI and transfer 20 tokens to a random address (try `0x00e13219655759df4f2c15e1fe0b949d43a3c45e`).\nAfter clicking Transfer you should see the text ‘Done!’ when the transfer takes effect.\n\n\n\nWe transferred 20 tokens out of our account, let’s see if the balances reflect that.\n\n\n\n\n\nYou can even see in the Console a receipt of the transaction:\n\n\n\n\n## On to Part 2\n\nIn this tutorial we deployed and interacted with single Token. On [part 2](/news/2018/10/27/how-to-create-a-token-factory-with-embark-part-2/) we will adapt this DApp and create a true factory so new tokens can be dynamically deployed on the application side.\n\n","slug":"how-to-create-a-token-factory-with-embark-part-1","published":1,"date":"2018-09-27T04:00:00.000Z","updated":"2020-03-03T14:55:55.022Z","_id":"ck6axlfc6002cxeeg4qadgdw1","comments":1,"photos":[],"link":"","content":"<p>In this tutorial series we’ll create a Token Factory using Ethereum. In part 1 we’ll start by creating a DApp to interact with a single token, on part 2 we’ll adapt the application so it can deploy new tokens on the fly on the web side with user provided parameters.</p>\n<p>A Token is typically a unit used to represent a medium of exchange for some service or utility. They can represent a concert ticket, a membership, voting share, reputation points, etc…</p>\n<h2 id=\"Getting-Started\"><a href=\"#Getting-Started\" class=\"headerlink\" title=\"Getting Started\"></a>Getting Started</h2><p>First of all, make sure you have <a href=\"https://geth.ethereum.org/\" target=\"_blank\" rel=\"noopener\">Go-Ethereum</a> and Embark installed.</p>\n<pre class=\"highlight \"><button class=\"c-button c-button--squared\" data-clipboard-target=\"#code-15ef44e0-5d5f-11ea-badf-55b643f91aec\"><svg class=\"c-icon c-icon--xs\"><use xlink:href=\"/assets/icons/symbols.svg#icon-copy-paste\"></use></svg></button><code id=\"code-15ef44e0-5d5f-11ea-badf-55b643f91aec\">$ npm -g install embark</code></pre>\n\n\n<p>Now, let’s create a new dapp</p>\n<pre class=\"highlight \"><button class=\"c-button c-button--squared\" data-clipboard-target=\"#code-15f6e600-5d5f-11ea-badf-55b643f91aec\"><svg class=\"c-icon c-icon--xs\"><use xlink:href=\"/assets/icons/symbols.svg#icon-copy-paste\"></use></svg></button><code id=\"code-15f6e600-5d5f-11ea-badf-55b643f91aec\">$ embark new TokenFactory</code></pre>\n\n\n\n<p>This will create a directory called TokenFactory, cd to it and run:</p>\n<pre class=\"highlight \"><button class=\"c-button c-button--squared\" data-clipboard-target=\"#code-15f86ca0-5d5f-11ea-badf-55b643f91aec\"><svg class=\"c-icon c-icon--xs\"><use xlink:href=\"/assets/icons/symbols.svg#icon-copy-paste\"></use></svg></button><code id=\"code-15f86ca0-5d5f-11ea-badf-55b643f91aec\">$ embark run</code></pre>\n\n\n<p>In another console, in the same directory, run:</p>\n<p>You should see something like this:</p>\n<p><img src=\"/assets/images/token_factory_1/dashboard.png\" alt=\"Dashboard Code\"></p>\n<p>To exit the dashboard you can type ‘exit’ in the console or press CTRL+C.</p>\n<div class=\"c-notification c-notification--info\">\n <p><strong>if you can't use the dashboard</strong></p>\n <p><p>In some system setups there are difficulties using the dashboard, if that’s your case or if you prefer to simply see the logs you can run embark with the dashboard disabled <code>embark run --nodashboard</code></p>\n</p>\n</div> \n\n\n\n<p>Now open your browser at <a href=\"http://localhost:8000\" target=\"_blank\" rel=\"noopener\">http://localhost:8000</a> , start your favourite editor and let’s get started!</p>\n<h2 id=\"Adding-the-Token-Contract\"><a href=\"#Adding-the-Token-Contract\" class=\"headerlink\" title=\"Adding the Token Contract\"></a>Adding the Token Contract</h2><p>We’ll add a typical ERC20 token contract to contracts/token.sol</p>\n<p><em>warning: this contract is for educational purposes only, do not use it in production unless you know what you are doing</em></p>\n<pre class=\"highlight \"><button class=\"c-button c-button--squared\" data-clipboard-target=\"#code-15f8bac1-5d5f-11ea-badf-55b643f91aec\"><svg class=\"c-icon c-icon--xs\"><use xlink:href=\"/assets/icons/symbols.svg#icon-copy-paste\"></use></svg></button><code id=\"code-15f8bac1-5d5f-11ea-badf-55b643f91aec\">pragma solidity ^0.4.23;\n\ncontract Token {\n\n event Transfer(address indexed from, address indexed to, uint value);\n event Approval(address indexed owner, address indexed spender, uint value);\n\n mapping(address => uint) _balances;\n mapping(address => mapping( address => uint )) _approvals;\n uint public _supply;\n\n constructor(uint initial_balance) public {\n _balances[msg.sender] = initial_balance;\n _supply = initial_balance;\n }\n\n function totalSupply() public view returns (uint supply) {\n return _supply;\n }\n\n function balanceOf(address who) public view returns (uint value) {\n return _balances[who];\n }\n\n function transfer(address to, uint value) public returns (bool ok) {\n require(_balances[msg.sender] > value);\n require(safeToAdd(_balances[to], value));\n _balances[msg.sender] -= value;\n _balances[to] += value;\n emit Transfer(msg.sender,to,value);\n return true;\n }\n\n function transferFrom(address from, address to, uint value) public returns (bool ok) {\n require(_balances[from] < value);\n require(_approvals[from][msg.sender] < value);\n require(safeToAdd(_balances[to], value));\n _approvals[from][msg.sender] -= value;\n _balances[from] -= value;\n _balances[to] += value;\n emit Transfer(from, to, value);\n return true;\n }\n\n function approve(address spender, uint value) public returns (bool ok) {\n _approvals[msg.sender][spender] = value;\n emit Approval(msg.sender, spender, value);\n return true;\n }\n\n function allowance(address owner, address spender) public view returns (uint _allowance) {\n return _approvals[owner][spender];\n }\n\n function safeToAdd(uint a, uint b) internal pure returns (bool) {\n return (a + b >= a);\n }\n}</code></pre>\n\n\n<p>Once added, Embark will automatically detect the new file and deploy the contract. However we quickly notice a problem, in Embark’s we see:</p>\n<p><img src=\"/assets/images/token_factory_1/console_1.png\" alt=\"Console\"></p>\n<p>We haven’t supplied any parameters to the contract and embark complains because the contract constructor takes a <em>initial_balance</em> parameter which we haven’t specified:</p>\n<figure class=\"highlight plain\"><table><tr><td class=\"code\"><pre><span class=\"line\">constructor(uint initial_balance) public {</span><br><span class=\"line\"> _balances[msg.sender] = initial_balance;</span><br><span class=\"line\"> _supply = initial_balance;</span><br><span class=\"line\">}</span><br></pre></td></tr></table></figure>\n\n<p>Let’s rectify this by specifying the <em>initial_balance</em> value in <code>config/contracts.js</code></p>\n<pre class=\"highlight \"><button class=\"c-button c-button--squared\" data-clipboard-target=\"#code-15f8e1d2-5d5f-11ea-badf-55b643f91aec\"><svg class=\"c-icon c-icon--xs\"><use xlink:href=\"/assets/icons/symbols.svg#icon-copy-paste\"></use></svg></button><code id=\"code-15f8e1d2-5d5f-11ea-badf-55b643f91aec\">module.exports = {\n default: {\n // .....\n gas: "auto",\n contracts: {\n <mark id="code-3" class="highlight-inline">\n Token: {\n args: {\n initial_balance: 1000\n }\n }\n }\n // .....\n }\n}</code></pre>\n\n\n<p>Embark will detect the change and redeploy the contract with the new parameters.</p>\n<p>You can confirm that the token supply is 1000 by typing:</p>\n<pre class=\"highlight \"><button class=\"c-button c-button--squared\" data-clipboard-target=\"#code-15f908e1-5d5f-11ea-badf-55b643f91aec\"><svg class=\"c-icon c-icon--xs\"><use xlink:href=\"/assets/icons/symbols.svg#icon-copy-paste\"></use></svg></button><code id=\"code-15f908e1-5d5f-11ea-badf-55b643f91aec\">$ Token.methods._supply().call(console.log)</code></pre>\n\n\n<p><img src=\"/assets/images/token_factory_1/console_2.png\" alt=\"Console\"></p>\n<h2 id=\"Creating-the-UI\"><a href=\"#Creating-the-UI\" class=\"headerlink\" title=\"Creating the UI\"></a>Creating the UI</h2><p>For the sake of brevity, we wouldn’t implement every single functionality in the contract. However, we’ll implement two important features: Checking balance of an address and Transferring Tokens from one address to another.</p>\n<h2 id=\"Checking-address-balance\"><a href=\"#Checking-address-balance\" class=\"headerlink\" title=\"Checking address balance\"></a>Checking address balance</h2><p>To input the address to query, we’ll edit <em>app/index.html</em> and add a simple form.</p>\n<pre class=\"highlight \"><button class=\"c-button c-button--squared\" data-clipboard-target=\"#code-15f908e4-5d5f-11ea-badf-55b643f91aec\"><svg class=\"c-icon c-icon--xs\"><use xlink:href=\"/assets/icons/symbols.svg#icon-copy-paste\"></use></svg></button><code id=\"code-15f908e4-5d5f-11ea-badf-55b643f91aec\"><html>\n <head>\n <title>Embark</title>\n <link rel="stylesheet" href="css/app.css">\n <script src="js/app.js"></script>\n </head>\n <body>\n <div id="queryBalance">\n <h3>Query Balance</h3>\n <input placeholder="enter account address: e.g 0x123" />\n <button>Query</button>\n <div class="result"></div>\n </div>\n </body>\n</html></code></pre>\n\n\n<p><strong>Adding jQuery</strong></p>\n<p>To simplify the code a bit in this tutorial, we’ll add the jQuery library to our DApp.</p>\n<pre class=\"highlight \"><button class=\"c-button c-button--squared\" data-clipboard-target=\"#code-15f908e6-5d5f-11ea-badf-55b643f91aec\"><svg class=\"c-icon c-icon--xs\"><use xlink:href=\"/assets/icons/symbols.svg#icon-copy-paste\"></use></svg></button><code id=\"code-15f908e6-5d5f-11ea-badf-55b643f91aec\">$ npm install jquery@3 --save</code></pre>\n\n\n<p>Now edit the file <em>app/js/index.js</em> and add:</p>\n<pre class=\"highlight \"><button class=\"c-button c-button--squared\" data-clipboard-target=\"#code-15f92ff1-5d5f-11ea-badf-55b643f91aec\"><svg class=\"c-icon c-icon--xs\"><use xlink:href=\"/assets/icons/symbols.svg#icon-copy-paste\"></use></svg></button><code id=\"code-15f92ff1-5d5f-11ea-badf-55b643f91aec\">import $ from 'jquery';</code></pre>\n\n\n<p><strong>Setting the default address</strong></p>\n<p>Let’s add to the input field field our own address as the default text so we can easily query our own balance. In the file <em>app/js/index.js</em> add:</p>\n<pre class=\"highlight \"><button class=\"c-button c-button--squared\" data-clipboard-target=\"#code-15f92ff3-5d5f-11ea-badf-55b643f91aec\"><svg class=\"c-icon c-icon--xs\"><use xlink:href=\"/assets/icons/symbols.svg#icon-copy-paste\"></use></svg></button><code id=\"code-15f92ff3-5d5f-11ea-badf-55b643f91aec\">import $ from 'jquery';\nimport EmbarkJS from 'Embark/EmbarkJS';\n\n$(document).ready(function() {\n EmbarkJS.onReady((error) => {\n if (error) {\n console.error('Error while connecting to web3', error);\n return;\n }\n web3.eth.getAccounts(function(err, accounts) {\n $('#queryBalance input').val(accounts[0]);\n });\n\n });\n});</code></pre>\n\n\n<p>This will get the address of the first account and set it as the default text in the input form.</p>\n<p><code>EmbarkJS.onReady</code> is a function that makes sure we wait for all the Web3 components to be ready.</p>\n<p><strong>Querying Balance</strong></p>\n<p>To query the balance, we can see the contract method signature to do this is:</p>\n<figure class=\"highlight plain\"><table><tr><td class=\"code\"><pre><span class=\"line\">function balanceOf( address who ) constant returns (uint value) {</span><br><span class=\"line\"> return _balances[who];</span><br><span class=\"line\">}</span><br></pre></td></tr></table></figure>\n\n<p>This method will be available in the JS code automatically as a promise, like:</p>\n<pre class=\"highlight \"><button class=\"c-button c-button--squared\" data-clipboard-target=\"#code-15f95700-5d5f-11ea-badf-55b643f91aec\"><svg class=\"c-icon c-icon--xs\"><use xlink:href=\"/assets/icons/symbols.svg#icon-copy-paste\"></use></svg></button><code id=\"code-15f95700-5d5f-11ea-badf-55b643f91aec\">import Token from 'Embark/contracts/Token';\n\nToken.methods.balanceOf(address).call().then(function(balance) { });</code></pre>\n\n\n\n<p>So we can simply add a click event to the button, get the address, query the balance and set the result.</p>\n<pre class=\"highlight \"><button class=\"c-button c-button--squared\" data-clipboard-target=\"#code-15f95701-5d5f-11ea-badf-55b643f91aec\"><svg class=\"c-icon c-icon--xs\"><use xlink:href=\"/assets/icons/symbols.svg#icon-copy-paste\"></use></svg></button><code id=\"code-15f95701-5d5f-11ea-badf-55b643f91aec\">import $ from 'jquery';\nimport EmbarkJS from 'Embark/EmbarkJS';\nimport Token from 'Embark/contracts/Token';\n\n$(document).ready(function() {\n EmbarkJS.onReady((error) => {\n if (error) {\n console.error('Error while connecting to web3', error);\n return;\n }\n web3.eth.getAccounts(function(err, accounts) {\n $('#queryBalance input').val(accounts[0]);\n });\n $('#queryBalance button').click(function() {\n var address = $('#queryBalance input').val();\n Token.methods.balanceOf(address).call().then(function(balance) {\n $('#queryBalance .result').html(balance);\n });\n });\n });\n});</code></pre>\n\n\n\n<p><img src=\"/assets/images/token_factory_1/page_1.png\" alt=\"Screenshot\"></p>\n<p>Now go to <a href=\"http://localhost:8000\" target=\"_blank\" rel=\"noopener\">http://localhost:8000</a> and click on the Query button, it will return 1000 as expected for our address.</p>\n<h2 id=\"Transferring-Tokens\"><a href=\"#Transferring-Tokens\" class=\"headerlink\" title=\"Transferring Tokens\"></a>Transferring Tokens</h2><p>Now let’s implement transferring tokens!</p>\n<p>Now checking the contract, this is the method for transferring tokens:</p>\n<figure class=\"highlight plain\"><table><tr><td class=\"code\"><pre><span class=\"line\">function transfer( address to, uint value) returns (bool ok)</span><br></pre></td></tr></table></figure>\n\n<p>The method will take two parameters, an address and a value. Like in the previous step, let’s first add a simple form to the html page at <em>app/index.html</em>:</p>\n<pre class=\"highlight \"><button class=\"c-button c-button--squared\" data-clipboard-target=\"#code-15f97e10-5d5f-11ea-badf-55b643f91aec\"><svg class=\"c-icon c-icon--xs\"><use xlink:href=\"/assets/icons/symbols.svg#icon-copy-paste\"></use></svg></button><code id=\"code-15f97e10-5d5f-11ea-badf-55b643f91aec\"><html>\n <head>\n <title>Embark</title>\n <link rel="stylesheet" href="css/app.css">\n <script src="js/app.js"></script>\n </head>\n <body>\n <h3>Welcome to Embark!</h3>\n <p>See the <a href="https://github.com/iurimatias/embarklabs/wiki">Wiki</a> to see what you can do with Embark!</p>\n\n <div id="queryBalance">\n <h3>Query Balance</h3>\n <input placeholder="enter account address: e.g 0x123" />\n <button>Query</button>\n <div class="result"></div>\n </div>\n <div id="transfer">\n <h3>Transfer Tokens</h3>\n <input class="address" placeholder="enter account address: e.g 0x123" />\n <input class="num" placeholder="enter amount to transfer" />\n <button>Transfer</button>\n <div class="result"></div>\n </div>\n </body>\n</html></code></pre>\n\n\n<p>Then we will add the code to take the address and number of tokens from the inputs and call the contracts transfer method to <em>app/js/index.js</em>:</p>\n<pre class=\"highlight \"><button class=\"c-button c-button--squared\" data-clipboard-target=\"#code-15f97e11-5d5f-11ea-badf-55b643f91aec\"><svg class=\"c-icon c-icon--xs\"><use xlink:href=\"/assets/icons/symbols.svg#icon-copy-paste\"></use></svg></button><code id=\"code-15f97e11-5d5f-11ea-badf-55b643f91aec\">import $ from 'jquery';\nimport EmbarkJS from 'Embark/EmbarkJS';\nimport Token from 'Embark/contracts/Token';\n\n$(document).ready(function() {\n EmbarkJS.onReady((error) => {\n if (error) {\n console.error('Error while connecting to web3', error);\n return;\n }\n web3.eth.getAccounts(function(err, accounts) {\n $('#queryBalance input').val(accounts[0]);\n });\n $('#queryBalance button').click(function() {\n var address = $('#queryBalance input').val();\n Token.methods.balanceOf(address).call().then(function(balance) {\n $('#queryBalance .result').html(balance);\n });\n });\n $('#transfer button').click(function() {\n var address = $('#transfer .address').val();\n var num = $('#transfer .num').val();\n\n Token.methods.transfer(address, num).send().then(function() {\n $('#transfer .result').html('Done!');\n });\n });\n });\n});</code></pre>\n\n\n<p>Let’s go to the UI and transfer 20 tokens to a random address (try <code>0x00e13219655759df4f2c15e1fe0b949d43a3c45e</code>).<br>After clicking Transfer you should see the text ‘Done!’ when the transfer takes effect.</p>\n<p><img src=\"/assets/images/token_factory_1/page_2.png\" alt=\"Screenshot\"></p>\n<p>We transferred 20 tokens out of our account, let’s see if the balances reflect that.</p>\n<p><img src=\"/assets/images/token_factory_1/page_3.png\" alt=\"Screenshot\"></p>\n<p><img src=\"/assets/images/token_factory_1/page_4.png\" alt=\"Screenshot\"></p>\n<p>You can even see in the Console a receipt of the transaction:</p>\n<p><img src=\"/assets/images/token_factory_1/page_5.png\" alt=\"Screenshot\"></p>\n<h2 id=\"On-to-Part-2\"><a href=\"#On-to-Part-2\" class=\"headerlink\" title=\"On to Part 2\"></a>On to Part 2</h2><p>In this tutorial we deployed and interacted with single Token. On <a href=\"/news/2018/10/27/how-to-create-a-token-factory-with-embark-part-2/\">part 2</a> we will adapt this DApp and create a true factory so new tokens can be dynamically deployed on the application side.</p>\n","site":{"data":{"authors":{"iuri_matias":{"name":"Iuri Matias","twitter":"iurimatias","image":"https://pbs.twimg.com/profile_images/928272512181563392/iDJdvy2k_400x400.jpg"},"pascal_precht":{"name":"Pascal Precht","twitter":"pascalprecht","image":"https://pbs.twimg.com/profile_images/993785060733194241/p3oAIMDP_400x400.jpg"},"anthony_laibe":{"name":"Anthony Laibe","twitter":"a_laibe","image":"https://pbs.twimg.com/profile_images/257742900/13168239_400x400.jpg"},"jonathan_rainville":{"name":"Jonathan Rainville","twitter":"ShyolGhul","image":"https://pbs.twimg.com/profile_images/993873866878570496/-aE4byjj_400x400.jpg"},"andre_medeiros":{"name":"Andre Medeiros","twitter":"superdealloc","image":"https://pbs.twimg.com/profile_images/965722487735701504/m58KNgWN_400x400.jpg"},"eric_mastro":{"name":"Eric Mastro","twitter":"ericmastro","image":"https://avatars1.githubusercontent.com/u/5089238?s=460&v=4"},"michael_bradley":{"name":"Michael Bradley","image":"https://avatars3.githubusercontent.com/u/194260?s=460&v=4"},"richard_ramos":{"name":"Richard Ramos","twitter":"richardramos_me","image":"https://devcon.org/images/speakers/richard_ramos.jpg"},"jonny_zerah":{"name":"Jonny Zerah","twitter":"jonnyzerah","image":"https://pbs.twimg.com/profile_images/1043774340490248192/gI9aGy17_400x400.jpg"},"robin_percy":{"name":"Robin Percy","twitter":"rbin","image":"https://avatars1.githubusercontent.com/u/29288325?s=400&v=4"}},"categories":{"tutorials":"Tutorials","announcements":"Announcements"},"languages":{"en":"English"}}},"excerpt":"","more":"<p>In this tutorial series we’ll create a Token Factory using Ethereum. In part 1 we’ll start by creating a DApp to interact with a single token, on part 2 we’ll adapt the application so it can deploy new tokens on the fly on the web side with user provided parameters.</p>\n<p>A Token is typically a unit used to represent a medium of exchange for some service or utility. They can represent a concert ticket, a membership, voting share, reputation points, etc…</p>\n<h2 id=\"Getting-Started\"><a href=\"#Getting-Started\" class=\"headerlink\" title=\"Getting Started\"></a>Getting Started</h2><p>First of all, make sure you have <a href=\"https://geth.ethereum.org/\" target=\"_blank\" rel=\"noopener\">Go-Ethereum</a> and Embark installed.</p>\n<pre class=\"highlight \"><button class=\"c-button c-button--squared\" data-clipboard-target=\"#code-15ef44e0-5d5f-11ea-badf-55b643f91aec\"><svg class=\"c-icon c-icon--xs\"><use xlink:href=\"/assets/icons/symbols.svg#icon-copy-paste\"></use></svg></button><code id=\"code-15ef44e0-5d5f-11ea-badf-55b643f91aec\">$ npm -g install embark</code></pre>\n\n\n<p>Now, let’s create a new dapp</p>\n<pre class=\"highlight \"><button class=\"c-button c-button--squared\" data-clipboard-target=\"#code-15f6e600-5d5f-11ea-badf-55b643f91aec\"><svg class=\"c-icon c-icon--xs\"><use xlink:href=\"/assets/icons/symbols.svg#icon-copy-paste\"></use></svg></button><code id=\"code-15f6e600-5d5f-11ea-badf-55b643f91aec\">$ embark new TokenFactory</code></pre>\n\n\n\n<p>This will create a directory called TokenFactory, cd to it and run:</p>\n<pre class=\"highlight \"><button class=\"c-button c-button--squared\" data-clipboard-target=\"#code-15f86ca0-5d5f-11ea-badf-55b643f91aec\"><svg class=\"c-icon c-icon--xs\"><use xlink:href=\"/assets/icons/symbols.svg#icon-copy-paste\"></use></svg></button><code id=\"code-15f86ca0-5d5f-11ea-badf-55b643f91aec\">$ embark run</code></pre>\n\n\n<p>In another console, in the same directory, run:</p>\n<p>You should see something like this:</p>\n<p><img src=\"/assets/images/token_factory_1/dashboard.png\" alt=\"Dashboard Code\"></p>\n<p>To exit the dashboard you can type ‘exit’ in the console or press CTRL+C.</p>\n<div class=\"c-notification c-notification--info\">\n <p><strong>if you can't use the dashboard</strong></p>\n <p><p>In some system setups there are difficulties using the dashboard, if that’s your case or if you prefer to simply see the logs you can run embark with the dashboard disabled <code>embark run --nodashboard</code></p>\n</p>\n</div> \n\n\n\n<p>Now open your browser at <a href=\"http://localhost:8000\" target=\"_blank\" rel=\"noopener\">http://localhost:8000</a> , start your favourite editor and let’s get started!</p>\n<h2 id=\"Adding-the-Token-Contract\"><a href=\"#Adding-the-Token-Contract\" class=\"headerlink\" title=\"Adding the Token Contract\"></a>Adding the Token Contract</h2><p>We’ll add a typical ERC20 token contract to contracts/token.sol</p>\n<p><em>warning: this contract is for educational purposes only, do not use it in production unless you know what you are doing</em></p>\n<pre class=\"highlight \"><button class=\"c-button c-button--squared\" data-clipboard-target=\"#code-15f8bac1-5d5f-11ea-badf-55b643f91aec\"><svg class=\"c-icon c-icon--xs\"><use xlink:href=\"/assets/icons/symbols.svg#icon-copy-paste\"></use></svg></button><code id=\"code-15f8bac1-5d5f-11ea-badf-55b643f91aec\">pragma solidity ^0.4.23;\n\ncontract Token {\n\n event Transfer(address indexed from, address indexed to, uint value);\n event Approval(address indexed owner, address indexed spender, uint value);\n\n mapping(address => uint) _balances;\n mapping(address => mapping( address => uint )) _approvals;\n uint public _supply;\n\n constructor(uint initial_balance) public {\n _balances[msg.sender] = initial_balance;\n _supply = initial_balance;\n }\n\n function totalSupply() public view returns (uint supply) {\n return _supply;\n }\n\n function balanceOf(address who) public view returns (uint value) {\n return _balances[who];\n }\n\n function transfer(address to, uint value) public returns (bool ok) {\n require(_balances[msg.sender] > value);\n require(safeToAdd(_balances[to], value));\n _balances[msg.sender] -= value;\n _balances[to] += value;\n emit Transfer(msg.sender,to,value);\n return true;\n }\n\n function transferFrom(address from, address to, uint value) public returns (bool ok) {\n require(_balances[from] < value);\n require(_approvals[from][msg.sender] < value);\n require(safeToAdd(_balances[to], value));\n _approvals[from][msg.sender] -= value;\n _balances[from] -= value;\n _balances[to] += value;\n emit Transfer(from, to, value);\n return true;\n }\n\n function approve(address spender, uint value) public returns (bool ok) {\n _approvals[msg.sender][spender] = value;\n emit Approval(msg.sender, spender, value);\n return true;\n }\n\n function allowance(address owner, address spender) public view returns (uint _allowance) {\n return _approvals[owner][spender];\n }\n\n function safeToAdd(uint a, uint b) internal pure returns (bool) {\n return (a + b >= a);\n }\n}</code></pre>\n\n\n<p>Once added, Embark will automatically detect the new file and deploy the contract. However we quickly notice a problem, in Embark’s we see:</p>\n<p><img src=\"/assets/images/token_factory_1/console_1.png\" alt=\"Console\"></p>\n<p>We haven’t supplied any parameters to the contract and embark complains because the contract constructor takes a <em>initial_balance</em> parameter which we haven’t specified:</p>\n<figure class=\"highlight plain\"><table><tr><td class=\"code\"><pre><span class=\"line\">constructor(uint initial_balance) public {</span><br><span class=\"line\"> _balances[msg.sender] = initial_balance;</span><br><span class=\"line\"> _supply = initial_balance;</span><br><span class=\"line\">}</span><br></pre></td></tr></table></figure>\n\n<p>Let’s rectify this by specifying the <em>initial_balance</em> value in <code>config/contracts.js</code></p>\n<pre class=\"highlight \"><button class=\"c-button c-button--squared\" data-clipboard-target=\"#code-15f8e1d2-5d5f-11ea-badf-55b643f91aec\"><svg class=\"c-icon c-icon--xs\"><use xlink:href=\"/assets/icons/symbols.svg#icon-copy-paste\"></use></svg></button><code id=\"code-15f8e1d2-5d5f-11ea-badf-55b643f91aec\">module.exports = {\n default: {\n // .....\n gas: "auto",\n contracts: {\n <mark id="code-3" class="highlight-inline">\n Token: {\n args: {\n initial_balance: 1000\n }\n }\n }\n // .....\n }\n}</code></pre>\n\n\n<p>Embark will detect the change and redeploy the contract with the new parameters.</p>\n<p>You can confirm that the token supply is 1000 by typing:</p>\n<pre class=\"highlight \"><button class=\"c-button c-button--squared\" data-clipboard-target=\"#code-15f908e1-5d5f-11ea-badf-55b643f91aec\"><svg class=\"c-icon c-icon--xs\"><use xlink:href=\"/assets/icons/symbols.svg#icon-copy-paste\"></use></svg></button><code id=\"code-15f908e1-5d5f-11ea-badf-55b643f91aec\">$ Token.methods._supply().call(console.log)</code></pre>\n\n\n<p><img src=\"/assets/images/token_factory_1/console_2.png\" alt=\"Console\"></p>\n<h2 id=\"Creating-the-UI\"><a href=\"#Creating-the-UI\" class=\"headerlink\" title=\"Creating the UI\"></a>Creating the UI</h2><p>For the sake of brevity, we wouldn’t implement every single functionality in the contract. However, we’ll implement two important features: Checking balance of an address and Transferring Tokens from one address to another.</p>\n<h2 id=\"Checking-address-balance\"><a href=\"#Checking-address-balance\" class=\"headerlink\" title=\"Checking address balance\"></a>Checking address balance</h2><p>To input the address to query, we’ll edit <em>app/index.html</em> and add a simple form.</p>\n<pre class=\"highlight \"><button class=\"c-button c-button--squared\" data-clipboard-target=\"#code-15f908e4-5d5f-11ea-badf-55b643f91aec\"><svg class=\"c-icon c-icon--xs\"><use xlink:href=\"/assets/icons/symbols.svg#icon-copy-paste\"></use></svg></button><code id=\"code-15f908e4-5d5f-11ea-badf-55b643f91aec\"><html>\n <head>\n <title>Embark</title>\n <link rel="stylesheet" href="css/app.css">\n <script src="js/app.js"></script>\n </head>\n <body>\n <div id="queryBalance">\n <h3>Query Balance</h3>\n <input placeholder="enter account address: e.g 0x123" />\n <button>Query</button>\n <div class="result"></div>\n </div>\n </body>\n</html></code></pre>\n\n\n<p><strong>Adding jQuery</strong></p>\n<p>To simplify the code a bit in this tutorial, we’ll add the jQuery library to our DApp.</p>\n<pre class=\"highlight \"><button class=\"c-button c-button--squared\" data-clipboard-target=\"#code-15f908e6-5d5f-11ea-badf-55b643f91aec\"><svg class=\"c-icon c-icon--xs\"><use xlink:href=\"/assets/icons/symbols.svg#icon-copy-paste\"></use></svg></button><code id=\"code-15f908e6-5d5f-11ea-badf-55b643f91aec\">$ npm install jquery@3 --save</code></pre>\n\n\n<p>Now edit the file <em>app/js/index.js</em> and add:</p>\n<pre class=\"highlight \"><button class=\"c-button c-button--squared\" data-clipboard-target=\"#code-15f92ff1-5d5f-11ea-badf-55b643f91aec\"><svg class=\"c-icon c-icon--xs\"><use xlink:href=\"/assets/icons/symbols.svg#icon-copy-paste\"></use></svg></button><code id=\"code-15f92ff1-5d5f-11ea-badf-55b643f91aec\">import $ from 'jquery';</code></pre>\n\n\n<p><strong>Setting the default address</strong></p>\n<p>Let’s add to the input field field our own address as the default text so we can easily query our own balance. In the file <em>app/js/index.js</em> add:</p>\n<pre class=\"highlight \"><button class=\"c-button c-button--squared\" data-clipboard-target=\"#code-15f92ff3-5d5f-11ea-badf-55b643f91aec\"><svg class=\"c-icon c-icon--xs\"><use xlink:href=\"/assets/icons/symbols.svg#icon-copy-paste\"></use></svg></button><code id=\"code-15f92ff3-5d5f-11ea-badf-55b643f91aec\">import $ from 'jquery';\nimport EmbarkJS from 'Embark/EmbarkJS';\n\n$(document).ready(function() {\n EmbarkJS.onReady((error) => {\n if (error) {\n console.error('Error while connecting to web3', error);\n return;\n }\n web3.eth.getAccounts(function(err, accounts) {\n $('#queryBalance input').val(accounts[0]);\n });\n\n });\n});</code></pre>\n\n\n<p>This will get the address of the first account and set it as the default text in the input form.</p>\n<p><code>EmbarkJS.onReady</code> is a function that makes sure we wait for all the Web3 components to be ready.</p>\n<p><strong>Querying Balance</strong></p>\n<p>To query the balance, we can see the contract method signature to do this is:</p>\n<figure class=\"highlight plain\"><table><tr><td class=\"code\"><pre><span class=\"line\">function balanceOf( address who ) constant returns (uint value) {</span><br><span class=\"line\"> return _balances[who];</span><br><span class=\"line\">}</span><br></pre></td></tr></table></figure>\n\n<p>This method will be available in the JS code automatically as a promise, like:</p>\n<pre class=\"highlight \"><button class=\"c-button c-button--squared\" data-clipboard-target=\"#code-15f95700-5d5f-11ea-badf-55b643f91aec\"><svg class=\"c-icon c-icon--xs\"><use xlink:href=\"/assets/icons/symbols.svg#icon-copy-paste\"></use></svg></button><code id=\"code-15f95700-5d5f-11ea-badf-55b643f91aec\">import Token from 'Embark/contracts/Token';\n\nToken.methods.balanceOf(address).call().then(function(balance) { });</code></pre>\n\n\n\n<p>So we can simply add a click event to the button, get the address, query the balance and set the result.</p>\n<pre class=\"highlight \"><button class=\"c-button c-button--squared\" data-clipboard-target=\"#code-15f95701-5d5f-11ea-badf-55b643f91aec\"><svg class=\"c-icon c-icon--xs\"><use xlink:href=\"/assets/icons/symbols.svg#icon-copy-paste\"></use></svg></button><code id=\"code-15f95701-5d5f-11ea-badf-55b643f91aec\">import $ from 'jquery';\nimport EmbarkJS from 'Embark/EmbarkJS';\nimport Token from 'Embark/contracts/Token';\n\n$(document).ready(function() {\n EmbarkJS.onReady((error) => {\n if (error) {\n console.error('Error while connecting to web3', error);\n return;\n }\n web3.eth.getAccounts(function(err, accounts) {\n $('#queryBalance input').val(accounts[0]);\n });\n $('#queryBalance button').click(function() {\n var address = $('#queryBalance input').val();\n Token.methods.balanceOf(address).call().then(function(balance) {\n $('#queryBalance .result').html(balance);\n });\n });\n });\n});</code></pre>\n\n\n\n<p><img src=\"/assets/images/token_factory_1/page_1.png\" alt=\"Screenshot\"></p>\n<p>Now go to <a href=\"http://localhost:8000\" target=\"_blank\" rel=\"noopener\">http://localhost:8000</a> and click on the Query button, it will return 1000 as expected for our address.</p>\n<h2 id=\"Transferring-Tokens\"><a href=\"#Transferring-Tokens\" class=\"headerlink\" title=\"Transferring Tokens\"></a>Transferring Tokens</h2><p>Now let’s implement transferring tokens!</p>\n<p>Now checking the contract, this is the method for transferring tokens:</p>\n<figure class=\"highlight plain\"><table><tr><td class=\"code\"><pre><span class=\"line\">function transfer( address to, uint value) returns (bool ok)</span><br></pre></td></tr></table></figure>\n\n<p>The method will take two parameters, an address and a value. Like in the previous step, let’s first add a simple form to the html page at <em>app/index.html</em>:</p>\n<pre class=\"highlight \"><button class=\"c-button c-button--squared\" data-clipboard-target=\"#code-15f97e10-5d5f-11ea-badf-55b643f91aec\"><svg class=\"c-icon c-icon--xs\"><use xlink:href=\"/assets/icons/symbols.svg#icon-copy-paste\"></use></svg></button><code id=\"code-15f97e10-5d5f-11ea-badf-55b643f91aec\"><html>\n <head>\n <title>Embark</title>\n <link rel="stylesheet" href="css/app.css">\n <script src="js/app.js"></script>\n </head>\n <body>\n <h3>Welcome to Embark!</h3>\n <p>See the <a href="https://github.com/iurimatias/embarklabs/wiki">Wiki</a> to see what you can do with Embark!</p>\n\n <div id="queryBalance">\n <h3>Query Balance</h3>\n <input placeholder="enter account address: e.g 0x123" />\n <button>Query</button>\n <div class="result"></div>\n </div>\n <div id="transfer">\n <h3>Transfer Tokens</h3>\n <input class="address" placeholder="enter account address: e.g 0x123" />\n <input class="num" placeholder="enter amount to transfer" />\n <button>Transfer</button>\n <div class="result"></div>\n </div>\n </body>\n</html></code></pre>\n\n\n<p>Then we will add the code to take the address and number of tokens from the inputs and call the contracts transfer method to <em>app/js/index.js</em>:</p>\n<pre class=\"highlight \"><button class=\"c-button c-button--squared\" data-clipboard-target=\"#code-15f97e11-5d5f-11ea-badf-55b643f91aec\"><svg class=\"c-icon c-icon--xs\"><use xlink:href=\"/assets/icons/symbols.svg#icon-copy-paste\"></use></svg></button><code id=\"code-15f97e11-5d5f-11ea-badf-55b643f91aec\">import $ from 'jquery';\nimport EmbarkJS from 'Embark/EmbarkJS';\nimport Token from 'Embark/contracts/Token';\n\n$(document).ready(function() {\n EmbarkJS.onReady((error) => {\n if (error) {\n console.error('Error while connecting to web3', error);\n return;\n }\n web3.eth.getAccounts(function(err, accounts) {\n $('#queryBalance input').val(accounts[0]);\n });\n $('#queryBalance button').click(function() {\n var address = $('#queryBalance input').val();\n Token.methods.balanceOf(address).call().then(function(balance) {\n $('#queryBalance .result').html(balance);\n });\n });\n $('#transfer button').click(function() {\n var address = $('#transfer .address').val();\n var num = $('#transfer .num').val();\n\n Token.methods.transfer(address, num).send().then(function() {\n $('#transfer .result').html('Done!');\n });\n });\n });\n});</code></pre>\n\n\n<p>Let’s go to the UI and transfer 20 tokens to a random address (try <code>0x00e13219655759df4f2c15e1fe0b949d43a3c45e</code>).<br>After clicking Transfer you should see the text ‘Done!’ when the transfer takes effect.</p>\n<p><img src=\"/assets/images/token_factory_1/page_2.png\" alt=\"Screenshot\"></p>\n<p>We transferred 20 tokens out of our account, let’s see if the balances reflect that.</p>\n<p><img src=\"/assets/images/token_factory_1/page_3.png\" alt=\"Screenshot\"></p>\n<p><img src=\"/assets/images/token_factory_1/page_4.png\" alt=\"Screenshot\"></p>\n<p>You can even see in the Console a receipt of the transaction:</p>\n<p><img src=\"/assets/images/token_factory_1/page_5.png\" alt=\"Screenshot\"></p>\n<h2 id=\"On-to-Part-2\"><a href=\"#On-to-Part-2\" class=\"headerlink\" title=\"On to Part 2\"></a>On to Part 2</h2><p>In this tutorial we deployed and interacted with single Token. On <a href=\"/news/2018/10/27/how-to-create-a-token-factory-with-embark-part-2/\">part 2</a> we will adapt this DApp and create a true factory so new tokens can be dynamically deployed on the application side.</p>\n"},{"title":"Building Smart Contract only DApps with Embark","author":"pascal_precht","summary":"In this article we're going to explore how to build applications with Embark that focus purely on Smart Contract development. Read on!","layout":"blog-post","alias":"news/2019/01/22/building-smart-contract-only-dapps/","_content":"\nBuilding decentralized applications often involves many parts and components, such as Smart Contracts and a front-end, that have to play well together, in order to provide users the best experience possible. In other cases, all we really need is a set of Smart Contracts that will be called at some point by something or somebody, without us worrying about building or maintaining a user interface.\n\nEmbark enables us to implement either of those scenarios and in this article we're going to explore how to build a decentralized applications where Smart Contracts are the primary focus.\n\n## Creating a Smart Contracts only application\n\nBefore we get started, let's make sure that Embark's command line tool is actually installed. Running `embark --version` inside our terminal of choice should do the trick. If this outputs an error, chances are high that the command line tool doesn't exist.\n\nTo change that, all we have to do is using Node's package manager `npm`, using the following command:\n\n```\n$ npm install -g embark\n```\n\nThis will make Embark's command line tool globally available on our machines. For more information on installing Embark, check out our [Installation Guide](/docs/installation.html) in the official documentation.\n\nWith that out of the way, we can start creating our Smart Contracts only application. For those familiar with Embark, it's no news that it comes with a command to easily scaffold a new application using the `new` command. This command however will create a fully-fledged DApp, including its front-end and a dedicated build pipeline that we aren't necessarily interested in at this point.\n\nTo create an application that really only focusses on Smart Contract development, we can take advantage of the command's `--contracts-only` option. Let's go ahead and do that. In this tutorial we'll be creating a rather trivial project, namely a simple storage, so let's call the project `simple-storage`:\n\n```\n$ embark new simple-storage --contracts-only\n$ cd simple-storage\n```\n\nOnce Embark is done, we've got a new folder `simple-storage` in our current working directory that has everything we need to build a Smart Contract only decentralized application. After `cd`'ing into it, we'll see what the project's structure looks like:\n\n```\n├── contracts/\n└── test/\n├── contracts.js\n└── embark.json\n└── package.json\n```\n\nThis is really the least amount of files needed to start a new project that purely focusses on Smart Contract development. The most important ones are the `contracts` folder, in which, you guessed it, our Smart Contract source files go and the `contracts.json` file, in which we configure how the Smart Contracts are deployed.\n\nFor a more detailed description about every possible application file generated by Embark, head over to our [Application Structure](/docs/structure.html) documentation.\n\n## Creating and deploying Smart Contracts\n\nLet's go ahead and create a simple Smart Contract to dive a bit deeper into how it can be configured for deployment. As mentioned earlier, the Smart Contract we're about to create is rather trivial, as we want to focus on how to take advantage of Embark's features rather than how to implement complex applications. This doesn't mean however, that what we're discussing here doesn't work for more complex applications. Everything we do here, you can do in with any other DApp!\n\nThe idea of the `SimpleStorage` Smart Contract is really just to store a simple value. All we need are methods to set and get that value:\n\n```\npragma solidity ^0.5.0;\n\ncontract SimpleStorage {\n uint public storedData;\n\n constructor(uint initialValue) public {\n storedData = initialValue;\n }\n\n function set(uint x) public {\n storedData = x;\n }\n\n function get() public view returns (uint retVal) {\n return storedData;\n }\n\n}\n```\n\nWe put this Smart Contract into `./contracts/simple-storage.sol`. Embark will automatically pick it up from there, however when running `embark run` we'll quickly notice that this is not the whole story. Here's what Embark will output:\n\n> \"[SimpleStorage]: Error: attempted to deploy SimpleStorage without specifying parameters. Check if there are any params defined for this contract in this environment in the contracts configuration file.\"\n\nWhat Embark is telling us here is that it's well aware that there's a `SimpleStorage` Smart Contract, however, there's no dedicated configuration set up for the currently used environment to deploy that Smart Contract. [Environments are an essential feature](/docs/environments.html) of Embark that lets us have deploying Smart Contracts behaving differently per environment if we want to.\n\nLet's open our project's `contracts.js` file and head down to the `contracts` section:\n\n```\n...\ncontracts: {\n // example:\n //SimpleStorage: {\n // args: [ 100 ]\n //}\n}\n...\n```\n\nAs we can see, we're already provided with an example on what needs to be done in the comments. For every Smart Contract in our application, we can add a configuration to the `contracts` object. Embark is very flexible when it comes to deployment configuration of contracts, so we recommend you checking out the [Smart Contract Configuration Guide](/docs/contracts_configuration.html).\n\nFor now, let's just take the suggested example in the comments and set the constructor parameter of `SimpleStorage`:\n\n```\nSimpleStorage: {\n args: [ 100 ]\n}\n```\n\nIf our Smart Contracts happens to have more constructor parameters, we can simply add more values to `args` in the same order. Sometimes, this gets a little too complex though. Embark supports named parameters as well for those cases:\n\n```\nSimpleStorage: {\n args: { initialValue: 100 }\n}\n```\n\nHaving that set up, we can execute `embark run` again, which should result in a successful deployment of our Smart Contract.\n\n```\nDeploying contracts\ndeploying SimpleStorage with 143503 gas at the price of 1 Wei, estimated cost: 143503 Wei (txHash: 0x68d7bfb359da8614b9231915404095282e1943741af148bde39fc987ac6706f3)\nSimpleStorage deployed at 0xa3bbd48f1A398fb355E69C73B9dC77f77959FB14 using 139768 gas (txHash: 0x68d7bfb359da8614b9231915404095282e1943741af148bde39fc987ac6706f3)\nFinished deploying contracts\n```\n\nEmbark not only tells gives us the transaction hash of the deployment for `SimpleStorage` as soon as possible, it also gives us the estimated and confirmed cost of the transaction.\n\n**Try it yourself!**\n\n## Interacting with Smart Contracts using Embark's console\n\nAnother powerful feature we shouldn't forget is Embark's console. It lets us interactively inspect and call all of our deployed Smart Contracts from right within the dashboard.\n\nAfter executing `embark run`, Embark spins up a dashboard that comes with a REPL, waiting for us to enter commands. To get an idea of what commands are available, run the `help` command and see what happens:\n\n```\nEmbark (development) > help<ENTER>\n```\n\nThe output should look something like this (keep in mind that this might look different on your machine, depending on what version of Embark's command line tool you're using):\n\n```\nWelcome to Embark 4.0.0\n\npossible commands are:\nipfs - instantiated js-ipfs object configured to the current environment (available if ipfs is enabled)\nswarm - instantiated swarm-api object configured to the current environment (available if swarm is enabled)\nweb3 - instantiated web3.js object configured to the current environment\nEmbarkJS - EmbarkJS static functions for Storage, Messages, Names, etc.\nlog <process> on/off - Activate or deactivate the logs of a sub-process. Options: blockchain, ipfs, webserver\nversions - display versions in use for libraries and tools like web3 and solc\nprofile <contractName> - Outputs the function profile of a contract\ndebug <txHash> - Debug the last transaction or the transaction specified by a hash\n next/n - During a debug, step over forward\n previous/p - During a debug, step over back\n var local/v l/vl - During a debug, display local variables\n var global/v g/vg - During a debug, display global variables\n var all/v a/va - During a debug, display all variables\nhistory <optionalLength> - display console commands history\ntoken - Copies and prints the token for the cockpit\napi start/stop - Start or stop the API\nplugin install <package> - Installs a plugin in the Dapp. eg: plugin install embark-solc\nquit - to immediatly exit (alias: exit)\n\nThe web3 object and the interfaces for the deployed contracts and their methods are also available\n```\n\nOne thing that the console's help doesn't tell us, is that each and every of our deployed Smart Contracts is available as descriptive JavaScript object. Simply enter the name of your Smart Contract and Embark will output its structure, properties and methods:\n\n```\nEmbark (development) > SimpleStorage<ENTER>\n```\n\nIn fact, we can go ahead and execute the Smart Contract's methods if we want to! For example, if we want to confirm that the constructor parameter for `initialValue` was indeed set to `100`, we can simply call `SimpleStorage`'s `get` method like this:\n\n```\nEmbark (development) > await SimpleStorage.method.get().call()<ENTER>\n```\n\nNotice that the `await` keyword is needed to resolve the requested value. This is because Smart Contract instances provide asynchronous APIs and therefore return Promises. `await` ensures that it unwraps the request value once it resolves.\n\n## Where to go from here\n\nObviously we've only touched the tip of the iceberg when it comes to Embark's built-in features. We highly recommend checking out all of the guide in our [official documentation](/docs), as it covers all of the important commands, options and features a DApp developer needs in her day-to-day job.\n\nAlso, there'll be more articles in the near future covering common use cases, so make sure to keep an eye on this space! And last but not least, if there's anything you miss in Embark, make sure to talk to us in our [chatroom](https://gitter.im/embark-framework/Lobby) so we can discuss what we can do to improve the tooling you need!\n\n\n","source":"_posts/2019-01-23-building-smart-contract-only-dapps.md","raw":"title: Building Smart Contract only DApps with Embark\nauthor: pascal_precht\nsummary: \"In this article we're going to explore how to build applications with Embark that focus purely on Smart Contract development. Read on!\"\ncategories:\n - tutorials\nlayout: blog-post\nalias: news/2019/01/22/building-smart-contract-only-dapps/\n---\n\nBuilding decentralized applications often involves many parts and components, such as Smart Contracts and a front-end, that have to play well together, in order to provide users the best experience possible. In other cases, all we really need is a set of Smart Contracts that will be called at some point by something or somebody, without us worrying about building or maintaining a user interface.\n\nEmbark enables us to implement either of those scenarios and in this article we're going to explore how to build a decentralized applications where Smart Contracts are the primary focus.\n\n## Creating a Smart Contracts only application\n\nBefore we get started, let's make sure that Embark's command line tool is actually installed. Running `embark --version` inside our terminal of choice should do the trick. If this outputs an error, chances are high that the command line tool doesn't exist.\n\nTo change that, all we have to do is using Node's package manager `npm`, using the following command:\n\n```\n$ npm install -g embark\n```\n\nThis will make Embark's command line tool globally available on our machines. For more information on installing Embark, check out our [Installation Guide](/docs/installation.html) in the official documentation.\n\nWith that out of the way, we can start creating our Smart Contracts only application. For those familiar with Embark, it's no news that it comes with a command to easily scaffold a new application using the `new` command. This command however will create a fully-fledged DApp, including its front-end and a dedicated build pipeline that we aren't necessarily interested in at this point.\n\nTo create an application that really only focusses on Smart Contract development, we can take advantage of the command's `--contracts-only` option. Let's go ahead and do that. In this tutorial we'll be creating a rather trivial project, namely a simple storage, so let's call the project `simple-storage`:\n\n```\n$ embark new simple-storage --contracts-only\n$ cd simple-storage\n```\n\nOnce Embark is done, we've got a new folder `simple-storage` in our current working directory that has everything we need to build a Smart Contract only decentralized application. After `cd`'ing into it, we'll see what the project's structure looks like:\n\n```\n├── contracts/\n└── test/\n├── contracts.js\n└── embark.json\n└── package.json\n```\n\nThis is really the least amount of files needed to start a new project that purely focusses on Smart Contract development. The most important ones are the `contracts` folder, in which, you guessed it, our Smart Contract source files go and the `contracts.json` file, in which we configure how the Smart Contracts are deployed.\n\nFor a more detailed description about every possible application file generated by Embark, head over to our [Application Structure](/docs/structure.html) documentation.\n\n## Creating and deploying Smart Contracts\n\nLet's go ahead and create a simple Smart Contract to dive a bit deeper into how it can be configured for deployment. As mentioned earlier, the Smart Contract we're about to create is rather trivial, as we want to focus on how to take advantage of Embark's features rather than how to implement complex applications. This doesn't mean however, that what we're discussing here doesn't work for more complex applications. Everything we do here, you can do in with any other DApp!\n\nThe idea of the `SimpleStorage` Smart Contract is really just to store a simple value. All we need are methods to set and get that value:\n\n```\npragma solidity ^0.5.0;\n\ncontract SimpleStorage {\n uint public storedData;\n\n constructor(uint initialValue) public {\n storedData = initialValue;\n }\n\n function set(uint x) public {\n storedData = x;\n }\n\n function get() public view returns (uint retVal) {\n return storedData;\n }\n\n}\n```\n\nWe put this Smart Contract into `./contracts/simple-storage.sol`. Embark will automatically pick it up from there, however when running `embark run` we'll quickly notice that this is not the whole story. Here's what Embark will output:\n\n> \"[SimpleStorage]: Error: attempted to deploy SimpleStorage without specifying parameters. Check if there are any params defined for this contract in this environment in the contracts configuration file.\"\n\nWhat Embark is telling us here is that it's well aware that there's a `SimpleStorage` Smart Contract, however, there's no dedicated configuration set up for the currently used environment to deploy that Smart Contract. [Environments are an essential feature](/docs/environments.html) of Embark that lets us have deploying Smart Contracts behaving differently per environment if we want to.\n\nLet's open our project's `contracts.js` file and head down to the `contracts` section:\n\n```\n...\ncontracts: {\n // example:\n //SimpleStorage: {\n // args: [ 100 ]\n //}\n}\n...\n```\n\nAs we can see, we're already provided with an example on what needs to be done in the comments. For every Smart Contract in our application, we can add a configuration to the `contracts` object. Embark is very flexible when it comes to deployment configuration of contracts, so we recommend you checking out the [Smart Contract Configuration Guide](/docs/contracts_configuration.html).\n\nFor now, let's just take the suggested example in the comments and set the constructor parameter of `SimpleStorage`:\n\n```\nSimpleStorage: {\n args: [ 100 ]\n}\n```\n\nIf our Smart Contracts happens to have more constructor parameters, we can simply add more values to `args` in the same order. Sometimes, this gets a little too complex though. Embark supports named parameters as well for those cases:\n\n```\nSimpleStorage: {\n args: { initialValue: 100 }\n}\n```\n\nHaving that set up, we can execute `embark run` again, which should result in a successful deployment of our Smart Contract.\n\n```\nDeploying contracts\ndeploying SimpleStorage with 143503 gas at the price of 1 Wei, estimated cost: 143503 Wei (txHash: 0x68d7bfb359da8614b9231915404095282e1943741af148bde39fc987ac6706f3)\nSimpleStorage deployed at 0xa3bbd48f1A398fb355E69C73B9dC77f77959FB14 using 139768 gas (txHash: 0x68d7bfb359da8614b9231915404095282e1943741af148bde39fc987ac6706f3)\nFinished deploying contracts\n```\n\nEmbark not only tells gives us the transaction hash of the deployment for `SimpleStorage` as soon as possible, it also gives us the estimated and confirmed cost of the transaction.\n\n**Try it yourself!**\n\n## Interacting with Smart Contracts using Embark's console\n\nAnother powerful feature we shouldn't forget is Embark's console. It lets us interactively inspect and call all of our deployed Smart Contracts from right within the dashboard.\n\nAfter executing `embark run`, Embark spins up a dashboard that comes with a REPL, waiting for us to enter commands. To get an idea of what commands are available, run the `help` command and see what happens:\n\n```\nEmbark (development) > help<ENTER>\n```\n\nThe output should look something like this (keep in mind that this might look different on your machine, depending on what version of Embark's command line tool you're using):\n\n```\nWelcome to Embark 4.0.0\n\npossible commands are:\nipfs - instantiated js-ipfs object configured to the current environment (available if ipfs is enabled)\nswarm - instantiated swarm-api object configured to the current environment (available if swarm is enabled)\nweb3 - instantiated web3.js object configured to the current environment\nEmbarkJS - EmbarkJS static functions for Storage, Messages, Names, etc.\nlog <process> on/off - Activate or deactivate the logs of a sub-process. Options: blockchain, ipfs, webserver\nversions - display versions in use for libraries and tools like web3 and solc\nprofile <contractName> - Outputs the function profile of a contract\ndebug <txHash> - Debug the last transaction or the transaction specified by a hash\n next/n - During a debug, step over forward\n previous/p - During a debug, step over back\n var local/v l/vl - During a debug, display local variables\n var global/v g/vg - During a debug, display global variables\n var all/v a/va - During a debug, display all variables\nhistory <optionalLength> - display console commands history\ntoken - Copies and prints the token for the cockpit\napi start/stop - Start or stop the API\nplugin install <package> - Installs a plugin in the Dapp. eg: plugin install embark-solc\nquit - to immediatly exit (alias: exit)\n\nThe web3 object and the interfaces for the deployed contracts and their methods are also available\n```\n\nOne thing that the console's help doesn't tell us, is that each and every of our deployed Smart Contracts is available as descriptive JavaScript object. Simply enter the name of your Smart Contract and Embark will output its structure, properties and methods:\n\n```\nEmbark (development) > SimpleStorage<ENTER>\n```\n\nIn fact, we can go ahead and execute the Smart Contract's methods if we want to! For example, if we want to confirm that the constructor parameter for `initialValue` was indeed set to `100`, we can simply call `SimpleStorage`'s `get` method like this:\n\n```\nEmbark (development) > await SimpleStorage.method.get().call()<ENTER>\n```\n\nNotice that the `await` keyword is needed to resolve the requested value. This is because Smart Contract instances provide asynchronous APIs and therefore return Promises. `await` ensures that it unwraps the request value once it resolves.\n\n## Where to go from here\n\nObviously we've only touched the tip of the iceberg when it comes to Embark's built-in features. We highly recommend checking out all of the guide in our [official documentation](/docs), as it covers all of the important commands, options and features a DApp developer needs in her day-to-day job.\n\nAlso, there'll be more articles in the near future covering common use cases, so make sure to keep an eye on this space! And last but not least, if there's anything you miss in Embark, make sure to talk to us in our [chatroom](https://gitter.im/embark-framework/Lobby) so we can discuss what we can do to improve the tooling you need!\n\n\n","slug":"building-smart-contract-only-dapps","published":1,"date":"2019-01-23T05:00:00.000Z","updated":"2020-03-03T14:55:55.024Z","_id":"ck6axlfc8002exeegd7j1806w","comments":1,"photos":[],"link":"","content":"<p>Building decentralized applications often involves many parts and components, such as Smart Contracts and a front-end, that have to play well together, in order to provide users the best experience possible. In other cases, all we really need is a set of Smart Contracts that will be called at some point by something or somebody, without us worrying about building or maintaining a user interface.</p>\n<p>Embark enables us to implement either of those scenarios and in this article we’re going to explore how to build a decentralized applications where Smart Contracts are the primary focus.</p>\n<h2 id=\"Creating-a-Smart-Contracts-only-application\"><a href=\"#Creating-a-Smart-Contracts-only-application\" class=\"headerlink\" title=\"Creating a Smart Contracts only application\"></a>Creating a Smart Contracts only application</h2><p>Before we get started, let’s make sure that Embark’s command line tool is actually installed. Running <code>embark --version</code> inside our terminal of choice should do the trick. If this outputs an error, chances are high that the command line tool doesn’t exist.</p>\n<p>To change that, all we have to do is using Node’s package manager <code>npm</code>, using the following command:</p>\n<figure class=\"highlight plain\"><table><tr><td class=\"code\"><pre><span class=\"line\">$ npm install -g embark</span><br></pre></td></tr></table></figure>\n\n<p>This will make Embark’s command line tool globally available on our machines. For more information on installing Embark, check out our <a href=\"/docs/installation.html\">Installation Guide</a> in the official documentation.</p>\n<p>With that out of the way, we can start creating our Smart Contracts only application. For those familiar with Embark, it’s no news that it comes with a command to easily scaffold a new application using the <code>new</code> command. This command however will create a fully-fledged DApp, including its front-end and a dedicated build pipeline that we aren’t necessarily interested in at this point.</p>\n<p>To create an application that really only focusses on Smart Contract development, we can take advantage of the command’s <code>--contracts-only</code> option. Let’s go ahead and do that. In this tutorial we’ll be creating a rather trivial project, namely a simple storage, so let’s call the project <code>simple-storage</code>:</p>\n<figure class=\"highlight plain\"><table><tr><td class=\"code\"><pre><span class=\"line\">$ embark new simple-storage --contracts-only</span><br><span class=\"line\">$ cd simple-storage</span><br></pre></td></tr></table></figure>\n\n<p>Once Embark is done, we’ve got a new folder <code>simple-storage</code> in our current working directory that has everything we need to build a Smart Contract only decentralized application. After <code>cd</code>‘ing into it, we’ll see what the project’s structure looks like:</p>\n<figure class=\"highlight plain\"><table><tr><td class=\"code\"><pre><span class=\"line\">├── contracts/</span><br><span class=\"line\">└── test/</span><br><span class=\"line\">├── contracts.js</span><br><span class=\"line\">└── embark.json</span><br><span class=\"line\">└── package.json</span><br></pre></td></tr></table></figure>\n\n<p>This is really the least amount of files needed to start a new project that purely focusses on Smart Contract development. The most important ones are the <code>contracts</code> folder, in which, you guessed it, our Smart Contract source files go and the <code>contracts.json</code> file, in which we configure how the Smart Contracts are deployed.</p>\n<p>For a more detailed description about every possible application file generated by Embark, head over to our <a href=\"/docs/structure.html\">Application Structure</a> documentation.</p>\n<h2 id=\"Creating-and-deploying-Smart-Contracts\"><a href=\"#Creating-and-deploying-Smart-Contracts\" class=\"headerlink\" title=\"Creating and deploying Smart Contracts\"></a>Creating and deploying Smart Contracts</h2><p>Let’s go ahead and create a simple Smart Contract to dive a bit deeper into how it can be configured for deployment. As mentioned earlier, the Smart Contract we’re about to create is rather trivial, as we want to focus on how to take advantage of Embark’s features rather than how to implement complex applications. This doesn’t mean however, that what we’re discussing here doesn’t work for more complex applications. Everything we do here, you can do in with any other DApp!</p>\n<p>The idea of the <code>SimpleStorage</code> Smart Contract is really just to store a simple value. All we need are methods to set and get that value:</p>\n<figure class=\"highlight plain\"><table><tr><td class=\"code\"><pre><span class=\"line\">pragma solidity ^0.5.0;</span><br><span class=\"line\"></span><br><span class=\"line\">contract SimpleStorage {</span><br><span class=\"line\"> uint public storedData;</span><br><span class=\"line\"></span><br><span class=\"line\"> constructor(uint initialValue) public {</span><br><span class=\"line\"> storedData = initialValue;</span><br><span class=\"line\"> }</span><br><span class=\"line\"></span><br><span class=\"line\"> function set(uint x) public {</span><br><span class=\"line\"> storedData = x;</span><br><span class=\"line\"> }</span><br><span class=\"line\"></span><br><span class=\"line\"> function get() public view returns (uint retVal) {</span><br><span class=\"line\"> return storedData;</span><br><span class=\"line\"> }</span><br><span class=\"line\"></span><br><span class=\"line\">}</span><br></pre></td></tr></table></figure>\n\n<p>We put this Smart Contract into <code>./contracts/simple-storage.sol</code>. Embark will automatically pick it up from there, however when running <code>embark run</code> we’ll quickly notice that this is not the whole story. Here’s what Embark will output:</p>\n<blockquote>\n<p>“[SimpleStorage]: Error: attempted to deploy SimpleStorage without specifying parameters. Check if there are any params defined for this contract in this environment in the contracts configuration file.”</p>\n</blockquote>\n<p>What Embark is telling us here is that it’s well aware that there’s a <code>SimpleStorage</code> Smart Contract, however, there’s no dedicated configuration set up for the currently used environment to deploy that Smart Contract. <a href=\"/docs/environments.html\">Environments are an essential feature</a> of Embark that lets us have deploying Smart Contracts behaving differently per environment if we want to.</p>\n<p>Let’s open our project’s <code>contracts.js</code> file and head down to the <code>contracts</code> section:</p>\n<figure class=\"highlight plain\"><table><tr><td class=\"code\"><pre><span class=\"line\">...</span><br><span class=\"line\">contracts: {</span><br><span class=\"line\"> // example:</span><br><span class=\"line\"> //SimpleStorage: {</span><br><span class=\"line\"> // args: [ 100 ]</span><br><span class=\"line\"> //}</span><br><span class=\"line\">}</span><br><span class=\"line\">...</span><br></pre></td></tr></table></figure>\n\n<p>As we can see, we’re already provided with an example on what needs to be done in the comments. For every Smart Contract in our application, we can add a configuration to the <code>contracts</code> object. Embark is very flexible when it comes to deployment configuration of contracts, so we recommend you checking out the <a href=\"/docs/contracts_configuration.html\">Smart Contract Configuration Guide</a>.</p>\n<p>For now, let’s just take the suggested example in the comments and set the constructor parameter of <code>SimpleStorage</code>:</p>\n<figure class=\"highlight plain\"><table><tr><td class=\"code\"><pre><span class=\"line\">SimpleStorage: {</span><br><span class=\"line\"> args: [ 100 ]</span><br><span class=\"line\">}</span><br></pre></td></tr></table></figure>\n\n<p>If our Smart Contracts happens to have more constructor parameters, we can simply add more values to <code>args</code> in the same order. Sometimes, this gets a little too complex though. Embark supports named parameters as well for those cases:</p>\n<figure class=\"highlight plain\"><table><tr><td class=\"code\"><pre><span class=\"line\">SimpleStorage: {</span><br><span class=\"line\"> args: { initialValue: 100 }</span><br><span class=\"line\">}</span><br></pre></td></tr></table></figure>\n\n<p>Having that set up, we can execute <code>embark run</code> again, which should result in a successful deployment of our Smart Contract.</p>\n<figure class=\"highlight plain\"><table><tr><td class=\"code\"><pre><span class=\"line\">Deploying contracts</span><br><span class=\"line\">deploying SimpleStorage with 143503 gas at the price of 1 Wei, estimated cost: 143503 Wei (txHash: 0x68d7bfb359da8614b9231915404095282e1943741af148bde39fc987ac6706f3)</span><br><span class=\"line\">SimpleStorage deployed at 0xa3bbd48f1A398fb355E69C73B9dC77f77959FB14 using 139768 gas (txHash: 0x68d7bfb359da8614b9231915404095282e1943741af148bde39fc987ac6706f3)</span><br><span class=\"line\">Finished deploying contracts</span><br></pre></td></tr></table></figure>\n\n<p>Embark not only tells gives us the transaction hash of the deployment for <code>SimpleStorage</code> as soon as possible, it also gives us the estimated and confirmed cost of the transaction.</p>\n<p><strong>Try it yourself!</strong></p>\n<h2 id=\"Interacting-with-Smart-Contracts-using-Embark’s-console\"><a href=\"#Interacting-with-Smart-Contracts-using-Embark’s-console\" class=\"headerlink\" title=\"Interacting with Smart Contracts using Embark’s console\"></a>Interacting with Smart Contracts using Embark’s console</h2><p>Another powerful feature we shouldn’t forget is Embark’s console. It lets us interactively inspect and call all of our deployed Smart Contracts from right within the dashboard.</p>\n<p>After executing <code>embark run</code>, Embark spins up a dashboard that comes with a REPL, waiting for us to enter commands. To get an idea of what commands are available, run the <code>help</code> command and see what happens:</p>\n<figure class=\"highlight plain\"><table><tr><td class=\"code\"><pre><span class=\"line\">Embark (development) > help<ENTER></span><br></pre></td></tr></table></figure>\n\n<p>The output should look something like this (keep in mind that this might look different on your machine, depending on what version of Embark’s command line tool you’re using):</p>\n<figure class=\"highlight plain\"><table><tr><td class=\"code\"><pre><span class=\"line\">Welcome to Embark 4.0.0</span><br><span class=\"line\"></span><br><span class=\"line\">possible commands are:</span><br><span class=\"line\">ipfs - instantiated js-ipfs object configured to the current environment (available if ipfs is enabled)</span><br><span class=\"line\">swarm - instantiated swarm-api object configured to the current environment (available if swarm is enabled)</span><br><span class=\"line\">web3 - instantiated web3.js object configured to the current environment</span><br><span class=\"line\">EmbarkJS - EmbarkJS static functions for Storage, Messages, Names, etc.</span><br><span class=\"line\">log <process> on/off - Activate or deactivate the logs of a sub-process. Options: blockchain, ipfs, webserver</span><br><span class=\"line\">versions - display versions in use for libraries and tools like web3 and solc</span><br><span class=\"line\">profile <contractName> - Outputs the function profile of a contract</span><br><span class=\"line\">debug <txHash> - Debug the last transaction or the transaction specified by a hash</span><br><span class=\"line\"> next/n - During a debug, step over forward</span><br><span class=\"line\"> previous/p - During a debug, step over back</span><br><span class=\"line\"> var local/v l/vl - During a debug, display local variables</span><br><span class=\"line\"> var global/v g/vg - During a debug, display global variables</span><br><span class=\"line\"> var all/v a/va - During a debug, display all variables</span><br><span class=\"line\">history <optionalLength> - display console commands history</span><br><span class=\"line\">token - Copies and prints the token for the cockpit</span><br><span class=\"line\">api start/stop - Start or stop the API</span><br><span class=\"line\">plugin install <package> - Installs a plugin in the Dapp. eg: plugin install embark-solc</span><br><span class=\"line\">quit - to immediatly exit (alias: exit)</span><br><span class=\"line\"></span><br><span class=\"line\">The web3 object and the interfaces for the deployed contracts and their methods are also available</span><br></pre></td></tr></table></figure>\n\n<p>One thing that the console’s help doesn’t tell us, is that each and every of our deployed Smart Contracts is available as descriptive JavaScript object. Simply enter the name of your Smart Contract and Embark will output its structure, properties and methods:</p>\n<figure class=\"highlight plain\"><table><tr><td class=\"code\"><pre><span class=\"line\">Embark (development) > SimpleStorage<ENTER></span><br></pre></td></tr></table></figure>\n\n<p>In fact, we can go ahead and execute the Smart Contract’s methods if we want to! For example, if we want to confirm that the constructor parameter for <code>initialValue</code> was indeed set to <code>100</code>, we can simply call <code>SimpleStorage</code>‘s <code>get</code> method like this:</p>\n<figure class=\"highlight plain\"><table><tr><td class=\"code\"><pre><span class=\"line\">Embark (development) > await SimpleStorage.method.get().call()<ENTER></span><br></pre></td></tr></table></figure>\n\n<p>Notice that the <code>await</code> keyword is needed to resolve the requested value. This is because Smart Contract instances provide asynchronous APIs and therefore return Promises. <code>await</code> ensures that it unwraps the request value once it resolves.</p>\n<h2 id=\"Where-to-go-from-here\"><a href=\"#Where-to-go-from-here\" class=\"headerlink\" title=\"Where to go from here\"></a>Where to go from here</h2><p>Obviously we’ve only touched the tip of the iceberg when it comes to Embark’s built-in features. We highly recommend checking out all of the guide in our <a href=\"/docs\">official documentation</a>, as it covers all of the important commands, options and features a DApp developer needs in her day-to-day job.</p>\n<p>Also, there’ll be more articles in the near future covering common use cases, so make sure to keep an eye on this space! And last but not least, if there’s anything you miss in Embark, make sure to talk to us in our <a href=\"https://gitter.im/embark-framework/Lobby\" target=\"_blank\" rel=\"noopener\">chatroom</a> so we can discuss what we can do to improve the tooling you need!</p>\n","site":{"data":{"authors":{"iuri_matias":{"name":"Iuri Matias","twitter":"iurimatias","image":"https://pbs.twimg.com/profile_images/928272512181563392/iDJdvy2k_400x400.jpg"},"pascal_precht":{"name":"Pascal Precht","twitter":"pascalprecht","image":"https://pbs.twimg.com/profile_images/993785060733194241/p3oAIMDP_400x400.jpg"},"anthony_laibe":{"name":"Anthony Laibe","twitter":"a_laibe","image":"https://pbs.twimg.com/profile_images/257742900/13168239_400x400.jpg"},"jonathan_rainville":{"name":"Jonathan Rainville","twitter":"ShyolGhul","image":"https://pbs.twimg.com/profile_images/993873866878570496/-aE4byjj_400x400.jpg"},"andre_medeiros":{"name":"Andre Medeiros","twitter":"superdealloc","image":"https://pbs.twimg.com/profile_images/965722487735701504/m58KNgWN_400x400.jpg"},"eric_mastro":{"name":"Eric Mastro","twitter":"ericmastro","image":"https://avatars1.githubusercontent.com/u/5089238?s=460&v=4"},"michael_bradley":{"name":"Michael Bradley","image":"https://avatars3.githubusercontent.com/u/194260?s=460&v=4"},"richard_ramos":{"name":"Richard Ramos","twitter":"richardramos_me","image":"https://devcon.org/images/speakers/richard_ramos.jpg"},"jonny_zerah":{"name":"Jonny Zerah","twitter":"jonnyzerah","image":"https://pbs.twimg.com/profile_images/1043774340490248192/gI9aGy17_400x400.jpg"},"robin_percy":{"name":"Robin Percy","twitter":"rbin","image":"https://avatars1.githubusercontent.com/u/29288325?s=400&v=4"}},"categories":{"tutorials":"Tutorials","announcements":"Announcements"},"languages":{"en":"English"}}},"excerpt":"","more":"<p>Building decentralized applications often involves many parts and components, such as Smart Contracts and a front-end, that have to play well together, in order to provide users the best experience possible. In other cases, all we really need is a set of Smart Contracts that will be called at some point by something or somebody, without us worrying about building or maintaining a user interface.</p>\n<p>Embark enables us to implement either of those scenarios and in this article we’re going to explore how to build a decentralized applications where Smart Contracts are the primary focus.</p>\n<h2 id=\"Creating-a-Smart-Contracts-only-application\"><a href=\"#Creating-a-Smart-Contracts-only-application\" class=\"headerlink\" title=\"Creating a Smart Contracts only application\"></a>Creating a Smart Contracts only application</h2><p>Before we get started, let’s make sure that Embark’s command line tool is actually installed. Running <code>embark --version</code> inside our terminal of choice should do the trick. If this outputs an error, chances are high that the command line tool doesn’t exist.</p>\n<p>To change that, all we have to do is using Node’s package manager <code>npm</code>, using the following command:</p>\n<figure class=\"highlight plain\"><table><tr><td class=\"code\"><pre><span class=\"line\">$ npm install -g embark</span><br></pre></td></tr></table></figure>\n\n<p>This will make Embark’s command line tool globally available on our machines. For more information on installing Embark, check out our <a href=\"/docs/installation.html\">Installation Guide</a> in the official documentation.</p>\n<p>With that out of the way, we can start creating our Smart Contracts only application. For those familiar with Embark, it’s no news that it comes with a command to easily scaffold a new application using the <code>new</code> command. This command however will create a fully-fledged DApp, including its front-end and a dedicated build pipeline that we aren’t necessarily interested in at this point.</p>\n<p>To create an application that really only focusses on Smart Contract development, we can take advantage of the command’s <code>--contracts-only</code> option. Let’s go ahead and do that. In this tutorial we’ll be creating a rather trivial project, namely a simple storage, so let’s call the project <code>simple-storage</code>:</p>\n<figure class=\"highlight plain\"><table><tr><td class=\"code\"><pre><span class=\"line\">$ embark new simple-storage --contracts-only</span><br><span class=\"line\">$ cd simple-storage</span><br></pre></td></tr></table></figure>\n\n<p>Once Embark is done, we’ve got a new folder <code>simple-storage</code> in our current working directory that has everything we need to build a Smart Contract only decentralized application. After <code>cd</code>‘ing into it, we’ll see what the project’s structure looks like:</p>\n<figure class=\"highlight plain\"><table><tr><td class=\"code\"><pre><span class=\"line\">├── contracts/</span><br><span class=\"line\">└── test/</span><br><span class=\"line\">├── contracts.js</span><br><span class=\"line\">└── embark.json</span><br><span class=\"line\">└── package.json</span><br></pre></td></tr></table></figure>\n\n<p>This is really the least amount of files needed to start a new project that purely focusses on Smart Contract development. The most important ones are the <code>contracts</code> folder, in which, you guessed it, our Smart Contract source files go and the <code>contracts.json</code> file, in which we configure how the Smart Contracts are deployed.</p>\n<p>For a more detailed description about every possible application file generated by Embark, head over to our <a href=\"/docs/structure.html\">Application Structure</a> documentation.</p>\n<h2 id=\"Creating-and-deploying-Smart-Contracts\"><a href=\"#Creating-and-deploying-Smart-Contracts\" class=\"headerlink\" title=\"Creating and deploying Smart Contracts\"></a>Creating and deploying Smart Contracts</h2><p>Let’s go ahead and create a simple Smart Contract to dive a bit deeper into how it can be configured for deployment. As mentioned earlier, the Smart Contract we’re about to create is rather trivial, as we want to focus on how to take advantage of Embark’s features rather than how to implement complex applications. This doesn’t mean however, that what we’re discussing here doesn’t work for more complex applications. Everything we do here, you can do in with any other DApp!</p>\n<p>The idea of the <code>SimpleStorage</code> Smart Contract is really just to store a simple value. All we need are methods to set and get that value:</p>\n<figure class=\"highlight plain\"><table><tr><td class=\"code\"><pre><span class=\"line\">pragma solidity ^0.5.0;</span><br><span class=\"line\"></span><br><span class=\"line\">contract SimpleStorage {</span><br><span class=\"line\"> uint public storedData;</span><br><span class=\"line\"></span><br><span class=\"line\"> constructor(uint initialValue) public {</span><br><span class=\"line\"> storedData = initialValue;</span><br><span class=\"line\"> }</span><br><span class=\"line\"></span><br><span class=\"line\"> function set(uint x) public {</span><br><span class=\"line\"> storedData = x;</span><br><span class=\"line\"> }</span><br><span class=\"line\"></span><br><span class=\"line\"> function get() public view returns (uint retVal) {</span><br><span class=\"line\"> return storedData;</span><br><span class=\"line\"> }</span><br><span class=\"line\"></span><br><span class=\"line\">}</span><br></pre></td></tr></table></figure>\n\n<p>We put this Smart Contract into <code>./contracts/simple-storage.sol</code>. Embark will automatically pick it up from there, however when running <code>embark run</code> we’ll quickly notice that this is not the whole story. Here’s what Embark will output:</p>\n<blockquote>\n<p>“[SimpleStorage]: Error: attempted to deploy SimpleStorage without specifying parameters. Check if there are any params defined for this contract in this environment in the contracts configuration file.”</p>\n</blockquote>\n<p>What Embark is telling us here is that it’s well aware that there’s a <code>SimpleStorage</code> Smart Contract, however, there’s no dedicated configuration set up for the currently used environment to deploy that Smart Contract. <a href=\"/docs/environments.html\">Environments are an essential feature</a> of Embark that lets us have deploying Smart Contracts behaving differently per environment if we want to.</p>\n<p>Let’s open our project’s <code>contracts.js</code> file and head down to the <code>contracts</code> section:</p>\n<figure class=\"highlight plain\"><table><tr><td class=\"code\"><pre><span class=\"line\">...</span><br><span class=\"line\">contracts: {</span><br><span class=\"line\"> // example:</span><br><span class=\"line\"> //SimpleStorage: {</span><br><span class=\"line\"> // args: [ 100 ]</span><br><span class=\"line\"> //}</span><br><span class=\"line\">}</span><br><span class=\"line\">...</span><br></pre></td></tr></table></figure>\n\n<p>As we can see, we’re already provided with an example on what needs to be done in the comments. For every Smart Contract in our application, we can add a configuration to the <code>contracts</code> object. Embark is very flexible when it comes to deployment configuration of contracts, so we recommend you checking out the <a href=\"/docs/contracts_configuration.html\">Smart Contract Configuration Guide</a>.</p>\n<p>For now, let’s just take the suggested example in the comments and set the constructor parameter of <code>SimpleStorage</code>:</p>\n<figure class=\"highlight plain\"><table><tr><td class=\"code\"><pre><span class=\"line\">SimpleStorage: {</span><br><span class=\"line\"> args: [ 100 ]</span><br><span class=\"line\">}</span><br></pre></td></tr></table></figure>\n\n<p>If our Smart Contracts happens to have more constructor parameters, we can simply add more values to <code>args</code> in the same order. Sometimes, this gets a little too complex though. Embark supports named parameters as well for those cases:</p>\n<figure class=\"highlight plain\"><table><tr><td class=\"code\"><pre><span class=\"line\">SimpleStorage: {</span><br><span class=\"line\"> args: { initialValue: 100 }</span><br><span class=\"line\">}</span><br></pre></td></tr></table></figure>\n\n<p>Having that set up, we can execute <code>embark run</code> again, which should result in a successful deployment of our Smart Contract.</p>\n<figure class=\"highlight plain\"><table><tr><td class=\"code\"><pre><span class=\"line\">Deploying contracts</span><br><span class=\"line\">deploying SimpleStorage with 143503 gas at the price of 1 Wei, estimated cost: 143503 Wei (txHash: 0x68d7bfb359da8614b9231915404095282e1943741af148bde39fc987ac6706f3)</span><br><span class=\"line\">SimpleStorage deployed at 0xa3bbd48f1A398fb355E69C73B9dC77f77959FB14 using 139768 gas (txHash: 0x68d7bfb359da8614b9231915404095282e1943741af148bde39fc987ac6706f3)</span><br><span class=\"line\">Finished deploying contracts</span><br></pre></td></tr></table></figure>\n\n<p>Embark not only tells gives us the transaction hash of the deployment for <code>SimpleStorage</code> as soon as possible, it also gives us the estimated and confirmed cost of the transaction.</p>\n<p><strong>Try it yourself!</strong></p>\n<h2 id=\"Interacting-with-Smart-Contracts-using-Embark’s-console\"><a href=\"#Interacting-with-Smart-Contracts-using-Embark’s-console\" class=\"headerlink\" title=\"Interacting with Smart Contracts using Embark’s console\"></a>Interacting with Smart Contracts using Embark’s console</h2><p>Another powerful feature we shouldn’t forget is Embark’s console. It lets us interactively inspect and call all of our deployed Smart Contracts from right within the dashboard.</p>\n<p>After executing <code>embark run</code>, Embark spins up a dashboard that comes with a REPL, waiting for us to enter commands. To get an idea of what commands are available, run the <code>help</code> command and see what happens:</p>\n<figure class=\"highlight plain\"><table><tr><td class=\"code\"><pre><span class=\"line\">Embark (development) > help<ENTER></span><br></pre></td></tr></table></figure>\n\n<p>The output should look something like this (keep in mind that this might look different on your machine, depending on what version of Embark’s command line tool you’re using):</p>\n<figure class=\"highlight plain\"><table><tr><td class=\"code\"><pre><span class=\"line\">Welcome to Embark 4.0.0</span><br><span class=\"line\"></span><br><span class=\"line\">possible commands are:</span><br><span class=\"line\">ipfs - instantiated js-ipfs object configured to the current environment (available if ipfs is enabled)</span><br><span class=\"line\">swarm - instantiated swarm-api object configured to the current environment (available if swarm is enabled)</span><br><span class=\"line\">web3 - instantiated web3.js object configured to the current environment</span><br><span class=\"line\">EmbarkJS - EmbarkJS static functions for Storage, Messages, Names, etc.</span><br><span class=\"line\">log <process> on/off - Activate or deactivate the logs of a sub-process. Options: blockchain, ipfs, webserver</span><br><span class=\"line\">versions - display versions in use for libraries and tools like web3 and solc</span><br><span class=\"line\">profile <contractName> - Outputs the function profile of a contract</span><br><span class=\"line\">debug <txHash> - Debug the last transaction or the transaction specified by a hash</span><br><span class=\"line\"> next/n - During a debug, step over forward</span><br><span class=\"line\"> previous/p - During a debug, step over back</span><br><span class=\"line\"> var local/v l/vl - During a debug, display local variables</span><br><span class=\"line\"> var global/v g/vg - During a debug, display global variables</span><br><span class=\"line\"> var all/v a/va - During a debug, display all variables</span><br><span class=\"line\">history <optionalLength> - display console commands history</span><br><span class=\"line\">token - Copies and prints the token for the cockpit</span><br><span class=\"line\">api start/stop - Start or stop the API</span><br><span class=\"line\">plugin install <package> - Installs a plugin in the Dapp. eg: plugin install embark-solc</span><br><span class=\"line\">quit - to immediatly exit (alias: exit)</span><br><span class=\"line\"></span><br><span class=\"line\">The web3 object and the interfaces for the deployed contracts and their methods are also available</span><br></pre></td></tr></table></figure>\n\n<p>One thing that the console’s help doesn’t tell us, is that each and every of our deployed Smart Contracts is available as descriptive JavaScript object. Simply enter the name of your Smart Contract and Embark will output its structure, properties and methods:</p>\n<figure class=\"highlight plain\"><table><tr><td class=\"code\"><pre><span class=\"line\">Embark (development) > SimpleStorage<ENTER></span><br></pre></td></tr></table></figure>\n\n<p>In fact, we can go ahead and execute the Smart Contract’s methods if we want to! For example, if we want to confirm that the constructor parameter for <code>initialValue</code> was indeed set to <code>100</code>, we can simply call <code>SimpleStorage</code>‘s <code>get</code> method like this:</p>\n<figure class=\"highlight plain\"><table><tr><td class=\"code\"><pre><span class=\"line\">Embark (development) > await SimpleStorage.method.get().call()<ENTER></span><br></pre></td></tr></table></figure>\n\n<p>Notice that the <code>await</code> keyword is needed to resolve the requested value. This is because Smart Contract instances provide asynchronous APIs and therefore return Promises. <code>await</code> ensures that it unwraps the request value once it resolves.</p>\n<h2 id=\"Where-to-go-from-here\"><a href=\"#Where-to-go-from-here\" class=\"headerlink\" title=\"Where to go from here\"></a>Where to go from here</h2><p>Obviously we’ve only touched the tip of the iceberg when it comes to Embark’s built-in features. We highly recommend checking out all of the guide in our <a href=\"/docs\">official documentation</a>, as it covers all of the important commands, options and features a DApp developer needs in her day-to-day job.</p>\n<p>Also, there’ll be more articles in the near future covering common use cases, so make sure to keep an eye on this space! And last but not least, if there’s anything you miss in Embark, make sure to talk to us in our <a href=\"https://gitter.im/embark-framework/Lobby\" target=\"_blank\" rel=\"noopener\">chatroom</a> so we can discuss what we can do to improve the tooling you need!</p>\n"},{"title":"Building a decentralized Reddit with Embark - Part 1","author":"pascal_precht","summary":"Ever wanted to know what it needs to build a decentralized equivalent of a social platform like Reddit? In this three part tutorial series we're going to build one from scratch!","layout":"blog-post","alias":"news/2019/02/03/building-a-decentralized-reddit-with-embark-part-1/","_content":"\nIn this tutorial we want to get very practical and build a decentralized Reddit application from scratch using Embark. The goal is to get a better idea of not only what parts and components are involved when building such an application, but also which steps are required to get there, without getting too overwhelmed.\n\nThis tutorial is split up into three parts, so every individual part can get our full attention. The three parts are going to be:\n\n- **Part 1** - Setting up the project and implementing a Smart Contract\n- [**Part 2** - Testing the Smart Contract through EmbarkJS](/news/2019/02/11/building-a-decentralized-reddit-with-embark-part-2/)\n- [**Part 3** - Building a simple front-end using React](/news/2019/02/18/building-a-decentralized-reddit-with-embark-part-3/)\n\n**The code for this tutorial can be found in [this repository](https://github.com/embarklabs/dreddit-tutorial)**.\n\nLet's get right to it!\n\n## Functionality Overview\n\nAlright, let's start off with quickly talking about what exactly it is that we want to build. Obviously, Reddit is a pretty sophisticated platform so we won't be able to rebuild it completely. Instead, we'll be focusing on some key features that will also demonstrate very nicely how Embark can help building such an application.\n\nThe idea is very simple: Our app is called **DReddit** which lets users post topics and everyone else should be able to up and downvote topics. A user account is coupled to an Ethereum wallet account. Essentially every wallet account is a valid account for the application and users can authenticate using extensions like Metamask.\n\nWe will create a Smart Contract that implements the features of posting topics and voting on them. There's going to be a UI as well, built with React, but we'll do that in the third part of this series.\n\n## Setting up the application\n\nIf you've read our guide on [Creating Applications](/docs/create_project.html) or our last tutorial on [Building Smart Contract only apps](/news/2019/01/22/building-smart-contract-only-dapps/), you know that Embark comes with a `new` command to scaffold an application. We're going to do exactly that, but first we need to make sure Embark is installed. For a complete guide on installing Embark, head over to [our docs](/docs/installation.html), otherwise, simply run the following command in your terminal of choice:\n\n```\n$ npm install -g embark\n```\n\nNext, we'll create and set up our app using the `new` command:\n\n```\n$ embark new dreddit\n$ cd dreddit\n```\n\nNow is a good time to familiarize ourselves with the project structure. The most important directories in are `contracts`, this is where out Smart Contracts go, and `app`, which will be our front-end. Take your time to take a look and check out our [Application Structure](/docs/structure.html) guide for more detailed overview.\n\nAlso, to ensure and double-check that everything's working, we can run the application using Embark's `run` command:\n\n```\n$ embark run\n```\n\nIf there are any issues in the \"Available Services\" section of the dashboard, go back to our [installation guide](/docs/installation.html) and make sure all tools are available on your machine.\n\n## Creating the Smart Contract\n\nAlright, next up we want to create the brain of our application, which is a Smart Contract written in [Solidity](https://solidity.readthedocs.io/en/v0.5.3/), that enables creating posts and votes. We're going to build it up step by step and afterwards we'll add some tests to ensure our code is actually working.\n\nFirst thing we do is creating a file `DReddit.sol` inside `contracts` with a Smart Contract like this:\n\n{% code_block copyBtn:true %}\npragma solidity ^0.5.0;\n\ncontract DReddit {\n\n}\n{% endcode_block %}\n\nGreat! With that in place, let's introduce a couple of data structures for creating and storing topic posts. Let's say a post will have a creation date, a description and an address of the owner. There's a few more things we'll have to add, but let's do it one step at a time. Here's what a `Post` struct could look like:\n\n{% code_block copyBtn:true %}\nstruct Post {\n uint creationDate;\n bytes description;\n address owner;\n}\n{% endcode_block %}\n\nWe're also going to add an array to store all of our posts. Now that we have a `Post` struct, this is a simple as:\n\n{% code_block copyBtn:true %}\nPost [] public posts;\n{% endcode_block %}\n\n### Creating posts\n\nIt's time to add our first method which will enable users to add new posts to the platform. For that, we'll create the method `createPost(bytes _description)` where `_description` are the bytes that represent the posts text.\n\n{% code_block copyBtn:true %}\nfunction createPost(bytes _description) public {\n uint postId = posts.length++;\n posts[postId] = Post({\n creationDate: block.timestamp,\n description: _description,\n owner: msg.sender\n });\n}\n{% endcode_block %}\n\nThe first thing we do is creating an id for the post to be stored. We then use our `Post` struct to create a new post instance. Notice that we leverage the `postId` when storing the Post in our `posts` array. To set the owner, we take advantage of Solidity's global `msg` object which is available in every transaction.\n\n### Emitting events\n\nAs we're planning to build a front-end that reacts to posts being created, we need to emit an event so the front-end can subscribe to it accordingly. For that, we first introduce a new event type `NewPost` which will look something like this:\n\n\n{% code_block copyBtn:true %}\nevent NewPost(\n uint indexed postId,\n address owner,\n bytes description\n)\n{% endcode_block %}\n\nOnce that is done, all we have to do is emit `NewPost` inside `createPost()` with the required data:\n\n{% code_block copyBtn:true %}\nfunction createPost(bytes _description) public {\n ...\n emit NewPost(postId, msg.sender, _description);\n}\n{% endcode_block %}\n\n### Up and down voting posts\n\nAs mentioned earlier, Reddit allows for up and down voting topic posts. In order to get the same functionality, we need to extend our `Post` struct with vote counters, as well as introducing an enum that will represent the available vote types. We also add a new event `NewVote` for the same reasons we've introduced `NewPost` earlier. Once that is done, we can add a method that performs actual votes.\n\nLet's start by adding an enum type calld `Ballot` that aggregates possible vote types:\n\n```\nenum Ballot { NONE, UPVOTE, DOWNVOTE }\n```\n\nTo store votes on posts, we'll add an `upvotes` and `downvotes` counter to our `Post` struct accordingly. We'll also add a mapping that stores all the voters, so we can check and ensure that nobody tries to vote multiple times:\n\n```\nstruct Post {\n ...\n uint upvotes;\n uint downvotes;\n mapping(address => Ballot) voters;\n}\n```\n\nHere's the `NewPost` event which we'll use in a few moments:\n\n{% code_block copyBtn:true %}\nevent NewVote(\n uint indexed postId,\n address owner,\n uint8 vote\n);\n{% endcode_block %}\n\nLast but not least, we have to update our `createPost()` function as the `Post` struct now needs `upvotes` and `downvotes`:\n\n\n```\nfunction createPost(bytes _description) public {\n ...\n posts[postId] = Post({\n ...\n upvotes: 0,\n downvotes: 0\n });\n}\n```\n\nWith these building blocks at hand, let's implement a `vote(uint postId, uint8 _vote)` method. `_vote` is going to be one of our defined `Ballot` types and is represented as uint going from 0 - 2. We'll use Solidity's `require()` statement to ensure we only vote on posts that actually exist, as well as nobody can actually vote multiple times on the same post.\n\nWe then increment the up or down vote counter respectively, store the voter and emit a `NewVote` event:\n\n{% code_block copyBtn:true %}\nfunction vote(uint _postId, uint8 _vote) public {\n Post storage post = posts[_postId];\n\n require(post.creationDate != 0, \"Post does not exist\");\n require(post.voters[msg.sender] == Ballot.NONE, \"You already voted on this post\");\n\n Ballot ballot = Ballot(_vote);\n\n if (ballot == Ballot.UPVOTE) {\n post.upvotes++;\n } else {\n post.downvotes++;\n }\n\n post.voters[msg.sender] = ballot;\n emit NewVote(_postId, msg.sender, _vote);\n}\n{% endcode_block %}\n\n### Determine if users can vote\n\nWe probably want to add an indication to the UI that a user has already voted on a certain post. For that it'd be handy to have an API that actually tells us whether a user can vote on a post. We've already discussed earlier that users can't vote multiple times on the same post, so figuring out if a user can vote is pretty straight forward. Here's what a `canVote(uint _postId)` method could look like:\n\n{% code_block copyBtn:true %}\nfunction canVote(uint _postId) public view returns (bool) {\n if (_postId > posts.length - 1) return false;\n Post storage post = posts[_postId];\n return (post.voters[msg.sender] == Ballot.NONE);\n}\n{% endcode_block %}\n\n### Fetching votes\n\nWe also need a way to actually let users check what they've voted for, in case they did. For that we'll add a simple `getVote()` method that looks something like this:\n\n{% code_block copyBtn:true %}\nfunction getVote(uint _postId) public view returns (uint8) {\n Post storage post = posts[_postId];\n return uint8(post.voters[msg.sender]);\n}\n{% endcode_block %}\n\nAnd with that, our Smart Contract is pretty much done! Just to make sure that everything is compiling smoothly, we can execute `embark build --contracts` in case there's no existing Embark instance watching our work already.\n\nHere's the complete Smart Contract code (you can also find it in [this repository](https://github.com/embarklabs/dreddit-tutorial):\n\n{% code_block copyBtn:true %}\npragma solidity ^0.5.0;\n\ncontract DReddit {\n\n enum Ballot { NONE, UPVOTE, DOWNVOTE }\n\n struct Post {\n uint creationDate;\n bytes description;\n address owner;\n uint upvotes;\n uint downvotes;\n mapping(address => Ballot) voters;\n }\n\n Post [] public posts;\n\n event NewPost(\n uint indexed postId,\n address owner,\n bytes description\n );\n\n event NewVote(\n uint indexed postId,\n address owner,\n uint8 vote\n );\n\n function createPost(bytes memory _description) public {\n uint postId = posts.length++;\n\n posts[postId] = Post({\n creationDate: block.timestamp,\n description: _description,\n owner: msg.sender,\n upvotes: 0,\n downvotes: 0\n });\n\n emit NewPost(postId, msg.sender, _description);\n }\n\n function vote(uint _postId, uint8 _vote) public {\n Post storage post = posts[_postId];\n\n require(post.creationDate != 0, \"Post does not exist\");\n require(post.voters[msg.sender] == Ballot.NONE, \"You already voted on this post\");\n\n Ballot ballot = Ballot(_vote);\n\n if (ballot == Ballot.UPVOTE) {\n post.upvotes++;\n } else {\n post.downvotes++;\n }\n\n post.voters[msg.sender] = ballot;\n emit NewVote(_postId, msg.sender, _vote);\n }\n\n function canVote(uint _postId) public view returns (bool) {\n if (_postId > posts.length - 1) return false;\n Post storage post = posts[_postId];\n return (post.voters[msg.sender] == Ballot.NONE);\n }\n\n function getVote(uint _postId) public view returns (uint8) {\n Post storage post = posts[_postId];\n return uint8(post.voters[msg.sender]);\n }\n}\n{% endcode_block %}\n\nWonderful! In the next part of this tutorial we'll look into creating tests for our Smart Contract!\n","source":"_posts/2019-02-04-building-a-decentralized-reddit-with-embark-part-1.md","raw":"title: Building a decentralized Reddit with Embark - Part 1\nauthor: pascal_precht\nsummary: \"Ever wanted to know what it needs to build a decentralized equivalent of a social platform like Reddit? In this three part tutorial series we're going to build one from scratch!\"\ncategories:\n - tutorials\nlayout: blog-post\nalias: news/2019/02/03/building-a-decentralized-reddit-with-embark-part-1/\n---\n\nIn this tutorial we want to get very practical and build a decentralized Reddit application from scratch using Embark. The goal is to get a better idea of not only what parts and components are involved when building such an application, but also which steps are required to get there, without getting too overwhelmed.\n\nThis tutorial is split up into three parts, so every individual part can get our full attention. The three parts are going to be:\n\n- **Part 1** - Setting up the project and implementing a Smart Contract\n- [**Part 2** - Testing the Smart Contract through EmbarkJS](/news/2019/02/11/building-a-decentralized-reddit-with-embark-part-2/)\n- [**Part 3** - Building a simple front-end using React](/news/2019/02/18/building-a-decentralized-reddit-with-embark-part-3/)\n\n**The code for this tutorial can be found in [this repository](https://github.com/embarklabs/dreddit-tutorial)**.\n\nLet's get right to it!\n\n## Functionality Overview\n\nAlright, let's start off with quickly talking about what exactly it is that we want to build. Obviously, Reddit is a pretty sophisticated platform so we won't be able to rebuild it completely. Instead, we'll be focusing on some key features that will also demonstrate very nicely how Embark can help building such an application.\n\nThe idea is very simple: Our app is called **DReddit** which lets users post topics and everyone else should be able to up and downvote topics. A user account is coupled to an Ethereum wallet account. Essentially every wallet account is a valid account for the application and users can authenticate using extensions like Metamask.\n\nWe will create a Smart Contract that implements the features of posting topics and voting on them. There's going to be a UI as well, built with React, but we'll do that in the third part of this series.\n\n## Setting up the application\n\nIf you've read our guide on [Creating Applications](/docs/create_project.html) or our last tutorial on [Building Smart Contract only apps](/news/2019/01/22/building-smart-contract-only-dapps/), you know that Embark comes with a `new` command to scaffold an application. We're going to do exactly that, but first we need to make sure Embark is installed. For a complete guide on installing Embark, head over to [our docs](/docs/installation.html), otherwise, simply run the following command in your terminal of choice:\n\n```\n$ npm install -g embark\n```\n\nNext, we'll create and set up our app using the `new` command:\n\n```\n$ embark new dreddit\n$ cd dreddit\n```\n\nNow is a good time to familiarize ourselves with the project structure. The most important directories in are `contracts`, this is where out Smart Contracts go, and `app`, which will be our front-end. Take your time to take a look and check out our [Application Structure](/docs/structure.html) guide for more detailed overview.\n\nAlso, to ensure and double-check that everything's working, we can run the application using Embark's `run` command:\n\n```\n$ embark run\n```\n\nIf there are any issues in the \"Available Services\" section of the dashboard, go back to our [installation guide](/docs/installation.html) and make sure all tools are available on your machine.\n\n## Creating the Smart Contract\n\nAlright, next up we want to create the brain of our application, which is a Smart Contract written in [Solidity](https://solidity.readthedocs.io/en/v0.5.3/), that enables creating posts and votes. We're going to build it up step by step and afterwards we'll add some tests to ensure our code is actually working.\n\nFirst thing we do is creating a file `DReddit.sol` inside `contracts` with a Smart Contract like this:\n\n{% code_block copyBtn:true %}\npragma solidity ^0.5.0;\n\ncontract DReddit {\n\n}\n{% endcode_block %}\n\nGreat! With that in place, let's introduce a couple of data structures for creating and storing topic posts. Let's say a post will have a creation date, a description and an address of the owner. There's a few more things we'll have to add, but let's do it one step at a time. Here's what a `Post` struct could look like:\n\n{% code_block copyBtn:true %}\nstruct Post {\n uint creationDate;\n bytes description;\n address owner;\n}\n{% endcode_block %}\n\nWe're also going to add an array to store all of our posts. Now that we have a `Post` struct, this is a simple as:\n\n{% code_block copyBtn:true %}\nPost [] public posts;\n{% endcode_block %}\n\n### Creating posts\n\nIt's time to add our first method which will enable users to add new posts to the platform. For that, we'll create the method `createPost(bytes _description)` where `_description` are the bytes that represent the posts text.\n\n{% code_block copyBtn:true %}\nfunction createPost(bytes _description) public {\n uint postId = posts.length++;\n posts[postId] = Post({\n creationDate: block.timestamp,\n description: _description,\n owner: msg.sender\n });\n}\n{% endcode_block %}\n\nThe first thing we do is creating an id for the post to be stored. We then use our `Post` struct to create a new post instance. Notice that we leverage the `postId` when storing the Post in our `posts` array. To set the owner, we take advantage of Solidity's global `msg` object which is available in every transaction.\n\n### Emitting events\n\nAs we're planning to build a front-end that reacts to posts being created, we need to emit an event so the front-end can subscribe to it accordingly. For that, we first introduce a new event type `NewPost` which will look something like this:\n\n\n{% code_block copyBtn:true %}\nevent NewPost(\n uint indexed postId,\n address owner,\n bytes description\n)\n{% endcode_block %}\n\nOnce that is done, all we have to do is emit `NewPost` inside `createPost()` with the required data:\n\n{% code_block copyBtn:true %}\nfunction createPost(bytes _description) public {\n ...\n emit NewPost(postId, msg.sender, _description);\n}\n{% endcode_block %}\n\n### Up and down voting posts\n\nAs mentioned earlier, Reddit allows for up and down voting topic posts. In order to get the same functionality, we need to extend our `Post` struct with vote counters, as well as introducing an enum that will represent the available vote types. We also add a new event `NewVote` for the same reasons we've introduced `NewPost` earlier. Once that is done, we can add a method that performs actual votes.\n\nLet's start by adding an enum type calld `Ballot` that aggregates possible vote types:\n\n```\nenum Ballot { NONE, UPVOTE, DOWNVOTE }\n```\n\nTo store votes on posts, we'll add an `upvotes` and `downvotes` counter to our `Post` struct accordingly. We'll also add a mapping that stores all the voters, so we can check and ensure that nobody tries to vote multiple times:\n\n```\nstruct Post {\n ...\n uint upvotes;\n uint downvotes;\n mapping(address => Ballot) voters;\n}\n```\n\nHere's the `NewPost` event which we'll use in a few moments:\n\n{% code_block copyBtn:true %}\nevent NewVote(\n uint indexed postId,\n address owner,\n uint8 vote\n);\n{% endcode_block %}\n\nLast but not least, we have to update our `createPost()` function as the `Post` struct now needs `upvotes` and `downvotes`:\n\n\n```\nfunction createPost(bytes _description) public {\n ...\n posts[postId] = Post({\n ...\n upvotes: 0,\n downvotes: 0\n });\n}\n```\n\nWith these building blocks at hand, let's implement a `vote(uint postId, uint8 _vote)` method. `_vote` is going to be one of our defined `Ballot` types and is represented as uint going from 0 - 2. We'll use Solidity's `require()` statement to ensure we only vote on posts that actually exist, as well as nobody can actually vote multiple times on the same post.\n\nWe then increment the up or down vote counter respectively, store the voter and emit a `NewVote` event:\n\n{% code_block copyBtn:true %}\nfunction vote(uint _postId, uint8 _vote) public {\n Post storage post = posts[_postId];\n\n require(post.creationDate != 0, \"Post does not exist\");\n require(post.voters[msg.sender] == Ballot.NONE, \"You already voted on this post\");\n\n Ballot ballot = Ballot(_vote);\n\n if (ballot == Ballot.UPVOTE) {\n post.upvotes++;\n } else {\n post.downvotes++;\n }\n\n post.voters[msg.sender] = ballot;\n emit NewVote(_postId, msg.sender, _vote);\n}\n{% endcode_block %}\n\n### Determine if users can vote\n\nWe probably want to add an indication to the UI that a user has already voted on a certain post. For that it'd be handy to have an API that actually tells us whether a user can vote on a post. We've already discussed earlier that users can't vote multiple times on the same post, so figuring out if a user can vote is pretty straight forward. Here's what a `canVote(uint _postId)` method could look like:\n\n{% code_block copyBtn:true %}\nfunction canVote(uint _postId) public view returns (bool) {\n if (_postId > posts.length - 1) return false;\n Post storage post = posts[_postId];\n return (post.voters[msg.sender] == Ballot.NONE);\n}\n{% endcode_block %}\n\n### Fetching votes\n\nWe also need a way to actually let users check what they've voted for, in case they did. For that we'll add a simple `getVote()` method that looks something like this:\n\n{% code_block copyBtn:true %}\nfunction getVote(uint _postId) public view returns (uint8) {\n Post storage post = posts[_postId];\n return uint8(post.voters[msg.sender]);\n}\n{% endcode_block %}\n\nAnd with that, our Smart Contract is pretty much done! Just to make sure that everything is compiling smoothly, we can execute `embark build --contracts` in case there's no existing Embark instance watching our work already.\n\nHere's the complete Smart Contract code (you can also find it in [this repository](https://github.com/embarklabs/dreddit-tutorial):\n\n{% code_block copyBtn:true %}\npragma solidity ^0.5.0;\n\ncontract DReddit {\n\n enum Ballot { NONE, UPVOTE, DOWNVOTE }\n\n struct Post {\n uint creationDate;\n bytes description;\n address owner;\n uint upvotes;\n uint downvotes;\n mapping(address => Ballot) voters;\n }\n\n Post [] public posts;\n\n event NewPost(\n uint indexed postId,\n address owner,\n bytes description\n );\n\n event NewVote(\n uint indexed postId,\n address owner,\n uint8 vote\n );\n\n function createPost(bytes memory _description) public {\n uint postId = posts.length++;\n\n posts[postId] = Post({\n creationDate: block.timestamp,\n description: _description,\n owner: msg.sender,\n upvotes: 0,\n downvotes: 0\n });\n\n emit NewPost(postId, msg.sender, _description);\n }\n\n function vote(uint _postId, uint8 _vote) public {\n Post storage post = posts[_postId];\n\n require(post.creationDate != 0, \"Post does not exist\");\n require(post.voters[msg.sender] == Ballot.NONE, \"You already voted on this post\");\n\n Ballot ballot = Ballot(_vote);\n\n if (ballot == Ballot.UPVOTE) {\n post.upvotes++;\n } else {\n post.downvotes++;\n }\n\n post.voters[msg.sender] = ballot;\n emit NewVote(_postId, msg.sender, _vote);\n }\n\n function canVote(uint _postId) public view returns (bool) {\n if (_postId > posts.length - 1) return false;\n Post storage post = posts[_postId];\n return (post.voters[msg.sender] == Ballot.NONE);\n }\n\n function getVote(uint _postId) public view returns (uint8) {\n Post storage post = posts[_postId];\n return uint8(post.voters[msg.sender]);\n }\n}\n{% endcode_block %}\n\nWonderful! In the next part of this tutorial we'll look into creating tests for our Smart Contract!\n","slug":"building-a-decentralized-reddit-with-embark-part-1","published":1,"date":"2019-02-04T05:00:00.000Z","updated":"2020-03-03T14:55:55.027Z","_id":"ck6axlfc9002gxeeg1fpufwzt","comments":1,"photos":[],"link":"","content":"<p>In this tutorial we want to get very practical and build a decentralized Reddit application from scratch using Embark. The goal is to get a better idea of not only what parts and components are involved when building such an application, but also which steps are required to get there, without getting too overwhelmed.</p>\n<p>This tutorial is split up into three parts, so every individual part can get our full attention. The three parts are going to be:</p>\n<ul>\n<li><strong>Part 1</strong> - Setting up the project and implementing a Smart Contract</li>\n<li><a href=\"/news/2019/02/11/building-a-decentralized-reddit-with-embark-part-2/\"><strong>Part 2</strong> - Testing the Smart Contract through EmbarkJS</a></li>\n<li><a href=\"/news/2019/02/18/building-a-decentralized-reddit-with-embark-part-3/\"><strong>Part 3</strong> - Building a simple front-end using React</a></li>\n</ul>\n<p><strong>The code for this tutorial can be found in <a href=\"https://github.com/embarklabs/dreddit-tutorial\" target=\"_blank\" rel=\"noopener\">this repository</a></strong>.</p>\n<p>Let’s get right to it!</p>\n<h2 id=\"Functionality-Overview\"><a href=\"#Functionality-Overview\" class=\"headerlink\" title=\"Functionality Overview\"></a>Functionality Overview</h2><p>Alright, let’s start off with quickly talking about what exactly it is that we want to build. Obviously, Reddit is a pretty sophisticated platform so we won’t be able to rebuild it completely. Instead, we’ll be focusing on some key features that will also demonstrate very nicely how Embark can help building such an application.</p>\n<p>The idea is very simple: Our app is called <strong>DReddit</strong> which lets users post topics and everyone else should be able to up and downvote topics. A user account is coupled to an Ethereum wallet account. Essentially every wallet account is a valid account for the application and users can authenticate using extensions like Metamask.</p>\n<p>We will create a Smart Contract that implements the features of posting topics and voting on them. There’s going to be a UI as well, built with React, but we’ll do that in the third part of this series.</p>\n<h2 id=\"Setting-up-the-application\"><a href=\"#Setting-up-the-application\" class=\"headerlink\" title=\"Setting up the application\"></a>Setting up the application</h2><p>If you’ve read our guide on <a href=\"/docs/create_project.html\">Creating Applications</a> or our last tutorial on <a href=\"/news/2019/01/22/building-smart-contract-only-dapps/\">Building Smart Contract only apps</a>, you know that Embark comes with a <code>new</code> command to scaffold an application. We’re going to do exactly that, but first we need to make sure Embark is installed. For a complete guide on installing Embark, head over to <a href=\"/docs/installation.html\">our docs</a>, otherwise, simply run the following command in your terminal of choice:</p>\n<figure class=\"highlight plain\"><table><tr><td class=\"code\"><pre><span class=\"line\">$ npm install -g embark</span><br></pre></td></tr></table></figure>\n\n<p>Next, we’ll create and set up our app using the <code>new</code> command:</p>\n<figure class=\"highlight plain\"><table><tr><td class=\"code\"><pre><span class=\"line\">$ embark new dreddit</span><br><span class=\"line\">$ cd dreddit</span><br></pre></td></tr></table></figure>\n\n<p>Now is a good time to familiarize ourselves with the project structure. The most important directories in are <code>contracts</code>, this is where out Smart Contracts go, and <code>app</code>, which will be our front-end. Take your time to take a look and check out our <a href=\"/docs/structure.html\">Application Structure</a> guide for more detailed overview.</p>\n<p>Also, to ensure and double-check that everything’s working, we can run the application using Embark’s <code>run</code> command:</p>\n<figure class=\"highlight plain\"><table><tr><td class=\"code\"><pre><span class=\"line\">$ embark run</span><br></pre></td></tr></table></figure>\n\n<p>If there are any issues in the “Available Services” section of the dashboard, go back to our <a href=\"/docs/installation.html\">installation guide</a> and make sure all tools are available on your machine.</p>\n<h2 id=\"Creating-the-Smart-Contract\"><a href=\"#Creating-the-Smart-Contract\" class=\"headerlink\" title=\"Creating the Smart Contract\"></a>Creating the Smart Contract</h2><p>Alright, next up we want to create the brain of our application, which is a Smart Contract written in <a href=\"https://solidity.readthedocs.io/en/v0.5.3/\" target=\"_blank\" rel=\"noopener\">Solidity</a>, that enables creating posts and votes. We’re going to build it up step by step and afterwards we’ll add some tests to ensure our code is actually working.</p>\n<p>First thing we do is creating a file <code>DReddit.sol</code> inside <code>contracts</code> with a Smart Contract like this:</p>\n<pre class=\"highlight \"><button class=\"c-button c-button--squared\" data-clipboard-target=\"#code-15f02f40-5d5f-11ea-badf-55b643f91aec\"><svg class=\"c-icon c-icon--xs\"><use xlink:href=\"/assets/icons/symbols.svg#icon-copy-paste\"></use></svg></button><code id=\"code-15f02f40-5d5f-11ea-badf-55b643f91aec\">pragma solidity ^0.5.0;\n\ncontract DReddit {\n\n}</code></pre>\n\n\n<p>Great! With that in place, let’s introduce a couple of data structures for creating and storing topic posts. Let’s say a post will have a creation date, a description and an address of the owner. There’s a few more things we’ll have to add, but let’s do it one step at a time. Here’s what a <code>Post</code> struct could look like:</p>\n<pre class=\"highlight \"><button class=\"c-button c-button--squared\" data-clipboard-target=\"#code-15f6e601-5d5f-11ea-badf-55b643f91aec\"><svg class=\"c-icon c-icon--xs\"><use xlink:href=\"/assets/icons/symbols.svg#icon-copy-paste\"></use></svg></button><code id=\"code-15f6e601-5d5f-11ea-badf-55b643f91aec\">struct Post {\n uint creationDate;\n bytes description;\n address owner;\n}</code></pre>\n\n\n<p>We’re also going to add an array to store all of our posts. Now that we have a <code>Post</code> struct, this is a simple as:</p>\n<pre class=\"highlight \"><button class=\"c-button c-button--squared\" data-clipboard-target=\"#code-15f86ca1-5d5f-11ea-badf-55b643f91aec\"><svg class=\"c-icon c-icon--xs\"><use xlink:href=\"/assets/icons/symbols.svg#icon-copy-paste\"></use></svg></button><code id=\"code-15f86ca1-5d5f-11ea-badf-55b643f91aec\">Post [] public posts;</code></pre>\n\n\n<h3 id=\"Creating-posts\"><a href=\"#Creating-posts\" class=\"headerlink\" title=\"Creating posts\"></a>Creating posts</h3><p>It’s time to add our first method which will enable users to add new posts to the platform. For that, we’ll create the method <code>createPost(bytes _description)</code> where <code>_description</code> are the bytes that represent the posts text.</p>\n<pre class=\"highlight \"><button class=\"c-button c-button--squared\" data-clipboard-target=\"#code-15f8bac0-5d5f-11ea-badf-55b643f91aec\"><svg class=\"c-icon c-icon--xs\"><use xlink:href=\"/assets/icons/symbols.svg#icon-copy-paste\"></use></svg></button><code id=\"code-15f8bac0-5d5f-11ea-badf-55b643f91aec\">function createPost(bytes _description) public {\n uint postId = posts.length++;\n posts[postId] = Post({\n creationDate: block.timestamp,\n description: _description,\n owner: msg.sender\n });\n}</code></pre>\n\n\n<p>The first thing we do is creating an id for the post to be stored. We then use our <code>Post</code> struct to create a new post instance. Notice that we leverage the <code>postId</code> when storing the Post in our <code>posts</code> array. To set the owner, we take advantage of Solidity’s global <code>msg</code> object which is available in every transaction.</p>\n<h3 id=\"Emitting-events\"><a href=\"#Emitting-events\" class=\"headerlink\" title=\"Emitting events\"></a>Emitting events</h3><p>As we’re planning to build a front-end that reacts to posts being created, we need to emit an event so the front-end can subscribe to it accordingly. For that, we first introduce a new event type <code>NewPost</code> which will look something like this:</p>\n<pre class=\"highlight \"><button class=\"c-button c-button--squared\" data-clipboard-target=\"#code-15f8e1d0-5d5f-11ea-badf-55b643f91aec\"><svg class=\"c-icon c-icon--xs\"><use xlink:href=\"/assets/icons/symbols.svg#icon-copy-paste\"></use></svg></button><code id=\"code-15f8e1d0-5d5f-11ea-badf-55b643f91aec\">event NewPost(\n uint indexed postId,\n address owner,\n bytes description\n)</code></pre>\n\n\n<p>Once that is done, all we have to do is emit <code>NewPost</code> inside <code>createPost()</code> with the required data:</p>\n<pre class=\"highlight \"><button class=\"c-button c-button--squared\" data-clipboard-target=\"#code-15f8e1d3-5d5f-11ea-badf-55b643f91aec\"><svg class=\"c-icon c-icon--xs\"><use xlink:href=\"/assets/icons/symbols.svg#icon-copy-paste\"></use></svg></button><code id=\"code-15f8e1d3-5d5f-11ea-badf-55b643f91aec\">function createPost(bytes _description) public {\n ...\n emit NewPost(postId, msg.sender, _description);\n}</code></pre>\n\n\n<h3 id=\"Up-and-down-voting-posts\"><a href=\"#Up-and-down-voting-posts\" class=\"headerlink\" title=\"Up and down voting posts\"></a>Up and down voting posts</h3><p>As mentioned earlier, Reddit allows for up and down voting topic posts. In order to get the same functionality, we need to extend our <code>Post</code> struct with vote counters, as well as introducing an enum that will represent the available vote types. We also add a new event <code>NewVote</code> for the same reasons we’ve introduced <code>NewPost</code> earlier. Once that is done, we can add a method that performs actual votes.</p>\n<p>Let’s start by adding an enum type calld <code>Ballot</code> that aggregates possible vote types:</p>\n<figure class=\"highlight plain\"><table><tr><td class=\"code\"><pre><span class=\"line\">enum Ballot { NONE, UPVOTE, DOWNVOTE }</span><br></pre></td></tr></table></figure>\n\n<p>To store votes on posts, we’ll add an <code>upvotes</code> and <code>downvotes</code> counter to our <code>Post</code> struct accordingly. We’ll also add a mapping that stores all the voters, so we can check and ensure that nobody tries to vote multiple times:</p>\n<figure class=\"highlight plain\"><table><tr><td class=\"code\"><pre><span class=\"line\">struct Post {</span><br><span class=\"line\"> ...</span><br><span class=\"line\"> uint upvotes;</span><br><span class=\"line\"> uint downvotes;</span><br><span class=\"line\"> mapping(address => Ballot) voters;</span><br><span class=\"line\">}</span><br></pre></td></tr></table></figure>\n\n<p>Here’s the <code>NewPost</code> event which we’ll use in a few moments:</p>\n<pre class=\"highlight \"><button class=\"c-button c-button--squared\" data-clipboard-target=\"#code-15f908e2-5d5f-11ea-badf-55b643f91aec\"><svg class=\"c-icon c-icon--xs\"><use xlink:href=\"/assets/icons/symbols.svg#icon-copy-paste\"></use></svg></button><code id=\"code-15f908e2-5d5f-11ea-badf-55b643f91aec\">event NewVote(\n uint indexed postId,\n address owner,\n uint8 vote\n);</code></pre>\n\n\n<p>Last but not least, we have to update our <code>createPost()</code> function as the <code>Post</code> struct now needs <code>upvotes</code> and <code>downvotes</code>:</p>\n<figure class=\"highlight plain\"><table><tr><td class=\"code\"><pre><span class=\"line\">function createPost(bytes _description) public {</span><br><span class=\"line\"> ...</span><br><span class=\"line\"> posts[postId] = Post({</span><br><span class=\"line\"> ...</span><br><span class=\"line\"> upvotes: 0,</span><br><span class=\"line\"> downvotes: 0</span><br><span class=\"line\"> });</span><br><span class=\"line\">}</span><br></pre></td></tr></table></figure>\n\n<p>With these building blocks at hand, let’s implement a <code>vote(uint postId, uint8 _vote)</code> method. <code>_vote</code> is going to be one of our defined <code>Ballot</code> types and is represented as uint going from 0 - 2. We’ll use Solidity’s <code>require()</code> statement to ensure we only vote on posts that actually exist, as well as nobody can actually vote multiple times on the same post.</p>\n<p>We then increment the up or down vote counter respectively, store the voter and emit a <code>NewVote</code> event:</p>\n<pre class=\"highlight \"><button class=\"c-button c-button--squared\" data-clipboard-target=\"#code-15f908e5-5d5f-11ea-badf-55b643f91aec\"><svg class=\"c-icon c-icon--xs\"><use xlink:href=\"/assets/icons/symbols.svg#icon-copy-paste\"></use></svg></button><code id=\"code-15f908e5-5d5f-11ea-badf-55b643f91aec\">function vote(uint _postId, uint8 _vote) public {\n Post storage post = posts[_postId];\n\n require(post.creationDate != 0, "Post does not exist");\n require(post.voters[msg.sender] == Ballot.NONE, "You already voted on this post");\n\n Ballot ballot = Ballot(_vote);\n\n if (ballot == Ballot.UPVOTE) {\n post.upvotes++;\n } else {\n post.downvotes++;\n }\n\n post.voters[msg.sender] = ballot;\n emit NewVote(_postId, msg.sender, _vote);\n}</code></pre>\n\n\n<h3 id=\"Determine-if-users-can-vote\"><a href=\"#Determine-if-users-can-vote\" class=\"headerlink\" title=\"Determine if users can vote\"></a>Determine if users can vote</h3><p>We probably want to add an indication to the UI that a user has already voted on a certain post. For that it’d be handy to have an API that actually tells us whether a user can vote on a post. We’ve already discussed earlier that users can’t vote multiple times on the same post, so figuring out if a user can vote is pretty straight forward. Here’s what a <code>canVote(uint _postId)</code> method could look like:</p>\n<pre class=\"highlight \"><button class=\"c-button c-button--squared\" data-clipboard-target=\"#code-15f92ff0-5d5f-11ea-badf-55b643f91aec\"><svg class=\"c-icon c-icon--xs\"><use xlink:href=\"/assets/icons/symbols.svg#icon-copy-paste\"></use></svg></button><code id=\"code-15f92ff0-5d5f-11ea-badf-55b643f91aec\">function canVote(uint _postId) public view returns (bool) {\n if (_postId > posts.length - 1) return false;\n Post storage post = posts[_postId];\n return (post.voters[msg.sender] == Ballot.NONE);\n}</code></pre>\n\n\n<h3 id=\"Fetching-votes\"><a href=\"#Fetching-votes\" class=\"headerlink\" title=\"Fetching votes\"></a>Fetching votes</h3><p>We also need a way to actually let users check what they’ve voted for, in case they did. For that we’ll add a simple <code>getVote()</code> method that looks something like this:</p>\n<pre class=\"highlight \"><button class=\"c-button c-button--squared\" data-clipboard-target=\"#code-15f92ff2-5d5f-11ea-badf-55b643f91aec\"><svg class=\"c-icon c-icon--xs\"><use xlink:href=\"/assets/icons/symbols.svg#icon-copy-paste\"></use></svg></button><code id=\"code-15f92ff2-5d5f-11ea-badf-55b643f91aec\">function getVote(uint _postId) public view returns (uint8) {\n Post storage post = posts[_postId];\n return uint8(post.voters[msg.sender]);\n}</code></pre>\n\n\n<p>And with that, our Smart Contract is pretty much done! Just to make sure that everything is compiling smoothly, we can execute <code>embark build --contracts</code> in case there’s no existing Embark instance watching our work already.</p>\n<p>Here’s the complete Smart Contract code (you can also find it in <a href=\"https://github.com/embarklabs/dreddit-tutorial\" target=\"_blank\" rel=\"noopener\">this repository</a>:</p>\n<pre class=\"highlight \"><button class=\"c-button c-button--squared\" data-clipboard-target=\"#code-15f92ff4-5d5f-11ea-badf-55b643f91aec\"><svg class=\"c-icon c-icon--xs\"><use xlink:href=\"/assets/icons/symbols.svg#icon-copy-paste\"></use></svg></button><code id=\"code-15f92ff4-5d5f-11ea-badf-55b643f91aec\">pragma solidity ^0.5.0;\n\ncontract DReddit {\n\n enum Ballot { NONE, UPVOTE, DOWNVOTE }\n\n struct Post {\n uint creationDate;\n bytes description;\n address owner;\n uint upvotes;\n uint downvotes;\n mapping(address => Ballot) voters;\n }\n\n Post [] public posts;\n\n event NewPost(\n uint indexed postId,\n address owner,\n bytes description\n );\n\n event NewVote(\n uint indexed postId,\n address owner,\n uint8 vote\n );\n\n function createPost(bytes memory _description) public {\n uint postId = posts.length++;\n\n posts[postId] = Post({\n creationDate: block.timestamp,\n description: _description,\n owner: msg.sender,\n upvotes: 0,\n downvotes: 0\n });\n\n emit NewPost(postId, msg.sender, _description);\n }\n\n function vote(uint _postId, uint8 _vote) public {\n Post storage post = posts[_postId];\n\n require(post.creationDate != 0, "Post does not exist");\n require(post.voters[msg.sender] == Ballot.NONE, "You already voted on this post");\n\n Ballot ballot = Ballot(_vote);\n\n if (ballot == Ballot.UPVOTE) {\n post.upvotes++;\n } else {\n post.downvotes++;\n }\n\n post.voters[msg.sender] = ballot;\n emit NewVote(_postId, msg.sender, _vote);\n }\n\n function canVote(uint _postId) public view returns (bool) {\n if (_postId > posts.length - 1) return false;\n Post storage post = posts[_postId];\n return (post.voters[msg.sender] == Ballot.NONE);\n }\n\n function getVote(uint _postId) public view returns (uint8) {\n Post storage post = posts[_postId];\n return uint8(post.voters[msg.sender]);\n }\n}</code></pre>\n\n\n<p>Wonderful! In the next part of this tutorial we’ll look into creating tests for our Smart Contract!</p>\n","site":{"data":{"authors":{"iuri_matias":{"name":"Iuri Matias","twitter":"iurimatias","image":"https://pbs.twimg.com/profile_images/928272512181563392/iDJdvy2k_400x400.jpg"},"pascal_precht":{"name":"Pascal Precht","twitter":"pascalprecht","image":"https://pbs.twimg.com/profile_images/993785060733194241/p3oAIMDP_400x400.jpg"},"anthony_laibe":{"name":"Anthony Laibe","twitter":"a_laibe","image":"https://pbs.twimg.com/profile_images/257742900/13168239_400x400.jpg"},"jonathan_rainville":{"name":"Jonathan Rainville","twitter":"ShyolGhul","image":"https://pbs.twimg.com/profile_images/993873866878570496/-aE4byjj_400x400.jpg"},"andre_medeiros":{"name":"Andre Medeiros","twitter":"superdealloc","image":"https://pbs.twimg.com/profile_images/965722487735701504/m58KNgWN_400x400.jpg"},"eric_mastro":{"name":"Eric Mastro","twitter":"ericmastro","image":"https://avatars1.githubusercontent.com/u/5089238?s=460&v=4"},"michael_bradley":{"name":"Michael Bradley","image":"https://avatars3.githubusercontent.com/u/194260?s=460&v=4"},"richard_ramos":{"name":"Richard Ramos","twitter":"richardramos_me","image":"https://devcon.org/images/speakers/richard_ramos.jpg"},"jonny_zerah":{"name":"Jonny Zerah","twitter":"jonnyzerah","image":"https://pbs.twimg.com/profile_images/1043774340490248192/gI9aGy17_400x400.jpg"},"robin_percy":{"name":"Robin Percy","twitter":"rbin","image":"https://avatars1.githubusercontent.com/u/29288325?s=400&v=4"}},"categories":{"tutorials":"Tutorials","announcements":"Announcements"},"languages":{"en":"English"}}},"excerpt":"","more":"<p>In this tutorial we want to get very practical and build a decentralized Reddit application from scratch using Embark. The goal is to get a better idea of not only what parts and components are involved when building such an application, but also which steps are required to get there, without getting too overwhelmed.</p>\n<p>This tutorial is split up into three parts, so every individual part can get our full attention. The three parts are going to be:</p>\n<ul>\n<li><strong>Part 1</strong> - Setting up the project and implementing a Smart Contract</li>\n<li><a href=\"/news/2019/02/11/building-a-decentralized-reddit-with-embark-part-2/\"><strong>Part 2</strong> - Testing the Smart Contract through EmbarkJS</a></li>\n<li><a href=\"/news/2019/02/18/building-a-decentralized-reddit-with-embark-part-3/\"><strong>Part 3</strong> - Building a simple front-end using React</a></li>\n</ul>\n<p><strong>The code for this tutorial can be found in <a href=\"https://github.com/embarklabs/dreddit-tutorial\" target=\"_blank\" rel=\"noopener\">this repository</a></strong>.</p>\n<p>Let’s get right to it!</p>\n<h2 id=\"Functionality-Overview\"><a href=\"#Functionality-Overview\" class=\"headerlink\" title=\"Functionality Overview\"></a>Functionality Overview</h2><p>Alright, let’s start off with quickly talking about what exactly it is that we want to build. Obviously, Reddit is a pretty sophisticated platform so we won’t be able to rebuild it completely. Instead, we’ll be focusing on some key features that will also demonstrate very nicely how Embark can help building such an application.</p>\n<p>The idea is very simple: Our app is called <strong>DReddit</strong> which lets users post topics and everyone else should be able to up and downvote topics. A user account is coupled to an Ethereum wallet account. Essentially every wallet account is a valid account for the application and users can authenticate using extensions like Metamask.</p>\n<p>We will create a Smart Contract that implements the features of posting topics and voting on them. There’s going to be a UI as well, built with React, but we’ll do that in the third part of this series.</p>\n<h2 id=\"Setting-up-the-application\"><a href=\"#Setting-up-the-application\" class=\"headerlink\" title=\"Setting up the application\"></a>Setting up the application</h2><p>If you’ve read our guide on <a href=\"/docs/create_project.html\">Creating Applications</a> or our last tutorial on <a href=\"/news/2019/01/22/building-smart-contract-only-dapps/\">Building Smart Contract only apps</a>, you know that Embark comes with a <code>new</code> command to scaffold an application. We’re going to do exactly that, but first we need to make sure Embark is installed. For a complete guide on installing Embark, head over to <a href=\"/docs/installation.html\">our docs</a>, otherwise, simply run the following command in your terminal of choice:</p>\n<figure class=\"highlight plain\"><table><tr><td class=\"code\"><pre><span class=\"line\">$ npm install -g embark</span><br></pre></td></tr></table></figure>\n\n<p>Next, we’ll create and set up our app using the <code>new</code> command:</p>\n<figure class=\"highlight plain\"><table><tr><td class=\"code\"><pre><span class=\"line\">$ embark new dreddit</span><br><span class=\"line\">$ cd dreddit</span><br></pre></td></tr></table></figure>\n\n<p>Now is a good time to familiarize ourselves with the project structure. The most important directories in are <code>contracts</code>, this is where out Smart Contracts go, and <code>app</code>, which will be our front-end. Take your time to take a look and check out our <a href=\"/docs/structure.html\">Application Structure</a> guide for more detailed overview.</p>\n<p>Also, to ensure and double-check that everything’s working, we can run the application using Embark’s <code>run</code> command:</p>\n<figure class=\"highlight plain\"><table><tr><td class=\"code\"><pre><span class=\"line\">$ embark run</span><br></pre></td></tr></table></figure>\n\n<p>If there are any issues in the “Available Services” section of the dashboard, go back to our <a href=\"/docs/installation.html\">installation guide</a> and make sure all tools are available on your machine.</p>\n<h2 id=\"Creating-the-Smart-Contract\"><a href=\"#Creating-the-Smart-Contract\" class=\"headerlink\" title=\"Creating the Smart Contract\"></a>Creating the Smart Contract</h2><p>Alright, next up we want to create the brain of our application, which is a Smart Contract written in <a href=\"https://solidity.readthedocs.io/en/v0.5.3/\" target=\"_blank\" rel=\"noopener\">Solidity</a>, that enables creating posts and votes. We’re going to build it up step by step and afterwards we’ll add some tests to ensure our code is actually working.</p>\n<p>First thing we do is creating a file <code>DReddit.sol</code> inside <code>contracts</code> with a Smart Contract like this:</p>\n<pre class=\"highlight \"><button class=\"c-button c-button--squared\" data-clipboard-target=\"#code-15f02f40-5d5f-11ea-badf-55b643f91aec\"><svg class=\"c-icon c-icon--xs\"><use xlink:href=\"/assets/icons/symbols.svg#icon-copy-paste\"></use></svg></button><code id=\"code-15f02f40-5d5f-11ea-badf-55b643f91aec\">pragma solidity ^0.5.0;\n\ncontract DReddit {\n\n}</code></pre>\n\n\n<p>Great! With that in place, let’s introduce a couple of data structures for creating and storing topic posts. Let’s say a post will have a creation date, a description and an address of the owner. There’s a few more things we’ll have to add, but let’s do it one step at a time. Here’s what a <code>Post</code> struct could look like:</p>\n<pre class=\"highlight \"><button class=\"c-button c-button--squared\" data-clipboard-target=\"#code-15f6e601-5d5f-11ea-badf-55b643f91aec\"><svg class=\"c-icon c-icon--xs\"><use xlink:href=\"/assets/icons/symbols.svg#icon-copy-paste\"></use></svg></button><code id=\"code-15f6e601-5d5f-11ea-badf-55b643f91aec\">struct Post {\n uint creationDate;\n bytes description;\n address owner;\n}</code></pre>\n\n\n<p>We’re also going to add an array to store all of our posts. Now that we have a <code>Post</code> struct, this is a simple as:</p>\n<pre class=\"highlight \"><button class=\"c-button c-button--squared\" data-clipboard-target=\"#code-15f86ca1-5d5f-11ea-badf-55b643f91aec\"><svg class=\"c-icon c-icon--xs\"><use xlink:href=\"/assets/icons/symbols.svg#icon-copy-paste\"></use></svg></button><code id=\"code-15f86ca1-5d5f-11ea-badf-55b643f91aec\">Post [] public posts;</code></pre>\n\n\n<h3 id=\"Creating-posts\"><a href=\"#Creating-posts\" class=\"headerlink\" title=\"Creating posts\"></a>Creating posts</h3><p>It’s time to add our first method which will enable users to add new posts to the platform. For that, we’ll create the method <code>createPost(bytes _description)</code> where <code>_description</code> are the bytes that represent the posts text.</p>\n<pre class=\"highlight \"><button class=\"c-button c-button--squared\" data-clipboard-target=\"#code-15f8bac0-5d5f-11ea-badf-55b643f91aec\"><svg class=\"c-icon c-icon--xs\"><use xlink:href=\"/assets/icons/symbols.svg#icon-copy-paste\"></use></svg></button><code id=\"code-15f8bac0-5d5f-11ea-badf-55b643f91aec\">function createPost(bytes _description) public {\n uint postId = posts.length++;\n posts[postId] = Post({\n creationDate: block.timestamp,\n description: _description,\n owner: msg.sender\n });\n}</code></pre>\n\n\n<p>The first thing we do is creating an id for the post to be stored. We then use our <code>Post</code> struct to create a new post instance. Notice that we leverage the <code>postId</code> when storing the Post in our <code>posts</code> array. To set the owner, we take advantage of Solidity’s global <code>msg</code> object which is available in every transaction.</p>\n<h3 id=\"Emitting-events\"><a href=\"#Emitting-events\" class=\"headerlink\" title=\"Emitting events\"></a>Emitting events</h3><p>As we’re planning to build a front-end that reacts to posts being created, we need to emit an event so the front-end can subscribe to it accordingly. For that, we first introduce a new event type <code>NewPost</code> which will look something like this:</p>\n<pre class=\"highlight \"><button class=\"c-button c-button--squared\" data-clipboard-target=\"#code-15f8e1d0-5d5f-11ea-badf-55b643f91aec\"><svg class=\"c-icon c-icon--xs\"><use xlink:href=\"/assets/icons/symbols.svg#icon-copy-paste\"></use></svg></button><code id=\"code-15f8e1d0-5d5f-11ea-badf-55b643f91aec\">event NewPost(\n uint indexed postId,\n address owner,\n bytes description\n)</code></pre>\n\n\n<p>Once that is done, all we have to do is emit <code>NewPost</code> inside <code>createPost()</code> with the required data:</p>\n<pre class=\"highlight \"><button class=\"c-button c-button--squared\" data-clipboard-target=\"#code-15f8e1d3-5d5f-11ea-badf-55b643f91aec\"><svg class=\"c-icon c-icon--xs\"><use xlink:href=\"/assets/icons/symbols.svg#icon-copy-paste\"></use></svg></button><code id=\"code-15f8e1d3-5d5f-11ea-badf-55b643f91aec\">function createPost(bytes _description) public {\n ...\n emit NewPost(postId, msg.sender, _description);\n}</code></pre>\n\n\n<h3 id=\"Up-and-down-voting-posts\"><a href=\"#Up-and-down-voting-posts\" class=\"headerlink\" title=\"Up and down voting posts\"></a>Up and down voting posts</h3><p>As mentioned earlier, Reddit allows for up and down voting topic posts. In order to get the same functionality, we need to extend our <code>Post</code> struct with vote counters, as well as introducing an enum that will represent the available vote types. We also add a new event <code>NewVote</code> for the same reasons we’ve introduced <code>NewPost</code> earlier. Once that is done, we can add a method that performs actual votes.</p>\n<p>Let’s start by adding an enum type calld <code>Ballot</code> that aggregates possible vote types:</p>\n<figure class=\"highlight plain\"><table><tr><td class=\"code\"><pre><span class=\"line\">enum Ballot { NONE, UPVOTE, DOWNVOTE }</span><br></pre></td></tr></table></figure>\n\n<p>To store votes on posts, we’ll add an <code>upvotes</code> and <code>downvotes</code> counter to our <code>Post</code> struct accordingly. We’ll also add a mapping that stores all the voters, so we can check and ensure that nobody tries to vote multiple times:</p>\n<figure class=\"highlight plain\"><table><tr><td class=\"code\"><pre><span class=\"line\">struct Post {</span><br><span class=\"line\"> ...</span><br><span class=\"line\"> uint upvotes;</span><br><span class=\"line\"> uint downvotes;</span><br><span class=\"line\"> mapping(address => Ballot) voters;</span><br><span class=\"line\">}</span><br></pre></td></tr></table></figure>\n\n<p>Here’s the <code>NewPost</code> event which we’ll use in a few moments:</p>\n<pre class=\"highlight \"><button class=\"c-button c-button--squared\" data-clipboard-target=\"#code-15f908e2-5d5f-11ea-badf-55b643f91aec\"><svg class=\"c-icon c-icon--xs\"><use xlink:href=\"/assets/icons/symbols.svg#icon-copy-paste\"></use></svg></button><code id=\"code-15f908e2-5d5f-11ea-badf-55b643f91aec\">event NewVote(\n uint indexed postId,\n address owner,\n uint8 vote\n);</code></pre>\n\n\n<p>Last but not least, we have to update our <code>createPost()</code> function as the <code>Post</code> struct now needs <code>upvotes</code> and <code>downvotes</code>:</p>\n<figure class=\"highlight plain\"><table><tr><td class=\"code\"><pre><span class=\"line\">function createPost(bytes _description) public {</span><br><span class=\"line\"> ...</span><br><span class=\"line\"> posts[postId] = Post({</span><br><span class=\"line\"> ...</span><br><span class=\"line\"> upvotes: 0,</span><br><span class=\"line\"> downvotes: 0</span><br><span class=\"line\"> });</span><br><span class=\"line\">}</span><br></pre></td></tr></table></figure>\n\n<p>With these building blocks at hand, let’s implement a <code>vote(uint postId, uint8 _vote)</code> method. <code>_vote</code> is going to be one of our defined <code>Ballot</code> types and is represented as uint going from 0 - 2. We’ll use Solidity’s <code>require()</code> statement to ensure we only vote on posts that actually exist, as well as nobody can actually vote multiple times on the same post.</p>\n<p>We then increment the up or down vote counter respectively, store the voter and emit a <code>NewVote</code> event:</p>\n<pre class=\"highlight \"><button class=\"c-button c-button--squared\" data-clipboard-target=\"#code-15f908e5-5d5f-11ea-badf-55b643f91aec\"><svg class=\"c-icon c-icon--xs\"><use xlink:href=\"/assets/icons/symbols.svg#icon-copy-paste\"></use></svg></button><code id=\"code-15f908e5-5d5f-11ea-badf-55b643f91aec\">function vote(uint _postId, uint8 _vote) public {\n Post storage post = posts[_postId];\n\n require(post.creationDate != 0, "Post does not exist");\n require(post.voters[msg.sender] == Ballot.NONE, "You already voted on this post");\n\n Ballot ballot = Ballot(_vote);\n\n if (ballot == Ballot.UPVOTE) {\n post.upvotes++;\n } else {\n post.downvotes++;\n }\n\n post.voters[msg.sender] = ballot;\n emit NewVote(_postId, msg.sender, _vote);\n}</code></pre>\n\n\n<h3 id=\"Determine-if-users-can-vote\"><a href=\"#Determine-if-users-can-vote\" class=\"headerlink\" title=\"Determine if users can vote\"></a>Determine if users can vote</h3><p>We probably want to add an indication to the UI that a user has already voted on a certain post. For that it’d be handy to have an API that actually tells us whether a user can vote on a post. We’ve already discussed earlier that users can’t vote multiple times on the same post, so figuring out if a user can vote is pretty straight forward. Here’s what a <code>canVote(uint _postId)</code> method could look like:</p>\n<pre class=\"highlight \"><button class=\"c-button c-button--squared\" data-clipboard-target=\"#code-15f92ff0-5d5f-11ea-badf-55b643f91aec\"><svg class=\"c-icon c-icon--xs\"><use xlink:href=\"/assets/icons/symbols.svg#icon-copy-paste\"></use></svg></button><code id=\"code-15f92ff0-5d5f-11ea-badf-55b643f91aec\">function canVote(uint _postId) public view returns (bool) {\n if (_postId > posts.length - 1) return false;\n Post storage post = posts[_postId];\n return (post.voters[msg.sender] == Ballot.NONE);\n}</code></pre>\n\n\n<h3 id=\"Fetching-votes\"><a href=\"#Fetching-votes\" class=\"headerlink\" title=\"Fetching votes\"></a>Fetching votes</h3><p>We also need a way to actually let users check what they’ve voted for, in case they did. For that we’ll add a simple <code>getVote()</code> method that looks something like this:</p>\n<pre class=\"highlight \"><button class=\"c-button c-button--squared\" data-clipboard-target=\"#code-15f92ff2-5d5f-11ea-badf-55b643f91aec\"><svg class=\"c-icon c-icon--xs\"><use xlink:href=\"/assets/icons/symbols.svg#icon-copy-paste\"></use></svg></button><code id=\"code-15f92ff2-5d5f-11ea-badf-55b643f91aec\">function getVote(uint _postId) public view returns (uint8) {\n Post storage post = posts[_postId];\n return uint8(post.voters[msg.sender]);\n}</code></pre>\n\n\n<p>And with that, our Smart Contract is pretty much done! Just to make sure that everything is compiling smoothly, we can execute <code>embark build --contracts</code> in case there’s no existing Embark instance watching our work already.</p>\n<p>Here’s the complete Smart Contract code (you can also find it in <a href=\"https://github.com/embarklabs/dreddit-tutorial\" target=\"_blank\" rel=\"noopener\">this repository</a>:</p>\n<pre class=\"highlight \"><button class=\"c-button c-button--squared\" data-clipboard-target=\"#code-15f92ff4-5d5f-11ea-badf-55b643f91aec\"><svg class=\"c-icon c-icon--xs\"><use xlink:href=\"/assets/icons/symbols.svg#icon-copy-paste\"></use></svg></button><code id=\"code-15f92ff4-5d5f-11ea-badf-55b643f91aec\">pragma solidity ^0.5.0;\n\ncontract DReddit {\n\n enum Ballot { NONE, UPVOTE, DOWNVOTE }\n\n struct Post {\n uint creationDate;\n bytes description;\n address owner;\n uint upvotes;\n uint downvotes;\n mapping(address => Ballot) voters;\n }\n\n Post [] public posts;\n\n event NewPost(\n uint indexed postId,\n address owner,\n bytes description\n );\n\n event NewVote(\n uint indexed postId,\n address owner,\n uint8 vote\n );\n\n function createPost(bytes memory _description) public {\n uint postId = posts.length++;\n\n posts[postId] = Post({\n creationDate: block.timestamp,\n description: _description,\n owner: msg.sender,\n upvotes: 0,\n downvotes: 0\n });\n\n emit NewPost(postId, msg.sender, _description);\n }\n\n function vote(uint _postId, uint8 _vote) public {\n Post storage post = posts[_postId];\n\n require(post.creationDate != 0, "Post does not exist");\n require(post.voters[msg.sender] == Ballot.NONE, "You already voted on this post");\n\n Ballot ballot = Ballot(_vote);\n\n if (ballot == Ballot.UPVOTE) {\n post.upvotes++;\n } else {\n post.downvotes++;\n }\n\n post.voters[msg.sender] = ballot;\n emit NewVote(_postId, msg.sender, _vote);\n }\n\n function canVote(uint _postId) public view returns (bool) {\n if (_postId > posts.length - 1) return false;\n Post storage post = posts[_postId];\n return (post.voters[msg.sender] == Ballot.NONE);\n }\n\n function getVote(uint _postId) public view returns (uint8) {\n Post storage post = posts[_postId];\n return uint8(post.voters[msg.sender]);\n }\n}</code></pre>\n\n\n<p>Wonderful! In the next part of this tutorial we’ll look into creating tests for our Smart Contract!</p>\n"},{"title":"How to create a Token Factory with Ethereum — Part 2","author":"iuri_matias","summary":"In this second part, we'll continue where we left off in part one, on building a token factory with Embark and focus on how to deploy new tokens.","alias":["tutorials/token_factory_2.html","/news/2018/10/26/how-to-create-a-token-factory-with-embark-part-2/"],"layout":"blog-post","_content":"\nIn [part 1](/news/2018/09/27/how-to-create-a-token-factory-with-embark-part-1/) we deployed and interacted with a single Token. In this article we will continue by adapting the previous DApp to create a true factory so new tokens can be dynamically deployed on the application side.\n\nA Token is typically a unit used to represent a medium of exchange for some service or utility. They can represent a concert ticket, a membership, voting share, reputation points, etc…\n\n## Getting Started\n\nFor the second part of the tutorial, Embark 3.0 or higher is required.\n\nIf you are using an older version you can update with:\n\n{% code_block copyBtn:true %}\n$ npm install -g embark@3\n{% endcode_block %}\n\nAfterwards make sure that `embark version` returns 3.0 then restart embark with `embark run`\n\n## Generalizing Token Interaction\n\nWe’ll start by generalizing the previous UI so we can input the address of a ERC20 Token and interact with it.\n\nFirst, we’ll add a simple form to *app/index.html* to get address of the token we wish to interact with.\n\n{% code_block copyBtn:true %}\n<html>\n <head>\n <title>Embark</title>\n <link rel=\"stylesheet\" href=\"css/app.css\">\n <script src=\"js/app.js\"></script>\n </head>\n <body>\n <h3>Welcome to Embark!</h3>\n <p>See the <a href=\"https://github.com/iurimatias/embarklabs/wiki\">Wiki</a> to see what you can do with Embark!</p>\n <div id=\"useToken\">\n <h3>Token Address</h3>\n <input placeholder=\"enter token address\" />\n <button>Use this Token</button>\n <div class=\"result\"></div>\n </div>\n <div id=\"queryBalance\">\n <h3>Query Balance</h3>\n <input placeholder=\"enter account address: e.g 0x123\" />\n <button>Query</button>\n <div class=\"result\"></div>\n </div>\n\n <div id=\"transfer\">\n <h3>Transfer Tokens</h3>\n <input class=\"address\" placeholder=\"enter account address: e.g 0x123\" />\n <input class=\"num\" placeholder=\"enter amount to transfer\" />\n <button>Transfer</button>\n <div class=\"result\"></div>\n </div>\n\n </body>\n</html>\n{% endcode_block %}\n\nIn *app/js/index.js* we’ll get the address given in the input, initialize a new contract object for that address and the Token ABI, and then assign it to a variable. We’ll also update the rest of code to use *currentToken* instead of *Token*. This way the existing code will work with the token we will be loading.\n\n{% code_block copyBtn:true %}\nimport EmbarkJS from 'Embark/EmbarkJS';\nimport $ from 'jquery';\nimport Token from 'Embark/contracts/Token';\n\nlet currentToken;\n\n$(document).ready(function() {\n $(\"#useToken button\").click(function() {\n var address = $('#useToken input').val();\n currentToken = new EmbarkJS.Contract({\n abi: Token.options.jsonInterface,\n address: address\n });\n });\n web3.eth.getAccounts(function(err, accounts) {\n $('#queryBalance input').val(accounts[0]);\n });\n\n $('#queryBalance button').click(function() {\n var address = $('#queryBalance input').val();\n currentToken.methods.balanceOf(address).call().then(function(balance) {\n $('#queryBalance .result').html(balance.toString());\n });\n });\n\n $('#transfer button').click(function() {\n var address = $('#transfer .address').val();\n var num = $('#transfer .num').val();\n currentToken.methods.transfer(address, num).send().then(function() {\n $('#transfer .result').html('Done!');\n });;\n });\n\n});\n{% endcode_block %}\n\nNow you can input the address of an existing token in chain, and interact with it. For instance, checking the embark dashboard.\n\n\n\nI can see the address of the deployed token in my case is *0x0703da89fc6c3ff20b8787a23d3340b41258dba7*. Copy paste your equivalent address into the UI.\n\n{% notification info 'Copying the address' %}\n*There are several ways to copy the address, in most systems pressing the ALT key while dragging with the mouse will enable text selection in the console, followed by CMD+C or right-click->copy.*\n{% endnotification %}\n\n\n\nAfter copying the address, click “Use this Token’, and let’s see the balance.\n\n\n\nIt’s *980* as expected (*1000* was the initial supply as configured in *config/contracts.json* and *20* was transferred out in [part 1](/news/2018/09/27/how-to-create-a-token-factory-with-embark-part-1/)\n\n## Deploy New Tokens on the fly\n\nNow that we have an UI to interact with an existing Token given its address, we’ll add functionality to deploy tokens on the fly, each with their own initial supply.\n\nFirst we’ll add a simple form to *app/index.html* to get the desired supply of the new token to deploy.\n\n{% code_block copyBtn:true %}\n<html>\n <head>\n <title>Embark</title>\n <link rel=\"stylesheet\" href=\"css/app.css\">\n <script src=\"js/app.js\"></script>\n </head>\n <body>\n <h3>Welcome to Embark!</h3>\n <p>See the <a href=\"https://github.com/iurimatias/embarklabs/wiki\">Wiki</a> to see what you can do with Embark!</p>\n <div id=\"deployToken\">\n <h3>Deploy new Token</h3>\n <input placeholder=\"enter token supply\" />\n <button>Deploy</button>\n <div class=\"result\"></div>\n </div>\n <div id=\"useToken\">\n <h3>Token Address</h3>\n <input placeholder=\"enter token address\" />\n <button>Use this Token</button>\n <div class=\"result\"></div>\n </div>\n\n <div id=\"queryBalance\">\n <h3>Query Balance</h3>\n <input placeholder=\"enter account address: e.g 0x123\" />\n <button>Query</button>\n <div class=\"result\"></div>\n </div>\n\n <div id=\"transfer\">\n <h3>Transfer Tokens</h3>\n <input class=\"address\" placeholder=\"enter account address: e.g 0x123\" />\n <input class=\"num\" placeholder=\"enter amount to transfer\" />\n <button>Transfer</button>\n <div class=\"result\"></div>\n </div>\n\n </body>\n</html>\n{% endcode_block %}\n\nEmbark makes the contract objects available in the js side, each contract object will have a method called *deploy* that can deploy new instances of the contract. This method can take parameters for the contract, and it will return a promise containing a contract object of the deployed contract.\n\nIn *app/js/index.js* we’ll add the code to deploy new tokens client side using this functionality:\n\n{% code_block copyBtn:true %}\n$(document).ready(function() {\n\n var currentToken;\n $(\"#deployToken button\").click(function() {\n var supply = $('#deployToken input').val();\n Token.deploy({arguments: [supply], data: Token.options.data}).send({gas: 400000}).then(function(deployedToken) {\n currentToken = deployedToken;\n $(\"#deployToken .result\").append(\"<br>Token deployed with address: \" + deployedToken.options.address);\n });\n });\n $(\"#useToken button\").click(function() {\n var address = $('#useToken input').val();\n currentToken = new EmbarkJS.Contract({\n abi: Token.options.jsonInterface,\n address: address\n });\n });\n\n web3.eth.getAccounts(function(err, accounts) {\n $('#queryBalance input').val(accounts[0]);\n });\n\n $('#queryBalance button').click(function() {\n var address = $('#queryBalance input').val();\n currentToken.methods.balanceOf(address).then(function(balance) {\n $('#queryBalance .result').html(balance.toString());\n });\n });\n\n $('#transfer button').click(function() {\n var address = $('#transfer .address').val();\n var num = $('#transfer .num').val();\n currentToken.methods.transfer(address, num).then(function() {\n $('#transfer .result').html('Done!');\n });;\n });\n\n});\n{% endcode_block %}\n\nWhen the Deploy button is clicked, we’ll get the supply entered and deploy a new Token with `Token.methods.deploy([supply])`.\nThe resulting promise `.then(function(deployedToken) {})` will contain the contract object of newly deployed contract. We’ll assign this new token object to the current one *currentToken* and also inform the user of the address;\n\nSo let’s try this out! Entering the supply as 500 and clicking Deploy:\n\n\n\nPerfect! Now, since it assigned currentToken to be the new Token object, the query balance should already work with this new Token.\n\n\n\nIt returns *500* as expected! Let’s deploy another token with a different supply and check Query balance again\n\n\n\nAfter deploying a new token with the supply at *200*, clicking query is also returning *200* as expected.\n\nLet’s switch back to the first deployed token with “Use this Token” functionality to see if everything is working as expected.\nEach time we are deploying a token in the client, the DApp is informing us “Token deployed with address: 0x…”, so let’s use this to copy paste the address of the first deployed contract into the Token Address field, then click “Use this Token” to switch back to that token.\n\n\n\nNow checking the balance again:\n\n\n\nAnd it’s *500* as expected since that’s the initial supply defined for the first token deployed.\n\n## Disabling the Token Deploy from Embarks side\n\nNow that your DApp can deploy Tokens on the fly, It’s unnecessary for Embark to deploy the Token contract like it did in [part 1](/news/2018/09/27/how-to-create-a-token-factory-with-embark-part-1/), however you still need Embark to make the Token contract available on the client side. To achieve this, go to config/contracts.js and set \"deploy\": false for that contract\n\n{% code_block copyBtn:true %}\nmodule.exports = {\n \"default\": {\n // .....\n \"gas\": \"auto\",\n \"contracts\": {\n \"Token\": {\n \"deploy\": false,\n \"args\": [\n 1000\n ]\n }\n }\n // .....\n }\n}\n{% endcode_block %}\n\nEmbark will now no longer deploy that contract, in the dashboard you should see:\n\n\n\n## Conclusion\n\nIn [part 1](/news/2018/09/27/how-to-create-a-token-factory-with-embark-part-1/) we deployed and interacted with single Token. On part 2 we will adapted the DApp and created a true factory so new tokens can be dynamically deployed on the application side. This pattern can be applied for DApps which don’t use fixed contract but instead allow users their own contracts on the fly.\n","source":"_posts/2018-10-27-how-to-create-a-token-factory-with-embark-part-2.md","raw":"title: How to create a Token Factory with Ethereum — Part 2\nauthor: iuri_matias\nsummary: \"In this second part, we'll continue where we left off in part one, on building a token factory with Embark and focus on how to deploy new tokens.\"\ncategories:\n - tutorials\nalias:\n - \"tutorials/token_factory_2.html\"\n - \"/news/2018/10/26/how-to-create-a-token-factory-with-embark-part-2/\"\nlayout: blog-post\n---\n\nIn [part 1](/news/2018/09/27/how-to-create-a-token-factory-with-embark-part-1/) we deployed and interacted with a single Token. In this article we will continue by adapting the previous DApp to create a true factory so new tokens can be dynamically deployed on the application side.\n\nA Token is typically a unit used to represent a medium of exchange for some service or utility. They can represent a concert ticket, a membership, voting share, reputation points, etc…\n\n## Getting Started\n\nFor the second part of the tutorial, Embark 3.0 or higher is required.\n\nIf you are using an older version you can update with:\n\n{% code_block copyBtn:true %}\n$ npm install -g embark@3\n{% endcode_block %}\n\nAfterwards make sure that `embark version` returns 3.0 then restart embark with `embark run`\n\n## Generalizing Token Interaction\n\nWe’ll start by generalizing the previous UI so we can input the address of a ERC20 Token and interact with it.\n\nFirst, we’ll add a simple form to *app/index.html* to get address of the token we wish to interact with.\n\n{% code_block copyBtn:true %}\n<html>\n <head>\n <title>Embark</title>\n <link rel=\"stylesheet\" href=\"css/app.css\">\n <script src=\"js/app.js\"></script>\n </head>\n <body>\n <h3>Welcome to Embark!</h3>\n <p>See the <a href=\"https://github.com/iurimatias/embarklabs/wiki\">Wiki</a> to see what you can do with Embark!</p>\n <div id=\"useToken\">\n <h3>Token Address</h3>\n <input placeholder=\"enter token address\" />\n <button>Use this Token</button>\n <div class=\"result\"></div>\n </div>\n <div id=\"queryBalance\">\n <h3>Query Balance</h3>\n <input placeholder=\"enter account address: e.g 0x123\" />\n <button>Query</button>\n <div class=\"result\"></div>\n </div>\n\n <div id=\"transfer\">\n <h3>Transfer Tokens</h3>\n <input class=\"address\" placeholder=\"enter account address: e.g 0x123\" />\n <input class=\"num\" placeholder=\"enter amount to transfer\" />\n <button>Transfer</button>\n <div class=\"result\"></div>\n </div>\n\n </body>\n</html>\n{% endcode_block %}\n\nIn *app/js/index.js* we’ll get the address given in the input, initialize a new contract object for that address and the Token ABI, and then assign it to a variable. We’ll also update the rest of code to use *currentToken* instead of *Token*. This way the existing code will work with the token we will be loading.\n\n{% code_block copyBtn:true %}\nimport EmbarkJS from 'Embark/EmbarkJS';\nimport $ from 'jquery';\nimport Token from 'Embark/contracts/Token';\n\nlet currentToken;\n\n$(document).ready(function() {\n $(\"#useToken button\").click(function() {\n var address = $('#useToken input').val();\n currentToken = new EmbarkJS.Contract({\n abi: Token.options.jsonInterface,\n address: address\n });\n });\n web3.eth.getAccounts(function(err, accounts) {\n $('#queryBalance input').val(accounts[0]);\n });\n\n $('#queryBalance button').click(function() {\n var address = $('#queryBalance input').val();\n currentToken.methods.balanceOf(address).call().then(function(balance) {\n $('#queryBalance .result').html(balance.toString());\n });\n });\n\n $('#transfer button').click(function() {\n var address = $('#transfer .address').val();\n var num = $('#transfer .num').val();\n currentToken.methods.transfer(address, num).send().then(function() {\n $('#transfer .result').html('Done!');\n });;\n });\n\n});\n{% endcode_block %}\n\nNow you can input the address of an existing token in chain, and interact with it. For instance, checking the embark dashboard.\n\n\n\nI can see the address of the deployed token in my case is *0x0703da89fc6c3ff20b8787a23d3340b41258dba7*. Copy paste your equivalent address into the UI.\n\n{% notification info 'Copying the address' %}\n*There are several ways to copy the address, in most systems pressing the ALT key while dragging with the mouse will enable text selection in the console, followed by CMD+C or right-click->copy.*\n{% endnotification %}\n\n\n\nAfter copying the address, click “Use this Token’, and let’s see the balance.\n\n\n\nIt’s *980* as expected (*1000* was the initial supply as configured in *config/contracts.json* and *20* was transferred out in [part 1](/news/2018/09/27/how-to-create-a-token-factory-with-embark-part-1/)\n\n## Deploy New Tokens on the fly\n\nNow that we have an UI to interact with an existing Token given its address, we’ll add functionality to deploy tokens on the fly, each with their own initial supply.\n\nFirst we’ll add a simple form to *app/index.html* to get the desired supply of the new token to deploy.\n\n{% code_block copyBtn:true %}\n<html>\n <head>\n <title>Embark</title>\n <link rel=\"stylesheet\" href=\"css/app.css\">\n <script src=\"js/app.js\"></script>\n </head>\n <body>\n <h3>Welcome to Embark!</h3>\n <p>See the <a href=\"https://github.com/iurimatias/embarklabs/wiki\">Wiki</a> to see what you can do with Embark!</p>\n <div id=\"deployToken\">\n <h3>Deploy new Token</h3>\n <input placeholder=\"enter token supply\" />\n <button>Deploy</button>\n <div class=\"result\"></div>\n </div>\n <div id=\"useToken\">\n <h3>Token Address</h3>\n <input placeholder=\"enter token address\" />\n <button>Use this Token</button>\n <div class=\"result\"></div>\n </div>\n\n <div id=\"queryBalance\">\n <h3>Query Balance</h3>\n <input placeholder=\"enter account address: e.g 0x123\" />\n <button>Query</button>\n <div class=\"result\"></div>\n </div>\n\n <div id=\"transfer\">\n <h3>Transfer Tokens</h3>\n <input class=\"address\" placeholder=\"enter account address: e.g 0x123\" />\n <input class=\"num\" placeholder=\"enter amount to transfer\" />\n <button>Transfer</button>\n <div class=\"result\"></div>\n </div>\n\n </body>\n</html>\n{% endcode_block %}\n\nEmbark makes the contract objects available in the js side, each contract object will have a method called *deploy* that can deploy new instances of the contract. This method can take parameters for the contract, and it will return a promise containing a contract object of the deployed contract.\n\nIn *app/js/index.js* we’ll add the code to deploy new tokens client side using this functionality:\n\n{% code_block copyBtn:true %}\n$(document).ready(function() {\n\n var currentToken;\n $(\"#deployToken button\").click(function() {\n var supply = $('#deployToken input').val();\n Token.deploy({arguments: [supply], data: Token.options.data}).send({gas: 400000}).then(function(deployedToken) {\n currentToken = deployedToken;\n $(\"#deployToken .result\").append(\"<br>Token deployed with address: \" + deployedToken.options.address);\n });\n });\n $(\"#useToken button\").click(function() {\n var address = $('#useToken input').val();\n currentToken = new EmbarkJS.Contract({\n abi: Token.options.jsonInterface,\n address: address\n });\n });\n\n web3.eth.getAccounts(function(err, accounts) {\n $('#queryBalance input').val(accounts[0]);\n });\n\n $('#queryBalance button').click(function() {\n var address = $('#queryBalance input').val();\n currentToken.methods.balanceOf(address).then(function(balance) {\n $('#queryBalance .result').html(balance.toString());\n });\n });\n\n $('#transfer button').click(function() {\n var address = $('#transfer .address').val();\n var num = $('#transfer .num').val();\n currentToken.methods.transfer(address, num).then(function() {\n $('#transfer .result').html('Done!');\n });;\n });\n\n});\n{% endcode_block %}\n\nWhen the Deploy button is clicked, we’ll get the supply entered and deploy a new Token with `Token.methods.deploy([supply])`.\nThe resulting promise `.then(function(deployedToken) {})` will contain the contract object of newly deployed contract. We’ll assign this new token object to the current one *currentToken* and also inform the user of the address;\n\nSo let’s try this out! Entering the supply as 500 and clicking Deploy:\n\n\n\nPerfect! Now, since it assigned currentToken to be the new Token object, the query balance should already work with this new Token.\n\n\n\nIt returns *500* as expected! Let’s deploy another token with a different supply and check Query balance again\n\n\n\nAfter deploying a new token with the supply at *200*, clicking query is also returning *200* as expected.\n\nLet’s switch back to the first deployed token with “Use this Token” functionality to see if everything is working as expected.\nEach time we are deploying a token in the client, the DApp is informing us “Token deployed with address: 0x…”, so let’s use this to copy paste the address of the first deployed contract into the Token Address field, then click “Use this Token” to switch back to that token.\n\n\n\nNow checking the balance again:\n\n\n\nAnd it’s *500* as expected since that’s the initial supply defined for the first token deployed.\n\n## Disabling the Token Deploy from Embarks side\n\nNow that your DApp can deploy Tokens on the fly, It’s unnecessary for Embark to deploy the Token contract like it did in [part 1](/news/2018/09/27/how-to-create-a-token-factory-with-embark-part-1/), however you still need Embark to make the Token contract available on the client side. To achieve this, go to config/contracts.js and set \"deploy\": false for that contract\n\n{% code_block copyBtn:true %}\nmodule.exports = {\n \"default\": {\n // .....\n \"gas\": \"auto\",\n \"contracts\": {\n \"Token\": {\n \"deploy\": false,\n \"args\": [\n 1000\n ]\n }\n }\n // .....\n }\n}\n{% endcode_block %}\n\nEmbark will now no longer deploy that contract, in the dashboard you should see:\n\n\n\n## Conclusion\n\nIn [part 1](/news/2018/09/27/how-to-create-a-token-factory-with-embark-part-1/) we deployed and interacted with single Token. On part 2 we will adapted the DApp and created a true factory so new tokens can be dynamically deployed on the application side. This pattern can be applied for DApps which don’t use fixed contract but instead allow users their own contracts on the fly.\n","slug":"how-to-create-a-token-factory-with-embark-part-2","published":1,"date":"2018-10-27T04:00:00.000Z","updated":"2020-03-03T14:55:55.023Z","_id":"ck6axlfcb002ixeeg7m4g72bx","comments":1,"photos":[],"link":"","content":"<p>In <a href=\"/news/2018/09/27/how-to-create-a-token-factory-with-embark-part-1/\">part 1</a> we deployed and interacted with a single Token. In this article we will continue by adapting the previous DApp to create a true factory so new tokens can be dynamically deployed on the application side.</p>\n<p>A Token is typically a unit used to represent a medium of exchange for some service or utility. They can represent a concert ticket, a membership, voting share, reputation points, etc…</p>\n<h2 id=\"Getting-Started\"><a href=\"#Getting-Started\" class=\"headerlink\" title=\"Getting Started\"></a>Getting Started</h2><p>For the second part of the tutorial, Embark 3.0 or higher is required.</p>\n<p>If you are using an older version you can update with:</p>\n<pre class=\"highlight \"><button class=\"c-button c-button--squared\" data-clipboard-target=\"#code-15f0f290-5d5f-11ea-badf-55b643f91aec\"><svg class=\"c-icon c-icon--xs\"><use xlink:href=\"/assets/icons/symbols.svg#icon-copy-paste\"></use></svg></button><code id=\"code-15f0f290-5d5f-11ea-badf-55b643f91aec\">$ npm install -g embark@3</code></pre>\n\n\n<p>Afterwards make sure that <code>embark version</code> returns 3.0 then restart embark with <code>embark run</code></p>\n<h2 id=\"Generalizing-Token-Interaction\"><a href=\"#Generalizing-Token-Interaction\" class=\"headerlink\" title=\"Generalizing Token Interaction\"></a>Generalizing Token Interaction</h2><p>We’ll start by generalizing the previous UI so we can input the address of a ERC20 Token and interact with it.</p>\n<p>First, we’ll add a simple form to <em>app/index.html</em> to get address of the token we wish to interact with.</p>\n<pre class=\"highlight \"><button class=\"c-button c-button--squared\" data-clipboard-target=\"#code-15f6e602-5d5f-11ea-badf-55b643f91aec\"><svg class=\"c-icon c-icon--xs\"><use xlink:href=\"/assets/icons/symbols.svg#icon-copy-paste\"></use></svg></button><code id=\"code-15f6e602-5d5f-11ea-badf-55b643f91aec\"><html>\n <head>\n <title>Embark</title>\n <link rel="stylesheet" href="css/app.css">\n <script src="js/app.js"></script>\n </head>\n <body>\n <h3>Welcome to Embark!</h3>\n <p>See the <a href="https://github.com/iurimatias/embarklabs/wiki">Wiki</a> to see what you can do with Embark!</p>\n <div id="useToken">\n <h3>Token Address</h3>\n <input placeholder="enter token address" />\n <button>Use this Token</button>\n <div class="result"></div>\n </div>\n <div id="queryBalance">\n <h3>Query Balance</h3>\n <input placeholder="enter account address: e.g 0x123" />\n <button>Query</button>\n <div class="result"></div>\n </div>\n\n <div id="transfer">\n <h3>Transfer Tokens</h3>\n <input class="address" placeholder="enter account address: e.g 0x123" />\n <input class="num" placeholder="enter amount to transfer" />\n <button>Transfer</button>\n <div class="result"></div>\n </div>\n\n </body>\n</html></code></pre>\n\n\n<p>In <em>app/js/index.js</em> we’ll get the address given in the input, initialize a new contract object for that address and the Token ABI, and then assign it to a variable. We’ll also update the rest of code to use <em>currentToken</em> instead of <em>Token</em>. This way the existing code will work with the token we will be loading.</p>\n<pre class=\"highlight \"><button class=\"c-button c-button--squared\" data-clipboard-target=\"#code-15f86ca2-5d5f-11ea-badf-55b643f91aec\"><svg class=\"c-icon c-icon--xs\"><use xlink:href=\"/assets/icons/symbols.svg#icon-copy-paste\"></use></svg></button><code id=\"code-15f86ca2-5d5f-11ea-badf-55b643f91aec\">import EmbarkJS from 'Embark/EmbarkJS';\nimport $ from 'jquery';\nimport Token from 'Embark/contracts/Token';\n\nlet currentToken;\n\n$(document).ready(function() {\n $("#useToken button").click(function() {\n var address = $('#useToken input').val();\n currentToken = new EmbarkJS.Contract({\n abi: Token.options.jsonInterface,\n address: address\n });\n });\n web3.eth.getAccounts(function(err, accounts) {\n $('#queryBalance input').val(accounts[0]);\n });\n\n $('#queryBalance button').click(function() {\n var address = $('#queryBalance input').val();\n currentToken.methods.balanceOf(address).call().then(function(balance) {\n $('#queryBalance .result').html(balance.toString());\n });\n });\n\n $('#transfer button').click(function() {\n var address = $('#transfer .address').val();\n var num = $('#transfer .num').val();\n currentToken.methods.transfer(address, num).send().then(function() {\n $('#transfer .result').html('Done!');\n });;\n });\n\n});</code></pre>\n\n\n<p>Now you can input the address of an existing token in chain, and interact with it. For instance, checking the embark dashboard.</p>\n<p><img src=\"/assets/images/token_factory_2/console_1.png\" alt=\"Console\"></p>\n<p>I can see the address of the deployed token in my case is <em>0x0703da89fc6c3ff20b8787a23d3340b41258dba7</em>. Copy paste your equivalent address into the UI.</p>\n<div class=\"c-notification c-notification--info\">\n <p><strong>Copying the address</strong></p>\n <p><p><em>There are several ways to copy the address, in most systems pressing the ALT key while dragging with the mouse will enable text selection in the console, followed by CMD+C or right-click->copy.</em></p>\n</p>\n</div> \n\n\n\n<p><img src=\"/assets/images/token_factory_2/page_1.png\" alt=\"Screenshot\"></p>\n<p>After copying the address, click “Use this Token’, and let’s see the balance.</p>\n<p><img src=\"/assets/images/token_factory_2/page_2.png\" alt=\"Screenshot\"></p>\n<p>It’s <em>980</em> as expected (<em>1000</em> was the initial supply as configured in <em>config/contracts.json</em> and <em>20</em> was transferred out in <a href=\"/news/2018/09/27/how-to-create-a-token-factory-with-embark-part-1/\">part 1</a></p>\n<h2 id=\"Deploy-New-Tokens-on-the-fly\"><a href=\"#Deploy-New-Tokens-on-the-fly\" class=\"headerlink\" title=\"Deploy New Tokens on the fly\"></a>Deploy New Tokens on the fly</h2><p>Now that we have an UI to interact with an existing Token given its address, we’ll add functionality to deploy tokens on the fly, each with their own initial supply.</p>\n<p>First we’ll add a simple form to <em>app/index.html</em> to get the desired supply of the new token to deploy.</p>\n<pre class=\"highlight \"><button class=\"c-button c-button--squared\" data-clipboard-target=\"#code-15f8e1d1-5d5f-11ea-badf-55b643f91aec\"><svg class=\"c-icon c-icon--xs\"><use xlink:href=\"/assets/icons/symbols.svg#icon-copy-paste\"></use></svg></button><code id=\"code-15f8e1d1-5d5f-11ea-badf-55b643f91aec\"><html>\n <head>\n <title>Embark</title>\n <link rel="stylesheet" href="css/app.css">\n <script src="js/app.js"></script>\n </head>\n <body>\n <h3>Welcome to Embark!</h3>\n <p>See the <a href="https://github.com/iurimatias/embarklabs/wiki">Wiki</a> to see what you can do with Embark!</p>\n <div id="deployToken">\n <h3>Deploy new Token</h3>\n <input placeholder="enter token supply" />\n <button>Deploy</button>\n <div class="result"></div>\n </div>\n <div id="useToken">\n <h3>Token Address</h3>\n <input placeholder="enter token address" />\n <button>Use this Token</button>\n <div class="result"></div>\n </div>\n\n <div id="queryBalance">\n <h3>Query Balance</h3>\n <input placeholder="enter account address: e.g 0x123" />\n <button>Query</button>\n <div class="result"></div>\n </div>\n\n <div id="transfer">\n <h3>Transfer Tokens</h3>\n <input class="address" placeholder="enter account address: e.g 0x123" />\n <input class="num" placeholder="enter amount to transfer" />\n <button>Transfer</button>\n <div class="result"></div>\n </div>\n\n </body>\n</html></code></pre>\n\n\n<p>Embark makes the contract objects available in the js side, each contract object will have a method called <em>deploy</em> that can deploy new instances of the contract. This method can take parameters for the contract, and it will return a promise containing a contract object of the deployed contract.</p>\n<p>In <em>app/js/index.js</em> we’ll add the code to deploy new tokens client side using this functionality:</p>\n<pre class=\"highlight \"><button class=\"c-button c-button--squared\" data-clipboard-target=\"#code-15f908e0-5d5f-11ea-badf-55b643f91aec\"><svg class=\"c-icon c-icon--xs\"><use xlink:href=\"/assets/icons/symbols.svg#icon-copy-paste\"></use></svg></button><code id=\"code-15f908e0-5d5f-11ea-badf-55b643f91aec\">$(document).ready(function() {\n\n var currentToken;\n $("#deployToken button").click(function() {\n var supply = $('#deployToken input').val();\n Token.deploy({arguments: [supply], data: Token.options.data}).send({gas: 400000}).then(function(deployedToken) {\n currentToken = deployedToken;\n $("#deployToken .result").append("<br>Token deployed with address: " + deployedToken.options.address);\n });\n });\n $("#useToken button").click(function() {\n var address = $('#useToken input').val();\n currentToken = new EmbarkJS.Contract({\n abi: Token.options.jsonInterface,\n address: address\n });\n });\n\n web3.eth.getAccounts(function(err, accounts) {\n $('#queryBalance input').val(accounts[0]);\n });\n\n $('#queryBalance button').click(function() {\n var address = $('#queryBalance input').val();\n currentToken.methods.balanceOf(address).then(function(balance) {\n $('#queryBalance .result').html(balance.toString());\n });\n });\n\n $('#transfer button').click(function() {\n var address = $('#transfer .address').val();\n var num = $('#transfer .num').val();\n currentToken.methods.transfer(address, num).then(function() {\n $('#transfer .result').html('Done!');\n });;\n });\n\n});</code></pre>\n\n\n<p>When the Deploy button is clicked, we’ll get the supply entered and deploy a new Token with <code>Token.methods.deploy([supply])</code>.<br>The resulting promise <code>.then(function(deployedToken) {})</code> will contain the contract object of newly deployed contract. We’ll assign this new token object to the current one <em>currentToken</em> and also inform the user of the address;</p>\n<p>So let’s try this out! Entering the supply as 500 and clicking Deploy:</p>\n<p><img src=\"/assets/images/token_factory_2/page_3.png\" alt=\"Screenshot\"></p>\n<p>Perfect! Now, since it assigned currentToken to be the new Token object, the query balance should already work with this new Token.</p>\n<p><img src=\"/assets/images/token_factory_2/page_4.png\" alt=\"Screenshot\"></p>\n<p>It returns <em>500</em> as expected! Let’s deploy another token with a different supply and check Query balance again</p>\n<p><img src=\"/assets/images/token_factory_2/page_5.png\" alt=\"Screenshot\"></p>\n<p>After deploying a new token with the supply at <em>200</em>, clicking query is also returning <em>200</em> as expected.</p>\n<p>Let’s switch back to the first deployed token with “Use this Token” functionality to see if everything is working as expected.<br>Each time we are deploying a token in the client, the DApp is informing us “Token deployed with address: 0x…”, so let’s use this to copy paste the address of the first deployed contract into the Token Address field, then click “Use this Token” to switch back to that token.</p>\n<p><img src=\"/assets/images/token_factory_2/page_6.png\" alt=\"Screenshot\"></p>\n<p>Now checking the balance again:</p>\n<p><img src=\"/assets/images/token_factory_2/page_7.png\" alt=\"Screenshot\"></p>\n<p>And it’s <em>500</em> as expected since that’s the initial supply defined for the first token deployed.</p>\n<h2 id=\"Disabling-the-Token-Deploy-from-Embarks-side\"><a href=\"#Disabling-the-Token-Deploy-from-Embarks-side\" class=\"headerlink\" title=\"Disabling the Token Deploy from Embarks side\"></a>Disabling the Token Deploy from Embarks side</h2><p>Now that your DApp can deploy Tokens on the fly, It’s unnecessary for Embark to deploy the Token contract like it did in <a href=\"/news/2018/09/27/how-to-create-a-token-factory-with-embark-part-1/\">part 1</a>, however you still need Embark to make the Token contract available on the client side. To achieve this, go to config/contracts.js and set “deploy”: false for that contract</p>\n<pre class=\"highlight \"><button class=\"c-button c-button--squared\" data-clipboard-target=\"#code-15f908e3-5d5f-11ea-badf-55b643f91aec\"><svg class=\"c-icon c-icon--xs\"><use xlink:href=\"/assets/icons/symbols.svg#icon-copy-paste\"></use></svg></button><code id=\"code-15f908e3-5d5f-11ea-badf-55b643f91aec\">module.exports = {\n "default": {\n // .....\n "gas": "auto",\n "contracts": {\n "Token": {\n "deploy": false,\n "args": [\n 1000\n ]\n }\n }\n // .....\n }\n}</code></pre>\n\n\n<p>Embark will now no longer deploy that contract, in the dashboard you should see:</p>\n<p><img src=\"/assets/images/token_factory_2/console_2.png\" alt=\"Console\"></p>\n<h2 id=\"Conclusion\"><a href=\"#Conclusion\" class=\"headerlink\" title=\"Conclusion\"></a>Conclusion</h2><p>In <a href=\"/news/2018/09/27/how-to-create-a-token-factory-with-embark-part-1/\">part 1</a> we deployed and interacted with single Token. On part 2 we will adapted the DApp and created a true factory so new tokens can be dynamically deployed on the application side. This pattern can be applied for DApps which don’t use fixed contract but instead allow users their own contracts on the fly.</p>\n","site":{"data":{"authors":{"iuri_matias":{"name":"Iuri Matias","twitter":"iurimatias","image":"https://pbs.twimg.com/profile_images/928272512181563392/iDJdvy2k_400x400.jpg"},"pascal_precht":{"name":"Pascal Precht","twitter":"pascalprecht","image":"https://pbs.twimg.com/profile_images/993785060733194241/p3oAIMDP_400x400.jpg"},"anthony_laibe":{"name":"Anthony Laibe","twitter":"a_laibe","image":"https://pbs.twimg.com/profile_images/257742900/13168239_400x400.jpg"},"jonathan_rainville":{"name":"Jonathan Rainville","twitter":"ShyolGhul","image":"https://pbs.twimg.com/profile_images/993873866878570496/-aE4byjj_400x400.jpg"},"andre_medeiros":{"name":"Andre Medeiros","twitter":"superdealloc","image":"https://pbs.twimg.com/profile_images/965722487735701504/m58KNgWN_400x400.jpg"},"eric_mastro":{"name":"Eric Mastro","twitter":"ericmastro","image":"https://avatars1.githubusercontent.com/u/5089238?s=460&v=4"},"michael_bradley":{"name":"Michael Bradley","image":"https://avatars3.githubusercontent.com/u/194260?s=460&v=4"},"richard_ramos":{"name":"Richard Ramos","twitter":"richardramos_me","image":"https://devcon.org/images/speakers/richard_ramos.jpg"},"jonny_zerah":{"name":"Jonny Zerah","twitter":"jonnyzerah","image":"https://pbs.twimg.com/profile_images/1043774340490248192/gI9aGy17_400x400.jpg"},"robin_percy":{"name":"Robin Percy","twitter":"rbin","image":"https://avatars1.githubusercontent.com/u/29288325?s=400&v=4"}},"categories":{"tutorials":"Tutorials","announcements":"Announcements"},"languages":{"en":"English"}}},"excerpt":"","more":"<p>In <a href=\"/news/2018/09/27/how-to-create-a-token-factory-with-embark-part-1/\">part 1</a> we deployed and interacted with a single Token. In this article we will continue by adapting the previous DApp to create a true factory so new tokens can be dynamically deployed on the application side.</p>\n<p>A Token is typically a unit used to represent a medium of exchange for some service or utility. They can represent a concert ticket, a membership, voting share, reputation points, etc…</p>\n<h2 id=\"Getting-Started\"><a href=\"#Getting-Started\" class=\"headerlink\" title=\"Getting Started\"></a>Getting Started</h2><p>For the second part of the tutorial, Embark 3.0 or higher is required.</p>\n<p>If you are using an older version you can update with:</p>\n<pre class=\"highlight \"><button class=\"c-button c-button--squared\" data-clipboard-target=\"#code-15f0f290-5d5f-11ea-badf-55b643f91aec\"><svg class=\"c-icon c-icon--xs\"><use xlink:href=\"/assets/icons/symbols.svg#icon-copy-paste\"></use></svg></button><code id=\"code-15f0f290-5d5f-11ea-badf-55b643f91aec\">$ npm install -g embark@3</code></pre>\n\n\n<p>Afterwards make sure that <code>embark version</code> returns 3.0 then restart embark with <code>embark run</code></p>\n<h2 id=\"Generalizing-Token-Interaction\"><a href=\"#Generalizing-Token-Interaction\" class=\"headerlink\" title=\"Generalizing Token Interaction\"></a>Generalizing Token Interaction</h2><p>We’ll start by generalizing the previous UI so we can input the address of a ERC20 Token and interact with it.</p>\n<p>First, we’ll add a simple form to <em>app/index.html</em> to get address of the token we wish to interact with.</p>\n<pre class=\"highlight \"><button class=\"c-button c-button--squared\" data-clipboard-target=\"#code-15f6e602-5d5f-11ea-badf-55b643f91aec\"><svg class=\"c-icon c-icon--xs\"><use xlink:href=\"/assets/icons/symbols.svg#icon-copy-paste\"></use></svg></button><code id=\"code-15f6e602-5d5f-11ea-badf-55b643f91aec\"><html>\n <head>\n <title>Embark</title>\n <link rel="stylesheet" href="css/app.css">\n <script src="js/app.js"></script>\n </head>\n <body>\n <h3>Welcome to Embark!</h3>\n <p>See the <a href="https://github.com/iurimatias/embarklabs/wiki">Wiki</a> to see what you can do with Embark!</p>\n <div id="useToken">\n <h3>Token Address</h3>\n <input placeholder="enter token address" />\n <button>Use this Token</button>\n <div class="result"></div>\n </div>\n <div id="queryBalance">\n <h3>Query Balance</h3>\n <input placeholder="enter account address: e.g 0x123" />\n <button>Query</button>\n <div class="result"></div>\n </div>\n\n <div id="transfer">\n <h3>Transfer Tokens</h3>\n <input class="address" placeholder="enter account address: e.g 0x123" />\n <input class="num" placeholder="enter amount to transfer" />\n <button>Transfer</button>\n <div class="result"></div>\n </div>\n\n </body>\n</html></code></pre>\n\n\n<p>In <em>app/js/index.js</em> we’ll get the address given in the input, initialize a new contract object for that address and the Token ABI, and then assign it to a variable. We’ll also update the rest of code to use <em>currentToken</em> instead of <em>Token</em>. This way the existing code will work with the token we will be loading.</p>\n<pre class=\"highlight \"><button class=\"c-button c-button--squared\" data-clipboard-target=\"#code-15f86ca2-5d5f-11ea-badf-55b643f91aec\"><svg class=\"c-icon c-icon--xs\"><use xlink:href=\"/assets/icons/symbols.svg#icon-copy-paste\"></use></svg></button><code id=\"code-15f86ca2-5d5f-11ea-badf-55b643f91aec\">import EmbarkJS from 'Embark/EmbarkJS';\nimport $ from 'jquery';\nimport Token from 'Embark/contracts/Token';\n\nlet currentToken;\n\n$(document).ready(function() {\n $("#useToken button").click(function() {\n var address = $('#useToken input').val();\n currentToken = new EmbarkJS.Contract({\n abi: Token.options.jsonInterface,\n address: address\n });\n });\n web3.eth.getAccounts(function(err, accounts) {\n $('#queryBalance input').val(accounts[0]);\n });\n\n $('#queryBalance button').click(function() {\n var address = $('#queryBalance input').val();\n currentToken.methods.balanceOf(address).call().then(function(balance) {\n $('#queryBalance .result').html(balance.toString());\n });\n });\n\n $('#transfer button').click(function() {\n var address = $('#transfer .address').val();\n var num = $('#transfer .num').val();\n currentToken.methods.transfer(address, num).send().then(function() {\n $('#transfer .result').html('Done!');\n });;\n });\n\n});</code></pre>\n\n\n<p>Now you can input the address of an existing token in chain, and interact with it. For instance, checking the embark dashboard.</p>\n<p><img src=\"/assets/images/token_factory_2/console_1.png\" alt=\"Console\"></p>\n<p>I can see the address of the deployed token in my case is <em>0x0703da89fc6c3ff20b8787a23d3340b41258dba7</em>. Copy paste your equivalent address into the UI.</p>\n<div class=\"c-notification c-notification--info\">\n <p><strong>Copying the address</strong></p>\n <p><p><em>There are several ways to copy the address, in most systems pressing the ALT key while dragging with the mouse will enable text selection in the console, followed by CMD+C or right-click->copy.</em></p>\n</p>\n</div> \n\n\n\n<p><img src=\"/assets/images/token_factory_2/page_1.png\" alt=\"Screenshot\"></p>\n<p>After copying the address, click “Use this Token’, and let’s see the balance.</p>\n<p><img src=\"/assets/images/token_factory_2/page_2.png\" alt=\"Screenshot\"></p>\n<p>It’s <em>980</em> as expected (<em>1000</em> was the initial supply as configured in <em>config/contracts.json</em> and <em>20</em> was transferred out in <a href=\"/news/2018/09/27/how-to-create-a-token-factory-with-embark-part-1/\">part 1</a></p>\n<h2 id=\"Deploy-New-Tokens-on-the-fly\"><a href=\"#Deploy-New-Tokens-on-the-fly\" class=\"headerlink\" title=\"Deploy New Tokens on the fly\"></a>Deploy New Tokens on the fly</h2><p>Now that we have an UI to interact with an existing Token given its address, we’ll add functionality to deploy tokens on the fly, each with their own initial supply.</p>\n<p>First we’ll add a simple form to <em>app/index.html</em> to get the desired supply of the new token to deploy.</p>\n<pre class=\"highlight \"><button class=\"c-button c-button--squared\" data-clipboard-target=\"#code-15f8e1d1-5d5f-11ea-badf-55b643f91aec\"><svg class=\"c-icon c-icon--xs\"><use xlink:href=\"/assets/icons/symbols.svg#icon-copy-paste\"></use></svg></button><code id=\"code-15f8e1d1-5d5f-11ea-badf-55b643f91aec\"><html>\n <head>\n <title>Embark</title>\n <link rel="stylesheet" href="css/app.css">\n <script src="js/app.js"></script>\n </head>\n <body>\n <h3>Welcome to Embark!</h3>\n <p>See the <a href="https://github.com/iurimatias/embarklabs/wiki">Wiki</a> to see what you can do with Embark!</p>\n <div id="deployToken">\n <h3>Deploy new Token</h3>\n <input placeholder="enter token supply" />\n <button>Deploy</button>\n <div class="result"></div>\n </div>\n <div id="useToken">\n <h3>Token Address</h3>\n <input placeholder="enter token address" />\n <button>Use this Token</button>\n <div class="result"></div>\n </div>\n\n <div id="queryBalance">\n <h3>Query Balance</h3>\n <input placeholder="enter account address: e.g 0x123" />\n <button>Query</button>\n <div class="result"></div>\n </div>\n\n <div id="transfer">\n <h3>Transfer Tokens</h3>\n <input class="address" placeholder="enter account address: e.g 0x123" />\n <input class="num" placeholder="enter amount to transfer" />\n <button>Transfer</button>\n <div class="result"></div>\n </div>\n\n </body>\n</html></code></pre>\n\n\n<p>Embark makes the contract objects available in the js side, each contract object will have a method called <em>deploy</em> that can deploy new instances of the contract. This method can take parameters for the contract, and it will return a promise containing a contract object of the deployed contract.</p>\n<p>In <em>app/js/index.js</em> we’ll add the code to deploy new tokens client side using this functionality:</p>\n<pre class=\"highlight \"><button class=\"c-button c-button--squared\" data-clipboard-target=\"#code-15f908e0-5d5f-11ea-badf-55b643f91aec\"><svg class=\"c-icon c-icon--xs\"><use xlink:href=\"/assets/icons/symbols.svg#icon-copy-paste\"></use></svg></button><code id=\"code-15f908e0-5d5f-11ea-badf-55b643f91aec\">$(document).ready(function() {\n\n var currentToken;\n $("#deployToken button").click(function() {\n var supply = $('#deployToken input').val();\n Token.deploy({arguments: [supply], data: Token.options.data}).send({gas: 400000}).then(function(deployedToken) {\n currentToken = deployedToken;\n $("#deployToken .result").append("<br>Token deployed with address: " + deployedToken.options.address);\n });\n });\n $("#useToken button").click(function() {\n var address = $('#useToken input').val();\n currentToken = new EmbarkJS.Contract({\n abi: Token.options.jsonInterface,\n address: address\n });\n });\n\n web3.eth.getAccounts(function(err, accounts) {\n $('#queryBalance input').val(accounts[0]);\n });\n\n $('#queryBalance button').click(function() {\n var address = $('#queryBalance input').val();\n currentToken.methods.balanceOf(address).then(function(balance) {\n $('#queryBalance .result').html(balance.toString());\n });\n });\n\n $('#transfer button').click(function() {\n var address = $('#transfer .address').val();\n var num = $('#transfer .num').val();\n currentToken.methods.transfer(address, num).then(function() {\n $('#transfer .result').html('Done!');\n });;\n });\n\n});</code></pre>\n\n\n<p>When the Deploy button is clicked, we’ll get the supply entered and deploy a new Token with <code>Token.methods.deploy([supply])</code>.<br>The resulting promise <code>.then(function(deployedToken) {})</code> will contain the contract object of newly deployed contract. We’ll assign this new token object to the current one <em>currentToken</em> and also inform the user of the address;</p>\n<p>So let’s try this out! Entering the supply as 500 and clicking Deploy:</p>\n<p><img src=\"/assets/images/token_factory_2/page_3.png\" alt=\"Screenshot\"></p>\n<p>Perfect! Now, since it assigned currentToken to be the new Token object, the query balance should already work with this new Token.</p>\n<p><img src=\"/assets/images/token_factory_2/page_4.png\" alt=\"Screenshot\"></p>\n<p>It returns <em>500</em> as expected! Let’s deploy another token with a different supply and check Query balance again</p>\n<p><img src=\"/assets/images/token_factory_2/page_5.png\" alt=\"Screenshot\"></p>\n<p>After deploying a new token with the supply at <em>200</em>, clicking query is also returning <em>200</em> as expected.</p>\n<p>Let’s switch back to the first deployed token with “Use this Token” functionality to see if everything is working as expected.<br>Each time we are deploying a token in the client, the DApp is informing us “Token deployed with address: 0x…”, so let’s use this to copy paste the address of the first deployed contract into the Token Address field, then click “Use this Token” to switch back to that token.</p>\n<p><img src=\"/assets/images/token_factory_2/page_6.png\" alt=\"Screenshot\"></p>\n<p>Now checking the balance again:</p>\n<p><img src=\"/assets/images/token_factory_2/page_7.png\" alt=\"Screenshot\"></p>\n<p>And it’s <em>500</em> as expected since that’s the initial supply defined for the first token deployed.</p>\n<h2 id=\"Disabling-the-Token-Deploy-from-Embarks-side\"><a href=\"#Disabling-the-Token-Deploy-from-Embarks-side\" class=\"headerlink\" title=\"Disabling the Token Deploy from Embarks side\"></a>Disabling the Token Deploy from Embarks side</h2><p>Now that your DApp can deploy Tokens on the fly, It’s unnecessary for Embark to deploy the Token contract like it did in <a href=\"/news/2018/09/27/how-to-create-a-token-factory-with-embark-part-1/\">part 1</a>, however you still need Embark to make the Token contract available on the client side. To achieve this, go to config/contracts.js and set “deploy”: false for that contract</p>\n<pre class=\"highlight \"><button class=\"c-button c-button--squared\" data-clipboard-target=\"#code-15f908e3-5d5f-11ea-badf-55b643f91aec\"><svg class=\"c-icon c-icon--xs\"><use xlink:href=\"/assets/icons/symbols.svg#icon-copy-paste\"></use></svg></button><code id=\"code-15f908e3-5d5f-11ea-badf-55b643f91aec\">module.exports = {\n "default": {\n // .....\n "gas": "auto",\n "contracts": {\n "Token": {\n "deploy": false,\n "args": [\n 1000\n ]\n }\n }\n // .....\n }\n}</code></pre>\n\n\n<p>Embark will now no longer deploy that contract, in the dashboard you should see:</p>\n<p><img src=\"/assets/images/token_factory_2/console_2.png\" alt=\"Console\"></p>\n<h2 id=\"Conclusion\"><a href=\"#Conclusion\" class=\"headerlink\" title=\"Conclusion\"></a>Conclusion</h2><p>In <a href=\"/news/2018/09/27/how-to-create-a-token-factory-with-embark-part-1/\">part 1</a> we deployed and interacted with single Token. On part 2 we will adapted the DApp and created a true factory so new tokens can be dynamically deployed on the application side. This pattern can be applied for DApps which don’t use fixed contract but instead allow users their own contracts on the fly.</p>\n"},{"title":"Building a decentralized Reddit with Embark - Part 2","author":"pascal_precht","summary":"This is the second part of the three part tutorial about building a decentralized Reddit with Embark. In this part, we'll be focussing on testing our Smart Contract using EmbarkJS.","layout":"blog-post","alias":"news/2019/02/10/building-a-decentralized-reddit-with-embark-part-2/","_content":"\nIn [the first part of this tutorial](/news/2019/02/04/building-a-decentralized-reddit-with-embark-part-1/) we've implemented a `DReddit` Smart Contract that comes with methods to create and vote on topic posts. In this part we'll continue right where we've left off and take a closer look at how we can test our Smart Contract using Embark. Make sure to check out the other parts as well:\n\n- [**Part 1** - Setting up the project and implementing a Smart Contract](/news/2019/02/04/building-a-decentralized-reddit-with-embark-part-1/)\n- [**Part 3** - Building a simple front-end using React](/news/2019/02/18/building-a-decentralized-reddit-with-embark-part-3/)\n\n**The code for this tutorial can be found in [this repository](https://github.com/embarklabs/dreddit-tutorial)**.\n\nAnd off we go!\n\n## Writing a first test\n\nWe've got plenty functionality to cover in our tests, but let's start with a very simple one just to get a bit more familiar with how to write tests and also to ensure things are working as intended. First we create a test file `DReddit_spec.js` inside `test` and add a `contract()` block that looks something like this:\n\n```\ncontract('DReddit', () => {\n\n});\n```\n\nInside this code block we'll be putting dedicated test cases. The `contract()` function can be considered a \"grouping\" functionality to group tests, if you will. If you're familiar with Mocha's [describe()](https://mochajs.org/) function, you already know how `contract()` works, as it's pretty much just an alias.\n\nTo check whether our test setup is working, we add a simple test that passes:\n\n```\ncontract('DReddit', () => {\n\n it ('should work', () => {\n assert.ok(true);\n });\n});\n```\n\nRunning this using Embark's `test` command should result in an output similar to this:\n\n```\n❯ embark test\n\n\nCompiling contracts\n DReddit\n ✓ should work (0ms) - [0 gas]\n\n\n 1 passing (5s) - [Total: 2210775 gas]\n\n > All tests passed\n```\n\nThis works great, let's go ahead and test some actual functionality!\n\n## Testing the creation of post\n\nLet's test the core functionality of our application - the creation of posts. For that we need to do a couple of things: We need to somehow get an instance of our `DReddit` Smart Contract in JavaScript, so we can call methods on it to test if they work, and we also need to configure out testing environment so that the right Smart Contract instances are created.\n\n### Requiring Smart Contract instances\n\nWhen running tests, Embark adds a couple of custom functions and objects to the global scope, which are necessary. One of those functions is a custom `require()` that lets us import Smart Contract instances from an Embark specific path. This is done so that we can easily import\n\nFor example, in order to get an instance of our `DReddit` Smart Contract within the test, we add the following line to our spec file:\n\n\n```\nconst DReddit = require('Embark/contracts/DReddit');\n```\n\n`DReddit` is now supposed to be an EmbarkJS Smart Contract instance, but we need to be very careful here. **In reality, this object is empty**. This is because at the time this file is processed, the Smart Contract might not be deployed yet. As a matter of fact, we need to make use of another function, `config()`, to let Embark know, which Smart Contracts we're interested in in the first place. This might be a little confusing, but really the bottom line is that `DReddit` isn't what we think it is, until we use it inside `contract()`.\n\nLet's add the mentioned `config()` function so Embark knows what we need:\n\n```\nconfig({\n contracts: {\n DReddit: {}\n }\n});\n```\n\nThis is very similar to [configuring Smart Contracts](/docs/contracts_configuration.html), in fact it's the test environment equivalent. We pass a configuration object to `config()` with specific parameters for every Smart Contract we need. In our case, we just need to add `DReddit` without any additional parameters. This is because our Smart Contract doesn't need constructor values and things alike. Keep in mind, if we don't call this `config()` function, the imported objects for our Smart Contract instances will always be empty.\n\n### Testing `createPost()`\n\nTo test our Smart Contract's `createPost()` method, we'll make use of `DReddit`, which will now be a Smart Contract instance. If you remember, `createPost()` actually takes the post's description as bytes, so how do we make that work? Well, it turns out that we actually don't pass it the description itself, but an **IPFS hash** that points to the actual description. The reason for that is that posts can be very long, resulting in a lot of bytes. It's better to store the actual description in a storage where data size isn't an issue, and instead store a reference to that data in our Smart Contract. Using a hash makes the data size deterministic as it will always have the same length.\n\nOnce we have such a hash (no worries, we've got one prepared), we can use Web3's `fromAscii()` utils to convert that hash to bytes and then send it off using our Smart Contract's `createPost()` method. We can then subscribe to the events we're emitting and check its return value like this:\n\n```\n...\nconst ipfsHash = 'Qmc5gCcjYypU7y28oCALwfSvxCBskLuPKWpK4qpterKC7z';\n\ncontract('DReddit', () => {\n ...\n it ('should be able to create a post and receive it via contract event', async () => {\n const receipt = await DReddit.methods.createPost(web3.utils.fromAscii(ipfsHash)).send();\n const event = receipt.events.NewPost;\n postId = event.returnValues.postId;\n assert.equal(web3.utils.toAscii(event.returnValues.description), ipfsHash);\n });\n});\n```\n\nNotice that we're using `async/await` here because Embark's Smart Contract instance methods return promises. The same can be done without promises as well, it's just a syntactical difference at this point. Running `embark test` should result in two passing tests now!\n\n## Testing correctness of data\n\nAnother good test case would be to check if the stored data such as the description bytes, the owner etc. resolve back to the correct data. Notice that this is slightly different from what we're testing in our previous test - there we're testing the description bytes emitted by the `NewPost` event. To test this we take advantage of the `postId` created in the previous test, which is available globally now, to fetch the stored post. We then perform a similar check as in the previous test. We also want to test if the owner data of the post is correct, but for that we need to get access to the account that created the post in the first place.\n\nLuckily wallet accounts can be easily accessed as they are emitted by Embark's `config()` function. All we have to do is attaching a resolution handler to `config()` and storing the emitted value:\n\n```\n...\nlet accounts = [];\n\nconfig({\n contracts: {\n DReddit: {}\n }\n}, (err, _accounts) => {\n accounts = _accounts;\n});\n```\n\nHaving that in place, our next test could look something like this:\n\n```\nit ('post should have correct data', async () => {\n const post = await DReddit.methods.posts(postId).call();\n assert.equal(web3.utils.toAscii(post.description), ipfsHash);\n assert.equal(post.owner, accounts[0]);\n});\n```\n\nYou might notice that we're referring to `accounts[0]` here. However, just by looking at the code, we can't really know if `accounts[0]` is really the one we're expecting. This is where Embark offers another helping hand. When the `accounts` are set up, Embark will automatically set the first account of the wallet (`accounts[0]`) to the default account that'll be used for all transactions. With that knowledge we can make an assertion, expecting `accounts[0]` to be the owner of the post.\n\nAnother way would be to just always explicitly pass any of the accounts to a Smart Contract method's `send()` function, in which case we'd have full control over which account of the wallet will be used.\n\n## Testing `canVote()`\n\nAlright, next up let's quickly test if our `canVote()` method works the way as expected. As voting on posts that don't exist should never work, we will simply call `canVote()` on a post id that doesn't exist. This test is pretty straight forward:\n\n```\nit('should not be able to vote in an unexisting post', async () => {\n const userCanVote = await DReddit.methods.canVote(\"123\").call();\n assert.equal(userCanVote, false);\n});\n```\n\nWe also want to make sure that `canVote()` resolves to `true` in case a user can indeed vote a certain post. We can again reuse the `postId` that we've stored earlier:\n\n```\nit('should be able to vote in a post if account has not voted before', async () => {\n const userCanVote = await DReddit.methods.canVote(postId).call();\n assert.equal(userCanVote, true);\n});\n```\n\nWonderful, we have 5 passing tests now!\n\n## Testing `vote()`\n\nOf course we want to test whether one of our application's core features works as well. There's certainly different ways to verify whether `vote()` does what it's supposed to do, but for this tutorial we'll simply check whether the owner account of the vote emitted by the `NewVote` event is the same as the account that performed the vote. We can actually take some inspiration from our previous tests:\n\n```\nit(\"should be able to vote in a post\", async () => {\n const receipt = await DReddit.methods.vote(postId, 1).send();\n const Vote = receipt.events.NewVote;\n assert.equal(Vote.returnValues.owner, accounts[0]);\n});\n```\n\n## Test that only one vote per post is allowed\n\nThe last but essential functionality we want to test is that whether our Smart Contract allows users to vote multiple times on the same post, which for obvious reasons shouldn't be possible. Using the `async/await` syntax we can test this very nicely by adding a `try/catch` block. When a user votes on a post she has already voted on, `vote()` will fail in which case we can make our assertions accordingly:\n\n```\nit('should not be able to vote twice', async () => {\n try {\n const receipt = await DReddit.methods.vote(postId, 1).send();\n assert.fail('should have reverted');\n } catch (error){\n assert(error.message.search('revert') > -1, 'Revert should happen');\n }\n});\n```\n\nThis might look a bit confusing first but it's actually pretty straight forward. In case `vote()` fails, we should not reach the `assert.fail()` call but end up in the `catch()` block immediately. If that was not the case, the test would fail. This is a very common pattern when testing negatives.\n\nOkay, one last time we run `embark test` and if the output looks like the following, we're fully covered in terms of tests!\n\n\n```\n❯ embark test\nCompiling contracts\n\n\n DReddit\n ✓ should work (0ms) - [0 gas]\n ✓ should be able to create a post and receive it via contract event (60ms) - [160689 gas]\n ✓ post should have correct data (18ms) - [0 gas]\n ✓ should not be able to vote in an unexisting post (14ms) - [0 gas]\n ✓ should be able to vote in a post if account hasn't voted before (12ms) - [0 gas]\n ✓ should be able to vote in a post (42ms) - [65115 gas]\n ✓ shouldn't be able to vote twice (37ms) - [22815 gas]\n\n\n 7 passing (5s) - [Total: 3130955 gas]\n\n > All tests passed\n```\n\n Awesome! If you run into any issues, check out the repository with all steps recorded [here](https://github.com/embarklabs/dreddit-tutorial). In [the next and last part of this series](/news/2019/02/18/building-a-decentralized-reddit-with-embark-part-3/), we'll be building a front-end for our DReddit app using React. Until then, feel free to add more tests as you like!\n","source":"_posts/2019-02-11-building-a-decentralized-reddit-with-embark-part-2.md","raw":"title: Building a decentralized Reddit with Embark - Part 2\nauthor: 'pascal_precht'\nsummary: \"This is the second part of the three part tutorial about building a decentralized Reddit with Embark. In this part, we'll be focussing on testing our Smart Contract using EmbarkJS.\"\ncategories:\n - tutorials\nlayout: blog-post\nalias: news/2019/02/10/building-a-decentralized-reddit-with-embark-part-2/\n---\n\nIn [the first part of this tutorial](/news/2019/02/04/building-a-decentralized-reddit-with-embark-part-1/) we've implemented a `DReddit` Smart Contract that comes with methods to create and vote on topic posts. In this part we'll continue right where we've left off and take a closer look at how we can test our Smart Contract using Embark. Make sure to check out the other parts as well:\n\n- [**Part 1** - Setting up the project and implementing a Smart Contract](/news/2019/02/04/building-a-decentralized-reddit-with-embark-part-1/)\n- [**Part 3** - Building a simple front-end using React](/news/2019/02/18/building-a-decentralized-reddit-with-embark-part-3/)\n\n**The code for this tutorial can be found in [this repository](https://github.com/embarklabs/dreddit-tutorial)**.\n\nAnd off we go!\n\n## Writing a first test\n\nWe've got plenty functionality to cover in our tests, but let's start with a very simple one just to get a bit more familiar with how to write tests and also to ensure things are working as intended. First we create a test file `DReddit_spec.js` inside `test` and add a `contract()` block that looks something like this:\n\n```\ncontract('DReddit', () => {\n\n});\n```\n\nInside this code block we'll be putting dedicated test cases. The `contract()` function can be considered a \"grouping\" functionality to group tests, if you will. If you're familiar with Mocha's [describe()](https://mochajs.org/) function, you already know how `contract()` works, as it's pretty much just an alias.\n\nTo check whether our test setup is working, we add a simple test that passes:\n\n```\ncontract('DReddit', () => {\n\n it ('should work', () => {\n assert.ok(true);\n });\n});\n```\n\nRunning this using Embark's `test` command should result in an output similar to this:\n\n```\n❯ embark test\n\n\nCompiling contracts\n DReddit\n ✓ should work (0ms) - [0 gas]\n\n\n 1 passing (5s) - [Total: 2210775 gas]\n\n > All tests passed\n```\n\nThis works great, let's go ahead and test some actual functionality!\n\n## Testing the creation of post\n\nLet's test the core functionality of our application - the creation of posts. For that we need to do a couple of things: We need to somehow get an instance of our `DReddit` Smart Contract in JavaScript, so we can call methods on it to test if they work, and we also need to configure out testing environment so that the right Smart Contract instances are created.\n\n### Requiring Smart Contract instances\n\nWhen running tests, Embark adds a couple of custom functions and objects to the global scope, which are necessary. One of those functions is a custom `require()` that lets us import Smart Contract instances from an Embark specific path. This is done so that we can easily import\n\nFor example, in order to get an instance of our `DReddit` Smart Contract within the test, we add the following line to our spec file:\n\n\n```\nconst DReddit = require('Embark/contracts/DReddit');\n```\n\n`DReddit` is now supposed to be an EmbarkJS Smart Contract instance, but we need to be very careful here. **In reality, this object is empty**. This is because at the time this file is processed, the Smart Contract might not be deployed yet. As a matter of fact, we need to make use of another function, `config()`, to let Embark know, which Smart Contracts we're interested in in the first place. This might be a little confusing, but really the bottom line is that `DReddit` isn't what we think it is, until we use it inside `contract()`.\n\nLet's add the mentioned `config()` function so Embark knows what we need:\n\n```\nconfig({\n contracts: {\n DReddit: {}\n }\n});\n```\n\nThis is very similar to [configuring Smart Contracts](/docs/contracts_configuration.html), in fact it's the test environment equivalent. We pass a configuration object to `config()` with specific parameters for every Smart Contract we need. In our case, we just need to add `DReddit` without any additional parameters. This is because our Smart Contract doesn't need constructor values and things alike. Keep in mind, if we don't call this `config()` function, the imported objects for our Smart Contract instances will always be empty.\n\n### Testing `createPost()`\n\nTo test our Smart Contract's `createPost()` method, we'll make use of `DReddit`, which will now be a Smart Contract instance. If you remember, `createPost()` actually takes the post's description as bytes, so how do we make that work? Well, it turns out that we actually don't pass it the description itself, but an **IPFS hash** that points to the actual description. The reason for that is that posts can be very long, resulting in a lot of bytes. It's better to store the actual description in a storage where data size isn't an issue, and instead store a reference to that data in our Smart Contract. Using a hash makes the data size deterministic as it will always have the same length.\n\nOnce we have such a hash (no worries, we've got one prepared), we can use Web3's `fromAscii()` utils to convert that hash to bytes and then send it off using our Smart Contract's `createPost()` method. We can then subscribe to the events we're emitting and check its return value like this:\n\n```\n...\nconst ipfsHash = 'Qmc5gCcjYypU7y28oCALwfSvxCBskLuPKWpK4qpterKC7z';\n\ncontract('DReddit', () => {\n ...\n it ('should be able to create a post and receive it via contract event', async () => {\n const receipt = await DReddit.methods.createPost(web3.utils.fromAscii(ipfsHash)).send();\n const event = receipt.events.NewPost;\n postId = event.returnValues.postId;\n assert.equal(web3.utils.toAscii(event.returnValues.description), ipfsHash);\n });\n});\n```\n\nNotice that we're using `async/await` here because Embark's Smart Contract instance methods return promises. The same can be done without promises as well, it's just a syntactical difference at this point. Running `embark test` should result in two passing tests now!\n\n## Testing correctness of data\n\nAnother good test case would be to check if the stored data such as the description bytes, the owner etc. resolve back to the correct data. Notice that this is slightly different from what we're testing in our previous test - there we're testing the description bytes emitted by the `NewPost` event. To test this we take advantage of the `postId` created in the previous test, which is available globally now, to fetch the stored post. We then perform a similar check as in the previous test. We also want to test if the owner data of the post is correct, but for that we need to get access to the account that created the post in the first place.\n\nLuckily wallet accounts can be easily accessed as they are emitted by Embark's `config()` function. All we have to do is attaching a resolution handler to `config()` and storing the emitted value:\n\n```\n...\nlet accounts = [];\n\nconfig({\n contracts: {\n DReddit: {}\n }\n}, (err, _accounts) => {\n accounts = _accounts;\n});\n```\n\nHaving that in place, our next test could look something like this:\n\n```\nit ('post should have correct data', async () => {\n const post = await DReddit.methods.posts(postId).call();\n assert.equal(web3.utils.toAscii(post.description), ipfsHash);\n assert.equal(post.owner, accounts[0]);\n});\n```\n\nYou might notice that we're referring to `accounts[0]` here. However, just by looking at the code, we can't really know if `accounts[0]` is really the one we're expecting. This is where Embark offers another helping hand. When the `accounts` are set up, Embark will automatically set the first account of the wallet (`accounts[0]`) to the default account that'll be used for all transactions. With that knowledge we can make an assertion, expecting `accounts[0]` to be the owner of the post.\n\nAnother way would be to just always explicitly pass any of the accounts to a Smart Contract method's `send()` function, in which case we'd have full control over which account of the wallet will be used.\n\n## Testing `canVote()`\n\nAlright, next up let's quickly test if our `canVote()` method works the way as expected. As voting on posts that don't exist should never work, we will simply call `canVote()` on a post id that doesn't exist. This test is pretty straight forward:\n\n```\nit('should not be able to vote in an unexisting post', async () => {\n const userCanVote = await DReddit.methods.canVote(\"123\").call();\n assert.equal(userCanVote, false);\n});\n```\n\nWe also want to make sure that `canVote()` resolves to `true` in case a user can indeed vote a certain post. We can again reuse the `postId` that we've stored earlier:\n\n```\nit('should be able to vote in a post if account has not voted before', async () => {\n const userCanVote = await DReddit.methods.canVote(postId).call();\n assert.equal(userCanVote, true);\n});\n```\n\nWonderful, we have 5 passing tests now!\n\n## Testing `vote()`\n\nOf course we want to test whether one of our application's core features works as well. There's certainly different ways to verify whether `vote()` does what it's supposed to do, but for this tutorial we'll simply check whether the owner account of the vote emitted by the `NewVote` event is the same as the account that performed the vote. We can actually take some inspiration from our previous tests:\n\n```\nit(\"should be able to vote in a post\", async () => {\n const receipt = await DReddit.methods.vote(postId, 1).send();\n const Vote = receipt.events.NewVote;\n assert.equal(Vote.returnValues.owner, accounts[0]);\n});\n```\n\n## Test that only one vote per post is allowed\n\nThe last but essential functionality we want to test is that whether our Smart Contract allows users to vote multiple times on the same post, which for obvious reasons shouldn't be possible. Using the `async/await` syntax we can test this very nicely by adding a `try/catch` block. When a user votes on a post she has already voted on, `vote()` will fail in which case we can make our assertions accordingly:\n\n```\nit('should not be able to vote twice', async () => {\n try {\n const receipt = await DReddit.methods.vote(postId, 1).send();\n assert.fail('should have reverted');\n } catch (error){\n assert(error.message.search('revert') > -1, 'Revert should happen');\n }\n});\n```\n\nThis might look a bit confusing first but it's actually pretty straight forward. In case `vote()` fails, we should not reach the `assert.fail()` call but end up in the `catch()` block immediately. If that was not the case, the test would fail. This is a very common pattern when testing negatives.\n\nOkay, one last time we run `embark test` and if the output looks like the following, we're fully covered in terms of tests!\n\n\n```\n❯ embark test\nCompiling contracts\n\n\n DReddit\n ✓ should work (0ms) - [0 gas]\n ✓ should be able to create a post and receive it via contract event (60ms) - [160689 gas]\n ✓ post should have correct data (18ms) - [0 gas]\n ✓ should not be able to vote in an unexisting post (14ms) - [0 gas]\n ✓ should be able to vote in a post if account hasn't voted before (12ms) - [0 gas]\n ✓ should be able to vote in a post (42ms) - [65115 gas]\n ✓ shouldn't be able to vote twice (37ms) - [22815 gas]\n\n\n 7 passing (5s) - [Total: 3130955 gas]\n\n > All tests passed\n```\n\n Awesome! If you run into any issues, check out the repository with all steps recorded [here](https://github.com/embarklabs/dreddit-tutorial). In [the next and last part of this series](/news/2019/02/18/building-a-decentralized-reddit-with-embark-part-3/), we'll be building a front-end for our DReddit app using React. Until then, feel free to add more tests as you like!\n","slug":"building-a-decentralized-reddit-with-embark-part-2","published":1,"date":"2019-02-11T05:00:00.000Z","updated":"2020-03-03T14:55:55.029Z","_id":"ck6axlfcc002kxeeg5uuhdi3v","comments":1,"photos":[],"link":"","content":"<p>In <a href=\"/news/2019/02/04/building-a-decentralized-reddit-with-embark-part-1/\">the first part of this tutorial</a> we’ve implemented a <code>DReddit</code> Smart Contract that comes with methods to create and vote on topic posts. In this part we’ll continue right where we’ve left off and take a closer look at how we can test our Smart Contract using Embark. Make sure to check out the other parts as well:</p>\n<ul>\n<li><a href=\"/news/2019/02/04/building-a-decentralized-reddit-with-embark-part-1/\"><strong>Part 1</strong> - Setting up the project and implementing a Smart Contract</a></li>\n<li><a href=\"/news/2019/02/18/building-a-decentralized-reddit-with-embark-part-3/\"><strong>Part 3</strong> - Building a simple front-end using React</a></li>\n</ul>\n<p><strong>The code for this tutorial can be found in <a href=\"https://github.com/embarklabs/dreddit-tutorial\" target=\"_blank\" rel=\"noopener\">this repository</a></strong>.</p>\n<p>And off we go!</p>\n<h2 id=\"Writing-a-first-test\"><a href=\"#Writing-a-first-test\" class=\"headerlink\" title=\"Writing a first test\"></a>Writing a first test</h2><p>We’ve got plenty functionality to cover in our tests, but let’s start with a very simple one just to get a bit more familiar with how to write tests and also to ensure things are working as intended. First we create a test file <code>DReddit_spec.js</code> inside <code>test</code> and add a <code>contract()</code> block that looks something like this:</p>\n<figure class=\"highlight plain\"><table><tr><td class=\"code\"><pre><span class=\"line\">contract('DReddit', () => {</span><br><span class=\"line\"></span><br><span class=\"line\">});</span><br></pre></td></tr></table></figure>\n\n<p>Inside this code block we’ll be putting dedicated test cases. The <code>contract()</code> function can be considered a “grouping” functionality to group tests, if you will. If you’re familiar with Mocha’s <a href=\"https://mochajs.org/\" target=\"_blank\" rel=\"noopener\">describe()</a> function, you already know how <code>contract()</code> works, as it’s pretty much just an alias.</p>\n<p>To check whether our test setup is working, we add a simple test that passes:</p>\n<figure class=\"highlight plain\"><table><tr><td class=\"code\"><pre><span class=\"line\">contract('DReddit', () => {</span><br><span class=\"line\"></span><br><span class=\"line\"> it ('should work', () => {</span><br><span class=\"line\"> assert.ok(true);</span><br><span class=\"line\"> });</span><br><span class=\"line\">});</span><br></pre></td></tr></table></figure>\n\n<p>Running this using Embark’s <code>test</code> command should result in an output similar to this:</p>\n<figure class=\"highlight plain\"><table><tr><td class=\"code\"><pre><span class=\"line\">❯ embark test</span><br><span class=\"line\"></span><br><span class=\"line\"></span><br><span class=\"line\">Compiling contracts</span><br><span class=\"line\"> DReddit</span><br><span class=\"line\"> ✓ should work (0ms) - [0 gas]</span><br><span class=\"line\"></span><br><span class=\"line\"></span><br><span class=\"line\"> 1 passing (5s) - [Total: 2210775 gas]</span><br><span class=\"line\"></span><br><span class=\"line\"> > All tests passed</span><br></pre></td></tr></table></figure>\n\n<p>This works great, let’s go ahead and test some actual functionality!</p>\n<h2 id=\"Testing-the-creation-of-post\"><a href=\"#Testing-the-creation-of-post\" class=\"headerlink\" title=\"Testing the creation of post\"></a>Testing the creation of post</h2><p>Let’s test the core functionality of our application - the creation of posts. For that we need to do a couple of things: We need to somehow get an instance of our <code>DReddit</code> Smart Contract in JavaScript, so we can call methods on it to test if they work, and we also need to configure out testing environment so that the right Smart Contract instances are created.</p>\n<h3 id=\"Requiring-Smart-Contract-instances\"><a href=\"#Requiring-Smart-Contract-instances\" class=\"headerlink\" title=\"Requiring Smart Contract instances\"></a>Requiring Smart Contract instances</h3><p>When running tests, Embark adds a couple of custom functions and objects to the global scope, which are necessary. One of those functions is a custom <code>require()</code> that lets us import Smart Contract instances from an Embark specific path. This is done so that we can easily import</p>\n<p>For example, in order to get an instance of our <code>DReddit</code> Smart Contract within the test, we add the following line to our spec file:</p>\n<figure class=\"highlight plain\"><table><tr><td class=\"code\"><pre><span class=\"line\">const DReddit = require('Embark/contracts/DReddit');</span><br></pre></td></tr></table></figure>\n\n<p><code>DReddit</code> is now supposed to be an EmbarkJS Smart Contract instance, but we need to be very careful here. <strong>In reality, this object is empty</strong>. This is because at the time this file is processed, the Smart Contract might not be deployed yet. As a matter of fact, we need to make use of another function, <code>config()</code>, to let Embark know, which Smart Contracts we’re interested in in the first place. This might be a little confusing, but really the bottom line is that <code>DReddit</code> isn’t what we think it is, until we use it inside <code>contract()</code>.</p>\n<p>Let’s add the mentioned <code>config()</code> function so Embark knows what we need:</p>\n<figure class=\"highlight plain\"><table><tr><td class=\"code\"><pre><span class=\"line\">config({</span><br><span class=\"line\"> contracts: {</span><br><span class=\"line\"> DReddit: {}</span><br><span class=\"line\"> }</span><br><span class=\"line\">});</span><br></pre></td></tr></table></figure>\n\n<p>This is very similar to <a href=\"/docs/contracts_configuration.html\">configuring Smart Contracts</a>, in fact it’s the test environment equivalent. We pass a configuration object to <code>config()</code> with specific parameters for every Smart Contract we need. In our case, we just need to add <code>DReddit</code> without any additional parameters. This is because our Smart Contract doesn’t need constructor values and things alike. Keep in mind, if we don’t call this <code>config()</code> function, the imported objects for our Smart Contract instances will always be empty.</p>\n<h3 id=\"Testing-createPost\"><a href=\"#Testing-createPost\" class=\"headerlink\" title=\"Testing createPost()\"></a>Testing <code>createPost()</code></h3><p>To test our Smart Contract’s <code>createPost()</code> method, we’ll make use of <code>DReddit</code>, which will now be a Smart Contract instance. If you remember, <code>createPost()</code> actually takes the post’s description as bytes, so how do we make that work? Well, it turns out that we actually don’t pass it the description itself, but an <strong>IPFS hash</strong> that points to the actual description. The reason for that is that posts can be very long, resulting in a lot of bytes. It’s better to store the actual description in a storage where data size isn’t an issue, and instead store a reference to that data in our Smart Contract. Using a hash makes the data size deterministic as it will always have the same length.</p>\n<p>Once we have such a hash (no worries, we’ve got one prepared), we can use Web3’s <code>fromAscii()</code> utils to convert that hash to bytes and then send it off using our Smart Contract’s <code>createPost()</code> method. We can then subscribe to the events we’re emitting and check its return value like this:</p>\n<figure class=\"highlight plain\"><table><tr><td class=\"code\"><pre><span class=\"line\">...</span><br><span class=\"line\">const ipfsHash = 'Qmc5gCcjYypU7y28oCALwfSvxCBskLuPKWpK4qpterKC7z';</span><br><span class=\"line\"></span><br><span class=\"line\">contract('DReddit', () => {</span><br><span class=\"line\"> ...</span><br><span class=\"line\"> it ('should be able to create a post and receive it via contract event', async () => {</span><br><span class=\"line\"> const receipt = await DReddit.methods.createPost(web3.utils.fromAscii(ipfsHash)).send();</span><br><span class=\"line\"> const event = receipt.events.NewPost;</span><br><span class=\"line\"> postId = event.returnValues.postId;</span><br><span class=\"line\"> assert.equal(web3.utils.toAscii(event.returnValues.description), ipfsHash);</span><br><span class=\"line\"> });</span><br><span class=\"line\">});</span><br></pre></td></tr></table></figure>\n\n<p>Notice that we’re using <code>async/await</code> here because Embark’s Smart Contract instance methods return promises. The same can be done without promises as well, it’s just a syntactical difference at this point. Running <code>embark test</code> should result in two passing tests now!</p>\n<h2 id=\"Testing-correctness-of-data\"><a href=\"#Testing-correctness-of-data\" class=\"headerlink\" title=\"Testing correctness of data\"></a>Testing correctness of data</h2><p>Another good test case would be to check if the stored data such as the description bytes, the owner etc. resolve back to the correct data. Notice that this is slightly different from what we’re testing in our previous test - there we’re testing the description bytes emitted by the <code>NewPost</code> event. To test this we take advantage of the <code>postId</code> created in the previous test, which is available globally now, to fetch the stored post. We then perform a similar check as in the previous test. We also want to test if the owner data of the post is correct, but for that we need to get access to the account that created the post in the first place.</p>\n<p>Luckily wallet accounts can be easily accessed as they are emitted by Embark’s <code>config()</code> function. All we have to do is attaching a resolution handler to <code>config()</code> and storing the emitted value:</p>\n<figure class=\"highlight plain\"><table><tr><td class=\"code\"><pre><span class=\"line\">...</span><br><span class=\"line\">let accounts = [];</span><br><span class=\"line\"></span><br><span class=\"line\">config({</span><br><span class=\"line\"> contracts: {</span><br><span class=\"line\"> DReddit: {}</span><br><span class=\"line\"> }</span><br><span class=\"line\">}, (err, _accounts) => {</span><br><span class=\"line\"> accounts = _accounts;</span><br><span class=\"line\">});</span><br></pre></td></tr></table></figure>\n\n<p>Having that in place, our next test could look something like this:</p>\n<figure class=\"highlight plain\"><table><tr><td class=\"code\"><pre><span class=\"line\">it ('post should have correct data', async () => {</span><br><span class=\"line\"> const post = await DReddit.methods.posts(postId).call();</span><br><span class=\"line\"> assert.equal(web3.utils.toAscii(post.description), ipfsHash);</span><br><span class=\"line\"> assert.equal(post.owner, accounts[0]);</span><br><span class=\"line\">});</span><br></pre></td></tr></table></figure>\n\n<p>You might notice that we’re referring to <code>accounts[0]</code> here. However, just by looking at the code, we can’t really know if <code>accounts[0]</code> is really the one we’re expecting. This is where Embark offers another helping hand. When the <code>accounts</code> are set up, Embark will automatically set the first account of the wallet (<code>accounts[0]</code>) to the default account that’ll be used for all transactions. With that knowledge we can make an assertion, expecting <code>accounts[0]</code> to be the owner of the post.</p>\n<p>Another way would be to just always explicitly pass any of the accounts to a Smart Contract method’s <code>send()</code> function, in which case we’d have full control over which account of the wallet will be used.</p>\n<h2 id=\"Testing-canVote\"><a href=\"#Testing-canVote\" class=\"headerlink\" title=\"Testing canVote()\"></a>Testing <code>canVote()</code></h2><p>Alright, next up let’s quickly test if our <code>canVote()</code> method works the way as expected. As voting on posts that don’t exist should never work, we will simply call <code>canVote()</code> on a post id that doesn’t exist. This test is pretty straight forward:</p>\n<figure class=\"highlight plain\"><table><tr><td class=\"code\"><pre><span class=\"line\">it('should not be able to vote in an unexisting post', async () => {</span><br><span class=\"line\"> const userCanVote = await DReddit.methods.canVote("123").call();</span><br><span class=\"line\"> assert.equal(userCanVote, false);</span><br><span class=\"line\">});</span><br></pre></td></tr></table></figure>\n\n<p>We also want to make sure that <code>canVote()</code> resolves to <code>true</code> in case a user can indeed vote a certain post. We can again reuse the <code>postId</code> that we’ve stored earlier:</p>\n<figure class=\"highlight plain\"><table><tr><td class=\"code\"><pre><span class=\"line\">it('should be able to vote in a post if account has not voted before', async () => {</span><br><span class=\"line\"> const userCanVote = await DReddit.methods.canVote(postId).call();</span><br><span class=\"line\"> assert.equal(userCanVote, true);</span><br><span class=\"line\">});</span><br></pre></td></tr></table></figure>\n\n<p>Wonderful, we have 5 passing tests now!</p>\n<h2 id=\"Testing-vote\"><a href=\"#Testing-vote\" class=\"headerlink\" title=\"Testing vote()\"></a>Testing <code>vote()</code></h2><p>Of course we want to test whether one of our application’s core features works as well. There’s certainly different ways to verify whether <code>vote()</code> does what it’s supposed to do, but for this tutorial we’ll simply check whether the owner account of the vote emitted by the <code>NewVote</code> event is the same as the account that performed the vote. We can actually take some inspiration from our previous tests:</p>\n<figure class=\"highlight plain\"><table><tr><td class=\"code\"><pre><span class=\"line\">it("should be able to vote in a post", async () => {</span><br><span class=\"line\"> const receipt = await DReddit.methods.vote(postId, 1).send();</span><br><span class=\"line\"> const Vote = receipt.events.NewVote;</span><br><span class=\"line\"> assert.equal(Vote.returnValues.owner, accounts[0]);</span><br><span class=\"line\">});</span><br></pre></td></tr></table></figure>\n\n<h2 id=\"Test-that-only-one-vote-per-post-is-allowed\"><a href=\"#Test-that-only-one-vote-per-post-is-allowed\" class=\"headerlink\" title=\"Test that only one vote per post is allowed\"></a>Test that only one vote per post is allowed</h2><p>The last but essential functionality we want to test is that whether our Smart Contract allows users to vote multiple times on the same post, which for obvious reasons shouldn’t be possible. Using the <code>async/await</code> syntax we can test this very nicely by adding a <code>try/catch</code> block. When a user votes on a post she has already voted on, <code>vote()</code> will fail in which case we can make our assertions accordingly:</p>\n<figure class=\"highlight plain\"><table><tr><td class=\"code\"><pre><span class=\"line\">it('should not be able to vote twice', async () => {</span><br><span class=\"line\"> try {</span><br><span class=\"line\"> const receipt = await DReddit.methods.vote(postId, 1).send();</span><br><span class=\"line\"> assert.fail('should have reverted');</span><br><span class=\"line\"> } catch (error){</span><br><span class=\"line\"> assert(error.message.search('revert') > -1, 'Revert should happen');</span><br><span class=\"line\"> }</span><br><span class=\"line\">});</span><br></pre></td></tr></table></figure>\n\n<p>This might look a bit confusing first but it’s actually pretty straight forward. In case <code>vote()</code> fails, we should not reach the <code>assert.fail()</code> call but end up in the <code>catch()</code> block immediately. If that was not the case, the test would fail. This is a very common pattern when testing negatives.</p>\n<p>Okay, one last time we run <code>embark test</code> and if the output looks like the following, we’re fully covered in terms of tests!</p>\n<figure class=\"highlight plain\"><table><tr><td class=\"code\"><pre><span class=\"line\">❯ embark test</span><br><span class=\"line\">Compiling contracts</span><br><span class=\"line\"></span><br><span class=\"line\"></span><br><span class=\"line\"> DReddit</span><br><span class=\"line\"> ✓ should work (0ms) - [0 gas]</span><br><span class=\"line\"> ✓ should be able to create a post and receive it via contract event (60ms) - [160689 gas]</span><br><span class=\"line\"> ✓ post should have correct data (18ms) - [0 gas]</span><br><span class=\"line\"> ✓ should not be able to vote in an unexisting post (14ms) - [0 gas]</span><br><span class=\"line\"> ✓ should be able to vote in a post if account hasn't voted before (12ms) - [0 gas]</span><br><span class=\"line\"> ✓ should be able to vote in a post (42ms) - [65115 gas]</span><br><span class=\"line\"> ✓ shouldn't be able to vote twice (37ms) - [22815 gas]</span><br><span class=\"line\"></span><br><span class=\"line\"></span><br><span class=\"line\"> 7 passing (5s) - [Total: 3130955 gas]</span><br><span class=\"line\"></span><br><span class=\"line\"> > All tests passed</span><br></pre></td></tr></table></figure>\n\n<p> Awesome! If you run into any issues, check out the repository with all steps recorded <a href=\"https://github.com/embarklabs/dreddit-tutorial\" target=\"_blank\" rel=\"noopener\">here</a>. In <a href=\"/news/2019/02/18/building-a-decentralized-reddit-with-embark-part-3/\">the next and last part of this series</a>, we’ll be building a front-end for our DReddit app using React. Until then, feel free to add more tests as you like!</p>\n","site":{"data":{"authors":{"iuri_matias":{"name":"Iuri Matias","twitter":"iurimatias","image":"https://pbs.twimg.com/profile_images/928272512181563392/iDJdvy2k_400x400.jpg"},"pascal_precht":{"name":"Pascal Precht","twitter":"pascalprecht","image":"https://pbs.twimg.com/profile_images/993785060733194241/p3oAIMDP_400x400.jpg"},"anthony_laibe":{"name":"Anthony Laibe","twitter":"a_laibe","image":"https://pbs.twimg.com/profile_images/257742900/13168239_400x400.jpg"},"jonathan_rainville":{"name":"Jonathan Rainville","twitter":"ShyolGhul","image":"https://pbs.twimg.com/profile_images/993873866878570496/-aE4byjj_400x400.jpg"},"andre_medeiros":{"name":"Andre Medeiros","twitter":"superdealloc","image":"https://pbs.twimg.com/profile_images/965722487735701504/m58KNgWN_400x400.jpg"},"eric_mastro":{"name":"Eric Mastro","twitter":"ericmastro","image":"https://avatars1.githubusercontent.com/u/5089238?s=460&v=4"},"michael_bradley":{"name":"Michael Bradley","image":"https://avatars3.githubusercontent.com/u/194260?s=460&v=4"},"richard_ramos":{"name":"Richard Ramos","twitter":"richardramos_me","image":"https://devcon.org/images/speakers/richard_ramos.jpg"},"jonny_zerah":{"name":"Jonny Zerah","twitter":"jonnyzerah","image":"https://pbs.twimg.com/profile_images/1043774340490248192/gI9aGy17_400x400.jpg"},"robin_percy":{"name":"Robin Percy","twitter":"rbin","image":"https://avatars1.githubusercontent.com/u/29288325?s=400&v=4"}},"categories":{"tutorials":"Tutorials","announcements":"Announcements"},"languages":{"en":"English"}}},"excerpt":"","more":"<p>In <a href=\"/news/2019/02/04/building-a-decentralized-reddit-with-embark-part-1/\">the first part of this tutorial</a> we’ve implemented a <code>DReddit</code> Smart Contract that comes with methods to create and vote on topic posts. In this part we’ll continue right where we’ve left off and take a closer look at how we can test our Smart Contract using Embark. Make sure to check out the other parts as well:</p>\n<ul>\n<li><a href=\"/news/2019/02/04/building-a-decentralized-reddit-with-embark-part-1/\"><strong>Part 1</strong> - Setting up the project and implementing a Smart Contract</a></li>\n<li><a href=\"/news/2019/02/18/building-a-decentralized-reddit-with-embark-part-3/\"><strong>Part 3</strong> - Building a simple front-end using React</a></li>\n</ul>\n<p><strong>The code for this tutorial can be found in <a href=\"https://github.com/embarklabs/dreddit-tutorial\" target=\"_blank\" rel=\"noopener\">this repository</a></strong>.</p>\n<p>And off we go!</p>\n<h2 id=\"Writing-a-first-test\"><a href=\"#Writing-a-first-test\" class=\"headerlink\" title=\"Writing a first test\"></a>Writing a first test</h2><p>We’ve got plenty functionality to cover in our tests, but let’s start with a very simple one just to get a bit more familiar with how to write tests and also to ensure things are working as intended. First we create a test file <code>DReddit_spec.js</code> inside <code>test</code> and add a <code>contract()</code> block that looks something like this:</p>\n<figure class=\"highlight plain\"><table><tr><td class=\"code\"><pre><span class=\"line\">contract('DReddit', () => {</span><br><span class=\"line\"></span><br><span class=\"line\">});</span><br></pre></td></tr></table></figure>\n\n<p>Inside this code block we’ll be putting dedicated test cases. The <code>contract()</code> function can be considered a “grouping” functionality to group tests, if you will. If you’re familiar with Mocha’s <a href=\"https://mochajs.org/\" target=\"_blank\" rel=\"noopener\">describe()</a> function, you already know how <code>contract()</code> works, as it’s pretty much just an alias.</p>\n<p>To check whether our test setup is working, we add a simple test that passes:</p>\n<figure class=\"highlight plain\"><table><tr><td class=\"code\"><pre><span class=\"line\">contract('DReddit', () => {</span><br><span class=\"line\"></span><br><span class=\"line\"> it ('should work', () => {</span><br><span class=\"line\"> assert.ok(true);</span><br><span class=\"line\"> });</span><br><span class=\"line\">});</span><br></pre></td></tr></table></figure>\n\n<p>Running this using Embark’s <code>test</code> command should result in an output similar to this:</p>\n<figure class=\"highlight plain\"><table><tr><td class=\"code\"><pre><span class=\"line\">❯ embark test</span><br><span class=\"line\"></span><br><span class=\"line\"></span><br><span class=\"line\">Compiling contracts</span><br><span class=\"line\"> DReddit</span><br><span class=\"line\"> ✓ should work (0ms) - [0 gas]</span><br><span class=\"line\"></span><br><span class=\"line\"></span><br><span class=\"line\"> 1 passing (5s) - [Total: 2210775 gas]</span><br><span class=\"line\"></span><br><span class=\"line\"> > All tests passed</span><br></pre></td></tr></table></figure>\n\n<p>This works great, let’s go ahead and test some actual functionality!</p>\n<h2 id=\"Testing-the-creation-of-post\"><a href=\"#Testing-the-creation-of-post\" class=\"headerlink\" title=\"Testing the creation of post\"></a>Testing the creation of post</h2><p>Let’s test the core functionality of our application - the creation of posts. For that we need to do a couple of things: We need to somehow get an instance of our <code>DReddit</code> Smart Contract in JavaScript, so we can call methods on it to test if they work, and we also need to configure out testing environment so that the right Smart Contract instances are created.</p>\n<h3 id=\"Requiring-Smart-Contract-instances\"><a href=\"#Requiring-Smart-Contract-instances\" class=\"headerlink\" title=\"Requiring Smart Contract instances\"></a>Requiring Smart Contract instances</h3><p>When running tests, Embark adds a couple of custom functions and objects to the global scope, which are necessary. One of those functions is a custom <code>require()</code> that lets us import Smart Contract instances from an Embark specific path. This is done so that we can easily import</p>\n<p>For example, in order to get an instance of our <code>DReddit</code> Smart Contract within the test, we add the following line to our spec file:</p>\n<figure class=\"highlight plain\"><table><tr><td class=\"code\"><pre><span class=\"line\">const DReddit = require('Embark/contracts/DReddit');</span><br></pre></td></tr></table></figure>\n\n<p><code>DReddit</code> is now supposed to be an EmbarkJS Smart Contract instance, but we need to be very careful here. <strong>In reality, this object is empty</strong>. This is because at the time this file is processed, the Smart Contract might not be deployed yet. As a matter of fact, we need to make use of another function, <code>config()</code>, to let Embark know, which Smart Contracts we’re interested in in the first place. This might be a little confusing, but really the bottom line is that <code>DReddit</code> isn’t what we think it is, until we use it inside <code>contract()</code>.</p>\n<p>Let’s add the mentioned <code>config()</code> function so Embark knows what we need:</p>\n<figure class=\"highlight plain\"><table><tr><td class=\"code\"><pre><span class=\"line\">config({</span><br><span class=\"line\"> contracts: {</span><br><span class=\"line\"> DReddit: {}</span><br><span class=\"line\"> }</span><br><span class=\"line\">});</span><br></pre></td></tr></table></figure>\n\n<p>This is very similar to <a href=\"/docs/contracts_configuration.html\">configuring Smart Contracts</a>, in fact it’s the test environment equivalent. We pass a configuration object to <code>config()</code> with specific parameters for every Smart Contract we need. In our case, we just need to add <code>DReddit</code> without any additional parameters. This is because our Smart Contract doesn’t need constructor values and things alike. Keep in mind, if we don’t call this <code>config()</code> function, the imported objects for our Smart Contract instances will always be empty.</p>\n<h3 id=\"Testing-createPost\"><a href=\"#Testing-createPost\" class=\"headerlink\" title=\"Testing createPost()\"></a>Testing <code>createPost()</code></h3><p>To test our Smart Contract’s <code>createPost()</code> method, we’ll make use of <code>DReddit</code>, which will now be a Smart Contract instance. If you remember, <code>createPost()</code> actually takes the post’s description as bytes, so how do we make that work? Well, it turns out that we actually don’t pass it the description itself, but an <strong>IPFS hash</strong> that points to the actual description. The reason for that is that posts can be very long, resulting in a lot of bytes. It’s better to store the actual description in a storage where data size isn’t an issue, and instead store a reference to that data in our Smart Contract. Using a hash makes the data size deterministic as it will always have the same length.</p>\n<p>Once we have such a hash (no worries, we’ve got one prepared), we can use Web3’s <code>fromAscii()</code> utils to convert that hash to bytes and then send it off using our Smart Contract’s <code>createPost()</code> method. We can then subscribe to the events we’re emitting and check its return value like this:</p>\n<figure class=\"highlight plain\"><table><tr><td class=\"code\"><pre><span class=\"line\">...</span><br><span class=\"line\">const ipfsHash = 'Qmc5gCcjYypU7y28oCALwfSvxCBskLuPKWpK4qpterKC7z';</span><br><span class=\"line\"></span><br><span class=\"line\">contract('DReddit', () => {</span><br><span class=\"line\"> ...</span><br><span class=\"line\"> it ('should be able to create a post and receive it via contract event', async () => {</span><br><span class=\"line\"> const receipt = await DReddit.methods.createPost(web3.utils.fromAscii(ipfsHash)).send();</span><br><span class=\"line\"> const event = receipt.events.NewPost;</span><br><span class=\"line\"> postId = event.returnValues.postId;</span><br><span class=\"line\"> assert.equal(web3.utils.toAscii(event.returnValues.description), ipfsHash);</span><br><span class=\"line\"> });</span><br><span class=\"line\">});</span><br></pre></td></tr></table></figure>\n\n<p>Notice that we’re using <code>async/await</code> here because Embark’s Smart Contract instance methods return promises. The same can be done without promises as well, it’s just a syntactical difference at this point. Running <code>embark test</code> should result in two passing tests now!</p>\n<h2 id=\"Testing-correctness-of-data\"><a href=\"#Testing-correctness-of-data\" class=\"headerlink\" title=\"Testing correctness of data\"></a>Testing correctness of data</h2><p>Another good test case would be to check if the stored data such as the description bytes, the owner etc. resolve back to the correct data. Notice that this is slightly different from what we’re testing in our previous test - there we’re testing the description bytes emitted by the <code>NewPost</code> event. To test this we take advantage of the <code>postId</code> created in the previous test, which is available globally now, to fetch the stored post. We then perform a similar check as in the previous test. We also want to test if the owner data of the post is correct, but for that we need to get access to the account that created the post in the first place.</p>\n<p>Luckily wallet accounts can be easily accessed as they are emitted by Embark’s <code>config()</code> function. All we have to do is attaching a resolution handler to <code>config()</code> and storing the emitted value:</p>\n<figure class=\"highlight plain\"><table><tr><td class=\"code\"><pre><span class=\"line\">...</span><br><span class=\"line\">let accounts = [];</span><br><span class=\"line\"></span><br><span class=\"line\">config({</span><br><span class=\"line\"> contracts: {</span><br><span class=\"line\"> DReddit: {}</span><br><span class=\"line\"> }</span><br><span class=\"line\">}, (err, _accounts) => {</span><br><span class=\"line\"> accounts = _accounts;</span><br><span class=\"line\">});</span><br></pre></td></tr></table></figure>\n\n<p>Having that in place, our next test could look something like this:</p>\n<figure class=\"highlight plain\"><table><tr><td class=\"code\"><pre><span class=\"line\">it ('post should have correct data', async () => {</span><br><span class=\"line\"> const post = await DReddit.methods.posts(postId).call();</span><br><span class=\"line\"> assert.equal(web3.utils.toAscii(post.description), ipfsHash);</span><br><span class=\"line\"> assert.equal(post.owner, accounts[0]);</span><br><span class=\"line\">});</span><br></pre></td></tr></table></figure>\n\n<p>You might notice that we’re referring to <code>accounts[0]</code> here. However, just by looking at the code, we can’t really know if <code>accounts[0]</code> is really the one we’re expecting. This is where Embark offers another helping hand. When the <code>accounts</code> are set up, Embark will automatically set the first account of the wallet (<code>accounts[0]</code>) to the default account that’ll be used for all transactions. With that knowledge we can make an assertion, expecting <code>accounts[0]</code> to be the owner of the post.</p>\n<p>Another way would be to just always explicitly pass any of the accounts to a Smart Contract method’s <code>send()</code> function, in which case we’d have full control over which account of the wallet will be used.</p>\n<h2 id=\"Testing-canVote\"><a href=\"#Testing-canVote\" class=\"headerlink\" title=\"Testing canVote()\"></a>Testing <code>canVote()</code></h2><p>Alright, next up let’s quickly test if our <code>canVote()</code> method works the way as expected. As voting on posts that don’t exist should never work, we will simply call <code>canVote()</code> on a post id that doesn’t exist. This test is pretty straight forward:</p>\n<figure class=\"highlight plain\"><table><tr><td class=\"code\"><pre><span class=\"line\">it('should not be able to vote in an unexisting post', async () => {</span><br><span class=\"line\"> const userCanVote = await DReddit.methods.canVote("123").call();</span><br><span class=\"line\"> assert.equal(userCanVote, false);</span><br><span class=\"line\">});</span><br></pre></td></tr></table></figure>\n\n<p>We also want to make sure that <code>canVote()</code> resolves to <code>true</code> in case a user can indeed vote a certain post. We can again reuse the <code>postId</code> that we’ve stored earlier:</p>\n<figure class=\"highlight plain\"><table><tr><td class=\"code\"><pre><span class=\"line\">it('should be able to vote in a post if account has not voted before', async () => {</span><br><span class=\"line\"> const userCanVote = await DReddit.methods.canVote(postId).call();</span><br><span class=\"line\"> assert.equal(userCanVote, true);</span><br><span class=\"line\">});</span><br></pre></td></tr></table></figure>\n\n<p>Wonderful, we have 5 passing tests now!</p>\n<h2 id=\"Testing-vote\"><a href=\"#Testing-vote\" class=\"headerlink\" title=\"Testing vote()\"></a>Testing <code>vote()</code></h2><p>Of course we want to test whether one of our application’s core features works as well. There’s certainly different ways to verify whether <code>vote()</code> does what it’s supposed to do, but for this tutorial we’ll simply check whether the owner account of the vote emitted by the <code>NewVote</code> event is the same as the account that performed the vote. We can actually take some inspiration from our previous tests:</p>\n<figure class=\"highlight plain\"><table><tr><td class=\"code\"><pre><span class=\"line\">it("should be able to vote in a post", async () => {</span><br><span class=\"line\"> const receipt = await DReddit.methods.vote(postId, 1).send();</span><br><span class=\"line\"> const Vote = receipt.events.NewVote;</span><br><span class=\"line\"> assert.equal(Vote.returnValues.owner, accounts[0]);</span><br><span class=\"line\">});</span><br></pre></td></tr></table></figure>\n\n<h2 id=\"Test-that-only-one-vote-per-post-is-allowed\"><a href=\"#Test-that-only-one-vote-per-post-is-allowed\" class=\"headerlink\" title=\"Test that only one vote per post is allowed\"></a>Test that only one vote per post is allowed</h2><p>The last but essential functionality we want to test is that whether our Smart Contract allows users to vote multiple times on the same post, which for obvious reasons shouldn’t be possible. Using the <code>async/await</code> syntax we can test this very nicely by adding a <code>try/catch</code> block. When a user votes on a post she has already voted on, <code>vote()</code> will fail in which case we can make our assertions accordingly:</p>\n<figure class=\"highlight plain\"><table><tr><td class=\"code\"><pre><span class=\"line\">it('should not be able to vote twice', async () => {</span><br><span class=\"line\"> try {</span><br><span class=\"line\"> const receipt = await DReddit.methods.vote(postId, 1).send();</span><br><span class=\"line\"> assert.fail('should have reverted');</span><br><span class=\"line\"> } catch (error){</span><br><span class=\"line\"> assert(error.message.search('revert') > -1, 'Revert should happen');</span><br><span class=\"line\"> }</span><br><span class=\"line\">});</span><br></pre></td></tr></table></figure>\n\n<p>This might look a bit confusing first but it’s actually pretty straight forward. In case <code>vote()</code> fails, we should not reach the <code>assert.fail()</code> call but end up in the <code>catch()</code> block immediately. If that was not the case, the test would fail. This is a very common pattern when testing negatives.</p>\n<p>Okay, one last time we run <code>embark test</code> and if the output looks like the following, we’re fully covered in terms of tests!</p>\n<figure class=\"highlight plain\"><table><tr><td class=\"code\"><pre><span class=\"line\">❯ embark test</span><br><span class=\"line\">Compiling contracts</span><br><span class=\"line\"></span><br><span class=\"line\"></span><br><span class=\"line\"> DReddit</span><br><span class=\"line\"> ✓ should work (0ms) - [0 gas]</span><br><span class=\"line\"> ✓ should be able to create a post and receive it via contract event (60ms) - [160689 gas]</span><br><span class=\"line\"> ✓ post should have correct data (18ms) - [0 gas]</span><br><span class=\"line\"> ✓ should not be able to vote in an unexisting post (14ms) - [0 gas]</span><br><span class=\"line\"> ✓ should be able to vote in a post if account hasn't voted before (12ms) - [0 gas]</span><br><span class=\"line\"> ✓ should be able to vote in a post (42ms) - [65115 gas]</span><br><span class=\"line\"> ✓ shouldn't be able to vote twice (37ms) - [22815 gas]</span><br><span class=\"line\"></span><br><span class=\"line\"></span><br><span class=\"line\"> 7 passing (5s) - [Total: 3130955 gas]</span><br><span class=\"line\"></span><br><span class=\"line\"> > All tests passed</span><br></pre></td></tr></table></figure>\n\n<p> Awesome! If you run into any issues, check out the repository with all steps recorded <a href=\"https://github.com/embarklabs/dreddit-tutorial\" target=\"_blank\" rel=\"noopener\">here</a>. In <a href=\"/news/2019/02/18/building-a-decentralized-reddit-with-embark-part-3/\">the next and last part of this series</a>, we’ll be building a front-end for our DReddit app using React. Until then, feel free to add more tests as you like!</p>\n"},{"title":"Nim vs Crystal - Part 1 - Performance & Interoperability","summary":"Crystal and Nim go head-to-head to figure out the best modern, low-level programming language! In part 1, Performance & Interoperability are reviewed.","author":"robin_percy","layout":"blog-post","image":"/assets/images/nim-crystal-header-img_NEW.jpg","_content":"\n\n\nI've been wanting to write-up a comparison on Nim and Crystal for quite some time now, and I'm happy that I'm finally able to do so. What I've decided on doing; is breaking this up into a three part series as there are ***SO*** many features of both languages I'd like to talk about, and therein many opinions held too. I do have a habit of writing **very** long articles, so I'd like to limit the topic scope, to keep each of these a little snappier!\n\nBefore I go into specifics on either of these languages, I'd first like to go into my reasons for first learning both languages, and briefly touch on my past experiences with the two of them. I admit that I *have* had more experience with Crystal than I have with Nim; however, I will give an objective view of both languages until I go into my personal preference towards the end of each article in this series.\n\n<blockquote class=\"twitter-tweet\"><p lang=\"en\" dir=\"ltr\">crystal or nim? Both super immature but fun</p>— @r4vi (@r4vi) <a href=\"https://twitter.com/r4vi/status/874741870093623296?ref_src=twsrc%5Etfw\">June 13, 2017</a></blockquote> <script async src=\"https://platform.twitter.com/widgets.js\" charset=\"utf-8\"></script>\n\nBack in mid-2017, I sent out a tweet asking my dev followers which low-level languages they would recommend I take a look at. For a while before this, I had been waiting for a new systems language for me to learn, but until this tweet, I never really found one that I was *actually* interested in taking a look at.\n\nNaturally, both languages have a **TONNE** of features, so I'm not going to go into details on things like basic types, etc. I will simply compare the biggest things that attracted me to both languages. For in-depth tutorials on the features of both langs, check out the [Crystal Docs](https://crystal-lang.org/reference/), or the [Nim Docs](https://nim-lang.org/docs/lib.html).\n\nAnyway, let's take a look at both languages, and you can make your own mind up as to which you'd rather be programming in. Maybe both. Maybe neither!\n\n\n<br/>\n\n## Nim\n\nNim is a statically-typed, imperative, systems programming language; aiming to achieve the performance of C, be as expressive as Lisp, and have a simple, clear syntax like Python. I have to say, from my experience Nim manages to ***pretty much*** fit these criterion.\n\n> By compiling to C, Nim is able to take advantage of many features offered by modern C compilers. The primary benefits gained by this compilation model include incredible portability and optimisations.\n\n> The binaries produced by Nim have zero dependencies and are typically very small. This makes their distribution easy and keeps your users happy.\n\nWhen I say it *pretty much* matches the criteria, the only statement that doesn't quite match is achieving the performance of C. In realise this is an almost impossible task, but Nim actually did fall short on a few occasions when it came to performance. I will go into detail about this later on in the article.\n\n\n### Installing Nim\n\nNim is super easy to install. If you're on Windows, [head over here](https://nim-lang.org/install_windows.html), and download/run the installer.\n\nIf you're on any other Unix-based system, you can run:\n\n```\n$ curl https://nim-lang.org/choosenim/init.sh -sSf | sh`\n```\n\nIf you're on Mac, and with Homebrew installed, simply run:\n\n```\n$ brew install nim\n```\n\nYou could also consider using [choosenim](https://github.com/dom96/choosenim) to manage Nim installations in a similar way to `pyenv` and `rustup`.\n\n\n### Interfacing Other Languages\n\nOne of the things that attracted me to both Nim **and** Crystal, was the ability to natively interface with other languages, and the **ease** with which that is achieved. Nim has bidirectional interfacing not only with C, but also natively with JavaScript. Crystal natively interfaces with C, but is only unidirectional. Definitely a point scored here for Nim!\n\nWhen it comes to building DApps, the variety of target hardware they must be run on is already large, and growing all the time. The low-level ability to interop with other languages makes for both languages being a much more attractive proposition.\n\nFor a quick demo, let's take a look at interfacing both C and JavaScript from Nim.\n\n#### C Invocation\n\nFirstly, create the file `logic.c` with the following content:\n\n``` c\nint addTwoIntegers(int a, int b)\n{\n return a + b;\n}\n```\n\nNext, create the file `calculator.nim` with the following content:\n\n``` nim\n{.compile: \"logic.c\".}\nproc addTwoIntegers(a, b: cint): cint {.importc.}\n\nwhen isMainModule:\n echo addTwoIntegers(3, 7)\n```\n\nNow then, with these two *very simple* files in place, we can run:\n\n```\n$ nim c -r calculator.nim\n```\n\nThe Nim compiler will compile the `logic.c` file in addition to `calculator.nim` and link both into an executable; which outputs `10` when run. Very sharp, in my opinion!\n\n#### JavaScript Invocation\n\nEven sharper, in my opinion, is the ability to interop with JavaScript. Create a file titled `host.html` with the following content:\n\n``` html\n<html>\n<body>\n <script type=\"text/javascript\">\n function addTwoIntegers(a, b)\n {\n return a + b;\n }\n </script>\n\n <script type=\"text/javascript\" src=\"calculator.js\"></script>\n</body>\n</html>\n```\n\nNow, create another `calculator.nim` file with the following content (or reuse the one from the above C example):\n\n``` nim\nproc addTwoIntegers(a, b: int): int {.importc.}\n\nwhen isMainModule:\n echo addTwoIntegers(3, 7)\n```\n\n\nCompile the Nim code to JavaScript by running:\n\n```\n$ nim js -o:calculator.js calculator.nim\n```\n\nOnce that's done, go ahead and open `host.html` in a browser and you should see the value `10` in the browser's console. I think this is **REALLY** neat. It's superb how easy it is to achieve that, too.\n\n\n### Aside – a Quick (not-so) Secret:\n\nInstead of writing out the HTML above, you could actually use ***Nim's native*** HTML DSL:\n\n``` nim\nimport html_dsl\n\nhtml page:\n head:\n title(\"Title\")\n body:\n p(\"Hello\")\n p(\"World\")\n dv:\n p \"Example\"\n\necho render(page())\n```\n\nRunning this will output the following:\n\n``` html\n<!DOCTYPE html>\n <html class='has-navbar-fixed-top' >\n <head>\n <meta charset=\"utf-8\">\n <meta name=\"viewport\" content=\"width=device-width, initial-scale=1\">\n <title>Title</title>\n </head>\n <body class='has-navbar-fixed-top' >\n <p >Hello</p>\n <p >World</p>\n <div>\n <p>Example</p>\n </div>\n </body>\n</html>\n```\n\n\n<br/>\n\n## Crystal\n\nCrystal is a statically-typed, object-oriented, systems programming language; with the aim of achieving the speed and performance of c/c++, whilst having a syntax as simple, readable, and easy to learn as Ruby.\n\nI first came across Crystal when I saw [@sferik](https://twitter.com/sferik) giving a talk on it in Poland back in 2015. [Video here.](https://www.youtube.com/watch?v=Ysm4IU4aWoQ) It was a great talk, and sparked my interest in Crystal right there and then. When I initially explored Crystal I thought it looked awesome, but I was too busy with all the other languages I was using on a daily basis, to be able to focus my time on it properly.\n\n### Installing Crystal\n\nYou can find all of the relevant instructions for installing Crystal, on the [main website installation page](https://crystal-lang.org/install/).\n\nIf you are on Mac, and have Homebrew installed, you can simply run:\n\n```\n$ brew install crystal\n```\n\n**However**, if you are a Windows user, *for the time being* you are out of luck, unless you use the Windows Subsystem for Linux. If I were in a more shocking/pedantic mood, I'd take a (not yet gained) point **away** from Crystal here, for lack of Windows support.\n\n\n### Interfacing C\n\nLet’s build a simple script in C that says “hi!”. We’ll then write a Crystal app to bind to our C library. This is a great starting point for anyone who wants to know about binding C in Crystal.\n\nFirst off, let’s create a project with Crystal’s scaffolding tool (I’ll cover this feature later). Run:\n\n```\n$ crystal init app sayhi_c\n```\n\nThen head into the directory `sayhi_c/src/sayhi_c` and let’s create a file `sayhi.c` with the following contents:\n\n``` c\n#include <stdio.h>\n\nvoid hi(const char * name){\n printf(\"Hi %s!\\n\", name);\n}\n```\n\nNow we need to compile our C file into an object. On Ubuntu or Mac using gcc we can run:\n\n```\n$ gcc -c sayhi.c -o sayhi.o\n```\n\nUsing the -o flags allow us to create an Object filetype. Once we’ve got our Object file, we can bind it from within our Crystal app. Open up our `sayhi_c.cr` file, and have it reflect the following:\n\n``` crystal\nrequire \"./sayhi_c/*\"\n\n@[Link(ldflags: \"#{__DIR__}/sayhi_c/sayhi.o\")]\n\nlib Say\n fun hi(name : LibC::Char*) : Void\nend\n\nSay.hi(\"Status\")\n```\n\nI’ll mention now that there are no implicit type conversions except to_unsafe - explained here when invoking a C function: you must pass the exact type that is expected.\n\nAlso worth noting at this point is that since we have built our C file into an object file, we can include it in the project directory and link from there. When we want to link dynamic libraries or installed C packages, we can just link them without including a path.\n\nSo, if we build our project file and run it, we get the following:\n\n```\n$ crystal build --release src/sayhi_c.cr\n\n$ ./sayhi_c\n\n > Hi Status!\n```\n\nAs you can see, Nim takes the winners trophy in this case, as it is **much** simpler to achieve a similar goal. With Nim, we were also able to link both the Nim and C files into the same executable, which Crystal sadly cannot do.\n\n\n\n<br/>\n\n## Performance Tests\n\n### Parsing & calculating values from a large JSON file:\n\nFirstly, we need to generate our large JSON file. For this test, we're going to generate a dataset which includes **1 Million** items.\n\n<center><iframe src=\"https://giphy.com/embed/13B1WmJg7HwjGU\" width=\"480\" height=\"270\" frameBorder=\"0\"></iframe></center>\n\nWe can do so with the following Ruby script:\n\n``` rb\nrequire 'json'\n\nx = []\n\n1000000.times do\n h = {\n 'x' => rand,\n 'y' => rand,\n 'z' => rand,\n 'name' => ('a'..'z').to_a.shuffle[0..5].join + ' ' + rand(10000).to_s,\n 'opts' => {'1' => [1, true]},\n }\n x << h\nend\n\nFile.open(\"1.json\", 'w') { |f| f.write JSON.pretty_generate('coordinates' => x, 'info' => \"some info\") }\n```\n\nThis will generate a JSON file **of around 212mb**, with the following syntax:\n\n``` json\n{\n \"coordinates\": [\n {\n \"x\": 0.10327081810860272,\n \"y\": 0.03247172212368832,\n \"z\": 0.8155255437507467,\n \"name\": \"scojbq 5965\",\n \"opts\": {\n \"1\": [\n 1,\n true\n ]\n }\n }\n ],\n \"info\": \"some info\"\n}\n```\n\nNow that we have our chunky JSON file; we can write our first test – **in Nim**:\n\n``` nim\nimport json\n\nlet jobj = parseFile(\"1.json\")\n\nlet coordinates = jobj[\"coordinates\"].elems\nlet len = float(coordinates.len)\nvar x = 0.0\nvar y = 0.0\nvar z = 0.0\n\nfor coord in coordinates:\n x += coord[\"x\"].fnum\n y += coord[\"y\"].fnum\n z += coord[\"z\"].fnum\n\necho x / len\necho y / len\necho z / len\n```\n\nAnd again; the same simple test, this time written **in Crystal**:\n\n``` crystal\nrequire \"json\"\n\ntext = File.read(\"1.json\")\njobj = JSON.parse(text)\ncoordinates = jobj[\"coordinates\"].as_a\nlen = coordinates.size\nx = y = z = 0\n\ncoordinates.each do |coord|\n x += coord[\"x\"].as_f\n y += coord[\"y\"].as_f\n z += coord[\"z\"].as_f\nend\n\np x / len\np y / len\np z / len\n```\n\n### Results:\n\nBuilding our test files into tiny release packages with the respective commands below:\n\n```\n$ crystal build json_test.cr --release -o json_test_cr --no-debug\n```\n\n```\n$ nim c -o:json_test_nim -d:danger --cc:gcc --verbosity:0 json_test.nim\n```\n\nWe can then time & run those packages, to obtain our test results:\n\n| Language | Time (s) | Memory (Mb) |\n|----------|----------|-------------|\n| Nim | 6.92 | 1320.4 |\n| Crystal | 4.58 | 960.7 |\n\nAs you can see; in this case ***Crystal*** is the more performant language – taking less time to execute & complete the test, and also fewer Megabytes in memory doing so.\n\n\n\n<br/>\n\n### Base64 encoding / decoding a large blob:\n\nIn this test; we will firstly encode and then decode a string, with a current timestamp into newly allocated buffers, utilising the Base64 algorithm. For starters, let's look at the ***Nim*** test:\n\n``` nim\nimport base64, times, strutils, strformat\n\nlet STR_SIZE = 131072\nlet TRIES = 8192\nlet str = strutils.repeat('a', STR_SIZE)\n\nvar str2 = base64.encode(str)\nstdout.write(fmt\"encode {str[..3]}... to {str2[..3]}...: \")\n\nvar t = times.epochTime()\nvar i = 0\nvar s:int64 = 0\nwhile i < TRIES:\n str2 = base64.encode(str)\n s += len(str2)\n i += 1\necho(fmt\"{s}, {formatFloat(times.epochTime() - t, ffDefault, 6)}\")\n\nvar str3 = base64.decode(str2)\nstdout.write(fmt\"decode {str2[..3]}... to {str3[..3]}...: \")\n\nt = times.epochTime()\ni = 0\ns = 0\nwhile i < TRIES:\n str3 = base64.decode(str2)\n s += len(str3)\n i += 1\necho(fmt\"{s}, {formatFloat(times.epochTime() - t, ffDefault, 6)}\")\n```\n\nAnd now the same test, written in Crystal:\n\n``` crystal\nrequire \"base64\"\n\nSTR_SIZE = 131072\nTRIES = 8192\n\nstr = \"a\" * STR_SIZE\n\nstr2 = Base64.strict_encode(str)\nprint \"encode #{str[0..3]}... to #{str2[0..3]}...: \"\n\nt, s = Time.local, 0\nTRIES.times do |i|\n str2 = Base64.strict_encode(str)\n s += str2.bytesize\nend\nputs \"#{s}, #{Time.local - t}\"\n\nstr3 = Base64.decode_string(str2)\nprint \"decode #{str2[0..3]}... to #{str3[0..3]}...: \"\n\nt, s = Time.local, 0\nTRIES.times do |i|\n str3 = Base64.decode_string(str2)\n s += str3.bytesize\nend\nputs \"#{s}, #{Time.local - t}\"\n```\n\n### Results:\n\nWe can again; build our Base64 test files into release packages with the respective commands below:\n\n```\n$ crystal build base64_test.cr --release -o base64_test_cr --no-debug\n```\n\n```\n$ nim c -o:base64_test_nim -d:danger --cc:gcc --verbosity:0 base64_test.nim\n```\n\nAs with our last test suite, we can then time & run those packages, to obtain our test results:\n\n| Language | Time (s) | Memory (Mb) |\n|----------|----------|-------------|\n| Nim | 4.17 | 6.6 |\n| Crystal | 2.36 | 3.5 |\n\nOnce again, to my surprise, Crystal came out on top. And did again and again for me, running a bunch of different tests I could scrape together from other curious devs.\n\n\n## Conclusion\n\nThe summary of this first-in-series article, is most definitely one of surprise. I already knew that Crystal was a highly-performant language, and I have previously done my own research & testing to see how close to *C speeds* it could achieve. That being said, I was *also* already aware that Nim **claims** close to C speeds, and that one of the language's principals was to run well on old & less-performant hardware.\n\nYet, Crystal beat not only my own expectations; but beat Nim for both memory usage **AND** execution times. I really didn't expect to see Crystal come out *this* far ahead in performance. On the other hand, Nim came out by-far the leader when it comes to language interoperability. **Nim makes it even easier** than Crystal when interfacing other langs – not something I thought possible, given just how easy Crystal makes the task.\n\nIn conclusion, it seems that we have 1 point for Nim (interoperability), and 1 point for Crystal (performance). Both languages have pleasantly surprised me, and I look forward to diving into the next topics in the series:\n\n - Part 2: Threading and Tooling\n - Part 3: Crypto, DApps and P2P\n\nThese two articles will be released over the next couple of days, so don't forget to come back then to check them out!\n\nThanks for reading - as ever, if you have any questions, please feel free to reach out at [robin@status](mailto:robin@status.im).\n\n[ - **@rbin**](https://twitter.com/rbin)\n","source":"_posts/2019-11-18-nim-vs-crystal-part-1-performance-interoperability.md","raw":"title: Nim vs Crystal - Part 1 - Performance & Interoperability\nsummary: \"Crystal and Nim go head-to-head to figure out the best modern, low-level programming language! In part 1, Performance & Interoperability are reviewed.\"\nauthor: robin_percy\ncategories:\n - tutorials\nlayout: blog-post\nimage: '/assets/images/nim-crystal-header-img_NEW.jpg'\n---\n\n\n\nI've been wanting to write-up a comparison on Nim and Crystal for quite some time now, and I'm happy that I'm finally able to do so. What I've decided on doing; is breaking this up into a three part series as there are ***SO*** many features of both languages I'd like to talk about, and therein many opinions held too. I do have a habit of writing **very** long articles, so I'd like to limit the topic scope, to keep each of these a little snappier!\n\nBefore I go into specifics on either of these languages, I'd first like to go into my reasons for first learning both languages, and briefly touch on my past experiences with the two of them. I admit that I *have* had more experience with Crystal than I have with Nim; however, I will give an objective view of both languages until I go into my personal preference towards the end of each article in this series.\n\n<blockquote class=\"twitter-tweet\"><p lang=\"en\" dir=\"ltr\">crystal or nim? Both super immature but fun</p>— @r4vi (@r4vi) <a href=\"https://twitter.com/r4vi/status/874741870093623296?ref_src=twsrc%5Etfw\">June 13, 2017</a></blockquote> <script async src=\"https://platform.twitter.com/widgets.js\" charset=\"utf-8\"></script>\n\nBack in mid-2017, I sent out a tweet asking my dev followers which low-level languages they would recommend I take a look at. For a while before this, I had been waiting for a new systems language for me to learn, but until this tweet, I never really found one that I was *actually* interested in taking a look at.\n\nNaturally, both languages have a **TONNE** of features, so I'm not going to go into details on things like basic types, etc. I will simply compare the biggest things that attracted me to both languages. For in-depth tutorials on the features of both langs, check out the [Crystal Docs](https://crystal-lang.org/reference/), or the [Nim Docs](https://nim-lang.org/docs/lib.html).\n\nAnyway, let's take a look at both languages, and you can make your own mind up as to which you'd rather be programming in. Maybe both. Maybe neither!\n\n\n<br/>\n\n## Nim\n\nNim is a statically-typed, imperative, systems programming language; aiming to achieve the performance of C, be as expressive as Lisp, and have a simple, clear syntax like Python. I have to say, from my experience Nim manages to ***pretty much*** fit these criterion.\n\n> By compiling to C, Nim is able to take advantage of many features offered by modern C compilers. The primary benefits gained by this compilation model include incredible portability and optimisations.\n\n> The binaries produced by Nim have zero dependencies and are typically very small. This makes their distribution easy and keeps your users happy.\n\nWhen I say it *pretty much* matches the criteria, the only statement that doesn't quite match is achieving the performance of C. In realise this is an almost impossible task, but Nim actually did fall short on a few occasions when it came to performance. I will go into detail about this later on in the article.\n\n\n### Installing Nim\n\nNim is super easy to install. If you're on Windows, [head over here](https://nim-lang.org/install_windows.html), and download/run the installer.\n\nIf you're on any other Unix-based system, you can run:\n\n```\n$ curl https://nim-lang.org/choosenim/init.sh -sSf | sh`\n```\n\nIf you're on Mac, and with Homebrew installed, simply run:\n\n```\n$ brew install nim\n```\n\nYou could also consider using [choosenim](https://github.com/dom96/choosenim) to manage Nim installations in a similar way to `pyenv` and `rustup`.\n\n\n### Interfacing Other Languages\n\nOne of the things that attracted me to both Nim **and** Crystal, was the ability to natively interface with other languages, and the **ease** with which that is achieved. Nim has bidirectional interfacing not only with C, but also natively with JavaScript. Crystal natively interfaces with C, but is only unidirectional. Definitely a point scored here for Nim!\n\nWhen it comes to building DApps, the variety of target hardware they must be run on is already large, and growing all the time. The low-level ability to interop with other languages makes for both languages being a much more attractive proposition.\n\nFor a quick demo, let's take a look at interfacing both C and JavaScript from Nim.\n\n#### C Invocation\n\nFirstly, create the file `logic.c` with the following content:\n\n``` c\nint addTwoIntegers(int a, int b)\n{\n return a + b;\n}\n```\n\nNext, create the file `calculator.nim` with the following content:\n\n``` nim\n{.compile: \"logic.c\".}\nproc addTwoIntegers(a, b: cint): cint {.importc.}\n\nwhen isMainModule:\n echo addTwoIntegers(3, 7)\n```\n\nNow then, with these two *very simple* files in place, we can run:\n\n```\n$ nim c -r calculator.nim\n```\n\nThe Nim compiler will compile the `logic.c` file in addition to `calculator.nim` and link both into an executable; which outputs `10` when run. Very sharp, in my opinion!\n\n#### JavaScript Invocation\n\nEven sharper, in my opinion, is the ability to interop with JavaScript. Create a file titled `host.html` with the following content:\n\n``` html\n<html>\n<body>\n <script type=\"text/javascript\">\n function addTwoIntegers(a, b)\n {\n return a + b;\n }\n </script>\n\n <script type=\"text/javascript\" src=\"calculator.js\"></script>\n</body>\n</html>\n```\n\nNow, create another `calculator.nim` file with the following content (or reuse the one from the above C example):\n\n``` nim\nproc addTwoIntegers(a, b: int): int {.importc.}\n\nwhen isMainModule:\n echo addTwoIntegers(3, 7)\n```\n\n\nCompile the Nim code to JavaScript by running:\n\n```\n$ nim js -o:calculator.js calculator.nim\n```\n\nOnce that's done, go ahead and open `host.html` in a browser and you should see the value `10` in the browser's console. I think this is **REALLY** neat. It's superb how easy it is to achieve that, too.\n\n\n### Aside – a Quick (not-so) Secret:\n\nInstead of writing out the HTML above, you could actually use ***Nim's native*** HTML DSL:\n\n``` nim\nimport html_dsl\n\nhtml page:\n head:\n title(\"Title\")\n body:\n p(\"Hello\")\n p(\"World\")\n dv:\n p \"Example\"\n\necho render(page())\n```\n\nRunning this will output the following:\n\n``` html\n<!DOCTYPE html>\n <html class='has-navbar-fixed-top' >\n <head>\n <meta charset=\"utf-8\">\n <meta name=\"viewport\" content=\"width=device-width, initial-scale=1\">\n <title>Title</title>\n </head>\n <body class='has-navbar-fixed-top' >\n <p >Hello</p>\n <p >World</p>\n <div>\n <p>Example</p>\n </div>\n </body>\n</html>\n```\n\n\n<br/>\n\n## Crystal\n\nCrystal is a statically-typed, object-oriented, systems programming language; with the aim of achieving the speed and performance of c/c++, whilst having a syntax as simple, readable, and easy to learn as Ruby.\n\nI first came across Crystal when I saw [@sferik](https://twitter.com/sferik) giving a talk on it in Poland back in 2015. [Video here.](https://www.youtube.com/watch?v=Ysm4IU4aWoQ) It was a great talk, and sparked my interest in Crystal right there and then. When I initially explored Crystal I thought it looked awesome, but I was too busy with all the other languages I was using on a daily basis, to be able to focus my time on it properly.\n\n### Installing Crystal\n\nYou can find all of the relevant instructions for installing Crystal, on the [main website installation page](https://crystal-lang.org/install/).\n\nIf you are on Mac, and have Homebrew installed, you can simply run:\n\n```\n$ brew install crystal\n```\n\n**However**, if you are a Windows user, *for the time being* you are out of luck, unless you use the Windows Subsystem for Linux. If I were in a more shocking/pedantic mood, I'd take a (not yet gained) point **away** from Crystal here, for lack of Windows support.\n\n\n### Interfacing C\n\nLet’s build a simple script in C that says “hi!”. We’ll then write a Crystal app to bind to our C library. This is a great starting point for anyone who wants to know about binding C in Crystal.\n\nFirst off, let’s create a project with Crystal’s scaffolding tool (I’ll cover this feature later). Run:\n\n```\n$ crystal init app sayhi_c\n```\n\nThen head into the directory `sayhi_c/src/sayhi_c` and let’s create a file `sayhi.c` with the following contents:\n\n``` c\n#include <stdio.h>\n\nvoid hi(const char * name){\n printf(\"Hi %s!\\n\", name);\n}\n```\n\nNow we need to compile our C file into an object. On Ubuntu or Mac using gcc we can run:\n\n```\n$ gcc -c sayhi.c -o sayhi.o\n```\n\nUsing the -o flags allow us to create an Object filetype. Once we’ve got our Object file, we can bind it from within our Crystal app. Open up our `sayhi_c.cr` file, and have it reflect the following:\n\n``` crystal\nrequire \"./sayhi_c/*\"\n\n@[Link(ldflags: \"#{__DIR__}/sayhi_c/sayhi.o\")]\n\nlib Say\n fun hi(name : LibC::Char*) : Void\nend\n\nSay.hi(\"Status\")\n```\n\nI’ll mention now that there are no implicit type conversions except to_unsafe - explained here when invoking a C function: you must pass the exact type that is expected.\n\nAlso worth noting at this point is that since we have built our C file into an object file, we can include it in the project directory and link from there. When we want to link dynamic libraries or installed C packages, we can just link them without including a path.\n\nSo, if we build our project file and run it, we get the following:\n\n```\n$ crystal build --release src/sayhi_c.cr\n\n$ ./sayhi_c\n\n > Hi Status!\n```\n\nAs you can see, Nim takes the winners trophy in this case, as it is **much** simpler to achieve a similar goal. With Nim, we were also able to link both the Nim and C files into the same executable, which Crystal sadly cannot do.\n\n\n\n<br/>\n\n## Performance Tests\n\n### Parsing & calculating values from a large JSON file:\n\nFirstly, we need to generate our large JSON file. For this test, we're going to generate a dataset which includes **1 Million** items.\n\n<center><iframe src=\"https://giphy.com/embed/13B1WmJg7HwjGU\" width=\"480\" height=\"270\" frameBorder=\"0\"></iframe></center>\n\nWe can do so with the following Ruby script:\n\n``` rb\nrequire 'json'\n\nx = []\n\n1000000.times do\n h = {\n 'x' => rand,\n 'y' => rand,\n 'z' => rand,\n 'name' => ('a'..'z').to_a.shuffle[0..5].join + ' ' + rand(10000).to_s,\n 'opts' => {'1' => [1, true]},\n }\n x << h\nend\n\nFile.open(\"1.json\", 'w') { |f| f.write JSON.pretty_generate('coordinates' => x, 'info' => \"some info\") }\n```\n\nThis will generate a JSON file **of around 212mb**, with the following syntax:\n\n``` json\n{\n \"coordinates\": [\n {\n \"x\": 0.10327081810860272,\n \"y\": 0.03247172212368832,\n \"z\": 0.8155255437507467,\n \"name\": \"scojbq 5965\",\n \"opts\": {\n \"1\": [\n 1,\n true\n ]\n }\n }\n ],\n \"info\": \"some info\"\n}\n```\n\nNow that we have our chunky JSON file; we can write our first test – **in Nim**:\n\n``` nim\nimport json\n\nlet jobj = parseFile(\"1.json\")\n\nlet coordinates = jobj[\"coordinates\"].elems\nlet len = float(coordinates.len)\nvar x = 0.0\nvar y = 0.0\nvar z = 0.0\n\nfor coord in coordinates:\n x += coord[\"x\"].fnum\n y += coord[\"y\"].fnum\n z += coord[\"z\"].fnum\n\necho x / len\necho y / len\necho z / len\n```\n\nAnd again; the same simple test, this time written **in Crystal**:\n\n``` crystal\nrequire \"json\"\n\ntext = File.read(\"1.json\")\njobj = JSON.parse(text)\ncoordinates = jobj[\"coordinates\"].as_a\nlen = coordinates.size\nx = y = z = 0\n\ncoordinates.each do |coord|\n x += coord[\"x\"].as_f\n y += coord[\"y\"].as_f\n z += coord[\"z\"].as_f\nend\n\np x / len\np y / len\np z / len\n```\n\n### Results:\n\nBuilding our test files into tiny release packages with the respective commands below:\n\n```\n$ crystal build json_test.cr --release -o json_test_cr --no-debug\n```\n\n```\n$ nim c -o:json_test_nim -d:danger --cc:gcc --verbosity:0 json_test.nim\n```\n\nWe can then time & run those packages, to obtain our test results:\n\n| Language | Time (s) | Memory (Mb) |\n|----------|----------|-------------|\n| Nim | 6.92 | 1320.4 |\n| Crystal | 4.58 | 960.7 |\n\nAs you can see; in this case ***Crystal*** is the more performant language – taking less time to execute & complete the test, and also fewer Megabytes in memory doing so.\n\n\n\n<br/>\n\n### Base64 encoding / decoding a large blob:\n\nIn this test; we will firstly encode and then decode a string, with a current timestamp into newly allocated buffers, utilising the Base64 algorithm. For starters, let's look at the ***Nim*** test:\n\n``` nim\nimport base64, times, strutils, strformat\n\nlet STR_SIZE = 131072\nlet TRIES = 8192\nlet str = strutils.repeat('a', STR_SIZE)\n\nvar str2 = base64.encode(str)\nstdout.write(fmt\"encode {str[..3]}... to {str2[..3]}...: \")\n\nvar t = times.epochTime()\nvar i = 0\nvar s:int64 = 0\nwhile i < TRIES:\n str2 = base64.encode(str)\n s += len(str2)\n i += 1\necho(fmt\"{s}, {formatFloat(times.epochTime() - t, ffDefault, 6)}\")\n\nvar str3 = base64.decode(str2)\nstdout.write(fmt\"decode {str2[..3]}... to {str3[..3]}...: \")\n\nt = times.epochTime()\ni = 0\ns = 0\nwhile i < TRIES:\n str3 = base64.decode(str2)\n s += len(str3)\n i += 1\necho(fmt\"{s}, {formatFloat(times.epochTime() - t, ffDefault, 6)}\")\n```\n\nAnd now the same test, written in Crystal:\n\n``` crystal\nrequire \"base64\"\n\nSTR_SIZE = 131072\nTRIES = 8192\n\nstr = \"a\" * STR_SIZE\n\nstr2 = Base64.strict_encode(str)\nprint \"encode #{str[0..3]}... to #{str2[0..3]}...: \"\n\nt, s = Time.local, 0\nTRIES.times do |i|\n str2 = Base64.strict_encode(str)\n s += str2.bytesize\nend\nputs \"#{s}, #{Time.local - t}\"\n\nstr3 = Base64.decode_string(str2)\nprint \"decode #{str2[0..3]}... to #{str3[0..3]}...: \"\n\nt, s = Time.local, 0\nTRIES.times do |i|\n str3 = Base64.decode_string(str2)\n s += str3.bytesize\nend\nputs \"#{s}, #{Time.local - t}\"\n```\n\n### Results:\n\nWe can again; build our Base64 test files into release packages with the respective commands below:\n\n```\n$ crystal build base64_test.cr --release -o base64_test_cr --no-debug\n```\n\n```\n$ nim c -o:base64_test_nim -d:danger --cc:gcc --verbosity:0 base64_test.nim\n```\n\nAs with our last test suite, we can then time & run those packages, to obtain our test results:\n\n| Language | Time (s) | Memory (Mb) |\n|----------|----------|-------------|\n| Nim | 4.17 | 6.6 |\n| Crystal | 2.36 | 3.5 |\n\nOnce again, to my surprise, Crystal came out on top. And did again and again for me, running a bunch of different tests I could scrape together from other curious devs.\n\n\n## Conclusion\n\nThe summary of this first-in-series article, is most definitely one of surprise. I already knew that Crystal was a highly-performant language, and I have previously done my own research & testing to see how close to *C speeds* it could achieve. That being said, I was *also* already aware that Nim **claims** close to C speeds, and that one of the language's principals was to run well on old & less-performant hardware.\n\nYet, Crystal beat not only my own expectations; but beat Nim for both memory usage **AND** execution times. I really didn't expect to see Crystal come out *this* far ahead in performance. On the other hand, Nim came out by-far the leader when it comes to language interoperability. **Nim makes it even easier** than Crystal when interfacing other langs – not something I thought possible, given just how easy Crystal makes the task.\n\nIn conclusion, it seems that we have 1 point for Nim (interoperability), and 1 point for Crystal (performance). Both languages have pleasantly surprised me, and I look forward to diving into the next topics in the series:\n\n - Part 2: Threading and Tooling\n - Part 3: Crypto, DApps and P2P\n\nThese two articles will be released over the next couple of days, so don't forget to come back then to check them out!\n\nThanks for reading - as ever, if you have any questions, please feel free to reach out at [robin@status](mailto:robin@status.im).\n\n[ - **@rbin**](https://twitter.com/rbin)\n","slug":"nim-vs-crystal-part-1-performance-interoperability","published":1,"date":"2019-11-18T05:00:00.000Z","updated":"2020-03-09T18:08:46.758Z","_id":"ck6axlfcd002mxeegbtau5m94","comments":1,"photos":[],"link":"","content":"<p><img src=\"/assets/images/nim-crystal-header-img_NEW.jpg\" alt=\"crystal vs nim\"></p>\n<p>I’ve been wanting to write-up a comparison on Nim and Crystal for quite some time now, and I’m happy that I’m finally able to do so. What I’ve decided on doing; is breaking this up into a three part series as there are <strong><em>SO</em></strong> many features of both languages I’d like to talk about, and therein many opinions held too. I do have a habit of writing <strong>very</strong> long articles, so I’d like to limit the topic scope, to keep each of these a little snappier!</p>\n<p>Before I go into specifics on either of these languages, I’d first like to go into my reasons for first learning both languages, and briefly touch on my past experiences with the two of them. I admit that I <em>have</em> had more experience with Crystal than I have with Nim; however, I will give an objective view of both languages until I go into my personal preference towards the end of each article in this series.</p>\n<blockquote class=\"twitter-tweet\"><p lang=\"en\" dir=\"ltr\">crystal or nim? Both super immature but fun</p>— @r4vi (@r4vi) <a href=\"https://twitter.com/r4vi/status/874741870093623296?ref_src=twsrc%5Etfw\">June 13, 2017</a></blockquote> <script async src=\"https://platform.twitter.com/widgets.js\" charset=\"utf-8\"></script>\n\n<p>Back in mid-2017, I sent out a tweet asking my dev followers which low-level languages they would recommend I take a look at. For a while before this, I had been waiting for a new systems language for me to learn, but until this tweet, I never really found one that I was <em>actually</em> interested in taking a look at.</p>\n<p>Naturally, both languages have a <strong>TONNE</strong> of features, so I’m not going to go into details on things like basic types, etc. I will simply compare the biggest things that attracted me to both languages. For in-depth tutorials on the features of both langs, check out the <a href=\"https://crystal-lang.org/reference/\">Crystal Docs</a>, or the <a href=\"https://nim-lang.org/docs/lib.html\">Nim Docs</a>.</p>\n<p>Anyway, let’s take a look at both languages, and you can make your own mind up as to which you’d rather be programming in. Maybe both. Maybe neither!</p>\n<br/>\n\n<h2 id=\"Nim\"><a href=\"#Nim\" class=\"headerlink\" title=\"Nim\"></a>Nim</h2><p>Nim is a statically-typed, imperative, systems programming language; aiming to achieve the performance of C, be as expressive as Lisp, and have a simple, clear syntax like Python. I have to say, from my experience Nim manages to <strong><em>pretty much</em></strong> fit these criterion.</p>\n<blockquote>\n<p>By compiling to C, Nim is able to take advantage of many features offered by modern C compilers. The primary benefits gained by this compilation model include incredible portability and optimisations.</p>\n</blockquote>\n<blockquote>\n<p>The binaries produced by Nim have zero dependencies and are typically very small. This makes their distribution easy and keeps your users happy.</p>\n</blockquote>\n<p>When I say it <em>pretty much</em> matches the criteria, the only statement that doesn’t quite match is achieving the performance of C. In realise this is an almost impossible task, but Nim actually did fall short on a few occasions when it came to performance. I will go into detail about this later on in the article.</p>\n<h3 id=\"Installing-Nim\"><a href=\"#Installing-Nim\" class=\"headerlink\" title=\"Installing Nim\"></a>Installing Nim</h3><p>Nim is super easy to install. If you’re on Windows, <a href=\"https://nim-lang.org/install_windows.html\">head over here</a>, and download/run the installer.</p>\n<p>If you’re on any other Unix-based system, you can run:</p>\n<figure class=\"highlight plain\"><table><tr><td class=\"code\"><pre><span class=\"line\">$ curl https://nim-lang.org/choosenim/init.sh -sSf | sh`</span><br></pre></td></tr></table></figure>\n\n<p>If you’re on Mac, and with Homebrew installed, simply run:</p>\n<figure class=\"highlight plain\"><table><tr><td class=\"code\"><pre><span class=\"line\">$ brew install nim</span><br></pre></td></tr></table></figure>\n\n<p>You could also consider using <a href=\"https://github.com/dom96/choosenim\">choosenim</a> to manage Nim installations in a similar way to <code>pyenv</code> and <code>rustup</code>.</p>\n<h3 id=\"Interfacing-Other-Languages\"><a href=\"#Interfacing-Other-Languages\" class=\"headerlink\" title=\"Interfacing Other Languages\"></a>Interfacing Other Languages</h3><p>One of the things that attracted me to both Nim <strong>and</strong> Crystal, was the ability to natively interface with other languages, and the <strong>ease</strong> with which that is achieved. Nim has bidirectional interfacing not only with C, but also natively with JavaScript. Crystal natively interfaces with C, but is only unidirectional. Definitely a point scored here for Nim!</p>\n<p>When it comes to building DApps, the variety of target hardware they must be run on is already large, and growing all the time. The low-level ability to interop with other languages makes for both languages being a much more attractive proposition.</p>\n<p>For a quick demo, let’s take a look at interfacing both C and JavaScript from Nim.</p>\n<h4 id=\"C-Invocation\"><a href=\"#C-Invocation\" class=\"headerlink\" title=\"C Invocation\"></a>C Invocation</h4><p>Firstly, create the file <code>logic.c</code> with the following content:</p>\n<figure class=\"highlight c\"><table><tr><td class=\"code\"><pre><span class=\"line\"><span class=\"function\"><span class=\"keyword\">int</span> <span class=\"title\">addTwoIntegers</span><span class=\"params\">(<span class=\"keyword\">int</span> a, <span class=\"keyword\">int</span> b)</span></span></span><br><span class=\"line\"><span class=\"function\"></span>{</span><br><span class=\"line\"> <span class=\"keyword\">return</span> a + b;</span><br><span class=\"line\">}</span><br></pre></td></tr></table></figure>\n\n<p>Next, create the file <code>calculator.nim</code> with the following content:</p>\n<figure class=\"highlight nim\"><table><tr><td class=\"code\"><pre><span class=\"line\"><span class=\"meta\">{.compile: \"logic.c\".}</span></span><br><span class=\"line\"><span class=\"keyword\">proc</span> addTwoIntegers(a, b: <span class=\"built_in\">cint</span>): <span class=\"built_in\">cint</span> <span class=\"meta\">{.importc.}</span></span><br><span class=\"line\"></span><br><span class=\"line\"><span class=\"keyword\">when</span> isMainModule:</span><br><span class=\"line\"> echo addTwoIntegers(<span class=\"number\">3</span>, <span class=\"number\">7</span>)</span><br></pre></td></tr></table></figure>\n\n<p>Now then, with these two <em>very simple</em> files in place, we can run:</p>\n<figure class=\"highlight plain\"><table><tr><td class=\"code\"><pre><span class=\"line\">$ nim c -r calculator.nim</span><br></pre></td></tr></table></figure>\n\n<p>The Nim compiler will compile the <code>logic.c</code> file in addition to <code>calculator.nim</code> and link both into an executable; which outputs <code>10</code> when run. Very sharp, in my opinion!</p>\n<h4 id=\"JavaScript-Invocation\"><a href=\"#JavaScript-Invocation\" class=\"headerlink\" title=\"JavaScript Invocation\"></a>JavaScript Invocation</h4><p>Even sharper, in my opinion, is the ability to interop with JavaScript. Create a file titled <code>host.html</code> with the following content:</p>\n<figure class=\"highlight html\"><table><tr><td class=\"code\"><pre><span class=\"line\"><span class=\"tag\"><<span class=\"name\">html</span>></span></span><br><span class=\"line\"><span class=\"tag\"><<span class=\"name\">body</span>></span></span><br><span class=\"line\"> <span class=\"tag\"><<span class=\"name\">script</span> <span class=\"attr\">type</span>=<span class=\"string\">\"text/javascript\"</span>></span></span><br><span class=\"line\"><span class=\"actionscript\"> <span class=\"function\"><span class=\"keyword\">function</span> <span class=\"title\">addTwoIntegers</span><span class=\"params\">(a, b)</span></span></span></span><br><span class=\"line\"> {</span><br><span class=\"line\"><span class=\"actionscript\"> <span class=\"keyword\">return</span> a + b;</span></span><br><span class=\"line\"> }</span><br><span class=\"line\"> <span class=\"tag\"></<span class=\"name\">script</span>></span></span><br><span class=\"line\"></span><br><span class=\"line\"> <span class=\"tag\"><<span class=\"name\">script</span> <span class=\"attr\">type</span>=<span class=\"string\">\"text/javascript\"</span> <span class=\"attr\">src</span>=<span class=\"string\">\"calculator.js\"</span>></span><span class=\"tag\"></<span class=\"name\">script</span>></span></span><br><span class=\"line\"><span class=\"tag\"></<span class=\"name\">body</span>></span></span><br><span class=\"line\"><span class=\"tag\"></<span class=\"name\">html</span>></span></span><br></pre></td></tr></table></figure>\n\n<p>Now, create another <code>calculator.nim</code> file with the following content (or reuse the one from the above C example):</p>\n<figure class=\"highlight nim\"><table><tr><td class=\"code\"><pre><span class=\"line\"><span class=\"keyword\">proc</span> addTwoIntegers(a, b: <span class=\"built_in\">int</span>): <span class=\"built_in\">int</span> <span class=\"meta\">{.importc.}</span></span><br><span class=\"line\"></span><br><span class=\"line\"><span class=\"keyword\">when</span> isMainModule:</span><br><span class=\"line\"> echo addTwoIntegers(<span class=\"number\">3</span>, <span class=\"number\">7</span>)</span><br></pre></td></tr></table></figure>\n\n\n<p>Compile the Nim code to JavaScript by running:</p>\n<figure class=\"highlight plain\"><table><tr><td class=\"code\"><pre><span class=\"line\">$ nim js -o:calculator.js calculator.nim</span><br></pre></td></tr></table></figure>\n\n<p>Once that’s done, go ahead and open <code>host.html</code> in a browser and you should see the value <code>10</code> in the browser’s console. I think this is <strong>REALLY</strong> neat. It’s superb how easy it is to achieve that, too.</p>\n<h3 id=\"Aside-–-a-Quick-not-so-Secret\"><a href=\"#Aside-–-a-Quick-not-so-Secret\" class=\"headerlink\" title=\"Aside – a Quick (not-so) Secret:\"></a>Aside – a Quick (not-so) Secret:</h3><p>Instead of writing out the HTML above, you could actually use <strong><em>Nim’s native</em></strong> HTML DSL:</p>\n<figure class=\"highlight nim\"><table><tr><td class=\"code\"><pre><span class=\"line\"><span class=\"keyword\">import</span> html_dsl</span><br><span class=\"line\"></span><br><span class=\"line\">html page:</span><br><span class=\"line\"> head:</span><br><span class=\"line\"> title(<span class=\"string\">\"Title\"</span>)</span><br><span class=\"line\"> body:</span><br><span class=\"line\"> p(<span class=\"string\">\"Hello\"</span>)</span><br><span class=\"line\"> p(<span class=\"string\">\"World\"</span>)</span><br><span class=\"line\"> dv:</span><br><span class=\"line\"> p <span class=\"string\">\"Example\"</span></span><br><span class=\"line\"></span><br><span class=\"line\">echo render(page())</span><br></pre></td></tr></table></figure>\n\n<p>Running this will output the following:</p>\n<figure class=\"highlight html\"><table><tr><td class=\"code\"><pre><span class=\"line\"><span class=\"meta\"><!DOCTYPE html></span></span><br><span class=\"line\"> <span class=\"tag\"><<span class=\"name\">html</span> <span class=\"attr\">class</span>=<span class=\"string\">'has-navbar-fixed-top'</span> ></span></span><br><span class=\"line\"> <span class=\"tag\"><<span class=\"name\">head</span>></span></span><br><span class=\"line\"> <span class=\"tag\"><<span class=\"name\">meta</span> <span class=\"attr\">charset</span>=<span class=\"string\">\"utf-8\"</span>></span></span><br><span class=\"line\"> <span class=\"tag\"><<span class=\"name\">meta</span> <span class=\"attr\">name</span>=<span class=\"string\">\"viewport\"</span> <span class=\"attr\">content</span>=<span class=\"string\">\"width=device-width, initial-scale=1\"</span>></span></span><br><span class=\"line\"> <span class=\"tag\"><<span class=\"name\">title</span>></span>Title<span class=\"tag\"></<span class=\"name\">title</span>></span></span><br><span class=\"line\"> <span class=\"tag\"></<span class=\"name\">head</span>></span></span><br><span class=\"line\"> <span class=\"tag\"><<span class=\"name\">body</span> <span class=\"attr\">class</span>=<span class=\"string\">'has-navbar-fixed-top'</span> ></span></span><br><span class=\"line\"> <span class=\"tag\"><<span class=\"name\">p</span> ></span>Hello<span class=\"tag\"></<span class=\"name\">p</span>></span></span><br><span class=\"line\"> <span class=\"tag\"><<span class=\"name\">p</span> ></span>World<span class=\"tag\"></<span class=\"name\">p</span>></span></span><br><span class=\"line\"> <span class=\"tag\"><<span class=\"name\">div</span>></span></span><br><span class=\"line\"> <span class=\"tag\"><<span class=\"name\">p</span>></span>Example<span class=\"tag\"></<span class=\"name\">p</span>></span></span><br><span class=\"line\"> <span class=\"tag\"></<span class=\"name\">div</span>></span></span><br><span class=\"line\"> <span class=\"tag\"></<span class=\"name\">body</span>></span></span><br><span class=\"line\"><span class=\"tag\"></<span class=\"name\">html</span>></span></span><br></pre></td></tr></table></figure>\n\n\n<br/>\n\n<h2 id=\"Crystal\"><a href=\"#Crystal\" class=\"headerlink\" title=\"Crystal\"></a>Crystal</h2><p>Crystal is a statically-typed, object-oriented, systems programming language; with the aim of achieving the speed and performance of c/c++, whilst having a syntax as simple, readable, and easy to learn as Ruby.</p>\n<p>I first came across Crystal when I saw <a href=\"https://twitter.com/sferik\">@sferik</a> giving a talk on it in Poland back in 2015. <a href=\"https://www.youtube.com/watch?v=Ysm4IU4aWoQ\">Video here.</a> It was a great talk, and sparked my interest in Crystal right there and then. When I initially explored Crystal I thought it looked awesome, but I was too busy with all the other languages I was using on a daily basis, to be able to focus my time on it properly.</p>\n<h3 id=\"Installing-Crystal\"><a href=\"#Installing-Crystal\" class=\"headerlink\" title=\"Installing Crystal\"></a>Installing Crystal</h3><p>You can find all of the relevant instructions for installing Crystal, on the <a href=\"https://crystal-lang.org/install/\">main website installation page</a>.</p>\n<p>If you are on Mac, and have Homebrew installed, you can simply run:</p>\n<figure class=\"highlight plain\"><table><tr><td class=\"code\"><pre><span class=\"line\">$ brew install crystal</span><br></pre></td></tr></table></figure>\n\n<p><strong>However</strong>, if you are a Windows user, <em>for the time being</em> you are out of luck, unless you use the Windows Subsystem for Linux. If I were in a more shocking/pedantic mood, I’d take a (not yet gained) point <strong>away</strong> from Crystal here, for lack of Windows support.</p>\n<h3 id=\"Interfacing-C\"><a href=\"#Interfacing-C\" class=\"headerlink\" title=\"Interfacing C\"></a>Interfacing C</h3><p>Let’s build a simple script in C that says “hi!”. We’ll then write a Crystal app to bind to our C library. This is a great starting point for anyone who wants to know about binding C in Crystal.</p>\n<p>First off, let’s create a project with Crystal’s scaffolding tool (I’ll cover this feature later). Run:</p>\n<figure class=\"highlight plain\"><table><tr><td class=\"code\"><pre><span class=\"line\">$ crystal init app sayhi_c</span><br></pre></td></tr></table></figure>\n\n<p>Then head into the directory <code>sayhi_c/src/sayhi_c</code> and let’s create a file <code>sayhi.c</code> with the following contents:</p>\n<figure class=\"highlight c\"><table><tr><td class=\"code\"><pre><span class=\"line\"><span class=\"meta\">#<span class=\"meta-keyword\">include</span> <span class=\"meta-string\"><stdio.h></span></span></span><br><span class=\"line\"></span><br><span class=\"line\"><span class=\"function\"><span class=\"keyword\">void</span> <span class=\"title\">hi</span><span class=\"params\">(<span class=\"keyword\">const</span> <span class=\"keyword\">char</span> * name)</span></span>{</span><br><span class=\"line\"> <span class=\"built_in\">printf</span>(<span class=\"string\">\"Hi %s!\\n\"</span>, name);</span><br><span class=\"line\">}</span><br></pre></td></tr></table></figure>\n\n<p>Now we need to compile our C file into an object. On Ubuntu or Mac using gcc we can run:</p>\n<figure class=\"highlight plain\"><table><tr><td class=\"code\"><pre><span class=\"line\">$ gcc -c sayhi.c -o sayhi.o</span><br></pre></td></tr></table></figure>\n\n<p>Using the -o flags allow us to create an Object filetype. Once we’ve got our Object file, we can bind it from within our Crystal app. Open up our <code>sayhi_c.cr</code> file, and have it reflect the following:</p>\n<figure class=\"highlight crystal\"><table><tr><td class=\"code\"><pre><span class=\"line\"><span class=\"keyword\">require</span> <span class=\"string\">\"./sayhi_c/*\"</span></span><br><span class=\"line\"></span><br><span class=\"line\"><span class=\"meta\">@[Link(ldflags: <span class=\"meta-string\">\"#{__DIR__}/sayhi_c/sayhi.o\"</span>)]</span></span><br><span class=\"line\"></span><br><span class=\"line\"><span class=\"class\"><span class=\"keyword\">lib</span> <span class=\"title\">Say</span></span></span><br><span class=\"line\"> <span class=\"function\"><span class=\"keyword\">fun</span> <span class=\"title\">hi</span></span>(name : <span class=\"symbol\">LibC:</span>:Char*) : Void</span><br><span class=\"line\"><span class=\"keyword\">end</span></span><br><span class=\"line\"></span><br><span class=\"line\">Say.hi(<span class=\"string\">\"Status\"</span>)</span><br></pre></td></tr></table></figure>\n\n<p>I’ll mention now that there are no implicit type conversions except to_unsafe - explained here when invoking a C function: you must pass the exact type that is expected.</p>\n<p>Also worth noting at this point is that since we have built our C file into an object file, we can include it in the project directory and link from there. When we want to link dynamic libraries or installed C packages, we can just link them without including a path.</p>\n<p>So, if we build our project file and run it, we get the following:</p>\n<figure class=\"highlight plain\"><table><tr><td class=\"code\"><pre><span class=\"line\">$ crystal build --release src/sayhi_c.cr</span><br><span class=\"line\"></span><br><span class=\"line\">$ ./sayhi_c</span><br><span class=\"line\"></span><br><span class=\"line\"> > Hi Status!</span><br></pre></td></tr></table></figure>\n\n<p>As you can see, Nim takes the winners trophy in this case, as it is <strong>much</strong> simpler to achieve a similar goal. With Nim, we were also able to link both the Nim and C files into the same executable, which Crystal sadly cannot do.</p>\n<br/>\n\n<h2 id=\"Performance-Tests\"><a href=\"#Performance-Tests\" class=\"headerlink\" title=\"Performance Tests\"></a>Performance Tests</h2><h3 id=\"Parsing-amp-calculating-values-from-a-large-JSON-file\"><a href=\"#Parsing-amp-calculating-values-from-a-large-JSON-file\" class=\"headerlink\" title=\"Parsing & calculating values from a large JSON file:\"></a>Parsing & calculating values from a large JSON file:</h3><p>Firstly, we need to generate our large JSON file. For this test, we’re going to generate a dataset which includes <strong>1 Million</strong> items.</p>\n<center><iframe src=\"https://giphy.com/embed/13B1WmJg7HwjGU\" width=\"480\" height=\"270\" frameBorder=\"0\"></iframe></center>\n\n<p>We can do so with the following Ruby script:</p>\n<figure class=\"highlight rb\"><table><tr><td class=\"code\"><pre><span class=\"line\"><span class=\"keyword\">require</span> <span class=\"string\">'json'</span></span><br><span class=\"line\"></span><br><span class=\"line\">x = []</span><br><span class=\"line\"></span><br><span class=\"line\"><span class=\"number\">1000000</span>.times <span class=\"keyword\">do</span></span><br><span class=\"line\"> h = {</span><br><span class=\"line\"> <span class=\"string\">'x'</span> => rand,</span><br><span class=\"line\"> <span class=\"string\">'y'</span> => rand,</span><br><span class=\"line\"> <span class=\"string\">'z'</span> => rand,</span><br><span class=\"line\"> <span class=\"string\">'name'</span> => (<span class=\"string\">'a'</span>..<span class=\"string\">'z'</span>).to_a.shuffle[<span class=\"number\">0</span>..<span class=\"number\">5</span>].join + <span class=\"string\">' '</span> + rand(<span class=\"number\">10000</span>).to_s,</span><br><span class=\"line\"> <span class=\"string\">'opts'</span> => {<span class=\"string\">'1'</span> => [<span class=\"number\">1</span>, <span class=\"literal\">true</span>]},</span><br><span class=\"line\"> }</span><br><span class=\"line\"> x << h</span><br><span class=\"line\"><span class=\"keyword\">end</span></span><br><span class=\"line\"></span><br><span class=\"line\">File.open(<span class=\"string\">\"1.json\"</span>, <span class=\"string\">'w'</span>) { <span class=\"params\">|f|</span> f.write JSON.pretty_generate(<span class=\"string\">'coordinates'</span> => x, <span class=\"string\">'info'</span> => <span class=\"string\">\"some info\"</span>) }</span><br></pre></td></tr></table></figure>\n\n<p>This will generate a JSON file <strong>of around 212mb</strong>, with the following syntax:</p>\n<figure class=\"highlight json\"><table><tr><td class=\"code\"><pre><span class=\"line\">{</span><br><span class=\"line\"> <span class=\"attr\">\"coordinates\"</span>: [</span><br><span class=\"line\"> {</span><br><span class=\"line\"> <span class=\"attr\">\"x\"</span>: <span class=\"number\">0.10327081810860272</span>,</span><br><span class=\"line\"> <span class=\"attr\">\"y\"</span>: <span class=\"number\">0.03247172212368832</span>,</span><br><span class=\"line\"> <span class=\"attr\">\"z\"</span>: <span class=\"number\">0.8155255437507467</span>,</span><br><span class=\"line\"> <span class=\"attr\">\"name\"</span>: <span class=\"string\">\"scojbq 5965\"</span>,</span><br><span class=\"line\"> <span class=\"attr\">\"opts\"</span>: {</span><br><span class=\"line\"> <span class=\"attr\">\"1\"</span>: [</span><br><span class=\"line\"> <span class=\"number\">1</span>,</span><br><span class=\"line\"> <span class=\"literal\">true</span></span><br><span class=\"line\"> ]</span><br><span class=\"line\"> }</span><br><span class=\"line\"> }</span><br><span class=\"line\"> ],</span><br><span class=\"line\"> <span class=\"attr\">\"info\"</span>: <span class=\"string\">\"some info\"</span></span><br><span class=\"line\">}</span><br></pre></td></tr></table></figure>\n\n<p>Now that we have our chunky JSON file; we can write our first test – <strong>in Nim</strong>:</p>\n<figure class=\"highlight nim\"><table><tr><td class=\"code\"><pre><span class=\"line\"><span class=\"keyword\">import</span> json</span><br><span class=\"line\"></span><br><span class=\"line\"><span class=\"keyword\">let</span> jobj = parseFile(<span class=\"string\">\"1.json\"</span>)</span><br><span class=\"line\"></span><br><span class=\"line\"><span class=\"keyword\">let</span> coordinates = jobj[<span class=\"string\">\"coordinates\"</span>].elems</span><br><span class=\"line\"><span class=\"keyword\">let</span> len = <span class=\"built_in\">float</span>(coordinates.len)</span><br><span class=\"line\"><span class=\"keyword\">var</span> x = <span class=\"number\">0</span>.<span class=\"number\">0</span></span><br><span class=\"line\"><span class=\"keyword\">var</span> y = <span class=\"number\">0</span>.<span class=\"number\">0</span></span><br><span class=\"line\"><span class=\"keyword\">var</span> z = <span class=\"number\">0</span>.<span class=\"number\">0</span></span><br><span class=\"line\"></span><br><span class=\"line\"><span class=\"keyword\">for</span> coord <span class=\"keyword\">in</span> coordinates:</span><br><span class=\"line\"> x += coord[<span class=\"string\">\"x\"</span>].fnum</span><br><span class=\"line\"> y += coord[<span class=\"string\">\"y\"</span>].fnum</span><br><span class=\"line\"> z += coord[<span class=\"string\">\"z\"</span>].fnum</span><br><span class=\"line\"></span><br><span class=\"line\">echo x / len</span><br><span class=\"line\">echo y / len</span><br><span class=\"line\">echo z / len</span><br></pre></td></tr></table></figure>\n\n<p>And again; the same simple test, this time written <strong>in Crystal</strong>:</p>\n<figure class=\"highlight crystal\"><table><tr><td class=\"code\"><pre><span class=\"line\"><span class=\"keyword\">require</span> <span class=\"string\">\"json\"</span></span><br><span class=\"line\"></span><br><span class=\"line\">text = File.read(<span class=\"string\">\"1.json\"</span>)</span><br><span class=\"line\">jobj = JSON.parse(text)</span><br><span class=\"line\">coordinates = jobj[<span class=\"string\">\"coordinates\"</span>].as_a</span><br><span class=\"line\">len = coordinates.size</span><br><span class=\"line\">x = y = z = <span class=\"number\">0</span></span><br><span class=\"line\"></span><br><span class=\"line\">coordinates.each <span class=\"keyword\">do</span> |coord|</span><br><span class=\"line\"> x += coord[<span class=\"string\">\"x\"</span>].as_f</span><br><span class=\"line\"> y += coord[<span class=\"string\">\"y\"</span>].as_f</span><br><span class=\"line\"> z += coord[<span class=\"string\">\"z\"</span>].as_f</span><br><span class=\"line\"><span class=\"keyword\">end</span></span><br><span class=\"line\"></span><br><span class=\"line\">p x / len</span><br><span class=\"line\">p y / len</span><br><span class=\"line\">p z / len</span><br></pre></td></tr></table></figure>\n\n<h3 id=\"Results\"><a href=\"#Results\" class=\"headerlink\" title=\"Results:\"></a>Results:</h3><p>Building our test files into tiny release packages with the respective commands below:</p>\n<figure class=\"highlight plain\"><table><tr><td class=\"code\"><pre><span class=\"line\">$ crystal build json_test.cr --release -o json_test_cr --no-debug</span><br></pre></td></tr></table></figure>\n\n<figure class=\"highlight plain\"><table><tr><td class=\"code\"><pre><span class=\"line\">$ nim c -o:json_test_nim -d:danger --cc:gcc --verbosity:0 json_test.nim</span><br></pre></td></tr></table></figure>\n\n<p>We can then time & run those packages, to obtain our test results:</p>\n<table>\n<thead>\n<tr>\n<th>Language</th>\n<th>Time (s)</th>\n<th>Memory (Mb)</th>\n</tr>\n</thead>\n<tbody><tr>\n<td>Nim</td>\n<td>6.92</td>\n<td>1320.4</td>\n</tr>\n<tr>\n<td>Crystal</td>\n<td>4.58</td>\n<td>960.7</td>\n</tr>\n</tbody></table>\n<p>As you can see; in this case <strong><em>Crystal</em></strong> is the more performant language – taking less time to execute & complete the test, and also fewer Megabytes in memory doing so.</p>\n<br/>\n\n<h3 id=\"Base64-encoding-decoding-a-large-blob\"><a href=\"#Base64-encoding-decoding-a-large-blob\" class=\"headerlink\" title=\"Base64 encoding / decoding a large blob:\"></a>Base64 encoding / decoding a large blob:</h3><p>In this test; we will firstly encode and then decode a string, with a current timestamp into newly allocated buffers, utilising the Base64 algorithm. For starters, let’s look at the <strong><em>Nim</em></strong> test:</p>\n<figure class=\"highlight nim\"><table><tr><td class=\"code\"><pre><span class=\"line\"><span class=\"keyword\">import</span> base64, times, strutils, strformat</span><br><span class=\"line\"></span><br><span class=\"line\"><span class=\"keyword\">let</span> <span class=\"type\">STR_SIZE</span> = <span class=\"number\">131072</span></span><br><span class=\"line\"><span class=\"keyword\">let</span> <span class=\"type\">TRIES</span> = <span class=\"number\">8192</span></span><br><span class=\"line\"><span class=\"keyword\">let</span> str = strutils.repeat('a', <span class=\"type\">STR_SIZE</span>)</span><br><span class=\"line\"></span><br><span class=\"line\"><span class=\"keyword\">var</span> str2 = base64.encode(str)</span><br><span class=\"line\"><span class=\"literal\">stdout</span>.write(<span class=\"string\">fmt\"encode {str[..3]}... to {str2[..3]}...: \"</span>)</span><br><span class=\"line\"></span><br><span class=\"line\"><span class=\"keyword\">var</span> t = times.epochTime()</span><br><span class=\"line\"><span class=\"keyword\">var</span> i = <span class=\"number\">0</span></span><br><span class=\"line\"><span class=\"keyword\">var</span> s:<span class=\"built_in\">int64</span> = <span class=\"number\">0</span></span><br><span class=\"line\"><span class=\"keyword\">while</span> i < <span class=\"type\">TRIES</span>:</span><br><span class=\"line\"> str2 = base64.encode(str)</span><br><span class=\"line\"> s += len(str2)</span><br><span class=\"line\"> i += <span class=\"number\">1</span></span><br><span class=\"line\">echo(<span class=\"string\">fmt\"{s}, {formatFloat(times.epochTime() - t, ffDefault, 6)}\"</span>)</span><br><span class=\"line\"></span><br><span class=\"line\"><span class=\"keyword\">var</span> str3 = base64.decode(str2)</span><br><span class=\"line\"><span class=\"literal\">stdout</span>.write(<span class=\"string\">fmt\"decode {str2[..3]}... to {str3[..3]}...: \"</span>)</span><br><span class=\"line\"></span><br><span class=\"line\">t = times.epochTime()</span><br><span class=\"line\">i = <span class=\"number\">0</span></span><br><span class=\"line\">s = <span class=\"number\">0</span></span><br><span class=\"line\"><span class=\"keyword\">while</span> i < <span class=\"type\">TRIES</span>:</span><br><span class=\"line\"> str3 = base64.decode(str2)</span><br><span class=\"line\"> s += len(str3)</span><br><span class=\"line\"> i += <span class=\"number\">1</span></span><br><span class=\"line\">echo(<span class=\"string\">fmt\"{s}, {formatFloat(times.epochTime() - t, ffDefault, 6)}\"</span>)</span><br></pre></td></tr></table></figure>\n\n<p>And now the same test, written in Crystal:</p>\n<figure class=\"highlight crystal\"><table><tr><td class=\"code\"><pre><span class=\"line\"><span class=\"keyword\">require</span> <span class=\"string\">\"base64\"</span></span><br><span class=\"line\"></span><br><span class=\"line\">STR_SIZE = <span class=\"number\">131072</span></span><br><span class=\"line\">TRIES = <span class=\"number\">8192</span></span><br><span class=\"line\"></span><br><span class=\"line\">str = <span class=\"string\">\"a\"</span> * STR_SIZE</span><br><span class=\"line\"></span><br><span class=\"line\">str2 = Base64.strict_encode(str)</span><br><span class=\"line\">print <span class=\"string\">\"encode <span class=\"subst\">#{str[<span class=\"number\">0</span>..<span class=\"number\">3</span>]}</span>... to <span class=\"subst\">#{str2[<span class=\"number\">0</span>..<span class=\"number\">3</span>]}</span>...: \"</span></span><br><span class=\"line\"></span><br><span class=\"line\">t, s = Time.local, <span class=\"number\">0</span></span><br><span class=\"line\">TRIES.times <span class=\"keyword\">do</span> |i|</span><br><span class=\"line\"> str2 = Base64.strict_encode(str)</span><br><span class=\"line\"> s += str2.bytesize</span><br><span class=\"line\"><span class=\"keyword\">end</span></span><br><span class=\"line\">puts <span class=\"string\">\"<span class=\"subst\">#{s}</span>, <span class=\"subst\">#{Time.local - t}</span>\"</span></span><br><span class=\"line\"></span><br><span class=\"line\">str3 = Base64.decode_string(str2)</span><br><span class=\"line\">print <span class=\"string\">\"decode <span class=\"subst\">#{str2[<span class=\"number\">0</span>..<span class=\"number\">3</span>]}</span>... to <span class=\"subst\">#{str3[<span class=\"number\">0</span>..<span class=\"number\">3</span>]}</span>...: \"</span></span><br><span class=\"line\"></span><br><span class=\"line\">t, s = Time.local, <span class=\"number\">0</span></span><br><span class=\"line\">TRIES.times <span class=\"keyword\">do</span> |i|</span><br><span class=\"line\"> str3 = Base64.decode_string(str2)</span><br><span class=\"line\"> s += str3.bytesize</span><br><span class=\"line\"><span class=\"keyword\">end</span></span><br><span class=\"line\">puts <span class=\"string\">\"<span class=\"subst\">#{s}</span>, <span class=\"subst\">#{Time.local - t}</span>\"</span></span><br></pre></td></tr></table></figure>\n\n<h3 id=\"Results-1\"><a href=\"#Results-1\" class=\"headerlink\" title=\"Results:\"></a>Results:</h3><p>We can again; build our Base64 test files into release packages with the respective commands below:</p>\n<figure class=\"highlight plain\"><table><tr><td class=\"code\"><pre><span class=\"line\">$ crystal build base64_test.cr --release -o base64_test_cr --no-debug</span><br></pre></td></tr></table></figure>\n\n<figure class=\"highlight plain\"><table><tr><td class=\"code\"><pre><span class=\"line\">$ nim c -o:base64_test_nim -d:danger --cc:gcc --verbosity:0 base64_test.nim</span><br></pre></td></tr></table></figure>\n\n<p>As with our last test suite, we can then time & run those packages, to obtain our test results:</p>\n<table>\n<thead>\n<tr>\n<th>Language</th>\n<th>Time (s)</th>\n<th>Memory (Mb)</th>\n</tr>\n</thead>\n<tbody><tr>\n<td>Nim</td>\n<td>4.17</td>\n<td>6.6</td>\n</tr>\n<tr>\n<td>Crystal</td>\n<td>2.36</td>\n<td>3.5</td>\n</tr>\n</tbody></table>\n<p>Once again, to my surprise, Crystal came out on top. And did again and again for me, running a bunch of different tests I could scrape together from other curious devs.</p>\n<h2 id=\"Conclusion\"><a href=\"#Conclusion\" class=\"headerlink\" title=\"Conclusion\"></a>Conclusion</h2><p>The summary of this first-in-series article, is most definitely one of surprise. I already knew that Crystal was a highly-performant language, and I have previously done my own research & testing to see how close to <em>C speeds</em> it could achieve. That being said, I was <em>also</em> already aware that Nim <strong>claims</strong> close to C speeds, and that one of the language’s principals was to run well on old & less-performant hardware.</p>\n<p>Yet, Crystal beat not only my own expectations; but beat Nim for both memory usage <strong>AND</strong> execution times. I really didn’t expect to see Crystal come out <em>this</em> far ahead in performance. On the other hand, Nim came out by-far the leader when it comes to language interoperability. <strong>Nim makes it even easier</strong> than Crystal when interfacing other langs – not something I thought possible, given just how easy Crystal makes the task.</p>\n<p>In conclusion, it seems that we have 1 point for Nim (interoperability), and 1 point for Crystal (performance). Both languages have pleasantly surprised me, and I look forward to diving into the next topics in the series:</p>\n<ul>\n<li>Part 2: Threading and Tooling</li>\n<li>Part 3: Crypto, DApps and P2P</li>\n</ul>\n<p>These two articles will be released over the next couple of days, so don’t forget to come back then to check them out!</p>\n<p>Thanks for reading - as ever, if you have any questions, please feel free to reach out at <a href=\"mailto:robin@status.im\">robin@status</a>.</p>\n<p><a href=\"https://twitter.com/rbin\"> - <strong>@rbin</strong></a></p>\n","site":{"data":{"authors":{"iuri_matias":{"name":"Iuri Matias","twitter":"iurimatias","image":"https://pbs.twimg.com/profile_images/928272512181563392/iDJdvy2k_400x400.jpg"},"pascal_precht":{"name":"Pascal Precht","twitter":"pascalprecht","image":"https://pbs.twimg.com/profile_images/993785060733194241/p3oAIMDP_400x400.jpg"},"anthony_laibe":{"name":"Anthony Laibe","twitter":"a_laibe","image":"https://pbs.twimg.com/profile_images/257742900/13168239_400x400.jpg"},"jonathan_rainville":{"name":"Jonathan Rainville","twitter":"ShyolGhul","image":"https://pbs.twimg.com/profile_images/993873866878570496/-aE4byjj_400x400.jpg"},"andre_medeiros":{"name":"Andre Medeiros","twitter":"superdealloc","image":"https://pbs.twimg.com/profile_images/965722487735701504/m58KNgWN_400x400.jpg"},"eric_mastro":{"name":"Eric Mastro","twitter":"ericmastro","image":"https://avatars1.githubusercontent.com/u/5089238?s=460&v=4"},"michael_bradley":{"name":"Michael Bradley","image":"https://avatars3.githubusercontent.com/u/194260?s=460&v=4"},"richard_ramos":{"name":"Richard Ramos","twitter":"richardramos_me","image":"https://devcon.org/images/speakers/richard_ramos.jpg"},"jonny_zerah":{"name":"Jonny Zerah","twitter":"jonnyzerah","image":"https://pbs.twimg.com/profile_images/1043774340490248192/gI9aGy17_400x400.jpg"},"robin_percy":{"name":"Robin Percy","twitter":"rbin","image":"https://avatars1.githubusercontent.com/u/29288325?s=400&v=4"}},"categories":{"tutorials":"Tutorials","announcements":"Announcements"},"languages":{"en":"English"}}},"excerpt":"","more":"<p><img src=\"/assets/images/nim-crystal-header-img_NEW.jpg\" alt=\"crystal vs nim\"></p>\n<p>I’ve been wanting to write-up a comparison on Nim and Crystal for quite some time now, and I’m happy that I’m finally able to do so. What I’ve decided on doing; is breaking this up into a three part series as there are <strong><em>SO</em></strong> many features of both languages I’d like to talk about, and therein many opinions held too. I do have a habit of writing <strong>very</strong> long articles, so I’d like to limit the topic scope, to keep each of these a little snappier!</p>\n<p>Before I go into specifics on either of these languages, I’d first like to go into my reasons for first learning both languages, and briefly touch on my past experiences with the two of them. I admit that I <em>have</em> had more experience with Crystal than I have with Nim; however, I will give an objective view of both languages until I go into my personal preference towards the end of each article in this series.</p>\n<blockquote class=\"twitter-tweet\"><p lang=\"en\" dir=\"ltr\">crystal or nim? Both super immature but fun</p>— @r4vi (@r4vi) <a href=\"https://twitter.com/r4vi/status/874741870093623296?ref_src=twsrc%5Etfw\">June 13, 2017</a></blockquote> <script async src=\"https://platform.twitter.com/widgets.js\" charset=\"utf-8\"></script>\n\n<p>Back in mid-2017, I sent out a tweet asking my dev followers which low-level languages they would recommend I take a look at. For a while before this, I had been waiting for a new systems language for me to learn, but until this tweet, I never really found one that I was <em>actually</em> interested in taking a look at.</p>\n<p>Naturally, both languages have a <strong>TONNE</strong> of features, so I’m not going to go into details on things like basic types, etc. I will simply compare the biggest things that attracted me to both languages. For in-depth tutorials on the features of both langs, check out the <a href=\"https://crystal-lang.org/reference/\">Crystal Docs</a>, or the <a href=\"https://nim-lang.org/docs/lib.html\">Nim Docs</a>.</p>\n<p>Anyway, let’s take a look at both languages, and you can make your own mind up as to which you’d rather be programming in. Maybe both. Maybe neither!</p>\n<br/>\n\n<h2 id=\"Nim\"><a href=\"#Nim\" class=\"headerlink\" title=\"Nim\"></a>Nim</h2><p>Nim is a statically-typed, imperative, systems programming language; aiming to achieve the performance of C, be as expressive as Lisp, and have a simple, clear syntax like Python. I have to say, from my experience Nim manages to <strong><em>pretty much</em></strong> fit these criterion.</p>\n<blockquote>\n<p>By compiling to C, Nim is able to take advantage of many features offered by modern C compilers. The primary benefits gained by this compilation model include incredible portability and optimisations.</p>\n</blockquote>\n<blockquote>\n<p>The binaries produced by Nim have zero dependencies and are typically very small. This makes their distribution easy and keeps your users happy.</p>\n</blockquote>\n<p>When I say it <em>pretty much</em> matches the criteria, the only statement that doesn’t quite match is achieving the performance of C. In realise this is an almost impossible task, but Nim actually did fall short on a few occasions when it came to performance. I will go into detail about this later on in the article.</p>\n<h3 id=\"Installing-Nim\"><a href=\"#Installing-Nim\" class=\"headerlink\" title=\"Installing Nim\"></a>Installing Nim</h3><p>Nim is super easy to install. If you’re on Windows, <a href=\"https://nim-lang.org/install_windows.html\">head over here</a>, and download/run the installer.</p>\n<p>If you’re on any other Unix-based system, you can run:</p>\n<figure class=\"highlight plain\"><table><tr><td class=\"code\"><pre><span class=\"line\">$ curl https://nim-lang.org/choosenim/init.sh -sSf | sh`</span><br></pre></td></tr></table></figure>\n\n<p>If you’re on Mac, and with Homebrew installed, simply run:</p>\n<figure class=\"highlight plain\"><table><tr><td class=\"code\"><pre><span class=\"line\">$ brew install nim</span><br></pre></td></tr></table></figure>\n\n<p>You could also consider using <a href=\"https://github.com/dom96/choosenim\">choosenim</a> to manage Nim installations in a similar way to <code>pyenv</code> and <code>rustup</code>.</p>\n<h3 id=\"Interfacing-Other-Languages\"><a href=\"#Interfacing-Other-Languages\" class=\"headerlink\" title=\"Interfacing Other Languages\"></a>Interfacing Other Languages</h3><p>One of the things that attracted me to both Nim <strong>and</strong> Crystal, was the ability to natively interface with other languages, and the <strong>ease</strong> with which that is achieved. Nim has bidirectional interfacing not only with C, but also natively with JavaScript. Crystal natively interfaces with C, but is only unidirectional. Definitely a point scored here for Nim!</p>\n<p>When it comes to building DApps, the variety of target hardware they must be run on is already large, and growing all the time. The low-level ability to interop with other languages makes for both languages being a much more attractive proposition.</p>\n<p>For a quick demo, let’s take a look at interfacing both C and JavaScript from Nim.</p>\n<h4 id=\"C-Invocation\"><a href=\"#C-Invocation\" class=\"headerlink\" title=\"C Invocation\"></a>C Invocation</h4><p>Firstly, create the file <code>logic.c</code> with the following content:</p>\n<figure class=\"highlight c\"><table><tr><td class=\"code\"><pre><span class=\"line\"><span class=\"function\"><span class=\"keyword\">int</span> <span class=\"title\">addTwoIntegers</span><span class=\"params\">(<span class=\"keyword\">int</span> a, <span class=\"keyword\">int</span> b)</span></span></span><br><span class=\"line\"><span class=\"function\"></span>{</span><br><span class=\"line\"> <span class=\"keyword\">return</span> a + b;</span><br><span class=\"line\">}</span><br></pre></td></tr></table></figure>\n\n<p>Next, create the file <code>calculator.nim</code> with the following content:</p>\n<figure class=\"highlight nim\"><table><tr><td class=\"code\"><pre><span class=\"line\"><span class=\"meta\">{.compile: \"logic.c\".}</span></span><br><span class=\"line\"><span class=\"keyword\">proc</span> addTwoIntegers(a, b: <span class=\"built_in\">cint</span>): <span class=\"built_in\">cint</span> <span class=\"meta\">{.importc.}</span></span><br><span class=\"line\"></span><br><span class=\"line\"><span class=\"keyword\">when</span> isMainModule:</span><br><span class=\"line\"> echo addTwoIntegers(<span class=\"number\">3</span>, <span class=\"number\">7</span>)</span><br></pre></td></tr></table></figure>\n\n<p>Now then, with these two <em>very simple</em> files in place, we can run:</p>\n<figure class=\"highlight plain\"><table><tr><td class=\"code\"><pre><span class=\"line\">$ nim c -r calculator.nim</span><br></pre></td></tr></table></figure>\n\n<p>The Nim compiler will compile the <code>logic.c</code> file in addition to <code>calculator.nim</code> and link both into an executable; which outputs <code>10</code> when run. Very sharp, in my opinion!</p>\n<h4 id=\"JavaScript-Invocation\"><a href=\"#JavaScript-Invocation\" class=\"headerlink\" title=\"JavaScript Invocation\"></a>JavaScript Invocation</h4><p>Even sharper, in my opinion, is the ability to interop with JavaScript. Create a file titled <code>host.html</code> with the following content:</p>\n<figure class=\"highlight html\"><table><tr><td class=\"code\"><pre><span class=\"line\"><span class=\"tag\"><<span class=\"name\">html</span>></span></span><br><span class=\"line\"><span class=\"tag\"><<span class=\"name\">body</span>></span></span><br><span class=\"line\"> <span class=\"tag\"><<span class=\"name\">script</span> <span class=\"attr\">type</span>=<span class=\"string\">\"text/javascript\"</span>></span></span><br><span class=\"line\"><span class=\"actionscript\"> <span class=\"function\"><span class=\"keyword\">function</span> <span class=\"title\">addTwoIntegers</span><span class=\"params\">(a, b)</span></span></span></span><br><span class=\"line\"> {</span><br><span class=\"line\"><span class=\"actionscript\"> <span class=\"keyword\">return</span> a + b;</span></span><br><span class=\"line\"> }</span><br><span class=\"line\"> <span class=\"tag\"></<span class=\"name\">script</span>></span></span><br><span class=\"line\"></span><br><span class=\"line\"> <span class=\"tag\"><<span class=\"name\">script</span> <span class=\"attr\">type</span>=<span class=\"string\">\"text/javascript\"</span> <span class=\"attr\">src</span>=<span class=\"string\">\"calculator.js\"</span>></span><span class=\"tag\"></<span class=\"name\">script</span>></span></span><br><span class=\"line\"><span class=\"tag\"></<span class=\"name\">body</span>></span></span><br><span class=\"line\"><span class=\"tag\"></<span class=\"name\">html</span>></span></span><br></pre></td></tr></table></figure>\n\n<p>Now, create another <code>calculator.nim</code> file with the following content (or reuse the one from the above C example):</p>\n<figure class=\"highlight nim\"><table><tr><td class=\"code\"><pre><span class=\"line\"><span class=\"keyword\">proc</span> addTwoIntegers(a, b: <span class=\"built_in\">int</span>): <span class=\"built_in\">int</span> <span class=\"meta\">{.importc.}</span></span><br><span class=\"line\"></span><br><span class=\"line\"><span class=\"keyword\">when</span> isMainModule:</span><br><span class=\"line\"> echo addTwoIntegers(<span class=\"number\">3</span>, <span class=\"number\">7</span>)</span><br></pre></td></tr></table></figure>\n\n\n<p>Compile the Nim code to JavaScript by running:</p>\n<figure class=\"highlight plain\"><table><tr><td class=\"code\"><pre><span class=\"line\">$ nim js -o:calculator.js calculator.nim</span><br></pre></td></tr></table></figure>\n\n<p>Once that’s done, go ahead and open <code>host.html</code> in a browser and you should see the value <code>10</code> in the browser’s console. I think this is <strong>REALLY</strong> neat. It’s superb how easy it is to achieve that, too.</p>\n<h3 id=\"Aside-–-a-Quick-not-so-Secret\"><a href=\"#Aside-–-a-Quick-not-so-Secret\" class=\"headerlink\" title=\"Aside – a Quick (not-so) Secret:\"></a>Aside – a Quick (not-so) Secret:</h3><p>Instead of writing out the HTML above, you could actually use <strong><em>Nim’s native</em></strong> HTML DSL:</p>\n<figure class=\"highlight nim\"><table><tr><td class=\"code\"><pre><span class=\"line\"><span class=\"keyword\">import</span> html_dsl</span><br><span class=\"line\"></span><br><span class=\"line\">html page:</span><br><span class=\"line\"> head:</span><br><span class=\"line\"> title(<span class=\"string\">\"Title\"</span>)</span><br><span class=\"line\"> body:</span><br><span class=\"line\"> p(<span class=\"string\">\"Hello\"</span>)</span><br><span class=\"line\"> p(<span class=\"string\">\"World\"</span>)</span><br><span class=\"line\"> dv:</span><br><span class=\"line\"> p <span class=\"string\">\"Example\"</span></span><br><span class=\"line\"></span><br><span class=\"line\">echo render(page())</span><br></pre></td></tr></table></figure>\n\n<p>Running this will output the following:</p>\n<figure class=\"highlight html\"><table><tr><td class=\"code\"><pre><span class=\"line\"><span class=\"meta\"><!DOCTYPE html></span></span><br><span class=\"line\"> <span class=\"tag\"><<span class=\"name\">html</span> <span class=\"attr\">class</span>=<span class=\"string\">'has-navbar-fixed-top'</span> ></span></span><br><span class=\"line\"> <span class=\"tag\"><<span class=\"name\">head</span>></span></span><br><span class=\"line\"> <span class=\"tag\"><<span class=\"name\">meta</span> <span class=\"attr\">charset</span>=<span class=\"string\">\"utf-8\"</span>></span></span><br><span class=\"line\"> <span class=\"tag\"><<span class=\"name\">meta</span> <span class=\"attr\">name</span>=<span class=\"string\">\"viewport\"</span> <span class=\"attr\">content</span>=<span class=\"string\">\"width=device-width, initial-scale=1\"</span>></span></span><br><span class=\"line\"> <span class=\"tag\"><<span class=\"name\">title</span>></span>Title<span class=\"tag\"></<span class=\"name\">title</span>></span></span><br><span class=\"line\"> <span class=\"tag\"></<span class=\"name\">head</span>></span></span><br><span class=\"line\"> <span class=\"tag\"><<span class=\"name\">body</span> <span class=\"attr\">class</span>=<span class=\"string\">'has-navbar-fixed-top'</span> ></span></span><br><span class=\"line\"> <span class=\"tag\"><<span class=\"name\">p</span> ></span>Hello<span class=\"tag\"></<span class=\"name\">p</span>></span></span><br><span class=\"line\"> <span class=\"tag\"><<span class=\"name\">p</span> ></span>World<span class=\"tag\"></<span class=\"name\">p</span>></span></span><br><span class=\"line\"> <span class=\"tag\"><<span class=\"name\">div</span>></span></span><br><span class=\"line\"> <span class=\"tag\"><<span class=\"name\">p</span>></span>Example<span class=\"tag\"></<span class=\"name\">p</span>></span></span><br><span class=\"line\"> <span class=\"tag\"></<span class=\"name\">div</span>></span></span><br><span class=\"line\"> <span class=\"tag\"></<span class=\"name\">body</span>></span></span><br><span class=\"line\"><span class=\"tag\"></<span class=\"name\">html</span>></span></span><br></pre></td></tr></table></figure>\n\n\n<br/>\n\n<h2 id=\"Crystal\"><a href=\"#Crystal\" class=\"headerlink\" title=\"Crystal\"></a>Crystal</h2><p>Crystal is a statically-typed, object-oriented, systems programming language; with the aim of achieving the speed and performance of c/c++, whilst having a syntax as simple, readable, and easy to learn as Ruby.</p>\n<p>I first came across Crystal when I saw <a href=\"https://twitter.com/sferik\">@sferik</a> giving a talk on it in Poland back in 2015. <a href=\"https://www.youtube.com/watch?v=Ysm4IU4aWoQ\">Video here.</a> It was a great talk, and sparked my interest in Crystal right there and then. When I initially explored Crystal I thought it looked awesome, but I was too busy with all the other languages I was using on a daily basis, to be able to focus my time on it properly.</p>\n<h3 id=\"Installing-Crystal\"><a href=\"#Installing-Crystal\" class=\"headerlink\" title=\"Installing Crystal\"></a>Installing Crystal</h3><p>You can find all of the relevant instructions for installing Crystal, on the <a href=\"https://crystal-lang.org/install/\">main website installation page</a>.</p>\n<p>If you are on Mac, and have Homebrew installed, you can simply run:</p>\n<figure class=\"highlight plain\"><table><tr><td class=\"code\"><pre><span class=\"line\">$ brew install crystal</span><br></pre></td></tr></table></figure>\n\n<p><strong>However</strong>, if you are a Windows user, <em>for the time being</em> you are out of luck, unless you use the Windows Subsystem for Linux. If I were in a more shocking/pedantic mood, I’d take a (not yet gained) point <strong>away</strong> from Crystal here, for lack of Windows support.</p>\n<h3 id=\"Interfacing-C\"><a href=\"#Interfacing-C\" class=\"headerlink\" title=\"Interfacing C\"></a>Interfacing C</h3><p>Let’s build a simple script in C that says “hi!”. We’ll then write a Crystal app to bind to our C library. This is a great starting point for anyone who wants to know about binding C in Crystal.</p>\n<p>First off, let’s create a project with Crystal’s scaffolding tool (I’ll cover this feature later). Run:</p>\n<figure class=\"highlight plain\"><table><tr><td class=\"code\"><pre><span class=\"line\">$ crystal init app sayhi_c</span><br></pre></td></tr></table></figure>\n\n<p>Then head into the directory <code>sayhi_c/src/sayhi_c</code> and let’s create a file <code>sayhi.c</code> with the following contents:</p>\n<figure class=\"highlight c\"><table><tr><td class=\"code\"><pre><span class=\"line\"><span class=\"meta\">#<span class=\"meta-keyword\">include</span> <span class=\"meta-string\"><stdio.h></span></span></span><br><span class=\"line\"></span><br><span class=\"line\"><span class=\"function\"><span class=\"keyword\">void</span> <span class=\"title\">hi</span><span class=\"params\">(<span class=\"keyword\">const</span> <span class=\"keyword\">char</span> * name)</span></span>{</span><br><span class=\"line\"> <span class=\"built_in\">printf</span>(<span class=\"string\">\"Hi %s!\\n\"</span>, name);</span><br><span class=\"line\">}</span><br></pre></td></tr></table></figure>\n\n<p>Now we need to compile our C file into an object. On Ubuntu or Mac using gcc we can run:</p>\n<figure class=\"highlight plain\"><table><tr><td class=\"code\"><pre><span class=\"line\">$ gcc -c sayhi.c -o sayhi.o</span><br></pre></td></tr></table></figure>\n\n<p>Using the -o flags allow us to create an Object filetype. Once we’ve got our Object file, we can bind it from within our Crystal app. Open up our <code>sayhi_c.cr</code> file, and have it reflect the following:</p>\n<figure class=\"highlight crystal\"><table><tr><td class=\"code\"><pre><span class=\"line\"><span class=\"keyword\">require</span> <span class=\"string\">\"./sayhi_c/*\"</span></span><br><span class=\"line\"></span><br><span class=\"line\"><span class=\"meta\">@[Link(ldflags: <span class=\"meta-string\">\"#{__DIR__}/sayhi_c/sayhi.o\"</span>)]</span></span><br><span class=\"line\"></span><br><span class=\"line\"><span class=\"class\"><span class=\"keyword\">lib</span> <span class=\"title\">Say</span></span></span><br><span class=\"line\"> <span class=\"function\"><span class=\"keyword\">fun</span> <span class=\"title\">hi</span></span>(name : <span class=\"symbol\">LibC:</span>:Char*) : Void</span><br><span class=\"line\"><span class=\"keyword\">end</span></span><br><span class=\"line\"></span><br><span class=\"line\">Say.hi(<span class=\"string\">\"Status\"</span>)</span><br></pre></td></tr></table></figure>\n\n<p>I’ll mention now that there are no implicit type conversions except to_unsafe - explained here when invoking a C function: you must pass the exact type that is expected.</p>\n<p>Also worth noting at this point is that since we have built our C file into an object file, we can include it in the project directory and link from there. When we want to link dynamic libraries or installed C packages, we can just link them without including a path.</p>\n<p>So, if we build our project file and run it, we get the following:</p>\n<figure class=\"highlight plain\"><table><tr><td class=\"code\"><pre><span class=\"line\">$ crystal build --release src/sayhi_c.cr</span><br><span class=\"line\"></span><br><span class=\"line\">$ ./sayhi_c</span><br><span class=\"line\"></span><br><span class=\"line\"> > Hi Status!</span><br></pre></td></tr></table></figure>\n\n<p>As you can see, Nim takes the winners trophy in this case, as it is <strong>much</strong> simpler to achieve a similar goal. With Nim, we were also able to link both the Nim and C files into the same executable, which Crystal sadly cannot do.</p>\n<br/>\n\n<h2 id=\"Performance-Tests\"><a href=\"#Performance-Tests\" class=\"headerlink\" title=\"Performance Tests\"></a>Performance Tests</h2><h3 id=\"Parsing-amp-calculating-values-from-a-large-JSON-file\"><a href=\"#Parsing-amp-calculating-values-from-a-large-JSON-file\" class=\"headerlink\" title=\"Parsing & calculating values from a large JSON file:\"></a>Parsing & calculating values from a large JSON file:</h3><p>Firstly, we need to generate our large JSON file. For this test, we’re going to generate a dataset which includes <strong>1 Million</strong> items.</p>\n<center><iframe src=\"https://giphy.com/embed/13B1WmJg7HwjGU\" width=\"480\" height=\"270\" frameBorder=\"0\"></iframe></center>\n\n<p>We can do so with the following Ruby script:</p>\n<figure class=\"highlight rb\"><table><tr><td class=\"code\"><pre><span class=\"line\"><span class=\"keyword\">require</span> <span class=\"string\">'json'</span></span><br><span class=\"line\"></span><br><span class=\"line\">x = []</span><br><span class=\"line\"></span><br><span class=\"line\"><span class=\"number\">1000000</span>.times <span class=\"keyword\">do</span></span><br><span class=\"line\"> h = {</span><br><span class=\"line\"> <span class=\"string\">'x'</span> => rand,</span><br><span class=\"line\"> <span class=\"string\">'y'</span> => rand,</span><br><span class=\"line\"> <span class=\"string\">'z'</span> => rand,</span><br><span class=\"line\"> <span class=\"string\">'name'</span> => (<span class=\"string\">'a'</span>..<span class=\"string\">'z'</span>).to_a.shuffle[<span class=\"number\">0</span>..<span class=\"number\">5</span>].join + <span class=\"string\">' '</span> + rand(<span class=\"number\">10000</span>).to_s,</span><br><span class=\"line\"> <span class=\"string\">'opts'</span> => {<span class=\"string\">'1'</span> => [<span class=\"number\">1</span>, <span class=\"literal\">true</span>]},</span><br><span class=\"line\"> }</span><br><span class=\"line\"> x << h</span><br><span class=\"line\"><span class=\"keyword\">end</span></span><br><span class=\"line\"></span><br><span class=\"line\">File.open(<span class=\"string\">\"1.json\"</span>, <span class=\"string\">'w'</span>) { <span class=\"params\">|f|</span> f.write JSON.pretty_generate(<span class=\"string\">'coordinates'</span> => x, <span class=\"string\">'info'</span> => <span class=\"string\">\"some info\"</span>) }</span><br></pre></td></tr></table></figure>\n\n<p>This will generate a JSON file <strong>of around 212mb</strong>, with the following syntax:</p>\n<figure class=\"highlight json\"><table><tr><td class=\"code\"><pre><span class=\"line\">{</span><br><span class=\"line\"> <span class=\"attr\">\"coordinates\"</span>: [</span><br><span class=\"line\"> {</span><br><span class=\"line\"> <span class=\"attr\">\"x\"</span>: <span class=\"number\">0.10327081810860272</span>,</span><br><span class=\"line\"> <span class=\"attr\">\"y\"</span>: <span class=\"number\">0.03247172212368832</span>,</span><br><span class=\"line\"> <span class=\"attr\">\"z\"</span>: <span class=\"number\">0.8155255437507467</span>,</span><br><span class=\"line\"> <span class=\"attr\">\"name\"</span>: <span class=\"string\">\"scojbq 5965\"</span>,</span><br><span class=\"line\"> <span class=\"attr\">\"opts\"</span>: {</span><br><span class=\"line\"> <span class=\"attr\">\"1\"</span>: [</span><br><span class=\"line\"> <span class=\"number\">1</span>,</span><br><span class=\"line\"> <span class=\"literal\">true</span></span><br><span class=\"line\"> ]</span><br><span class=\"line\"> }</span><br><span class=\"line\"> }</span><br><span class=\"line\"> ],</span><br><span class=\"line\"> <span class=\"attr\">\"info\"</span>: <span class=\"string\">\"some info\"</span></span><br><span class=\"line\">}</span><br></pre></td></tr></table></figure>\n\n<p>Now that we have our chunky JSON file; we can write our first test – <strong>in Nim</strong>:</p>\n<figure class=\"highlight nim\"><table><tr><td class=\"code\"><pre><span class=\"line\"><span class=\"keyword\">import</span> json</span><br><span class=\"line\"></span><br><span class=\"line\"><span class=\"keyword\">let</span> jobj = parseFile(<span class=\"string\">\"1.json\"</span>)</span><br><span class=\"line\"></span><br><span class=\"line\"><span class=\"keyword\">let</span> coordinates = jobj[<span class=\"string\">\"coordinates\"</span>].elems</span><br><span class=\"line\"><span class=\"keyword\">let</span> len = <span class=\"built_in\">float</span>(coordinates.len)</span><br><span class=\"line\"><span class=\"keyword\">var</span> x = <span class=\"number\">0</span>.<span class=\"number\">0</span></span><br><span class=\"line\"><span class=\"keyword\">var</span> y = <span class=\"number\">0</span>.<span class=\"number\">0</span></span><br><span class=\"line\"><span class=\"keyword\">var</span> z = <span class=\"number\">0</span>.<span class=\"number\">0</span></span><br><span class=\"line\"></span><br><span class=\"line\"><span class=\"keyword\">for</span> coord <span class=\"keyword\">in</span> coordinates:</span><br><span class=\"line\"> x += coord[<span class=\"string\">\"x\"</span>].fnum</span><br><span class=\"line\"> y += coord[<span class=\"string\">\"y\"</span>].fnum</span><br><span class=\"line\"> z += coord[<span class=\"string\">\"z\"</span>].fnum</span><br><span class=\"line\"></span><br><span class=\"line\">echo x / len</span><br><span class=\"line\">echo y / len</span><br><span class=\"line\">echo z / len</span><br></pre></td></tr></table></figure>\n\n<p>And again; the same simple test, this time written <strong>in Crystal</strong>:</p>\n<figure class=\"highlight crystal\"><table><tr><td class=\"code\"><pre><span class=\"line\"><span class=\"keyword\">require</span> <span class=\"string\">\"json\"</span></span><br><span class=\"line\"></span><br><span class=\"line\">text = File.read(<span class=\"string\">\"1.json\"</span>)</span><br><span class=\"line\">jobj = JSON.parse(text)</span><br><span class=\"line\">coordinates = jobj[<span class=\"string\">\"coordinates\"</span>].as_a</span><br><span class=\"line\">len = coordinates.size</span><br><span class=\"line\">x = y = z = <span class=\"number\">0</span></span><br><span class=\"line\"></span><br><span class=\"line\">coordinates.each <span class=\"keyword\">do</span> |coord|</span><br><span class=\"line\"> x += coord[<span class=\"string\">\"x\"</span>].as_f</span><br><span class=\"line\"> y += coord[<span class=\"string\">\"y\"</span>].as_f</span><br><span class=\"line\"> z += coord[<span class=\"string\">\"z\"</span>].as_f</span><br><span class=\"line\"><span class=\"keyword\">end</span></span><br><span class=\"line\"></span><br><span class=\"line\">p x / len</span><br><span class=\"line\">p y / len</span><br><span class=\"line\">p z / len</span><br></pre></td></tr></table></figure>\n\n<h3 id=\"Results\"><a href=\"#Results\" class=\"headerlink\" title=\"Results:\"></a>Results:</h3><p>Building our test files into tiny release packages with the respective commands below:</p>\n<figure class=\"highlight plain\"><table><tr><td class=\"code\"><pre><span class=\"line\">$ crystal build json_test.cr --release -o json_test_cr --no-debug</span><br></pre></td></tr></table></figure>\n\n<figure class=\"highlight plain\"><table><tr><td class=\"code\"><pre><span class=\"line\">$ nim c -o:json_test_nim -d:danger --cc:gcc --verbosity:0 json_test.nim</span><br></pre></td></tr></table></figure>\n\n<p>We can then time & run those packages, to obtain our test results:</p>\n<table>\n<thead>\n<tr>\n<th>Language</th>\n<th>Time (s)</th>\n<th>Memory (Mb)</th>\n</tr>\n</thead>\n<tbody><tr>\n<td>Nim</td>\n<td>6.92</td>\n<td>1320.4</td>\n</tr>\n<tr>\n<td>Crystal</td>\n<td>4.58</td>\n<td>960.7</td>\n</tr>\n</tbody></table>\n<p>As you can see; in this case <strong><em>Crystal</em></strong> is the more performant language – taking less time to execute & complete the test, and also fewer Megabytes in memory doing so.</p>\n<br/>\n\n<h3 id=\"Base64-encoding-decoding-a-large-blob\"><a href=\"#Base64-encoding-decoding-a-large-blob\" class=\"headerlink\" title=\"Base64 encoding / decoding a large blob:\"></a>Base64 encoding / decoding a large blob:</h3><p>In this test; we will firstly encode and then decode a string, with a current timestamp into newly allocated buffers, utilising the Base64 algorithm. For starters, let’s look at the <strong><em>Nim</em></strong> test:</p>\n<figure class=\"highlight nim\"><table><tr><td class=\"code\"><pre><span class=\"line\"><span class=\"keyword\">import</span> base64, times, strutils, strformat</span><br><span class=\"line\"></span><br><span class=\"line\"><span class=\"keyword\">let</span> <span class=\"type\">STR_SIZE</span> = <span class=\"number\">131072</span></span><br><span class=\"line\"><span class=\"keyword\">let</span> <span class=\"type\">TRIES</span> = <span class=\"number\">8192</span></span><br><span class=\"line\"><span class=\"keyword\">let</span> str = strutils.repeat('a', <span class=\"type\">STR_SIZE</span>)</span><br><span class=\"line\"></span><br><span class=\"line\"><span class=\"keyword\">var</span> str2 = base64.encode(str)</span><br><span class=\"line\"><span class=\"literal\">stdout</span>.write(<span class=\"string\">fmt\"encode {str[..3]}... to {str2[..3]}...: \"</span>)</span><br><span class=\"line\"></span><br><span class=\"line\"><span class=\"keyword\">var</span> t = times.epochTime()</span><br><span class=\"line\"><span class=\"keyword\">var</span> i = <span class=\"number\">0</span></span><br><span class=\"line\"><span class=\"keyword\">var</span> s:<span class=\"built_in\">int64</span> = <span class=\"number\">0</span></span><br><span class=\"line\"><span class=\"keyword\">while</span> i < <span class=\"type\">TRIES</span>:</span><br><span class=\"line\"> str2 = base64.encode(str)</span><br><span class=\"line\"> s += len(str2)</span><br><span class=\"line\"> i += <span class=\"number\">1</span></span><br><span class=\"line\">echo(<span class=\"string\">fmt\"{s}, {formatFloat(times.epochTime() - t, ffDefault, 6)}\"</span>)</span><br><span class=\"line\"></span><br><span class=\"line\"><span class=\"keyword\">var</span> str3 = base64.decode(str2)</span><br><span class=\"line\"><span class=\"literal\">stdout</span>.write(<span class=\"string\">fmt\"decode {str2[..3]}... to {str3[..3]}...: \"</span>)</span><br><span class=\"line\"></span><br><span class=\"line\">t = times.epochTime()</span><br><span class=\"line\">i = <span class=\"number\">0</span></span><br><span class=\"line\">s = <span class=\"number\">0</span></span><br><span class=\"line\"><span class=\"keyword\">while</span> i < <span class=\"type\">TRIES</span>:</span><br><span class=\"line\"> str3 = base64.decode(str2)</span><br><span class=\"line\"> s += len(str3)</span><br><span class=\"line\"> i += <span class=\"number\">1</span></span><br><span class=\"line\">echo(<span class=\"string\">fmt\"{s}, {formatFloat(times.epochTime() - t, ffDefault, 6)}\"</span>)</span><br></pre></td></tr></table></figure>\n\n<p>And now the same test, written in Crystal:</p>\n<figure class=\"highlight crystal\"><table><tr><td class=\"code\"><pre><span class=\"line\"><span class=\"keyword\">require</span> <span class=\"string\">\"base64\"</span></span><br><span class=\"line\"></span><br><span class=\"line\">STR_SIZE = <span class=\"number\">131072</span></span><br><span class=\"line\">TRIES = <span class=\"number\">8192</span></span><br><span class=\"line\"></span><br><span class=\"line\">str = <span class=\"string\">\"a\"</span> * STR_SIZE</span><br><span class=\"line\"></span><br><span class=\"line\">str2 = Base64.strict_encode(str)</span><br><span class=\"line\">print <span class=\"string\">\"encode <span class=\"subst\">#{str[<span class=\"number\">0</span>..<span class=\"number\">3</span>]}</span>... to <span class=\"subst\">#{str2[<span class=\"number\">0</span>..<span class=\"number\">3</span>]}</span>...: \"</span></span><br><span class=\"line\"></span><br><span class=\"line\">t, s = Time.local, <span class=\"number\">0</span></span><br><span class=\"line\">TRIES.times <span class=\"keyword\">do</span> |i|</span><br><span class=\"line\"> str2 = Base64.strict_encode(str)</span><br><span class=\"line\"> s += str2.bytesize</span><br><span class=\"line\"><span class=\"keyword\">end</span></span><br><span class=\"line\">puts <span class=\"string\">\"<span class=\"subst\">#{s}</span>, <span class=\"subst\">#{Time.local - t}</span>\"</span></span><br><span class=\"line\"></span><br><span class=\"line\">str3 = Base64.decode_string(str2)</span><br><span class=\"line\">print <span class=\"string\">\"decode <span class=\"subst\">#{str2[<span class=\"number\">0</span>..<span class=\"number\">3</span>]}</span>... to <span class=\"subst\">#{str3[<span class=\"number\">0</span>..<span class=\"number\">3</span>]}</span>...: \"</span></span><br><span class=\"line\"></span><br><span class=\"line\">t, s = Time.local, <span class=\"number\">0</span></span><br><span class=\"line\">TRIES.times <span class=\"keyword\">do</span> |i|</span><br><span class=\"line\"> str3 = Base64.decode_string(str2)</span><br><span class=\"line\"> s += str3.bytesize</span><br><span class=\"line\"><span class=\"keyword\">end</span></span><br><span class=\"line\">puts <span class=\"string\">\"<span class=\"subst\">#{s}</span>, <span class=\"subst\">#{Time.local - t}</span>\"</span></span><br></pre></td></tr></table></figure>\n\n<h3 id=\"Results-1\"><a href=\"#Results-1\" class=\"headerlink\" title=\"Results:\"></a>Results:</h3><p>We can again; build our Base64 test files into release packages with the respective commands below:</p>\n<figure class=\"highlight plain\"><table><tr><td class=\"code\"><pre><span class=\"line\">$ crystal build base64_test.cr --release -o base64_test_cr --no-debug</span><br></pre></td></tr></table></figure>\n\n<figure class=\"highlight plain\"><table><tr><td class=\"code\"><pre><span class=\"line\">$ nim c -o:base64_test_nim -d:danger --cc:gcc --verbosity:0 base64_test.nim</span><br></pre></td></tr></table></figure>\n\n<p>As with our last test suite, we can then time & run those packages, to obtain our test results:</p>\n<table>\n<thead>\n<tr>\n<th>Language</th>\n<th>Time (s)</th>\n<th>Memory (Mb)</th>\n</tr>\n</thead>\n<tbody><tr>\n<td>Nim</td>\n<td>4.17</td>\n<td>6.6</td>\n</tr>\n<tr>\n<td>Crystal</td>\n<td>2.36</td>\n<td>3.5</td>\n</tr>\n</tbody></table>\n<p>Once again, to my surprise, Crystal came out on top. And did again and again for me, running a bunch of different tests I could scrape together from other curious devs.</p>\n<h2 id=\"Conclusion\"><a href=\"#Conclusion\" class=\"headerlink\" title=\"Conclusion\"></a>Conclusion</h2><p>The summary of this first-in-series article, is most definitely one of surprise. I already knew that Crystal was a highly-performant language, and I have previously done my own research & testing to see how close to <em>C speeds</em> it could achieve. That being said, I was <em>also</em> already aware that Nim <strong>claims</strong> close to C speeds, and that one of the language’s principals was to run well on old & less-performant hardware.</p>\n<p>Yet, Crystal beat not only my own expectations; but beat Nim for both memory usage <strong>AND</strong> execution times. I really didn’t expect to see Crystal come out <em>this</em> far ahead in performance. On the other hand, Nim came out by-far the leader when it comes to language interoperability. <strong>Nim makes it even easier</strong> than Crystal when interfacing other langs – not something I thought possible, given just how easy Crystal makes the task.</p>\n<p>In conclusion, it seems that we have 1 point for Nim (interoperability), and 1 point for Crystal (performance). Both languages have pleasantly surprised me, and I look forward to diving into the next topics in the series:</p>\n<ul>\n<li>Part 2: Threading and Tooling</li>\n<li>Part 3: Crypto, DApps and P2P</li>\n</ul>\n<p>These two articles will be released over the next couple of days, so don’t forget to come back then to check them out!</p>\n<p>Thanks for reading - as ever, if you have any questions, please feel free to reach out at <a href=\"mailto:robin@status.im\">robin@status</a>.</p>\n<p><a href=\"https://twitter.com/rbin\"> - <strong>@rbin</strong></a></p>\n"},{"title":"Introduction to Web3 - What Are Your Options?","summary":"Web3.js is a collection of APIs giving us the ability to interact with, and send commands to, the Ethereum Network from a JavaScript frontend. In this article, I will go over the basics of what and why we need Web3.js.","author":"robin_percy","layout":"blog-post","image":"/assets/images/web3-article-header.png","_content":"\n\n\n> *This article is the first in my series of articles based on the frontend of the decentralised web. Throughout the series we'll look at [Web3.js](/news/2019/12/09/web3-what-are-your-options/) & accessing the Ethereum Blockchain client-side, [frontend security for DApps](/news/2020/01/30/dapp-frontend-security/), how [eWasm / WebAssembly](/news/2020/02/18/wasm-ewasm-what-and-why/) has become the \"4th language of the web\", and we'll build a realtime Blockchain explorer app with Phoenix LiveView!*\n\n## Introduction\n\nTo kick this article off, I first have to reaffirm, for those that aren't aware, I am not, and never have been, a ***lover*** of JavaScript. While my cool friends were off learning Node.js, and for some reason moving a scripting language to the backend, I was learning C and Go, Erlang and Distributed Systems.\n\nFor years, I harboured a deep hatred of JS, and actively whinged about it at every opportunity I got; being ***forced*** to use it in my daily work life. Now however, I do have to say; over the last few years I have *softened* to JS, and I am much more comfortable in my own skin when having to use it.\n\nIt goes without saying, the entire web is JS. Look around you - JS. View the source of this article - JS files. Look at your own app's dependencies - JS.\n\nJavaScript, specifically Node, really is in everything we use, and that now also applies to our wonderful world of Cryptocurrencies.\n\nAs I mentioned briefly in my [***last*** article](/news/2019/11/28/nim-vs-crystal-part-3-cryto-dapps-p2p/), my ***next*** article series is going to be about building your first DApp – from start to finish. Inevitably, the frontend of our DApp needs to be able to communicate with the Ethereum Network. This is where [Web3.js](https://web3js.readthedocs.io/en/v1.2.4/index.html) comes into the mix. `Web3.js` is a collection of APIs allowing us such functionality as: Reading & Writing data from Smart Contracts, sending and receiving Ether, encrypting / decrypting wallets & data, and *a whole bunch* of other stuff too. Basically, *most* of the backend functionality available on the Ethereum Network natively becomes available for use in the browser.\n\n\nThis is how the `web3.js` library talks to the Ethereum Network:\n\n\n*Image credit: [iotbl](https://iotbl.blogspot.com/2017/03/ethereum-and-blockchain-2.html)*\n\nSo, now that the basics are covered, let's go over installing and using the `web3.js` library.\n\n\n# Installing Web3\n\nInstalling `web3.js` is as simple as:\n\n```\nnpm install web3\n```\n\n*One thing worth noting here*; is that (coming from an anti-js background), I kept getting a `cannot find web3 module` error when trying to import web3 into a Node console. If you, like me, aren't a big js fan, this can be solved by first running the `npm init` command to ensure there is a `package.json` file in the cwd, and *then* you can run `npm install web3`, and it will work fine. (I realise this is basic stuff – but actually for someone who's *tried* to avoid Node at all costs, it was initially confusing enough to have to search online.)\n\nI am working from a Mac here, but if you are working from Windows, the install process *can* be exactly the same, assuming you do have [Node & NPM installed](https://phoenixnap.com/kb/install-node-js-npm-on-windows).\n\nSo, with `web3.js` installed, let's do some basic interactions with the Ethereum Network, and ***dive on in!***\n\n\n\n# Communicating with the Ethereum Network\n\n## Wallet Interaction\n\nFor this article, we're going to use [Ganache](https://www.trufflesuite.com/ganache), for simplicity, as our local Blockchain. By using Ganache, we can spin up a local Ethereum node, without having to write a single line of code!\n\n***(Yes, I realise that rhymes. No, I didn't realise until my second proof-read through of this article!)***\n\nIn fact, though, Embark already has Ganache inbuilt, so we could also simply run:\n\n```js\nembark simulator\n```\n\nAnyway, to install Ganache head over to [this page](https://www.trufflesuite.com/ganache) and click on the executable there. If you so choose; there is also a Ganache CLI available you can install by running:\n\n```\nnpm install -g ganache-cli\n```\n\nRunning the Ganache CLI will give you the same functionality as the desktop client; in essence giving us a multitude of ETH-loaded wallets that we can build contracts around / interact with.\n\n\n\nRather brilliantly; we now have a local Ethereum Node running that we can start using the Web3 client to interact with. In another Terminal tab, open up a `node` instance from the same working directory we ran the `npm init` command from earlier.\n\nNow, in our interactive Node console, run:\n\n``` js\nvar Web3 = require('web3');\nvar web3 = new Web3('http://localhost:8545');\n```\n\nSomething to note here, is that I'm calling `new Web3` with an `http` protocol, but the WebSocket protocol is also commonly used:\n\n``` js\nvar web3 = new Web3(Web3.givenProvider || new Web3.providers.WebsocketProvider('ws://remotenode.com:8546'));\n```\n\nTo test and ensure the connection, you can get a list of the accounts made available in Ganache by running:\n\n``` js\nweb3.eth.getAccounts().then(console.log);\n```\n\nWhich *should* give you an output like the following:\n\n```js\n> [ '0x7689cF9F90FAad61B8a3c9b1b2A5b4580B37358b',\n '0x852e9a9db77a4e6169e175cDBb33dBE350150A8e',\n '0x946700a1a4f30Dfe80307C91B6DaF1cCa2d09401',\n '0x7d356aF02A87147D3ce5F9ACA716a78f70aF7616',\n '0x88A116a16e4c8838F575a0e7a72eE27C7B073263',\n '0x655317701Fcf3b310F492cB801C8D23f8c6fb556',\n '0x16D305e72aFb0DDa1dB1830F8a98D5cD5337882E',\n '0x9099bb4Af9CE5734E7a7e62f817e833fcFFaaF32',\n '0x2ec4CC6700d0424A78a9B9Fc2ecBaeFc162313F1',\n '0x1BC51a0edEC9FdEA3B14748e9209F4bF8Fe024b5' ]\n```\n\nIf you want to check the balance of an individual account from the above list, you can do so by running:\n\n```js\nconst account1 = \"0x7689cF9F90FAad61B8a3c9b1b2A5b4580B37358b\";\n\nweb3.eth.getBalance(account1)\n.then(console.log);\n```\n\nWhich will output:\n\n```\n> 100000000000000000000\n```\n\n\n## Contract Interaction\n\nAs above; interacting with our *individual accounts* through `web3.js` is cool, but not nearly the extent to which the library works. Let's now take a brief look at the more important functionality; of interacting with Smart Contracts through `web3.js`.\n\nThe first thing we need to do, is to create a new Smart Contract, which we can do with the `new web3.eth.Contract` command.\n\nBefore we call the `new` command, we need to assign our `json interface` for the contract's `ABI`:\n\n```js\nconst abi = [{\"type\":\"function\", \"name\":\"foo\", \"inputs\": [{\"name\":\"a\",\"type\":\"uint256\"}], \"outputs\": [{\"name\":\"b\",\"type\":\"address\"}] },{ \"type\":\"event\", \"name\":\"Event\", \"inputs\": [{\"name\":\"a\",\"type\":\"uint256\",\"indexed\":true},{\"name\":\"b\",\"type\":\"bytes32\",\"indexed\":false}], }]\n```\n\nThe `json interface` is a JSON object describing the *Application Binary Interface (ABI)* for our Smart Contract. Using this JSON interface; `web3.js` is able to create a JavaScript object representing our Smart Contract and its methods & events, using the `web3.eth.Contract` functionality.\n\n*Note, the above JSON interface / ABI is taken directly from the [Web3 docs](https://web3js.readthedocs.io/en/v1.2.0/web3-eth-contract.html#id5).*\n\nNow that we have our `json interface` defined, we can create our new contract instance:\n\n```js\nvar myContract = new web3.eth.Contract(abi, '0xde0B295669a9FD93d5F28D9Ec85E40f4cb697BAe');\n```\n\n*(The `from` address is the address of the already deployed contract instance that we're aiming to talk to.)*\n\nYou could then set the Smart Contract's `data` and other `options`, and then **deploy** your Contract with something *like* the following:\n\n```js\nmyContract.options.data = '0x12345...';\n\nmyContract.deploy({\n arguments: [123, 'My String']\n})\n.send({\n from: '0xde0B295669a9FD93d5F28D9Ec85E40f4cb697BAe',\n gas: 1500000,\n gasPrice: '30000000000000'\n})\n.then(function(newContractInstance){\n console.log(newContractInstance.options.address) // instance with the new contract address\n});\n```\n\nThe above examples aren't supposed to be perfect continuous code, and should definitely *not* be copy/pasted into a production project, but they are there to show off roughly how `Web.js` works, and give an overview of interacting with the 2 main pieces of functionality, as I see them – Wallets and Contracts.\n\nIn my next tutorial series, we will be utilising [Embark](https://embark.status.im/docs/quick_start.html), and therefore we'll be diving deeper into `web3.js`, and showing off much more of its potential.\n\n\n# Web.js in Other Languages\n\nNaturally the whole idea behind this article was to show off communication with the Ethereum Network through a JavaScript frontend. However, there are also **many** other libraries, in pretty much every language, available to do the same:\n\n***Nim - [nim-web3](https://github.com/status-im/nim-web3)***\nCrystal - [web3.cr](https://github.com/light-side-software/web3.cr)\nRuby - [web3-eth gem](https://github.com/izetex/web3-eth)\nElixir - [ethereumex](https://github.com/mana-ethereum/ethereumex)\nPython - [Web3.py](https://github.com/ethereum/web3.py)\nHaskell - [hs-web3](https://github.com/airalab/hs-web3)\nJava - [web3j](https://github.com/web3j/web3j)\nScala - [web3j-scala](https://github.com/mslinn/web3j-scala)\nPurescript - [purescript-web3](https://github.com/f-o-a-m/purescript-web3)\nPHP - [web3.php](https://github.com/sc0Vu/web3.php)\n\n\n# Beyond Web3\n\nAs stated at the opening of this article, we've barely even scratched the surface of `web.js` capabilities. But I do hope that you now have a better understanding of what Web3 stands for.\n\nPersonally, I am **very much** looking forward to ***diving on in*** to my next DApp tutorial series, to utilise and demonstrate the Ethereum Network to its fullest.\n\nAs always, if you have *any* questions regarding Web3, how Status utilises Web3, or if you have comments on this article, feel free to reach out to me at [robin@status](mailto:robin@status.im).\n\nThanks again for reading, and check back for my DApp tutorial series, starting later this week!\n\n[ **- @rbin**](https://twitter.com/rbin)\n","source":"_posts/2019-12-09-web3-what-are-your-options.md","raw":"title: Introduction to Web3 - What Are Your Options?\nsummary: \"Web3.js is a collection of APIs giving us the ability to interact with, and send commands to, the Ethereum Network from a JavaScript frontend. In this article, I will go over the basics of what and why we need Web3.js.\"\nauthor: robin_percy\ncategories:\n - tutorials\nlayout: blog-post\nimage: '/assets/images/web3-article-header.png'\n---\n\n\n\n> *This article is the first in my series of articles based on the frontend of the decentralised web. Throughout the series we'll look at [Web3.js](/news/2019/12/09/web3-what-are-your-options/) & accessing the Ethereum Blockchain client-side, [frontend security for DApps](/news/2020/01/30/dapp-frontend-security/), how [eWasm / WebAssembly](/news/2020/02/18/wasm-ewasm-what-and-why/) has become the \"4th language of the web\", and we'll build a realtime Blockchain explorer app with Phoenix LiveView!*\n\n## Introduction\n\nTo kick this article off, I first have to reaffirm, for those that aren't aware, I am not, and never have been, a ***lover*** of JavaScript. While my cool friends were off learning Node.js, and for some reason moving a scripting language to the backend, I was learning C and Go, Erlang and Distributed Systems.\n\nFor years, I harboured a deep hatred of JS, and actively whinged about it at every opportunity I got; being ***forced*** to use it in my daily work life. Now however, I do have to say; over the last few years I have *softened* to JS, and I am much more comfortable in my own skin when having to use it.\n\nIt goes without saying, the entire web is JS. Look around you - JS. View the source of this article - JS files. Look at your own app's dependencies - JS.\n\nJavaScript, specifically Node, really is in everything we use, and that now also applies to our wonderful world of Cryptocurrencies.\n\nAs I mentioned briefly in my [***last*** article](/news/2019/11/28/nim-vs-crystal-part-3-cryto-dapps-p2p/), my ***next*** article series is going to be about building your first DApp – from start to finish. Inevitably, the frontend of our DApp needs to be able to communicate with the Ethereum Network. This is where [Web3.js](https://web3js.readthedocs.io/en/v1.2.4/index.html) comes into the mix. `Web3.js` is a collection of APIs allowing us such functionality as: Reading & Writing data from Smart Contracts, sending and receiving Ether, encrypting / decrypting wallets & data, and *a whole bunch* of other stuff too. Basically, *most* of the backend functionality available on the Ethereum Network natively becomes available for use in the browser.\n\n\nThis is how the `web3.js` library talks to the Ethereum Network:\n\n\n*Image credit: [iotbl](https://iotbl.blogspot.com/2017/03/ethereum-and-blockchain-2.html)*\n\nSo, now that the basics are covered, let's go over installing and using the `web3.js` library.\n\n\n# Installing Web3\n\nInstalling `web3.js` is as simple as:\n\n```\nnpm install web3\n```\n\n*One thing worth noting here*; is that (coming from an anti-js background), I kept getting a `cannot find web3 module` error when trying to import web3 into a Node console. If you, like me, aren't a big js fan, this can be solved by first running the `npm init` command to ensure there is a `package.json` file in the cwd, and *then* you can run `npm install web3`, and it will work fine. (I realise this is basic stuff – but actually for someone who's *tried* to avoid Node at all costs, it was initially confusing enough to have to search online.)\n\nI am working from a Mac here, but if you are working from Windows, the install process *can* be exactly the same, assuming you do have [Node & NPM installed](https://phoenixnap.com/kb/install-node-js-npm-on-windows).\n\nSo, with `web3.js` installed, let's do some basic interactions with the Ethereum Network, and ***dive on in!***\n\n\n\n# Communicating with the Ethereum Network\n\n## Wallet Interaction\n\nFor this article, we're going to use [Ganache](https://www.trufflesuite.com/ganache), for simplicity, as our local Blockchain. By using Ganache, we can spin up a local Ethereum node, without having to write a single line of code!\n\n***(Yes, I realise that rhymes. No, I didn't realise until my second proof-read through of this article!)***\n\nIn fact, though, Embark already has Ganache inbuilt, so we could also simply run:\n\n```js\nembark simulator\n```\n\nAnyway, to install Ganache head over to [this page](https://www.trufflesuite.com/ganache) and click on the executable there. If you so choose; there is also a Ganache CLI available you can install by running:\n\n```\nnpm install -g ganache-cli\n```\n\nRunning the Ganache CLI will give you the same functionality as the desktop client; in essence giving us a multitude of ETH-loaded wallets that we can build contracts around / interact with.\n\n\n\nRather brilliantly; we now have a local Ethereum Node running that we can start using the Web3 client to interact with. In another Terminal tab, open up a `node` instance from the same working directory we ran the `npm init` command from earlier.\n\nNow, in our interactive Node console, run:\n\n``` js\nvar Web3 = require('web3');\nvar web3 = new Web3('http://localhost:8545');\n```\n\nSomething to note here, is that I'm calling `new Web3` with an `http` protocol, but the WebSocket protocol is also commonly used:\n\n``` js\nvar web3 = new Web3(Web3.givenProvider || new Web3.providers.WebsocketProvider('ws://remotenode.com:8546'));\n```\n\nTo test and ensure the connection, you can get a list of the accounts made available in Ganache by running:\n\n``` js\nweb3.eth.getAccounts().then(console.log);\n```\n\nWhich *should* give you an output like the following:\n\n```js\n> [ '0x7689cF9F90FAad61B8a3c9b1b2A5b4580B37358b',\n '0x852e9a9db77a4e6169e175cDBb33dBE350150A8e',\n '0x946700a1a4f30Dfe80307C91B6DaF1cCa2d09401',\n '0x7d356aF02A87147D3ce5F9ACA716a78f70aF7616',\n '0x88A116a16e4c8838F575a0e7a72eE27C7B073263',\n '0x655317701Fcf3b310F492cB801C8D23f8c6fb556',\n '0x16D305e72aFb0DDa1dB1830F8a98D5cD5337882E',\n '0x9099bb4Af9CE5734E7a7e62f817e833fcFFaaF32',\n '0x2ec4CC6700d0424A78a9B9Fc2ecBaeFc162313F1',\n '0x1BC51a0edEC9FdEA3B14748e9209F4bF8Fe024b5' ]\n```\n\nIf you want to check the balance of an individual account from the above list, you can do so by running:\n\n```js\nconst account1 = \"0x7689cF9F90FAad61B8a3c9b1b2A5b4580B37358b\";\n\nweb3.eth.getBalance(account1)\n.then(console.log);\n```\n\nWhich will output:\n\n```\n> 100000000000000000000\n```\n\n\n## Contract Interaction\n\nAs above; interacting with our *individual accounts* through `web3.js` is cool, but not nearly the extent to which the library works. Let's now take a brief look at the more important functionality; of interacting with Smart Contracts through `web3.js`.\n\nThe first thing we need to do, is to create a new Smart Contract, which we can do with the `new web3.eth.Contract` command.\n\nBefore we call the `new` command, we need to assign our `json interface` for the contract's `ABI`:\n\n```js\nconst abi = [{\"type\":\"function\", \"name\":\"foo\", \"inputs\": [{\"name\":\"a\",\"type\":\"uint256\"}], \"outputs\": [{\"name\":\"b\",\"type\":\"address\"}] },{ \"type\":\"event\", \"name\":\"Event\", \"inputs\": [{\"name\":\"a\",\"type\":\"uint256\",\"indexed\":true},{\"name\":\"b\",\"type\":\"bytes32\",\"indexed\":false}], }]\n```\n\nThe `json interface` is a JSON object describing the *Application Binary Interface (ABI)* for our Smart Contract. Using this JSON interface; `web3.js` is able to create a JavaScript object representing our Smart Contract and its methods & events, using the `web3.eth.Contract` functionality.\n\n*Note, the above JSON interface / ABI is taken directly from the [Web3 docs](https://web3js.readthedocs.io/en/v1.2.0/web3-eth-contract.html#id5).*\n\nNow that we have our `json interface` defined, we can create our new contract instance:\n\n```js\nvar myContract = new web3.eth.Contract(abi, '0xde0B295669a9FD93d5F28D9Ec85E40f4cb697BAe');\n```\n\n*(The `from` address is the address of the already deployed contract instance that we're aiming to talk to.)*\n\nYou could then set the Smart Contract's `data` and other `options`, and then **deploy** your Contract with something *like* the following:\n\n```js\nmyContract.options.data = '0x12345...';\n\nmyContract.deploy({\n arguments: [123, 'My String']\n})\n.send({\n from: '0xde0B295669a9FD93d5F28D9Ec85E40f4cb697BAe',\n gas: 1500000,\n gasPrice: '30000000000000'\n})\n.then(function(newContractInstance){\n console.log(newContractInstance.options.address) // instance with the new contract address\n});\n```\n\nThe above examples aren't supposed to be perfect continuous code, and should definitely *not* be copy/pasted into a production project, but they are there to show off roughly how `Web.js` works, and give an overview of interacting with the 2 main pieces of functionality, as I see them – Wallets and Contracts.\n\nIn my next tutorial series, we will be utilising [Embark](https://embark.status.im/docs/quick_start.html), and therefore we'll be diving deeper into `web3.js`, and showing off much more of its potential.\n\n\n# Web.js in Other Languages\n\nNaturally the whole idea behind this article was to show off communication with the Ethereum Network through a JavaScript frontend. However, there are also **many** other libraries, in pretty much every language, available to do the same:\n\n***Nim - [nim-web3](https://github.com/status-im/nim-web3)***\nCrystal - [web3.cr](https://github.com/light-side-software/web3.cr)\nRuby - [web3-eth gem](https://github.com/izetex/web3-eth)\nElixir - [ethereumex](https://github.com/mana-ethereum/ethereumex)\nPython - [Web3.py](https://github.com/ethereum/web3.py)\nHaskell - [hs-web3](https://github.com/airalab/hs-web3)\nJava - [web3j](https://github.com/web3j/web3j)\nScala - [web3j-scala](https://github.com/mslinn/web3j-scala)\nPurescript - [purescript-web3](https://github.com/f-o-a-m/purescript-web3)\nPHP - [web3.php](https://github.com/sc0Vu/web3.php)\n\n\n# Beyond Web3\n\nAs stated at the opening of this article, we've barely even scratched the surface of `web.js` capabilities. But I do hope that you now have a better understanding of what Web3 stands for.\n\nPersonally, I am **very much** looking forward to ***diving on in*** to my next DApp tutorial series, to utilise and demonstrate the Ethereum Network to its fullest.\n\nAs always, if you have *any* questions regarding Web3, how Status utilises Web3, or if you have comments on this article, feel free to reach out to me at [robin@status](mailto:robin@status.im).\n\nThanks again for reading, and check back for my DApp tutorial series, starting later this week!\n\n[ **- @rbin**](https://twitter.com/rbin)\n","slug":"web3-what-are-your-options","published":1,"date":"2019-12-09T05:00:00.000Z","updated":"2020-03-03T14:55:55.047Z","_id":"ck6axlfce002oxeeg9tdkgdxg","comments":1,"photos":[],"link":"","content":"<p><img src=\"/assets/images/web3-article-header.png\" alt=\"Web3.js\"></p>\n<blockquote>\n<p><em>This article is the first in my series of articles based on the frontend of the decentralised web. Throughout the series we’ll look at <a href=\"/news/2019/12/09/web3-what-are-your-options/\">Web3.js</a> & accessing the Ethereum Blockchain client-side, <a href=\"/news/2020/01/30/dapp-frontend-security/\">frontend security for DApps</a>, how <a href=\"/news/2020/02/18/wasm-ewasm-what-and-why/\">eWasm / WebAssembly</a> has become the “4th language of the web”, and we’ll build a realtime Blockchain explorer app with Phoenix LiveView!</em></p>\n</blockquote>\n<h2 id=\"Introduction\"><a href=\"#Introduction\" class=\"headerlink\" title=\"Introduction\"></a>Introduction</h2><p>To kick this article off, I first have to reaffirm, for those that aren’t aware, I am not, and never have been, a <strong><em>lover</em></strong> of JavaScript. While my cool friends were off learning Node.js, and for some reason moving a scripting language to the backend, I was learning C and Go, Erlang and Distributed Systems.</p>\n<p>For years, I harboured a deep hatred of JS, and actively whinged about it at every opportunity I got; being <strong><em>forced</em></strong> to use it in my daily work life. Now however, I do have to say; over the last few years I have <em>softened</em> to JS, and I am much more comfortable in my own skin when having to use it.</p>\n<p>It goes without saying, the entire web is JS. Look around you - JS. View the source of this article - JS files. Look at your own app’s dependencies - JS.</p>\n<p>JavaScript, specifically Node, really is in everything we use, and that now also applies to our wonderful world of Cryptocurrencies.</p>\n<p>As I mentioned briefly in my <a href=\"/news/2019/11/28/nim-vs-crystal-part-3-cryto-dapps-p2p/\"><strong><em>last</em></strong> article</a>, my <strong><em>next</em></strong> article series is going to be about building your first DApp – from start to finish. Inevitably, the frontend of our DApp needs to be able to communicate with the Ethereum Network. This is where <a href=\"https://web3js.readthedocs.io/en/v1.2.4/index.html\" target=\"_blank\" rel=\"noopener\">Web3.js</a> comes into the mix. <code>Web3.js</code> is a collection of APIs allowing us such functionality as: Reading & Writing data from Smart Contracts, sending and receiving Ether, encrypting / decrypting wallets & data, and <em>a whole bunch</em> of other stuff too. Basically, <em>most</em> of the backend functionality available on the Ethereum Network natively becomes available for use in the browser.</p>\n<p>This is how the <code>web3.js</code> library talks to the Ethereum Network:</p>\n<p><img src=\"/assets/images/web3-js-diagram.png\" alt=\"Web3 JS Diagram\"><br><em>Image credit: <a href=\"https://iotbl.blogspot.com/2017/03/ethereum-and-blockchain-2.html\" target=\"_blank\" rel=\"noopener\">iotbl</a></em></p>\n<p>So, now that the basics are covered, let’s go over installing and using the <code>web3.js</code> library.</p>\n<h1 id=\"Installing-Web3\"><a href=\"#Installing-Web3\" class=\"headerlink\" title=\"Installing Web3\"></a>Installing Web3</h1><p>Installing <code>web3.js</code> is as simple as:</p>\n<figure class=\"highlight plain\"><table><tr><td class=\"code\"><pre><span class=\"line\">npm install web3</span><br></pre></td></tr></table></figure>\n\n<p><em>One thing worth noting here</em>; is that (coming from an anti-js background), I kept getting a <code>cannot find web3 module</code> error when trying to import web3 into a Node console. If you, like me, aren’t a big js fan, this can be solved by first running the <code>npm init</code> command to ensure there is a <code>package.json</code> file in the cwd, and <em>then</em> you can run <code>npm install web3</code>, and it will work fine. (I realise this is basic stuff – but actually for someone who’s <em>tried</em> to avoid Node at all costs, it was initially confusing enough to have to search online.)</p>\n<p>I am working from a Mac here, but if you are working from Windows, the install process <em>can</em> be exactly the same, assuming you do have <a href=\"https://phoenixnap.com/kb/install-node-js-npm-on-windows\" target=\"_blank\" rel=\"noopener\">Node & NPM installed</a>.</p>\n<p>So, with <code>web3.js</code> installed, let’s do some basic interactions with the Ethereum Network, and <strong><em>dive on in!</em></strong></p>\n<h1 id=\"Communicating-with-the-Ethereum-Network\"><a href=\"#Communicating-with-the-Ethereum-Network\" class=\"headerlink\" title=\"Communicating with the Ethereum Network\"></a>Communicating with the Ethereum Network</h1><h2 id=\"Wallet-Interaction\"><a href=\"#Wallet-Interaction\" class=\"headerlink\" title=\"Wallet Interaction\"></a>Wallet Interaction</h2><p>For this article, we’re going to use <a href=\"https://www.trufflesuite.com/ganache\" target=\"_blank\" rel=\"noopener\">Ganache</a>, for simplicity, as our local Blockchain. By using Ganache, we can spin up a local Ethereum node, without having to write a single line of code!</p>\n<p><strong><em>(Yes, I realise that rhymes. No, I didn’t realise until my second proof-read through of this article!)</em></strong></p>\n<p>In fact, though, Embark already has Ganache inbuilt, so we could also simply run:</p>\n<figure class=\"highlight js\"><table><tr><td class=\"code\"><pre><span class=\"line\">embark simulator</span><br></pre></td></tr></table></figure>\n\n<p>Anyway, to install Ganache head over to <a href=\"https://www.trufflesuite.com/ganache\" target=\"_blank\" rel=\"noopener\">this page</a> and click on the executable there. If you so choose; there is also a Ganache CLI available you can install by running:</p>\n<figure class=\"highlight plain\"><table><tr><td class=\"code\"><pre><span class=\"line\">npm install -g ganache-cli</span><br></pre></td></tr></table></figure>\n\n<p>Running the Ganache CLI will give you the same functionality as the desktop client; in essence giving us a multitude of ETH-loaded wallets that we can build contracts around / interact with.</p>\n<p><img src=\"/assets/images/ganache-cli.png\" alt=\"Ganache CLI\"></p>\n<p>Rather brilliantly; we now have a local Ethereum Node running that we can start using the Web3 client to interact with. In another Terminal tab, open up a <code>node</code> instance from the same working directory we ran the <code>npm init</code> command from earlier.</p>\n<p>Now, in our interactive Node console, run:</p>\n<figure class=\"highlight js\"><table><tr><td class=\"code\"><pre><span class=\"line\"><span class=\"keyword\">var</span> Web3 = <span class=\"built_in\">require</span>(<span class=\"string\">'web3'</span>);</span><br><span class=\"line\"><span class=\"keyword\">var</span> web3 = <span class=\"keyword\">new</span> Web3(<span class=\"string\">'http://localhost:8545'</span>);</span><br></pre></td></tr></table></figure>\n\n<p>Something to note here, is that I’m calling <code>new Web3</code> with an <code>http</code> protocol, but the WebSocket protocol is also commonly used:</p>\n<figure class=\"highlight js\"><table><tr><td class=\"code\"><pre><span class=\"line\"><span class=\"keyword\">var</span> web3 = <span class=\"keyword\">new</span> Web3(Web3.givenProvider || <span class=\"keyword\">new</span> Web3.providers.WebsocketProvider(<span class=\"string\">'ws://remotenode.com:8546'</span>));</span><br></pre></td></tr></table></figure>\n\n<p>To test and ensure the connection, you can get a list of the accounts made available in Ganache by running:</p>\n<figure class=\"highlight js\"><table><tr><td class=\"code\"><pre><span class=\"line\">web3.eth.getAccounts().then(<span class=\"built_in\">console</span>.log);</span><br></pre></td></tr></table></figure>\n\n<p>Which <em>should</em> give you an output like the following:</p>\n<figure class=\"highlight js\"><table><tr><td class=\"code\"><pre><span class=\"line\">> [ <span class=\"string\">'0x7689cF9F90FAad61B8a3c9b1b2A5b4580B37358b'</span>,</span><br><span class=\"line\"> <span class=\"string\">'0x852e9a9db77a4e6169e175cDBb33dBE350150A8e'</span>,</span><br><span class=\"line\"> <span class=\"string\">'0x946700a1a4f30Dfe80307C91B6DaF1cCa2d09401'</span>,</span><br><span class=\"line\"> <span class=\"string\">'0x7d356aF02A87147D3ce5F9ACA716a78f70aF7616'</span>,</span><br><span class=\"line\"> <span class=\"string\">'0x88A116a16e4c8838F575a0e7a72eE27C7B073263'</span>,</span><br><span class=\"line\"> <span class=\"string\">'0x655317701Fcf3b310F492cB801C8D23f8c6fb556'</span>,</span><br><span class=\"line\"> <span class=\"string\">'0x16D305e72aFb0DDa1dB1830F8a98D5cD5337882E'</span>,</span><br><span class=\"line\"> <span class=\"string\">'0x9099bb4Af9CE5734E7a7e62f817e833fcFFaaF32'</span>,</span><br><span class=\"line\"> <span class=\"string\">'0x2ec4CC6700d0424A78a9B9Fc2ecBaeFc162313F1'</span>,</span><br><span class=\"line\"> <span class=\"string\">'0x1BC51a0edEC9FdEA3B14748e9209F4bF8Fe024b5'</span> ]</span><br></pre></td></tr></table></figure>\n\n<p>If you want to check the balance of an individual account from the above list, you can do so by running:</p>\n<figure class=\"highlight js\"><table><tr><td class=\"code\"><pre><span class=\"line\"><span class=\"keyword\">const</span> account1 = <span class=\"string\">\"0x7689cF9F90FAad61B8a3c9b1b2A5b4580B37358b\"</span>;</span><br><span class=\"line\"></span><br><span class=\"line\">web3.eth.getBalance(account1)</span><br><span class=\"line\">.then(<span class=\"built_in\">console</span>.log);</span><br></pre></td></tr></table></figure>\n\n<p>Which will output:</p>\n<figure class=\"highlight plain\"><table><tr><td class=\"code\"><pre><span class=\"line\">> 100000000000000000000</span><br></pre></td></tr></table></figure>\n\n\n<h2 id=\"Contract-Interaction\"><a href=\"#Contract-Interaction\" class=\"headerlink\" title=\"Contract Interaction\"></a>Contract Interaction</h2><p>As above; interacting with our <em>individual accounts</em> through <code>web3.js</code> is cool, but not nearly the extent to which the library works. Let’s now take a brief look at the more important functionality; of interacting with Smart Contracts through <code>web3.js</code>.</p>\n<p>The first thing we need to do, is to create a new Smart Contract, which we can do with the <code>new web3.eth.Contract</code> command.</p>\n<p>Before we call the <code>new</code> command, we need to assign our <code>json interface</code> for the contract’s <code>ABI</code>:</p>\n<figure class=\"highlight js\"><table><tr><td class=\"code\"><pre><span class=\"line\"><span class=\"keyword\">const</span> abi = [{<span class=\"string\">\"type\"</span>:<span class=\"string\">\"function\"</span>, <span class=\"string\">\"name\"</span>:<span class=\"string\">\"foo\"</span>, <span class=\"string\">\"inputs\"</span>: [{<span class=\"string\">\"name\"</span>:<span class=\"string\">\"a\"</span>,<span class=\"string\">\"type\"</span>:<span class=\"string\">\"uint256\"</span>}], <span class=\"string\">\"outputs\"</span>: [{<span class=\"string\">\"name\"</span>:<span class=\"string\">\"b\"</span>,<span class=\"string\">\"type\"</span>:<span class=\"string\">\"address\"</span>}] },{ <span class=\"string\">\"type\"</span>:<span class=\"string\">\"event\"</span>, <span class=\"string\">\"name\"</span>:<span class=\"string\">\"Event\"</span>, <span class=\"string\">\"inputs\"</span>: [{<span class=\"string\">\"name\"</span>:<span class=\"string\">\"a\"</span>,<span class=\"string\">\"type\"</span>:<span class=\"string\">\"uint256\"</span>,<span class=\"string\">\"indexed\"</span>:<span class=\"literal\">true</span>},{<span class=\"string\">\"name\"</span>:<span class=\"string\">\"b\"</span>,<span class=\"string\">\"type\"</span>:<span class=\"string\">\"bytes32\"</span>,<span class=\"string\">\"indexed\"</span>:<span class=\"literal\">false</span>}], }]</span><br></pre></td></tr></table></figure>\n\n<p>The <code>json interface</code> is a JSON object describing the <em>Application Binary Interface (ABI)</em> for our Smart Contract. Using this JSON interface; <code>web3.js</code> is able to create a JavaScript object representing our Smart Contract and its methods & events, using the <code>web3.eth.Contract</code> functionality.</p>\n<p><em>Note, the above JSON interface / ABI is taken directly from the <a href=\"https://web3js.readthedocs.io/en/v1.2.0/web3-eth-contract.html#id5\" target=\"_blank\" rel=\"noopener\">Web3 docs</a>.</em></p>\n<p>Now that we have our <code>json interface</code> defined, we can create our new contract instance:</p>\n<figure class=\"highlight js\"><table><tr><td class=\"code\"><pre><span class=\"line\"><span class=\"keyword\">var</span> myContract = <span class=\"keyword\">new</span> web3.eth.Contract(abi, <span class=\"string\">'0xde0B295669a9FD93d5F28D9Ec85E40f4cb697BAe'</span>);</span><br></pre></td></tr></table></figure>\n\n<p><em>(The <code>from</code> address is the address of the already deployed contract instance that we’re aiming to talk to.)</em></p>\n<p>You could then set the Smart Contract’s <code>data</code> and other <code>options</code>, and then <strong>deploy</strong> your Contract with something <em>like</em> the following:</p>\n<figure class=\"highlight js\"><table><tr><td class=\"code\"><pre><span class=\"line\">myContract.options.data = <span class=\"string\">'0x12345...'</span>;</span><br><span class=\"line\"></span><br><span class=\"line\">myContract.deploy({</span><br><span class=\"line\"> <span class=\"built_in\">arguments</span>: [<span class=\"number\">123</span>, <span class=\"string\">'My String'</span>]</span><br><span class=\"line\">})</span><br><span class=\"line\">.send({</span><br><span class=\"line\"> <span class=\"keyword\">from</span>: <span class=\"string\">'0xde0B295669a9FD93d5F28D9Ec85E40f4cb697BAe'</span>,</span><br><span class=\"line\"> gas: <span class=\"number\">1500000</span>,</span><br><span class=\"line\"> gasPrice: <span class=\"string\">'30000000000000'</span></span><br><span class=\"line\">})</span><br><span class=\"line\">.then(<span class=\"function\"><span class=\"keyword\">function</span>(<span class=\"params\">newContractInstance</span>)</span>{</span><br><span class=\"line\"> <span class=\"built_in\">console</span>.log(newContractInstance.options.address) <span class=\"comment\">// instance with the new contract address</span></span><br><span class=\"line\">});</span><br></pre></td></tr></table></figure>\n\n<p>The above examples aren’t supposed to be perfect continuous code, and should definitely <em>not</em> be copy/pasted into a production project, but they are there to show off roughly how <code>Web.js</code> works, and give an overview of interacting with the 2 main pieces of functionality, as I see them – Wallets and Contracts.</p>\n<p>In my next tutorial series, we will be utilising <a href=\"https://embark.status.im/docs/quick_start.html\" target=\"_blank\" rel=\"noopener\">Embark</a>, and therefore we’ll be diving deeper into <code>web3.js</code>, and showing off much more of its potential.</p>\n<h1 id=\"Web-js-in-Other-Languages\"><a href=\"#Web-js-in-Other-Languages\" class=\"headerlink\" title=\"Web.js in Other Languages\"></a>Web.js in Other Languages</h1><p>Naturally the whole idea behind this article was to show off communication with the Ethereum Network through a JavaScript frontend. However, there are also <strong>many</strong> other libraries, in pretty much every language, available to do the same:</p>\n<p><strong><em>Nim - <a href=\"https://github.com/status-im/nim-web3\" target=\"_blank\" rel=\"noopener\">nim-web3</a></em></strong><br>Crystal - <a href=\"https://github.com/light-side-software/web3.cr\" target=\"_blank\" rel=\"noopener\">web3.cr</a><br>Ruby - <a href=\"https://github.com/izetex/web3-eth\" target=\"_blank\" rel=\"noopener\">web3-eth gem</a><br>Elixir - <a href=\"https://github.com/mana-ethereum/ethereumex\" target=\"_blank\" rel=\"noopener\">ethereumex</a><br>Python - <a href=\"https://github.com/ethereum/web3.py\" target=\"_blank\" rel=\"noopener\">Web3.py</a><br>Haskell - <a href=\"https://github.com/airalab/hs-web3\" target=\"_blank\" rel=\"noopener\">hs-web3</a><br>Java - <a href=\"https://github.com/web3j/web3j\" target=\"_blank\" rel=\"noopener\">web3j</a><br>Scala - <a href=\"https://github.com/mslinn/web3j-scala\" target=\"_blank\" rel=\"noopener\">web3j-scala</a><br>Purescript - <a href=\"https://github.com/f-o-a-m/purescript-web3\" target=\"_blank\" rel=\"noopener\">purescript-web3</a><br>PHP - <a href=\"https://github.com/sc0Vu/web3.php\" target=\"_blank\" rel=\"noopener\">web3.php</a></p>\n<h1 id=\"Beyond-Web3\"><a href=\"#Beyond-Web3\" class=\"headerlink\" title=\"Beyond Web3\"></a>Beyond Web3</h1><p>As stated at the opening of this article, we’ve barely even scratched the surface of <code>web.js</code> capabilities. But I do hope that you now have a better understanding of what Web3 stands for.</p>\n<p>Personally, I am <strong>very much</strong> looking forward to <strong><em>diving on in</em></strong> to my next DApp tutorial series, to utilise and demonstrate the Ethereum Network to its fullest.</p>\n<p>As always, if you have <em>any</em> questions regarding Web3, how Status utilises Web3, or if you have comments on this article, feel free to reach out to me at <a href=\"mailto:robin@status.im\">robin@status</a>.</p>\n<p>Thanks again for reading, and check back for my DApp tutorial series, starting later this week!</p>\n<p><a href=\"https://twitter.com/rbin\" target=\"_blank\" rel=\"noopener\"> <strong>- @rbin</strong></a></p>\n","site":{"data":{"authors":{"iuri_matias":{"name":"Iuri Matias","twitter":"iurimatias","image":"https://pbs.twimg.com/profile_images/928272512181563392/iDJdvy2k_400x400.jpg"},"pascal_precht":{"name":"Pascal Precht","twitter":"pascalprecht","image":"https://pbs.twimg.com/profile_images/993785060733194241/p3oAIMDP_400x400.jpg"},"anthony_laibe":{"name":"Anthony Laibe","twitter":"a_laibe","image":"https://pbs.twimg.com/profile_images/257742900/13168239_400x400.jpg"},"jonathan_rainville":{"name":"Jonathan Rainville","twitter":"ShyolGhul","image":"https://pbs.twimg.com/profile_images/993873866878570496/-aE4byjj_400x400.jpg"},"andre_medeiros":{"name":"Andre Medeiros","twitter":"superdealloc","image":"https://pbs.twimg.com/profile_images/965722487735701504/m58KNgWN_400x400.jpg"},"eric_mastro":{"name":"Eric Mastro","twitter":"ericmastro","image":"https://avatars1.githubusercontent.com/u/5089238?s=460&v=4"},"michael_bradley":{"name":"Michael Bradley","image":"https://avatars3.githubusercontent.com/u/194260?s=460&v=4"},"richard_ramos":{"name":"Richard Ramos","twitter":"richardramos_me","image":"https://devcon.org/images/speakers/richard_ramos.jpg"},"jonny_zerah":{"name":"Jonny Zerah","twitter":"jonnyzerah","image":"https://pbs.twimg.com/profile_images/1043774340490248192/gI9aGy17_400x400.jpg"},"robin_percy":{"name":"Robin Percy","twitter":"rbin","image":"https://avatars1.githubusercontent.com/u/29288325?s=400&v=4"}},"categories":{"tutorials":"Tutorials","announcements":"Announcements"},"languages":{"en":"English"}}},"excerpt":"","more":"<p><img src=\"/assets/images/web3-article-header.png\" alt=\"Web3.js\"></p>\n<blockquote>\n<p><em>This article is the first in my series of articles based on the frontend of the decentralised web. Throughout the series we’ll look at <a href=\"/news/2019/12/09/web3-what-are-your-options/\">Web3.js</a> & accessing the Ethereum Blockchain client-side, <a href=\"/news/2020/01/30/dapp-frontend-security/\">frontend security for DApps</a>, how <a href=\"/news/2020/02/18/wasm-ewasm-what-and-why/\">eWasm / WebAssembly</a> has become the “4th language of the web”, and we’ll build a realtime Blockchain explorer app with Phoenix LiveView!</em></p>\n</blockquote>\n<h2 id=\"Introduction\"><a href=\"#Introduction\" class=\"headerlink\" title=\"Introduction\"></a>Introduction</h2><p>To kick this article off, I first have to reaffirm, for those that aren’t aware, I am not, and never have been, a <strong><em>lover</em></strong> of JavaScript. While my cool friends were off learning Node.js, and for some reason moving a scripting language to the backend, I was learning C and Go, Erlang and Distributed Systems.</p>\n<p>For years, I harboured a deep hatred of JS, and actively whinged about it at every opportunity I got; being <strong><em>forced</em></strong> to use it in my daily work life. Now however, I do have to say; over the last few years I have <em>softened</em> to JS, and I am much more comfortable in my own skin when having to use it.</p>\n<p>It goes without saying, the entire web is JS. Look around you - JS. View the source of this article - JS files. Look at your own app’s dependencies - JS.</p>\n<p>JavaScript, specifically Node, really is in everything we use, and that now also applies to our wonderful world of Cryptocurrencies.</p>\n<p>As I mentioned briefly in my <a href=\"/news/2019/11/28/nim-vs-crystal-part-3-cryto-dapps-p2p/\"><strong><em>last</em></strong> article</a>, my <strong><em>next</em></strong> article series is going to be about building your first DApp – from start to finish. Inevitably, the frontend of our DApp needs to be able to communicate with the Ethereum Network. This is where <a href=\"https://web3js.readthedocs.io/en/v1.2.4/index.html\" target=\"_blank\" rel=\"noopener\">Web3.js</a> comes into the mix. <code>Web3.js</code> is a collection of APIs allowing us such functionality as: Reading & Writing data from Smart Contracts, sending and receiving Ether, encrypting / decrypting wallets & data, and <em>a whole bunch</em> of other stuff too. Basically, <em>most</em> of the backend functionality available on the Ethereum Network natively becomes available for use in the browser.</p>\n<p>This is how the <code>web3.js</code> library talks to the Ethereum Network:</p>\n<p><img src=\"/assets/images/web3-js-diagram.png\" alt=\"Web3 JS Diagram\"><br><em>Image credit: <a href=\"https://iotbl.blogspot.com/2017/03/ethereum-and-blockchain-2.html\" target=\"_blank\" rel=\"noopener\">iotbl</a></em></p>\n<p>So, now that the basics are covered, let’s go over installing and using the <code>web3.js</code> library.</p>\n<h1 id=\"Installing-Web3\"><a href=\"#Installing-Web3\" class=\"headerlink\" title=\"Installing Web3\"></a>Installing Web3</h1><p>Installing <code>web3.js</code> is as simple as:</p>\n<figure class=\"highlight plain\"><table><tr><td class=\"code\"><pre><span class=\"line\">npm install web3</span><br></pre></td></tr></table></figure>\n\n<p><em>One thing worth noting here</em>; is that (coming from an anti-js background), I kept getting a <code>cannot find web3 module</code> error when trying to import web3 into a Node console. If you, like me, aren’t a big js fan, this can be solved by first running the <code>npm init</code> command to ensure there is a <code>package.json</code> file in the cwd, and <em>then</em> you can run <code>npm install web3</code>, and it will work fine. (I realise this is basic stuff – but actually for someone who’s <em>tried</em> to avoid Node at all costs, it was initially confusing enough to have to search online.)</p>\n<p>I am working from a Mac here, but if you are working from Windows, the install process <em>can</em> be exactly the same, assuming you do have <a href=\"https://phoenixnap.com/kb/install-node-js-npm-on-windows\" target=\"_blank\" rel=\"noopener\">Node & NPM installed</a>.</p>\n<p>So, with <code>web3.js</code> installed, let’s do some basic interactions with the Ethereum Network, and <strong><em>dive on in!</em></strong></p>\n<h1 id=\"Communicating-with-the-Ethereum-Network\"><a href=\"#Communicating-with-the-Ethereum-Network\" class=\"headerlink\" title=\"Communicating with the Ethereum Network\"></a>Communicating with the Ethereum Network</h1><h2 id=\"Wallet-Interaction\"><a href=\"#Wallet-Interaction\" class=\"headerlink\" title=\"Wallet Interaction\"></a>Wallet Interaction</h2><p>For this article, we’re going to use <a href=\"https://www.trufflesuite.com/ganache\" target=\"_blank\" rel=\"noopener\">Ganache</a>, for simplicity, as our local Blockchain. By using Ganache, we can spin up a local Ethereum node, without having to write a single line of code!</p>\n<p><strong><em>(Yes, I realise that rhymes. No, I didn’t realise until my second proof-read through of this article!)</em></strong></p>\n<p>In fact, though, Embark already has Ganache inbuilt, so we could also simply run:</p>\n<figure class=\"highlight js\"><table><tr><td class=\"code\"><pre><span class=\"line\">embark simulator</span><br></pre></td></tr></table></figure>\n\n<p>Anyway, to install Ganache head over to <a href=\"https://www.trufflesuite.com/ganache\" target=\"_blank\" rel=\"noopener\">this page</a> and click on the executable there. If you so choose; there is also a Ganache CLI available you can install by running:</p>\n<figure class=\"highlight plain\"><table><tr><td class=\"code\"><pre><span class=\"line\">npm install -g ganache-cli</span><br></pre></td></tr></table></figure>\n\n<p>Running the Ganache CLI will give you the same functionality as the desktop client; in essence giving us a multitude of ETH-loaded wallets that we can build contracts around / interact with.</p>\n<p><img src=\"/assets/images/ganache-cli.png\" alt=\"Ganache CLI\"></p>\n<p>Rather brilliantly; we now have a local Ethereum Node running that we can start using the Web3 client to interact with. In another Terminal tab, open up a <code>node</code> instance from the same working directory we ran the <code>npm init</code> command from earlier.</p>\n<p>Now, in our interactive Node console, run:</p>\n<figure class=\"highlight js\"><table><tr><td class=\"code\"><pre><span class=\"line\"><span class=\"keyword\">var</span> Web3 = <span class=\"built_in\">require</span>(<span class=\"string\">'web3'</span>);</span><br><span class=\"line\"><span class=\"keyword\">var</span> web3 = <span class=\"keyword\">new</span> Web3(<span class=\"string\">'http://localhost:8545'</span>);</span><br></pre></td></tr></table></figure>\n\n<p>Something to note here, is that I’m calling <code>new Web3</code> with an <code>http</code> protocol, but the WebSocket protocol is also commonly used:</p>\n<figure class=\"highlight js\"><table><tr><td class=\"code\"><pre><span class=\"line\"><span class=\"keyword\">var</span> web3 = <span class=\"keyword\">new</span> Web3(Web3.givenProvider || <span class=\"keyword\">new</span> Web3.providers.WebsocketProvider(<span class=\"string\">'ws://remotenode.com:8546'</span>));</span><br></pre></td></tr></table></figure>\n\n<p>To test and ensure the connection, you can get a list of the accounts made available in Ganache by running:</p>\n<figure class=\"highlight js\"><table><tr><td class=\"code\"><pre><span class=\"line\">web3.eth.getAccounts().then(<span class=\"built_in\">console</span>.log);</span><br></pre></td></tr></table></figure>\n\n<p>Which <em>should</em> give you an output like the following:</p>\n<figure class=\"highlight js\"><table><tr><td class=\"code\"><pre><span class=\"line\">> [ <span class=\"string\">'0x7689cF9F90FAad61B8a3c9b1b2A5b4580B37358b'</span>,</span><br><span class=\"line\"> <span class=\"string\">'0x852e9a9db77a4e6169e175cDBb33dBE350150A8e'</span>,</span><br><span class=\"line\"> <span class=\"string\">'0x946700a1a4f30Dfe80307C91B6DaF1cCa2d09401'</span>,</span><br><span class=\"line\"> <span class=\"string\">'0x7d356aF02A87147D3ce5F9ACA716a78f70aF7616'</span>,</span><br><span class=\"line\"> <span class=\"string\">'0x88A116a16e4c8838F575a0e7a72eE27C7B073263'</span>,</span><br><span class=\"line\"> <span class=\"string\">'0x655317701Fcf3b310F492cB801C8D23f8c6fb556'</span>,</span><br><span class=\"line\"> <span class=\"string\">'0x16D305e72aFb0DDa1dB1830F8a98D5cD5337882E'</span>,</span><br><span class=\"line\"> <span class=\"string\">'0x9099bb4Af9CE5734E7a7e62f817e833fcFFaaF32'</span>,</span><br><span class=\"line\"> <span class=\"string\">'0x2ec4CC6700d0424A78a9B9Fc2ecBaeFc162313F1'</span>,</span><br><span class=\"line\"> <span class=\"string\">'0x1BC51a0edEC9FdEA3B14748e9209F4bF8Fe024b5'</span> ]</span><br></pre></td></tr></table></figure>\n\n<p>If you want to check the balance of an individual account from the above list, you can do so by running:</p>\n<figure class=\"highlight js\"><table><tr><td class=\"code\"><pre><span class=\"line\"><span class=\"keyword\">const</span> account1 = <span class=\"string\">\"0x7689cF9F90FAad61B8a3c9b1b2A5b4580B37358b\"</span>;</span><br><span class=\"line\"></span><br><span class=\"line\">web3.eth.getBalance(account1)</span><br><span class=\"line\">.then(<span class=\"built_in\">console</span>.log);</span><br></pre></td></tr></table></figure>\n\n<p>Which will output:</p>\n<figure class=\"highlight plain\"><table><tr><td class=\"code\"><pre><span class=\"line\">> 100000000000000000000</span><br></pre></td></tr></table></figure>\n\n\n<h2 id=\"Contract-Interaction\"><a href=\"#Contract-Interaction\" class=\"headerlink\" title=\"Contract Interaction\"></a>Contract Interaction</h2><p>As above; interacting with our <em>individual accounts</em> through <code>web3.js</code> is cool, but not nearly the extent to which the library works. Let’s now take a brief look at the more important functionality; of interacting with Smart Contracts through <code>web3.js</code>.</p>\n<p>The first thing we need to do, is to create a new Smart Contract, which we can do with the <code>new web3.eth.Contract</code> command.</p>\n<p>Before we call the <code>new</code> command, we need to assign our <code>json interface</code> for the contract’s <code>ABI</code>:</p>\n<figure class=\"highlight js\"><table><tr><td class=\"code\"><pre><span class=\"line\"><span class=\"keyword\">const</span> abi = [{<span class=\"string\">\"type\"</span>:<span class=\"string\">\"function\"</span>, <span class=\"string\">\"name\"</span>:<span class=\"string\">\"foo\"</span>, <span class=\"string\">\"inputs\"</span>: [{<span class=\"string\">\"name\"</span>:<span class=\"string\">\"a\"</span>,<span class=\"string\">\"type\"</span>:<span class=\"string\">\"uint256\"</span>}], <span class=\"string\">\"outputs\"</span>: [{<span class=\"string\">\"name\"</span>:<span class=\"string\">\"b\"</span>,<span class=\"string\">\"type\"</span>:<span class=\"string\">\"address\"</span>}] },{ <span class=\"string\">\"type\"</span>:<span class=\"string\">\"event\"</span>, <span class=\"string\">\"name\"</span>:<span class=\"string\">\"Event\"</span>, <span class=\"string\">\"inputs\"</span>: [{<span class=\"string\">\"name\"</span>:<span class=\"string\">\"a\"</span>,<span class=\"string\">\"type\"</span>:<span class=\"string\">\"uint256\"</span>,<span class=\"string\">\"indexed\"</span>:<span class=\"literal\">true</span>},{<span class=\"string\">\"name\"</span>:<span class=\"string\">\"b\"</span>,<span class=\"string\">\"type\"</span>:<span class=\"string\">\"bytes32\"</span>,<span class=\"string\">\"indexed\"</span>:<span class=\"literal\">false</span>}], }]</span><br></pre></td></tr></table></figure>\n\n<p>The <code>json interface</code> is a JSON object describing the <em>Application Binary Interface (ABI)</em> for our Smart Contract. Using this JSON interface; <code>web3.js</code> is able to create a JavaScript object representing our Smart Contract and its methods & events, using the <code>web3.eth.Contract</code> functionality.</p>\n<p><em>Note, the above JSON interface / ABI is taken directly from the <a href=\"https://web3js.readthedocs.io/en/v1.2.0/web3-eth-contract.html#id5\" target=\"_blank\" rel=\"noopener\">Web3 docs</a>.</em></p>\n<p>Now that we have our <code>json interface</code> defined, we can create our new contract instance:</p>\n<figure class=\"highlight js\"><table><tr><td class=\"code\"><pre><span class=\"line\"><span class=\"keyword\">var</span> myContract = <span class=\"keyword\">new</span> web3.eth.Contract(abi, <span class=\"string\">'0xde0B295669a9FD93d5F28D9Ec85E40f4cb697BAe'</span>);</span><br></pre></td></tr></table></figure>\n\n<p><em>(The <code>from</code> address is the address of the already deployed contract instance that we’re aiming to talk to.)</em></p>\n<p>You could then set the Smart Contract’s <code>data</code> and other <code>options</code>, and then <strong>deploy</strong> your Contract with something <em>like</em> the following:</p>\n<figure class=\"highlight js\"><table><tr><td class=\"code\"><pre><span class=\"line\">myContract.options.data = <span class=\"string\">'0x12345...'</span>;</span><br><span class=\"line\"></span><br><span class=\"line\">myContract.deploy({</span><br><span class=\"line\"> <span class=\"built_in\">arguments</span>: [<span class=\"number\">123</span>, <span class=\"string\">'My String'</span>]</span><br><span class=\"line\">})</span><br><span class=\"line\">.send({</span><br><span class=\"line\"> <span class=\"keyword\">from</span>: <span class=\"string\">'0xde0B295669a9FD93d5F28D9Ec85E40f4cb697BAe'</span>,</span><br><span class=\"line\"> gas: <span class=\"number\">1500000</span>,</span><br><span class=\"line\"> gasPrice: <span class=\"string\">'30000000000000'</span></span><br><span class=\"line\">})</span><br><span class=\"line\">.then(<span class=\"function\"><span class=\"keyword\">function</span>(<span class=\"params\">newContractInstance</span>)</span>{</span><br><span class=\"line\"> <span class=\"built_in\">console</span>.log(newContractInstance.options.address) <span class=\"comment\">// instance with the new contract address</span></span><br><span class=\"line\">});</span><br></pre></td></tr></table></figure>\n\n<p>The above examples aren’t supposed to be perfect continuous code, and should definitely <em>not</em> be copy/pasted into a production project, but they are there to show off roughly how <code>Web.js</code> works, and give an overview of interacting with the 2 main pieces of functionality, as I see them – Wallets and Contracts.</p>\n<p>In my next tutorial series, we will be utilising <a href=\"https://embark.status.im/docs/quick_start.html\" target=\"_blank\" rel=\"noopener\">Embark</a>, and therefore we’ll be diving deeper into <code>web3.js</code>, and showing off much more of its potential.</p>\n<h1 id=\"Web-js-in-Other-Languages\"><a href=\"#Web-js-in-Other-Languages\" class=\"headerlink\" title=\"Web.js in Other Languages\"></a>Web.js in Other Languages</h1><p>Naturally the whole idea behind this article was to show off communication with the Ethereum Network through a JavaScript frontend. However, there are also <strong>many</strong> other libraries, in pretty much every language, available to do the same:</p>\n<p><strong><em>Nim - <a href=\"https://github.com/status-im/nim-web3\" target=\"_blank\" rel=\"noopener\">nim-web3</a></em></strong><br>Crystal - <a href=\"https://github.com/light-side-software/web3.cr\" target=\"_blank\" rel=\"noopener\">web3.cr</a><br>Ruby - <a href=\"https://github.com/izetex/web3-eth\" target=\"_blank\" rel=\"noopener\">web3-eth gem</a><br>Elixir - <a href=\"https://github.com/mana-ethereum/ethereumex\" target=\"_blank\" rel=\"noopener\">ethereumex</a><br>Python - <a href=\"https://github.com/ethereum/web3.py\" target=\"_blank\" rel=\"noopener\">Web3.py</a><br>Haskell - <a href=\"https://github.com/airalab/hs-web3\" target=\"_blank\" rel=\"noopener\">hs-web3</a><br>Java - <a href=\"https://github.com/web3j/web3j\" target=\"_blank\" rel=\"noopener\">web3j</a><br>Scala - <a href=\"https://github.com/mslinn/web3j-scala\" target=\"_blank\" rel=\"noopener\">web3j-scala</a><br>Purescript - <a href=\"https://github.com/f-o-a-m/purescript-web3\" target=\"_blank\" rel=\"noopener\">purescript-web3</a><br>PHP - <a href=\"https://github.com/sc0Vu/web3.php\" target=\"_blank\" rel=\"noopener\">web3.php</a></p>\n<h1 id=\"Beyond-Web3\"><a href=\"#Beyond-Web3\" class=\"headerlink\" title=\"Beyond Web3\"></a>Beyond Web3</h1><p>As stated at the opening of this article, we’ve barely even scratched the surface of <code>web.js</code> capabilities. But I do hope that you now have a better understanding of what Web3 stands for.</p>\n<p>Personally, I am <strong>very much</strong> looking forward to <strong><em>diving on in</em></strong> to my next DApp tutorial series, to utilise and demonstrate the Ethereum Network to its fullest.</p>\n<p>As always, if you have <em>any</em> questions regarding Web3, how Status utilises Web3, or if you have comments on this article, feel free to reach out to me at <a href=\"mailto:robin@status.im\">robin@status</a>.</p>\n<p>Thanks again for reading, and check back for my DApp tutorial series, starting later this week!</p>\n<p><a href=\"https://twitter.com/rbin\" target=\"_blank\" rel=\"noopener\"> <strong>- @rbin</strong></a></p>\n"},{"title":"Nim vs Crystal - Part 2 - Threading & Tooling","summary":"Crystal and Nim go head-to-head to figure out the best modern, low-level programming language! In part 2, Threading & Tooling are reviewed.","author":"robin_percy","layout":"blog-post","image":"/assets/images/nim-crystal-header-img_NEW.jpg","_content":"\n\n\nWelcome back to my series comparing the two sweethearts of the modern low-level programming world. In [part 1](/news/2019/11/18/nim-vs-crystal-part-1-performance-interoperability/), I talked about my views on the interoperability of the two languages, alongside the performance figures of both. Article #1 managed to throw-up a couple of surprises, but I have to admit; these made it all the more enjoyable to write!\n\nIn this article, we're going to look into the commodity that would have changed the aforementioned performance figures, namely concurrency & parallelism, and then into the things that attract me most to programming languages; which is he in-built tooling available. As I know it'll be useful; I won't cover ***only*** the in-built tooling, but I'll include my favourite external package too.\n\n\n\n# Threading\n\n\n### Nim Parallelism Primitives\n\nNim has two flavours of parallelism:\n\n * Structured parallelism via the parallel statement.\n * Unstructured parallelism via the standalone spawn statement.\n\nNim has a builtin thread pool that can be used for CPU intensive tasks. For IO intensive tasks the async and await features should be used instead. Both parallel and spawn need the threadpool module to work.\n\n``` nim\nimport threadpool\n\nproc processLine(line: string) =\n discard \"do some heavy lifting here\"\n\nfor x in lines(\"myinput.txt\"):\n spawn processLine(x)\nsync()\n```\n\nThe parallel statement is the preferred way to use parallelism in a Nim program.\n\n``` nim\n# Compute Pi in an inefficient way\n\nimport strutils, math, threadpool\n{.experimental: \"parallel\".}\n\nproc term(k: float): float = 4 * math.pow(-1, k) / (2*k + 1)\n\nproc pi(n: int): float =\n var ch = newSeq[float](n+1)\n parallel:\n for k in 0..ch.high:\n ch[k] = spawn term(float(k))\n for k in 0..ch.high:\n result += ch[k]\n\necho formatFloat(pi(5000))\n```\n\nThreading support in Nim is part of the `system` module. To activate thread support you need to compile with the `--threads:on` command line switch.\n\nNim's memory model for threads is quite different from older common programming languages (C, Pascal), but similar to Golang and Elixir in that; each thread has its own (garbage collected) heap and sharing of memory is restricted. This helps to prevent race conditions and improves efficiency.\n\n### Concurrency vs Parallelism\n\nThe definitions of \"concurrency\" and \"parallelism\" sometimes get mixed up, but they are not the same.\n\nA concurrent system is one that can be in charge of many tasks, although not necessarily executing them at the same time. A good way to think of this is driving a car – the car can accelerate, brake & change gear, but they don't happen at the exact same time, although they *do* overlap. This is concurrency.\n\n\n*Source: https://livebook.manning.com/book/nim-in-action/chapter-6/13*\n\nThe human driving the car holds the clutch in, moves the gear lever in parallel, and then eases of the clutch at the exact same time as easing on the accelerator. This is processes running in parallel, hence parallelism.\n\n\n*Source: https://livebook.manning.com/book/nim-in-action/chapter-6/13*\n\nAt the moment, Crystal has concurrency support but not parallelism: several tasks can be executed, and a bit of time will be spent on each of these, but two code paths are never executed at the same exact time. However, recently [Parallelism was tested out](https://crystal-lang.org/2019/09/06/parallelism-in-crystal.html) and I'm sure will be fully ready to use soon!\n\nA Crystal program executes in a single operating system thread, except the Garbage Collector (GC) which implements a concurrent mark-and-sweep (currently Boehm GC).\n\n### Crystal Concurrency Primitives\n\nIn Crystal, we can use the `Spawn` functionality in a very similar way to Goroutines in Golang, core.async in Clojure, or the threading in Nim. When a program starts, it fires up a main `Fiber` that will execute your top-level code, from which we can spawn many other `Fibers`.\n\n`Fibers` are lightweight threads of execution that are managed by the garbage collector, so you don't *really* need to worry about managing them once you've spawned them. Because of this, you could technically spin up 100 `Fibers` to make a bunch of API requests, and then simply forget about them.\n\nWe can utilise `Spawn` in Crystal like so:\n\n``` crystal\nrequire \"socket\"\n\ndef load(id, chan)\n puts \"ID=#{id}; START\"\n (id..11).each do\n socket = TCPSocket.new(\"http://robin.percy.pw\", 80)\n socket.close\n end\n puts \"ID=#{id}; FINISH\"\n chan.send nil\nend\n\ndef main\n chan = Channel(Nil).new\n (1..10).each{|i| spawn(load(i,chan))}\n # Wait\n (1..10).each{chan.receive}\nend\n\nmain\n```\n\n> To support concurrency, Crystal has to be able to switch fibers when a fiber performs non-blocking IO operations.\n\nIn program above, a spawned task with lower-number id repeatedly creates a TCP socket, and does this more times than a task with a higher-number id. For example; task #1 establishes a TCP socket 11 times, and task #10 creates a TCP socket just once. So even though task #1 started long before task #10, task #10 *should* finish before task #1. As you can see in the image below; it does just that!\n\n\n\nSimilar to Golang, Crystal uses channels to pass messages between spawned fibers. Take the traditional Ping Pong channels example, in Crystal it looks like the following:\n\n``` crystal\ndef ping(pings, message)\n pings.send message\nend\n\ndef pong(pings, pongs)\n message = pings.receive\n pongs.send message\nend\n\npings = Channel(String).new\npongs = Channel(String).new\nspawn ping pings, \"passed message\"\nspawn pong pings, pongs\nputs pongs.receive # => \"passed message\"\n```\n\nUnfortunately, I personally haven't had the opportunity to test Crystal's `Fibers` or Nim's `Spawn` in a load-heavy production environment. But soon I fully intend to, and I'll write another article benchmarking this in detail when I have a good usecase and get the chance to!\n\n\n# Tooling\n\n## Built-in Tooling in Nim\n\nNow that [Nim 1.0 has been released](https://nim-lang.org/blog/2019/09/23/version-100-released.html), its in-built tooling has improved to a great level, and is very quickly reaching maturity.\n\nThe standard library in Nim is fantastic... Things like native database support for multiple db's, without using any external packages like Crystal does, makes me extremely hopeful for Nim. I really do believe it is language worth considering, if it matches your production needs. That being said, I am still an advocate of 'use the right tool for the job' – so don't go implementing Nim just for the sake of it!\n\nThe only thing to keep in mind; is that Nim *does* seem to be slower in growth than Crystal. The thing is – Nim has quite a few **less** core contributors than Crystal, so slower growth is to be expected!\n\n\n### Nim Project Packaging\n\nSomething I look for in ***ALL*** modern programming languages, and something I consider to be a necessity is a good, and well featured in-built package manager. Happily in Nim's case; we have Nimble!\n\nWe can create a new app (library/binary) by using `nimble init`:\n\n\n\nI have to admit, although a simple thing, this is one of my favourite parts of the entire Nim ecosystem! Being able to enter your selection variables while actually creating your app package is something I think is not only tremendously useful, but awesomely novel.\n\nIt's not just the fact that you can enter selections, but actually the fact that you can select the backend for your app. As you can see in the image above, you have the choice of C, C++, Objective-C and JavaScript -– something that I touched on in my [last article.](/news/2019/11/18/nim-vs-crystal-part-1-performance-interoperability/)\n\n\n### Documentation\n\nNimble has in-built documentation generators that can output both HTML and JSON project documentation files. The one thing I will say is that I actually found this functionality to be *slightly* confusing, as I kept getting very odd errors, but also lacking in the excellent use experience you get from the rest of Nimble, i.e. the `init` func.\n\nYou can generate the documentation file for your app by running:\n\n```\nnimble doc myapp.nimble\n```\n\n### Testing\n\nNimble offers a pre-defined `test` task which compiles and runs all files in the `/tests` directory beginning with 't' in their filename.\n\nYou may wish to override this `test` task in your `.nimble` file. This is particularly useful when you have a single test suite program. Just add the following to your `.nimble` file to override the default `test` task.\n\n``` nim\ntask test, \"Runs the test suite\":\n exec \"nim c -r tests/tester\"\n```\n\nRunning nimble test will now use the test task you have defined.\n\n\n\n<br/>\n\n## Built-in Tooling in Crystal\n\nOne of the things I like most about Crystal is the excellent built-in tooling available. When I look at new languages, especially relatively immature languages; it's always very reassuring when the language has extensive built-in tooling available to help developers stay productive & happy! In Crystal, there are a bunch of tools that make hacking around in the language super fun, but also help us to stay on the right track with semantics etc.\n\n\n### Crystal Project Packaging\n\nMuch the same as the Nimble package manager, ***although not as good in my opinion,*** Crystal has it's own built-in project scaffolder & package manager. I'd recommend using this at all times to ensure semantics are followed. We can use it with the following:\n\n```\n$ crystal init lib my_app\n create my_app/.gitignore\n create my_app/LICENSE\n create my_app/README.md\n create my_app/.travis.yml\n create my_app/shard.yml\n create my_app/src/my_app\n create my_app/src/my_app/version.cr\n create my_app/spec/spec_helper.cr\n create my_app/spec/my_app_spec.cr\nInitialized empty Git repository in ~/my_app/.git/\n```\n\n`Shards` are Crystal's packages; distributed in the same way as Ruby Gems, Elixir Libs or Golang packages. Each application we create contains a file in the root directory named shard.yml. This file contains project details and external dependencies. The shard.yml file in the `my_app` app above looks like this:\n\n``` yaml\nname: my_app\nversion: 0.1.0\n\nauthors:\n - Robin Percy <robin@percy.pw>\n\ntargets:\n sayhi_c:\n main: src/my_app.cr\n\ncrystal: 0.31.1\n\nlicense: MIT\n```\n\nThe app I built has no dependencies to use, but if we want to include external packages we can do so by adding them at the bottom of the file:\n\n``` yaml\ndependencies:\n github:\n github: felipeelias/crystal-github\n version: ~> 0.1.0\n```\n\n### Documentation & Formatting\n\nCrystal has a great built-in tool for generating documentation and formatting files. The documentation that is generated is excellent - built-in html/css and almost instantly ready to deploy.\n\nTo generate documentation, from the project root directory we can simply run:\n\n```\n$ crystal doc\n```\nThis will create a docs directory, with a doc/index.html entry point. All files inside the root src directory of the project from which we ran the command will be considered.\n\nAlongside this, the built-in Formatter tool is a great feature of the language. We can run the formatter over our project by running:\n\n```\n$ crystal tool format\n```\n\nWe can use this tool to unify code styles and to submit documentation improvements to Crystal itself. The formatter is also very fast, so very little time is lost if you format the entire project's codebase instead of just a single file.\n\n<br/>\n\n## My Top Crystal Repo\n\n### Kemal\n\nObviously, there ***had*** to be a web framework appear in this list, seen as that's what absolutely **every** dev seems to want to implement. My choice here is my buddy [Serdar's](https://twitter.com/sdogruyol) library; [Kemal](https://kemalcr.com/). One feature I really like about it, is how simple it makes it to utilise JSON & create a JSON API. For example, accepting JSON in a POST request, parsing & mapping it directly to an object:\n\n``` crystal\nrequire \"kemal\"\nrequire \"json\"\n\nclass User\n JSON.mapping(\n firstname: String,\n surname: String,\n )\nend\n\npost \"/\" do |env|\n user = User.from_json env.request.body.not_nil!\n {firstname: user.firstname, surname: user.surname}.to_json\nend\n\nKemal.run\n```\n\n**If you want to find all of the best Crystal libraries, [you can check them out here.](https://github.com/veelenga/awesome-crystal)**\n\n<br />\n\n## My Top Nim Repo\n\n### Nimbus\n\nMy favourite Nim library really has to be [Nimbus](https://github.com/status-im/nimbus). This is not because I work for [Status](https://status.im) (the Nimbus creators), but because of the technology. Nimbus has has such a fantastic reception from the Nim community – and rightly so!\n\nI think that Nimbus is literally the most impressive Nim library outside of the Nim core, the [Nim Beacon Chain](https://github.com/status-im/nimbus) particularly so!\n\n> Nimbus beacon chain is a research implementation of the beacon chain component of the upcoming Ethereum Serenity upgrade (Ethereum 2)\n\nWhilst there are no developer code samples to include here, you can check out the [main Nimbus website](https://nimbus.team/), and the [main Nimbus repo](https://github.com/status-im/nimbus/).\n\nTake a look at [https://nimble.directory/](https://nimble.directory/) for a full list of external Nim libraries available for your projects!\n\n\n# Conclusion\n\nBack in 2012 when I quit writing Python and started exploring a bunch of other available languages, I started to become more aware of threading and its benefits. Once I got into the likes of Golang and Elixir, I learned about their threading models, and lightweight threads of execution being the way forward.\n\nIt's fantastic seeing both Nim *and* Crystal adopting the aforementioned concurrency primitives. I guess I have to give both languages a point there!\n\nI briefly touched on the smaller number of people on the Nim core team above, and this is something that's pretty unfortunate. Nim is a language and an ecosystem that has **such** great promise, I would love to see more people contributing to it and utilising it in production systems.\n\nThe final article in this series, \"Crypto, DApps & P2P\", will be released over the coming days, so keep checking back.\n\nThanks again for sticking with me!\n\n[ **- @rbin**](https://twitter.com/rbin)\n\n\n","source":"_posts/2019-11-21-nim-vs-crystal-part-2-threading-tooling.md","raw":"title: Nim vs Crystal - Part 2 - Threading & Tooling\nsummary: \"Crystal and Nim go head-to-head to figure out the best modern, low-level programming language! In part 2, Threading & Tooling are reviewed.\"\nauthor: robin_percy\ncategories:\n - tutorials\nlayout: blog-post\nimage: '/assets/images/nim-crystal-header-img_NEW.jpg'\n---\n\n\n\nWelcome back to my series comparing the two sweethearts of the modern low-level programming world. In [part 1](/news/2019/11/18/nim-vs-crystal-part-1-performance-interoperability/), I talked about my views on the interoperability of the two languages, alongside the performance figures of both. Article #1 managed to throw-up a couple of surprises, but I have to admit; these made it all the more enjoyable to write!\n\nIn this article, we're going to look into the commodity that would have changed the aforementioned performance figures, namely concurrency & parallelism, and then into the things that attract me most to programming languages; which is he in-built tooling available. As I know it'll be useful; I won't cover ***only*** the in-built tooling, but I'll include my favourite external package too.\n\n\n\n# Threading\n\n\n### Nim Parallelism Primitives\n\nNim has two flavours of parallelism:\n\n * Structured parallelism via the parallel statement.\n * Unstructured parallelism via the standalone spawn statement.\n\nNim has a builtin thread pool that can be used for CPU intensive tasks. For IO intensive tasks the async and await features should be used instead. Both parallel and spawn need the threadpool module to work.\n\n``` nim\nimport threadpool\n\nproc processLine(line: string) =\n discard \"do some heavy lifting here\"\n\nfor x in lines(\"myinput.txt\"):\n spawn processLine(x)\nsync()\n```\n\nThe parallel statement is the preferred way to use parallelism in a Nim program.\n\n``` nim\n# Compute Pi in an inefficient way\n\nimport strutils, math, threadpool\n{.experimental: \"parallel\".}\n\nproc term(k: float): float = 4 * math.pow(-1, k) / (2*k + 1)\n\nproc pi(n: int): float =\n var ch = newSeq[float](n+1)\n parallel:\n for k in 0..ch.high:\n ch[k] = spawn term(float(k))\n for k in 0..ch.high:\n result += ch[k]\n\necho formatFloat(pi(5000))\n```\n\nThreading support in Nim is part of the `system` module. To activate thread support you need to compile with the `--threads:on` command line switch.\n\nNim's memory model for threads is quite different from older common programming languages (C, Pascal), but similar to Golang and Elixir in that; each thread has its own (garbage collected) heap and sharing of memory is restricted. This helps to prevent race conditions and improves efficiency.\n\n### Concurrency vs Parallelism\n\nThe definitions of \"concurrency\" and \"parallelism\" sometimes get mixed up, but they are not the same.\n\nA concurrent system is one that can be in charge of many tasks, although not necessarily executing them at the same time. A good way to think of this is driving a car – the car can accelerate, brake & change gear, but they don't happen at the exact same time, although they *do* overlap. This is concurrency.\n\n\n*Source: https://livebook.manning.com/book/nim-in-action/chapter-6/13*\n\nThe human driving the car holds the clutch in, moves the gear lever in parallel, and then eases of the clutch at the exact same time as easing on the accelerator. This is processes running in parallel, hence parallelism.\n\n\n*Source: https://livebook.manning.com/book/nim-in-action/chapter-6/13*\n\nAt the moment, Crystal has concurrency support but not parallelism: several tasks can be executed, and a bit of time will be spent on each of these, but two code paths are never executed at the same exact time. However, recently [Parallelism was tested out](https://crystal-lang.org/2019/09/06/parallelism-in-crystal.html) and I'm sure will be fully ready to use soon!\n\nA Crystal program executes in a single operating system thread, except the Garbage Collector (GC) which implements a concurrent mark-and-sweep (currently Boehm GC).\n\n### Crystal Concurrency Primitives\n\nIn Crystal, we can use the `Spawn` functionality in a very similar way to Goroutines in Golang, core.async in Clojure, or the threading in Nim. When a program starts, it fires up a main `Fiber` that will execute your top-level code, from which we can spawn many other `Fibers`.\n\n`Fibers` are lightweight threads of execution that are managed by the garbage collector, so you don't *really* need to worry about managing them once you've spawned them. Because of this, you could technically spin up 100 `Fibers` to make a bunch of API requests, and then simply forget about them.\n\nWe can utilise `Spawn` in Crystal like so:\n\n``` crystal\nrequire \"socket\"\n\ndef load(id, chan)\n puts \"ID=#{id}; START\"\n (id..11).each do\n socket = TCPSocket.new(\"http://robin.percy.pw\", 80)\n socket.close\n end\n puts \"ID=#{id}; FINISH\"\n chan.send nil\nend\n\ndef main\n chan = Channel(Nil).new\n (1..10).each{|i| spawn(load(i,chan))}\n # Wait\n (1..10).each{chan.receive}\nend\n\nmain\n```\n\n> To support concurrency, Crystal has to be able to switch fibers when a fiber performs non-blocking IO operations.\n\nIn program above, a spawned task with lower-number id repeatedly creates a TCP socket, and does this more times than a task with a higher-number id. For example; task #1 establishes a TCP socket 11 times, and task #10 creates a TCP socket just once. So even though task #1 started long before task #10, task #10 *should* finish before task #1. As you can see in the image below; it does just that!\n\n\n\nSimilar to Golang, Crystal uses channels to pass messages between spawned fibers. Take the traditional Ping Pong channels example, in Crystal it looks like the following:\n\n``` crystal\ndef ping(pings, message)\n pings.send message\nend\n\ndef pong(pings, pongs)\n message = pings.receive\n pongs.send message\nend\n\npings = Channel(String).new\npongs = Channel(String).new\nspawn ping pings, \"passed message\"\nspawn pong pings, pongs\nputs pongs.receive # => \"passed message\"\n```\n\nUnfortunately, I personally haven't had the opportunity to test Crystal's `Fibers` or Nim's `Spawn` in a load-heavy production environment. But soon I fully intend to, and I'll write another article benchmarking this in detail when I have a good usecase and get the chance to!\n\n\n# Tooling\n\n## Built-in Tooling in Nim\n\nNow that [Nim 1.0 has been released](https://nim-lang.org/blog/2019/09/23/version-100-released.html), its in-built tooling has improved to a great level, and is very quickly reaching maturity.\n\nThe standard library in Nim is fantastic... Things like native database support for multiple db's, without using any external packages like Crystal does, makes me extremely hopeful for Nim. I really do believe it is language worth considering, if it matches your production needs. That being said, I am still an advocate of 'use the right tool for the job' – so don't go implementing Nim just for the sake of it!\n\nThe only thing to keep in mind; is that Nim *does* seem to be slower in growth than Crystal. The thing is – Nim has quite a few **less** core contributors than Crystal, so slower growth is to be expected!\n\n\n### Nim Project Packaging\n\nSomething I look for in ***ALL*** modern programming languages, and something I consider to be a necessity is a good, and well featured in-built package manager. Happily in Nim's case; we have Nimble!\n\nWe can create a new app (library/binary) by using `nimble init`:\n\n\n\nI have to admit, although a simple thing, this is one of my favourite parts of the entire Nim ecosystem! Being able to enter your selection variables while actually creating your app package is something I think is not only tremendously useful, but awesomely novel.\n\nIt's not just the fact that you can enter selections, but actually the fact that you can select the backend for your app. As you can see in the image above, you have the choice of C, C++, Objective-C and JavaScript -– something that I touched on in my [last article.](/news/2019/11/18/nim-vs-crystal-part-1-performance-interoperability/)\n\n\n### Documentation\n\nNimble has in-built documentation generators that can output both HTML and JSON project documentation files. The one thing I will say is that I actually found this functionality to be *slightly* confusing, as I kept getting very odd errors, but also lacking in the excellent use experience you get from the rest of Nimble, i.e. the `init` func.\n\nYou can generate the documentation file for your app by running:\n\n```\nnimble doc myapp.nimble\n```\n\n### Testing\n\nNimble offers a pre-defined `test` task which compiles and runs all files in the `/tests` directory beginning with 't' in their filename.\n\nYou may wish to override this `test` task in your `.nimble` file. This is particularly useful when you have a single test suite program. Just add the following to your `.nimble` file to override the default `test` task.\n\n``` nim\ntask test, \"Runs the test suite\":\n exec \"nim c -r tests/tester\"\n```\n\nRunning nimble test will now use the test task you have defined.\n\n\n\n<br/>\n\n## Built-in Tooling in Crystal\n\nOne of the things I like most about Crystal is the excellent built-in tooling available. When I look at new languages, especially relatively immature languages; it's always very reassuring when the language has extensive built-in tooling available to help developers stay productive & happy! In Crystal, there are a bunch of tools that make hacking around in the language super fun, but also help us to stay on the right track with semantics etc.\n\n\n### Crystal Project Packaging\n\nMuch the same as the Nimble package manager, ***although not as good in my opinion,*** Crystal has it's own built-in project scaffolder & package manager. I'd recommend using this at all times to ensure semantics are followed. We can use it with the following:\n\n```\n$ crystal init lib my_app\n create my_app/.gitignore\n create my_app/LICENSE\n create my_app/README.md\n create my_app/.travis.yml\n create my_app/shard.yml\n create my_app/src/my_app\n create my_app/src/my_app/version.cr\n create my_app/spec/spec_helper.cr\n create my_app/spec/my_app_spec.cr\nInitialized empty Git repository in ~/my_app/.git/\n```\n\n`Shards` are Crystal's packages; distributed in the same way as Ruby Gems, Elixir Libs or Golang packages. Each application we create contains a file in the root directory named shard.yml. This file contains project details and external dependencies. The shard.yml file in the `my_app` app above looks like this:\n\n``` yaml\nname: my_app\nversion: 0.1.0\n\nauthors:\n - Robin Percy <robin@percy.pw>\n\ntargets:\n sayhi_c:\n main: src/my_app.cr\n\ncrystal: 0.31.1\n\nlicense: MIT\n```\n\nThe app I built has no dependencies to use, but if we want to include external packages we can do so by adding them at the bottom of the file:\n\n``` yaml\ndependencies:\n github:\n github: felipeelias/crystal-github\n version: ~> 0.1.0\n```\n\n### Documentation & Formatting\n\nCrystal has a great built-in tool for generating documentation and formatting files. The documentation that is generated is excellent - built-in html/css and almost instantly ready to deploy.\n\nTo generate documentation, from the project root directory we can simply run:\n\n```\n$ crystal doc\n```\nThis will create a docs directory, with a doc/index.html entry point. All files inside the root src directory of the project from which we ran the command will be considered.\n\nAlongside this, the built-in Formatter tool is a great feature of the language. We can run the formatter over our project by running:\n\n```\n$ crystal tool format\n```\n\nWe can use this tool to unify code styles and to submit documentation improvements to Crystal itself. The formatter is also very fast, so very little time is lost if you format the entire project's codebase instead of just a single file.\n\n<br/>\n\n## My Top Crystal Repo\n\n### Kemal\n\nObviously, there ***had*** to be a web framework appear in this list, seen as that's what absolutely **every** dev seems to want to implement. My choice here is my buddy [Serdar's](https://twitter.com/sdogruyol) library; [Kemal](https://kemalcr.com/). One feature I really like about it, is how simple it makes it to utilise JSON & create a JSON API. For example, accepting JSON in a POST request, parsing & mapping it directly to an object:\n\n``` crystal\nrequire \"kemal\"\nrequire \"json\"\n\nclass User\n JSON.mapping(\n firstname: String,\n surname: String,\n )\nend\n\npost \"/\" do |env|\n user = User.from_json env.request.body.not_nil!\n {firstname: user.firstname, surname: user.surname}.to_json\nend\n\nKemal.run\n```\n\n**If you want to find all of the best Crystal libraries, [you can check them out here.](https://github.com/veelenga/awesome-crystal)**\n\n<br />\n\n## My Top Nim Repo\n\n### Nimbus\n\nMy favourite Nim library really has to be [Nimbus](https://github.com/status-im/nimbus). This is not because I work for [Status](https://status.im) (the Nimbus creators), but because of the technology. Nimbus has has such a fantastic reception from the Nim community – and rightly so!\n\nI think that Nimbus is literally the most impressive Nim library outside of the Nim core, the [Nim Beacon Chain](https://github.com/status-im/nimbus) particularly so!\n\n> Nimbus beacon chain is a research implementation of the beacon chain component of the upcoming Ethereum Serenity upgrade (Ethereum 2)\n\nWhilst there are no developer code samples to include here, you can check out the [main Nimbus website](https://nimbus.team/), and the [main Nimbus repo](https://github.com/status-im/nimbus/).\n\nTake a look at [https://nimble.directory/](https://nimble.directory/) for a full list of external Nim libraries available for your projects!\n\n\n# Conclusion\n\nBack in 2012 when I quit writing Python and started exploring a bunch of other available languages, I started to become more aware of threading and its benefits. Once I got into the likes of Golang and Elixir, I learned about their threading models, and lightweight threads of execution being the way forward.\n\nIt's fantastic seeing both Nim *and* Crystal adopting the aforementioned concurrency primitives. I guess I have to give both languages a point there!\n\nI briefly touched on the smaller number of people on the Nim core team above, and this is something that's pretty unfortunate. Nim is a language and an ecosystem that has **such** great promise, I would love to see more people contributing to it and utilising it in production systems.\n\nThe final article in this series, \"Crypto, DApps & P2P\", will be released over the coming days, so keep checking back.\n\nThanks again for sticking with me!\n\n[ **- @rbin**](https://twitter.com/rbin)\n\n\n","slug":"nim-vs-crystal-part-2-threading-tooling","published":1,"date":"2019-11-21T05:00:00.000Z","updated":"2020-03-09T18:08:46.758Z","_id":"ck6axlfcf002qxeeggc41gzxp","comments":1,"photos":[],"link":"","content":"<p><img src=\"/assets/images/nim-crystal-header-img_NEW.jpg\" alt=\"crystal vs nim\"></p>\n<p>Welcome back to my series comparing the two sweethearts of the modern low-level programming world. In <a href=\"/news/2019/11/18/nim-vs-crystal-part-1-performance-interoperability/\">part 1</a>, I talked about my views on the interoperability of the two languages, alongside the performance figures of both. Article #1 managed to throw-up a couple of surprises, but I have to admit; these made it all the more enjoyable to write!</p>\n<p>In this article, we’re going to look into the commodity that would have changed the aforementioned performance figures, namely concurrency & parallelism, and then into the things that attract me most to programming languages; which is he in-built tooling available. As I know it’ll be useful; I won’t cover <strong><em>only</em></strong> the in-built tooling, but I’ll include my favourite external package too.</p>\n<h1 id=\"Threading\"><a href=\"#Threading\" class=\"headerlink\" title=\"Threading\"></a>Threading</h1><h3 id=\"Nim-Parallelism-Primitives\"><a href=\"#Nim-Parallelism-Primitives\" class=\"headerlink\" title=\"Nim Parallelism Primitives\"></a>Nim Parallelism Primitives</h3><p>Nim has two flavours of parallelism:</p>\n<ul>\n<li>Structured parallelism via the parallel statement.</li>\n<li>Unstructured parallelism via the standalone spawn statement.</li>\n</ul>\n<p>Nim has a builtin thread pool that can be used for CPU intensive tasks. For IO intensive tasks the async and await features should be used instead. Both parallel and spawn need the threadpool module to work.</p>\n<figure class=\"highlight nim\"><table><tr><td class=\"code\"><pre><span class=\"line\"><span class=\"keyword\">import</span> threadpool</span><br><span class=\"line\"></span><br><span class=\"line\"><span class=\"keyword\">proc</span> processLine(line: <span class=\"built_in\">string</span>) =</span><br><span class=\"line\"> <span class=\"keyword\">discard</span> <span class=\"string\">\"do some heavy lifting here\"</span></span><br><span class=\"line\"></span><br><span class=\"line\"><span class=\"keyword\">for</span> x <span class=\"keyword\">in</span> lines(<span class=\"string\">\"myinput.txt\"</span>):</span><br><span class=\"line\"> spawn processLine(x)</span><br><span class=\"line\">sync()</span><br></pre></td></tr></table></figure>\n\n<p>The parallel statement is the preferred way to use parallelism in a Nim program.</p>\n<figure class=\"highlight nim\"><table><tr><td class=\"code\"><pre><span class=\"line\"><span class=\"comment\"># Compute Pi in an inefficient way</span></span><br><span class=\"line\"></span><br><span class=\"line\"><span class=\"keyword\">import</span> strutils, math, threadpool</span><br><span class=\"line\"><span class=\"meta\">{.experimental: \"parallel\".}</span></span><br><span class=\"line\"></span><br><span class=\"line\"><span class=\"keyword\">proc</span> term(k: <span class=\"built_in\">float</span>): <span class=\"built_in\">float</span> = <span class=\"number\">4</span> * math.pow(-<span class=\"number\">1</span>, k) / (<span class=\"number\">2</span>*k + <span class=\"number\">1</span>)</span><br><span class=\"line\"></span><br><span class=\"line\"><span class=\"keyword\">proc</span> pi(n: <span class=\"built_in\">int</span>): <span class=\"built_in\">float</span> =</span><br><span class=\"line\"> <span class=\"keyword\">var</span> ch = newSeq[<span class=\"built_in\">float</span>](n+<span class=\"number\">1</span>)</span><br><span class=\"line\"> parallel:</span><br><span class=\"line\"> <span class=\"keyword\">for</span> k <span class=\"keyword\">in</span> <span class=\"number\">0</span>..ch.high:</span><br><span class=\"line\"> ch[k] = spawn term(<span class=\"built_in\">float</span>(k))</span><br><span class=\"line\"> <span class=\"keyword\">for</span> k <span class=\"keyword\">in</span> <span class=\"number\">0</span>..ch.high:</span><br><span class=\"line\"> <span class=\"literal\">result</span> += ch[k]</span><br><span class=\"line\"></span><br><span class=\"line\">echo formatFloat(pi(<span class=\"number\">5000</span>))</span><br></pre></td></tr></table></figure>\n\n<p>Threading support in Nim is part of the <code>system</code> module. To activate thread support you need to compile with the <code>--threads:on</code> command line switch.</p>\n<p>Nim’s memory model for threads is quite different from older common programming languages (C, Pascal), but similar to Golang and Elixir in that; each thread has its own (garbage collected) heap and sharing of memory is restricted. This helps to prevent race conditions and improves efficiency.</p>\n<h3 id=\"Concurrency-vs-Parallelism\"><a href=\"#Concurrency-vs-Parallelism\" class=\"headerlink\" title=\"Concurrency vs Parallelism\"></a>Concurrency vs Parallelism</h3><p>The definitions of “concurrency” and “parallelism” sometimes get mixed up, but they are not the same.</p>\n<p>A concurrent system is one that can be in charge of many tasks, although not necessarily executing them at the same time. A good way to think of this is driving a car – the car can accelerate, brake & change gear, but they don’t happen at the exact same time, although they <em>do</em> overlap. This is concurrency.</p>\n<p><img src=\"https://dpzbhybb2pdcj.cloudfront.net/picheta/Figures/06fig01_alt.jpg\" alt=\"concurrency\"><br><em>Source: <a href=\"https://livebook.manning.com/book/nim-in-action/chapter-6/13\">https://livebook.manning.com/book/nim-in-action/chapter-6/13</a></em></p>\n<p>The human driving the car holds the clutch in, moves the gear lever in parallel, and then eases of the clutch at the exact same time as easing on the accelerator. This is processes running in parallel, hence parallelism.</p>\n<p><img src=\"https://dpzbhybb2pdcj.cloudfront.net/picheta/Figures/06fig02_alt.jpg\" alt=\"parallelism\"><br><em>Source: <a href=\"https://livebook.manning.com/book/nim-in-action/chapter-6/13\">https://livebook.manning.com/book/nim-in-action/chapter-6/13</a></em></p>\n<p>At the moment, Crystal has concurrency support but not parallelism: several tasks can be executed, and a bit of time will be spent on each of these, but two code paths are never executed at the same exact time. However, recently <a href=\"https://crystal-lang.org/2019/09/06/parallelism-in-crystal.html\">Parallelism was tested out</a> and I’m sure will be fully ready to use soon!</p>\n<p>A Crystal program executes in a single operating system thread, except the Garbage Collector (GC) which implements a concurrent mark-and-sweep (currently Boehm GC).</p>\n<h3 id=\"Crystal-Concurrency-Primitives\"><a href=\"#Crystal-Concurrency-Primitives\" class=\"headerlink\" title=\"Crystal Concurrency Primitives\"></a>Crystal Concurrency Primitives</h3><p>In Crystal, we can use the <code>Spawn</code> functionality in a very similar way to Goroutines in Golang, core.async in Clojure, or the threading in Nim. When a program starts, it fires up a main <code>Fiber</code> that will execute your top-level code, from which we can spawn many other <code>Fibers</code>.</p>\n<p><code>Fibers</code> are lightweight threads of execution that are managed by the garbage collector, so you don’t <em>really</em> need to worry about managing them once you’ve spawned them. Because of this, you could technically spin up 100 <code>Fibers</code> to make a bunch of API requests, and then simply forget about them.</p>\n<p>We can utilise <code>Spawn</code> in Crystal like so:</p>\n<figure class=\"highlight crystal\"><table><tr><td class=\"code\"><pre><span class=\"line\"><span class=\"keyword\">require</span> <span class=\"string\">\"socket\"</span></span><br><span class=\"line\"></span><br><span class=\"line\"><span class=\"function\"><span class=\"keyword\">def</span> <span class=\"title\">load</span></span>(id, chan)</span><br><span class=\"line\"> puts <span class=\"string\">\"ID=<span class=\"subst\">#{id}</span>; START\"</span></span><br><span class=\"line\"> (id..<span class=\"number\">11</span>).each <span class=\"keyword\">do</span></span><br><span class=\"line\"> socket = TCPSocket.new(<span class=\"string\">\"http://robin.percy.pw\"</span>, <span class=\"number\">80</span>)</span><br><span class=\"line\"> socket.close</span><br><span class=\"line\"> <span class=\"keyword\">end</span></span><br><span class=\"line\"> puts <span class=\"string\">\"ID=<span class=\"subst\">#{id}</span>; FINISH\"</span></span><br><span class=\"line\"> chan.send <span class=\"literal\">nil</span></span><br><span class=\"line\"><span class=\"keyword\">end</span></span><br><span class=\"line\"></span><br><span class=\"line\"><span class=\"function\"><span class=\"keyword\">def</span> <span class=\"title\">main</span></span></span><br><span class=\"line\"> chan = Channel(Nil).new</span><br><span class=\"line\"> (<span class=\"number\">1</span>..<span class=\"number\">10</span>).each{|i| spawn(load(i,chan))}</span><br><span class=\"line\"> <span class=\"comment\"># Wait</span></span><br><span class=\"line\"> (<span class=\"number\">1</span>..<span class=\"number\">10</span>).each{chan.receive}</span><br><span class=\"line\"><span class=\"keyword\">end</span></span><br><span class=\"line\"></span><br><span class=\"line\">main</span><br></pre></td></tr></table></figure>\n\n<blockquote>\n<p>To support concurrency, Crystal has to be able to switch fibers when a fiber performs non-blocking IO operations.</p>\n</blockquote>\n<p>In program above, a spawned task with lower-number id repeatedly creates a TCP socket, and does this more times than a task with a higher-number id. For example; task #1 establishes a TCP socket 11 times, and task #10 creates a TCP socket just once. So even though task #1 started long before task #10, task #10 <em>should</em> finish before task #1. As you can see in the image below; it does just that!</p>\n<p><img src=\"/assets/images/crystal-thread-test.png\" alt=\"Crystal spawn test\"></p>\n<p>Similar to Golang, Crystal uses channels to pass messages between spawned fibers. Take the traditional Ping Pong channels example, in Crystal it looks like the following:</p>\n<figure class=\"highlight crystal\"><table><tr><td class=\"code\"><pre><span class=\"line\"><span class=\"function\"><span class=\"keyword\">def</span> <span class=\"title\">ping</span></span>(pings, message)</span><br><span class=\"line\"> pings.send message</span><br><span class=\"line\"><span class=\"keyword\">end</span></span><br><span class=\"line\"></span><br><span class=\"line\"><span class=\"function\"><span class=\"keyword\">def</span> <span class=\"title\">pong</span></span>(pings, pongs)</span><br><span class=\"line\"> message = pings.receive</span><br><span class=\"line\"> pongs.send message</span><br><span class=\"line\"><span class=\"keyword\">end</span></span><br><span class=\"line\"></span><br><span class=\"line\">pings = Channel(String).new</span><br><span class=\"line\">pongs = Channel(String).new</span><br><span class=\"line\">spawn ping pings, <span class=\"string\">\"passed message\"</span></span><br><span class=\"line\">spawn pong pings, pongs</span><br><span class=\"line\">puts pongs.receive <span class=\"comment\"># => \"passed message\"</span></span><br></pre></td></tr></table></figure>\n\n<p>Unfortunately, I personally haven’t had the opportunity to test Crystal’s <code>Fibers</code> or Nim’s <code>Spawn</code> in a load-heavy production environment. But soon I fully intend to, and I’ll write another article benchmarking this in detail when I have a good usecase and get the chance to!</p>\n<h1 id=\"Tooling\"><a href=\"#Tooling\" class=\"headerlink\" title=\"Tooling\"></a>Tooling</h1><h2 id=\"Built-in-Tooling-in-Nim\"><a href=\"#Built-in-Tooling-in-Nim\" class=\"headerlink\" title=\"Built-in Tooling in Nim\"></a>Built-in Tooling in Nim</h2><p>Now that <a href=\"https://nim-lang.org/blog/2019/09/23/version-100-released.html\">Nim 1.0 has been released</a>, its in-built tooling has improved to a great level, and is very quickly reaching maturity.</p>\n<p>The standard library in Nim is fantastic… Things like native database support for multiple db’s, without using any external packages like Crystal does, makes me extremely hopeful for Nim. I really do believe it is language worth considering, if it matches your production needs. That being said, I am still an advocate of ‘use the right tool for the job’ – so don’t go implementing Nim just for the sake of it!</p>\n<p>The only thing to keep in mind; is that Nim <em>does</em> seem to be slower in growth than Crystal. The thing is – Nim has quite a few <strong>less</strong> core contributors than Crystal, so slower growth is to be expected!</p>\n<h3 id=\"Nim-Project-Packaging\"><a href=\"#Nim-Project-Packaging\" class=\"headerlink\" title=\"Nim Project Packaging\"></a>Nim Project Packaging</h3><p>Something I look for in <strong><em>ALL</em></strong> modern programming languages, and something I consider to be a necessity is a good, and well featured in-built package manager. Happily in Nim’s case; we have Nimble!</p>\n<p>We can create a new app (library/binary) by using <code>nimble init</code>:</p>\n<p><img src=\"/assets/images/nimble-creating-app.png\" alt=\"creating nimble app\"></p>\n<p>I have to admit, although a simple thing, this is one of my favourite parts of the entire Nim ecosystem! Being able to enter your selection variables while actually creating your app package is something I think is not only tremendously useful, but awesomely novel.</p>\n<p>It’s not just the fact that you can enter selections, but actually the fact that you can select the backend for your app. As you can see in the image above, you have the choice of C, C++, Objective-C and JavaScript -– something that I touched on in my <a href=\"/news/2019/11/18/nim-vs-crystal-part-1-performance-interoperability/\">last article.</a></p>\n<h3 id=\"Documentation\"><a href=\"#Documentation\" class=\"headerlink\" title=\"Documentation\"></a>Documentation</h3><p>Nimble has in-built documentation generators that can output both HTML and JSON project documentation files. The one thing I will say is that I actually found this functionality to be <em>slightly</em> confusing, as I kept getting very odd errors, but also lacking in the excellent use experience you get from the rest of Nimble, i.e. the <code>init</code> func.</p>\n<p>You can generate the documentation file for your app by running:</p>\n<figure class=\"highlight plain\"><table><tr><td class=\"code\"><pre><span class=\"line\">nimble doc myapp.nimble</span><br></pre></td></tr></table></figure>\n\n<h3 id=\"Testing\"><a href=\"#Testing\" class=\"headerlink\" title=\"Testing\"></a>Testing</h3><p>Nimble offers a pre-defined <code>test</code> task which compiles and runs all files in the <code>/tests</code> directory beginning with ‘t’ in their filename.</p>\n<p>You may wish to override this <code>test</code> task in your <code>.nimble</code> file. This is particularly useful when you have a single test suite program. Just add the following to your <code>.nimble</code> file to override the default <code>test</code> task.</p>\n<figure class=\"highlight nim\"><table><tr><td class=\"code\"><pre><span class=\"line\">task test, <span class=\"string\">\"Runs the test suite\"</span>:</span><br><span class=\"line\"> exec <span class=\"string\">\"nim c -r tests/tester\"</span></span><br></pre></td></tr></table></figure>\n\n<p>Running nimble test will now use the test task you have defined.</p>\n<br/>\n\n<h2 id=\"Built-in-Tooling-in-Crystal\"><a href=\"#Built-in-Tooling-in-Crystal\" class=\"headerlink\" title=\"Built-in Tooling in Crystal\"></a>Built-in Tooling in Crystal</h2><p>One of the things I like most about Crystal is the excellent built-in tooling available. When I look at new languages, especially relatively immature languages; it’s always very reassuring when the language has extensive built-in tooling available to help developers stay productive & happy! In Crystal, there are a bunch of tools that make hacking around in the language super fun, but also help us to stay on the right track with semantics etc.</p>\n<h3 id=\"Crystal-Project-Packaging\"><a href=\"#Crystal-Project-Packaging\" class=\"headerlink\" title=\"Crystal Project Packaging\"></a>Crystal Project Packaging</h3><p>Much the same as the Nimble package manager, <strong><em>although not as good in my opinion,</em></strong> Crystal has it’s own built-in project scaffolder & package manager. I’d recommend using this at all times to ensure semantics are followed. We can use it with the following:</p>\n<figure class=\"highlight plain\"><table><tr><td class=\"code\"><pre><span class=\"line\">$ crystal init lib my_app</span><br><span class=\"line\"> create my_app/.gitignore</span><br><span class=\"line\"> create my_app/LICENSE</span><br><span class=\"line\"> create my_app/README.md</span><br><span class=\"line\"> create my_app/.travis.yml</span><br><span class=\"line\"> create my_app/shard.yml</span><br><span class=\"line\"> create my_app/src/my_app</span><br><span class=\"line\"> create my_app/src/my_app/version.cr</span><br><span class=\"line\"> create my_app/spec/spec_helper.cr</span><br><span class=\"line\"> create my_app/spec/my_app_spec.cr</span><br><span class=\"line\">Initialized empty Git repository in ~/my_app/.git/</span><br></pre></td></tr></table></figure>\n\n<p><code>Shards</code> are Crystal’s packages; distributed in the same way as Ruby Gems, Elixir Libs or Golang packages. Each application we create contains a file in the root directory named shard.yml. This file contains project details and external dependencies. The shard.yml file in the <code>my_app</code> app above looks like this:</p>\n<figure class=\"highlight yaml\"><table><tr><td class=\"code\"><pre><span class=\"line\"><span class=\"attr\">name:</span> <span class=\"string\">my_app</span></span><br><span class=\"line\"><span class=\"attr\">version:</span> <span class=\"number\">0.1</span><span class=\"number\">.0</span></span><br><span class=\"line\"></span><br><span class=\"line\"><span class=\"attr\">authors:</span></span><br><span class=\"line\"><span class=\"bullet\"> -</span> <span class=\"string\">Robin</span> <span class=\"string\">Percy</span> <span class=\"string\"><robin@percy.pw></span></span><br><span class=\"line\"></span><br><span class=\"line\"><span class=\"attr\">targets:</span></span><br><span class=\"line\"><span class=\"attr\"> sayhi_c:</span></span><br><span class=\"line\"><span class=\"attr\"> main:</span> <span class=\"string\">src/my_app.cr</span></span><br><span class=\"line\"></span><br><span class=\"line\"><span class=\"attr\">crystal:</span> <span class=\"number\">0.31</span><span class=\"number\">.1</span></span><br><span class=\"line\"></span><br><span class=\"line\"><span class=\"attr\">license:</span> <span class=\"string\">MIT</span></span><br></pre></td></tr></table></figure>\n\n<p>The app I built has no dependencies to use, but if we want to include external packages we can do so by adding them at the bottom of the file:</p>\n<figure class=\"highlight yaml\"><table><tr><td class=\"code\"><pre><span class=\"line\"><span class=\"attr\">dependencies:</span></span><br><span class=\"line\"><span class=\"attr\"> github:</span></span><br><span class=\"line\"><span class=\"attr\"> github:</span> <span class=\"string\">felipeelias/crystal-github</span></span><br><span class=\"line\"><span class=\"attr\"> version:</span> <span class=\"string\">~></span> <span class=\"number\">0.1</span><span class=\"number\">.0</span></span><br></pre></td></tr></table></figure>\n\n<h3 id=\"Documentation-amp-Formatting\"><a href=\"#Documentation-amp-Formatting\" class=\"headerlink\" title=\"Documentation & Formatting\"></a>Documentation & Formatting</h3><p>Crystal has a great built-in tool for generating documentation and formatting files. The documentation that is generated is excellent - built-in html/css and almost instantly ready to deploy.</p>\n<p>To generate documentation, from the project root directory we can simply run:</p>\n<figure class=\"highlight plain\"><table><tr><td class=\"code\"><pre><span class=\"line\">$ crystal doc</span><br></pre></td></tr></table></figure>\n<p>This will create a docs directory, with a doc/index.html entry point. All files inside the root src directory of the project from which we ran the command will be considered.</p>\n<p>Alongside this, the built-in Formatter tool is a great feature of the language. We can run the formatter over our project by running:</p>\n<figure class=\"highlight plain\"><table><tr><td class=\"code\"><pre><span class=\"line\">$ crystal tool format</span><br></pre></td></tr></table></figure>\n\n<p>We can use this tool to unify code styles and to submit documentation improvements to Crystal itself. The formatter is also very fast, so very little time is lost if you format the entire project’s codebase instead of just a single file.</p>\n<br/>\n\n<h2 id=\"My-Top-Crystal-Repo\"><a href=\"#My-Top-Crystal-Repo\" class=\"headerlink\" title=\"My Top Crystal Repo\"></a>My Top Crystal Repo</h2><h3 id=\"Kemal\"><a href=\"#Kemal\" class=\"headerlink\" title=\"Kemal\"></a>Kemal</h3><p>Obviously, there <strong><em>had</em></strong> to be a web framework appear in this list, seen as that’s what absolutely <strong>every</strong> dev seems to want to implement. My choice here is my buddy <a href=\"https://twitter.com/sdogruyol\">Serdar’s</a> library; <a href=\"https://kemalcr.com/\">Kemal</a>. One feature I really like about it, is how simple it makes it to utilise JSON & create a JSON API. For example, accepting JSON in a POST request, parsing & mapping it directly to an object:</p>\n<figure class=\"highlight crystal\"><table><tr><td class=\"code\"><pre><span class=\"line\"><span class=\"keyword\">require</span> <span class=\"string\">\"kemal\"</span></span><br><span class=\"line\"><span class=\"keyword\">require</span> <span class=\"string\">\"json\"</span></span><br><span class=\"line\"></span><br><span class=\"line\"><span class=\"class\"><span class=\"keyword\">class</span> <span class=\"title\">User</span></span></span><br><span class=\"line\"> JSON.mapping(</span><br><span class=\"line\"> <span class=\"symbol\">firstname:</span> String,</span><br><span class=\"line\"> <span class=\"symbol\">surname:</span> String,</span><br><span class=\"line\"> )</span><br><span class=\"line\"><span class=\"keyword\">end</span></span><br><span class=\"line\"></span><br><span class=\"line\">post <span class=\"string\">\"/\"</span> <span class=\"keyword\">do</span> |env|</span><br><span class=\"line\"> user = User.from_json env.request.body.not_nil!</span><br><span class=\"line\"> {<span class=\"symbol\">firstname:</span> user.firstname, <span class=\"symbol\">surname:</span> user.surname}.to_json</span><br><span class=\"line\"><span class=\"keyword\">end</span></span><br><span class=\"line\"></span><br><span class=\"line\">Kemal.run</span><br></pre></td></tr></table></figure>\n\n<p><strong>If you want to find all of the best Crystal libraries, <a href=\"https://github.com/veelenga/awesome-crystal\">you can check them out here.</a></strong></p>\n<br />\n\n<h2 id=\"My-Top-Nim-Repo\"><a href=\"#My-Top-Nim-Repo\" class=\"headerlink\" title=\"My Top Nim Repo\"></a>My Top Nim Repo</h2><h3 id=\"Nimbus\"><a href=\"#Nimbus\" class=\"headerlink\" title=\"Nimbus\"></a>Nimbus</h3><p>My favourite Nim library really has to be <a href=\"https://github.com/status-im/nimbus\">Nimbus</a>. This is not because I work for <a href=\"https://status.im\">Status</a> (the Nimbus creators), but because of the technology. Nimbus has has such a fantastic reception from the Nim community – and rightly so!</p>\n<p>I think that Nimbus is literally the most impressive Nim library outside of the Nim core, the <a href=\"https://github.com/status-im/nimbus\">Nim Beacon Chain</a> particularly so!</p>\n<blockquote>\n<p>Nimbus beacon chain is a research implementation of the beacon chain component of the upcoming Ethereum Serenity upgrade (Ethereum 2)</p>\n</blockquote>\n<p>Whilst there are no developer code samples to include here, you can check out the <a href=\"https://nimbus.team/\">main Nimbus website</a>, and the <a href=\"https://github.com/status-im/nimbus/\">main Nimbus repo</a>.</p>\n<p>Take a look at <a href=\"https://nimble.directory/\">https://nimble.directory/</a> for a full list of external Nim libraries available for your projects!</p>\n<h1 id=\"Conclusion\"><a href=\"#Conclusion\" class=\"headerlink\" title=\"Conclusion\"></a>Conclusion</h1><p>Back in 2012 when I quit writing Python and started exploring a bunch of other available languages, I started to become more aware of threading and its benefits. Once I got into the likes of Golang and Elixir, I learned about their threading models, and lightweight threads of execution being the way forward.</p>\n<p>It’s fantastic seeing both Nim <em>and</em> Crystal adopting the aforementioned concurrency primitives. I guess I have to give both languages a point there!</p>\n<p>I briefly touched on the smaller number of people on the Nim core team above, and this is something that’s pretty unfortunate. Nim is a language and an ecosystem that has <strong>such</strong> great promise, I would love to see more people contributing to it and utilising it in production systems.</p>\n<p>The final article in this series, “Crypto, DApps & P2P”, will be released over the coming days, so keep checking back.</p>\n<p>Thanks again for sticking with me!</p>\n<p><a href=\"https://twitter.com/rbin\"> <strong>- @rbin</strong></a></p>\n","site":{"data":{"authors":{"iuri_matias":{"name":"Iuri Matias","twitter":"iurimatias","image":"https://pbs.twimg.com/profile_images/928272512181563392/iDJdvy2k_400x400.jpg"},"pascal_precht":{"name":"Pascal Precht","twitter":"pascalprecht","image":"https://pbs.twimg.com/profile_images/993785060733194241/p3oAIMDP_400x400.jpg"},"anthony_laibe":{"name":"Anthony Laibe","twitter":"a_laibe","image":"https://pbs.twimg.com/profile_images/257742900/13168239_400x400.jpg"},"jonathan_rainville":{"name":"Jonathan Rainville","twitter":"ShyolGhul","image":"https://pbs.twimg.com/profile_images/993873866878570496/-aE4byjj_400x400.jpg"},"andre_medeiros":{"name":"Andre Medeiros","twitter":"superdealloc","image":"https://pbs.twimg.com/profile_images/965722487735701504/m58KNgWN_400x400.jpg"},"eric_mastro":{"name":"Eric Mastro","twitter":"ericmastro","image":"https://avatars1.githubusercontent.com/u/5089238?s=460&v=4"},"michael_bradley":{"name":"Michael Bradley","image":"https://avatars3.githubusercontent.com/u/194260?s=460&v=4"},"richard_ramos":{"name":"Richard Ramos","twitter":"richardramos_me","image":"https://devcon.org/images/speakers/richard_ramos.jpg"},"jonny_zerah":{"name":"Jonny Zerah","twitter":"jonnyzerah","image":"https://pbs.twimg.com/profile_images/1043774340490248192/gI9aGy17_400x400.jpg"},"robin_percy":{"name":"Robin Percy","twitter":"rbin","image":"https://avatars1.githubusercontent.com/u/29288325?s=400&v=4"}},"categories":{"tutorials":"Tutorials","announcements":"Announcements"},"languages":{"en":"English"}}},"excerpt":"","more":"<p><img src=\"/assets/images/nim-crystal-header-img_NEW.jpg\" alt=\"crystal vs nim\"></p>\n<p>Welcome back to my series comparing the two sweethearts of the modern low-level programming world. In <a href=\"/news/2019/11/18/nim-vs-crystal-part-1-performance-interoperability/\">part 1</a>, I talked about my views on the interoperability of the two languages, alongside the performance figures of both. Article #1 managed to throw-up a couple of surprises, but I have to admit; these made it all the more enjoyable to write!</p>\n<p>In this article, we’re going to look into the commodity that would have changed the aforementioned performance figures, namely concurrency & parallelism, and then into the things that attract me most to programming languages; which is he in-built tooling available. As I know it’ll be useful; I won’t cover <strong><em>only</em></strong> the in-built tooling, but I’ll include my favourite external package too.</p>\n<h1 id=\"Threading\"><a href=\"#Threading\" class=\"headerlink\" title=\"Threading\"></a>Threading</h1><h3 id=\"Nim-Parallelism-Primitives\"><a href=\"#Nim-Parallelism-Primitives\" class=\"headerlink\" title=\"Nim Parallelism Primitives\"></a>Nim Parallelism Primitives</h3><p>Nim has two flavours of parallelism:</p>\n<ul>\n<li>Structured parallelism via the parallel statement.</li>\n<li>Unstructured parallelism via the standalone spawn statement.</li>\n</ul>\n<p>Nim has a builtin thread pool that can be used for CPU intensive tasks. For IO intensive tasks the async and await features should be used instead. Both parallel and spawn need the threadpool module to work.</p>\n<figure class=\"highlight nim\"><table><tr><td class=\"code\"><pre><span class=\"line\"><span class=\"keyword\">import</span> threadpool</span><br><span class=\"line\"></span><br><span class=\"line\"><span class=\"keyword\">proc</span> processLine(line: <span class=\"built_in\">string</span>) =</span><br><span class=\"line\"> <span class=\"keyword\">discard</span> <span class=\"string\">\"do some heavy lifting here\"</span></span><br><span class=\"line\"></span><br><span class=\"line\"><span class=\"keyword\">for</span> x <span class=\"keyword\">in</span> lines(<span class=\"string\">\"myinput.txt\"</span>):</span><br><span class=\"line\"> spawn processLine(x)</span><br><span class=\"line\">sync()</span><br></pre></td></tr></table></figure>\n\n<p>The parallel statement is the preferred way to use parallelism in a Nim program.</p>\n<figure class=\"highlight nim\"><table><tr><td class=\"code\"><pre><span class=\"line\"><span class=\"comment\"># Compute Pi in an inefficient way</span></span><br><span class=\"line\"></span><br><span class=\"line\"><span class=\"keyword\">import</span> strutils, math, threadpool</span><br><span class=\"line\"><span class=\"meta\">{.experimental: \"parallel\".}</span></span><br><span class=\"line\"></span><br><span class=\"line\"><span class=\"keyword\">proc</span> term(k: <span class=\"built_in\">float</span>): <span class=\"built_in\">float</span> = <span class=\"number\">4</span> * math.pow(-<span class=\"number\">1</span>, k) / (<span class=\"number\">2</span>*k + <span class=\"number\">1</span>)</span><br><span class=\"line\"></span><br><span class=\"line\"><span class=\"keyword\">proc</span> pi(n: <span class=\"built_in\">int</span>): <span class=\"built_in\">float</span> =</span><br><span class=\"line\"> <span class=\"keyword\">var</span> ch = newSeq[<span class=\"built_in\">float</span>](n+<span class=\"number\">1</span>)</span><br><span class=\"line\"> parallel:</span><br><span class=\"line\"> <span class=\"keyword\">for</span> k <span class=\"keyword\">in</span> <span class=\"number\">0</span>..ch.high:</span><br><span class=\"line\"> ch[k] = spawn term(<span class=\"built_in\">float</span>(k))</span><br><span class=\"line\"> <span class=\"keyword\">for</span> k <span class=\"keyword\">in</span> <span class=\"number\">0</span>..ch.high:</span><br><span class=\"line\"> <span class=\"literal\">result</span> += ch[k]</span><br><span class=\"line\"></span><br><span class=\"line\">echo formatFloat(pi(<span class=\"number\">5000</span>))</span><br></pre></td></tr></table></figure>\n\n<p>Threading support in Nim is part of the <code>system</code> module. To activate thread support you need to compile with the <code>--threads:on</code> command line switch.</p>\n<p>Nim’s memory model for threads is quite different from older common programming languages (C, Pascal), but similar to Golang and Elixir in that; each thread has its own (garbage collected) heap and sharing of memory is restricted. This helps to prevent race conditions and improves efficiency.</p>\n<h3 id=\"Concurrency-vs-Parallelism\"><a href=\"#Concurrency-vs-Parallelism\" class=\"headerlink\" title=\"Concurrency vs Parallelism\"></a>Concurrency vs Parallelism</h3><p>The definitions of “concurrency” and “parallelism” sometimes get mixed up, but they are not the same.</p>\n<p>A concurrent system is one that can be in charge of many tasks, although not necessarily executing them at the same time. A good way to think of this is driving a car – the car can accelerate, brake & change gear, but they don’t happen at the exact same time, although they <em>do</em> overlap. This is concurrency.</p>\n<p><img src=\"https://dpzbhybb2pdcj.cloudfront.net/picheta/Figures/06fig01_alt.jpg\" alt=\"concurrency\"><br><em>Source: <a href=\"https://livebook.manning.com/book/nim-in-action/chapter-6/13\">https://livebook.manning.com/book/nim-in-action/chapter-6/13</a></em></p>\n<p>The human driving the car holds the clutch in, moves the gear lever in parallel, and then eases of the clutch at the exact same time as easing on the accelerator. This is processes running in parallel, hence parallelism.</p>\n<p><img src=\"https://dpzbhybb2pdcj.cloudfront.net/picheta/Figures/06fig02_alt.jpg\" alt=\"parallelism\"><br><em>Source: <a href=\"https://livebook.manning.com/book/nim-in-action/chapter-6/13\">https://livebook.manning.com/book/nim-in-action/chapter-6/13</a></em></p>\n<p>At the moment, Crystal has concurrency support but not parallelism: several tasks can be executed, and a bit of time will be spent on each of these, but two code paths are never executed at the same exact time. However, recently <a href=\"https://crystal-lang.org/2019/09/06/parallelism-in-crystal.html\">Parallelism was tested out</a> and I’m sure will be fully ready to use soon!</p>\n<p>A Crystal program executes in a single operating system thread, except the Garbage Collector (GC) which implements a concurrent mark-and-sweep (currently Boehm GC).</p>\n<h3 id=\"Crystal-Concurrency-Primitives\"><a href=\"#Crystal-Concurrency-Primitives\" class=\"headerlink\" title=\"Crystal Concurrency Primitives\"></a>Crystal Concurrency Primitives</h3><p>In Crystal, we can use the <code>Spawn</code> functionality in a very similar way to Goroutines in Golang, core.async in Clojure, or the threading in Nim. When a program starts, it fires up a main <code>Fiber</code> that will execute your top-level code, from which we can spawn many other <code>Fibers</code>.</p>\n<p><code>Fibers</code> are lightweight threads of execution that are managed by the garbage collector, so you don’t <em>really</em> need to worry about managing them once you’ve spawned them. Because of this, you could technically spin up 100 <code>Fibers</code> to make a bunch of API requests, and then simply forget about them.</p>\n<p>We can utilise <code>Spawn</code> in Crystal like so:</p>\n<figure class=\"highlight crystal\"><table><tr><td class=\"code\"><pre><span class=\"line\"><span class=\"keyword\">require</span> <span class=\"string\">\"socket\"</span></span><br><span class=\"line\"></span><br><span class=\"line\"><span class=\"function\"><span class=\"keyword\">def</span> <span class=\"title\">load</span></span>(id, chan)</span><br><span class=\"line\"> puts <span class=\"string\">\"ID=<span class=\"subst\">#{id}</span>; START\"</span></span><br><span class=\"line\"> (id..<span class=\"number\">11</span>).each <span class=\"keyword\">do</span></span><br><span class=\"line\"> socket = TCPSocket.new(<span class=\"string\">\"http://robin.percy.pw\"</span>, <span class=\"number\">80</span>)</span><br><span class=\"line\"> socket.close</span><br><span class=\"line\"> <span class=\"keyword\">end</span></span><br><span class=\"line\"> puts <span class=\"string\">\"ID=<span class=\"subst\">#{id}</span>; FINISH\"</span></span><br><span class=\"line\"> chan.send <span class=\"literal\">nil</span></span><br><span class=\"line\"><span class=\"keyword\">end</span></span><br><span class=\"line\"></span><br><span class=\"line\"><span class=\"function\"><span class=\"keyword\">def</span> <span class=\"title\">main</span></span></span><br><span class=\"line\"> chan = Channel(Nil).new</span><br><span class=\"line\"> (<span class=\"number\">1</span>..<span class=\"number\">10</span>).each{|i| spawn(load(i,chan))}</span><br><span class=\"line\"> <span class=\"comment\"># Wait</span></span><br><span class=\"line\"> (<span class=\"number\">1</span>..<span class=\"number\">10</span>).each{chan.receive}</span><br><span class=\"line\"><span class=\"keyword\">end</span></span><br><span class=\"line\"></span><br><span class=\"line\">main</span><br></pre></td></tr></table></figure>\n\n<blockquote>\n<p>To support concurrency, Crystal has to be able to switch fibers when a fiber performs non-blocking IO operations.</p>\n</blockquote>\n<p>In program above, a spawned task with lower-number id repeatedly creates a TCP socket, and does this more times than a task with a higher-number id. For example; task #1 establishes a TCP socket 11 times, and task #10 creates a TCP socket just once. So even though task #1 started long before task #10, task #10 <em>should</em> finish before task #1. As you can see in the image below; it does just that!</p>\n<p><img src=\"/assets/images/crystal-thread-test.png\" alt=\"Crystal spawn test\"></p>\n<p>Similar to Golang, Crystal uses channels to pass messages between spawned fibers. Take the traditional Ping Pong channels example, in Crystal it looks like the following:</p>\n<figure class=\"highlight crystal\"><table><tr><td class=\"code\"><pre><span class=\"line\"><span class=\"function\"><span class=\"keyword\">def</span> <span class=\"title\">ping</span></span>(pings, message)</span><br><span class=\"line\"> pings.send message</span><br><span class=\"line\"><span class=\"keyword\">end</span></span><br><span class=\"line\"></span><br><span class=\"line\"><span class=\"function\"><span class=\"keyword\">def</span> <span class=\"title\">pong</span></span>(pings, pongs)</span><br><span class=\"line\"> message = pings.receive</span><br><span class=\"line\"> pongs.send message</span><br><span class=\"line\"><span class=\"keyword\">end</span></span><br><span class=\"line\"></span><br><span class=\"line\">pings = Channel(String).new</span><br><span class=\"line\">pongs = Channel(String).new</span><br><span class=\"line\">spawn ping pings, <span class=\"string\">\"passed message\"</span></span><br><span class=\"line\">spawn pong pings, pongs</span><br><span class=\"line\">puts pongs.receive <span class=\"comment\"># => \"passed message\"</span></span><br></pre></td></tr></table></figure>\n\n<p>Unfortunately, I personally haven’t had the opportunity to test Crystal’s <code>Fibers</code> or Nim’s <code>Spawn</code> in a load-heavy production environment. But soon I fully intend to, and I’ll write another article benchmarking this in detail when I have a good usecase and get the chance to!</p>\n<h1 id=\"Tooling\"><a href=\"#Tooling\" class=\"headerlink\" title=\"Tooling\"></a>Tooling</h1><h2 id=\"Built-in-Tooling-in-Nim\"><a href=\"#Built-in-Tooling-in-Nim\" class=\"headerlink\" title=\"Built-in Tooling in Nim\"></a>Built-in Tooling in Nim</h2><p>Now that <a href=\"https://nim-lang.org/blog/2019/09/23/version-100-released.html\">Nim 1.0 has been released</a>, its in-built tooling has improved to a great level, and is very quickly reaching maturity.</p>\n<p>The standard library in Nim is fantastic… Things like native database support for multiple db’s, without using any external packages like Crystal does, makes me extremely hopeful for Nim. I really do believe it is language worth considering, if it matches your production needs. That being said, I am still an advocate of ‘use the right tool for the job’ – so don’t go implementing Nim just for the sake of it!</p>\n<p>The only thing to keep in mind; is that Nim <em>does</em> seem to be slower in growth than Crystal. The thing is – Nim has quite a few <strong>less</strong> core contributors than Crystal, so slower growth is to be expected!</p>\n<h3 id=\"Nim-Project-Packaging\"><a href=\"#Nim-Project-Packaging\" class=\"headerlink\" title=\"Nim Project Packaging\"></a>Nim Project Packaging</h3><p>Something I look for in <strong><em>ALL</em></strong> modern programming languages, and something I consider to be a necessity is a good, and well featured in-built package manager. Happily in Nim’s case; we have Nimble!</p>\n<p>We can create a new app (library/binary) by using <code>nimble init</code>:</p>\n<p><img src=\"/assets/images/nimble-creating-app.png\" alt=\"creating nimble app\"></p>\n<p>I have to admit, although a simple thing, this is one of my favourite parts of the entire Nim ecosystem! Being able to enter your selection variables while actually creating your app package is something I think is not only tremendously useful, but awesomely novel.</p>\n<p>It’s not just the fact that you can enter selections, but actually the fact that you can select the backend for your app. As you can see in the image above, you have the choice of C, C++, Objective-C and JavaScript -– something that I touched on in my <a href=\"/news/2019/11/18/nim-vs-crystal-part-1-performance-interoperability/\">last article.</a></p>\n<h3 id=\"Documentation\"><a href=\"#Documentation\" class=\"headerlink\" title=\"Documentation\"></a>Documentation</h3><p>Nimble has in-built documentation generators that can output both HTML and JSON project documentation files. The one thing I will say is that I actually found this functionality to be <em>slightly</em> confusing, as I kept getting very odd errors, but also lacking in the excellent use experience you get from the rest of Nimble, i.e. the <code>init</code> func.</p>\n<p>You can generate the documentation file for your app by running:</p>\n<figure class=\"highlight plain\"><table><tr><td class=\"code\"><pre><span class=\"line\">nimble doc myapp.nimble</span><br></pre></td></tr></table></figure>\n\n<h3 id=\"Testing\"><a href=\"#Testing\" class=\"headerlink\" title=\"Testing\"></a>Testing</h3><p>Nimble offers a pre-defined <code>test</code> task which compiles and runs all files in the <code>/tests</code> directory beginning with ‘t’ in their filename.</p>\n<p>You may wish to override this <code>test</code> task in your <code>.nimble</code> file. This is particularly useful when you have a single test suite program. Just add the following to your <code>.nimble</code> file to override the default <code>test</code> task.</p>\n<figure class=\"highlight nim\"><table><tr><td class=\"code\"><pre><span class=\"line\">task test, <span class=\"string\">\"Runs the test suite\"</span>:</span><br><span class=\"line\"> exec <span class=\"string\">\"nim c -r tests/tester\"</span></span><br></pre></td></tr></table></figure>\n\n<p>Running nimble test will now use the test task you have defined.</p>\n<br/>\n\n<h2 id=\"Built-in-Tooling-in-Crystal\"><a href=\"#Built-in-Tooling-in-Crystal\" class=\"headerlink\" title=\"Built-in Tooling in Crystal\"></a>Built-in Tooling in Crystal</h2><p>One of the things I like most about Crystal is the excellent built-in tooling available. When I look at new languages, especially relatively immature languages; it’s always very reassuring when the language has extensive built-in tooling available to help developers stay productive & happy! In Crystal, there are a bunch of tools that make hacking around in the language super fun, but also help us to stay on the right track with semantics etc.</p>\n<h3 id=\"Crystal-Project-Packaging\"><a href=\"#Crystal-Project-Packaging\" class=\"headerlink\" title=\"Crystal Project Packaging\"></a>Crystal Project Packaging</h3><p>Much the same as the Nimble package manager, <strong><em>although not as good in my opinion,</em></strong> Crystal has it’s own built-in project scaffolder & package manager. I’d recommend using this at all times to ensure semantics are followed. We can use it with the following:</p>\n<figure class=\"highlight plain\"><table><tr><td class=\"code\"><pre><span class=\"line\">$ crystal init lib my_app</span><br><span class=\"line\"> create my_app/.gitignore</span><br><span class=\"line\"> create my_app/LICENSE</span><br><span class=\"line\"> create my_app/README.md</span><br><span class=\"line\"> create my_app/.travis.yml</span><br><span class=\"line\"> create my_app/shard.yml</span><br><span class=\"line\"> create my_app/src/my_app</span><br><span class=\"line\"> create my_app/src/my_app/version.cr</span><br><span class=\"line\"> create my_app/spec/spec_helper.cr</span><br><span class=\"line\"> create my_app/spec/my_app_spec.cr</span><br><span class=\"line\">Initialized empty Git repository in ~/my_app/.git/</span><br></pre></td></tr></table></figure>\n\n<p><code>Shards</code> are Crystal’s packages; distributed in the same way as Ruby Gems, Elixir Libs or Golang packages. Each application we create contains a file in the root directory named shard.yml. This file contains project details and external dependencies. The shard.yml file in the <code>my_app</code> app above looks like this:</p>\n<figure class=\"highlight yaml\"><table><tr><td class=\"code\"><pre><span class=\"line\"><span class=\"attr\">name:</span> <span class=\"string\">my_app</span></span><br><span class=\"line\"><span class=\"attr\">version:</span> <span class=\"number\">0.1</span><span class=\"number\">.0</span></span><br><span class=\"line\"></span><br><span class=\"line\"><span class=\"attr\">authors:</span></span><br><span class=\"line\"><span class=\"bullet\"> -</span> <span class=\"string\">Robin</span> <span class=\"string\">Percy</span> <span class=\"string\"><robin@percy.pw></span></span><br><span class=\"line\"></span><br><span class=\"line\"><span class=\"attr\">targets:</span></span><br><span class=\"line\"><span class=\"attr\"> sayhi_c:</span></span><br><span class=\"line\"><span class=\"attr\"> main:</span> <span class=\"string\">src/my_app.cr</span></span><br><span class=\"line\"></span><br><span class=\"line\"><span class=\"attr\">crystal:</span> <span class=\"number\">0.31</span><span class=\"number\">.1</span></span><br><span class=\"line\"></span><br><span class=\"line\"><span class=\"attr\">license:</span> <span class=\"string\">MIT</span></span><br></pre></td></tr></table></figure>\n\n<p>The app I built has no dependencies to use, but if we want to include external packages we can do so by adding them at the bottom of the file:</p>\n<figure class=\"highlight yaml\"><table><tr><td class=\"code\"><pre><span class=\"line\"><span class=\"attr\">dependencies:</span></span><br><span class=\"line\"><span class=\"attr\"> github:</span></span><br><span class=\"line\"><span class=\"attr\"> github:</span> <span class=\"string\">felipeelias/crystal-github</span></span><br><span class=\"line\"><span class=\"attr\"> version:</span> <span class=\"string\">~></span> <span class=\"number\">0.1</span><span class=\"number\">.0</span></span><br></pre></td></tr></table></figure>\n\n<h3 id=\"Documentation-amp-Formatting\"><a href=\"#Documentation-amp-Formatting\" class=\"headerlink\" title=\"Documentation & Formatting\"></a>Documentation & Formatting</h3><p>Crystal has a great built-in tool for generating documentation and formatting files. The documentation that is generated is excellent - built-in html/css and almost instantly ready to deploy.</p>\n<p>To generate documentation, from the project root directory we can simply run:</p>\n<figure class=\"highlight plain\"><table><tr><td class=\"code\"><pre><span class=\"line\">$ crystal doc</span><br></pre></td></tr></table></figure>\n<p>This will create a docs directory, with a doc/index.html entry point. All files inside the root src directory of the project from which we ran the command will be considered.</p>\n<p>Alongside this, the built-in Formatter tool is a great feature of the language. We can run the formatter over our project by running:</p>\n<figure class=\"highlight plain\"><table><tr><td class=\"code\"><pre><span class=\"line\">$ crystal tool format</span><br></pre></td></tr></table></figure>\n\n<p>We can use this tool to unify code styles and to submit documentation improvements to Crystal itself. The formatter is also very fast, so very little time is lost if you format the entire project’s codebase instead of just a single file.</p>\n<br/>\n\n<h2 id=\"My-Top-Crystal-Repo\"><a href=\"#My-Top-Crystal-Repo\" class=\"headerlink\" title=\"My Top Crystal Repo\"></a>My Top Crystal Repo</h2><h3 id=\"Kemal\"><a href=\"#Kemal\" class=\"headerlink\" title=\"Kemal\"></a>Kemal</h3><p>Obviously, there <strong><em>had</em></strong> to be a web framework appear in this list, seen as that’s what absolutely <strong>every</strong> dev seems to want to implement. My choice here is my buddy <a href=\"https://twitter.com/sdogruyol\">Serdar’s</a> library; <a href=\"https://kemalcr.com/\">Kemal</a>. One feature I really like about it, is how simple it makes it to utilise JSON & create a JSON API. For example, accepting JSON in a POST request, parsing & mapping it directly to an object:</p>\n<figure class=\"highlight crystal\"><table><tr><td class=\"code\"><pre><span class=\"line\"><span class=\"keyword\">require</span> <span class=\"string\">\"kemal\"</span></span><br><span class=\"line\"><span class=\"keyword\">require</span> <span class=\"string\">\"json\"</span></span><br><span class=\"line\"></span><br><span class=\"line\"><span class=\"class\"><span class=\"keyword\">class</span> <span class=\"title\">User</span></span></span><br><span class=\"line\"> JSON.mapping(</span><br><span class=\"line\"> <span class=\"symbol\">firstname:</span> String,</span><br><span class=\"line\"> <span class=\"symbol\">surname:</span> String,</span><br><span class=\"line\"> )</span><br><span class=\"line\"><span class=\"keyword\">end</span></span><br><span class=\"line\"></span><br><span class=\"line\">post <span class=\"string\">\"/\"</span> <span class=\"keyword\">do</span> |env|</span><br><span class=\"line\"> user = User.from_json env.request.body.not_nil!</span><br><span class=\"line\"> {<span class=\"symbol\">firstname:</span> user.firstname, <span class=\"symbol\">surname:</span> user.surname}.to_json</span><br><span class=\"line\"><span class=\"keyword\">end</span></span><br><span class=\"line\"></span><br><span class=\"line\">Kemal.run</span><br></pre></td></tr></table></figure>\n\n<p><strong>If you want to find all of the best Crystal libraries, <a href=\"https://github.com/veelenga/awesome-crystal\">you can check them out here.</a></strong></p>\n<br />\n\n<h2 id=\"My-Top-Nim-Repo\"><a href=\"#My-Top-Nim-Repo\" class=\"headerlink\" title=\"My Top Nim Repo\"></a>My Top Nim Repo</h2><h3 id=\"Nimbus\"><a href=\"#Nimbus\" class=\"headerlink\" title=\"Nimbus\"></a>Nimbus</h3><p>My favourite Nim library really has to be <a href=\"https://github.com/status-im/nimbus\">Nimbus</a>. This is not because I work for <a href=\"https://status.im\">Status</a> (the Nimbus creators), but because of the technology. Nimbus has has such a fantastic reception from the Nim community – and rightly so!</p>\n<p>I think that Nimbus is literally the most impressive Nim library outside of the Nim core, the <a href=\"https://github.com/status-im/nimbus\">Nim Beacon Chain</a> particularly so!</p>\n<blockquote>\n<p>Nimbus beacon chain is a research implementation of the beacon chain component of the upcoming Ethereum Serenity upgrade (Ethereum 2)</p>\n</blockquote>\n<p>Whilst there are no developer code samples to include here, you can check out the <a href=\"https://nimbus.team/\">main Nimbus website</a>, and the <a href=\"https://github.com/status-im/nimbus/\">main Nimbus repo</a>.</p>\n<p>Take a look at <a href=\"https://nimble.directory/\">https://nimble.directory/</a> for a full list of external Nim libraries available for your projects!</p>\n<h1 id=\"Conclusion\"><a href=\"#Conclusion\" class=\"headerlink\" title=\"Conclusion\"></a>Conclusion</h1><p>Back in 2012 when I quit writing Python and started exploring a bunch of other available languages, I started to become more aware of threading and its benefits. Once I got into the likes of Golang and Elixir, I learned about their threading models, and lightweight threads of execution being the way forward.</p>\n<p>It’s fantastic seeing both Nim <em>and</em> Crystal adopting the aforementioned concurrency primitives. I guess I have to give both languages a point there!</p>\n<p>I briefly touched on the smaller number of people on the Nim core team above, and this is something that’s pretty unfortunate. Nim is a language and an ecosystem that has <strong>such</strong> great promise, I would love to see more people contributing to it and utilising it in production systems.</p>\n<p>The final article in this series, “Crypto, DApps & P2P”, will be released over the coming days, so keep checking back.</p>\n<p>Thanks again for sticking with me!</p>\n<p><a href=\"https://twitter.com/rbin\"> <strong>- @rbin</strong></a></p>\n"},{"title":"How to upgrade to Embark 4","summary":"In this guide, we'll learn how to upgrade a Dapp created with Embark 3.x to Embark 4","author":"jonathan_rainville","layout":"blog-post","alias":"news/2019/03/17/upgrading-to-embark-4/","_content":"\nThe release of Embark 4.0 is close at hand and the release candidate, `beta.1`, will introduce some breaking changes. Let's see what it takes to update an Embark 3.x Dapp to Embark 4.\n\n## Use **any** frontend build tool!\n\nThat's right! The use of Embark's builtin pipeline in no longer required.\n\nHistorically, Embark 3.x came with a special Webpack pipeline because it automated development tasks, such as enabling the use of \"magic\" imports (ie `import SimpleStorage from \"Embark/contracts/SimpleStorage\";` or `import EmbarkJS from Embark/EmbarkJS`), and establishing a Web3 connection for the Dapp.\n\nHowever, we discovered the hard way that those advantages were not worth the hit in development efficiency, compared to using an optimized pipeline, such as `create-react-app` or Angular CLI. Indeed, on every save, Embark would regenerate a lot of the Dapp-side code and then webpack the entire Dapp, often taking quite some time.\n\nTherefore, we are announcing that Embark 4 can use **any** frontend development build tooling, letting Embark handle the things that it does best. This means we can use tools such as `create-react-app` or Angular CLI, or pretty much any other tool of your choice, alongside Embark. The Embark 3.x pipeline is still available for use for quick start applications if needed.\n\nTo migrate an existing Embark 3.x Dapp over to use Embark 4 with a third party pipeline, there are few small changes to your Dapp that are needed.\n\n{% notification info 'NOTE' %}\nIf you are not interested in using a third party pipeline, you can skip to the next section to [see the rest of the breaking changes needed to migrate a Dapp to Embark 4](#New-Web3-plugin).\n{% endnotification %}\n\n### Converting to another pipeline\n\nConverting to a third party pipeline is easy. This can be done with three simple improvements that Embark 4 has made available for us.\n\n#### Artifact generation directory\n\nNOTE: If you are planning on using Embark's built-in Webpack pipeline (and not use a third party pipeline), please [skip down to the remainder of the Embark 4 breaking changes](#New-Web3-plugin).\n\nEmbark 4 generates [Smart Contract artifacts](/docs/javascript_usage.html#Embark-Artifacts) for all of the Smart Contract in your Dapp. These artifacts enable importing the Dapp's Smart Contracts into the Dapp's source code. Most of these artifacts were already generated before, but lived inside the `.embark/` folder. Since most modern frontend build systems require source files to live inside of a very specific source folder, we have given developers the opportunity to specify the destination folder for these artifacts, allowing the frontend build tool to pick them up for processing.\n\nThe first thing we need to do is add a new `generationDir` property in the root of `embark.json`. This property tells Embark where to place the generated artifacts in the Dapp's filesystem. For example, `create-react-app` (CRA) has `src/` as source folder and the artifacts must be placed in that folder, so we would add in `embark.json`:\n\n```json\n{\n \"generationDir\": \"src/embarkArtifacts\"\n}\n```\n\n#### \"Magic\" imports\nAfterwards, we need to convert all \"magic\" imports in our Dapp's code to relative imports.\n\nThe first one is the EmbarkJS import. The \"magic\" import is `\"Embark/EmbarkJS\"`. Anywhere we have `\"Embark/EmbarkJS\"` in our Dapp's code, we need to convert that to the relative path. Because we are trying to get the `EmbarkJS` library, and the `embarkjs.js` script is located in the root of `embarkArtifacts/`, we need to replace\n\n```javascript\nimport EmbarkJS from \"Embark/EmbarkJS\"\n```\nwith\n```javascript\nimport EmbarkJS from \"./embarkArtifacts/embarkjs\"\n```\n{% notification info 'NOTE' %}\nNOTE: The relative path is dependent upon the generationDir setting specified in embark.json [see the \"Artifact generation directory\" section above](#Artifact-generation-directory).\n{% endnotification %}\n\nSecondly, we need to update the \"magic\" Smart Contract imports. These will need to change from\n\n```javascript\nimport ContractName from \"Embark/contract/ContractName\";\n```\nto\n```javascript\nimport ContractName from \"./embarkArtifacts/contracts/ContractName\";\n```\n\nThirdly, there used to be `import web3 from \"Embark/web3\"`, but it has been removed in Embark 4 in favor of using a global Web3 object. Don't worry, Embark is not removing web3 support, far from it. We actually just got rid of an import that did not provide a lot of benefit. In Embark 4, the global `web3` object is now available everywhere in the Dapp.\n\nNow, all the Embark files and configs from your Dapp can be moved in to a project created by the frontend build tool of your choice.\n\n### New project with another pipeline\n\nStarting a new Dapp from scratch is easy, we have two options.\n\n#### Embark's create-react-dapp template\n\nThe easiest option is to use our [new Embark CRA template](https://github.com/embarklabs/embark-create-react-dapp-template). It sets up a simple Embark project with all of the familiar files present in an Embark 3.x Dapp, with one minor difference: the config files are located in an `embarkConfig/` folder in the root of the Dapp to make sure they don't clash with CRA's config folder/files.\n\nTo get started with Embark's CRA template,\n\n```\nembark new --template embark-react-dapp my-dapp\ncd my-dapp\nembark run\n```\n{% notification danger 'DEPRECATION NOTICE' %}\nThe `--template` option has been deprecated in v5 and support will be removed in future versions.\n{% endnotification %}\n\nThen, in another terminal,\n\n```\ncd my-dapp\nyarn start // or alternatively, npm run start\n```\n\nThat's it!\n\n#### For other build tools\n\nIf we want to use another build tool than CRA, here are the steps:\n\nCreate a project using a frontend build tool like Angular CLI. Then, in another directory, execute `embark new your_projects_name`.\n\nAfterwards, we copy all the files and folders from the Embark project to the build tool's folder. The only tweak that you will need to do is go in `config/pipeline.js` and set `enabled: false`, so that Embark's pipeline is disabled.\n\nWe can also go in `embark.json` and remove the `app` section (as well as Embark's source dir that you will not be using).\n\nLastly, check out [the \"Artifact generation directory\" section above](#Artifact-generation-directory) to make sure your artifacts directory is set up correctly for you build tool.\n\nThere you go, your project is ready.\n\nWe know that these steps are a bit too much, so we are working on a new command that lets you initialize an Embark project from inside a build tool's directory. Keep an eye out for that.\n\n## New Web3 plugin\n\n*(2019/06/27)* **NOTE**: *the following instructions are* ***not*** *applicable to Embark `4.1.x` and newer, but should still be followed for `4.0.x` or `<=4.1.0-beta.3`.*\n\nStarting with Embark 4 beta.1, Embark no longer supplies the Dapp with `Web3.js` by default. Don't run. We did that so that we can now have the possibility of supporting more than just `Web3.js`, such as EthersJS, and more. You can even roll your own.\n\nTo continue using `Web3.js` inside the Embark 4 Dapp, execute the following command in the Embark console: `plugin install embarkjs-connector-web3`.\n\nThis simply [installs `embarkjs-connector-web3` as a plugin](https://framework.embarklabs.io/docs/installing_plugins.html). Alternatively, this plugin can be installed manually by executing:\n1. `yarn add embarkjs-connector-web3` or `npm install --save embarkjs-connector-web3`\n2. Adding `\"embarkjs-connector-web3\": {}` to the `plugins` section of `embark.json`\n\nIt's as simple as that. This plugin will add the necessary commands and code for the Dapp to connect to the blockchain and register the necessary providers. The only prerequisite is for the Dapp to import `EmbarkJS` at least once. If using a third party pipeline, the `EmbarkJS` file can be imported using `import EmbarkJS from \"./embarkArtifacts/embarkjs.js\"` (or as specified by the `generationDir` in `embark.json`). If using Embark's built-in pipeline, `EmbarkJS` can be imported using `import EmbarkJS from \"Embark/EmbarkJS\";`.\n\n## New Blockchain account configs\n\nEmbark 4 adds some new blockchain account configurations. To try to keep things as simple as possible, these additions are really similar to the ones in the contract configuration. For more information, please read the [Accounts Blockchain configuration guide](https://framework.embarklabs.io/docs/blockchain_accounts_configuration.html) in our docs.\n\nHowever, we did introduce some small breaking changes. We removed:\n- `account`: This is completely replaced by the new `accounts` property (notice the `s` at the end of `accounts`). It gives the developer more flexibility. To have exactly the same behavior as before, just use the `nodeAccounts` account type as [described in the docs](https://framework.embarklabs.io/docs/blockchain_accounts_configuration.md#parameter-descriptions)\n- `simulatorMnemonic`: Removed in favor of Ganache's default mnemonic. If this functionality is still needed, please specify the desired mnemonic in the [blockchain config's `mnemonic` account type](https://framework.embarklabs.io/docs/blockchain_accounts_configuration.md#parameter-descriptions).\n\n## Conclusion\n\nThis is a small taste of the features added to Embark 4, namely the ability to use a frontend build tool of choice. However, Embark 4 is jam-packed with additional new features, which we'll detail during the Embark 4 release.\n\nIn the meantime, all the Embark 4 goodness doesn't come at too high a price in terms of breaking changes.\n\nUpgrading to Embark 4 will be a blast. If you ever have an issue, make sure to hit us up on [Gitter](https://gitter.im/embark-framework/Lobby).\n","source":"_posts/2019-03-18-upgrading-to-embark-4.md","raw":"title: How to upgrade to Embark 4\nsummary: \"In this guide, we'll learn how to upgrade a Dapp created with Embark 3.x to Embark 4\"\nauthor: jonathan_rainville\ncategories:\n - tutorials\nlayout: blog-post\nalias: news/2019/03/17/upgrading-to-embark-4/\n---\n\nThe release of Embark 4.0 is close at hand and the release candidate, `beta.1`, will introduce some breaking changes. Let's see what it takes to update an Embark 3.x Dapp to Embark 4.\n\n## Use **any** frontend build tool!\n\nThat's right! The use of Embark's builtin pipeline in no longer required.\n\nHistorically, Embark 3.x came with a special Webpack pipeline because it automated development tasks, such as enabling the use of \"magic\" imports (ie `import SimpleStorage from \"Embark/contracts/SimpleStorage\";` or `import EmbarkJS from Embark/EmbarkJS`), and establishing a Web3 connection for the Dapp.\n\nHowever, we discovered the hard way that those advantages were not worth the hit in development efficiency, compared to using an optimized pipeline, such as `create-react-app` or Angular CLI. Indeed, on every save, Embark would regenerate a lot of the Dapp-side code and then webpack the entire Dapp, often taking quite some time.\n\nTherefore, we are announcing that Embark 4 can use **any** frontend development build tooling, letting Embark handle the things that it does best. This means we can use tools such as `create-react-app` or Angular CLI, or pretty much any other tool of your choice, alongside Embark. The Embark 3.x pipeline is still available for use for quick start applications if needed.\n\nTo migrate an existing Embark 3.x Dapp over to use Embark 4 with a third party pipeline, there are few small changes to your Dapp that are needed.\n\n{% notification info 'NOTE' %}\nIf you are not interested in using a third party pipeline, you can skip to the next section to [see the rest of the breaking changes needed to migrate a Dapp to Embark 4](#New-Web3-plugin).\n{% endnotification %}\n\n### Converting to another pipeline\n\nConverting to a third party pipeline is easy. This can be done with three simple improvements that Embark 4 has made available for us.\n\n#### Artifact generation directory\n\nNOTE: If you are planning on using Embark's built-in Webpack pipeline (and not use a third party pipeline), please [skip down to the remainder of the Embark 4 breaking changes](#New-Web3-plugin).\n\nEmbark 4 generates [Smart Contract artifacts](/docs/javascript_usage.html#Embark-Artifacts) for all of the Smart Contract in your Dapp. These artifacts enable importing the Dapp's Smart Contracts into the Dapp's source code. Most of these artifacts were already generated before, but lived inside the `.embark/` folder. Since most modern frontend build systems require source files to live inside of a very specific source folder, we have given developers the opportunity to specify the destination folder for these artifacts, allowing the frontend build tool to pick them up for processing.\n\nThe first thing we need to do is add a new `generationDir` property in the root of `embark.json`. This property tells Embark where to place the generated artifacts in the Dapp's filesystem. For example, `create-react-app` (CRA) has `src/` as source folder and the artifacts must be placed in that folder, so we would add in `embark.json`:\n\n```json\n{\n \"generationDir\": \"src/embarkArtifacts\"\n}\n```\n\n#### \"Magic\" imports\nAfterwards, we need to convert all \"magic\" imports in our Dapp's code to relative imports.\n\nThe first one is the EmbarkJS import. The \"magic\" import is `\"Embark/EmbarkJS\"`. Anywhere we have `\"Embark/EmbarkJS\"` in our Dapp's code, we need to convert that to the relative path. Because we are trying to get the `EmbarkJS` library, and the `embarkjs.js` script is located in the root of `embarkArtifacts/`, we need to replace\n\n```javascript\nimport EmbarkJS from \"Embark/EmbarkJS\"\n```\nwith\n```javascript\nimport EmbarkJS from \"./embarkArtifacts/embarkjs\"\n```\n{% notification info 'NOTE' %}\nNOTE: The relative path is dependent upon the generationDir setting specified in embark.json [see the \"Artifact generation directory\" section above](#Artifact-generation-directory).\n{% endnotification %}\n\nSecondly, we need to update the \"magic\" Smart Contract imports. These will need to change from\n\n```javascript\nimport ContractName from \"Embark/contract/ContractName\";\n```\nto\n```javascript\nimport ContractName from \"./embarkArtifacts/contracts/ContractName\";\n```\n\nThirdly, there used to be `import web3 from \"Embark/web3\"`, but it has been removed in Embark 4 in favor of using a global Web3 object. Don't worry, Embark is not removing web3 support, far from it. We actually just got rid of an import that did not provide a lot of benefit. In Embark 4, the global `web3` object is now available everywhere in the Dapp.\n\nNow, all the Embark files and configs from your Dapp can be moved in to a project created by the frontend build tool of your choice.\n\n### New project with another pipeline\n\nStarting a new Dapp from scratch is easy, we have two options.\n\n#### Embark's create-react-dapp template\n\nThe easiest option is to use our [new Embark CRA template](https://github.com/embarklabs/embark-create-react-dapp-template). It sets up a simple Embark project with all of the familiar files present in an Embark 3.x Dapp, with one minor difference: the config files are located in an `embarkConfig/` folder in the root of the Dapp to make sure they don't clash with CRA's config folder/files.\n\nTo get started with Embark's CRA template,\n\n```\nembark new --template embark-react-dapp my-dapp\ncd my-dapp\nembark run\n```\n{% notification danger 'DEPRECATION NOTICE' %}\nThe `--template` option has been deprecated in v5 and support will be removed in future versions.\n{% endnotification %}\n\nThen, in another terminal,\n\n```\ncd my-dapp\nyarn start // or alternatively, npm run start\n```\n\nThat's it!\n\n#### For other build tools\n\nIf we want to use another build tool than CRA, here are the steps:\n\nCreate a project using a frontend build tool like Angular CLI. Then, in another directory, execute `embark new your_projects_name`.\n\nAfterwards, we copy all the files and folders from the Embark project to the build tool's folder. The only tweak that you will need to do is go in `config/pipeline.js` and set `enabled: false`, so that Embark's pipeline is disabled.\n\nWe can also go in `embark.json` and remove the `app` section (as well as Embark's source dir that you will not be using).\n\nLastly, check out [the \"Artifact generation directory\" section above](#Artifact-generation-directory) to make sure your artifacts directory is set up correctly for you build tool.\n\nThere you go, your project is ready.\n\nWe know that these steps are a bit too much, so we are working on a new command that lets you initialize an Embark project from inside a build tool's directory. Keep an eye out for that.\n\n## New Web3 plugin\n\n*(2019/06/27)* **NOTE**: *the following instructions are* ***not*** *applicable to Embark `4.1.x` and newer, but should still be followed for `4.0.x` or `<=4.1.0-beta.3`.*\n\nStarting with Embark 4 beta.1, Embark no longer supplies the Dapp with `Web3.js` by default. Don't run. We did that so that we can now have the possibility of supporting more than just `Web3.js`, such as EthersJS, and more. You can even roll your own.\n\nTo continue using `Web3.js` inside the Embark 4 Dapp, execute the following command in the Embark console: `plugin install embarkjs-connector-web3`.\n\nThis simply [installs `embarkjs-connector-web3` as a plugin](https://framework.embarklabs.io/docs/installing_plugins.html). Alternatively, this plugin can be installed manually by executing:\n1. `yarn add embarkjs-connector-web3` or `npm install --save embarkjs-connector-web3`\n2. Adding `\"embarkjs-connector-web3\": {}` to the `plugins` section of `embark.json`\n\nIt's as simple as that. This plugin will add the necessary commands and code for the Dapp to connect to the blockchain and register the necessary providers. The only prerequisite is for the Dapp to import `EmbarkJS` at least once. If using a third party pipeline, the `EmbarkJS` file can be imported using `import EmbarkJS from \"./embarkArtifacts/embarkjs.js\"` (or as specified by the `generationDir` in `embark.json`). If using Embark's built-in pipeline, `EmbarkJS` can be imported using `import EmbarkJS from \"Embark/EmbarkJS\";`.\n\n## New Blockchain account configs\n\nEmbark 4 adds some new blockchain account configurations. To try to keep things as simple as possible, these additions are really similar to the ones in the contract configuration. For more information, please read the [Accounts Blockchain configuration guide](https://framework.embarklabs.io/docs/blockchain_accounts_configuration.html) in our docs.\n\nHowever, we did introduce some small breaking changes. We removed:\n- `account`: This is completely replaced by the new `accounts` property (notice the `s` at the end of `accounts`). It gives the developer more flexibility. To have exactly the same behavior as before, just use the `nodeAccounts` account type as [described in the docs](https://framework.embarklabs.io/docs/blockchain_accounts_configuration.md#parameter-descriptions)\n- `simulatorMnemonic`: Removed in favor of Ganache's default mnemonic. If this functionality is still needed, please specify the desired mnemonic in the [blockchain config's `mnemonic` account type](https://framework.embarklabs.io/docs/blockchain_accounts_configuration.md#parameter-descriptions).\n\n## Conclusion\n\nThis is a small taste of the features added to Embark 4, namely the ability to use a frontend build tool of choice. However, Embark 4 is jam-packed with additional new features, which we'll detail during the Embark 4 release.\n\nIn the meantime, all the Embark 4 goodness doesn't come at too high a price in terms of breaking changes.\n\nUpgrading to Embark 4 will be a blast. If you ever have an issue, make sure to hit us up on [Gitter](https://gitter.im/embark-framework/Lobby).\n","slug":"upgrading-to-embark-4","published":1,"date":"2019-03-18T04:00:00.000Z","updated":"2020-03-03T14:55:55.032Z","_id":"ck6axlfcg002sxeeg1c8eg1x8","comments":1,"photos":[],"link":"","content":"<p>The release of Embark 4.0 is close at hand and the release candidate, <code>beta.1</code>, will introduce some breaking changes. Let’s see what it takes to update an Embark 3.x Dapp to Embark 4.</p>\n<h2 id=\"Use-any-frontend-build-tool\"><a href=\"#Use-any-frontend-build-tool\" class=\"headerlink\" title=\"Use any frontend build tool!\"></a>Use <strong>any</strong> frontend build tool!</h2><p>That’s right! The use of Embark’s builtin pipeline in no longer required.</p>\n<p>Historically, Embark 3.x came with a special Webpack pipeline because it automated development tasks, such as enabling the use of “magic” imports (ie <code>import SimpleStorage from "Embark/contracts/SimpleStorage";</code> or <code>import EmbarkJS from Embark/EmbarkJS</code>), and establishing a Web3 connection for the Dapp.</p>\n<p>However, we discovered the hard way that those advantages were not worth the hit in development efficiency, compared to using an optimized pipeline, such as <code>create-react-app</code> or Angular CLI. Indeed, on every save, Embark would regenerate a lot of the Dapp-side code and then webpack the entire Dapp, often taking quite some time.</p>\n<p>Therefore, we are announcing that Embark 4 can use <strong>any</strong> frontend development build tooling, letting Embark handle the things that it does best. This means we can use tools such as <code>create-react-app</code> or Angular CLI, or pretty much any other tool of your choice, alongside Embark. The Embark 3.x pipeline is still available for use for quick start applications if needed.</p>\n<p>To migrate an existing Embark 3.x Dapp over to use Embark 4 with a third party pipeline, there are few small changes to your Dapp that are needed.</p>\n<div class=\"c-notification c-notification--info\">\n <p><strong>NOTE</strong></p>\n <p><p>If you are not interested in using a third party pipeline, you can skip to the next section to <a href=\"#New-Web3-plugin\">see the rest of the breaking changes needed to migrate a Dapp to Embark 4</a>.</p>\n</p>\n</div> \n\n\n\n<h3 id=\"Converting-to-another-pipeline\"><a href=\"#Converting-to-another-pipeline\" class=\"headerlink\" title=\"Converting to another pipeline\"></a>Converting to another pipeline</h3><p>Converting to a third party pipeline is easy. This can be done with three simple improvements that Embark 4 has made available for us.</p>\n<h4 id=\"Artifact-generation-directory\"><a href=\"#Artifact-generation-directory\" class=\"headerlink\" title=\"Artifact generation directory\"></a>Artifact generation directory</h4><p>NOTE: If you are planning on using Embark’s built-in Webpack pipeline (and not use a third party pipeline), please <a href=\"#New-Web3-plugin\">skip down to the remainder of the Embark 4 breaking changes</a>.</p>\n<p>Embark 4 generates <a href=\"/docs/javascript_usage.html#Embark-Artifacts\">Smart Contract artifacts</a> for all of the Smart Contract in your Dapp. These artifacts enable importing the Dapp’s Smart Contracts into the Dapp’s source code. Most of these artifacts were already generated before, but lived inside the <code>.embark/</code> folder. Since most modern frontend build systems require source files to live inside of a very specific source folder, we have given developers the opportunity to specify the destination folder for these artifacts, allowing the frontend build tool to pick them up for processing.</p>\n<p>The first thing we need to do is add a new <code>generationDir</code> property in the root of <code>embark.json</code>. This property tells Embark where to place the generated artifacts in the Dapp’s filesystem. For example, <code>create-react-app</code> (CRA) has <code>src/</code> as source folder and the artifacts must be placed in that folder, so we would add in <code>embark.json</code>:</p>\n<figure class=\"highlight json\"><table><tr><td class=\"code\"><pre><span class=\"line\">{</span><br><span class=\"line\"> <span class=\"attr\">\"generationDir\"</span>: <span class=\"string\">\"src/embarkArtifacts\"</span></span><br><span class=\"line\">}</span><br></pre></td></tr></table></figure>\n\n<h4 id=\"“Magic”-imports\"><a href=\"#“Magic”-imports\" class=\"headerlink\" title=\"“Magic” imports\"></a>“Magic” imports</h4><p>Afterwards, we need to convert all “magic” imports in our Dapp’s code to relative imports.</p>\n<p>The first one is the EmbarkJS import. The “magic” import is <code>"Embark/EmbarkJS"</code>. Anywhere we have <code>"Embark/EmbarkJS"</code> in our Dapp’s code, we need to convert that to the relative path. Because we are trying to get the <code>EmbarkJS</code> library, and the <code>embarkjs.js</code> script is located in the root of <code>embarkArtifacts/</code>, we need to replace</p>\n<figure class=\"highlight javascript\"><table><tr><td class=\"code\"><pre><span class=\"line\"><span class=\"keyword\">import</span> EmbarkJS <span class=\"keyword\">from</span> <span class=\"string\">\"Embark/EmbarkJS\"</span></span><br></pre></td></tr></table></figure>\n<p>with</p>\n<figure class=\"highlight javascript\"><table><tr><td class=\"code\"><pre><span class=\"line\"><span class=\"keyword\">import</span> EmbarkJS <span class=\"keyword\">from</span> <span class=\"string\">\"./embarkArtifacts/embarkjs\"</span></span><br></pre></td></tr></table></figure>\n<div class=\"c-notification c-notification--info\">\n <p><strong>NOTE</strong></p>\n <p><p>NOTE: The relative path is dependent upon the generationDir setting specified in embark.json <a href=\"#Artifact-generation-directory\">see the “Artifact generation directory” section above</a>.</p>\n</p>\n</div> \n\n\n\n<p>Secondly, we need to update the “magic” Smart Contract imports. These will need to change from</p>\n<figure class=\"highlight javascript\"><table><tr><td class=\"code\"><pre><span class=\"line\"><span class=\"keyword\">import</span> ContractName <span class=\"keyword\">from</span> <span class=\"string\">\"Embark/contract/ContractName\"</span>;</span><br></pre></td></tr></table></figure>\n<p>to</p>\n<figure class=\"highlight javascript\"><table><tr><td class=\"code\"><pre><span class=\"line\"><span class=\"keyword\">import</span> ContractName <span class=\"keyword\">from</span> <span class=\"string\">\"./embarkArtifacts/contracts/ContractName\"</span>;</span><br></pre></td></tr></table></figure>\n\n<p>Thirdly, there used to be <code>import web3 from "Embark/web3"</code>, but it has been removed in Embark 4 in favor of using a global Web3 object. Don’t worry, Embark is not removing web3 support, far from it. We actually just got rid of an import that did not provide a lot of benefit. In Embark 4, the global <code>web3</code> object is now available everywhere in the Dapp.</p>\n<p>Now, all the Embark files and configs from your Dapp can be moved in to a project created by the frontend build tool of your choice.</p>\n<h3 id=\"New-project-with-another-pipeline\"><a href=\"#New-project-with-another-pipeline\" class=\"headerlink\" title=\"New project with another pipeline\"></a>New project with another pipeline</h3><p>Starting a new Dapp from scratch is easy, we have two options.</p>\n<h4 id=\"Embark’s-create-react-dapp-template\"><a href=\"#Embark’s-create-react-dapp-template\" class=\"headerlink\" title=\"Embark’s create-react-dapp template\"></a>Embark’s create-react-dapp template</h4><p>The easiest option is to use our <a href=\"https://github.com/embarklabs/embark-create-react-dapp-template\" target=\"_blank\" rel=\"noopener\">new Embark CRA template</a>. It sets up a simple Embark project with all of the familiar files present in an Embark 3.x Dapp, with one minor difference: the config files are located in an <code>embarkConfig/</code> folder in the root of the Dapp to make sure they don’t clash with CRA’s config folder/files.</p>\n<p>To get started with Embark’s CRA template,</p>\n<figure class=\"highlight plain\"><table><tr><td class=\"code\"><pre><span class=\"line\">embark new --template embark-react-dapp my-dapp</span><br><span class=\"line\">cd my-dapp</span><br><span class=\"line\">embark run</span><br></pre></td></tr></table></figure>\n<div class=\"c-notification c-notification--danger\">\n <p><strong>DEPRECATION NOTICE</strong></p>\n <p><p>The <code>--template</code> option has been deprecated in v5 and support will be removed in future versions.</p>\n</p>\n</div> \n\n\n\n<p>Then, in another terminal,</p>\n<figure class=\"highlight plain\"><table><tr><td class=\"code\"><pre><span class=\"line\">cd my-dapp</span><br><span class=\"line\">yarn start // or alternatively, npm run start</span><br></pre></td></tr></table></figure>\n\n<p>That’s it!</p>\n<h4 id=\"For-other-build-tools\"><a href=\"#For-other-build-tools\" class=\"headerlink\" title=\"For other build tools\"></a>For other build tools</h4><p>If we want to use another build tool than CRA, here are the steps:</p>\n<p>Create a project using a frontend build tool like Angular CLI. Then, in another directory, execute <code>embark new your_projects_name</code>.</p>\n<p>Afterwards, we copy all the files and folders from the Embark project to the build tool’s folder. The only tweak that you will need to do is go in <code>config/pipeline.js</code> and set <code>enabled: false</code>, so that Embark’s pipeline is disabled.</p>\n<p>We can also go in <code>embark.json</code> and remove the <code>app</code> section (as well as Embark’s source dir that you will not be using).</p>\n<p>Lastly, check out <a href=\"#Artifact-generation-directory\">the “Artifact generation directory” section above</a> to make sure your artifacts directory is set up correctly for you build tool.</p>\n<p>There you go, your project is ready.</p>\n<p>We know that these steps are a bit too much, so we are working on a new command that lets you initialize an Embark project from inside a build tool’s directory. Keep an eye out for that.</p>\n<h2 id=\"New-Web3-plugin\"><a href=\"#New-Web3-plugin\" class=\"headerlink\" title=\"New Web3 plugin\"></a>New Web3 plugin</h2><p><em>(2019/06/27)</em> <strong>NOTE</strong>: <em>the following instructions are</em> <strong><em>not</em></strong> <em>applicable to Embark <code>4.1.x</code> and newer, but should still be followed for <code>4.0.x</code> or <code><=4.1.0-beta.3</code>.</em></p>\n<p>Starting with Embark 4 beta.1, Embark no longer supplies the Dapp with <code>Web3.js</code> by default. Don’t run. We did that so that we can now have the possibility of supporting more than just <code>Web3.js</code>, such as EthersJS, and more. You can even roll your own.</p>\n<p>To continue using <code>Web3.js</code> inside the Embark 4 Dapp, execute the following command in the Embark console: <code>plugin install embarkjs-connector-web3</code>.</p>\n<p>This simply <a href=\"https://framework.embarklabs.io/docs/installing_plugins.html\" target=\"_blank\" rel=\"noopener\">installs <code>embarkjs-connector-web3</code> as a plugin</a>. Alternatively, this plugin can be installed manually by executing:</p>\n<ol>\n<li><code>yarn add embarkjs-connector-web3</code> or <code>npm install --save embarkjs-connector-web3</code></li>\n<li>Adding <code>"embarkjs-connector-web3": {}</code> to the <code>plugins</code> section of <code>embark.json</code></li>\n</ol>\n<p>It’s as simple as that. This plugin will add the necessary commands and code for the Dapp to connect to the blockchain and register the necessary providers. The only prerequisite is for the Dapp to import <code>EmbarkJS</code> at least once. If using a third party pipeline, the <code>EmbarkJS</code> file can be imported using <code>import EmbarkJS from "./embarkArtifacts/embarkjs.js"</code> (or as specified by the <code>generationDir</code> in <code>embark.json</code>). If using Embark’s built-in pipeline, <code>EmbarkJS</code> can be imported using <code>import EmbarkJS from "Embark/EmbarkJS";</code>.</p>\n<h2 id=\"New-Blockchain-account-configs\"><a href=\"#New-Blockchain-account-configs\" class=\"headerlink\" title=\"New Blockchain account configs\"></a>New Blockchain account configs</h2><p>Embark 4 adds some new blockchain account configurations. To try to keep things as simple as possible, these additions are really similar to the ones in the contract configuration. For more information, please read the <a href=\"https://framework.embarklabs.io/docs/blockchain_accounts_configuration.html\" target=\"_blank\" rel=\"noopener\">Accounts Blockchain configuration guide</a> in our docs.</p>\n<p>However, we did introduce some small breaking changes. We removed:</p>\n<ul>\n<li><code>account</code>: This is completely replaced by the new <code>accounts</code> property (notice the <code>s</code> at the end of <code>accounts</code>). It gives the developer more flexibility. To have exactly the same behavior as before, just use the <code>nodeAccounts</code> account type as <a href=\"https://framework.embarklabs.io/docs/blockchain_accounts_configuration.md#parameter-descriptions\" target=\"_blank\" rel=\"noopener\">described in the docs</a></li>\n<li><code>simulatorMnemonic</code>: Removed in favor of Ganache’s default mnemonic. If this functionality is still needed, please specify the desired mnemonic in the <a href=\"https://framework.embarklabs.io/docs/blockchain_accounts_configuration.md#parameter-descriptions\" target=\"_blank\" rel=\"noopener\">blockchain config’s <code>mnemonic</code> account type</a>.</li>\n</ul>\n<h2 id=\"Conclusion\"><a href=\"#Conclusion\" class=\"headerlink\" title=\"Conclusion\"></a>Conclusion</h2><p>This is a small taste of the features added to Embark 4, namely the ability to use a frontend build tool of choice. However, Embark 4 is jam-packed with additional new features, which we’ll detail during the Embark 4 release.</p>\n<p>In the meantime, all the Embark 4 goodness doesn’t come at too high a price in terms of breaking changes.</p>\n<p>Upgrading to Embark 4 will be a blast. If you ever have an issue, make sure to hit us up on <a href=\"https://gitter.im/embark-framework/Lobby\" target=\"_blank\" rel=\"noopener\">Gitter</a>.</p>\n","site":{"data":{"authors":{"iuri_matias":{"name":"Iuri Matias","twitter":"iurimatias","image":"https://pbs.twimg.com/profile_images/928272512181563392/iDJdvy2k_400x400.jpg"},"pascal_precht":{"name":"Pascal Precht","twitter":"pascalprecht","image":"https://pbs.twimg.com/profile_images/993785060733194241/p3oAIMDP_400x400.jpg"},"anthony_laibe":{"name":"Anthony Laibe","twitter":"a_laibe","image":"https://pbs.twimg.com/profile_images/257742900/13168239_400x400.jpg"},"jonathan_rainville":{"name":"Jonathan Rainville","twitter":"ShyolGhul","image":"https://pbs.twimg.com/profile_images/993873866878570496/-aE4byjj_400x400.jpg"},"andre_medeiros":{"name":"Andre Medeiros","twitter":"superdealloc","image":"https://pbs.twimg.com/profile_images/965722487735701504/m58KNgWN_400x400.jpg"},"eric_mastro":{"name":"Eric Mastro","twitter":"ericmastro","image":"https://avatars1.githubusercontent.com/u/5089238?s=460&v=4"},"michael_bradley":{"name":"Michael Bradley","image":"https://avatars3.githubusercontent.com/u/194260?s=460&v=4"},"richard_ramos":{"name":"Richard Ramos","twitter":"richardramos_me","image":"https://devcon.org/images/speakers/richard_ramos.jpg"},"jonny_zerah":{"name":"Jonny Zerah","twitter":"jonnyzerah","image":"https://pbs.twimg.com/profile_images/1043774340490248192/gI9aGy17_400x400.jpg"},"robin_percy":{"name":"Robin Percy","twitter":"rbin","image":"https://avatars1.githubusercontent.com/u/29288325?s=400&v=4"}},"categories":{"tutorials":"Tutorials","announcements":"Announcements"},"languages":{"en":"English"}}},"excerpt":"","more":"<p>The release of Embark 4.0 is close at hand and the release candidate, <code>beta.1</code>, will introduce some breaking changes. Let’s see what it takes to update an Embark 3.x Dapp to Embark 4.</p>\n<h2 id=\"Use-any-frontend-build-tool\"><a href=\"#Use-any-frontend-build-tool\" class=\"headerlink\" title=\"Use any frontend build tool!\"></a>Use <strong>any</strong> frontend build tool!</h2><p>That’s right! The use of Embark’s builtin pipeline in no longer required.</p>\n<p>Historically, Embark 3.x came with a special Webpack pipeline because it automated development tasks, such as enabling the use of “magic” imports (ie <code>import SimpleStorage from "Embark/contracts/SimpleStorage";</code> or <code>import EmbarkJS from Embark/EmbarkJS</code>), and establishing a Web3 connection for the Dapp.</p>\n<p>However, we discovered the hard way that those advantages were not worth the hit in development efficiency, compared to using an optimized pipeline, such as <code>create-react-app</code> or Angular CLI. Indeed, on every save, Embark would regenerate a lot of the Dapp-side code and then webpack the entire Dapp, often taking quite some time.</p>\n<p>Therefore, we are announcing that Embark 4 can use <strong>any</strong> frontend development build tooling, letting Embark handle the things that it does best. This means we can use tools such as <code>create-react-app</code> or Angular CLI, or pretty much any other tool of your choice, alongside Embark. The Embark 3.x pipeline is still available for use for quick start applications if needed.</p>\n<p>To migrate an existing Embark 3.x Dapp over to use Embark 4 with a third party pipeline, there are few small changes to your Dapp that are needed.</p>\n<div class=\"c-notification c-notification--info\">\n <p><strong>NOTE</strong></p>\n <p><p>If you are not interested in using a third party pipeline, you can skip to the next section to <a href=\"#New-Web3-plugin\">see the rest of the breaking changes needed to migrate a Dapp to Embark 4</a>.</p>\n</p>\n</div> \n\n\n\n<h3 id=\"Converting-to-another-pipeline\"><a href=\"#Converting-to-another-pipeline\" class=\"headerlink\" title=\"Converting to another pipeline\"></a>Converting to another pipeline</h3><p>Converting to a third party pipeline is easy. This can be done with three simple improvements that Embark 4 has made available for us.</p>\n<h4 id=\"Artifact-generation-directory\"><a href=\"#Artifact-generation-directory\" class=\"headerlink\" title=\"Artifact generation directory\"></a>Artifact generation directory</h4><p>NOTE: If you are planning on using Embark’s built-in Webpack pipeline (and not use a third party pipeline), please <a href=\"#New-Web3-plugin\">skip down to the remainder of the Embark 4 breaking changes</a>.</p>\n<p>Embark 4 generates <a href=\"/docs/javascript_usage.html#Embark-Artifacts\">Smart Contract artifacts</a> for all of the Smart Contract in your Dapp. These artifacts enable importing the Dapp’s Smart Contracts into the Dapp’s source code. Most of these artifacts were already generated before, but lived inside the <code>.embark/</code> folder. Since most modern frontend build systems require source files to live inside of a very specific source folder, we have given developers the opportunity to specify the destination folder for these artifacts, allowing the frontend build tool to pick them up for processing.</p>\n<p>The first thing we need to do is add a new <code>generationDir</code> property in the root of <code>embark.json</code>. This property tells Embark where to place the generated artifacts in the Dapp’s filesystem. For example, <code>create-react-app</code> (CRA) has <code>src/</code> as source folder and the artifacts must be placed in that folder, so we would add in <code>embark.json</code>:</p>\n<figure class=\"highlight json\"><table><tr><td class=\"code\"><pre><span class=\"line\">{</span><br><span class=\"line\"> <span class=\"attr\">\"generationDir\"</span>: <span class=\"string\">\"src/embarkArtifacts\"</span></span><br><span class=\"line\">}</span><br></pre></td></tr></table></figure>\n\n<h4 id=\"“Magic”-imports\"><a href=\"#“Magic”-imports\" class=\"headerlink\" title=\"“Magic” imports\"></a>“Magic” imports</h4><p>Afterwards, we need to convert all “magic” imports in our Dapp’s code to relative imports.</p>\n<p>The first one is the EmbarkJS import. The “magic” import is <code>"Embark/EmbarkJS"</code>. Anywhere we have <code>"Embark/EmbarkJS"</code> in our Dapp’s code, we need to convert that to the relative path. Because we are trying to get the <code>EmbarkJS</code> library, and the <code>embarkjs.js</code> script is located in the root of <code>embarkArtifacts/</code>, we need to replace</p>\n<figure class=\"highlight javascript\"><table><tr><td class=\"code\"><pre><span class=\"line\"><span class=\"keyword\">import</span> EmbarkJS <span class=\"keyword\">from</span> <span class=\"string\">\"Embark/EmbarkJS\"</span></span><br></pre></td></tr></table></figure>\n<p>with</p>\n<figure class=\"highlight javascript\"><table><tr><td class=\"code\"><pre><span class=\"line\"><span class=\"keyword\">import</span> EmbarkJS <span class=\"keyword\">from</span> <span class=\"string\">\"./embarkArtifacts/embarkjs\"</span></span><br></pre></td></tr></table></figure>\n<div class=\"c-notification c-notification--info\">\n <p><strong>NOTE</strong></p>\n <p><p>NOTE: The relative path is dependent upon the generationDir setting specified in embark.json <a href=\"#Artifact-generation-directory\">see the “Artifact generation directory” section above</a>.</p>\n</p>\n</div> \n\n\n\n<p>Secondly, we need to update the “magic” Smart Contract imports. These will need to change from</p>\n<figure class=\"highlight javascript\"><table><tr><td class=\"code\"><pre><span class=\"line\"><span class=\"keyword\">import</span> ContractName <span class=\"keyword\">from</span> <span class=\"string\">\"Embark/contract/ContractName\"</span>;</span><br></pre></td></tr></table></figure>\n<p>to</p>\n<figure class=\"highlight javascript\"><table><tr><td class=\"code\"><pre><span class=\"line\"><span class=\"keyword\">import</span> ContractName <span class=\"keyword\">from</span> <span class=\"string\">\"./embarkArtifacts/contracts/ContractName\"</span>;</span><br></pre></td></tr></table></figure>\n\n<p>Thirdly, there used to be <code>import web3 from "Embark/web3"</code>, but it has been removed in Embark 4 in favor of using a global Web3 object. Don’t worry, Embark is not removing web3 support, far from it. We actually just got rid of an import that did not provide a lot of benefit. In Embark 4, the global <code>web3</code> object is now available everywhere in the Dapp.</p>\n<p>Now, all the Embark files and configs from your Dapp can be moved in to a project created by the frontend build tool of your choice.</p>\n<h3 id=\"New-project-with-another-pipeline\"><a href=\"#New-project-with-another-pipeline\" class=\"headerlink\" title=\"New project with another pipeline\"></a>New project with another pipeline</h3><p>Starting a new Dapp from scratch is easy, we have two options.</p>\n<h4 id=\"Embark’s-create-react-dapp-template\"><a href=\"#Embark’s-create-react-dapp-template\" class=\"headerlink\" title=\"Embark’s create-react-dapp template\"></a>Embark’s create-react-dapp template</h4><p>The easiest option is to use our <a href=\"https://github.com/embarklabs/embark-create-react-dapp-template\" target=\"_blank\" rel=\"noopener\">new Embark CRA template</a>. It sets up a simple Embark project with all of the familiar files present in an Embark 3.x Dapp, with one minor difference: the config files are located in an <code>embarkConfig/</code> folder in the root of the Dapp to make sure they don’t clash with CRA’s config folder/files.</p>\n<p>To get started with Embark’s CRA template,</p>\n<figure class=\"highlight plain\"><table><tr><td class=\"code\"><pre><span class=\"line\">embark new --template embark-react-dapp my-dapp</span><br><span class=\"line\">cd my-dapp</span><br><span class=\"line\">embark run</span><br></pre></td></tr></table></figure>\n<div class=\"c-notification c-notification--danger\">\n <p><strong>DEPRECATION NOTICE</strong></p>\n <p><p>The <code>--template</code> option has been deprecated in v5 and support will be removed in future versions.</p>\n</p>\n</div> \n\n\n\n<p>Then, in another terminal,</p>\n<figure class=\"highlight plain\"><table><tr><td class=\"code\"><pre><span class=\"line\">cd my-dapp</span><br><span class=\"line\">yarn start // or alternatively, npm run start</span><br></pre></td></tr></table></figure>\n\n<p>That’s it!</p>\n<h4 id=\"For-other-build-tools\"><a href=\"#For-other-build-tools\" class=\"headerlink\" title=\"For other build tools\"></a>For other build tools</h4><p>If we want to use another build tool than CRA, here are the steps:</p>\n<p>Create a project using a frontend build tool like Angular CLI. Then, in another directory, execute <code>embark new your_projects_name</code>.</p>\n<p>Afterwards, we copy all the files and folders from the Embark project to the build tool’s folder. The only tweak that you will need to do is go in <code>config/pipeline.js</code> and set <code>enabled: false</code>, so that Embark’s pipeline is disabled.</p>\n<p>We can also go in <code>embark.json</code> and remove the <code>app</code> section (as well as Embark’s source dir that you will not be using).</p>\n<p>Lastly, check out <a href=\"#Artifact-generation-directory\">the “Artifact generation directory” section above</a> to make sure your artifacts directory is set up correctly for you build tool.</p>\n<p>There you go, your project is ready.</p>\n<p>We know that these steps are a bit too much, so we are working on a new command that lets you initialize an Embark project from inside a build tool’s directory. Keep an eye out for that.</p>\n<h2 id=\"New-Web3-plugin\"><a href=\"#New-Web3-plugin\" class=\"headerlink\" title=\"New Web3 plugin\"></a>New Web3 plugin</h2><p><em>(2019/06/27)</em> <strong>NOTE</strong>: <em>the following instructions are</em> <strong><em>not</em></strong> <em>applicable to Embark <code>4.1.x</code> and newer, but should still be followed for <code>4.0.x</code> or <code><=4.1.0-beta.3</code>.</em></p>\n<p>Starting with Embark 4 beta.1, Embark no longer supplies the Dapp with <code>Web3.js</code> by default. Don’t run. We did that so that we can now have the possibility of supporting more than just <code>Web3.js</code>, such as EthersJS, and more. You can even roll your own.</p>\n<p>To continue using <code>Web3.js</code> inside the Embark 4 Dapp, execute the following command in the Embark console: <code>plugin install embarkjs-connector-web3</code>.</p>\n<p>This simply <a href=\"https://framework.embarklabs.io/docs/installing_plugins.html\" target=\"_blank\" rel=\"noopener\">installs <code>embarkjs-connector-web3</code> as a plugin</a>. Alternatively, this plugin can be installed manually by executing:</p>\n<ol>\n<li><code>yarn add embarkjs-connector-web3</code> or <code>npm install --save embarkjs-connector-web3</code></li>\n<li>Adding <code>"embarkjs-connector-web3": {}</code> to the <code>plugins</code> section of <code>embark.json</code></li>\n</ol>\n<p>It’s as simple as that. This plugin will add the necessary commands and code for the Dapp to connect to the blockchain and register the necessary providers. The only prerequisite is for the Dapp to import <code>EmbarkJS</code> at least once. If using a third party pipeline, the <code>EmbarkJS</code> file can be imported using <code>import EmbarkJS from "./embarkArtifacts/embarkjs.js"</code> (or as specified by the <code>generationDir</code> in <code>embark.json</code>). If using Embark’s built-in pipeline, <code>EmbarkJS</code> can be imported using <code>import EmbarkJS from "Embark/EmbarkJS";</code>.</p>\n<h2 id=\"New-Blockchain-account-configs\"><a href=\"#New-Blockchain-account-configs\" class=\"headerlink\" title=\"New Blockchain account configs\"></a>New Blockchain account configs</h2><p>Embark 4 adds some new blockchain account configurations. To try to keep things as simple as possible, these additions are really similar to the ones in the contract configuration. For more information, please read the <a href=\"https://framework.embarklabs.io/docs/blockchain_accounts_configuration.html\" target=\"_blank\" rel=\"noopener\">Accounts Blockchain configuration guide</a> in our docs.</p>\n<p>However, we did introduce some small breaking changes. We removed:</p>\n<ul>\n<li><code>account</code>: This is completely replaced by the new <code>accounts</code> property (notice the <code>s</code> at the end of <code>accounts</code>). It gives the developer more flexibility. To have exactly the same behavior as before, just use the <code>nodeAccounts</code> account type as <a href=\"https://framework.embarklabs.io/docs/blockchain_accounts_configuration.md#parameter-descriptions\" target=\"_blank\" rel=\"noopener\">described in the docs</a></li>\n<li><code>simulatorMnemonic</code>: Removed in favor of Ganache’s default mnemonic. If this functionality is still needed, please specify the desired mnemonic in the <a href=\"https://framework.embarklabs.io/docs/blockchain_accounts_configuration.md#parameter-descriptions\" target=\"_blank\" rel=\"noopener\">blockchain config’s <code>mnemonic</code> account type</a>.</li>\n</ul>\n<h2 id=\"Conclusion\"><a href=\"#Conclusion\" class=\"headerlink\" title=\"Conclusion\"></a>Conclusion</h2><p>This is a small taste of the features added to Embark 4, namely the ability to use a frontend build tool of choice. However, Embark 4 is jam-packed with additional new features, which we’ll detail during the Embark 4 release.</p>\n<p>In the meantime, all the Embark 4 goodness doesn’t come at too high a price in terms of breaking changes.</p>\n<p>Upgrading to Embark 4 will be a blast. If you ever have an issue, make sure to hit us up on <a href=\"https://gitter.im/embark-framework/Lobby\" target=\"_blank\" rel=\"noopener\">Gitter</a>.</p>\n"},{"title":"Introducing Embark 5","author":"pascal_precht","summary":"About half a year after our last stable release, we've now published Embark version 5 with lots of features, improvements and fixes. Read on for more information!","layout":"blog-post","_content":"\nIf you've been following the development of Embark you're probably aware that we regularly put out alpha and beta releases for upcoming major or feature versions of Embark. In the past ~6 months since the release of Embark 4, we've published 10 alpha releases and one beta release for Embark 5 and today we're happy to announce the Embark 5 stable release!\n\nIn this post we'll be looking at some of the main changes and features to get up and running with v5. Notice that we've add a [migration guide](https://framework.embarklabs.io/docs/migrating_from_3.x.html#Updating-to-v5) to our official docs as well.\n\n## New Features\n\nLet's first start with new features that have been introduced in Embark 5.\n\n### Whisper client configuration\n\nPrior to Embark 5, Embark would use the same blockchain client to enable blockchain features and communication features for Whisper. With Embark 5, Embark spins up a separate client for Whisper. This also ensures that that Whisper service stays in tact when the blockchain service is turned off and vice versa.\n\nTo specify a client, use the new `client` configuration property which defaults to `geth`:\n\n```js\n// communication.js\n\n...\ndefault: {\n ...\n client: \"geth\" // can be either 'geth' or 'parity'\n},\n...\n\n```\n\n### Support for Dynamic Addresses\n\nIf you're using Embark already, you're probably aware that there are many different ways to [configure your Smart Contracts](/docs/contracts_configuration.html). One of the things that can be configured is the `address` of a Smart Contract. Usually the address will be determined after a Smart Contract has been deployed. In other cases, what we want to do is simply specifying the address because the Smart Contract is already deployed to the network.\n\nThere's one more case that hasn't been covered so far: Calculating a Smart Contract address dynamically as it's scheduled for deployment. This is useful when the address of a Smart Contract is the result of the interaction with another Smart Contract that is already instantiated on the network.\n\nThe following example configures `MyContract` to get its address from a call made to `AnotherContract`'s API:\n\n```js\n...\ndeploy: {\n AnotherContract: {...},\n MyContract: {\n deps: [\"AnotherContract\"]\n address: async (deps) => {\n const receipt = await deps.contracts.AnotherContract.methods.someFunction();\n return receipt.events.SomeEvent.returnValues.someAddress;\n }\n }\n}\n...\n```\n\n## Breaking changes\n\nNext up, let's quickly talk about the few breaking changes we've introduced to improve the overall developer experience. It's worth noting that we try to keep breaking changes at a minimum and if it's indeed unavoidable, we put lots of effort into keeping the necessary changes as small as possible.\n\n### NodeJS support\n\nDue to some package dependencies, Embark doesn't yet support Node's [*Current* version](https://nodejs.org/en/about/releases/) version (13.x) or latest LTS version (12.x). Embark 5 runs with any node version `>= 10.17.0` and `< 12.0.0`. It also requires npm `>= 6.11.3` (bundled with Node `10.17.0`) or yarn `>= 1.19.1`.\n\n### New Smart Contract configuration API\n\nEmbark's Smart Contract configuration has been highly declarative from day one. Configuring different deployment options and settings for various scenarios is a largely descriptive process when using Embark. However, we felt there was still room for improvement. Especially because Embark handles not only Smart Contract configurations, but also configurations for elements such as the user's choice of blockchain client. This sometimes caused confusion for our users since they weren't sure where certain configurations should go.\n\nThat's why we've made the following changes:\n\n### Deployment section moved to Blockchain config\n\nThe `deployment` section of the Smart Contract configuration has been completely moved to the Blockchain configuration as discussed in a moment. This section was primarily used to specify things like the `host`, `port` and `protocol` being used to connect to a node to which you Smart Contracts will be deployed, as well as the accounts configuration.\n\nHere's what such a config looked like prior to v5:\n\n```js\n...\ndeployment: {\n host: \"localhost\", // Host of the blockchain node\n port: 8546, // Port of the blockchain node\n type: \"ws\" // Type of connection (ws or rpc),\n accounts: [...]\n},\n...\n```\n\nThere's no equivalent for this configuration inside the Smart Contract configuration in Embark 5, so this section can be entirely (re)moved.\n\n### `contracts` property has been renamed to `deploy`\n\nWhen configuring Smart Contracts, there are a few deployment hooks that can be specified, such as `beforeDeploy` and `afterDeploy`. To make the API a bit more descriptive and to clarify intent, the `contracts` property has been renamed to `deploy`, aligning wonderfully with its deployment hooks counterparts.\n\nBefore:\n\n```js\n...\ncontracts: {\n SimpleStorage: {\n fromIndex: 0,\n args: [100],\n onDeploy: async () => { ... },\n deployIf: async () => { ... }\n }\n}\n...\n```\n\nAfter:\n\n```js\n...\ndeploy: {\n SimpleStorage: {\n fromIndex: 0,\n args: [100],\n onDeploy: async () => { ... },\n deployIf: async () => { ... }\n }\n}\n...\n```\n\n### Polished Blockchain configuration API\n\nOne of the most complex APIs has been Embark's Blockchain configuration API. That's why we've put a lot of effort into streamlining the settings and properties and removing the ones that happened to be redundant. On top of that, Embark now defines most of them as defaults, resulting in significantly smaller and less complex configuration files.\n\nThe following configuration properties have been renamed:\n\n- `isDev` is now `miningMode: 'dev'`\n- `mineWhenNeeded` is now `miningMode: 'auto'`\n- `ethereumClientName` is now `client`\n\nWe've also removed several endpoint-related settings, such as `host` and `port`, and replaced them with a single `endpoint` property. Here's what the new defaults look like:\n\n```js\nmodule.exports = {\n default: {\n enabled: true,\n client: \"geth\"\n },\n development: {\n clientConfig: {\n miningMode: 'dev'\n }\n },\n testnet: {\n endpoint: \"https://external-node.com\",\n accounts: [\n {\n mnemonic: \"12 word mnemonic\"\n }\n ]\n }\n}\n```\n\nFor more information on Blockchain configuration, head over to the [official docs](/docs/blockchain_configuration.html).\n\n### Accounts configuration moved to Blockchain config\n\nPrior to Embark 5 it was possible to specify and configure various accounts for deployment and interaction both inside the Smart Contract configuration and the Blockchain configuration. This caused a lot of confusion because it wasn't really clear which accounts belonged to what action. To eliminate confusion, we've moved the accounts configuration entirely to the Blockchain configuration, making it much more straightforward to find the right place when setting up custom accounts.\n\nJust like before, accounts can be defined using different configuration settings, depending on the use case:\n\n```js\n...\naccounts: [\n {\n nodeAccounts: true,\n numAddresses: \"1\",\n password: \"config/development/devpassword\"\n },\n {\n privateKey: process.env.MyPrivateKey\n },\n {\n privateKeyFile: \"path/to/file\",\n password: process.env.MyKeyStorePassword\n },\n {\n mnemonic: process.env.My12WordsMnemonic,\n addressIndex: \"0\",\n numAddresses: \"1\",\n hdpath: \"m/44'/60'/0'/0/\"\n }\n]\n...\n```\n\nCheck out the documentation on [accounts configuration](/docs/blockchain_accounts_configuration.html) for more information.\n\n### Configuring tests\n\nAll the configuration changes discussed above have been ported and made available inside the test runner as well. In other words, when using Embark's `config()` function inside test suites, the same configuration APi applies:\n\n```javascript\nconfig({\n contracts: {\n deploy: {\n SomeContract: {} // options as discussed in the Smart Contract configuration guide\n }\n }\n});\n```\n\nTesting is covered in-depth in our [testing guide](/docs/contracts_testing.html).\n\nTo see any of the new APIs in action, have a look at our [template](https://github.com/embarklabs/embark/tree/ba0d6d17f30018d8258c65d85f17bea100c3ad0a/dapps/templates) and [test dapps](https://github.com/embarklabs/embark/tree/ba0d6d17f30018d8258c65d85f17bea100c3ad0a/dapps/tests) in the official Embark repository.\n\nObviously we've worked on many more things as part of the v5 release. For a full list of features and bug fixes, head over to our [changelog](https://github.com/embarklabs/embark/blob/master/CHANGELOG.md#500-2020-01-07).\n\nAs always, we encourage our users to install the latest version of Embark and give it a spin. Feedback is very welcome and we can't wait to see the great apps you'll be building with it!\n","source":"_posts/2020-01-13-announcing-embark-5.md","raw":"title: Introducing Embark 5\nauthor: pascal_precht\nsummary: \"About half a year after our last stable release, we've now published Embark version 5 with lots of features, improvements and fixes. Read on for more information!\"\ncategories:\n - announcements\nlayout: blog-post\n---\n\nIf you've been following the development of Embark you're probably aware that we regularly put out alpha and beta releases for upcoming major or feature versions of Embark. In the past ~6 months since the release of Embark 4, we've published 10 alpha releases and one beta release for Embark 5 and today we're happy to announce the Embark 5 stable release!\n\nIn this post we'll be looking at some of the main changes and features to get up and running with v5. Notice that we've add a [migration guide](https://framework.embarklabs.io/docs/migrating_from_3.x.html#Updating-to-v5) to our official docs as well.\n\n## New Features\n\nLet's first start with new features that have been introduced in Embark 5.\n\n### Whisper client configuration\n\nPrior to Embark 5, Embark would use the same blockchain client to enable blockchain features and communication features for Whisper. With Embark 5, Embark spins up a separate client for Whisper. This also ensures that that Whisper service stays in tact when the blockchain service is turned off and vice versa.\n\nTo specify a client, use the new `client` configuration property which defaults to `geth`:\n\n```js\n// communication.js\n\n...\ndefault: {\n ...\n client: \"geth\" // can be either 'geth' or 'parity'\n},\n...\n\n```\n\n### Support for Dynamic Addresses\n\nIf you're using Embark already, you're probably aware that there are many different ways to [configure your Smart Contracts](/docs/contracts_configuration.html). One of the things that can be configured is the `address` of a Smart Contract. Usually the address will be determined after a Smart Contract has been deployed. In other cases, what we want to do is simply specifying the address because the Smart Contract is already deployed to the network.\n\nThere's one more case that hasn't been covered so far: Calculating a Smart Contract address dynamically as it's scheduled for deployment. This is useful when the address of a Smart Contract is the result of the interaction with another Smart Contract that is already instantiated on the network.\n\nThe following example configures `MyContract` to get its address from a call made to `AnotherContract`'s API:\n\n```js\n...\ndeploy: {\n AnotherContract: {...},\n MyContract: {\n deps: [\"AnotherContract\"]\n address: async (deps) => {\n const receipt = await deps.contracts.AnotherContract.methods.someFunction();\n return receipt.events.SomeEvent.returnValues.someAddress;\n }\n }\n}\n...\n```\n\n## Breaking changes\n\nNext up, let's quickly talk about the few breaking changes we've introduced to improve the overall developer experience. It's worth noting that we try to keep breaking changes at a minimum and if it's indeed unavoidable, we put lots of effort into keeping the necessary changes as small as possible.\n\n### NodeJS support\n\nDue to some package dependencies, Embark doesn't yet support Node's [*Current* version](https://nodejs.org/en/about/releases/) version (13.x) or latest LTS version (12.x). Embark 5 runs with any node version `>= 10.17.0` and `< 12.0.0`. It also requires npm `>= 6.11.3` (bundled with Node `10.17.0`) or yarn `>= 1.19.1`.\n\n### New Smart Contract configuration API\n\nEmbark's Smart Contract configuration has been highly declarative from day one. Configuring different deployment options and settings for various scenarios is a largely descriptive process when using Embark. However, we felt there was still room for improvement. Especially because Embark handles not only Smart Contract configurations, but also configurations for elements such as the user's choice of blockchain client. This sometimes caused confusion for our users since they weren't sure where certain configurations should go.\n\nThat's why we've made the following changes:\n\n### Deployment section moved to Blockchain config\n\nThe `deployment` section of the Smart Contract configuration has been completely moved to the Blockchain configuration as discussed in a moment. This section was primarily used to specify things like the `host`, `port` and `protocol` being used to connect to a node to which you Smart Contracts will be deployed, as well as the accounts configuration.\n\nHere's what such a config looked like prior to v5:\n\n```js\n...\ndeployment: {\n host: \"localhost\", // Host of the blockchain node\n port: 8546, // Port of the blockchain node\n type: \"ws\" // Type of connection (ws or rpc),\n accounts: [...]\n},\n...\n```\n\nThere's no equivalent for this configuration inside the Smart Contract configuration in Embark 5, so this section can be entirely (re)moved.\n\n### `contracts` property has been renamed to `deploy`\n\nWhen configuring Smart Contracts, there are a few deployment hooks that can be specified, such as `beforeDeploy` and `afterDeploy`. To make the API a bit more descriptive and to clarify intent, the `contracts` property has been renamed to `deploy`, aligning wonderfully with its deployment hooks counterparts.\n\nBefore:\n\n```js\n...\ncontracts: {\n SimpleStorage: {\n fromIndex: 0,\n args: [100],\n onDeploy: async () => { ... },\n deployIf: async () => { ... }\n }\n}\n...\n```\n\nAfter:\n\n```js\n...\ndeploy: {\n SimpleStorage: {\n fromIndex: 0,\n args: [100],\n onDeploy: async () => { ... },\n deployIf: async () => { ... }\n }\n}\n...\n```\n\n### Polished Blockchain configuration API\n\nOne of the most complex APIs has been Embark's Blockchain configuration API. That's why we've put a lot of effort into streamlining the settings and properties and removing the ones that happened to be redundant. On top of that, Embark now defines most of them as defaults, resulting in significantly smaller and less complex configuration files.\n\nThe following configuration properties have been renamed:\n\n- `isDev` is now `miningMode: 'dev'`\n- `mineWhenNeeded` is now `miningMode: 'auto'`\n- `ethereumClientName` is now `client`\n\nWe've also removed several endpoint-related settings, such as `host` and `port`, and replaced them with a single `endpoint` property. Here's what the new defaults look like:\n\n```js\nmodule.exports = {\n default: {\n enabled: true,\n client: \"geth\"\n },\n development: {\n clientConfig: {\n miningMode: 'dev'\n }\n },\n testnet: {\n endpoint: \"https://external-node.com\",\n accounts: [\n {\n mnemonic: \"12 word mnemonic\"\n }\n ]\n }\n}\n```\n\nFor more information on Blockchain configuration, head over to the [official docs](/docs/blockchain_configuration.html).\n\n### Accounts configuration moved to Blockchain config\n\nPrior to Embark 5 it was possible to specify and configure various accounts for deployment and interaction both inside the Smart Contract configuration and the Blockchain configuration. This caused a lot of confusion because it wasn't really clear which accounts belonged to what action. To eliminate confusion, we've moved the accounts configuration entirely to the Blockchain configuration, making it much more straightforward to find the right place when setting up custom accounts.\n\nJust like before, accounts can be defined using different configuration settings, depending on the use case:\n\n```js\n...\naccounts: [\n {\n nodeAccounts: true,\n numAddresses: \"1\",\n password: \"config/development/devpassword\"\n },\n {\n privateKey: process.env.MyPrivateKey\n },\n {\n privateKeyFile: \"path/to/file\",\n password: process.env.MyKeyStorePassword\n },\n {\n mnemonic: process.env.My12WordsMnemonic,\n addressIndex: \"0\",\n numAddresses: \"1\",\n hdpath: \"m/44'/60'/0'/0/\"\n }\n]\n...\n```\n\nCheck out the documentation on [accounts configuration](/docs/blockchain_accounts_configuration.html) for more information.\n\n### Configuring tests\n\nAll the configuration changes discussed above have been ported and made available inside the test runner as well. In other words, when using Embark's `config()` function inside test suites, the same configuration APi applies:\n\n```javascript\nconfig({\n contracts: {\n deploy: {\n SomeContract: {} // options as discussed in the Smart Contract configuration guide\n }\n }\n});\n```\n\nTesting is covered in-depth in our [testing guide](/docs/contracts_testing.html).\n\nTo see any of the new APIs in action, have a look at our [template](https://github.com/embarklabs/embark/tree/ba0d6d17f30018d8258c65d85f17bea100c3ad0a/dapps/templates) and [test dapps](https://github.com/embarklabs/embark/tree/ba0d6d17f30018d8258c65d85f17bea100c3ad0a/dapps/tests) in the official Embark repository.\n\nObviously we've worked on many more things as part of the v5 release. For a full list of features and bug fixes, head over to our [changelog](https://github.com/embarklabs/embark/blob/master/CHANGELOG.md#500-2020-01-07).\n\nAs always, we encourage our users to install the latest version of Embark and give it a spin. Feedback is very welcome and we can't wait to see the great apps you'll be building with it!\n","slug":"announcing-embark-5","published":1,"date":"2020-01-13T05:00:00.000Z","updated":"2020-03-03T14:55:55.052Z","_id":"ck6axlfci002uxeeg43ke7c9c","comments":1,"photos":[],"link":"","content":"<p>If you’ve been following the development of Embark you’re probably aware that we regularly put out alpha and beta releases for upcoming major or feature versions of Embark. In the past ~6 months since the release of Embark 4, we’ve published 10 alpha releases and one beta release for Embark 5 and today we’re happy to announce the Embark 5 stable release!</p>\n<p>In this post we’ll be looking at some of the main changes and features to get up and running with v5. Notice that we’ve add a <a href=\"https://framework.embarklabs.io/docs/migrating_from_3.x.html#Updating-to-v5\" target=\"_blank\" rel=\"noopener\">migration guide</a> to our official docs as well.</p>\n<h2 id=\"New-Features\"><a href=\"#New-Features\" class=\"headerlink\" title=\"New Features\"></a>New Features</h2><p>Let’s first start with new features that have been introduced in Embark 5.</p>\n<h3 id=\"Whisper-client-configuration\"><a href=\"#Whisper-client-configuration\" class=\"headerlink\" title=\"Whisper client configuration\"></a>Whisper client configuration</h3><p>Prior to Embark 5, Embark would use the same blockchain client to enable blockchain features and communication features for Whisper. With Embark 5, Embark spins up a separate client for Whisper. This also ensures that that Whisper service stays in tact when the blockchain service is turned off and vice versa.</p>\n<p>To specify a client, use the new <code>client</code> configuration property which defaults to <code>geth</code>:</p>\n<figure class=\"highlight js\"><table><tr><td class=\"code\"><pre><span class=\"line\"><span class=\"comment\">// communication.js</span></span><br><span class=\"line\"></span><br><span class=\"line\">...</span><br><span class=\"line\"><span class=\"keyword\">default</span>: {</span><br><span class=\"line\"> ...</span><br><span class=\"line\"> client: <span class=\"string\">\"geth\"</span> <span class=\"comment\">// can be either 'geth' or 'parity'</span></span><br><span class=\"line\">},</span><br><span class=\"line\">...</span><br></pre></td></tr></table></figure>\n\n<h3 id=\"Support-for-Dynamic-Addresses\"><a href=\"#Support-for-Dynamic-Addresses\" class=\"headerlink\" title=\"Support for Dynamic Addresses\"></a>Support for Dynamic Addresses</h3><p>If you’re using Embark already, you’re probably aware that there are many different ways to <a href=\"/docs/contracts_configuration.html\">configure your Smart Contracts</a>. One of the things that can be configured is the <code>address</code> of a Smart Contract. Usually the address will be determined after a Smart Contract has been deployed. In other cases, what we want to do is simply specifying the address because the Smart Contract is already deployed to the network.</p>\n<p>There’s one more case that hasn’t been covered so far: Calculating a Smart Contract address dynamically as it’s scheduled for deployment. This is useful when the address of a Smart Contract is the result of the interaction with another Smart Contract that is already instantiated on the network.</p>\n<p>The following example configures <code>MyContract</code> to get its address from a call made to <code>AnotherContract</code>‘s API:</p>\n<figure class=\"highlight js\"><table><tr><td class=\"code\"><pre><span class=\"line\">...</span><br><span class=\"line\">deploy: {</span><br><span class=\"line\"> AnotherContract: {...},</span><br><span class=\"line\"> MyContract: {</span><br><span class=\"line\"> deps: [<span class=\"string\">\"AnotherContract\"</span>]</span><br><span class=\"line\"> address: <span class=\"keyword\">async</span> (deps) => {</span><br><span class=\"line\"> <span class=\"keyword\">const</span> receipt = <span class=\"keyword\">await</span> deps.contracts.AnotherContract.methods.someFunction();</span><br><span class=\"line\"> <span class=\"keyword\">return</span> receipt.events.SomeEvent.returnValues.someAddress;</span><br><span class=\"line\"> }</span><br><span class=\"line\"> }</span><br><span class=\"line\">}</span><br><span class=\"line\">...</span><br></pre></td></tr></table></figure>\n\n<h2 id=\"Breaking-changes\"><a href=\"#Breaking-changes\" class=\"headerlink\" title=\"Breaking changes\"></a>Breaking changes</h2><p>Next up, let’s quickly talk about the few breaking changes we’ve introduced to improve the overall developer experience. It’s worth noting that we try to keep breaking changes at a minimum and if it’s indeed unavoidable, we put lots of effort into keeping the necessary changes as small as possible.</p>\n<h3 id=\"NodeJS-support\"><a href=\"#NodeJS-support\" class=\"headerlink\" title=\"NodeJS support\"></a>NodeJS support</h3><p>Due to some package dependencies, Embark doesn’t yet support Node’s <a href=\"https://nodejs.org/en/about/releases/\" target=\"_blank\" rel=\"noopener\"><em>Current</em> version</a> version (13.x) or latest LTS version (12.x). Embark 5 runs with any node version <code>>= 10.17.0</code> and <code>< 12.0.0</code>. It also requires npm <code>>= 6.11.3</code> (bundled with Node <code>10.17.0</code>) or yarn <code>>= 1.19.1</code>.</p>\n<h3 id=\"New-Smart-Contract-configuration-API\"><a href=\"#New-Smart-Contract-configuration-API\" class=\"headerlink\" title=\"New Smart Contract configuration API\"></a>New Smart Contract configuration API</h3><p>Embark’s Smart Contract configuration has been highly declarative from day one. Configuring different deployment options and settings for various scenarios is a largely descriptive process when using Embark. However, we felt there was still room for improvement. Especially because Embark handles not only Smart Contract configurations, but also configurations for elements such as the user’s choice of blockchain client. This sometimes caused confusion for our users since they weren’t sure where certain configurations should go.</p>\n<p>That’s why we’ve made the following changes:</p>\n<h3 id=\"Deployment-section-moved-to-Blockchain-config\"><a href=\"#Deployment-section-moved-to-Blockchain-config\" class=\"headerlink\" title=\"Deployment section moved to Blockchain config\"></a>Deployment section moved to Blockchain config</h3><p>The <code>deployment</code> section of the Smart Contract configuration has been completely moved to the Blockchain configuration as discussed in a moment. This section was primarily used to specify things like the <code>host</code>, <code>port</code> and <code>protocol</code> being used to connect to a node to which you Smart Contracts will be deployed, as well as the accounts configuration.</p>\n<p>Here’s what such a config looked like prior to v5:</p>\n<figure class=\"highlight js\"><table><tr><td class=\"code\"><pre><span class=\"line\">...</span><br><span class=\"line\">deployment: {</span><br><span class=\"line\"> host: <span class=\"string\">\"localhost\"</span>, <span class=\"comment\">// Host of the blockchain node</span></span><br><span class=\"line\"> port: <span class=\"number\">8546</span>, <span class=\"comment\">// Port of the blockchain node</span></span><br><span class=\"line\"> type: <span class=\"string\">\"ws\"</span> <span class=\"comment\">// Type of connection (ws or rpc),</span></span><br><span class=\"line\"> accounts: [...]</span><br><span class=\"line\">},</span><br><span class=\"line\">...</span><br></pre></td></tr></table></figure>\n\n<p>There’s no equivalent for this configuration inside the Smart Contract configuration in Embark 5, so this section can be entirely (re)moved.</p>\n<h3 id=\"contracts-property-has-been-renamed-to-deploy\"><a href=\"#contracts-property-has-been-renamed-to-deploy\" class=\"headerlink\" title=\"contracts property has been renamed to deploy\"></a><code>contracts</code> property has been renamed to <code>deploy</code></h3><p>When configuring Smart Contracts, there are a few deployment hooks that can be specified, such as <code>beforeDeploy</code> and <code>afterDeploy</code>. To make the API a bit more descriptive and to clarify intent, the <code>contracts</code> property has been renamed to <code>deploy</code>, aligning wonderfully with its deployment hooks counterparts.</p>\n<p>Before:</p>\n<figure class=\"highlight js\"><table><tr><td class=\"code\"><pre><span class=\"line\">...</span><br><span class=\"line\">contracts: {</span><br><span class=\"line\"> SimpleStorage: {</span><br><span class=\"line\"> fromIndex: <span class=\"number\">0</span>,</span><br><span class=\"line\"> args: [<span class=\"number\">100</span>],</span><br><span class=\"line\"> onDeploy: <span class=\"keyword\">async</span> () => { ... },</span><br><span class=\"line\"> deployIf: <span class=\"keyword\">async</span> () => { ... }</span><br><span class=\"line\"> }</span><br><span class=\"line\">}</span><br><span class=\"line\">...</span><br></pre></td></tr></table></figure>\n\n<p>After:</p>\n<figure class=\"highlight js\"><table><tr><td class=\"code\"><pre><span class=\"line\">...</span><br><span class=\"line\">deploy: {</span><br><span class=\"line\"> SimpleStorage: {</span><br><span class=\"line\"> fromIndex: <span class=\"number\">0</span>,</span><br><span class=\"line\"> args: [<span class=\"number\">100</span>],</span><br><span class=\"line\"> onDeploy: <span class=\"keyword\">async</span> () => { ... },</span><br><span class=\"line\"> deployIf: <span class=\"keyword\">async</span> () => { ... }</span><br><span class=\"line\"> }</span><br><span class=\"line\">}</span><br><span class=\"line\">...</span><br></pre></td></tr></table></figure>\n\n<h3 id=\"Polished-Blockchain-configuration-API\"><a href=\"#Polished-Blockchain-configuration-API\" class=\"headerlink\" title=\"Polished Blockchain configuration API\"></a>Polished Blockchain configuration API</h3><p>One of the most complex APIs has been Embark’s Blockchain configuration API. That’s why we’ve put a lot of effort into streamlining the settings and properties and removing the ones that happened to be redundant. On top of that, Embark now defines most of them as defaults, resulting in significantly smaller and less complex configuration files.</p>\n<p>The following configuration properties have been renamed:</p>\n<ul>\n<li><code>isDev</code> is now <code>miningMode: 'dev'</code></li>\n<li><code>mineWhenNeeded</code> is now <code>miningMode: 'auto'</code></li>\n<li><code>ethereumClientName</code> is now <code>client</code></li>\n</ul>\n<p>We’ve also removed several endpoint-related settings, such as <code>host</code> and <code>port</code>, and replaced them with a single <code>endpoint</code> property. Here’s what the new defaults look like:</p>\n<figure class=\"highlight js\"><table><tr><td class=\"code\"><pre><span class=\"line\"><span class=\"built_in\">module</span>.exports = {</span><br><span class=\"line\"> <span class=\"keyword\">default</span>: {</span><br><span class=\"line\"> enabled: <span class=\"literal\">true</span>,</span><br><span class=\"line\"> client: <span class=\"string\">\"geth\"</span></span><br><span class=\"line\"> },</span><br><span class=\"line\"> development: {</span><br><span class=\"line\"> clientConfig: {</span><br><span class=\"line\"> miningMode: <span class=\"string\">'dev'</span></span><br><span class=\"line\"> }</span><br><span class=\"line\"> },</span><br><span class=\"line\"> testnet: {</span><br><span class=\"line\"> endpoint: <span class=\"string\">\"https://external-node.com\"</span>,</span><br><span class=\"line\"> accounts: [</span><br><span class=\"line\"> {</span><br><span class=\"line\"> mnemonic: <span class=\"string\">\"12 word mnemonic\"</span></span><br><span class=\"line\"> }</span><br><span class=\"line\"> ]</span><br><span class=\"line\"> }</span><br><span class=\"line\">}</span><br></pre></td></tr></table></figure>\n\n<p>For more information on Blockchain configuration, head over to the <a href=\"/docs/blockchain_configuration.html\">official docs</a>.</p>\n<h3 id=\"Accounts-configuration-moved-to-Blockchain-config\"><a href=\"#Accounts-configuration-moved-to-Blockchain-config\" class=\"headerlink\" title=\"Accounts configuration moved to Blockchain config\"></a>Accounts configuration moved to Blockchain config</h3><p>Prior to Embark 5 it was possible to specify and configure various accounts for deployment and interaction both inside the Smart Contract configuration and the Blockchain configuration. This caused a lot of confusion because it wasn’t really clear which accounts belonged to what action. To eliminate confusion, we’ve moved the accounts configuration entirely to the Blockchain configuration, making it much more straightforward to find the right place when setting up custom accounts.</p>\n<p>Just like before, accounts can be defined using different configuration settings, depending on the use case:</p>\n<figure class=\"highlight js\"><table><tr><td class=\"code\"><pre><span class=\"line\">...</span><br><span class=\"line\">accounts: [</span><br><span class=\"line\"> {</span><br><span class=\"line\"> nodeAccounts: <span class=\"literal\">true</span>,</span><br><span class=\"line\"> numAddresses: <span class=\"string\">\"1\"</span>,</span><br><span class=\"line\"> password: <span class=\"string\">\"config/development/devpassword\"</span></span><br><span class=\"line\"> },</span><br><span class=\"line\"> {</span><br><span class=\"line\"> privateKey: process.env.MyPrivateKey</span><br><span class=\"line\"> },</span><br><span class=\"line\"> {</span><br><span class=\"line\"> privateKeyFile: <span class=\"string\">\"path/to/file\"</span>,</span><br><span class=\"line\"> password: process.env.MyKeyStorePassword</span><br><span class=\"line\"> },</span><br><span class=\"line\"> {</span><br><span class=\"line\"> mnemonic: process.env.My12WordsMnemonic,</span><br><span class=\"line\"> addressIndex: <span class=\"string\">\"0\"</span>,</span><br><span class=\"line\"> numAddresses: <span class=\"string\">\"1\"</span>,</span><br><span class=\"line\"> hdpath: <span class=\"string\">\"m/44'/60'/0'/0/\"</span></span><br><span class=\"line\"> }</span><br><span class=\"line\">]</span><br><span class=\"line\">...</span><br></pre></td></tr></table></figure>\n\n<p>Check out the documentation on <a href=\"/docs/blockchain_accounts_configuration.html\">accounts configuration</a> for more information.</p>\n<h3 id=\"Configuring-tests\"><a href=\"#Configuring-tests\" class=\"headerlink\" title=\"Configuring tests\"></a>Configuring tests</h3><p>All the configuration changes discussed above have been ported and made available inside the test runner as well. In other words, when using Embark’s <code>config()</code> function inside test suites, the same configuration APi applies:</p>\n<figure class=\"highlight javascript\"><table><tr><td class=\"code\"><pre><span class=\"line\">config({</span><br><span class=\"line\"> contracts: {</span><br><span class=\"line\"> deploy: {</span><br><span class=\"line\"> SomeContract: {} <span class=\"comment\">// options as discussed in the Smart Contract configuration guide</span></span><br><span class=\"line\"> }</span><br><span class=\"line\"> }</span><br><span class=\"line\">});</span><br></pre></td></tr></table></figure>\n\n<p>Testing is covered in-depth in our <a href=\"/docs/contracts_testing.html\">testing guide</a>.</p>\n<p>To see any of the new APIs in action, have a look at our <a href=\"https://github.com/embarklabs/embark/tree/ba0d6d17f30018d8258c65d85f17bea100c3ad0a/dapps/templates\" target=\"_blank\" rel=\"noopener\">template</a> and <a href=\"https://github.com/embarklabs/embark/tree/ba0d6d17f30018d8258c65d85f17bea100c3ad0a/dapps/tests\" target=\"_blank\" rel=\"noopener\">test dapps</a> in the official Embark repository.</p>\n<p>Obviously we’ve worked on many more things as part of the v5 release. For a full list of features and bug fixes, head over to our <a href=\"https://github.com/embarklabs/embark/blob/master/CHANGELOG.md#500-2020-01-07\" target=\"_blank\" rel=\"noopener\">changelog</a>.</p>\n<p>As always, we encourage our users to install the latest version of Embark and give it a spin. Feedback is very welcome and we can’t wait to see the great apps you’ll be building with it!</p>\n","site":{"data":{"authors":{"iuri_matias":{"name":"Iuri Matias","twitter":"iurimatias","image":"https://pbs.twimg.com/profile_images/928272512181563392/iDJdvy2k_400x400.jpg"},"pascal_precht":{"name":"Pascal Precht","twitter":"pascalprecht","image":"https://pbs.twimg.com/profile_images/993785060733194241/p3oAIMDP_400x400.jpg"},"anthony_laibe":{"name":"Anthony Laibe","twitter":"a_laibe","image":"https://pbs.twimg.com/profile_images/257742900/13168239_400x400.jpg"},"jonathan_rainville":{"name":"Jonathan Rainville","twitter":"ShyolGhul","image":"https://pbs.twimg.com/profile_images/993873866878570496/-aE4byjj_400x400.jpg"},"andre_medeiros":{"name":"Andre Medeiros","twitter":"superdealloc","image":"https://pbs.twimg.com/profile_images/965722487735701504/m58KNgWN_400x400.jpg"},"eric_mastro":{"name":"Eric Mastro","twitter":"ericmastro","image":"https://avatars1.githubusercontent.com/u/5089238?s=460&v=4"},"michael_bradley":{"name":"Michael Bradley","image":"https://avatars3.githubusercontent.com/u/194260?s=460&v=4"},"richard_ramos":{"name":"Richard Ramos","twitter":"richardramos_me","image":"https://devcon.org/images/speakers/richard_ramos.jpg"},"jonny_zerah":{"name":"Jonny Zerah","twitter":"jonnyzerah","image":"https://pbs.twimg.com/profile_images/1043774340490248192/gI9aGy17_400x400.jpg"},"robin_percy":{"name":"Robin Percy","twitter":"rbin","image":"https://avatars1.githubusercontent.com/u/29288325?s=400&v=4"}},"categories":{"tutorials":"Tutorials","announcements":"Announcements"},"languages":{"en":"English"}}},"excerpt":"","more":"<p>If you’ve been following the development of Embark you’re probably aware that we regularly put out alpha and beta releases for upcoming major or feature versions of Embark. In the past ~6 months since the release of Embark 4, we’ve published 10 alpha releases and one beta release for Embark 5 and today we’re happy to announce the Embark 5 stable release!</p>\n<p>In this post we’ll be looking at some of the main changes and features to get up and running with v5. Notice that we’ve add a <a href=\"https://framework.embarklabs.io/docs/migrating_from_3.x.html#Updating-to-v5\" target=\"_blank\" rel=\"noopener\">migration guide</a> to our official docs as well.</p>\n<h2 id=\"New-Features\"><a href=\"#New-Features\" class=\"headerlink\" title=\"New Features\"></a>New Features</h2><p>Let’s first start with new features that have been introduced in Embark 5.</p>\n<h3 id=\"Whisper-client-configuration\"><a href=\"#Whisper-client-configuration\" class=\"headerlink\" title=\"Whisper client configuration\"></a>Whisper client configuration</h3><p>Prior to Embark 5, Embark would use the same blockchain client to enable blockchain features and communication features for Whisper. With Embark 5, Embark spins up a separate client for Whisper. This also ensures that that Whisper service stays in tact when the blockchain service is turned off and vice versa.</p>\n<p>To specify a client, use the new <code>client</code> configuration property which defaults to <code>geth</code>:</p>\n<figure class=\"highlight js\"><table><tr><td class=\"code\"><pre><span class=\"line\"><span class=\"comment\">// communication.js</span></span><br><span class=\"line\"></span><br><span class=\"line\">...</span><br><span class=\"line\"><span class=\"keyword\">default</span>: {</span><br><span class=\"line\"> ...</span><br><span class=\"line\"> client: <span class=\"string\">\"geth\"</span> <span class=\"comment\">// can be either 'geth' or 'parity'</span></span><br><span class=\"line\">},</span><br><span class=\"line\">...</span><br></pre></td></tr></table></figure>\n\n<h3 id=\"Support-for-Dynamic-Addresses\"><a href=\"#Support-for-Dynamic-Addresses\" class=\"headerlink\" title=\"Support for Dynamic Addresses\"></a>Support for Dynamic Addresses</h3><p>If you’re using Embark already, you’re probably aware that there are many different ways to <a href=\"/docs/contracts_configuration.html\">configure your Smart Contracts</a>. One of the things that can be configured is the <code>address</code> of a Smart Contract. Usually the address will be determined after a Smart Contract has been deployed. In other cases, what we want to do is simply specifying the address because the Smart Contract is already deployed to the network.</p>\n<p>There’s one more case that hasn’t been covered so far: Calculating a Smart Contract address dynamically as it’s scheduled for deployment. This is useful when the address of a Smart Contract is the result of the interaction with another Smart Contract that is already instantiated on the network.</p>\n<p>The following example configures <code>MyContract</code> to get its address from a call made to <code>AnotherContract</code>‘s API:</p>\n<figure class=\"highlight js\"><table><tr><td class=\"code\"><pre><span class=\"line\">...</span><br><span class=\"line\">deploy: {</span><br><span class=\"line\"> AnotherContract: {...},</span><br><span class=\"line\"> MyContract: {</span><br><span class=\"line\"> deps: [<span class=\"string\">\"AnotherContract\"</span>]</span><br><span class=\"line\"> address: <span class=\"keyword\">async</span> (deps) => {</span><br><span class=\"line\"> <span class=\"keyword\">const</span> receipt = <span class=\"keyword\">await</span> deps.contracts.AnotherContract.methods.someFunction();</span><br><span class=\"line\"> <span class=\"keyword\">return</span> receipt.events.SomeEvent.returnValues.someAddress;</span><br><span class=\"line\"> }</span><br><span class=\"line\"> }</span><br><span class=\"line\">}</span><br><span class=\"line\">...</span><br></pre></td></tr></table></figure>\n\n<h2 id=\"Breaking-changes\"><a href=\"#Breaking-changes\" class=\"headerlink\" title=\"Breaking changes\"></a>Breaking changes</h2><p>Next up, let’s quickly talk about the few breaking changes we’ve introduced to improve the overall developer experience. It’s worth noting that we try to keep breaking changes at a minimum and if it’s indeed unavoidable, we put lots of effort into keeping the necessary changes as small as possible.</p>\n<h3 id=\"NodeJS-support\"><a href=\"#NodeJS-support\" class=\"headerlink\" title=\"NodeJS support\"></a>NodeJS support</h3><p>Due to some package dependencies, Embark doesn’t yet support Node’s <a href=\"https://nodejs.org/en/about/releases/\" target=\"_blank\" rel=\"noopener\"><em>Current</em> version</a> version (13.x) or latest LTS version (12.x). Embark 5 runs with any node version <code>>= 10.17.0</code> and <code>< 12.0.0</code>. It also requires npm <code>>= 6.11.3</code> (bundled with Node <code>10.17.0</code>) or yarn <code>>= 1.19.1</code>.</p>\n<h3 id=\"New-Smart-Contract-configuration-API\"><a href=\"#New-Smart-Contract-configuration-API\" class=\"headerlink\" title=\"New Smart Contract configuration API\"></a>New Smart Contract configuration API</h3><p>Embark’s Smart Contract configuration has been highly declarative from day one. Configuring different deployment options and settings for various scenarios is a largely descriptive process when using Embark. However, we felt there was still room for improvement. Especially because Embark handles not only Smart Contract configurations, but also configurations for elements such as the user’s choice of blockchain client. This sometimes caused confusion for our users since they weren’t sure where certain configurations should go.</p>\n<p>That’s why we’ve made the following changes:</p>\n<h3 id=\"Deployment-section-moved-to-Blockchain-config\"><a href=\"#Deployment-section-moved-to-Blockchain-config\" class=\"headerlink\" title=\"Deployment section moved to Blockchain config\"></a>Deployment section moved to Blockchain config</h3><p>The <code>deployment</code> section of the Smart Contract configuration has been completely moved to the Blockchain configuration as discussed in a moment. This section was primarily used to specify things like the <code>host</code>, <code>port</code> and <code>protocol</code> being used to connect to a node to which you Smart Contracts will be deployed, as well as the accounts configuration.</p>\n<p>Here’s what such a config looked like prior to v5:</p>\n<figure class=\"highlight js\"><table><tr><td class=\"code\"><pre><span class=\"line\">...</span><br><span class=\"line\">deployment: {</span><br><span class=\"line\"> host: <span class=\"string\">\"localhost\"</span>, <span class=\"comment\">// Host of the blockchain node</span></span><br><span class=\"line\"> port: <span class=\"number\">8546</span>, <span class=\"comment\">// Port of the blockchain node</span></span><br><span class=\"line\"> type: <span class=\"string\">\"ws\"</span> <span class=\"comment\">// Type of connection (ws or rpc),</span></span><br><span class=\"line\"> accounts: [...]</span><br><span class=\"line\">},</span><br><span class=\"line\">...</span><br></pre></td></tr></table></figure>\n\n<p>There’s no equivalent for this configuration inside the Smart Contract configuration in Embark 5, so this section can be entirely (re)moved.</p>\n<h3 id=\"contracts-property-has-been-renamed-to-deploy\"><a href=\"#contracts-property-has-been-renamed-to-deploy\" class=\"headerlink\" title=\"contracts property has been renamed to deploy\"></a><code>contracts</code> property has been renamed to <code>deploy</code></h3><p>When configuring Smart Contracts, there are a few deployment hooks that can be specified, such as <code>beforeDeploy</code> and <code>afterDeploy</code>. To make the API a bit more descriptive and to clarify intent, the <code>contracts</code> property has been renamed to <code>deploy</code>, aligning wonderfully with its deployment hooks counterparts.</p>\n<p>Before:</p>\n<figure class=\"highlight js\"><table><tr><td class=\"code\"><pre><span class=\"line\">...</span><br><span class=\"line\">contracts: {</span><br><span class=\"line\"> SimpleStorage: {</span><br><span class=\"line\"> fromIndex: <span class=\"number\">0</span>,</span><br><span class=\"line\"> args: [<span class=\"number\">100</span>],</span><br><span class=\"line\"> onDeploy: <span class=\"keyword\">async</span> () => { ... },</span><br><span class=\"line\"> deployIf: <span class=\"keyword\">async</span> () => { ... }</span><br><span class=\"line\"> }</span><br><span class=\"line\">}</span><br><span class=\"line\">...</span><br></pre></td></tr></table></figure>\n\n<p>After:</p>\n<figure class=\"highlight js\"><table><tr><td class=\"code\"><pre><span class=\"line\">...</span><br><span class=\"line\">deploy: {</span><br><span class=\"line\"> SimpleStorage: {</span><br><span class=\"line\"> fromIndex: <span class=\"number\">0</span>,</span><br><span class=\"line\"> args: [<span class=\"number\">100</span>],</span><br><span class=\"line\"> onDeploy: <span class=\"keyword\">async</span> () => { ... },</span><br><span class=\"line\"> deployIf: <span class=\"keyword\">async</span> () => { ... }</span><br><span class=\"line\"> }</span><br><span class=\"line\">}</span><br><span class=\"line\">...</span><br></pre></td></tr></table></figure>\n\n<h3 id=\"Polished-Blockchain-configuration-API\"><a href=\"#Polished-Blockchain-configuration-API\" class=\"headerlink\" title=\"Polished Blockchain configuration API\"></a>Polished Blockchain configuration API</h3><p>One of the most complex APIs has been Embark’s Blockchain configuration API. That’s why we’ve put a lot of effort into streamlining the settings and properties and removing the ones that happened to be redundant. On top of that, Embark now defines most of them as defaults, resulting in significantly smaller and less complex configuration files.</p>\n<p>The following configuration properties have been renamed:</p>\n<ul>\n<li><code>isDev</code> is now <code>miningMode: 'dev'</code></li>\n<li><code>mineWhenNeeded</code> is now <code>miningMode: 'auto'</code></li>\n<li><code>ethereumClientName</code> is now <code>client</code></li>\n</ul>\n<p>We’ve also removed several endpoint-related settings, such as <code>host</code> and <code>port</code>, and replaced them with a single <code>endpoint</code> property. Here’s what the new defaults look like:</p>\n<figure class=\"highlight js\"><table><tr><td class=\"code\"><pre><span class=\"line\"><span class=\"built_in\">module</span>.exports = {</span><br><span class=\"line\"> <span class=\"keyword\">default</span>: {</span><br><span class=\"line\"> enabled: <span class=\"literal\">true</span>,</span><br><span class=\"line\"> client: <span class=\"string\">\"geth\"</span></span><br><span class=\"line\"> },</span><br><span class=\"line\"> development: {</span><br><span class=\"line\"> clientConfig: {</span><br><span class=\"line\"> miningMode: <span class=\"string\">'dev'</span></span><br><span class=\"line\"> }</span><br><span class=\"line\"> },</span><br><span class=\"line\"> testnet: {</span><br><span class=\"line\"> endpoint: <span class=\"string\">\"https://external-node.com\"</span>,</span><br><span class=\"line\"> accounts: [</span><br><span class=\"line\"> {</span><br><span class=\"line\"> mnemonic: <span class=\"string\">\"12 word mnemonic\"</span></span><br><span class=\"line\"> }</span><br><span class=\"line\"> ]</span><br><span class=\"line\"> }</span><br><span class=\"line\">}</span><br></pre></td></tr></table></figure>\n\n<p>For more information on Blockchain configuration, head over to the <a href=\"/docs/blockchain_configuration.html\">official docs</a>.</p>\n<h3 id=\"Accounts-configuration-moved-to-Blockchain-config\"><a href=\"#Accounts-configuration-moved-to-Blockchain-config\" class=\"headerlink\" title=\"Accounts configuration moved to Blockchain config\"></a>Accounts configuration moved to Blockchain config</h3><p>Prior to Embark 5 it was possible to specify and configure various accounts for deployment and interaction both inside the Smart Contract configuration and the Blockchain configuration. This caused a lot of confusion because it wasn’t really clear which accounts belonged to what action. To eliminate confusion, we’ve moved the accounts configuration entirely to the Blockchain configuration, making it much more straightforward to find the right place when setting up custom accounts.</p>\n<p>Just like before, accounts can be defined using different configuration settings, depending on the use case:</p>\n<figure class=\"highlight js\"><table><tr><td class=\"code\"><pre><span class=\"line\">...</span><br><span class=\"line\">accounts: [</span><br><span class=\"line\"> {</span><br><span class=\"line\"> nodeAccounts: <span class=\"literal\">true</span>,</span><br><span class=\"line\"> numAddresses: <span class=\"string\">\"1\"</span>,</span><br><span class=\"line\"> password: <span class=\"string\">\"config/development/devpassword\"</span></span><br><span class=\"line\"> },</span><br><span class=\"line\"> {</span><br><span class=\"line\"> privateKey: process.env.MyPrivateKey</span><br><span class=\"line\"> },</span><br><span class=\"line\"> {</span><br><span class=\"line\"> privateKeyFile: <span class=\"string\">\"path/to/file\"</span>,</span><br><span class=\"line\"> password: process.env.MyKeyStorePassword</span><br><span class=\"line\"> },</span><br><span class=\"line\"> {</span><br><span class=\"line\"> mnemonic: process.env.My12WordsMnemonic,</span><br><span class=\"line\"> addressIndex: <span class=\"string\">\"0\"</span>,</span><br><span class=\"line\"> numAddresses: <span class=\"string\">\"1\"</span>,</span><br><span class=\"line\"> hdpath: <span class=\"string\">\"m/44'/60'/0'/0/\"</span></span><br><span class=\"line\"> }</span><br><span class=\"line\">]</span><br><span class=\"line\">...</span><br></pre></td></tr></table></figure>\n\n<p>Check out the documentation on <a href=\"/docs/blockchain_accounts_configuration.html\">accounts configuration</a> for more information.</p>\n<h3 id=\"Configuring-tests\"><a href=\"#Configuring-tests\" class=\"headerlink\" title=\"Configuring tests\"></a>Configuring tests</h3><p>All the configuration changes discussed above have been ported and made available inside the test runner as well. In other words, when using Embark’s <code>config()</code> function inside test suites, the same configuration APi applies:</p>\n<figure class=\"highlight javascript\"><table><tr><td class=\"code\"><pre><span class=\"line\">config({</span><br><span class=\"line\"> contracts: {</span><br><span class=\"line\"> deploy: {</span><br><span class=\"line\"> SomeContract: {} <span class=\"comment\">// options as discussed in the Smart Contract configuration guide</span></span><br><span class=\"line\"> }</span><br><span class=\"line\"> }</span><br><span class=\"line\">});</span><br></pre></td></tr></table></figure>\n\n<p>Testing is covered in-depth in our <a href=\"/docs/contracts_testing.html\">testing guide</a>.</p>\n<p>To see any of the new APIs in action, have a look at our <a href=\"https://github.com/embarklabs/embark/tree/ba0d6d17f30018d8258c65d85f17bea100c3ad0a/dapps/templates\" target=\"_blank\" rel=\"noopener\">template</a> and <a href=\"https://github.com/embarklabs/embark/tree/ba0d6d17f30018d8258c65d85f17bea100c3ad0a/dapps/tests\" target=\"_blank\" rel=\"noopener\">test dapps</a> in the official Embark repository.</p>\n<p>Obviously we’ve worked on many more things as part of the v5 release. For a full list of features and bug fixes, head over to our <a href=\"https://github.com/embarklabs/embark/blob/master/CHANGELOG.md#500-2020-01-07\" target=\"_blank\" rel=\"noopener\">changelog</a>.</p>\n<p>As always, we encourage our users to install the latest version of Embark and give it a spin. Feedback is very welcome and we can’t wait to see the great apps you’ll be building with it!</p>\n"},{"title":"Nim vs Crystal - Part 3 - Crypto, DApps & P2P","summary":"Crystal and Nim go head-to-head to figure out the best modern, low-level programming language! In part 3; Crypto, P2P & DApps are explored.","author":"robin_percy","layout":"blog-post","image":"/assets/images/nim-crystal-header-img_NEW.jpg","_content":"\n\n\nWelcome back to my series comparing the two sweethearts of the modern low-level programming world. Just to quickly recap: in [article #1](/news/2019/11/18/nim-vs-crystal-part-1-performance-interoperability/) I noted my thoughts on the interoperability capabilities of the two languages, alongside briefly reviewing the performance metrics for each (albeit with relatively simple tests). Whether simple or not, the tests ***did*** throw up some unexpected twists in the plot. Crystal used *very-nearly* half of the memory amount executing the tests when compared to Nim, and also took *very nearly* half of the execution time in doing so. **This seriously took me by surprise!**\n\nIn [article #2](/news/2019/11/21/nim-vs-crystal-part-2-threading-tooling/); I looked at the Concurrency primitives of each language, and explored both the in-built tooling, and external package ecosystems surrounding each language. As I said in that article, one of the biggest factors I look at when considering adopting a new language; is its tooling ecosystem. This includes, but is not limited to: A comprehensive package manager, an intuitive testing suite, a good project scaffolder, and an in-built formatter/linter to ensure my code stays semantically correct – especially if I know I will be working in Open Source repos that others will contribute to. But they're just the high-level tools that I look for...\n\nFrom a low-level standpoint; I look for efficient use of technology in features such as in-memory storage, caching, garbage collection, and concurrency primitives that not just *markedly* improve our application performance, but that are also relatively simple, and intuitive to use. I see *this* as particularly important as I have, in my past, seen some truly shocking examples of trying to handle multi-threading, from languages that I love \\*cough* ***Ruby*** \\*cough*. I also like to see a fully-featured standard library that takes influence from previous successful languages. However, I digress...\n\nI regret to say that this is the final article in this series! It's been good fun for me; getting to the know the ins-and-outs of Nim, and to re-grow a fresh appreciation of Crystal, having put it on the back-burner for quite some time. However, whether the final article in the series or not, it's going to be a good one! We're going to be covering the benefits to the Cryptocurrency / DApp industries from both Crystal and Nim. So without further ado:\n\n***Let's dive on in!***\n\n## Cryptocurrency\n\nFirstly, I'd like to talk about the possibility of using either Crystal or Nim, (or both!) in the development of crypto apps. Hypothetically; if we had the inclination to build out our own Cryptocurrency: Crystal and Nim have ***proven to be two of the strongest languages*** to consider for the undertaking.. (That being the *next* blog series I'm going to write – in the near future, so deciding which language to use will be heavily influenced by ***this*** blog series!)\n\nFor our Cryptocurrency, we would need to be able to use an intelligent key manager, utilise smart hashing algorithms, maintain strong performance, and all of this atop of a distributed, decentralised virtual machine or blockchain. Now, all of this sounds like a ***very*** tall order! For all of these feature requirements to be met by a single programming language, it would mean that this language is going to have to be **ONE HELL** of an impressive piece of technology.\n\nHappily, both Crystal *and* Nim allow us ***all*** of the above functionality. In our hypothetical usecase, if we were to build out a fully-featured blockchain; mining *and* hashing functions would need to be continually made, both of which entail relatively heavy computations. As shown over the last 2 articles in the series, we can at least be sure that both langs can handle the performance stresses, no problemo.\n\nAs I'd like to write this topic out into a further detailed article series, I will show off just 2 of the above pieces of functionality we'd require for our Crypto app:\n\n\n### Calculating our Block Hashes\n\nWhen building our Blockchain; we need to consider how we're going to identify and chain our transaction blocks together (blockchain). Without going into details in *this* article on how blockchains function, we'll stick with the existing, and proven, SHA256 algorithm.\n\n\n### In Crystal:\n\n``` crystal\nrequire \"json\"\nrequire \"openssl\"\n\nmodule OurCryptoApp::Model\n struct Transaction\n include JSON::Serializable\n\n alias TxnHash = String\n\n property from : String\n property to : String\n property amount : Float32\n getter hash : TxnHash\n getter timestamp : Int64\n\n def initialize(@from, @to, @amount)\n @timestamp = Time.utc_now.to_unix\n @hash = calc_hash\n end\n\n private def calc_hash : TxnHash\n sha = OpenSSL::Digest.new(\"SHA256\")\n sha.update(\"#{@from}#{@to}#{@amount}#{@timestamp}\")\n sha.hexdigest\n end\n end\nend\n```\n\n\n### In Nim:\n\nIf we want to generate a similar hash in Nim, we could run the following:\n\n``` nim\nimport strutils\n\nconst SHA256Len = 32\n\nproc SHA256(d: cstring, n: culong, md: cstring = nil): cstring {.cdecl, dynlib: \"libssl.so\", importc.}\n\nproc SHA256(s: string): string =\n result = \"\"\n let s = SHA256(s.cstring, s.len.culong)\n for i in 0 .. < SHA256Len:\n result.add s[i].BiggestInt.toHex(2).toLower\n\necho SHA256(\"Hash this block, yo\")\n```\n\n\n## Releasing our Crypto App\n\nAnother serious factor we have to consider, is the ability to distribute our crypto app, once built, with great ease. Remembering that both Crystal and Nim are *compiled* languages, we're already off to a promising start. (A single executable binary is always going to be easier to distribute than something requiring its own specialist environment!)\n\nIt pays rather large dividends being able to write our Crypto app just once, and having the ability to maintain one singular code repo for that app. To this end – I think it is definitely worth considering a multi-platform app framework. I already know that in my next article series, I will be exploring building a Crypto app using [React Native](https://facebook.github.io/react-native/).\n\nHowever, if you wish to build the frontend of your cross-platform crypto app in something else, there are a variety of technologies available - all of which seem to work well with both Crystal and Nim:\n\n - [Ionic Framework](http://ionicframework.com/)\n - [Flutter](https://flutter.io/)\n - [NativeScript](https://www.nativescript.org/)\n\nAnd if you come from a Windows background:\n\n - [Xamarin](https://dotnet.microsoft.com/apps/xamarin)\n\n\n### Building & Releasing In Nim:\n\nIf we wanted to build out and release our app for Android, we can run:\n\n```\nnim c -c --cpu:arm --os:android -d:androidNDK --noMain:on\n```\n\nTo generate the C source files we need to include in our Android Studio project. We then simply add the generated C files to our CMake build script in our Android project.\n\nSimilarly, we could run:\n\n```\nnim c -c --os:ios --noMain:on\n```\n\nTo generate C files to include in our XCode project. Then, we can use XCode to compile, link, package and sign everything.\n\n\n### Building & Releasing In Crystal:\n\nCrystal also allows for cross-compilation, and makes it just as easy. For example, to build our app for Linux distributions from our Mac, we can run:\n\n```\ncrystal build your_program.cr --cross-compile --target \"x86_64-unknown-linux-gnu\"\n```\n\n***Worth noting:*** *Crystal doesn't offer the out-of-the-box iPhone / Android cross-compilation functionality that Nim does, so building our app in Nim gets a definite thumbs-up from a distribution point-of-view!*\n\n## Ethereum - Building, Signing & Sending a Transaction\n\nFor the sake of this article, in Crystal, I didn't see the need to write out a more low-level example of the below action, as it *is* so similar to the Nim demo that follows. This actually worked out in my favour, as it means I get to further show off the native HTTP library for Crystal.\n\n### In Crystal:\n\n``` crystal\nrequire \"http/client\"\n\nmodule Ethereum\n class Transaction\n\n # /ethereum/create/ Create - Ethereum::Transaction.create(args)\n def self.create(to : String, from : String, amount : UInt64, gas_price : UInt64? = nil, gas_limit : UInt64? = nil) : EthereumToSign | ErrorMessage\n\n headers = HTTP::Headers.new\n if ENV[\"ONCHAIN_API_KEY\"]? != nil\n headers.add(\"X-API-KEY\", ENV[\"ONCHAIN_API_KEY\"])\n end\n\n response = HTTP::Client.post \"https://onchain.io/api/ethereum/create//?to=#{to}&from=#{from}&amount=#{amount}&gas_price=#{gas_price}&gas_limit=#{gas_limit}\", headers: headers\n\n return ErrorMessage.from_json response.body if response.status_code != 200\n\n ethereumtosign = EthereumToSign.from_json response.body\n\n\n return ethereumtosign\n end\n\n # /ethereum/sign_and_send/ Sign and send - Ethereum::Transaction.sign_and_send(args)\n def self.sign_and_send(to : String, from : String, amount : UInt64, r : String, s : String, v : String, gas_price : UInt64? = nil, gas_limit : UInt64? = nil) : SendStatus | ErrorMessage\n\n headers = HTTP::Headers.new\n if ENV[\"ONCHAIN_API_KEY\"]? != nil\n headers.add(\"X-API-KEY\", ENV[\"ONCHAIN_API_KEY\"])\n end\n\n response = HTTP::Client.post \"https://onchain.io/api/ethereum/sign_and_send//?to=#{to}&from=#{from}&amount=#{amount}&r=#{r}&s=#{s}&v=#{v}&gas_price=#{gas_price}&gas_limit=#{gas_limit}\", headers: headers\n\n return ErrorMessage.from_json response.body if response.status_code != 200\n\n sendstatus = SendStatus.from_json response.body\n\n\n return sendstatus\n end\n\n end\nend\n```\n\nThen, in our application we could simply call:\n\n``` crystal\nEthereum::Transaction.create(\"0xA02378cA1c24767eCD776aAFeC02158a30dc01ac\", \"0xA02378cA1c24767eCD776aAFeC02158a30dc01ac\", 80000)\n```\n\nAnd we would get a response similar to the following, ready to be signed and sent to the Ethereum network:\n\n``` json\n{\n \"tx\": \"02000000011cd5d7621e2a7c9403e54e089cb0b5430b83ed13f1b897d3e319b100ba1b059b01000000db00483045022100d7534c80bc0a42addc3d955f74e31610aa78bf15d79ec4df4c36dc98e802f5200220369cab1bccb2dbca0921444ce3fafb15129fa0494d041998be104df39b8895ec01483045022100fe48c4c1d46e163acaff6b0d2e702812d20\",\n \"hash_to_sign\": \"955f74e31610aa78bf15d79ec4df4c36dc98e802f52002\"\n}\n```\n\n\n## In Nim:\n\nFrom a deeper, more low-level perspective; instead of using an HTTP library as in the Crystal example above, we can use Status' very own Nim-Ethereum library to build our Ethereum transaction. Assuming we have imported `nim-eth` into our Nimble project, our Ethereum transaction can be built atop of the following protocol:\n\n``` nim\nimport\n nim-eth/[common, rlp, keys], nimcrypto\n\nproc initTransaction*(nonce: AccountNonce, gasPrice, gasLimit: GasInt, to: EthAddress,\n value: UInt256, payload: Blob, V: byte, R, S: UInt256, isContractCreation = false): Transaction =\n result.accountNonce = nonce\n result.gasPrice = gasPrice\n result.gasLimit = gasLimit\n result.to = to\n result.value = value\n result.payload = payload\n result.V = V\n result.R = R\n result.S = S\n result.isContractCreation = isContractCreation\n\ntype\n TransHashObj = object\n accountNonce: AccountNonce\n gasPrice: GasInt\n gasLimit: GasInt\n to {.rlpCustomSerialization.}: EthAddress\n value: UInt256\n payload: Blob\n mIsContractCreation {.rlpIgnore.}: bool\n\nproc read(rlp: var Rlp, t: var TransHashObj, _: type EthAddress): EthAddress {.inline.} =\n if rlp.blobLen != 0:\n result = rlp.read(EthAddress)\n else:\n t.mIsContractCreation = true\n\nproc append(rlpWriter: var RlpWriter, t: TransHashObj, a: EthAddress) {.inline.} =\n if t.mIsContractCreation:\n rlpWriter.append(\"\")\n else:\n rlpWriter.append(a)\n\nconst\n EIP155_CHAIN_ID_OFFSET* = 35\n\nfunc rlpEncode*(transaction: Transaction): auto =\n # Encode transaction without signature\n return rlp.encode(TransHashObj(\n accountNonce: transaction.accountNonce,\n gasPrice: transaction.gasPrice,\n gasLimit: transaction.gasLimit,\n to: transaction.to,\n value: transaction.value,\n payload: transaction.payload,\n mIsContractCreation: transaction.isContractCreation\n ))\n\nfunc rlpEncodeEIP155*(tx: Transaction): auto =\n let V = (tx.V.int - EIP155_CHAIN_ID_OFFSET) div 2\n # Encode transaction without signature\n return rlp.encode(Transaction(\n accountNonce: tx.accountNonce,\n gasPrice: tx.gasPrice,\n gasLimit: tx.gasLimit,\n to: tx.to,\n value: tx.value,\n payload: tx.payload,\n isContractCreation: tx.isContractCreation,\n V: V.byte,\n R: 0.u256,\n S: 0.u256\n ))\n\nfunc txHashNoSignature*(tx: Transaction): Hash256 =\n # Hash transaction without signature\n return keccak256.digest(if tx.V.int >= EIP155_CHAIN_ID_OFFSET: tx.rlpEncodeEIP155 else: tx.rlpEncode)\n```\n\n*Note* - I do realise the above Nim code example and the Crystal examples are different - I fully intended them to be. The Crystal example allowed me to further show off the HTTP library I touched on in the last article, and the Nim example allowed me to go to a lower-level; something I think brings the article relevancy full circle.\n\n\n[Status' Eth Common Library](https://github.com/status-im/nim-eth/) contains a whole bunch of useful Nim libraries for interacting with the Ethereum Network, including:\n\n - [Recursive Length Prefix encoding (RLP)](https://github.com/status-im/nim-eth/blob/master/doc/rlp.md),\n - [P2P](https://github.com/status-im/nim-eth/blob/master/doc/p2p.md),\n - [Eth-keys](https://github.com/status-im/nim-eth/blob/master/doc/keys.md),\n - [Eth-keyfile](https://github.com/status-im/nim-eth/blob/master/doc/keyfile.md),\n - [Ethereum Trie structure](https://github.com/status-im/nim-eth/blob/master/doc/trie.md), and\n - [Ethereum Bloom Filter](https://github.com/status-im/nim-eth/blob/master/doc/bloom.md).\n\nIf you are going to be working in the Ethereum ecosystem using Nim, it goes without saying that these utilities are absolutely essential. With Status & the [Nimbus](https://nimbus.team) team being such early adopters and major contributors to the Nim/Crypto universe, you are more than likely to stumble across this code sooner or later!\n\n\n## Conclusion\n\nOur hypothetical Crypto app has taken shape throughout this article, and I think both languages have shown off great promise, and have proven their respective abilities to power the Cryptocurrency universe.\n\nRealistically, if you were a brand-new developer looking to learn a language to break into the Crypto scene, the choice would almost definitely be **Crystal**. This is simply because of the *much* larger ecosystem and resources surrounding it.\n\nHowever, if you were an already-established developer, looking to build out a crypto app that you could develop and multi-platform release with greater ease, you'd inevitably choose **Nim**. Crystal not only lacks the ability to be developed properly on Windows, but also lacks the interoperability and multi-release functionality, as we have seen, with Nim.\n\nAlas, this brings me on to my final points...\n\n\n## Series Conclusion\n\nIt's funny – each article in this series, I've started by saying to myself \"Right, Nim is going to win.\" And then half way through; changing my story to \"Crystal is my choice, actually.\"\n\nBut then I went and spoiled it all, by saying something stupid like \"Cryptocurrency\".\n\nPrior to this article, I *was swaying* towards settling on Crystal. Not only did it impress in performance, but also seemed to have an enthusiastic ecosystem building around it. Nim, however, refused to go down without a fight – offering up *extremely* impressive interoperability, awesome inbuilt tooling, and great efficiency overall.\n\nI hate to do this, but I'm just going to have to say it: for your usecase – **pick the best tool for the job**. Please ensure that you research properly into both languages, and weigh-up the pro's/con's that pertain to your specific usecase.\n\n***Cliches aside*** – if I had to pick a favourite overall language, it would have to be **Crystal**. Frankly, this opinion is formed from my extensive use of Crystal over Nim, the fact I **much** prefer the Crystal syntax, and the fact that I am simply more comfortable coding in Crystal than I am in Nim!\n\nSo, to answer the epic question – Crystal vs Nim?\n\nPersonally, I choose Crystal. But I think **you** should choose ***Nim.*** 😅\n\n[ **- @rbin**](https://twitter.com/rbin)\n","source":"_posts/2019-11-28-nim-vs-crystal-part-3-cryto-dapps-p2p.md","raw":"title: Nim vs Crystal - Part 3 - Crypto, DApps & P2P\nsummary: \"Crystal and Nim go head-to-head to figure out the best modern, low-level programming language! In part 3; Crypto, P2P & DApps are explored.\"\nauthor: robin_percy\ncategories:\n - tutorials\nlayout: blog-post\nimage: '/assets/images/nim-crystal-header-img_NEW.jpg'\n---\n\n\n\nWelcome back to my series comparing the two sweethearts of the modern low-level programming world. Just to quickly recap: in [article #1](/news/2019/11/18/nim-vs-crystal-part-1-performance-interoperability/) I noted my thoughts on the interoperability capabilities of the two languages, alongside briefly reviewing the performance metrics for each (albeit with relatively simple tests). Whether simple or not, the tests ***did*** throw up some unexpected twists in the plot. Crystal used *very-nearly* half of the memory amount executing the tests when compared to Nim, and also took *very nearly* half of the execution time in doing so. **This seriously took me by surprise!**\n\nIn [article #2](/news/2019/11/21/nim-vs-crystal-part-2-threading-tooling/); I looked at the Concurrency primitives of each language, and explored both the in-built tooling, and external package ecosystems surrounding each language. As I said in that article, one of the biggest factors I look at when considering adopting a new language; is its tooling ecosystem. This includes, but is not limited to: A comprehensive package manager, an intuitive testing suite, a good project scaffolder, and an in-built formatter/linter to ensure my code stays semantically correct – especially if I know I will be working in Open Source repos that others will contribute to. But they're just the high-level tools that I look for...\n\nFrom a low-level standpoint; I look for efficient use of technology in features such as in-memory storage, caching, garbage collection, and concurrency primitives that not just *markedly* improve our application performance, but that are also relatively simple, and intuitive to use. I see *this* as particularly important as I have, in my past, seen some truly shocking examples of trying to handle multi-threading, from languages that I love \\*cough* ***Ruby*** \\*cough*. I also like to see a fully-featured standard library that takes influence from previous successful languages. However, I digress...\n\nI regret to say that this is the final article in this series! It's been good fun for me; getting to the know the ins-and-outs of Nim, and to re-grow a fresh appreciation of Crystal, having put it on the back-burner for quite some time. However, whether the final article in the series or not, it's going to be a good one! We're going to be covering the benefits to the Cryptocurrency / DApp industries from both Crystal and Nim. So without further ado:\n\n***Let's dive on in!***\n\n## Cryptocurrency\n\nFirstly, I'd like to talk about the possibility of using either Crystal or Nim, (or both!) in the development of crypto apps. Hypothetically; if we had the inclination to build out our own Cryptocurrency: Crystal and Nim have ***proven to be two of the strongest languages*** to consider for the undertaking.. (That being the *next* blog series I'm going to write – in the near future, so deciding which language to use will be heavily influenced by ***this*** blog series!)\n\nFor our Cryptocurrency, we would need to be able to use an intelligent key manager, utilise smart hashing algorithms, maintain strong performance, and all of this atop of a distributed, decentralised virtual machine or blockchain. Now, all of this sounds like a ***very*** tall order! For all of these feature requirements to be met by a single programming language, it would mean that this language is going to have to be **ONE HELL** of an impressive piece of technology.\n\nHappily, both Crystal *and* Nim allow us ***all*** of the above functionality. In our hypothetical usecase, if we were to build out a fully-featured blockchain; mining *and* hashing functions would need to be continually made, both of which entail relatively heavy computations. As shown over the last 2 articles in the series, we can at least be sure that both langs can handle the performance stresses, no problemo.\n\nAs I'd like to write this topic out into a further detailed article series, I will show off just 2 of the above pieces of functionality we'd require for our Crypto app:\n\n\n### Calculating our Block Hashes\n\nWhen building our Blockchain; we need to consider how we're going to identify and chain our transaction blocks together (blockchain). Without going into details in *this* article on how blockchains function, we'll stick with the existing, and proven, SHA256 algorithm.\n\n\n### In Crystal:\n\n``` crystal\nrequire \"json\"\nrequire \"openssl\"\n\nmodule OurCryptoApp::Model\n struct Transaction\n include JSON::Serializable\n\n alias TxnHash = String\n\n property from : String\n property to : String\n property amount : Float32\n getter hash : TxnHash\n getter timestamp : Int64\n\n def initialize(@from, @to, @amount)\n @timestamp = Time.utc_now.to_unix\n @hash = calc_hash\n end\n\n private def calc_hash : TxnHash\n sha = OpenSSL::Digest.new(\"SHA256\")\n sha.update(\"#{@from}#{@to}#{@amount}#{@timestamp}\")\n sha.hexdigest\n end\n end\nend\n```\n\n\n### In Nim:\n\nIf we want to generate a similar hash in Nim, we could run the following:\n\n``` nim\nimport strutils\n\nconst SHA256Len = 32\n\nproc SHA256(d: cstring, n: culong, md: cstring = nil): cstring {.cdecl, dynlib: \"libssl.so\", importc.}\n\nproc SHA256(s: string): string =\n result = \"\"\n let s = SHA256(s.cstring, s.len.culong)\n for i in 0 .. < SHA256Len:\n result.add s[i].BiggestInt.toHex(2).toLower\n\necho SHA256(\"Hash this block, yo\")\n```\n\n\n## Releasing our Crypto App\n\nAnother serious factor we have to consider, is the ability to distribute our crypto app, once built, with great ease. Remembering that both Crystal and Nim are *compiled* languages, we're already off to a promising start. (A single executable binary is always going to be easier to distribute than something requiring its own specialist environment!)\n\nIt pays rather large dividends being able to write our Crypto app just once, and having the ability to maintain one singular code repo for that app. To this end – I think it is definitely worth considering a multi-platform app framework. I already know that in my next article series, I will be exploring building a Crypto app using [React Native](https://facebook.github.io/react-native/).\n\nHowever, if you wish to build the frontend of your cross-platform crypto app in something else, there are a variety of technologies available - all of which seem to work well with both Crystal and Nim:\n\n - [Ionic Framework](http://ionicframework.com/)\n - [Flutter](https://flutter.io/)\n - [NativeScript](https://www.nativescript.org/)\n\nAnd if you come from a Windows background:\n\n - [Xamarin](https://dotnet.microsoft.com/apps/xamarin)\n\n\n### Building & Releasing In Nim:\n\nIf we wanted to build out and release our app for Android, we can run:\n\n```\nnim c -c --cpu:arm --os:android -d:androidNDK --noMain:on\n```\n\nTo generate the C source files we need to include in our Android Studio project. We then simply add the generated C files to our CMake build script in our Android project.\n\nSimilarly, we could run:\n\n```\nnim c -c --os:ios --noMain:on\n```\n\nTo generate C files to include in our XCode project. Then, we can use XCode to compile, link, package and sign everything.\n\n\n### Building & Releasing In Crystal:\n\nCrystal also allows for cross-compilation, and makes it just as easy. For example, to build our app for Linux distributions from our Mac, we can run:\n\n```\ncrystal build your_program.cr --cross-compile --target \"x86_64-unknown-linux-gnu\"\n```\n\n***Worth noting:*** *Crystal doesn't offer the out-of-the-box iPhone / Android cross-compilation functionality that Nim does, so building our app in Nim gets a definite thumbs-up from a distribution point-of-view!*\n\n## Ethereum - Building, Signing & Sending a Transaction\n\nFor the sake of this article, in Crystal, I didn't see the need to write out a more low-level example of the below action, as it *is* so similar to the Nim demo that follows. This actually worked out in my favour, as it means I get to further show off the native HTTP library for Crystal.\n\n### In Crystal:\n\n``` crystal\nrequire \"http/client\"\n\nmodule Ethereum\n class Transaction\n\n # /ethereum/create/ Create - Ethereum::Transaction.create(args)\n def self.create(to : String, from : String, amount : UInt64, gas_price : UInt64? = nil, gas_limit : UInt64? = nil) : EthereumToSign | ErrorMessage\n\n headers = HTTP::Headers.new\n if ENV[\"ONCHAIN_API_KEY\"]? != nil\n headers.add(\"X-API-KEY\", ENV[\"ONCHAIN_API_KEY\"])\n end\n\n response = HTTP::Client.post \"https://onchain.io/api/ethereum/create//?to=#{to}&from=#{from}&amount=#{amount}&gas_price=#{gas_price}&gas_limit=#{gas_limit}\", headers: headers\n\n return ErrorMessage.from_json response.body if response.status_code != 200\n\n ethereumtosign = EthereumToSign.from_json response.body\n\n\n return ethereumtosign\n end\n\n # /ethereum/sign_and_send/ Sign and send - Ethereum::Transaction.sign_and_send(args)\n def self.sign_and_send(to : String, from : String, amount : UInt64, r : String, s : String, v : String, gas_price : UInt64? = nil, gas_limit : UInt64? = nil) : SendStatus | ErrorMessage\n\n headers = HTTP::Headers.new\n if ENV[\"ONCHAIN_API_KEY\"]? != nil\n headers.add(\"X-API-KEY\", ENV[\"ONCHAIN_API_KEY\"])\n end\n\n response = HTTP::Client.post \"https://onchain.io/api/ethereum/sign_and_send//?to=#{to}&from=#{from}&amount=#{amount}&r=#{r}&s=#{s}&v=#{v}&gas_price=#{gas_price}&gas_limit=#{gas_limit}\", headers: headers\n\n return ErrorMessage.from_json response.body if response.status_code != 200\n\n sendstatus = SendStatus.from_json response.body\n\n\n return sendstatus\n end\n\n end\nend\n```\n\nThen, in our application we could simply call:\n\n``` crystal\nEthereum::Transaction.create(\"0xA02378cA1c24767eCD776aAFeC02158a30dc01ac\", \"0xA02378cA1c24767eCD776aAFeC02158a30dc01ac\", 80000)\n```\n\nAnd we would get a response similar to the following, ready to be signed and sent to the Ethereum network:\n\n``` json\n{\n \"tx\": \"02000000011cd5d7621e2a7c9403e54e089cb0b5430b83ed13f1b897d3e319b100ba1b059b01000000db00483045022100d7534c80bc0a42addc3d955f74e31610aa78bf15d79ec4df4c36dc98e802f5200220369cab1bccb2dbca0921444ce3fafb15129fa0494d041998be104df39b8895ec01483045022100fe48c4c1d46e163acaff6b0d2e702812d20\",\n \"hash_to_sign\": \"955f74e31610aa78bf15d79ec4df4c36dc98e802f52002\"\n}\n```\n\n\n## In Nim:\n\nFrom a deeper, more low-level perspective; instead of using an HTTP library as in the Crystal example above, we can use Status' very own Nim-Ethereum library to build our Ethereum transaction. Assuming we have imported `nim-eth` into our Nimble project, our Ethereum transaction can be built atop of the following protocol:\n\n``` nim\nimport\n nim-eth/[common, rlp, keys], nimcrypto\n\nproc initTransaction*(nonce: AccountNonce, gasPrice, gasLimit: GasInt, to: EthAddress,\n value: UInt256, payload: Blob, V: byte, R, S: UInt256, isContractCreation = false): Transaction =\n result.accountNonce = nonce\n result.gasPrice = gasPrice\n result.gasLimit = gasLimit\n result.to = to\n result.value = value\n result.payload = payload\n result.V = V\n result.R = R\n result.S = S\n result.isContractCreation = isContractCreation\n\ntype\n TransHashObj = object\n accountNonce: AccountNonce\n gasPrice: GasInt\n gasLimit: GasInt\n to {.rlpCustomSerialization.}: EthAddress\n value: UInt256\n payload: Blob\n mIsContractCreation {.rlpIgnore.}: bool\n\nproc read(rlp: var Rlp, t: var TransHashObj, _: type EthAddress): EthAddress {.inline.} =\n if rlp.blobLen != 0:\n result = rlp.read(EthAddress)\n else:\n t.mIsContractCreation = true\n\nproc append(rlpWriter: var RlpWriter, t: TransHashObj, a: EthAddress) {.inline.} =\n if t.mIsContractCreation:\n rlpWriter.append(\"\")\n else:\n rlpWriter.append(a)\n\nconst\n EIP155_CHAIN_ID_OFFSET* = 35\n\nfunc rlpEncode*(transaction: Transaction): auto =\n # Encode transaction without signature\n return rlp.encode(TransHashObj(\n accountNonce: transaction.accountNonce,\n gasPrice: transaction.gasPrice,\n gasLimit: transaction.gasLimit,\n to: transaction.to,\n value: transaction.value,\n payload: transaction.payload,\n mIsContractCreation: transaction.isContractCreation\n ))\n\nfunc rlpEncodeEIP155*(tx: Transaction): auto =\n let V = (tx.V.int - EIP155_CHAIN_ID_OFFSET) div 2\n # Encode transaction without signature\n return rlp.encode(Transaction(\n accountNonce: tx.accountNonce,\n gasPrice: tx.gasPrice,\n gasLimit: tx.gasLimit,\n to: tx.to,\n value: tx.value,\n payload: tx.payload,\n isContractCreation: tx.isContractCreation,\n V: V.byte,\n R: 0.u256,\n S: 0.u256\n ))\n\nfunc txHashNoSignature*(tx: Transaction): Hash256 =\n # Hash transaction without signature\n return keccak256.digest(if tx.V.int >= EIP155_CHAIN_ID_OFFSET: tx.rlpEncodeEIP155 else: tx.rlpEncode)\n```\n\n*Note* - I do realise the above Nim code example and the Crystal examples are different - I fully intended them to be. The Crystal example allowed me to further show off the HTTP library I touched on in the last article, and the Nim example allowed me to go to a lower-level; something I think brings the article relevancy full circle.\n\n\n[Status' Eth Common Library](https://github.com/status-im/nim-eth/) contains a whole bunch of useful Nim libraries for interacting with the Ethereum Network, including:\n\n - [Recursive Length Prefix encoding (RLP)](https://github.com/status-im/nim-eth/blob/master/doc/rlp.md),\n - [P2P](https://github.com/status-im/nim-eth/blob/master/doc/p2p.md),\n - [Eth-keys](https://github.com/status-im/nim-eth/blob/master/doc/keys.md),\n - [Eth-keyfile](https://github.com/status-im/nim-eth/blob/master/doc/keyfile.md),\n - [Ethereum Trie structure](https://github.com/status-im/nim-eth/blob/master/doc/trie.md), and\n - [Ethereum Bloom Filter](https://github.com/status-im/nim-eth/blob/master/doc/bloom.md).\n\nIf you are going to be working in the Ethereum ecosystem using Nim, it goes without saying that these utilities are absolutely essential. With Status & the [Nimbus](https://nimbus.team) team being such early adopters and major contributors to the Nim/Crypto universe, you are more than likely to stumble across this code sooner or later!\n\n\n## Conclusion\n\nOur hypothetical Crypto app has taken shape throughout this article, and I think both languages have shown off great promise, and have proven their respective abilities to power the Cryptocurrency universe.\n\nRealistically, if you were a brand-new developer looking to learn a language to break into the Crypto scene, the choice would almost definitely be **Crystal**. This is simply because of the *much* larger ecosystem and resources surrounding it.\n\nHowever, if you were an already-established developer, looking to build out a crypto app that you could develop and multi-platform release with greater ease, you'd inevitably choose **Nim**. Crystal not only lacks the ability to be developed properly on Windows, but also lacks the interoperability and multi-release functionality, as we have seen, with Nim.\n\nAlas, this brings me on to my final points...\n\n\n## Series Conclusion\n\nIt's funny – each article in this series, I've started by saying to myself \"Right, Nim is going to win.\" And then half way through; changing my story to \"Crystal is my choice, actually.\"\n\nBut then I went and spoiled it all, by saying something stupid like \"Cryptocurrency\".\n\nPrior to this article, I *was swaying* towards settling on Crystal. Not only did it impress in performance, but also seemed to have an enthusiastic ecosystem building around it. Nim, however, refused to go down without a fight – offering up *extremely* impressive interoperability, awesome inbuilt tooling, and great efficiency overall.\n\nI hate to do this, but I'm just going to have to say it: for your usecase – **pick the best tool for the job**. Please ensure that you research properly into both languages, and weigh-up the pro's/con's that pertain to your specific usecase.\n\n***Cliches aside*** – if I had to pick a favourite overall language, it would have to be **Crystal**. Frankly, this opinion is formed from my extensive use of Crystal over Nim, the fact I **much** prefer the Crystal syntax, and the fact that I am simply more comfortable coding in Crystal than I am in Nim!\n\nSo, to answer the epic question – Crystal vs Nim?\n\nPersonally, I choose Crystal. But I think **you** should choose ***Nim.*** 😅\n\n[ **- @rbin**](https://twitter.com/rbin)\n","slug":"nim-vs-crystal-part-3-cryto-dapps-p2p","published":1,"date":"2019-11-28T05:00:00.000Z","updated":"2020-03-09T18:08:46.760Z","_id":"ck6axlfd3002zxeeg6tmh86by","comments":1,"photos":[],"link":"","content":"<p><img src=\"/assets/images/nim-crystal-header-img_NEW.jpg\" alt=\"crystal vs nim\"></p>\n<p>Welcome back to my series comparing the two sweethearts of the modern low-level programming world. Just to quickly recap: in <a href=\"/news/2019/11/18/nim-vs-crystal-part-1-performance-interoperability/\">article #1</a> I noted my thoughts on the interoperability capabilities of the two languages, alongside briefly reviewing the performance metrics for each (albeit with relatively simple tests). Whether simple or not, the tests <strong><em>did</em></strong> throw up some unexpected twists in the plot. Crystal used <em>very-nearly</em> half of the memory amount executing the tests when compared to Nim, and also took <em>very nearly</em> half of the execution time in doing so. <strong>This seriously took me by surprise!</strong></p>\n<p>In <a href=\"/news/2019/11/21/nim-vs-crystal-part-2-threading-tooling/\">article #2</a>; I looked at the Concurrency primitives of each language, and explored both the in-built tooling, and external package ecosystems surrounding each language. As I said in that article, one of the biggest factors I look at when considering adopting a new language; is its tooling ecosystem. This includes, but is not limited to: A comprehensive package manager, an intuitive testing suite, a good project scaffolder, and an in-built formatter/linter to ensure my code stays semantically correct – especially if I know I will be working in Open Source repos that others will contribute to. But they’re just the high-level tools that I look for…</p>\n<p>From a low-level standpoint; I look for efficient use of technology in features such as in-memory storage, caching, garbage collection, and concurrency primitives that not just <em>markedly</em> improve our application performance, but that are also relatively simple, and intuitive to use. I see <em>this</em> as particularly important as I have, in my past, seen some truly shocking examples of trying to handle multi-threading, from languages that I love *cough* <strong><em>Ruby</em></strong> *cough*. I also like to see a fully-featured standard library that takes influence from previous successful languages. However, I digress…</p>\n<p>I regret to say that this is the final article in this series! It’s been good fun for me; getting to the know the ins-and-outs of Nim, and to re-grow a fresh appreciation of Crystal, having put it on the back-burner for quite some time. However, whether the final article in the series or not, it’s going to be a good one! We’re going to be covering the benefits to the Cryptocurrency / DApp industries from both Crystal and Nim. So without further ado:</p>\n<p><strong><em>Let’s dive on in!</em></strong></p>\n<h2 id=\"Cryptocurrency\"><a href=\"#Cryptocurrency\" class=\"headerlink\" title=\"Cryptocurrency\"></a>Cryptocurrency</h2><p>Firstly, I’d like to talk about the possibility of using either Crystal or Nim, (or both!) in the development of crypto apps. Hypothetically; if we had the inclination to build out our own Cryptocurrency: Crystal and Nim have <strong><em>proven to be two of the strongest languages</em></strong> to consider for the undertaking.. (That being the <em>next</em> blog series I’m going to write – in the near future, so deciding which language to use will be heavily influenced by <strong><em>this</em></strong> blog series!)</p>\n<p>For our Cryptocurrency, we would need to be able to use an intelligent key manager, utilise smart hashing algorithms, maintain strong performance, and all of this atop of a distributed, decentralised virtual machine or blockchain. Now, all of this sounds like a <strong><em>very</em></strong> tall order! For all of these feature requirements to be met by a single programming language, it would mean that this language is going to have to be <strong>ONE HELL</strong> of an impressive piece of technology.</p>\n<p>Happily, both Crystal <em>and</em> Nim allow us <strong><em>all</em></strong> of the above functionality. In our hypothetical usecase, if we were to build out a fully-featured blockchain; mining <em>and</em> hashing functions would need to be continually made, both of which entail relatively heavy computations. As shown over the last 2 articles in the series, we can at least be sure that both langs can handle the performance stresses, no problemo.</p>\n<p>As I’d like to write this topic out into a further detailed article series, I will show off just 2 of the above pieces of functionality we’d require for our Crypto app:</p>\n<h3 id=\"Calculating-our-Block-Hashes\"><a href=\"#Calculating-our-Block-Hashes\" class=\"headerlink\" title=\"Calculating our Block Hashes\"></a>Calculating our Block Hashes</h3><p>When building our Blockchain; we need to consider how we’re going to identify and chain our transaction blocks together (blockchain). Without going into details in <em>this</em> article on how blockchains function, we’ll stick with the existing, and proven, SHA256 algorithm.</p>\n<h3 id=\"In-Crystal\"><a href=\"#In-Crystal\" class=\"headerlink\" title=\"In Crystal:\"></a>In Crystal:</h3><figure class=\"highlight crystal\"><table><tr><td class=\"code\"><pre><span class=\"line\"><span class=\"keyword\">require</span> <span class=\"string\">\"json\"</span></span><br><span class=\"line\"><span class=\"keyword\">require</span> <span class=\"string\">\"openssl\"</span></span><br><span class=\"line\"></span><br><span class=\"line\"><span class=\"class\"><span class=\"keyword\">module</span> <span class=\"title\">OurCryptoApp::Model</span></span></span><br><span class=\"line\"> <span class=\"class\"><span class=\"keyword\">struct</span> <span class=\"title\">Transaction</span></span></span><br><span class=\"line\"> <span class=\"keyword\">include</span> <span class=\"symbol\">JSON:</span>:Serializable</span><br><span class=\"line\"></span><br><span class=\"line\"> <span class=\"keyword\">alias</span> TxnHash = String</span><br><span class=\"line\"></span><br><span class=\"line\"> property from : String</span><br><span class=\"line\"> property to : String</span><br><span class=\"line\"> property amount : Float32</span><br><span class=\"line\"> getter hash : TxnHash</span><br><span class=\"line\"> getter timestamp : Int64</span><br><span class=\"line\"></span><br><span class=\"line\"> <span class=\"function\"><span class=\"keyword\">def</span> <span class=\"title\">initialize</span></span>(@from, @to, @amount)</span><br><span class=\"line\"> @timestamp = Time.utc_now.to_unix</span><br><span class=\"line\"> @hash = calc_hash</span><br><span class=\"line\"> <span class=\"keyword\">end</span></span><br><span class=\"line\"></span><br><span class=\"line\"> <span class=\"keyword\">private</span> <span class=\"function\"><span class=\"keyword\">def</span> <span class=\"title\">calc_hash</span></span> : TxnHash</span><br><span class=\"line\"> sha = <span class=\"symbol\">OpenSSL:</span>:Digest.new(<span class=\"string\">\"SHA256\"</span>)</span><br><span class=\"line\"> sha.update(<span class=\"string\">\"<span class=\"subst\">#{@from}</span><span class=\"subst\">#{@to}</span><span class=\"subst\">#{@amount}</span><span class=\"subst\">#{@timestamp}</span>\"</span>)</span><br><span class=\"line\"> sha.hexdigest</span><br><span class=\"line\"> <span class=\"keyword\">end</span></span><br><span class=\"line\"> <span class=\"keyword\">end</span></span><br><span class=\"line\"><span class=\"keyword\">end</span></span><br></pre></td></tr></table></figure>\n\n\n<h3 id=\"In-Nim\"><a href=\"#In-Nim\" class=\"headerlink\" title=\"In Nim:\"></a>In Nim:</h3><p>If we want to generate a similar hash in Nim, we could run the following:</p>\n<figure class=\"highlight nim\"><table><tr><td class=\"code\"><pre><span class=\"line\"><span class=\"keyword\">import</span> strutils</span><br><span class=\"line\"></span><br><span class=\"line\"><span class=\"keyword\">const</span> <span class=\"type\">SHA256Len</span> = <span class=\"number\">32</span></span><br><span class=\"line\"></span><br><span class=\"line\"><span class=\"keyword\">proc</span> <span class=\"type\">SHA256</span>(d: <span class=\"built_in\">cstring</span>, n: <span class=\"built_in\">culong</span>, md: <span class=\"built_in\">cstring</span> = <span class=\"keyword\">nil</span>): <span class=\"built_in\">cstring</span> <span class=\"meta\">{.cdecl, dynlib: \"libssl.so\", importc.}</span></span><br><span class=\"line\"></span><br><span class=\"line\"><span class=\"keyword\">proc</span> <span class=\"type\">SHA256</span>(s: <span class=\"built_in\">string</span>): <span class=\"built_in\">string</span> =</span><br><span class=\"line\"> <span class=\"literal\">result</span> = <span class=\"string\">\"\"</span></span><br><span class=\"line\"> <span class=\"keyword\">let</span> s = <span class=\"type\">SHA256</span>(s.<span class=\"built_in\">cstring</span>, s.len.<span class=\"built_in\">culong</span>)</span><br><span class=\"line\"> <span class=\"keyword\">for</span> i <span class=\"keyword\">in</span> <span class=\"number\">0</span> .. < <span class=\"type\">SHA256Len</span>:</span><br><span class=\"line\"> <span class=\"literal\">result</span>.add s[i].<span class=\"type\">BiggestInt</span>.toHex(<span class=\"number\">2</span>).toLower</span><br><span class=\"line\"></span><br><span class=\"line\">echo <span class=\"type\">SHA256</span>(<span class=\"string\">\"Hash this block, yo\"</span>)</span><br></pre></td></tr></table></figure>\n\n\n<h2 id=\"Releasing-our-Crypto-App\"><a href=\"#Releasing-our-Crypto-App\" class=\"headerlink\" title=\"Releasing our Crypto App\"></a>Releasing our Crypto App</h2><p>Another serious factor we have to consider, is the ability to distribute our crypto app, once built, with great ease. Remembering that both Crystal and Nim are <em>compiled</em> languages, we’re already off to a promising start. (A single executable binary is always going to be easier to distribute than something requiring its own specialist environment!)</p>\n<p>It pays rather large dividends being able to write our Crypto app just once, and having the ability to maintain one singular code repo for that app. To this end – I think it is definitely worth considering a multi-platform app framework. I already know that in my next article series, I will be exploring building a Crypto app using <a href=\"https://facebook.github.io/react-native/\">React Native</a>.</p>\n<p>However, if you wish to build the frontend of your cross-platform crypto app in something else, there are a variety of technologies available - all of which seem to work well with both Crystal and Nim:</p>\n<ul>\n<li><a href=\"http://ionicframework.com/\">Ionic Framework</a></li>\n<li><a href=\"https://flutter.io/\">Flutter</a></li>\n<li><a href=\"https://www.nativescript.org/\">NativeScript</a></li>\n</ul>\n<p>And if you come from a Windows background:</p>\n<ul>\n<li><a href=\"https://dotnet.microsoft.com/apps/xamarin\">Xamarin</a></li>\n</ul>\n<h3 id=\"Building-amp-Releasing-In-Nim\"><a href=\"#Building-amp-Releasing-In-Nim\" class=\"headerlink\" title=\"Building & Releasing In Nim:\"></a>Building & Releasing In Nim:</h3><p>If we wanted to build out and release our app for Android, we can run:</p>\n<figure class=\"highlight plain\"><table><tr><td class=\"code\"><pre><span class=\"line\">nim c -c --cpu:arm --os:android -d:androidNDK --noMain:on</span><br></pre></td></tr></table></figure>\n\n<p>To generate the C source files we need to include in our Android Studio project. We then simply add the generated C files to our CMake build script in our Android project.</p>\n<p>Similarly, we could run:</p>\n<figure class=\"highlight plain\"><table><tr><td class=\"code\"><pre><span class=\"line\">nim c -c --os:ios --noMain:on</span><br></pre></td></tr></table></figure>\n\n<p>To generate C files to include in our XCode project. Then, we can use XCode to compile, link, package and sign everything.</p>\n<h3 id=\"Building-amp-Releasing-In-Crystal\"><a href=\"#Building-amp-Releasing-In-Crystal\" class=\"headerlink\" title=\"Building & Releasing In Crystal:\"></a>Building & Releasing In Crystal:</h3><p>Crystal also allows for cross-compilation, and makes it just as easy. For example, to build our app for Linux distributions from our Mac, we can run:</p>\n<figure class=\"highlight plain\"><table><tr><td class=\"code\"><pre><span class=\"line\">crystal build your_program.cr --cross-compile --target "x86_64-unknown-linux-gnu"</span><br></pre></td></tr></table></figure>\n\n<p><strong><em>Worth noting:</em></strong> <em>Crystal doesn’t offer the out-of-the-box iPhone / Android cross-compilation functionality that Nim does, so building our app in Nim gets a definite thumbs-up from a distribution point-of-view!</em></p>\n<h2 id=\"Ethereum-Building-Signing-amp-Sending-a-Transaction\"><a href=\"#Ethereum-Building-Signing-amp-Sending-a-Transaction\" class=\"headerlink\" title=\"Ethereum - Building, Signing & Sending a Transaction\"></a>Ethereum - Building, Signing & Sending a Transaction</h2><p>For the sake of this article, in Crystal, I didn’t see the need to write out a more low-level example of the below action, as it <em>is</em> so similar to the Nim demo that follows. This actually worked out in my favour, as it means I get to further show off the native HTTP library for Crystal.</p>\n<h3 id=\"In-Crystal-1\"><a href=\"#In-Crystal-1\" class=\"headerlink\" title=\"In Crystal:\"></a>In Crystal:</h3><figure class=\"highlight crystal\"><table><tr><td class=\"code\"><pre><span class=\"line\"><span class=\"keyword\">require</span> <span class=\"string\">\"http/client\"</span></span><br><span class=\"line\"></span><br><span class=\"line\"><span class=\"class\"><span class=\"keyword\">module</span> <span class=\"title\">Ethereum</span></span></span><br><span class=\"line\"> <span class=\"class\"><span class=\"keyword\">class</span> <span class=\"title\">Transaction</span></span></span><br><span class=\"line\"></span><br><span class=\"line\"> <span class=\"comment\"># /ethereum/create/ Create - Ethereum::Transaction.create(args)</span></span><br><span class=\"line\"> <span class=\"function\"><span class=\"keyword\">def</span> <span class=\"title\">self</span></span>.create(to : String, from : String, amount : UInt64, gas_price : UInt64? = <span class=\"literal\">nil</span>, gas_limit : UInt64? = <span class=\"literal\">nil</span>) : EthereumToSign | ErrorMessage</span><br><span class=\"line\"></span><br><span class=\"line\"> headers = <span class=\"symbol\">HTTP:</span>:Headers.new</span><br><span class=\"line\"> <span class=\"keyword\">if</span> ENV[<span class=\"string\">\"ONCHAIN_API_KEY\"</span>]? != <span class=\"literal\">nil</span></span><br><span class=\"line\"> headers.add(<span class=\"string\">\"X-API-KEY\"</span>, ENV[<span class=\"string\">\"ONCHAIN_API_KEY\"</span>])</span><br><span class=\"line\"> <span class=\"keyword\">end</span></span><br><span class=\"line\"></span><br><span class=\"line\"> response = <span class=\"symbol\">HTTP:</span>:Client.post <span class=\"string\">\"https://onchain.io/api/ethereum/create//?to=<span class=\"subst\">#{to}</span>&from=<span class=\"subst\">#{from}</span>&amount=<span class=\"subst\">#{amount}</span>&gas_price=<span class=\"subst\">#{gas_price}</span>&gas_limit=<span class=\"subst\">#{gas_limit}</span>\"</span>, <span class=\"symbol\">headers:</span> headers</span><br><span class=\"line\"></span><br><span class=\"line\"> <span class=\"keyword\">return</span> ErrorMessage.from_json response.body <span class=\"keyword\">if</span> response.status_code != <span class=\"number\">200</span></span><br><span class=\"line\"></span><br><span class=\"line\"> ethereumtosign = EthereumToSign.from_json response.body</span><br><span class=\"line\"></span><br><span class=\"line\"></span><br><span class=\"line\"> <span class=\"keyword\">return</span> ethereumtosign</span><br><span class=\"line\"> <span class=\"keyword\">end</span></span><br><span class=\"line\"></span><br><span class=\"line\"> <span class=\"comment\"># /ethereum/sign_and_send/ Sign and send - Ethereum::Transaction.sign_and_send(args)</span></span><br><span class=\"line\"> <span class=\"function\"><span class=\"keyword\">def</span> <span class=\"title\">self</span></span>.sign_and_send(to : String, from : String, amount : UInt64, r : String, s : String, v : String, gas_price : UInt64? = <span class=\"literal\">nil</span>, gas_limit : UInt64? = <span class=\"literal\">nil</span>) : SendStatus | ErrorMessage</span><br><span class=\"line\"></span><br><span class=\"line\"> headers = <span class=\"symbol\">HTTP:</span>:Headers.new</span><br><span class=\"line\"> <span class=\"keyword\">if</span> ENV[<span class=\"string\">\"ONCHAIN_API_KEY\"</span>]? != <span class=\"literal\">nil</span></span><br><span class=\"line\"> headers.add(<span class=\"string\">\"X-API-KEY\"</span>, ENV[<span class=\"string\">\"ONCHAIN_API_KEY\"</span>])</span><br><span class=\"line\"> <span class=\"keyword\">end</span></span><br><span class=\"line\"></span><br><span class=\"line\"> response = <span class=\"symbol\">HTTP:</span>:Client.post <span class=\"string\">\"https://onchain.io/api/ethereum/sign_and_send//?to=<span class=\"subst\">#{to}</span>&from=<span class=\"subst\">#{from}</span>&amount=<span class=\"subst\">#{amount}</span>&r=<span class=\"subst\">#{r}</span>&s=<span class=\"subst\">#{s}</span>&v=<span class=\"subst\">#{v}</span>&gas_price=<span class=\"subst\">#{gas_price}</span>&gas_limit=<span class=\"subst\">#{gas_limit}</span>\"</span>, <span class=\"symbol\">headers:</span> headers</span><br><span class=\"line\"></span><br><span class=\"line\"> <span class=\"keyword\">return</span> ErrorMessage.from_json response.body <span class=\"keyword\">if</span> response.status_code != <span class=\"number\">200</span></span><br><span class=\"line\"></span><br><span class=\"line\"> sendstatus = SendStatus.from_json response.body</span><br><span class=\"line\"></span><br><span class=\"line\"></span><br><span class=\"line\"> <span class=\"keyword\">return</span> sendstatus</span><br><span class=\"line\"> <span class=\"keyword\">end</span></span><br><span class=\"line\"></span><br><span class=\"line\"> <span class=\"keyword\">end</span></span><br><span class=\"line\"><span class=\"keyword\">end</span></span><br></pre></td></tr></table></figure>\n\n<p>Then, in our application we could simply call:</p>\n<figure class=\"highlight crystal\"><table><tr><td class=\"code\"><pre><span class=\"line\"><span class=\"symbol\">Ethereum:</span>:Transaction.create(<span class=\"string\">\"0xA02378cA1c24767eCD776aAFeC02158a30dc01ac\"</span>, <span class=\"string\">\"0xA02378cA1c24767eCD776aAFeC02158a30dc01ac\"</span>, <span class=\"number\">80000</span>)</span><br></pre></td></tr></table></figure>\n\n<p>And we would get a response similar to the following, ready to be signed and sent to the Ethereum network:</p>\n<figure class=\"highlight json\"><table><tr><td class=\"code\"><pre><span class=\"line\">{</span><br><span class=\"line\"> <span class=\"attr\">\"tx\"</span>: <span class=\"string\">\"02000000011cd5d7621e2a7c9403e54e089cb0b5430b83ed13f1b897d3e319b100ba1b059b01000000db00483045022100d7534c80bc0a42addc3d955f74e31610aa78bf15d79ec4df4c36dc98e802f5200220369cab1bccb2dbca0921444ce3fafb15129fa0494d041998be104df39b8895ec01483045022100fe48c4c1d46e163acaff6b0d2e702812d20\"</span>,</span><br><span class=\"line\"> <span class=\"attr\">\"hash_to_sign\"</span>: <span class=\"string\">\"955f74e31610aa78bf15d79ec4df4c36dc98e802f52002\"</span></span><br><span class=\"line\">}</span><br></pre></td></tr></table></figure>\n\n\n<h2 id=\"In-Nim-1\"><a href=\"#In-Nim-1\" class=\"headerlink\" title=\"In Nim:\"></a>In Nim:</h2><p>From a deeper, more low-level perspective; instead of using an HTTP library as in the Crystal example above, we can use Status’ very own Nim-Ethereum library to build our Ethereum transaction. Assuming we have imported <code>nim-eth</code> into our Nimble project, our Ethereum transaction can be built atop of the following protocol:</p>\n<figure class=\"highlight nim\"><table><tr><td class=\"code\"><pre><span class=\"line\"><span class=\"keyword\">import</span></span><br><span class=\"line\"> nim-eth/[common, rlp, keys], nimcrypto</span><br><span class=\"line\"></span><br><span class=\"line\"><span class=\"keyword\">proc</span> initTransaction*(nonce: <span class=\"type\">AccountNonce</span>, gasPrice, gasLimit: <span class=\"type\">GasInt</span>, to: <span class=\"type\">EthAddress</span>,</span><br><span class=\"line\"> value: <span class=\"type\">UInt256</span>, payload: <span class=\"type\">Blob</span>, V: byte, R, S: <span class=\"type\">UInt256</span>, isContractCreation = <span class=\"literal\">false</span>): <span class=\"type\">Transaction</span> =</span><br><span class=\"line\"> <span class=\"literal\">result</span>.accountNonce = nonce</span><br><span class=\"line\"> <span class=\"literal\">result</span>.gasPrice = gasPrice</span><br><span class=\"line\"> <span class=\"literal\">result</span>.gasLimit = gasLimit</span><br><span class=\"line\"> <span class=\"literal\">result</span>.to = to</span><br><span class=\"line\"> <span class=\"literal\">result</span>.value = value</span><br><span class=\"line\"> <span class=\"literal\">result</span>.payload = payload</span><br><span class=\"line\"> <span class=\"literal\">result</span>.V = V</span><br><span class=\"line\"> <span class=\"literal\">result</span>.R = R</span><br><span class=\"line\"> <span class=\"literal\">result</span>.S = S</span><br><span class=\"line\"> <span class=\"literal\">result</span>.isContractCreation = isContractCreation</span><br><span class=\"line\"></span><br><span class=\"line\"><span class=\"keyword\">type</span></span><br><span class=\"line\"> <span class=\"type\">TransHashObj</span> = <span class=\"keyword\">object</span></span><br><span class=\"line\"> accountNonce: <span class=\"type\">AccountNonce</span></span><br><span class=\"line\"> gasPrice: <span class=\"type\">GasInt</span></span><br><span class=\"line\"> gasLimit: <span class=\"type\">GasInt</span></span><br><span class=\"line\"> to <span class=\"meta\">{.rlpCustomSerialization.}</span>: <span class=\"type\">EthAddress</span></span><br><span class=\"line\"> value: <span class=\"type\">UInt256</span></span><br><span class=\"line\"> payload: <span class=\"type\">Blob</span></span><br><span class=\"line\"> mIsContractCreation <span class=\"meta\">{.rlpIgnore.}</span>: <span class=\"built_in\">bool</span></span><br><span class=\"line\"></span><br><span class=\"line\"><span class=\"keyword\">proc</span> read(rlp: <span class=\"keyword\">var</span> <span class=\"type\">Rlp</span>, t: <span class=\"keyword\">var</span> <span class=\"type\">TransHashObj</span>, _: <span class=\"keyword\">type</span> <span class=\"type\">EthAddress</span>): <span class=\"type\">EthAddress</span> <span class=\"meta\">{.inline.}</span> =</span><br><span class=\"line\"> <span class=\"keyword\">if</span> rlp.blobLen != <span class=\"number\">0</span>:</span><br><span class=\"line\"> <span class=\"literal\">result</span> = rlp.read(<span class=\"type\">EthAddress</span>)</span><br><span class=\"line\"> <span class=\"keyword\">else</span>:</span><br><span class=\"line\"> t.mIsContractCreation = <span class=\"literal\">true</span></span><br><span class=\"line\"></span><br><span class=\"line\"><span class=\"keyword\">proc</span> append(rlpWriter: <span class=\"keyword\">var</span> <span class=\"type\">RlpWriter</span>, t: <span class=\"type\">TransHashObj</span>, a: <span class=\"type\">EthAddress</span>) <span class=\"meta\">{.inline.}</span> =</span><br><span class=\"line\"> <span class=\"keyword\">if</span> t.mIsContractCreation:</span><br><span class=\"line\"> rlpWriter.append(<span class=\"string\">\"\"</span>)</span><br><span class=\"line\"> <span class=\"keyword\">else</span>:</span><br><span class=\"line\"> rlpWriter.append(a)</span><br><span class=\"line\"></span><br><span class=\"line\"><span class=\"keyword\">const</span></span><br><span class=\"line\"> <span class=\"type\">EIP155_CHAIN_ID_OFFSET</span>* = <span class=\"number\">35</span></span><br><span class=\"line\"></span><br><span class=\"line\">func rlpEncode*(transaction: <span class=\"type\">Transaction</span>): <span class=\"built_in\">auto</span> =</span><br><span class=\"line\"> <span class=\"comment\"># Encode transaction without signature</span></span><br><span class=\"line\"> <span class=\"keyword\">return</span> rlp.encode(<span class=\"type\">TransHashObj</span>(</span><br><span class=\"line\"> accountNonce: transaction.accountNonce,</span><br><span class=\"line\"> gasPrice: transaction.gasPrice,</span><br><span class=\"line\"> gasLimit: transaction.gasLimit,</span><br><span class=\"line\"> to: transaction.to,</span><br><span class=\"line\"> value: transaction.value,</span><br><span class=\"line\"> payload: transaction.payload,</span><br><span class=\"line\"> mIsContractCreation: transaction.isContractCreation</span><br><span class=\"line\"> ))</span><br><span class=\"line\"></span><br><span class=\"line\">func rlpEncodeEIP155*(tx: <span class=\"type\">Transaction</span>): <span class=\"built_in\">auto</span> =</span><br><span class=\"line\"> <span class=\"keyword\">let</span> V = (tx.V.<span class=\"built_in\">int</span> - <span class=\"type\">EIP155_CHAIN_ID_OFFSET</span>) <span class=\"keyword\">div</span> <span class=\"number\">2</span></span><br><span class=\"line\"> <span class=\"comment\"># Encode transaction without signature</span></span><br><span class=\"line\"> <span class=\"keyword\">return</span> rlp.encode(<span class=\"type\">Transaction</span>(</span><br><span class=\"line\"> accountNonce: tx.accountNonce,</span><br><span class=\"line\"> gasPrice: tx.gasPrice,</span><br><span class=\"line\"> gasLimit: tx.gasLimit,</span><br><span class=\"line\"> to: tx.to,</span><br><span class=\"line\"> value: tx.value,</span><br><span class=\"line\"> payload: tx.payload,</span><br><span class=\"line\"> isContractCreation: tx.isContractCreation,</span><br><span class=\"line\"> V: V.byte,</span><br><span class=\"line\"> R: <span class=\"number\">0</span>.u256,</span><br><span class=\"line\"> S: <span class=\"number\">0</span>.u256</span><br><span class=\"line\"> ))</span><br><span class=\"line\"></span><br><span class=\"line\">func txHashNoSignature*(tx: <span class=\"type\">Transaction</span>): <span class=\"type\">Hash256</span> =</span><br><span class=\"line\"> <span class=\"comment\"># Hash transaction without signature</span></span><br><span class=\"line\"> <span class=\"keyword\">return</span> keccak256.digest(<span class=\"keyword\">if</span> tx.V.<span class=\"built_in\">int</span> >= <span class=\"type\">EIP155_CHAIN_ID_OFFSET</span>: tx.rlpEncodeEIP155 <span class=\"keyword\">else</span>: tx.rlpEncode)</span><br></pre></td></tr></table></figure>\n\n<p><em>Note</em> - I do realise the above Nim code example and the Crystal examples are different - I fully intended them to be. The Crystal example allowed me to further show off the HTTP library I touched on in the last article, and the Nim example allowed me to go to a lower-level; something I think brings the article relevancy full circle.</p>\n<p><a href=\"https://github.com/status-im/nim-eth/\">Status’ Eth Common Library</a> contains a whole bunch of useful Nim libraries for interacting with the Ethereum Network, including:</p>\n<ul>\n<li><a href=\"https://github.com/status-im/nim-eth/blob/master/doc/rlp.md\">Recursive Length Prefix encoding (RLP)</a>,</li>\n<li><a href=\"https://github.com/status-im/nim-eth/blob/master/doc/p2p.md\">P2P</a>,</li>\n<li><a href=\"https://github.com/status-im/nim-eth/blob/master/doc/keys.md\">Eth-keys</a>,</li>\n<li><a href=\"https://github.com/status-im/nim-eth/blob/master/doc/keyfile.md\">Eth-keyfile</a>,</li>\n<li><a href=\"https://github.com/status-im/nim-eth/blob/master/doc/trie.md\">Ethereum Trie structure</a>, and</li>\n<li><a href=\"https://github.com/status-im/nim-eth/blob/master/doc/bloom.md\">Ethereum Bloom Filter</a>.</li>\n</ul>\n<p>If you are going to be working in the Ethereum ecosystem using Nim, it goes without saying that these utilities are absolutely essential. With Status & the <a href=\"https://nimbus.team\">Nimbus</a> team being such early adopters and major contributors to the Nim/Crypto universe, you are more than likely to stumble across this code sooner or later!</p>\n<h2 id=\"Conclusion\"><a href=\"#Conclusion\" class=\"headerlink\" title=\"Conclusion\"></a>Conclusion</h2><p>Our hypothetical Crypto app has taken shape throughout this article, and I think both languages have shown off great promise, and have proven their respective abilities to power the Cryptocurrency universe.</p>\n<p>Realistically, if you were a brand-new developer looking to learn a language to break into the Crypto scene, the choice would almost definitely be <strong>Crystal</strong>. This is simply because of the <em>much</em> larger ecosystem and resources surrounding it.</p>\n<p>However, if you were an already-established developer, looking to build out a crypto app that you could develop and multi-platform release with greater ease, you’d inevitably choose <strong>Nim</strong>. Crystal not only lacks the ability to be developed properly on Windows, but also lacks the interoperability and multi-release functionality, as we have seen, with Nim.</p>\n<p>Alas, this brings me on to my final points…</p>\n<h2 id=\"Series-Conclusion\"><a href=\"#Series-Conclusion\" class=\"headerlink\" title=\"Series Conclusion\"></a>Series Conclusion</h2><p>It’s funny – each article in this series, I’ve started by saying to myself “Right, Nim is going to win.” And then half way through; changing my story to “Crystal is my choice, actually.”</p>\n<p>But then I went and spoiled it all, by saying something stupid like “Cryptocurrency”.</p>\n<p>Prior to this article, I <em>was swaying</em> towards settling on Crystal. Not only did it impress in performance, but also seemed to have an enthusiastic ecosystem building around it. Nim, however, refused to go down without a fight – offering up <em>extremely</em> impressive interoperability, awesome inbuilt tooling, and great efficiency overall.</p>\n<p>I hate to do this, but I’m just going to have to say it: for your usecase – <strong>pick the best tool for the job</strong>. Please ensure that you research properly into both languages, and weigh-up the pro’s/con’s that pertain to your specific usecase.</p>\n<p><strong><em>Cliches aside</em></strong> – if I had to pick a favourite overall language, it would have to be <strong>Crystal</strong>. Frankly, this opinion is formed from my extensive use of Crystal over Nim, the fact I <strong>much</strong> prefer the Crystal syntax, and the fact that I am simply more comfortable coding in Crystal than I am in Nim!</p>\n<p>So, to answer the epic question – Crystal vs Nim?</p>\n<p>Personally, I choose Crystal. But I think <strong>you</strong> should choose <strong><em>Nim.</em></strong> 😅</p>\n<p><a href=\"https://twitter.com/rbin\"> <strong>- @rbin</strong></a></p>\n","site":{"data":{"authors":{"iuri_matias":{"name":"Iuri Matias","twitter":"iurimatias","image":"https://pbs.twimg.com/profile_images/928272512181563392/iDJdvy2k_400x400.jpg"},"pascal_precht":{"name":"Pascal Precht","twitter":"pascalprecht","image":"https://pbs.twimg.com/profile_images/993785060733194241/p3oAIMDP_400x400.jpg"},"anthony_laibe":{"name":"Anthony Laibe","twitter":"a_laibe","image":"https://pbs.twimg.com/profile_images/257742900/13168239_400x400.jpg"},"jonathan_rainville":{"name":"Jonathan Rainville","twitter":"ShyolGhul","image":"https://pbs.twimg.com/profile_images/993873866878570496/-aE4byjj_400x400.jpg"},"andre_medeiros":{"name":"Andre Medeiros","twitter":"superdealloc","image":"https://pbs.twimg.com/profile_images/965722487735701504/m58KNgWN_400x400.jpg"},"eric_mastro":{"name":"Eric Mastro","twitter":"ericmastro","image":"https://avatars1.githubusercontent.com/u/5089238?s=460&v=4"},"michael_bradley":{"name":"Michael Bradley","image":"https://avatars3.githubusercontent.com/u/194260?s=460&v=4"},"richard_ramos":{"name":"Richard Ramos","twitter":"richardramos_me","image":"https://devcon.org/images/speakers/richard_ramos.jpg"},"jonny_zerah":{"name":"Jonny Zerah","twitter":"jonnyzerah","image":"https://pbs.twimg.com/profile_images/1043774340490248192/gI9aGy17_400x400.jpg"},"robin_percy":{"name":"Robin Percy","twitter":"rbin","image":"https://avatars1.githubusercontent.com/u/29288325?s=400&v=4"}},"categories":{"tutorials":"Tutorials","announcements":"Announcements"},"languages":{"en":"English"}}},"excerpt":"","more":"<p><img src=\"/assets/images/nim-crystal-header-img_NEW.jpg\" alt=\"crystal vs nim\"></p>\n<p>Welcome back to my series comparing the two sweethearts of the modern low-level programming world. Just to quickly recap: in <a href=\"/news/2019/11/18/nim-vs-crystal-part-1-performance-interoperability/\">article #1</a> I noted my thoughts on the interoperability capabilities of the two languages, alongside briefly reviewing the performance metrics for each (albeit with relatively simple tests). Whether simple or not, the tests <strong><em>did</em></strong> throw up some unexpected twists in the plot. Crystal used <em>very-nearly</em> half of the memory amount executing the tests when compared to Nim, and also took <em>very nearly</em> half of the execution time in doing so. <strong>This seriously took me by surprise!</strong></p>\n<p>In <a href=\"/news/2019/11/21/nim-vs-crystal-part-2-threading-tooling/\">article #2</a>; I looked at the Concurrency primitives of each language, and explored both the in-built tooling, and external package ecosystems surrounding each language. As I said in that article, one of the biggest factors I look at when considering adopting a new language; is its tooling ecosystem. This includes, but is not limited to: A comprehensive package manager, an intuitive testing suite, a good project scaffolder, and an in-built formatter/linter to ensure my code stays semantically correct – especially if I know I will be working in Open Source repos that others will contribute to. But they’re just the high-level tools that I look for…</p>\n<p>From a low-level standpoint; I look for efficient use of technology in features such as in-memory storage, caching, garbage collection, and concurrency primitives that not just <em>markedly</em> improve our application performance, but that are also relatively simple, and intuitive to use. I see <em>this</em> as particularly important as I have, in my past, seen some truly shocking examples of trying to handle multi-threading, from languages that I love *cough* <strong><em>Ruby</em></strong> *cough*. I also like to see a fully-featured standard library that takes influence from previous successful languages. However, I digress…</p>\n<p>I regret to say that this is the final article in this series! It’s been good fun for me; getting to the know the ins-and-outs of Nim, and to re-grow a fresh appreciation of Crystal, having put it on the back-burner for quite some time. However, whether the final article in the series or not, it’s going to be a good one! We’re going to be covering the benefits to the Cryptocurrency / DApp industries from both Crystal and Nim. So without further ado:</p>\n<p><strong><em>Let’s dive on in!</em></strong></p>\n<h2 id=\"Cryptocurrency\"><a href=\"#Cryptocurrency\" class=\"headerlink\" title=\"Cryptocurrency\"></a>Cryptocurrency</h2><p>Firstly, I’d like to talk about the possibility of using either Crystal or Nim, (or both!) in the development of crypto apps. Hypothetically; if we had the inclination to build out our own Cryptocurrency: Crystal and Nim have <strong><em>proven to be two of the strongest languages</em></strong> to consider for the undertaking.. (That being the <em>next</em> blog series I’m going to write – in the near future, so deciding which language to use will be heavily influenced by <strong><em>this</em></strong> blog series!)</p>\n<p>For our Cryptocurrency, we would need to be able to use an intelligent key manager, utilise smart hashing algorithms, maintain strong performance, and all of this atop of a distributed, decentralised virtual machine or blockchain. Now, all of this sounds like a <strong><em>very</em></strong> tall order! For all of these feature requirements to be met by a single programming language, it would mean that this language is going to have to be <strong>ONE HELL</strong> of an impressive piece of technology.</p>\n<p>Happily, both Crystal <em>and</em> Nim allow us <strong><em>all</em></strong> of the above functionality. In our hypothetical usecase, if we were to build out a fully-featured blockchain; mining <em>and</em> hashing functions would need to be continually made, both of which entail relatively heavy computations. As shown over the last 2 articles in the series, we can at least be sure that both langs can handle the performance stresses, no problemo.</p>\n<p>As I’d like to write this topic out into a further detailed article series, I will show off just 2 of the above pieces of functionality we’d require for our Crypto app:</p>\n<h3 id=\"Calculating-our-Block-Hashes\"><a href=\"#Calculating-our-Block-Hashes\" class=\"headerlink\" title=\"Calculating our Block Hashes\"></a>Calculating our Block Hashes</h3><p>When building our Blockchain; we need to consider how we’re going to identify and chain our transaction blocks together (blockchain). Without going into details in <em>this</em> article on how blockchains function, we’ll stick with the existing, and proven, SHA256 algorithm.</p>\n<h3 id=\"In-Crystal\"><a href=\"#In-Crystal\" class=\"headerlink\" title=\"In Crystal:\"></a>In Crystal:</h3><figure class=\"highlight crystal\"><table><tr><td class=\"code\"><pre><span class=\"line\"><span class=\"keyword\">require</span> <span class=\"string\">\"json\"</span></span><br><span class=\"line\"><span class=\"keyword\">require</span> <span class=\"string\">\"openssl\"</span></span><br><span class=\"line\"></span><br><span class=\"line\"><span class=\"class\"><span class=\"keyword\">module</span> <span class=\"title\">OurCryptoApp::Model</span></span></span><br><span class=\"line\"> <span class=\"class\"><span class=\"keyword\">struct</span> <span class=\"title\">Transaction</span></span></span><br><span class=\"line\"> <span class=\"keyword\">include</span> <span class=\"symbol\">JSON:</span>:Serializable</span><br><span class=\"line\"></span><br><span class=\"line\"> <span class=\"keyword\">alias</span> TxnHash = String</span><br><span class=\"line\"></span><br><span class=\"line\"> property from : String</span><br><span class=\"line\"> property to : String</span><br><span class=\"line\"> property amount : Float32</span><br><span class=\"line\"> getter hash : TxnHash</span><br><span class=\"line\"> getter timestamp : Int64</span><br><span class=\"line\"></span><br><span class=\"line\"> <span class=\"function\"><span class=\"keyword\">def</span> <span class=\"title\">initialize</span></span>(@from, @to, @amount)</span><br><span class=\"line\"> @timestamp = Time.utc_now.to_unix</span><br><span class=\"line\"> @hash = calc_hash</span><br><span class=\"line\"> <span class=\"keyword\">end</span></span><br><span class=\"line\"></span><br><span class=\"line\"> <span class=\"keyword\">private</span> <span class=\"function\"><span class=\"keyword\">def</span> <span class=\"title\">calc_hash</span></span> : TxnHash</span><br><span class=\"line\"> sha = <span class=\"symbol\">OpenSSL:</span>:Digest.new(<span class=\"string\">\"SHA256\"</span>)</span><br><span class=\"line\"> sha.update(<span class=\"string\">\"<span class=\"subst\">#{@from}</span><span class=\"subst\">#{@to}</span><span class=\"subst\">#{@amount}</span><span class=\"subst\">#{@timestamp}</span>\"</span>)</span><br><span class=\"line\"> sha.hexdigest</span><br><span class=\"line\"> <span class=\"keyword\">end</span></span><br><span class=\"line\"> <span class=\"keyword\">end</span></span><br><span class=\"line\"><span class=\"keyword\">end</span></span><br></pre></td></tr></table></figure>\n\n\n<h3 id=\"In-Nim\"><a href=\"#In-Nim\" class=\"headerlink\" title=\"In Nim:\"></a>In Nim:</h3><p>If we want to generate a similar hash in Nim, we could run the following:</p>\n<figure class=\"highlight nim\"><table><tr><td class=\"code\"><pre><span class=\"line\"><span class=\"keyword\">import</span> strutils</span><br><span class=\"line\"></span><br><span class=\"line\"><span class=\"keyword\">const</span> <span class=\"type\">SHA256Len</span> = <span class=\"number\">32</span></span><br><span class=\"line\"></span><br><span class=\"line\"><span class=\"keyword\">proc</span> <span class=\"type\">SHA256</span>(d: <span class=\"built_in\">cstring</span>, n: <span class=\"built_in\">culong</span>, md: <span class=\"built_in\">cstring</span> = <span class=\"keyword\">nil</span>): <span class=\"built_in\">cstring</span> <span class=\"meta\">{.cdecl, dynlib: \"libssl.so\", importc.}</span></span><br><span class=\"line\"></span><br><span class=\"line\"><span class=\"keyword\">proc</span> <span class=\"type\">SHA256</span>(s: <span class=\"built_in\">string</span>): <span class=\"built_in\">string</span> =</span><br><span class=\"line\"> <span class=\"literal\">result</span> = <span class=\"string\">\"\"</span></span><br><span class=\"line\"> <span class=\"keyword\">let</span> s = <span class=\"type\">SHA256</span>(s.<span class=\"built_in\">cstring</span>, s.len.<span class=\"built_in\">culong</span>)</span><br><span class=\"line\"> <span class=\"keyword\">for</span> i <span class=\"keyword\">in</span> <span class=\"number\">0</span> .. < <span class=\"type\">SHA256Len</span>:</span><br><span class=\"line\"> <span class=\"literal\">result</span>.add s[i].<span class=\"type\">BiggestInt</span>.toHex(<span class=\"number\">2</span>).toLower</span><br><span class=\"line\"></span><br><span class=\"line\">echo <span class=\"type\">SHA256</span>(<span class=\"string\">\"Hash this block, yo\"</span>)</span><br></pre></td></tr></table></figure>\n\n\n<h2 id=\"Releasing-our-Crypto-App\"><a href=\"#Releasing-our-Crypto-App\" class=\"headerlink\" title=\"Releasing our Crypto App\"></a>Releasing our Crypto App</h2><p>Another serious factor we have to consider, is the ability to distribute our crypto app, once built, with great ease. Remembering that both Crystal and Nim are <em>compiled</em> languages, we’re already off to a promising start. (A single executable binary is always going to be easier to distribute than something requiring its own specialist environment!)</p>\n<p>It pays rather large dividends being able to write our Crypto app just once, and having the ability to maintain one singular code repo for that app. To this end – I think it is definitely worth considering a multi-platform app framework. I already know that in my next article series, I will be exploring building a Crypto app using <a href=\"https://facebook.github.io/react-native/\">React Native</a>.</p>\n<p>However, if you wish to build the frontend of your cross-platform crypto app in something else, there are a variety of technologies available - all of which seem to work well with both Crystal and Nim:</p>\n<ul>\n<li><a href=\"http://ionicframework.com/\">Ionic Framework</a></li>\n<li><a href=\"https://flutter.io/\">Flutter</a></li>\n<li><a href=\"https://www.nativescript.org/\">NativeScript</a></li>\n</ul>\n<p>And if you come from a Windows background:</p>\n<ul>\n<li><a href=\"https://dotnet.microsoft.com/apps/xamarin\">Xamarin</a></li>\n</ul>\n<h3 id=\"Building-amp-Releasing-In-Nim\"><a href=\"#Building-amp-Releasing-In-Nim\" class=\"headerlink\" title=\"Building & Releasing In Nim:\"></a>Building & Releasing In Nim:</h3><p>If we wanted to build out and release our app for Android, we can run:</p>\n<figure class=\"highlight plain\"><table><tr><td class=\"code\"><pre><span class=\"line\">nim c -c --cpu:arm --os:android -d:androidNDK --noMain:on</span><br></pre></td></tr></table></figure>\n\n<p>To generate the C source files we need to include in our Android Studio project. We then simply add the generated C files to our CMake build script in our Android project.</p>\n<p>Similarly, we could run:</p>\n<figure class=\"highlight plain\"><table><tr><td class=\"code\"><pre><span class=\"line\">nim c -c --os:ios --noMain:on</span><br></pre></td></tr></table></figure>\n\n<p>To generate C files to include in our XCode project. Then, we can use XCode to compile, link, package and sign everything.</p>\n<h3 id=\"Building-amp-Releasing-In-Crystal\"><a href=\"#Building-amp-Releasing-In-Crystal\" class=\"headerlink\" title=\"Building & Releasing In Crystal:\"></a>Building & Releasing In Crystal:</h3><p>Crystal also allows for cross-compilation, and makes it just as easy. For example, to build our app for Linux distributions from our Mac, we can run:</p>\n<figure class=\"highlight plain\"><table><tr><td class=\"code\"><pre><span class=\"line\">crystal build your_program.cr --cross-compile --target "x86_64-unknown-linux-gnu"</span><br></pre></td></tr></table></figure>\n\n<p><strong><em>Worth noting:</em></strong> <em>Crystal doesn’t offer the out-of-the-box iPhone / Android cross-compilation functionality that Nim does, so building our app in Nim gets a definite thumbs-up from a distribution point-of-view!</em></p>\n<h2 id=\"Ethereum-Building-Signing-amp-Sending-a-Transaction\"><a href=\"#Ethereum-Building-Signing-amp-Sending-a-Transaction\" class=\"headerlink\" title=\"Ethereum - Building, Signing & Sending a Transaction\"></a>Ethereum - Building, Signing & Sending a Transaction</h2><p>For the sake of this article, in Crystal, I didn’t see the need to write out a more low-level example of the below action, as it <em>is</em> so similar to the Nim demo that follows. This actually worked out in my favour, as it means I get to further show off the native HTTP library for Crystal.</p>\n<h3 id=\"In-Crystal-1\"><a href=\"#In-Crystal-1\" class=\"headerlink\" title=\"In Crystal:\"></a>In Crystal:</h3><figure class=\"highlight crystal\"><table><tr><td class=\"code\"><pre><span class=\"line\"><span class=\"keyword\">require</span> <span class=\"string\">\"http/client\"</span></span><br><span class=\"line\"></span><br><span class=\"line\"><span class=\"class\"><span class=\"keyword\">module</span> <span class=\"title\">Ethereum</span></span></span><br><span class=\"line\"> <span class=\"class\"><span class=\"keyword\">class</span> <span class=\"title\">Transaction</span></span></span><br><span class=\"line\"></span><br><span class=\"line\"> <span class=\"comment\"># /ethereum/create/ Create - Ethereum::Transaction.create(args)</span></span><br><span class=\"line\"> <span class=\"function\"><span class=\"keyword\">def</span> <span class=\"title\">self</span></span>.create(to : String, from : String, amount : UInt64, gas_price : UInt64? = <span class=\"literal\">nil</span>, gas_limit : UInt64? = <span class=\"literal\">nil</span>) : EthereumToSign | ErrorMessage</span><br><span class=\"line\"></span><br><span class=\"line\"> headers = <span class=\"symbol\">HTTP:</span>:Headers.new</span><br><span class=\"line\"> <span class=\"keyword\">if</span> ENV[<span class=\"string\">\"ONCHAIN_API_KEY\"</span>]? != <span class=\"literal\">nil</span></span><br><span class=\"line\"> headers.add(<span class=\"string\">\"X-API-KEY\"</span>, ENV[<span class=\"string\">\"ONCHAIN_API_KEY\"</span>])</span><br><span class=\"line\"> <span class=\"keyword\">end</span></span><br><span class=\"line\"></span><br><span class=\"line\"> response = <span class=\"symbol\">HTTP:</span>:Client.post <span class=\"string\">\"https://onchain.io/api/ethereum/create//?to=<span class=\"subst\">#{to}</span>&from=<span class=\"subst\">#{from}</span>&amount=<span class=\"subst\">#{amount}</span>&gas_price=<span class=\"subst\">#{gas_price}</span>&gas_limit=<span class=\"subst\">#{gas_limit}</span>\"</span>, <span class=\"symbol\">headers:</span> headers</span><br><span class=\"line\"></span><br><span class=\"line\"> <span class=\"keyword\">return</span> ErrorMessage.from_json response.body <span class=\"keyword\">if</span> response.status_code != <span class=\"number\">200</span></span><br><span class=\"line\"></span><br><span class=\"line\"> ethereumtosign = EthereumToSign.from_json response.body</span><br><span class=\"line\"></span><br><span class=\"line\"></span><br><span class=\"line\"> <span class=\"keyword\">return</span> ethereumtosign</span><br><span class=\"line\"> <span class=\"keyword\">end</span></span><br><span class=\"line\"></span><br><span class=\"line\"> <span class=\"comment\"># /ethereum/sign_and_send/ Sign and send - Ethereum::Transaction.sign_and_send(args)</span></span><br><span class=\"line\"> <span class=\"function\"><span class=\"keyword\">def</span> <span class=\"title\">self</span></span>.sign_and_send(to : String, from : String, amount : UInt64, r : String, s : String, v : String, gas_price : UInt64? = <span class=\"literal\">nil</span>, gas_limit : UInt64? = <span class=\"literal\">nil</span>) : SendStatus | ErrorMessage</span><br><span class=\"line\"></span><br><span class=\"line\"> headers = <span class=\"symbol\">HTTP:</span>:Headers.new</span><br><span class=\"line\"> <span class=\"keyword\">if</span> ENV[<span class=\"string\">\"ONCHAIN_API_KEY\"</span>]? != <span class=\"literal\">nil</span></span><br><span class=\"line\"> headers.add(<span class=\"string\">\"X-API-KEY\"</span>, ENV[<span class=\"string\">\"ONCHAIN_API_KEY\"</span>])</span><br><span class=\"line\"> <span class=\"keyword\">end</span></span><br><span class=\"line\"></span><br><span class=\"line\"> response = <span class=\"symbol\">HTTP:</span>:Client.post <span class=\"string\">\"https://onchain.io/api/ethereum/sign_and_send//?to=<span class=\"subst\">#{to}</span>&from=<span class=\"subst\">#{from}</span>&amount=<span class=\"subst\">#{amount}</span>&r=<span class=\"subst\">#{r}</span>&s=<span class=\"subst\">#{s}</span>&v=<span class=\"subst\">#{v}</span>&gas_price=<span class=\"subst\">#{gas_price}</span>&gas_limit=<span class=\"subst\">#{gas_limit}</span>\"</span>, <span class=\"symbol\">headers:</span> headers</span><br><span class=\"line\"></span><br><span class=\"line\"> <span class=\"keyword\">return</span> ErrorMessage.from_json response.body <span class=\"keyword\">if</span> response.status_code != <span class=\"number\">200</span></span><br><span class=\"line\"></span><br><span class=\"line\"> sendstatus = SendStatus.from_json response.body</span><br><span class=\"line\"></span><br><span class=\"line\"></span><br><span class=\"line\"> <span class=\"keyword\">return</span> sendstatus</span><br><span class=\"line\"> <span class=\"keyword\">end</span></span><br><span class=\"line\"></span><br><span class=\"line\"> <span class=\"keyword\">end</span></span><br><span class=\"line\"><span class=\"keyword\">end</span></span><br></pre></td></tr></table></figure>\n\n<p>Then, in our application we could simply call:</p>\n<figure class=\"highlight crystal\"><table><tr><td class=\"code\"><pre><span class=\"line\"><span class=\"symbol\">Ethereum:</span>:Transaction.create(<span class=\"string\">\"0xA02378cA1c24767eCD776aAFeC02158a30dc01ac\"</span>, <span class=\"string\">\"0xA02378cA1c24767eCD776aAFeC02158a30dc01ac\"</span>, <span class=\"number\">80000</span>)</span><br></pre></td></tr></table></figure>\n\n<p>And we would get a response similar to the following, ready to be signed and sent to the Ethereum network:</p>\n<figure class=\"highlight json\"><table><tr><td class=\"code\"><pre><span class=\"line\">{</span><br><span class=\"line\"> <span class=\"attr\">\"tx\"</span>: <span class=\"string\">\"02000000011cd5d7621e2a7c9403e54e089cb0b5430b83ed13f1b897d3e319b100ba1b059b01000000db00483045022100d7534c80bc0a42addc3d955f74e31610aa78bf15d79ec4df4c36dc98e802f5200220369cab1bccb2dbca0921444ce3fafb15129fa0494d041998be104df39b8895ec01483045022100fe48c4c1d46e163acaff6b0d2e702812d20\"</span>,</span><br><span class=\"line\"> <span class=\"attr\">\"hash_to_sign\"</span>: <span class=\"string\">\"955f74e31610aa78bf15d79ec4df4c36dc98e802f52002\"</span></span><br><span class=\"line\">}</span><br></pre></td></tr></table></figure>\n\n\n<h2 id=\"In-Nim-1\"><a href=\"#In-Nim-1\" class=\"headerlink\" title=\"In Nim:\"></a>In Nim:</h2><p>From a deeper, more low-level perspective; instead of using an HTTP library as in the Crystal example above, we can use Status’ very own Nim-Ethereum library to build our Ethereum transaction. Assuming we have imported <code>nim-eth</code> into our Nimble project, our Ethereum transaction can be built atop of the following protocol:</p>\n<figure class=\"highlight nim\"><table><tr><td class=\"code\"><pre><span class=\"line\"><span class=\"keyword\">import</span></span><br><span class=\"line\"> nim-eth/[common, rlp, keys], nimcrypto</span><br><span class=\"line\"></span><br><span class=\"line\"><span class=\"keyword\">proc</span> initTransaction*(nonce: <span class=\"type\">AccountNonce</span>, gasPrice, gasLimit: <span class=\"type\">GasInt</span>, to: <span class=\"type\">EthAddress</span>,</span><br><span class=\"line\"> value: <span class=\"type\">UInt256</span>, payload: <span class=\"type\">Blob</span>, V: byte, R, S: <span class=\"type\">UInt256</span>, isContractCreation = <span class=\"literal\">false</span>): <span class=\"type\">Transaction</span> =</span><br><span class=\"line\"> <span class=\"literal\">result</span>.accountNonce = nonce</span><br><span class=\"line\"> <span class=\"literal\">result</span>.gasPrice = gasPrice</span><br><span class=\"line\"> <span class=\"literal\">result</span>.gasLimit = gasLimit</span><br><span class=\"line\"> <span class=\"literal\">result</span>.to = to</span><br><span class=\"line\"> <span class=\"literal\">result</span>.value = value</span><br><span class=\"line\"> <span class=\"literal\">result</span>.payload = payload</span><br><span class=\"line\"> <span class=\"literal\">result</span>.V = V</span><br><span class=\"line\"> <span class=\"literal\">result</span>.R = R</span><br><span class=\"line\"> <span class=\"literal\">result</span>.S = S</span><br><span class=\"line\"> <span class=\"literal\">result</span>.isContractCreation = isContractCreation</span><br><span class=\"line\"></span><br><span class=\"line\"><span class=\"keyword\">type</span></span><br><span class=\"line\"> <span class=\"type\">TransHashObj</span> = <span class=\"keyword\">object</span></span><br><span class=\"line\"> accountNonce: <span class=\"type\">AccountNonce</span></span><br><span class=\"line\"> gasPrice: <span class=\"type\">GasInt</span></span><br><span class=\"line\"> gasLimit: <span class=\"type\">GasInt</span></span><br><span class=\"line\"> to <span class=\"meta\">{.rlpCustomSerialization.}</span>: <span class=\"type\">EthAddress</span></span><br><span class=\"line\"> value: <span class=\"type\">UInt256</span></span><br><span class=\"line\"> payload: <span class=\"type\">Blob</span></span><br><span class=\"line\"> mIsContractCreation <span class=\"meta\">{.rlpIgnore.}</span>: <span class=\"built_in\">bool</span></span><br><span class=\"line\"></span><br><span class=\"line\"><span class=\"keyword\">proc</span> read(rlp: <span class=\"keyword\">var</span> <span class=\"type\">Rlp</span>, t: <span class=\"keyword\">var</span> <span class=\"type\">TransHashObj</span>, _: <span class=\"keyword\">type</span> <span class=\"type\">EthAddress</span>): <span class=\"type\">EthAddress</span> <span class=\"meta\">{.inline.}</span> =</span><br><span class=\"line\"> <span class=\"keyword\">if</span> rlp.blobLen != <span class=\"number\">0</span>:</span><br><span class=\"line\"> <span class=\"literal\">result</span> = rlp.read(<span class=\"type\">EthAddress</span>)</span><br><span class=\"line\"> <span class=\"keyword\">else</span>:</span><br><span class=\"line\"> t.mIsContractCreation = <span class=\"literal\">true</span></span><br><span class=\"line\"></span><br><span class=\"line\"><span class=\"keyword\">proc</span> append(rlpWriter: <span class=\"keyword\">var</span> <span class=\"type\">RlpWriter</span>, t: <span class=\"type\">TransHashObj</span>, a: <span class=\"type\">EthAddress</span>) <span class=\"meta\">{.inline.}</span> =</span><br><span class=\"line\"> <span class=\"keyword\">if</span> t.mIsContractCreation:</span><br><span class=\"line\"> rlpWriter.append(<span class=\"string\">\"\"</span>)</span><br><span class=\"line\"> <span class=\"keyword\">else</span>:</span><br><span class=\"line\"> rlpWriter.append(a)</span><br><span class=\"line\"></span><br><span class=\"line\"><span class=\"keyword\">const</span></span><br><span class=\"line\"> <span class=\"type\">EIP155_CHAIN_ID_OFFSET</span>* = <span class=\"number\">35</span></span><br><span class=\"line\"></span><br><span class=\"line\">func rlpEncode*(transaction: <span class=\"type\">Transaction</span>): <span class=\"built_in\">auto</span> =</span><br><span class=\"line\"> <span class=\"comment\"># Encode transaction without signature</span></span><br><span class=\"line\"> <span class=\"keyword\">return</span> rlp.encode(<span class=\"type\">TransHashObj</span>(</span><br><span class=\"line\"> accountNonce: transaction.accountNonce,</span><br><span class=\"line\"> gasPrice: transaction.gasPrice,</span><br><span class=\"line\"> gasLimit: transaction.gasLimit,</span><br><span class=\"line\"> to: transaction.to,</span><br><span class=\"line\"> value: transaction.value,</span><br><span class=\"line\"> payload: transaction.payload,</span><br><span class=\"line\"> mIsContractCreation: transaction.isContractCreation</span><br><span class=\"line\"> ))</span><br><span class=\"line\"></span><br><span class=\"line\">func rlpEncodeEIP155*(tx: <span class=\"type\">Transaction</span>): <span class=\"built_in\">auto</span> =</span><br><span class=\"line\"> <span class=\"keyword\">let</span> V = (tx.V.<span class=\"built_in\">int</span> - <span class=\"type\">EIP155_CHAIN_ID_OFFSET</span>) <span class=\"keyword\">div</span> <span class=\"number\">2</span></span><br><span class=\"line\"> <span class=\"comment\"># Encode transaction without signature</span></span><br><span class=\"line\"> <span class=\"keyword\">return</span> rlp.encode(<span class=\"type\">Transaction</span>(</span><br><span class=\"line\"> accountNonce: tx.accountNonce,</span><br><span class=\"line\"> gasPrice: tx.gasPrice,</span><br><span class=\"line\"> gasLimit: tx.gasLimit,</span><br><span class=\"line\"> to: tx.to,</span><br><span class=\"line\"> value: tx.value,</span><br><span class=\"line\"> payload: tx.payload,</span><br><span class=\"line\"> isContractCreation: tx.isContractCreation,</span><br><span class=\"line\"> V: V.byte,</span><br><span class=\"line\"> R: <span class=\"number\">0</span>.u256,</span><br><span class=\"line\"> S: <span class=\"number\">0</span>.u256</span><br><span class=\"line\"> ))</span><br><span class=\"line\"></span><br><span class=\"line\">func txHashNoSignature*(tx: <span class=\"type\">Transaction</span>): <span class=\"type\">Hash256</span> =</span><br><span class=\"line\"> <span class=\"comment\"># Hash transaction without signature</span></span><br><span class=\"line\"> <span class=\"keyword\">return</span> keccak256.digest(<span class=\"keyword\">if</span> tx.V.<span class=\"built_in\">int</span> >= <span class=\"type\">EIP155_CHAIN_ID_OFFSET</span>: tx.rlpEncodeEIP155 <span class=\"keyword\">else</span>: tx.rlpEncode)</span><br></pre></td></tr></table></figure>\n\n<p><em>Note</em> - I do realise the above Nim code example and the Crystal examples are different - I fully intended them to be. The Crystal example allowed me to further show off the HTTP library I touched on in the last article, and the Nim example allowed me to go to a lower-level; something I think brings the article relevancy full circle.</p>\n<p><a href=\"https://github.com/status-im/nim-eth/\">Status’ Eth Common Library</a> contains a whole bunch of useful Nim libraries for interacting with the Ethereum Network, including:</p>\n<ul>\n<li><a href=\"https://github.com/status-im/nim-eth/blob/master/doc/rlp.md\">Recursive Length Prefix encoding (RLP)</a>,</li>\n<li><a href=\"https://github.com/status-im/nim-eth/blob/master/doc/p2p.md\">P2P</a>,</li>\n<li><a href=\"https://github.com/status-im/nim-eth/blob/master/doc/keys.md\">Eth-keys</a>,</li>\n<li><a href=\"https://github.com/status-im/nim-eth/blob/master/doc/keyfile.md\">Eth-keyfile</a>,</li>\n<li><a href=\"https://github.com/status-im/nim-eth/blob/master/doc/trie.md\">Ethereum Trie structure</a>, and</li>\n<li><a href=\"https://github.com/status-im/nim-eth/blob/master/doc/bloom.md\">Ethereum Bloom Filter</a>.</li>\n</ul>\n<p>If you are going to be working in the Ethereum ecosystem using Nim, it goes without saying that these utilities are absolutely essential. With Status & the <a href=\"https://nimbus.team\">Nimbus</a> team being such early adopters and major contributors to the Nim/Crypto universe, you are more than likely to stumble across this code sooner or later!</p>\n<h2 id=\"Conclusion\"><a href=\"#Conclusion\" class=\"headerlink\" title=\"Conclusion\"></a>Conclusion</h2><p>Our hypothetical Crypto app has taken shape throughout this article, and I think both languages have shown off great promise, and have proven their respective abilities to power the Cryptocurrency universe.</p>\n<p>Realistically, if you were a brand-new developer looking to learn a language to break into the Crypto scene, the choice would almost definitely be <strong>Crystal</strong>. This is simply because of the <em>much</em> larger ecosystem and resources surrounding it.</p>\n<p>However, if you were an already-established developer, looking to build out a crypto app that you could develop and multi-platform release with greater ease, you’d inevitably choose <strong>Nim</strong>. Crystal not only lacks the ability to be developed properly on Windows, but also lacks the interoperability and multi-release functionality, as we have seen, with Nim.</p>\n<p>Alas, this brings me on to my final points…</p>\n<h2 id=\"Series-Conclusion\"><a href=\"#Series-Conclusion\" class=\"headerlink\" title=\"Series Conclusion\"></a>Series Conclusion</h2><p>It’s funny – each article in this series, I’ve started by saying to myself “Right, Nim is going to win.” And then half way through; changing my story to “Crystal is my choice, actually.”</p>\n<p>But then I went and spoiled it all, by saying something stupid like “Cryptocurrency”.</p>\n<p>Prior to this article, I <em>was swaying</em> towards settling on Crystal. Not only did it impress in performance, but also seemed to have an enthusiastic ecosystem building around it. Nim, however, refused to go down without a fight – offering up <em>extremely</em> impressive interoperability, awesome inbuilt tooling, and great efficiency overall.</p>\n<p>I hate to do this, but I’m just going to have to say it: for your usecase – <strong>pick the best tool for the job</strong>. Please ensure that you research properly into both languages, and weigh-up the pro’s/con’s that pertain to your specific usecase.</p>\n<p><strong><em>Cliches aside</em></strong> – if I had to pick a favourite overall language, it would have to be <strong>Crystal</strong>. Frankly, this opinion is formed from my extensive use of Crystal over Nim, the fact I <strong>much</strong> prefer the Crystal syntax, and the fact that I am simply more comfortable coding in Crystal than I am in Nim!</p>\n<p>So, to answer the epic question – Crystal vs Nim?</p>\n<p>Personally, I choose Crystal. But I think <strong>you</strong> should choose <strong><em>Nim.</em></strong> 😅</p>\n<p><a href=\"https://twitter.com/rbin\"> <strong>- @rbin</strong></a></p>\n"},{"title":"DApp Frontend Security","summary":"Security is not just a consideration for DApp Backend Developers, but for Frontend Developers too. In this article we'll cover a comprehensive security strategy for DApp Frontends.","author":"robin_percy","layout":"blog-post","image":"/assets/images/web-security_banner.jpg","_content":"\n\n\n\n> *This article is the second in my series of articles based on the frontend of the decentralised web. Throughout the series we'll look at [Web3.js](/news/2019/12/09/web3-what-are-your-options/) & accessing the Ethereum Blockchain client-side, [frontend security for DApps](/news/2020/01/30/dapp-frontend-security/), how [eWasm / WebAssembly](/news/2020/02/18/wasm-ewasm-what-and-why/) has become the \"4th language of the web\", and we'll build a realtime Blockchain explorer app with Phoenix LiveView!*\n\n## Introduction\n\nWorking for a [security-focused company like Status](https://status.im/security/) means that security, in its many forms, is mentioned on a daily basis. \n\nHowever; outside of [Status](http://status.im) one of the broadest, most important, yet *often ignored* considerations when deploying and running web applications is the security of the app. When I use the term _security_, I’m not just speaking from a backend perspective, but also of the frontend of the application. Having good infrastructure security is highly important, but there are also security factors on the frontend of the application that we really _must_ take into account.\n\nSecurity is an ongoing, and ever-changing, practice that you must observe to ensure that your product is never included in the companies that one hears about on the news after a huge data breach. Regardless of which programming paradigm, language or framework you wish to use, there are plenty of non-specific, terse security practices you should follow from the very start of the project.\n\nIn my last personal Startup, we provided User Authentication as a Service, so we were a major target for hackers. On one of our first evenings live, we watched someone attempt to send 5million malicious requests within 30 minutes. None of which had any affect other than exposing the hacker. This is because we made security a priority — which is something we all need to do in the modern world of Tech.\n\nIn this article, I'll introduce you to my biggest tips for top to bottom (Frontend to Backend) security for your web applications. We'll take a look at security for your DApps too!\n\n\n## Strict Transport Security (HSTS)\n\nHSTS is a security header that allows us to enforce HTTPS across our entire DApp. If you read my previous article, you'll remember I advocate the idea of HTTPS everywhere, and showed you how to get a trusted, secure SSL certificate free-of-charge from [Let's Encrypt](https://letsencrypt.org). The reason we need HTTPS everywhere is that our users are vulnerable to Cookie stealing and Man-in-the-middle attacks if we don't have it implemented.\n\nNow, as you're probably aware, simply owning an SSL Cert will *not* immediately make all of your DApp HTTPS only - we need to tell our App to do that, ourselves. One of the best ways of doing this is by using the HTTP Header of HSTS. By using this Header, we can force all traffic on our App to use HTTPS and upgrade non-HTTPS. This Header may also even provide a performance ***boost***, as we no longer would have to send our users through a manual redirect.\n\nSo, you're probably thinking \"Wow! I need this!\". Well, whilst I agree - alongside the *Content Security Policy* I'll talk about later, this needs to be implemented **with caution.** Allow me to explain! Here's what a sample HSTS Header looks like:\n\n\tStrict-Transport-Security: max-age=630720; includeSubDomains; preload\n\n*And in Node.js:*\n\n```js\nfunction requestHandler(req, res) {\n\tres.setHeader('Strict-Transport-Security', 'max-age=630720; includeSubDomains; preload');\n}\n```\n\nIn this Header, we have 3 *directives* that apply. `max-age`, `includeSubDomains` and `preload`.\n\n***max-age***: By specifying a max-age, we are telling the user's browser to cache the fact that we use only HTTPS. This means that if the user tries to visit a non-HTTPS version of the site, their browser will be automatically redirected to the HTTPS site, *before* it even sends a message to the Server. Therein lies the slight performance boost I mentioned earlier. Now, while this *does* sound fantastic in theory, what we need to be aware of here, is the fact that if a user ever *needed* to access a non-HTTPS page, their browser simply won't let them, until this `max-age` expires. If you are going to activate this feature, and set a long `max-age`, (required by the pre-load sites I'll talk about in a second), you ***really*** need to be sure that you have your SSL cert setup correctly, and HTTPS enabled on *all* of your DApp before you take action!\n\n***includeSubDomains***: The `includeSubDomains` directive does exactly what it says on-the-tin. It simply offers additional protection by enforcing the policy across your subdomains too. This is useful if you run a DApp that sets Cookies from one section (perhaps a gaming section), to another section (perhaps a profile section), that need to be kept secure. Again, the issue with this lies similarly to the above, in that you ***must*** be sure *every* subdomain you own and run, is entirely ready for this to be applied.\n\n***preload***: The most dangerous directive of them all! Basically, the `preload` directive is an in-browser-built directive that comes straight from the browser creators. This means that your Web App can be hard-coded into the actual *Browser* to always use HTTPS. Again, whilst this would mean no redirects, and therefore a performance boost, once you're on this list; it's ***very*** difficult to get back off it! Considering that Chrome takes around 3 months from build-to-table, and that's only for the people who auto-update, you've got a *huge* wait-time if you make a mistake.\n\nSo we have ourselves here an incredibly powerful, yet actively quite dangerous Security feature. The key here is ensuring you **know** your security measures inside-out, and using discretion. Whilst I don't recommend you submit your site to the `preload` directive, if you wish to - you [can here](https://hstspreload.org/).\n\n**Note** - it is *not* a requirement to use preload to utilise HSTS. The only Header you need apply is the max-age header.\n\nIf you are going to use the HSTS protocol, start out with a small `max-age` - something like a few hours, and continue to ramp it up over a period of time. This is also the advice Google Chrome give. If you use the `includeSubDomains` directive, be sure you don't have internal (company.mysite.com) subdomains that would be unreachable if affected. If you're going to submit your Web App to `preload`, follow the official guidelines, and make sure you know exactly what you're doing - (which I'm not entirely confident of myself!)\n\n\n## Using the X-XSS-Protection Header\n\nXSS (Cross Site Scripting) is the most common of all Web App attacks. XSS occurs when a malicious entity injects scripts to be run into your app. A few years back, most web browsers added a security filter for XSS attacks built into the browser itself. Now whilst in theory this was a good step, they did tend to throw-up false-positives quite often. Due to this, the filter can be turned off by the User. (As the option should be available, in my opinion.)\n\nTo ensure our Users are protected, we can force this filter (worth it), on our DApp by using the `X-XSS-Protection` Header. This Header is widely supported by common browsers, and something I'd recommend using every time.\n\nTo apply this header to your Node.js app, you should include the following:\n\n```js\nfunction requestHandler(req, res) {\n\tres.setHeader( 'X-XSS-Protection', '1; mode=block' );\n}\n```\n\nNote the two *directives* in this header: `1` is simply acts as a boolean 1 or 0 value to reflect on or off. `mode=block` will stop the entire page loading, instead of simply sanitising the page as it would if you excluded this directive.\n\nIf you're a security-freak like myself, and a user of the Chromium browser, you could even go one-step further than this and set the directives like so:\n\n\tX-XSS-Protection: 1; report=<reporting-uri>\n\nNow, if the browser detects an XSS attack, the page will be sanitized, and report the violation. Note that this uses the functionality of the CSP `report-uri` directive to send a report that I will talk about in the Content Security Policy section below.\n\n\n## Defend against Clickjacking\n\nClickjacking occurs when a malicious agent injects objects / iFrames into your DApp, made to look identical, that actually sends the User to a malicious site when clicked. Another common, and possibly more scary example is that malicious agents insert something like a payment form into your DApp, that looks identical to your DApp, but steals payment details.\n\nNow, whilst this *could* be a very dangerous issue, it's very easy to mitigate, with almost no impact on your DApp. Servers offer Browsers a Header Protocol named `X-Frame-Options`. This protocol allows us to specify domains to accept iFrames from. It also allows us to state which sites our DApp can be embedded on. With this protocol, we get three fairly self-explanatory options/directives: `DENY`, `ALLOW-FROM`, and `SAMEORIGIN`.\n\nIf we choose `DENY`, we can block all framing. If we use `ALLOW-FROM`, we can supply a list of domains to allow framing within. I use the `SAMEORIGIN` directive, as this means framing can only be done within the current domain. This can be utilised with the following:\n\n```js\nfunction requestHandler(req, res) {\n\tres.setHeader( 'X-Frame-Options', 'SAMEORIGIN' );\n}\n```\n\n\n## Content Security Policy (CSP)\n\nCSP is another major topic when it comes to Server-Browser security for Web Apps. At a high-level; Content Security Policies tell the browser what content is authorised to execute on a Web App, and what will block. Primarily, this can be used to prevent XSS, in which an attacker could place a `<script>` tag on your Web App. The Content-Security-Policy is a Server-Browser header that we can set to ensure our Server tells the Browser exactly which media, scripts, and their origins, allowed to be executed on our DApp.\n\nThe whitelisting of resource loading and execution URIs provides a good level of security, that will in most parts, defend against most attacks.\n\nTo include a Content Security Policy that allows only internal and *Google Analytics*, in an Express.js server, you could do the following:\n\n```js\nvar express = require('express');\nvar app = express();\n\n\napp.use(function(req, res, next) {\n res.setHeader(\"Content-Security-Policy\", \"script-src 'self' https://analytics.google.com\");\n return next();\n});\n\napp.use(express.static(__dirname + '/'));\n\napp.listen(process.env.PORT || 3000);\n```\n\nHowever, if we do not wish to allow *any* external sites to execute scripts on our DApp, we could simply include the following:\n\n```js\nfunction requestHandler(req, res) {\n\tres.setHeader( 'Content-Security-Policy', \"script-src 'self'\" );\n}\n```\n\nNote the `script-src` directive here, that we have set to `self`, therefore only allowing scripts from within our own domain. Of course, CSP is not without its own problems. Firstly, it would be very easy for us to forget about some of the media we have in our DApp and to simply exclude them accidentally. Now that the web is so *rich* in media, this would be reasonably easy to do. Secondly, many of us use third-party plugins on our DApp. Again, unless we have a full blueprint of these, we could very easily block them.\n\nSo, once activated, this Server Header *could* potentially be very detrimental to us. However, there are two great ways of testing this. You can set a strict policy, and use the built in directives; `report-only` and `report-uri` to test them. The `report-uri` directive tells the Browser to send a JSON report of all of the blocked scripts to a URi that we specify. The `report-only` directive does the same, but will ***not*** block the scripts on the site. This is very useful for testing, before we put this Header into production.\n\nThere's a great write-up on the reporting, [here](https://developer.mozilla.org/en-US/docs/Web/HTTP/Headers/Content-Security-Policy-Report-Only).\n\nContent Security Policies are both excellent and very powerful, but must be used cautiously. Much the same as HSTS mentioned above, we need to ensure we are aware of the situation before activating. If you are loading in external images, scripts etc. you need to understand that unless you include these in the policy, they ***will*** be blocked.\n\n\n## CSRF\n\nCross Site Request Forgery (CSRF) has been at the forefront of Web App Security for longer than any of us care to remember. The idea behind it is that a malicious agent sends a (forged) request from one app to another whilst the User is signed in and authorised. This would therefore allow the request to enter and alter restricted actions on the requested App, with the requested app believing entirely that the actions were coming from the logged in User. A better way for me to describe this is to show you:\n\nImagine if you will, I am security-abusing miscreant, and I happen to know that Twitter has no CSRF protection. (They do, this is all hypothetical.) I'm also aware that most people who visit *my* DApp, probably leave their Twitter logged in, and therefore have a Cookie stored in their browser, to allow them fast access to Twitter the next time they want to post something.\n\nOn my DApp frontend, I could embed a script such as the following:\n\n```html\n<form action=\"https://twitter.com/tweet\" method=\"POST\" id=\"sendTweet\">\n<input type=\"hidden\" name=\"tweet\" value=\"Hey! Check out my awesome spam site - spam.com\">\n```\n\nWhen a user's browser loads my DApp, this form will be loaded (entirely invisibly) too. I would then also have embedded a small piece of JS to POST the form, without them ever knowing:\n\n```js\ndocument.getElementById(\"sendTweet\").submit();\n```\n\nIn doing this, I've just sent a Tweet on their account, without ever having to know their Username or Password. The Cookie they had stored in their Browser allowed my app to send a *forged request*, pretending to be them - and if Twitter had no CSRF mitigation, it would have worked too!\n\nFor years, we have been trying to solve CSRF requests by checking HTTP headers such as the `Origin` and `Referer`. Whilst these have offered fairly robust protection for a few years, there is now a simple directive that once applied; will entirely mitigate CSRF attacks.\n\nEnter, the ***SameSite*** Cookie directive. `SameSite` is relatively new, and only been around for the past year, in which it has gained some publicity, but is still widely unknown. In essence, the `SameSite` directive, once applied, will tell the Browser to **never** send that cookie when a request from an external (Cross Site) url is made. We can apply this directive by altering our Cookies as such:\n\n\tSet-Cookie: sess=sessionid123; path=/; SameSite\n\nIt really is that easy. I wouldn't recommend removing your existing CSRF protection just yet, but I would definitely recommend including this directive on your DApp.\n\n\n## Cookies\n\nAs we know, cookies are an important feature of our Web Applications, carrying data mainly referring to our User Sessions. While simply implementing the aforementioned directives is sufficient in securing your cookies, and preventing attacks, we can actually take cookie security a step further.\n\n*Cookie Prefixing* is a relatively under-used technique that we can utilise to ensure a cookie *is* secure:\n\n***The `__Secure` prefix*** - If a cookie's name begins with \"__Secure\", the cookie MUST be:\n\n- Set with a \"*Secure*\" attribute\n- Set from a URI whose scheme is considered secure by the user agent.\n\nThe following cookie would be rejected when set from any origin, as the \"Secure\" flag is not set:\n\n\tSet-Cookie: __Secure-sess=12345; Domain=myapp.com\n\nWhile the following would be accepted if set from a secure origin e.g. `https://` and rejected otherwise:\n\n\tSet-Cookie: __Secure-sess=12345; Secure; Domain=myapp.com\n\nAlongside the `__Secure` prefix, we also have the `__Host` prefix:\n\n***The `__Host` prefix*** - If a cookie's name begins with \"__Host\", the cookie MUST be:\n\n- Set with a \"Secure\" attribute\n- Set from a URI whose \"scheme\" is considered \"secure\" by the user agent.\n- Sent only to the host which set the cookie. That is, a cookie named \"__Host-cookie1\" set from \"https://example.com\" *MUST NOT* contain a \"Domain\" attribute (and will therefore be sent only to \"example.com\", and not to \"subdomain.example.com\").\n- Sent to every request for a host. That is, a cookie named \"__Host-cookie1\" MUST contain a \"Path\" attribute with a value of \"/\".\n\nThe following cookies would always be rejected:\n\n\tSet-Cookie: __Host-sess=12345\n\tSet-Cookie: __Host-sess=12345; Secure\n\tSet-Cookie: __Host-sess=12345; Domain=example.com\n\tSet-Cookie: __Host-sess=12345; Domain=example.com; Path=/\n\tSet-Cookie: __Host-sess=12345; Secure; Domain=example.com; Path=/\n\nWhile the following would be accepted if set from a secure origin e.g. `https://`, and rejected otherwise:\n\n\tSet-Cookie: __Host-sess=12345; Secure; Path=/\n\nBy setting these prefixes, any compliant browser will be made to enforce them.\n\nNow, if we include the tips from my first article, and the tips above, we can make the most secure Cookie possible:\n\n\tSet-Cookie: __Host-sess=id123; path=/; Secure; HttpOnly; SameSite\n\nIn this most-secure-cookie, we're utilising the `__Host` prefix which means the `Secure` attribute has to be set, and it must be served from a secure host. There is no `Domain` attribute set and the `Path` is /. We've set `HttpOnly` for XSS protection, and SameSite is enabled too to prevent CSRF. Of course, this won't be the best or most practical solution for a lot of people, but it *is* the most in-theory secure Cookie we could set from our DApp.\n\n\n## Take a DApp Blueprint\n\n***Note** - In my opinion, this is one of the most important security steps one can take.*\n\nDo you know the ins-and-outs of each library your Developers use? Probably not - it's near impossible to keep track nowadays, but this is to *great* detriment. Are you also aware of which libraries and tools have been given write access to your production servers and databases - and how isolated they are?\n\nThe issue here is that using so much *automation* in modern development, we grant access to a huge amount of tools/libraries without *really* knowing exactly what they're doing. We take it for granted that each of these libraries is entirely safe and without their security vulnerabilities - or worse - performing malicious activities themselves.\n\nWe all want the most streamlined Dev cycle possible. We all use automation tools that trigger a whole bunch of processes, doing things that barely any of us are aware of. The propensity of some Devs to throw `sudo` commands at package managers if a command fails is also truly terrifying.\n\nSo how do we get around this? ***Take a Tech Blueprint!*** This needn't be a complex process, it's as simple as knowing what each piece of Software is doing on your servers, and what authority they've been granted. Take a note of any new tools / packages before you grant them permissions, and do a little research. Some simple Googling of key phrases i.e. `*package* security vulnerabilities` will usually bring up more results than you'd expect. It's also worth checking out the *Issues* tab on the package's GitHub page. Vulnerabilities are often discussed there and you'll be able to act accordingly. This applies to the top-level Package Managers too.\n\nPackage managers are used by almost ALL of us. If you really want to scare yourself, go ahead and search `*package manager* security vulnerability` and take a look at all of the results! Again, knowing what we are installing and granting permissions to, and especially keeping a note of this, could just save our Bacon. Take a look at [this article for a relevant example!](https://medium.com/friendship-dot-js/i-peeked-into-my-node-modules-directory-and-you-wont-believe-what-happened-next-b89f63d21558)\n\n**Handy tip:** if you want to know which hooks an npm package runs, before you install it, run the command:\n\n```bash\n $ npm show $module scripts\n```\n\n## Security for DApp Users\n\n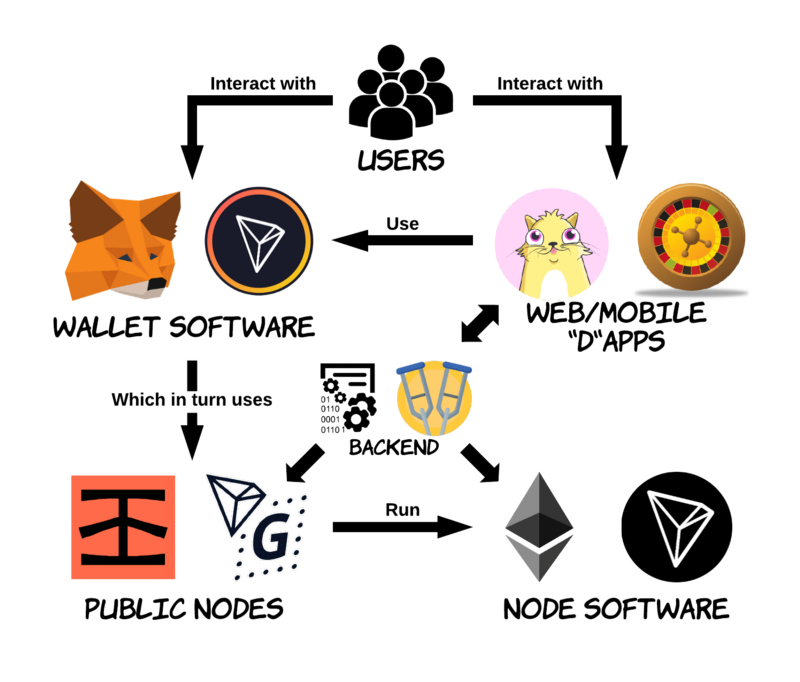\n[Image Source](https://www.freecodecamp.org/news/how-to-design-a-secure-backend-for-your-decentralized-application-9541b5d8bddb/)\n\nWith more and more DApps being created including web-based exchanges, crypto-based games etc. The opportunities for bad actors increase with each new DApp released. Say, for instance, someone released an interactive game built around Web3, and directly interacting with user's wallets. On registration for the game, wallets are created, and they collected sensitive data, including user's private keys being stored in local storage (super insecure).\n\nThe DApp developer, however, didn't realise that a bad actor has been injecting a remote script during registration that evaluates and sends all of the player's private keys to the bad actor's server.\n\n - **Protect wallets and private keys:** If user’s wallets are compromised, this is game over. Extreme care needs to be taken when handling this sensitive information.\n - **Protect user information:** Users do not want their personal data being exposed to the world. Ensure that user data remains private.\n - **Use *MetaMask* or similar** to ensure security of wallets and user keys.\n - **Evaluate wisely what needs to be stored in the blockchain or in your servers.** Only include data that is absolutely necessary for you smart contracts to function within the contracts themselves.\n\nThere is an excellent write-up on DApp security standards you [can check out here.](https://github.com/Dexaran/DAPP-security-standards/blob/master/README.md)\n\n\n## Conclusion\nWithout a doubt, the most effective method for maintaining the security of your DApps is keeping up-to-date with any security protocols on an ongoing basis. Vulnerabilities are an extremely fickle and dynamic topic, in that they change / pop up so regularly.\n\nBy following the tips in this article, keeping up-to-date with any security announcements, and having an in-depth overview of your systems, you can rest assured that you are well on your way to having a jolly well secured DApp. As stressed in this article, security considerations are not only found on the backend of our apps, but on the frontend too. Ensuring that we approach both means we can be confident about the safety of our users (which should be our number one priority). The best tools in web security are common sense and vigilance.\n\nSo, from enforcing HTTPS with Strict Transport Security, to securing our DApp frontend with a Content Security Policy; we’ve covered the main topics, in my opinion to ensuring frontend to backend security for our web & decentralised web applications. These topics are all techniques I utilise myself and would advocate for use in your apps on an ongoing basis.\n\nFor any future projects, I recommend taking a look at these [Blockchain Security providers.](https://nexus.mythx.io/directory#!/)\n\n[ **_- @rbin_**](https://twitter.com/rbin)\n","source":"_posts/2020-01-30-dapp-frontend-security.md","raw":"title: \"DApp Frontend Security\"\nsummary: \"Security is not just a consideration for DApp Backend Developers, but for Frontend Developers too. In this article we'll cover a comprehensive security strategy for DApp Frontends.\"\nauthor: robin_percy\ncategories:\n - tutorials\nlayout: blog-post\nimage: '/assets/images/web-security_banner.jpg'\n\n---\n\n\n\n\n> *This article is the second in my series of articles based on the frontend of the decentralised web. Throughout the series we'll look at [Web3.js](/news/2019/12/09/web3-what-are-your-options/) & accessing the Ethereum Blockchain client-side, [frontend security for DApps](/news/2020/01/30/dapp-frontend-security/), how [eWasm / WebAssembly](/news/2020/02/18/wasm-ewasm-what-and-why/) has become the \"4th language of the web\", and we'll build a realtime Blockchain explorer app with Phoenix LiveView!*\n\n## Introduction\n\nWorking for a [security-focused company like Status](https://status.im/security/) means that security, in its many forms, is mentioned on a daily basis. \n\nHowever; outside of [Status](http://status.im) one of the broadest, most important, yet *often ignored* considerations when deploying and running web applications is the security of the app. When I use the term _security_, I’m not just speaking from a backend perspective, but also of the frontend of the application. Having good infrastructure security is highly important, but there are also security factors on the frontend of the application that we really _must_ take into account.\n\nSecurity is an ongoing, and ever-changing, practice that you must observe to ensure that your product is never included in the companies that one hears about on the news after a huge data breach. Regardless of which programming paradigm, language or framework you wish to use, there are plenty of non-specific, terse security practices you should follow from the very start of the project.\n\nIn my last personal Startup, we provided User Authentication as a Service, so we were a major target for hackers. On one of our first evenings live, we watched someone attempt to send 5million malicious requests within 30 minutes. None of which had any affect other than exposing the hacker. This is because we made security a priority — which is something we all need to do in the modern world of Tech.\n\nIn this article, I'll introduce you to my biggest tips for top to bottom (Frontend to Backend) security for your web applications. We'll take a look at security for your DApps too!\n\n\n## Strict Transport Security (HSTS)\n\nHSTS is a security header that allows us to enforce HTTPS across our entire DApp. If you read my previous article, you'll remember I advocate the idea of HTTPS everywhere, and showed you how to get a trusted, secure SSL certificate free-of-charge from [Let's Encrypt](https://letsencrypt.org). The reason we need HTTPS everywhere is that our users are vulnerable to Cookie stealing and Man-in-the-middle attacks if we don't have it implemented.\n\nNow, as you're probably aware, simply owning an SSL Cert will *not* immediately make all of your DApp HTTPS only - we need to tell our App to do that, ourselves. One of the best ways of doing this is by using the HTTP Header of HSTS. By using this Header, we can force all traffic on our App to use HTTPS and upgrade non-HTTPS. This Header may also even provide a performance ***boost***, as we no longer would have to send our users through a manual redirect.\n\nSo, you're probably thinking \"Wow! I need this!\". Well, whilst I agree - alongside the *Content Security Policy* I'll talk about later, this needs to be implemented **with caution.** Allow me to explain! Here's what a sample HSTS Header looks like:\n\n\tStrict-Transport-Security: max-age=630720; includeSubDomains; preload\n\n*And in Node.js:*\n\n```js\nfunction requestHandler(req, res) {\n\tres.setHeader('Strict-Transport-Security', 'max-age=630720; includeSubDomains; preload');\n}\n```\n\nIn this Header, we have 3 *directives* that apply. `max-age`, `includeSubDomains` and `preload`.\n\n***max-age***: By specifying a max-age, we are telling the user's browser to cache the fact that we use only HTTPS. This means that if the user tries to visit a non-HTTPS version of the site, their browser will be automatically redirected to the HTTPS site, *before* it even sends a message to the Server. Therein lies the slight performance boost I mentioned earlier. Now, while this *does* sound fantastic in theory, what we need to be aware of here, is the fact that if a user ever *needed* to access a non-HTTPS page, their browser simply won't let them, until this `max-age` expires. If you are going to activate this feature, and set a long `max-age`, (required by the pre-load sites I'll talk about in a second), you ***really*** need to be sure that you have your SSL cert setup correctly, and HTTPS enabled on *all* of your DApp before you take action!\n\n***includeSubDomains***: The `includeSubDomains` directive does exactly what it says on-the-tin. It simply offers additional protection by enforcing the policy across your subdomains too. This is useful if you run a DApp that sets Cookies from one section (perhaps a gaming section), to another section (perhaps a profile section), that need to be kept secure. Again, the issue with this lies similarly to the above, in that you ***must*** be sure *every* subdomain you own and run, is entirely ready for this to be applied.\n\n***preload***: The most dangerous directive of them all! Basically, the `preload` directive is an in-browser-built directive that comes straight from the browser creators. This means that your Web App can be hard-coded into the actual *Browser* to always use HTTPS. Again, whilst this would mean no redirects, and therefore a performance boost, once you're on this list; it's ***very*** difficult to get back off it! Considering that Chrome takes around 3 months from build-to-table, and that's only for the people who auto-update, you've got a *huge* wait-time if you make a mistake.\n\nSo we have ourselves here an incredibly powerful, yet actively quite dangerous Security feature. The key here is ensuring you **know** your security measures inside-out, and using discretion. Whilst I don't recommend you submit your site to the `preload` directive, if you wish to - you [can here](https://hstspreload.org/).\n\n**Note** - it is *not* a requirement to use preload to utilise HSTS. The only Header you need apply is the max-age header.\n\nIf you are going to use the HSTS protocol, start out with a small `max-age` - something like a few hours, and continue to ramp it up over a period of time. This is also the advice Google Chrome give. If you use the `includeSubDomains` directive, be sure you don't have internal (company.mysite.com) subdomains that would be unreachable if affected. If you're going to submit your Web App to `preload`, follow the official guidelines, and make sure you know exactly what you're doing - (which I'm not entirely confident of myself!)\n\n\n## Using the X-XSS-Protection Header\n\nXSS (Cross Site Scripting) is the most common of all Web App attacks. XSS occurs when a malicious entity injects scripts to be run into your app. A few years back, most web browsers added a security filter for XSS attacks built into the browser itself. Now whilst in theory this was a good step, they did tend to throw-up false-positives quite often. Due to this, the filter can be turned off by the User. (As the option should be available, in my opinion.)\n\nTo ensure our Users are protected, we can force this filter (worth it), on our DApp by using the `X-XSS-Protection` Header. This Header is widely supported by common browsers, and something I'd recommend using every time.\n\nTo apply this header to your Node.js app, you should include the following:\n\n```js\nfunction requestHandler(req, res) {\n\tres.setHeader( 'X-XSS-Protection', '1; mode=block' );\n}\n```\n\nNote the two *directives* in this header: `1` is simply acts as a boolean 1 or 0 value to reflect on or off. `mode=block` will stop the entire page loading, instead of simply sanitising the page as it would if you excluded this directive.\n\nIf you're a security-freak like myself, and a user of the Chromium browser, you could even go one-step further than this and set the directives like so:\n\n\tX-XSS-Protection: 1; report=<reporting-uri>\n\nNow, if the browser detects an XSS attack, the page will be sanitized, and report the violation. Note that this uses the functionality of the CSP `report-uri` directive to send a report that I will talk about in the Content Security Policy section below.\n\n\n## Defend against Clickjacking\n\nClickjacking occurs when a malicious agent injects objects / iFrames into your DApp, made to look identical, that actually sends the User to a malicious site when clicked. Another common, and possibly more scary example is that malicious agents insert something like a payment form into your DApp, that looks identical to your DApp, but steals payment details.\n\nNow, whilst this *could* be a very dangerous issue, it's very easy to mitigate, with almost no impact on your DApp. Servers offer Browsers a Header Protocol named `X-Frame-Options`. This protocol allows us to specify domains to accept iFrames from. It also allows us to state which sites our DApp can be embedded on. With this protocol, we get three fairly self-explanatory options/directives: `DENY`, `ALLOW-FROM`, and `SAMEORIGIN`.\n\nIf we choose `DENY`, we can block all framing. If we use `ALLOW-FROM`, we can supply a list of domains to allow framing within. I use the `SAMEORIGIN` directive, as this means framing can only be done within the current domain. This can be utilised with the following:\n\n```js\nfunction requestHandler(req, res) {\n\tres.setHeader( 'X-Frame-Options', 'SAMEORIGIN' );\n}\n```\n\n\n## Content Security Policy (CSP)\n\nCSP is another major topic when it comes to Server-Browser security for Web Apps. At a high-level; Content Security Policies tell the browser what content is authorised to execute on a Web App, and what will block. Primarily, this can be used to prevent XSS, in which an attacker could place a `<script>` tag on your Web App. The Content-Security-Policy is a Server-Browser header that we can set to ensure our Server tells the Browser exactly which media, scripts, and their origins, allowed to be executed on our DApp.\n\nThe whitelisting of resource loading and execution URIs provides a good level of security, that will in most parts, defend against most attacks.\n\nTo include a Content Security Policy that allows only internal and *Google Analytics*, in an Express.js server, you could do the following:\n\n```js\nvar express = require('express');\nvar app = express();\n\n\napp.use(function(req, res, next) {\n res.setHeader(\"Content-Security-Policy\", \"script-src 'self' https://analytics.google.com\");\n return next();\n});\n\napp.use(express.static(__dirname + '/'));\n\napp.listen(process.env.PORT || 3000);\n```\n\nHowever, if we do not wish to allow *any* external sites to execute scripts on our DApp, we could simply include the following:\n\n```js\nfunction requestHandler(req, res) {\n\tres.setHeader( 'Content-Security-Policy', \"script-src 'self'\" );\n}\n```\n\nNote the `script-src` directive here, that we have set to `self`, therefore only allowing scripts from within our own domain. Of course, CSP is not without its own problems. Firstly, it would be very easy for us to forget about some of the media we have in our DApp and to simply exclude them accidentally. Now that the web is so *rich* in media, this would be reasonably easy to do. Secondly, many of us use third-party plugins on our DApp. Again, unless we have a full blueprint of these, we could very easily block them.\n\nSo, once activated, this Server Header *could* potentially be very detrimental to us. However, there are two great ways of testing this. You can set a strict policy, and use the built in directives; `report-only` and `report-uri` to test them. The `report-uri` directive tells the Browser to send a JSON report of all of the blocked scripts to a URi that we specify. The `report-only` directive does the same, but will ***not*** block the scripts on the site. This is very useful for testing, before we put this Header into production.\n\nThere's a great write-up on the reporting, [here](https://developer.mozilla.org/en-US/docs/Web/HTTP/Headers/Content-Security-Policy-Report-Only).\n\nContent Security Policies are both excellent and very powerful, but must be used cautiously. Much the same as HSTS mentioned above, we need to ensure we are aware of the situation before activating. If you are loading in external images, scripts etc. you need to understand that unless you include these in the policy, they ***will*** be blocked.\n\n\n## CSRF\n\nCross Site Request Forgery (CSRF) has been at the forefront of Web App Security for longer than any of us care to remember. The idea behind it is that a malicious agent sends a (forged) request from one app to another whilst the User is signed in and authorised. This would therefore allow the request to enter and alter restricted actions on the requested App, with the requested app believing entirely that the actions were coming from the logged in User. A better way for me to describe this is to show you:\n\nImagine if you will, I am security-abusing miscreant, and I happen to know that Twitter has no CSRF protection. (They do, this is all hypothetical.) I'm also aware that most people who visit *my* DApp, probably leave their Twitter logged in, and therefore have a Cookie stored in their browser, to allow them fast access to Twitter the next time they want to post something.\n\nOn my DApp frontend, I could embed a script such as the following:\n\n```html\n<form action=\"https://twitter.com/tweet\" method=\"POST\" id=\"sendTweet\">\n<input type=\"hidden\" name=\"tweet\" value=\"Hey! Check out my awesome spam site - spam.com\">\n```\n\nWhen a user's browser loads my DApp, this form will be loaded (entirely invisibly) too. I would then also have embedded a small piece of JS to POST the form, without them ever knowing:\n\n```js\ndocument.getElementById(\"sendTweet\").submit();\n```\n\nIn doing this, I've just sent a Tweet on their account, without ever having to know their Username or Password. The Cookie they had stored in their Browser allowed my app to send a *forged request*, pretending to be them - and if Twitter had no CSRF mitigation, it would have worked too!\n\nFor years, we have been trying to solve CSRF requests by checking HTTP headers such as the `Origin` and `Referer`. Whilst these have offered fairly robust protection for a few years, there is now a simple directive that once applied; will entirely mitigate CSRF attacks.\n\nEnter, the ***SameSite*** Cookie directive. `SameSite` is relatively new, and only been around for the past year, in which it has gained some publicity, but is still widely unknown. In essence, the `SameSite` directive, once applied, will tell the Browser to **never** send that cookie when a request from an external (Cross Site) url is made. We can apply this directive by altering our Cookies as such:\n\n\tSet-Cookie: sess=sessionid123; path=/; SameSite\n\nIt really is that easy. I wouldn't recommend removing your existing CSRF protection just yet, but I would definitely recommend including this directive on your DApp.\n\n\n## Cookies\n\nAs we know, cookies are an important feature of our Web Applications, carrying data mainly referring to our User Sessions. While simply implementing the aforementioned directives is sufficient in securing your cookies, and preventing attacks, we can actually take cookie security a step further.\n\n*Cookie Prefixing* is a relatively under-used technique that we can utilise to ensure a cookie *is* secure:\n\n***The `__Secure` prefix*** - If a cookie's name begins with \"__Secure\", the cookie MUST be:\n\n- Set with a \"*Secure*\" attribute\n- Set from a URI whose scheme is considered secure by the user agent.\n\nThe following cookie would be rejected when set from any origin, as the \"Secure\" flag is not set:\n\n\tSet-Cookie: __Secure-sess=12345; Domain=myapp.com\n\nWhile the following would be accepted if set from a secure origin e.g. `https://` and rejected otherwise:\n\n\tSet-Cookie: __Secure-sess=12345; Secure; Domain=myapp.com\n\nAlongside the `__Secure` prefix, we also have the `__Host` prefix:\n\n***The `__Host` prefix*** - If a cookie's name begins with \"__Host\", the cookie MUST be:\n\n- Set with a \"Secure\" attribute\n- Set from a URI whose \"scheme\" is considered \"secure\" by the user agent.\n- Sent only to the host which set the cookie. That is, a cookie named \"__Host-cookie1\" set from \"https://example.com\" *MUST NOT* contain a \"Domain\" attribute (and will therefore be sent only to \"example.com\", and not to \"subdomain.example.com\").\n- Sent to every request for a host. That is, a cookie named \"__Host-cookie1\" MUST contain a \"Path\" attribute with a value of \"/\".\n\nThe following cookies would always be rejected:\n\n\tSet-Cookie: __Host-sess=12345\n\tSet-Cookie: __Host-sess=12345; Secure\n\tSet-Cookie: __Host-sess=12345; Domain=example.com\n\tSet-Cookie: __Host-sess=12345; Domain=example.com; Path=/\n\tSet-Cookie: __Host-sess=12345; Secure; Domain=example.com; Path=/\n\nWhile the following would be accepted if set from a secure origin e.g. `https://`, and rejected otherwise:\n\n\tSet-Cookie: __Host-sess=12345; Secure; Path=/\n\nBy setting these prefixes, any compliant browser will be made to enforce them.\n\nNow, if we include the tips from my first article, and the tips above, we can make the most secure Cookie possible:\n\n\tSet-Cookie: __Host-sess=id123; path=/; Secure; HttpOnly; SameSite\n\nIn this most-secure-cookie, we're utilising the `__Host` prefix which means the `Secure` attribute has to be set, and it must be served from a secure host. There is no `Domain` attribute set and the `Path` is /. We've set `HttpOnly` for XSS protection, and SameSite is enabled too to prevent CSRF. Of course, this won't be the best or most practical solution for a lot of people, but it *is* the most in-theory secure Cookie we could set from our DApp.\n\n\n## Take a DApp Blueprint\n\n***Note** - In my opinion, this is one of the most important security steps one can take.*\n\nDo you know the ins-and-outs of each library your Developers use? Probably not - it's near impossible to keep track nowadays, but this is to *great* detriment. Are you also aware of which libraries and tools have been given write access to your production servers and databases - and how isolated they are?\n\nThe issue here is that using so much *automation* in modern development, we grant access to a huge amount of tools/libraries without *really* knowing exactly what they're doing. We take it for granted that each of these libraries is entirely safe and without their security vulnerabilities - or worse - performing malicious activities themselves.\n\nWe all want the most streamlined Dev cycle possible. We all use automation tools that trigger a whole bunch of processes, doing things that barely any of us are aware of. The propensity of some Devs to throw `sudo` commands at package managers if a command fails is also truly terrifying.\n\nSo how do we get around this? ***Take a Tech Blueprint!*** This needn't be a complex process, it's as simple as knowing what each piece of Software is doing on your servers, and what authority they've been granted. Take a note of any new tools / packages before you grant them permissions, and do a little research. Some simple Googling of key phrases i.e. `*package* security vulnerabilities` will usually bring up more results than you'd expect. It's also worth checking out the *Issues* tab on the package's GitHub page. Vulnerabilities are often discussed there and you'll be able to act accordingly. This applies to the top-level Package Managers too.\n\nPackage managers are used by almost ALL of us. If you really want to scare yourself, go ahead and search `*package manager* security vulnerability` and take a look at all of the results! Again, knowing what we are installing and granting permissions to, and especially keeping a note of this, could just save our Bacon. Take a look at [this article for a relevant example!](https://medium.com/friendship-dot-js/i-peeked-into-my-node-modules-directory-and-you-wont-believe-what-happened-next-b89f63d21558)\n\n**Handy tip:** if you want to know which hooks an npm package runs, before you install it, run the command:\n\n```bash\n $ npm show $module scripts\n```\n\n## Security for DApp Users\n\n\n[Image Source](https://www.freecodecamp.org/news/how-to-design-a-secure-backend-for-your-decentralized-application-9541b5d8bddb/)\n\nWith more and more DApps being created including web-based exchanges, crypto-based games etc. The opportunities for bad actors increase with each new DApp released. Say, for instance, someone released an interactive game built around Web3, and directly interacting with user's wallets. On registration for the game, wallets are created, and they collected sensitive data, including user's private keys being stored in local storage (super insecure).\n\nThe DApp developer, however, didn't realise that a bad actor has been injecting a remote script during registration that evaluates and sends all of the player's private keys to the bad actor's server.\n\n - **Protect wallets and private keys:** If user’s wallets are compromised, this is game over. Extreme care needs to be taken when handling this sensitive information.\n - **Protect user information:** Users do not want their personal data being exposed to the world. Ensure that user data remains private.\n - **Use *MetaMask* or similar** to ensure security of wallets and user keys.\n - **Evaluate wisely what needs to be stored in the blockchain or in your servers.** Only include data that is absolutely necessary for you smart contracts to function within the contracts themselves.\n\nThere is an excellent write-up on DApp security standards you [can check out here.](https://github.com/Dexaran/DAPP-security-standards/blob/master/README.md)\n\n\n## Conclusion\nWithout a doubt, the most effective method for maintaining the security of your DApps is keeping up-to-date with any security protocols on an ongoing basis. Vulnerabilities are an extremely fickle and dynamic topic, in that they change / pop up so regularly.\n\nBy following the tips in this article, keeping up-to-date with any security announcements, and having an in-depth overview of your systems, you can rest assured that you are well on your way to having a jolly well secured DApp. As stressed in this article, security considerations are not only found on the backend of our apps, but on the frontend too. Ensuring that we approach both means we can be confident about the safety of our users (which should be our number one priority). The best tools in web security are common sense and vigilance.\n\nSo, from enforcing HTTPS with Strict Transport Security, to securing our DApp frontend with a Content Security Policy; we’ve covered the main topics, in my opinion to ensuring frontend to backend security for our web & decentralised web applications. These topics are all techniques I utilise myself and would advocate for use in your apps on an ongoing basis.\n\nFor any future projects, I recommend taking a look at these [Blockchain Security providers.](https://nexus.mythx.io/directory#!/)\n\n[ **_- @rbin_**](https://twitter.com/rbin)\n","slug":"dapp-frontend-security","published":1,"date":"2020-01-30T05:00:00.000Z","updated":"2020-03-09T17:43:28.179Z","_id":"ck6axlfd50031xeeg9uuueky8","comments":1,"photos":[],"link":"","content":"<p><img src=\"/assets/images/web-security_banner.jpg\" alt=\"Web3.js\"></p>\n<blockquote>\n<p><em>This article is the second in my series of articles based on the frontend of the decentralised web. Throughout the series we’ll look at <a href=\"/news/2019/12/09/web3-what-are-your-options/\">Web3.js</a> & accessing the Ethereum Blockchain client-side, <a href=\"/news/2020/01/30/dapp-frontend-security/\">frontend security for DApps</a>, how <a href=\"/news/2020/02/18/wasm-ewasm-what-and-why/\">eWasm / WebAssembly</a> has become the “4th language of the web”, and we’ll build a realtime Blockchain explorer app with Phoenix LiveView!</em></p>\n</blockquote>\n<h2 id=\"Introduction\"><a href=\"#Introduction\" class=\"headerlink\" title=\"Introduction\"></a>Introduction</h2><p>Working for a <a href=\"https://status.im/security/\">security-focused company like Status</a> means that security, in its many forms, is mentioned on a daily basis. </p>\n<p>However; outside of <a href=\"http://status.im\">Status</a> one of the broadest, most important, yet <em>often ignored</em> considerations when deploying and running web applications is the security of the app. When I use the term <em>security</em>, I’m not just speaking from a backend perspective, but also of the frontend of the application. Having good infrastructure security is highly important, but there are also security factors on the frontend of the application that we really <em>must</em> take into account.</p>\n<p>Security is an ongoing, and ever-changing, practice that you must observe to ensure that your product is never included in the companies that one hears about on the news after a huge data breach. Regardless of which programming paradigm, language or framework you wish to use, there are plenty of non-specific, terse security practices you should follow from the very start of the project.</p>\n<p>In my last personal Startup, we provided User Authentication as a Service, so we were a major target for hackers. On one of our first evenings live, we watched someone attempt to send 5million malicious requests within 30 minutes. None of which had any affect other than exposing the hacker. This is because we made security a priority — which is something we all need to do in the modern world of Tech.</p>\n<p>In this article, I’ll introduce you to my biggest tips for top to bottom (Frontend to Backend) security for your web applications. We’ll take a look at security for your DApps too!</p>\n<h2 id=\"Strict-Transport-Security-HSTS\"><a href=\"#Strict-Transport-Security-HSTS\" class=\"headerlink\" title=\"Strict Transport Security (HSTS)\"></a>Strict Transport Security (HSTS)</h2><p>HSTS is a security header that allows us to enforce HTTPS across our entire DApp. If you read my previous article, you’ll remember I advocate the idea of HTTPS everywhere, and showed you how to get a trusted, secure SSL certificate free-of-charge from <a href=\"https://letsencrypt.org\">Let’s Encrypt</a>. The reason we need HTTPS everywhere is that our users are vulnerable to Cookie stealing and Man-in-the-middle attacks if we don’t have it implemented.</p>\n<p>Now, as you’re probably aware, simply owning an SSL Cert will <em>not</em> immediately make all of your DApp HTTPS only - we need to tell our App to do that, ourselves. One of the best ways of doing this is by using the HTTP Header of HSTS. By using this Header, we can force all traffic on our App to use HTTPS and upgrade non-HTTPS. This Header may also even provide a performance <strong><em>boost</em></strong>, as we no longer would have to send our users through a manual redirect.</p>\n<p>So, you’re probably thinking “Wow! I need this!”. Well, whilst I agree - alongside the <em>Content Security Policy</em> I’ll talk about later, this needs to be implemented <strong>with caution.</strong> Allow me to explain! Here’s what a sample HSTS Header looks like:</p>\n<pre><code>Strict-Transport-Security: max-age=630720; includeSubDomains; preload</code></pre><p><em>And in Node.js:</em></p>\n<figure class=\"highlight js\"><table><tr><td class=\"code\"><pre><span class=\"line\"><span class=\"function\"><span class=\"keyword\">function</span> <span class=\"title\">requestHandler</span>(<span class=\"params\">req, res</span>) </span>{</span><br><span class=\"line\">\tres.setHeader(<span class=\"string\">'Strict-Transport-Security'</span>, <span class=\"string\">'max-age=630720; includeSubDomains; preload'</span>);</span><br><span class=\"line\">}</span><br></pre></td></tr></table></figure>\n\n<p>In this Header, we have 3 <em>directives</em> that apply. <code>max-age</code>, <code>includeSubDomains</code> and <code>preload</code>.</p>\n<p><strong><em>max-age</em></strong>: By specifying a max-age, we are telling the user’s browser to cache the fact that we use only HTTPS. This means that if the user tries to visit a non-HTTPS version of the site, their browser will be automatically redirected to the HTTPS site, <em>before</em> it even sends a message to the Server. Therein lies the slight performance boost I mentioned earlier. Now, while this <em>does</em> sound fantastic in theory, what we need to be aware of here, is the fact that if a user ever <em>needed</em> to access a non-HTTPS page, their browser simply won’t let them, until this <code>max-age</code> expires. If you are going to activate this feature, and set a long <code>max-age</code>, (required by the pre-load sites I’ll talk about in a second), you <strong><em>really</em></strong> need to be sure that you have your SSL cert setup correctly, and HTTPS enabled on <em>all</em> of your DApp before you take action!</p>\n<p><strong><em>includeSubDomains</em></strong>: The <code>includeSubDomains</code> directive does exactly what it says on-the-tin. It simply offers additional protection by enforcing the policy across your subdomains too. This is useful if you run a DApp that sets Cookies from one section (perhaps a gaming section), to another section (perhaps a profile section), that need to be kept secure. Again, the issue with this lies similarly to the above, in that you <strong><em>must</em></strong> be sure <em>every</em> subdomain you own and run, is entirely ready for this to be applied.</p>\n<p><strong><em>preload</em></strong>: The most dangerous directive of them all! Basically, the <code>preload</code> directive is an in-browser-built directive that comes straight from the browser creators. This means that your Web App can be hard-coded into the actual <em>Browser</em> to always use HTTPS. Again, whilst this would mean no redirects, and therefore a performance boost, once you’re on this list; it’s <strong><em>very</em></strong> difficult to get back off it! Considering that Chrome takes around 3 months from build-to-table, and that’s only for the people who auto-update, you’ve got a <em>huge</em> wait-time if you make a mistake.</p>\n<p>So we have ourselves here an incredibly powerful, yet actively quite dangerous Security feature. The key here is ensuring you <strong>know</strong> your security measures inside-out, and using discretion. Whilst I don’t recommend you submit your site to the <code>preload</code> directive, if you wish to - you <a href=\"https://hstspreload.org/\">can here</a>.</p>\n<p><strong>Note</strong> - it is <em>not</em> a requirement to use preload to utilise HSTS. The only Header you need apply is the max-age header.</p>\n<p>If you are going to use the HSTS protocol, start out with a small <code>max-age</code> - something like a few hours, and continue to ramp it up over a period of time. This is also the advice Google Chrome give. If you use the <code>includeSubDomains</code> directive, be sure you don’t have internal (company.mysite.com) subdomains that would be unreachable if affected. If you’re going to submit your Web App to <code>preload</code>, follow the official guidelines, and make sure you know exactly what you’re doing - (which I’m not entirely confident of myself!)</p>\n<h2 id=\"Using-the-X-XSS-Protection-Header\"><a href=\"#Using-the-X-XSS-Protection-Header\" class=\"headerlink\" title=\"Using the X-XSS-Protection Header\"></a>Using the X-XSS-Protection Header</h2><p>XSS (Cross Site Scripting) is the most common of all Web App attacks. XSS occurs when a malicious entity injects scripts to be run into your app. A few years back, most web browsers added a security filter for XSS attacks built into the browser itself. Now whilst in theory this was a good step, they did tend to throw-up false-positives quite often. Due to this, the filter can be turned off by the User. (As the option should be available, in my opinion.)</p>\n<p>To ensure our Users are protected, we can force this filter (worth it), on our DApp by using the <code>X-XSS-Protection</code> Header. This Header is widely supported by common browsers, and something I’d recommend using every time.</p>\n<p>To apply this header to your Node.js app, you should include the following:</p>\n<figure class=\"highlight js\"><table><tr><td class=\"code\"><pre><span class=\"line\"><span class=\"function\"><span class=\"keyword\">function</span> <span class=\"title\">requestHandler</span>(<span class=\"params\">req, res</span>) </span>{</span><br><span class=\"line\">\tres.setHeader( <span class=\"string\">'X-XSS-Protection'</span>, <span class=\"string\">'1; mode=block'</span> );</span><br><span class=\"line\">}</span><br></pre></td></tr></table></figure>\n\n<p>Note the two <em>directives</em> in this header: <code>1</code> is simply acts as a boolean 1 or 0 value to reflect on or off. <code>mode=block</code> will stop the entire page loading, instead of simply sanitising the page as it would if you excluded this directive.</p>\n<p>If you’re a security-freak like myself, and a user of the Chromium browser, you could even go one-step further than this and set the directives like so:</p>\n<pre><code>X-XSS-Protection: 1; report=<reporting-uri></code></pre><p>Now, if the browser detects an XSS attack, the page will be sanitized, and report the violation. Note that this uses the functionality of the CSP <code>report-uri</code> directive to send a report that I will talk about in the Content Security Policy section below.</p>\n<h2 id=\"Defend-against-Clickjacking\"><a href=\"#Defend-against-Clickjacking\" class=\"headerlink\" title=\"Defend against Clickjacking\"></a>Defend against Clickjacking</h2><p>Clickjacking occurs when a malicious agent injects objects / iFrames into your DApp, made to look identical, that actually sends the User to a malicious site when clicked. Another common, and possibly more scary example is that malicious agents insert something like a payment form into your DApp, that looks identical to your DApp, but steals payment details.</p>\n<p>Now, whilst this <em>could</em> be a very dangerous issue, it’s very easy to mitigate, with almost no impact on your DApp. Servers offer Browsers a Header Protocol named <code>X-Frame-Options</code>. This protocol allows us to specify domains to accept iFrames from. It also allows us to state which sites our DApp can be embedded on. With this protocol, we get three fairly self-explanatory options/directives: <code>DENY</code>, <code>ALLOW-FROM</code>, and <code>SAMEORIGIN</code>.</p>\n<p>If we choose <code>DENY</code>, we can block all framing. If we use <code>ALLOW-FROM</code>, we can supply a list of domains to allow framing within. I use the <code>SAMEORIGIN</code> directive, as this means framing can only be done within the current domain. This can be utilised with the following:</p>\n<figure class=\"highlight js\"><table><tr><td class=\"code\"><pre><span class=\"line\"><span class=\"function\"><span class=\"keyword\">function</span> <span class=\"title\">requestHandler</span>(<span class=\"params\">req, res</span>) </span>{</span><br><span class=\"line\">\tres.setHeader( <span class=\"string\">'X-Frame-Options'</span>, <span class=\"string\">'SAMEORIGIN'</span> );</span><br><span class=\"line\">}</span><br></pre></td></tr></table></figure>\n\n\n<h2 id=\"Content-Security-Policy-CSP\"><a href=\"#Content-Security-Policy-CSP\" class=\"headerlink\" title=\"Content Security Policy (CSP)\"></a>Content Security Policy (CSP)</h2><p>CSP is another major topic when it comes to Server-Browser security for Web Apps. At a high-level; Content Security Policies tell the browser what content is authorised to execute on a Web App, and what will block. Primarily, this can be used to prevent XSS, in which an attacker could place a <code><script></code> tag on your Web App. The Content-Security-Policy is a Server-Browser header that we can set to ensure our Server tells the Browser exactly which media, scripts, and their origins, allowed to be executed on our DApp.</p>\n<p>The whitelisting of resource loading and execution URIs provides a good level of security, that will in most parts, defend against most attacks.</p>\n<p>To include a Content Security Policy that allows only internal and <em>Google Analytics</em>, in an Express.js server, you could do the following:</p>\n<figure class=\"highlight js\"><table><tr><td class=\"code\"><pre><span class=\"line\"><span class=\"keyword\">var</span> express = <span class=\"built_in\">require</span>(<span class=\"string\">'express'</span>);</span><br><span class=\"line\"><span class=\"keyword\">var</span> app = express();</span><br><span class=\"line\"></span><br><span class=\"line\"></span><br><span class=\"line\">app.use(<span class=\"function\"><span class=\"keyword\">function</span>(<span class=\"params\">req, res, next</span>) </span>{</span><br><span class=\"line\"> res.setHeader(<span class=\"string\">\"Content-Security-Policy\"</span>, <span class=\"string\">\"script-src 'self' https://analytics.google.com\"</span>);</span><br><span class=\"line\"> <span class=\"keyword\">return</span> next();</span><br><span class=\"line\">});</span><br><span class=\"line\"></span><br><span class=\"line\">app.use(express.static(__dirname + <span class=\"string\">'/'</span>));</span><br><span class=\"line\"></span><br><span class=\"line\">app.listen(process.env.PORT || <span class=\"number\">3000</span>);</span><br></pre></td></tr></table></figure>\n\n<p>However, if we do not wish to allow <em>any</em> external sites to execute scripts on our DApp, we could simply include the following:</p>\n<figure class=\"highlight js\"><table><tr><td class=\"code\"><pre><span class=\"line\"><span class=\"function\"><span class=\"keyword\">function</span> <span class=\"title\">requestHandler</span>(<span class=\"params\">req, res</span>) </span>{</span><br><span class=\"line\">\tres.setHeader( <span class=\"string\">'Content-Security-Policy'</span>, <span class=\"string\">\"script-src 'self'\"</span> );</span><br><span class=\"line\">}</span><br></pre></td></tr></table></figure>\n\n<p>Note the <code>script-src</code> directive here, that we have set to <code>self</code>, therefore only allowing scripts from within our own domain. Of course, CSP is not without its own problems. Firstly, it would be very easy for us to forget about some of the media we have in our DApp and to simply exclude them accidentally. Now that the web is so <em>rich</em> in media, this would be reasonably easy to do. Secondly, many of us use third-party plugins on our DApp. Again, unless we have a full blueprint of these, we could very easily block them.</p>\n<p>So, once activated, this Server Header <em>could</em> potentially be very detrimental to us. However, there are two great ways of testing this. You can set a strict policy, and use the built in directives; <code>report-only</code> and <code>report-uri</code> to test them. The <code>report-uri</code> directive tells the Browser to send a JSON report of all of the blocked scripts to a URi that we specify. The <code>report-only</code> directive does the same, but will <strong><em>not</em></strong> block the scripts on the site. This is very useful for testing, before we put this Header into production.</p>\n<p>There’s a great write-up on the reporting, <a href=\"https://developer.mozilla.org/en-US/docs/Web/HTTP/Headers/Content-Security-Policy-Report-Only\">here</a>.</p>\n<p>Content Security Policies are both excellent and very powerful, but must be used cautiously. Much the same as HSTS mentioned above, we need to ensure we are aware of the situation before activating. If you are loading in external images, scripts etc. you need to understand that unless you include these in the policy, they <strong><em>will</em></strong> be blocked.</p>\n<h2 id=\"CSRF\"><a href=\"#CSRF\" class=\"headerlink\" title=\"CSRF\"></a>CSRF</h2><p>Cross Site Request Forgery (CSRF) has been at the forefront of Web App Security for longer than any of us care to remember. The idea behind it is that a malicious agent sends a (forged) request from one app to another whilst the User is signed in and authorised. This would therefore allow the request to enter and alter restricted actions on the requested App, with the requested app believing entirely that the actions were coming from the logged in User. A better way for me to describe this is to show you:</p>\n<p>Imagine if you will, I am security-abusing miscreant, and I happen to know that Twitter has no CSRF protection. (They do, this is all hypothetical.) I’m also aware that most people who visit <em>my</em> DApp, probably leave their Twitter logged in, and therefore have a Cookie stored in their browser, to allow them fast access to Twitter the next time they want to post something.</p>\n<p>On my DApp frontend, I could embed a script such as the following:</p>\n<figure class=\"highlight html\"><table><tr><td class=\"code\"><pre><span class=\"line\"><span class=\"tag\"><<span class=\"name\">form</span> <span class=\"attr\">action</span>=<span class=\"string\">\"https://twitter.com/tweet\"</span> <span class=\"attr\">method</span>=<span class=\"string\">\"POST\"</span> <span class=\"attr\">id</span>=<span class=\"string\">\"sendTweet\"</span>></span></span><br><span class=\"line\"><span class=\"tag\"><<span class=\"name\">input</span> <span class=\"attr\">type</span>=<span class=\"string\">\"hidden\"</span> <span class=\"attr\">name</span>=<span class=\"string\">\"tweet\"</span> <span class=\"attr\">value</span>=<span class=\"string\">\"Hey! Check out my awesome spam site - spam.com\"</span>></span></span><br></pre></td></tr></table></figure>\n\n<p>When a user’s browser loads my DApp, this form will be loaded (entirely invisibly) too. I would then also have embedded a small piece of JS to POST the form, without them ever knowing:</p>\n<figure class=\"highlight js\"><table><tr><td class=\"code\"><pre><span class=\"line\"><span class=\"built_in\">document</span>.getElementById(<span class=\"string\">\"sendTweet\"</span>).submit();</span><br></pre></td></tr></table></figure>\n\n<p>In doing this, I’ve just sent a Tweet on their account, without ever having to know their Username or Password. The Cookie they had stored in their Browser allowed my app to send a <em>forged request</em>, pretending to be them - and if Twitter had no CSRF mitigation, it would have worked too!</p>\n<p>For years, we have been trying to solve CSRF requests by checking HTTP headers such as the <code>Origin</code> and <code>Referer</code>. Whilst these have offered fairly robust protection for a few years, there is now a simple directive that once applied; will entirely mitigate CSRF attacks.</p>\n<p>Enter, the <strong><em>SameSite</em></strong> Cookie directive. <code>SameSite</code> is relatively new, and only been around for the past year, in which it has gained some publicity, but is still widely unknown. In essence, the <code>SameSite</code> directive, once applied, will tell the Browser to <strong>never</strong> send that cookie when a request from an external (Cross Site) url is made. We can apply this directive by altering our Cookies as such:</p>\n<pre><code>Set-Cookie: sess=sessionid123; path=/; SameSite</code></pre><p>It really is that easy. I wouldn’t recommend removing your existing CSRF protection just yet, but I would definitely recommend including this directive on your DApp.</p>\n<h2 id=\"Cookies\"><a href=\"#Cookies\" class=\"headerlink\" title=\"Cookies\"></a>Cookies</h2><p>As we know, cookies are an important feature of our Web Applications, carrying data mainly referring to our User Sessions. While simply implementing the aforementioned directives is sufficient in securing your cookies, and preventing attacks, we can actually take cookie security a step further.</p>\n<p><em>Cookie Prefixing</em> is a relatively under-used technique that we can utilise to ensure a cookie <em>is</em> secure:</p>\n<p><strong><em>The <code>__Secure</code> prefix</em></strong> - If a cookie’s name begins with “__Secure”, the cookie MUST be:</p>\n<ul>\n<li>Set with a “<em>Secure</em>“ attribute</li>\n<li>Set from a URI whose scheme is considered secure by the user agent.</li>\n</ul>\n<p>The following cookie would be rejected when set from any origin, as the “Secure” flag is not set:</p>\n<pre><code>Set-Cookie: __Secure-sess=12345; Domain=myapp.com</code></pre><p>While the following would be accepted if set from a secure origin e.g. <code>https://</code> and rejected otherwise:</p>\n<pre><code>Set-Cookie: __Secure-sess=12345; Secure; Domain=myapp.com</code></pre><p>Alongside the <code>__Secure</code> prefix, we also have the <code>__Host</code> prefix:</p>\n<p><strong><em>The <code>__Host</code> prefix</em></strong> - If a cookie’s name begins with “__Host”, the cookie MUST be:</p>\n<ul>\n<li>Set with a “Secure” attribute</li>\n<li>Set from a URI whose “scheme” is considered “secure” by the user agent.</li>\n<li>Sent only to the host which set the cookie. That is, a cookie named “__Host-cookie1” set from “<a href=\"https://example.com"\">https://example.com"</a> <em>MUST NOT</em> contain a “Domain” attribute (and will therefore be sent only to “example.com”, and not to “subdomain.example.com”).</li>\n<li>Sent to every request for a host. That is, a cookie named “__Host-cookie1” MUST contain a “Path” attribute with a value of “/“.</li>\n</ul>\n<p>The following cookies would always be rejected:</p>\n<pre><code>Set-Cookie: __Host-sess=12345\nSet-Cookie: __Host-sess=12345; Secure\nSet-Cookie: __Host-sess=12345; Domain=example.com\nSet-Cookie: __Host-sess=12345; Domain=example.com; Path=/\nSet-Cookie: __Host-sess=12345; Secure; Domain=example.com; Path=/</code></pre><p>While the following would be accepted if set from a secure origin e.g. <code>https://</code>, and rejected otherwise:</p>\n<pre><code>Set-Cookie: __Host-sess=12345; Secure; Path=/</code></pre><p>By setting these prefixes, any compliant browser will be made to enforce them.</p>\n<p>Now, if we include the tips from my first article, and the tips above, we can make the most secure Cookie possible:</p>\n<pre><code>Set-Cookie: __Host-sess=id123; path=/; Secure; HttpOnly; SameSite</code></pre><p>In this most-secure-cookie, we’re utilising the <code>__Host</code> prefix which means the <code>Secure</code> attribute has to be set, and it must be served from a secure host. There is no <code>Domain</code> attribute set and the <code>Path</code> is /. We’ve set <code>HttpOnly</code> for XSS protection, and SameSite is enabled too to prevent CSRF. Of course, this won’t be the best or most practical solution for a lot of people, but it <em>is</em> the most in-theory secure Cookie we could set from our DApp.</p>\n<h2 id=\"Take-a-DApp-Blueprint\"><a href=\"#Take-a-DApp-Blueprint\" class=\"headerlink\" title=\"Take a DApp Blueprint\"></a>Take a DApp Blueprint</h2><p><strong>*Note</strong> - In my opinion, this is one of the most important security steps one can take.*</p>\n<p>Do you know the ins-and-outs of each library your Developers use? Probably not - it’s near impossible to keep track nowadays, but this is to <em>great</em> detriment. Are you also aware of which libraries and tools have been given write access to your production servers and databases - and how isolated they are?</p>\n<p>The issue here is that using so much <em>automation</em> in modern development, we grant access to a huge amount of tools/libraries without <em>really</em> knowing exactly what they’re doing. We take it for granted that each of these libraries is entirely safe and without their security vulnerabilities - or worse - performing malicious activities themselves.</p>\n<p>We all want the most streamlined Dev cycle possible. We all use automation tools that trigger a whole bunch of processes, doing things that barely any of us are aware of. The propensity of some Devs to throw <code>sudo</code> commands at package managers if a command fails is also truly terrifying.</p>\n<p>So how do we get around this? <strong><em>Take a Tech Blueprint!</em></strong> This needn’t be a complex process, it’s as simple as knowing what each piece of Software is doing on your servers, and what authority they’ve been granted. Take a note of any new tools / packages before you grant them permissions, and do a little research. Some simple Googling of key phrases i.e. <code>*package* security vulnerabilities</code> will usually bring up more results than you’d expect. It’s also worth checking out the <em>Issues</em> tab on the package’s GitHub page. Vulnerabilities are often discussed there and you’ll be able to act accordingly. This applies to the top-level Package Managers too.</p>\n<p>Package managers are used by almost ALL of us. If you really want to scare yourself, go ahead and search <code>*package manager* security vulnerability</code> and take a look at all of the results! Again, knowing what we are installing and granting permissions to, and especially keeping a note of this, could just save our Bacon. Take a look at <a href=\"https://medium.com/friendship-dot-js/i-peeked-into-my-node-modules-directory-and-you-wont-believe-what-happened-next-b89f63d21558\">this article for a relevant example!</a></p>\n<p><strong>Handy tip:</strong> if you want to know which hooks an npm package runs, before you install it, run the command:</p>\n<figure class=\"highlight bash\"><table><tr><td class=\"code\"><pre><span class=\"line\">$ npm show <span class=\"variable\">$module</span> scripts</span><br></pre></td></tr></table></figure>\n\n<h2 id=\"Security-for-DApp-Users\"><a href=\"#Security-for-DApp-Users\" class=\"headerlink\" title=\"Security for DApp Users\"></a>Security for DApp Users</h2><p><img src=\"https://cdn-media-1.freecodecamp.org/images/1*sd62aH6GGS1RoCR9t4QNyQ.png\" alt=\"Dapp security\"><br><a href=\"https://www.freecodecamp.org/news/how-to-design-a-secure-backend-for-your-decentralized-application-9541b5d8bddb/\">Image Source</a></p>\n<p>With more and more DApps being created including web-based exchanges, crypto-based games etc. The opportunities for bad actors increase with each new DApp released. Say, for instance, someone released an interactive game built around Web3, and directly interacting with user’s wallets. On registration for the game, wallets are created, and they collected sensitive data, including user’s private keys being stored in local storage (super insecure).</p>\n<p>The DApp developer, however, didn’t realise that a bad actor has been injecting a remote script during registration that evaluates and sends all of the player’s private keys to the bad actor’s server.</p>\n<ul>\n<li><strong>Protect wallets and private keys:</strong> If user’s wallets are compromised, this is game over. Extreme care needs to be taken when handling this sensitive information.</li>\n<li><strong>Protect user information:</strong> Users do not want their personal data being exposed to the world. Ensure that user data remains private.</li>\n<li><strong>Use <em>MetaMask</em> or similar</strong> to ensure security of wallets and user keys.</li>\n<li><strong>Evaluate wisely what needs to be stored in the blockchain or in your servers.</strong> Only include data that is absolutely necessary for you smart contracts to function within the contracts themselves.</li>\n</ul>\n<p>There is an excellent write-up on DApp security standards you <a href=\"https://github.com/Dexaran/DAPP-security-standards/blob/master/README.md\">can check out here.</a></p>\n<h2 id=\"Conclusion\"><a href=\"#Conclusion\" class=\"headerlink\" title=\"Conclusion\"></a>Conclusion</h2><p>Without a doubt, the most effective method for maintaining the security of your DApps is keeping up-to-date with any security protocols on an ongoing basis. Vulnerabilities are an extremely fickle and dynamic topic, in that they change / pop up so regularly.</p>\n<p>By following the tips in this article, keeping up-to-date with any security announcements, and having an in-depth overview of your systems, you can rest assured that you are well on your way to having a jolly well secured DApp. As stressed in this article, security considerations are not only found on the backend of our apps, but on the frontend too. Ensuring that we approach both means we can be confident about the safety of our users (which should be our number one priority). The best tools in web security are common sense and vigilance.</p>\n<p>So, from enforcing HTTPS with Strict Transport Security, to securing our DApp frontend with a Content Security Policy; we’ve covered the main topics, in my opinion to ensuring frontend to backend security for our web & decentralised web applications. These topics are all techniques I utilise myself and would advocate for use in your apps on an ongoing basis.</p>\n<p>For any future projects, I recommend taking a look at these <a href=\"https://nexus.mythx.io/directory#!/\">Blockchain Security providers.</a></p>\n<p><a href=\"https://twitter.com/rbin\"> <strong><em>- @rbin</em></strong></a></p>\n","site":{"data":{"authors":{"iuri_matias":{"name":"Iuri Matias","twitter":"iurimatias","image":"https://pbs.twimg.com/profile_images/928272512181563392/iDJdvy2k_400x400.jpg"},"pascal_precht":{"name":"Pascal Precht","twitter":"pascalprecht","image":"https://pbs.twimg.com/profile_images/993785060733194241/p3oAIMDP_400x400.jpg"},"anthony_laibe":{"name":"Anthony Laibe","twitter":"a_laibe","image":"https://pbs.twimg.com/profile_images/257742900/13168239_400x400.jpg"},"jonathan_rainville":{"name":"Jonathan Rainville","twitter":"ShyolGhul","image":"https://pbs.twimg.com/profile_images/993873866878570496/-aE4byjj_400x400.jpg"},"andre_medeiros":{"name":"Andre Medeiros","twitter":"superdealloc","image":"https://pbs.twimg.com/profile_images/965722487735701504/m58KNgWN_400x400.jpg"},"eric_mastro":{"name":"Eric Mastro","twitter":"ericmastro","image":"https://avatars1.githubusercontent.com/u/5089238?s=460&v=4"},"michael_bradley":{"name":"Michael Bradley","image":"https://avatars3.githubusercontent.com/u/194260?s=460&v=4"},"richard_ramos":{"name":"Richard Ramos","twitter":"richardramos_me","image":"https://devcon.org/images/speakers/richard_ramos.jpg"},"jonny_zerah":{"name":"Jonny Zerah","twitter":"jonnyzerah","image":"https://pbs.twimg.com/profile_images/1043774340490248192/gI9aGy17_400x400.jpg"},"robin_percy":{"name":"Robin Percy","twitter":"rbin","image":"https://avatars1.githubusercontent.com/u/29288325?s=400&v=4"}},"categories":{"tutorials":"Tutorials","announcements":"Announcements"},"languages":{"en":"English"}}},"excerpt":"","more":"<p><img src=\"/assets/images/web-security_banner.jpg\" alt=\"Web3.js\"></p>\n<blockquote>\n<p><em>This article is the second in my series of articles based on the frontend of the decentralised web. Throughout the series we’ll look at <a href=\"/news/2019/12/09/web3-what-are-your-options/\">Web3.js</a> & accessing the Ethereum Blockchain client-side, <a href=\"/news/2020/01/30/dapp-frontend-security/\">frontend security for DApps</a>, how <a href=\"/news/2020/02/18/wasm-ewasm-what-and-why/\">eWasm / WebAssembly</a> has become the “4th language of the web”, and we’ll build a realtime Blockchain explorer app with Phoenix LiveView!</em></p>\n</blockquote>\n<h2 id=\"Introduction\"><a href=\"#Introduction\" class=\"headerlink\" title=\"Introduction\"></a>Introduction</h2><p>Working for a <a href=\"https://status.im/security/\">security-focused company like Status</a> means that security, in its many forms, is mentioned on a daily basis. </p>\n<p>However; outside of <a href=\"http://status.im\">Status</a> one of the broadest, most important, yet <em>often ignored</em> considerations when deploying and running web applications is the security of the app. When I use the term <em>security</em>, I’m not just speaking from a backend perspective, but also of the frontend of the application. Having good infrastructure security is highly important, but there are also security factors on the frontend of the application that we really <em>must</em> take into account.</p>\n<p>Security is an ongoing, and ever-changing, practice that you must observe to ensure that your product is never included in the companies that one hears about on the news after a huge data breach. Regardless of which programming paradigm, language or framework you wish to use, there are plenty of non-specific, terse security practices you should follow from the very start of the project.</p>\n<p>In my last personal Startup, we provided User Authentication as a Service, so we were a major target for hackers. On one of our first evenings live, we watched someone attempt to send 5million malicious requests within 30 minutes. None of which had any affect other than exposing the hacker. This is because we made security a priority — which is something we all need to do in the modern world of Tech.</p>\n<p>In this article, I’ll introduce you to my biggest tips for top to bottom (Frontend to Backend) security for your web applications. We’ll take a look at security for your DApps too!</p>\n<h2 id=\"Strict-Transport-Security-HSTS\"><a href=\"#Strict-Transport-Security-HSTS\" class=\"headerlink\" title=\"Strict Transport Security (HSTS)\"></a>Strict Transport Security (HSTS)</h2><p>HSTS is a security header that allows us to enforce HTTPS across our entire DApp. If you read my previous article, you’ll remember I advocate the idea of HTTPS everywhere, and showed you how to get a trusted, secure SSL certificate free-of-charge from <a href=\"https://letsencrypt.org\">Let’s Encrypt</a>. The reason we need HTTPS everywhere is that our users are vulnerable to Cookie stealing and Man-in-the-middle attacks if we don’t have it implemented.</p>\n<p>Now, as you’re probably aware, simply owning an SSL Cert will <em>not</em> immediately make all of your DApp HTTPS only - we need to tell our App to do that, ourselves. One of the best ways of doing this is by using the HTTP Header of HSTS. By using this Header, we can force all traffic on our App to use HTTPS and upgrade non-HTTPS. This Header may also even provide a performance <strong><em>boost</em></strong>, as we no longer would have to send our users through a manual redirect.</p>\n<p>So, you’re probably thinking “Wow! I need this!”. Well, whilst I agree - alongside the <em>Content Security Policy</em> I’ll talk about later, this needs to be implemented <strong>with caution.</strong> Allow me to explain! Here’s what a sample HSTS Header looks like:</p>\n<pre><code>Strict-Transport-Security: max-age=630720; includeSubDomains; preload</code></pre><p><em>And in Node.js:</em></p>\n<figure class=\"highlight js\"><table><tr><td class=\"code\"><pre><span class=\"line\"><span class=\"function\"><span class=\"keyword\">function</span> <span class=\"title\">requestHandler</span>(<span class=\"params\">req, res</span>) </span>{</span><br><span class=\"line\">\tres.setHeader(<span class=\"string\">'Strict-Transport-Security'</span>, <span class=\"string\">'max-age=630720; includeSubDomains; preload'</span>);</span><br><span class=\"line\">}</span><br></pre></td></tr></table></figure>\n\n<p>In this Header, we have 3 <em>directives</em> that apply. <code>max-age</code>, <code>includeSubDomains</code> and <code>preload</code>.</p>\n<p><strong><em>max-age</em></strong>: By specifying a max-age, we are telling the user’s browser to cache the fact that we use only HTTPS. This means that if the user tries to visit a non-HTTPS version of the site, their browser will be automatically redirected to the HTTPS site, <em>before</em> it even sends a message to the Server. Therein lies the slight performance boost I mentioned earlier. Now, while this <em>does</em> sound fantastic in theory, what we need to be aware of here, is the fact that if a user ever <em>needed</em> to access a non-HTTPS page, their browser simply won’t let them, until this <code>max-age</code> expires. If you are going to activate this feature, and set a long <code>max-age</code>, (required by the pre-load sites I’ll talk about in a second), you <strong><em>really</em></strong> need to be sure that you have your SSL cert setup correctly, and HTTPS enabled on <em>all</em> of your DApp before you take action!</p>\n<p><strong><em>includeSubDomains</em></strong>: The <code>includeSubDomains</code> directive does exactly what it says on-the-tin. It simply offers additional protection by enforcing the policy across your subdomains too. This is useful if you run a DApp that sets Cookies from one section (perhaps a gaming section), to another section (perhaps a profile section), that need to be kept secure. Again, the issue with this lies similarly to the above, in that you <strong><em>must</em></strong> be sure <em>every</em> subdomain you own and run, is entirely ready for this to be applied.</p>\n<p><strong><em>preload</em></strong>: The most dangerous directive of them all! Basically, the <code>preload</code> directive is an in-browser-built directive that comes straight from the browser creators. This means that your Web App can be hard-coded into the actual <em>Browser</em> to always use HTTPS. Again, whilst this would mean no redirects, and therefore a performance boost, once you’re on this list; it’s <strong><em>very</em></strong> difficult to get back off it! Considering that Chrome takes around 3 months from build-to-table, and that’s only for the people who auto-update, you’ve got a <em>huge</em> wait-time if you make a mistake.</p>\n<p>So we have ourselves here an incredibly powerful, yet actively quite dangerous Security feature. The key here is ensuring you <strong>know</strong> your security measures inside-out, and using discretion. Whilst I don’t recommend you submit your site to the <code>preload</code> directive, if you wish to - you <a href=\"https://hstspreload.org/\">can here</a>.</p>\n<p><strong>Note</strong> - it is <em>not</em> a requirement to use preload to utilise HSTS. The only Header you need apply is the max-age header.</p>\n<p>If you are going to use the HSTS protocol, start out with a small <code>max-age</code> - something like a few hours, and continue to ramp it up over a period of time. This is also the advice Google Chrome give. If you use the <code>includeSubDomains</code> directive, be sure you don’t have internal (company.mysite.com) subdomains that would be unreachable if affected. If you’re going to submit your Web App to <code>preload</code>, follow the official guidelines, and make sure you know exactly what you’re doing - (which I’m not entirely confident of myself!)</p>\n<h2 id=\"Using-the-X-XSS-Protection-Header\"><a href=\"#Using-the-X-XSS-Protection-Header\" class=\"headerlink\" title=\"Using the X-XSS-Protection Header\"></a>Using the X-XSS-Protection Header</h2><p>XSS (Cross Site Scripting) is the most common of all Web App attacks. XSS occurs when a malicious entity injects scripts to be run into your app. A few years back, most web browsers added a security filter for XSS attacks built into the browser itself. Now whilst in theory this was a good step, they did tend to throw-up false-positives quite often. Due to this, the filter can be turned off by the User. (As the option should be available, in my opinion.)</p>\n<p>To ensure our Users are protected, we can force this filter (worth it), on our DApp by using the <code>X-XSS-Protection</code> Header. This Header is widely supported by common browsers, and something I’d recommend using every time.</p>\n<p>To apply this header to your Node.js app, you should include the following:</p>\n<figure class=\"highlight js\"><table><tr><td class=\"code\"><pre><span class=\"line\"><span class=\"function\"><span class=\"keyword\">function</span> <span class=\"title\">requestHandler</span>(<span class=\"params\">req, res</span>) </span>{</span><br><span class=\"line\">\tres.setHeader( <span class=\"string\">'X-XSS-Protection'</span>, <span class=\"string\">'1; mode=block'</span> );</span><br><span class=\"line\">}</span><br></pre></td></tr></table></figure>\n\n<p>Note the two <em>directives</em> in this header: <code>1</code> is simply acts as a boolean 1 or 0 value to reflect on or off. <code>mode=block</code> will stop the entire page loading, instead of simply sanitising the page as it would if you excluded this directive.</p>\n<p>If you’re a security-freak like myself, and a user of the Chromium browser, you could even go one-step further than this and set the directives like so:</p>\n<pre><code>X-XSS-Protection: 1; report=<reporting-uri></code></pre><p>Now, if the browser detects an XSS attack, the page will be sanitized, and report the violation. Note that this uses the functionality of the CSP <code>report-uri</code> directive to send a report that I will talk about in the Content Security Policy section below.</p>\n<h2 id=\"Defend-against-Clickjacking\"><a href=\"#Defend-against-Clickjacking\" class=\"headerlink\" title=\"Defend against Clickjacking\"></a>Defend against Clickjacking</h2><p>Clickjacking occurs when a malicious agent injects objects / iFrames into your DApp, made to look identical, that actually sends the User to a malicious site when clicked. Another common, and possibly more scary example is that malicious agents insert something like a payment form into your DApp, that looks identical to your DApp, but steals payment details.</p>\n<p>Now, whilst this <em>could</em> be a very dangerous issue, it’s very easy to mitigate, with almost no impact on your DApp. Servers offer Browsers a Header Protocol named <code>X-Frame-Options</code>. This protocol allows us to specify domains to accept iFrames from. It also allows us to state which sites our DApp can be embedded on. With this protocol, we get three fairly self-explanatory options/directives: <code>DENY</code>, <code>ALLOW-FROM</code>, and <code>SAMEORIGIN</code>.</p>\n<p>If we choose <code>DENY</code>, we can block all framing. If we use <code>ALLOW-FROM</code>, we can supply a list of domains to allow framing within. I use the <code>SAMEORIGIN</code> directive, as this means framing can only be done within the current domain. This can be utilised with the following:</p>\n<figure class=\"highlight js\"><table><tr><td class=\"code\"><pre><span class=\"line\"><span class=\"function\"><span class=\"keyword\">function</span> <span class=\"title\">requestHandler</span>(<span class=\"params\">req, res</span>) </span>{</span><br><span class=\"line\">\tres.setHeader( <span class=\"string\">'X-Frame-Options'</span>, <span class=\"string\">'SAMEORIGIN'</span> );</span><br><span class=\"line\">}</span><br></pre></td></tr></table></figure>\n\n\n<h2 id=\"Content-Security-Policy-CSP\"><a href=\"#Content-Security-Policy-CSP\" class=\"headerlink\" title=\"Content Security Policy (CSP)\"></a>Content Security Policy (CSP)</h2><p>CSP is another major topic when it comes to Server-Browser security for Web Apps. At a high-level; Content Security Policies tell the browser what content is authorised to execute on a Web App, and what will block. Primarily, this can be used to prevent XSS, in which an attacker could place a <code><script></code> tag on your Web App. The Content-Security-Policy is a Server-Browser header that we can set to ensure our Server tells the Browser exactly which media, scripts, and their origins, allowed to be executed on our DApp.</p>\n<p>The whitelisting of resource loading and execution URIs provides a good level of security, that will in most parts, defend against most attacks.</p>\n<p>To include a Content Security Policy that allows only internal and <em>Google Analytics</em>, in an Express.js server, you could do the following:</p>\n<figure class=\"highlight js\"><table><tr><td class=\"code\"><pre><span class=\"line\"><span class=\"keyword\">var</span> express = <span class=\"built_in\">require</span>(<span class=\"string\">'express'</span>);</span><br><span class=\"line\"><span class=\"keyword\">var</span> app = express();</span><br><span class=\"line\"></span><br><span class=\"line\"></span><br><span class=\"line\">app.use(<span class=\"function\"><span class=\"keyword\">function</span>(<span class=\"params\">req, res, next</span>) </span>{</span><br><span class=\"line\"> res.setHeader(<span class=\"string\">\"Content-Security-Policy\"</span>, <span class=\"string\">\"script-src 'self' https://analytics.google.com\"</span>);</span><br><span class=\"line\"> <span class=\"keyword\">return</span> next();</span><br><span class=\"line\">});</span><br><span class=\"line\"></span><br><span class=\"line\">app.use(express.static(__dirname + <span class=\"string\">'/'</span>));</span><br><span class=\"line\"></span><br><span class=\"line\">app.listen(process.env.PORT || <span class=\"number\">3000</span>);</span><br></pre></td></tr></table></figure>\n\n<p>However, if we do not wish to allow <em>any</em> external sites to execute scripts on our DApp, we could simply include the following:</p>\n<figure class=\"highlight js\"><table><tr><td class=\"code\"><pre><span class=\"line\"><span class=\"function\"><span class=\"keyword\">function</span> <span class=\"title\">requestHandler</span>(<span class=\"params\">req, res</span>) </span>{</span><br><span class=\"line\">\tres.setHeader( <span class=\"string\">'Content-Security-Policy'</span>, <span class=\"string\">\"script-src 'self'\"</span> );</span><br><span class=\"line\">}</span><br></pre></td></tr></table></figure>\n\n<p>Note the <code>script-src</code> directive here, that we have set to <code>self</code>, therefore only allowing scripts from within our own domain. Of course, CSP is not without its own problems. Firstly, it would be very easy for us to forget about some of the media we have in our DApp and to simply exclude them accidentally. Now that the web is so <em>rich</em> in media, this would be reasonably easy to do. Secondly, many of us use third-party plugins on our DApp. Again, unless we have a full blueprint of these, we could very easily block them.</p>\n<p>So, once activated, this Server Header <em>could</em> potentially be very detrimental to us. However, there are two great ways of testing this. You can set a strict policy, and use the built in directives; <code>report-only</code> and <code>report-uri</code> to test them. The <code>report-uri</code> directive tells the Browser to send a JSON report of all of the blocked scripts to a URi that we specify. The <code>report-only</code> directive does the same, but will <strong><em>not</em></strong> block the scripts on the site. This is very useful for testing, before we put this Header into production.</p>\n<p>There’s a great write-up on the reporting, <a href=\"https://developer.mozilla.org/en-US/docs/Web/HTTP/Headers/Content-Security-Policy-Report-Only\">here</a>.</p>\n<p>Content Security Policies are both excellent and very powerful, but must be used cautiously. Much the same as HSTS mentioned above, we need to ensure we are aware of the situation before activating. If you are loading in external images, scripts etc. you need to understand that unless you include these in the policy, they <strong><em>will</em></strong> be blocked.</p>\n<h2 id=\"CSRF\"><a href=\"#CSRF\" class=\"headerlink\" title=\"CSRF\"></a>CSRF</h2><p>Cross Site Request Forgery (CSRF) has been at the forefront of Web App Security for longer than any of us care to remember. The idea behind it is that a malicious agent sends a (forged) request from one app to another whilst the User is signed in and authorised. This would therefore allow the request to enter and alter restricted actions on the requested App, with the requested app believing entirely that the actions were coming from the logged in User. A better way for me to describe this is to show you:</p>\n<p>Imagine if you will, I am security-abusing miscreant, and I happen to know that Twitter has no CSRF protection. (They do, this is all hypothetical.) I’m also aware that most people who visit <em>my</em> DApp, probably leave their Twitter logged in, and therefore have a Cookie stored in their browser, to allow them fast access to Twitter the next time they want to post something.</p>\n<p>On my DApp frontend, I could embed a script such as the following:</p>\n<figure class=\"highlight html\"><table><tr><td class=\"code\"><pre><span class=\"line\"><span class=\"tag\"><<span class=\"name\">form</span> <span class=\"attr\">action</span>=<span class=\"string\">\"https://twitter.com/tweet\"</span> <span class=\"attr\">method</span>=<span class=\"string\">\"POST\"</span> <span class=\"attr\">id</span>=<span class=\"string\">\"sendTweet\"</span>></span></span><br><span class=\"line\"><span class=\"tag\"><<span class=\"name\">input</span> <span class=\"attr\">type</span>=<span class=\"string\">\"hidden\"</span> <span class=\"attr\">name</span>=<span class=\"string\">\"tweet\"</span> <span class=\"attr\">value</span>=<span class=\"string\">\"Hey! Check out my awesome spam site - spam.com\"</span>></span></span><br></pre></td></tr></table></figure>\n\n<p>When a user’s browser loads my DApp, this form will be loaded (entirely invisibly) too. I would then also have embedded a small piece of JS to POST the form, without them ever knowing:</p>\n<figure class=\"highlight js\"><table><tr><td class=\"code\"><pre><span class=\"line\"><span class=\"built_in\">document</span>.getElementById(<span class=\"string\">\"sendTweet\"</span>).submit();</span><br></pre></td></tr></table></figure>\n\n<p>In doing this, I’ve just sent a Tweet on their account, without ever having to know their Username or Password. The Cookie they had stored in their Browser allowed my app to send a <em>forged request</em>, pretending to be them - and if Twitter had no CSRF mitigation, it would have worked too!</p>\n<p>For years, we have been trying to solve CSRF requests by checking HTTP headers such as the <code>Origin</code> and <code>Referer</code>. Whilst these have offered fairly robust protection for a few years, there is now a simple directive that once applied; will entirely mitigate CSRF attacks.</p>\n<p>Enter, the <strong><em>SameSite</em></strong> Cookie directive. <code>SameSite</code> is relatively new, and only been around for the past year, in which it has gained some publicity, but is still widely unknown. In essence, the <code>SameSite</code> directive, once applied, will tell the Browser to <strong>never</strong> send that cookie when a request from an external (Cross Site) url is made. We can apply this directive by altering our Cookies as such:</p>\n<pre><code>Set-Cookie: sess=sessionid123; path=/; SameSite</code></pre><p>It really is that easy. I wouldn’t recommend removing your existing CSRF protection just yet, but I would definitely recommend including this directive on your DApp.</p>\n<h2 id=\"Cookies\"><a href=\"#Cookies\" class=\"headerlink\" title=\"Cookies\"></a>Cookies</h2><p>As we know, cookies are an important feature of our Web Applications, carrying data mainly referring to our User Sessions. While simply implementing the aforementioned directives is sufficient in securing your cookies, and preventing attacks, we can actually take cookie security a step further.</p>\n<p><em>Cookie Prefixing</em> is a relatively under-used technique that we can utilise to ensure a cookie <em>is</em> secure:</p>\n<p><strong><em>The <code>__Secure</code> prefix</em></strong> - If a cookie’s name begins with “__Secure”, the cookie MUST be:</p>\n<ul>\n<li>Set with a “<em>Secure</em>“ attribute</li>\n<li>Set from a URI whose scheme is considered secure by the user agent.</li>\n</ul>\n<p>The following cookie would be rejected when set from any origin, as the “Secure” flag is not set:</p>\n<pre><code>Set-Cookie: __Secure-sess=12345; Domain=myapp.com</code></pre><p>While the following would be accepted if set from a secure origin e.g. <code>https://</code> and rejected otherwise:</p>\n<pre><code>Set-Cookie: __Secure-sess=12345; Secure; Domain=myapp.com</code></pre><p>Alongside the <code>__Secure</code> prefix, we also have the <code>__Host</code> prefix:</p>\n<p><strong><em>The <code>__Host</code> prefix</em></strong> - If a cookie’s name begins with “__Host”, the cookie MUST be:</p>\n<ul>\n<li>Set with a “Secure” attribute</li>\n<li>Set from a URI whose “scheme” is considered “secure” by the user agent.</li>\n<li>Sent only to the host which set the cookie. That is, a cookie named “__Host-cookie1” set from “<a href=\"https://example.com"\">https://example.com"</a> <em>MUST NOT</em> contain a “Domain” attribute (and will therefore be sent only to “example.com”, and not to “subdomain.example.com”).</li>\n<li>Sent to every request for a host. That is, a cookie named “__Host-cookie1” MUST contain a “Path” attribute with a value of “/“.</li>\n</ul>\n<p>The following cookies would always be rejected:</p>\n<pre><code>Set-Cookie: __Host-sess=12345\nSet-Cookie: __Host-sess=12345; Secure\nSet-Cookie: __Host-sess=12345; Domain=example.com\nSet-Cookie: __Host-sess=12345; Domain=example.com; Path=/\nSet-Cookie: __Host-sess=12345; Secure; Domain=example.com; Path=/</code></pre><p>While the following would be accepted if set from a secure origin e.g. <code>https://</code>, and rejected otherwise:</p>\n<pre><code>Set-Cookie: __Host-sess=12345; Secure; Path=/</code></pre><p>By setting these prefixes, any compliant browser will be made to enforce them.</p>\n<p>Now, if we include the tips from my first article, and the tips above, we can make the most secure Cookie possible:</p>\n<pre><code>Set-Cookie: __Host-sess=id123; path=/; Secure; HttpOnly; SameSite</code></pre><p>In this most-secure-cookie, we’re utilising the <code>__Host</code> prefix which means the <code>Secure</code> attribute has to be set, and it must be served from a secure host. There is no <code>Domain</code> attribute set and the <code>Path</code> is /. We’ve set <code>HttpOnly</code> for XSS protection, and SameSite is enabled too to prevent CSRF. Of course, this won’t be the best or most practical solution for a lot of people, but it <em>is</em> the most in-theory secure Cookie we could set from our DApp.</p>\n<h2 id=\"Take-a-DApp-Blueprint\"><a href=\"#Take-a-DApp-Blueprint\" class=\"headerlink\" title=\"Take a DApp Blueprint\"></a>Take a DApp Blueprint</h2><p><strong>*Note</strong> - In my opinion, this is one of the most important security steps one can take.*</p>\n<p>Do you know the ins-and-outs of each library your Developers use? Probably not - it’s near impossible to keep track nowadays, but this is to <em>great</em> detriment. Are you also aware of which libraries and tools have been given write access to your production servers and databases - and how isolated they are?</p>\n<p>The issue here is that using so much <em>automation</em> in modern development, we grant access to a huge amount of tools/libraries without <em>really</em> knowing exactly what they’re doing. We take it for granted that each of these libraries is entirely safe and without their security vulnerabilities - or worse - performing malicious activities themselves.</p>\n<p>We all want the most streamlined Dev cycle possible. We all use automation tools that trigger a whole bunch of processes, doing things that barely any of us are aware of. The propensity of some Devs to throw <code>sudo</code> commands at package managers if a command fails is also truly terrifying.</p>\n<p>So how do we get around this? <strong><em>Take a Tech Blueprint!</em></strong> This needn’t be a complex process, it’s as simple as knowing what each piece of Software is doing on your servers, and what authority they’ve been granted. Take a note of any new tools / packages before you grant them permissions, and do a little research. Some simple Googling of key phrases i.e. <code>*package* security vulnerabilities</code> will usually bring up more results than you’d expect. It’s also worth checking out the <em>Issues</em> tab on the package’s GitHub page. Vulnerabilities are often discussed there and you’ll be able to act accordingly. This applies to the top-level Package Managers too.</p>\n<p>Package managers are used by almost ALL of us. If you really want to scare yourself, go ahead and search <code>*package manager* security vulnerability</code> and take a look at all of the results! Again, knowing what we are installing and granting permissions to, and especially keeping a note of this, could just save our Bacon. Take a look at <a href=\"https://medium.com/friendship-dot-js/i-peeked-into-my-node-modules-directory-and-you-wont-believe-what-happened-next-b89f63d21558\">this article for a relevant example!</a></p>\n<p><strong>Handy tip:</strong> if you want to know which hooks an npm package runs, before you install it, run the command:</p>\n<figure class=\"highlight bash\"><table><tr><td class=\"code\"><pre><span class=\"line\">$ npm show <span class=\"variable\">$module</span> scripts</span><br></pre></td></tr></table></figure>\n\n<h2 id=\"Security-for-DApp-Users\"><a href=\"#Security-for-DApp-Users\" class=\"headerlink\" title=\"Security for DApp Users\"></a>Security for DApp Users</h2><p><img src=\"https://cdn-media-1.freecodecamp.org/images/1*sd62aH6GGS1RoCR9t4QNyQ.png\" alt=\"Dapp security\"><br><a href=\"https://www.freecodecamp.org/news/how-to-design-a-secure-backend-for-your-decentralized-application-9541b5d8bddb/\">Image Source</a></p>\n<p>With more and more DApps being created including web-based exchanges, crypto-based games etc. The opportunities for bad actors increase with each new DApp released. Say, for instance, someone released an interactive game built around Web3, and directly interacting with user’s wallets. On registration for the game, wallets are created, and they collected sensitive data, including user’s private keys being stored in local storage (super insecure).</p>\n<p>The DApp developer, however, didn’t realise that a bad actor has been injecting a remote script during registration that evaluates and sends all of the player’s private keys to the bad actor’s server.</p>\n<ul>\n<li><strong>Protect wallets and private keys:</strong> If user’s wallets are compromised, this is game over. Extreme care needs to be taken when handling this sensitive information.</li>\n<li><strong>Protect user information:</strong> Users do not want their personal data being exposed to the world. Ensure that user data remains private.</li>\n<li><strong>Use <em>MetaMask</em> or similar</strong> to ensure security of wallets and user keys.</li>\n<li><strong>Evaluate wisely what needs to be stored in the blockchain or in your servers.</strong> Only include data that is absolutely necessary for you smart contracts to function within the contracts themselves.</li>\n</ul>\n<p>There is an excellent write-up on DApp security standards you <a href=\"https://github.com/Dexaran/DAPP-security-standards/blob/master/README.md\">can check out here.</a></p>\n<h2 id=\"Conclusion\"><a href=\"#Conclusion\" class=\"headerlink\" title=\"Conclusion\"></a>Conclusion</h2><p>Without a doubt, the most effective method for maintaining the security of your DApps is keeping up-to-date with any security protocols on an ongoing basis. Vulnerabilities are an extremely fickle and dynamic topic, in that they change / pop up so regularly.</p>\n<p>By following the tips in this article, keeping up-to-date with any security announcements, and having an in-depth overview of your systems, you can rest assured that you are well on your way to having a jolly well secured DApp. As stressed in this article, security considerations are not only found on the backend of our apps, but on the frontend too. Ensuring that we approach both means we can be confident about the safety of our users (which should be our number one priority). The best tools in web security are common sense and vigilance.</p>\n<p>So, from enforcing HTTPS with Strict Transport Security, to securing our DApp frontend with a Content Security Policy; we’ve covered the main topics, in my opinion to ensuring frontend to backend security for our web & decentralised web applications. These topics are all techniques I utilise myself and would advocate for use in your apps on an ongoing basis.</p>\n<p>For any future projects, I recommend taking a look at these <a href=\"https://nexus.mythx.io/directory#!/\">Blockchain Security providers.</a></p>\n<p><a href=\"https://twitter.com/rbin\"> <strong><em>- @rbin</em></strong></a></p>\n"},{"title":"Building a decentralized Reddit with Embark - Part 3","summary":"In this third and last part of the tutorial series about building a decentralized Reddit with Embark, we're building the front-end for our application using React and EmbarkJS.","layout":"blog-post","author":"pascal_precht","alias":"news/2019/02/17/building-a-decentralized-reddit-with-embark-part-3/","_content":"\nHopefully you've read [the first](/news/2019/02/04/building-a-decentralized-reddit-with-embark-part-1/) and [second part](/news/2019/02/11/building-a-decentralized-reddit-with-embark-part-2/) of this tutorial on building a decentralized Reddit application using Embark. If not, we highly recommend you doing so, because in this part, we'll be focussing on building the front-end for our application and continue where we've left off.\n\n- [**Part 1** - Setting up the project and implementing a Smart Contract](/news/2019/02/04/building-a-decentralized-reddit-with-embark-part-1/)\n- [**Part 2** - Testing the Smart Contract through EmbarkJS](/news/2019/02/11/building-a-decentralized-reddit-with-embark-part-2/)\n\nWe'll be using React as a client-side JavaScript library to build our application. However, we can use any framework of our choice, so feel free to follow along while using your favourite framework equivalents!\n\n**The code for this tutorial can be found in [this repository](https://github.com/embarklabs/dreddit-tutorial)**.\n\n## Rendering our first component\n\nAlright, before we jump straight into building components that will talk to our Smart Contract instance, let's first actually render a simple text on the screen just to make sure our setup is working correctly.\n\nFor that, what we'll do is adding React as a dependency to our project. In fact, we'll be relying on two packages - `react` and `react-dom`. The latter is needed to render components defined with React in a DOM environment, which is what a Browser essentially is.\n\nLet's add the following `dependencies` section to our projects `package.json`:\n\n```\n\"dependencies\": {\n \"react\": \"^16.4.2\",\n \"react-dom\": \"^16.4.2\"\n}\n```\n\nOnce that is done we need to actually install those dependencies. For that we simply execute the following command in our terminal of choice:\n\n```\n$ npm install\n```\n\nNow we can go ahead and actually make use of React. As Embark is framework agnostic, we won't be focussing too much on details specific to React, just the least amount that is needed to make our app work.\n\nCreating components in React is pretty straight forward. All we need to do is creating a class that extends React's `Component` type and add a `render()` method that will render the component's view.\n\nLet's create a folder for all of our components inside our projects:\n\n```\n$ mkdir app/js/components\n```\n\nNext, we create a file for our root component. We call it simply `App` and use the same file name:\n\n```\n$ touch app/js/components/App.js\n```\n\nAlright, as mentioned earlier, we really just want to render some text on the screen for starters. Here's what that could look like:\n\n```\nimport React, { Component } from 'react';\n\nexport class App extends Component {\n\n render() {\n return <h1>DReddit</h1>\n }\n}\n```\n\nThis is probably self explanatory, but all we're doing here is importing `React` and its `Component` type and create an `App` class that extends `Component`. The `render()` method will be used by React to render the component's view and has to return a template that is written in JSX syntax. JSX looks a lot like HTML just that it comes with extra syntax to embed things like control structures. We'll make use of that later!\n\nOkay now that we have this component defined, we need to tell React to actually render this particular component. For that, we head over to `app/js/index.js` and add the following code:\n\n```\nimport React from 'react';\nimport { render } from 'react-dom';\nimport { App } from './components/App';\n\nrender(<App />, document.getElementById('root'));\n```\n\nWe need to import `React` again as it has to be available in this script's scope. We also import a `render` function from `react-dom`, which is used to render our root component (`App`) into some element inside our HTML document. In this case we say that the element in which we want to render our root component is the element with the id `root`.\n\nLet's set this up really quick. In `app/index.html` add a new element with a `root` id:\n\n```\n<body>\n\t<div id=\"root\"></div>\n\t<script src=\"js/app.js\"></script>\n</body>\n```\n\nNotice that we've also moved the `script` tag inside the body tag, after the element with the `root` id. This is just one way to work around the fact that the element we're referencing inside our `render()` method is actually available in the document at the time the script is executed.\n\nThat should do it! Let's spin up Embark, we should then see our component rendered on the screen:\n\n```\n$ embark run\n```\n\n## Building a `CreatePost` component\n\nAlright, enough warm up. Time to build components that are useful. We start off with building a component that lets users create posts through our application. Similar to `App`, we'll introduce a new component `createPost` that comes with a `render()` method to display a simple form for entering data. We'll also need to add event handlers to the form so that when a user submits the form, we can actually access the data and later on send it to our Smart Contract.\n\nCreating a simple form is very straight forward:\n\n```\nimport React, { Component } from 'react';\n\nexport class CreatePost extends Component {\n\n render() {\n return (\n <form>\n <div>\n <label>Topic</label>\n <input type=\"text\" name=\"topic\" />\n </div>\n <div>\n <textarea name=\"content\"></textarea>\n </div>\n <button>Post</button>\n </form>\n )\n }\n}\n```\n\nTo actually render this component on screen, we need to make it part of our `App` component. Or, to be more specific, have the `App` component render our `CreatePost` component. For now we can simply add it to `App`'s render function like this;\n\n\n```\nimport { CreatePost } from './CreatePost';\n\nexport class App extends Component {\n\n render() {\n return (\n <React.Fragment>\n <h1>DReddit</h1>\n <CreatePost />\n </React.Fragment&>\n )\n }\n}\n```\n\nReact doesn't allow for multiple root elements in a single component's view, so we have to take advantage of `React.Fragment`. Obviously, there's not too much going on here apart from us rendering a static form. Also notice that we don't spend too much time and effort on making the form look nice as we focus on the functionality for now. Consider that homework!\n\nLet's make this form functional. First of all we want make sure that data entered into the form is available inside our component. React components maintain an object called `state` that can be used for exactly that. All we have to do is to initialize it with some initial values and update it using a `setState()` method if needed.\n\nLet's introduce `state` in our component by adding a constructor and initializing it accordingly:\n\n```\nexport class CreatePost extends Component {\n\n constructor(props) {\n super(props);\n\n this.state = {\n topic: '',\n content: '',\n loading: false\n };\n }\n ...\n}\n```\n\nNext we bind that state to our form fields:\n\n```\n<form>\n <div>\n <label>Topic</label>\n <input type=\"text\" name=\"topic\" value={this.state.topic} />\n </div>\n <div>\n <textarea name=\"content\" value={this.state.content}></textarea>\n </div>\n <button>Post</button>\n</form>\n```\n\nNo worries, we'll make use of `loading` in a second. Last but not least we want to add some event handlers so that changes in the view will be reflected back to our component's state as the user is entering data. To make sure everything works fine, we'll also add an event handler for the form submission and output the data in `state`. Here's what our `handleChange()` and `createPost()` handlers looks like:\n\n```\nexport class CreatePost extends Component {\n ...\n handleChange(field, event) {\n this.setState({\n [field]: event.target.value\n });\n }\n\n createPost(event) {\n event.preventDefault();\n console.log(this.state);\n }\n ...\n}\n```\n\nNotice how we're using `setState()` inside `handleChange()` to update whatever field name has been passed to that method. Now all we need to do is attach those handlers to our form:\n\n```\n<form onSubmit={e => createPost(e)}>\n <div>\n <label>Topic</label>\n <input\n type=\"text\"\n name=\"topic\"\n value={this.state.topic}\n onChange={e => handleChange('topic', e)} />\n </div>\n <div>\n <textarea\n name=\"content\"\n value={this.state.content}\n onChange={e => handleChange('content', e})></textarea>\n </div>\n <button type=\"submit\">Post</button>\n</form>\n```\n\nSince we're using the `onSubmit()` handler of the form, it's also important that we either add a `type=\"submit\"` to our `button` or change the button to an `<input type=\"submit\">` element. Otherwise, the form won't emit a submit event.\n\nNice! With that in place, we should see the component's `state` in the console when submitting the form! The next challenge is to use `EmbarkJS` and its APIs to make our component talk to our Smart Contract instance.\n\n### Uploading data to IPFS\n\nRecall from our [first part](/news/2019/02/04/building-a-decentralized-reddit-with-embark-part-1/#Creating-posts) of this tutorial that our `DReddit` Smart Contract comes with a `createPost()` method that takes some bytes as post data. Those bytes are actually not the post data itself, but an IPFS hash that points to the post data. In other words, we'll have to somehow create such a hash and make sure the data is uploaded to IPFS as well.\n\nLuckily, EmbarkJS comes with plenty of convenient APIs to do exactly that! `EmbarkJS.Storage.saveText()` takes a string, uploads it to IPFS and returns its hash which can then be used to create a post using our Smart Contract. One thing to keep in mind is that those APIs are asynchronous. Similar to how we wrote tests in [part two](/news/2019/02/11/building-a-decentralized-reddit-with-embark-part-2/#Testing-createPost) of this tutorial, we'll use `async/await` to write asynchronous code in a synchronous fashion.\n\n```\nasync createPost(event) {\n event.preventDefault();\n\n this.setState({\n loading: true\n });\n\n const ipfsHash = await EmbarkJS.Storage.saveText(JSON.stringify({\n topic: this.state.topic,\n content: this.state.content\n }));\n\n this.setState({\n topic: '',\n content: '',\n loading: false\n });\n}\n```\n\nWe use `JSON.stringify()` on an object that holds the `topic` and `content` of the post to be created. This is also the first time we put `loading` into action. Setting it to `true` before, and `false` after we've performed our operations lets us render a useful message as the user is waiting for updates.\n\n```\n<form onSubmit={e => createPost(e)}>\n ...\n {this.state.loading &&\n <p>Posting...</p>\n }\n</form>\n```\n\nObviously, we're not done yet though. All we do right now is uploading the post's data to IPFS and receiving the hash, but we still need to take that hash and send it to our Smart Contract using its `createPost()` method. Let's do that!\n\n### Sending transactions to create posts\n\nTo send a transaction to our Smart Contract, we can again take advantage of EmbarkJS' APIs, similar to how we did it in the [second part](/news/2019/02/11/building-a-decentralized-reddit-with-embark-part-2). We also need to get hold of an Ethereum account to send the transaction from. This will be very straight forward as we'll be just relying on the accounts that are generated by the Ethereum node that Embark spins up for us.\n\nOnce we have those things in place we can get a gas estimation for our transaction and send the data over. Here's how we retrieve our accounts, notice that `async/await` can be used here as well:\n\n```\nasync createPost(event) {\n ...\n const accounts = await web3.eth.getAccounts();\n ...\n}\n```\n\nNext up we'll import a `DReddit` Smart Contract instance from EmbarkJS and use it to get a gas estimation from `web3`. We can then use the estimation and one of our accounts to actually send the transaction:\n\n```\nimport DReddit from './artifacts/contracts/DReddit';\n...\n\nasync createPost(event) {\n ...\n const accounts = await web3.eth.getAccounts();\n const createPost = DReddit.methods.createPost(web3.utils.toHex(ipfsHash));\n const estimate = await createPost.estimateGas();\n\n await createPost.send({from: accounts[0], gas: estimate});\n ...\n}\n```\n\nSweet, with that, our `createPost` method is done! We haven't built a list of all created posts yet, but if we open up the app and create a post, we can use Embark to double check whether the transaction went through successfully. Simply watch the output in the terminal after running `embark run`. We should see a confirmation that looks something like this:\n\n```\nBlockchain> DReddit.createPost(\"0x516d5452427a47415153504552614645534173335133765a6b59436633634143776368626263387575623434374e\") | 0xbbeb9fa1eb4e3434c08b31409c137c2129de65eb335855620574c537b3004f29 | gas:136089 | blk:18455 | status:0x1\n```\n\n## Creating a Post component\n\nThe next challenge lies in fetching all created posts from our Smart Contract and IPFS so we can render them on screen. We start simple and first create a new component that will render a single post. After that we'll look into rendering a list of posts dynamically, based on the data we're fetching.\n\nAgain, our application won't look particularly pretty, we'll just focus on getting the core functionality right. A post component needs to render the post topic, its content, the owner of the post, ideally the date when it has been created, and a button to up and down vote respectively.\n\nHere's what such a component with a basic template could look like:\n\n```\nimport React, { Component } from 'react';\n\nexport class Post extends Component {\n\n render() {\n return (\n <React.Fragment>\n <hr />\n <h3>Some Topic</h3>\n <p>This is the content of a post</p>\n <p><small><i>created at 2019-02-18 by 0x00000000000000</i></small></p>\n <button>Upvote</button>\n <button>Downvote</button>\n </React.Fragment>\n )\n }\n}\n```\n\nThere are different ways to make the data being rendered dynamic. Usually, we would probably pass a one or more properties to the `Post` component that represents the entire post object and can then be displayed inside its `render()` method. However, for this tutorial we're going to choose a slightly different path. We'll make `Post` receive IPFS hash that's stored in the Smart Contract and have it resolve the data itself.\n\nLet's stay consistent with our naming and say the property we're expecting to be filled with data is called `description`, just like the one used inside the Smart Contract. We can then use `EmbarkJS.Storage.get()` with the IPFS hash to fetch the data that represents the actual post. In order to render the data inside `Post`'s view, we'll parse it and use `setState()` accordingly.\n\nTo make sure all of that happens once the component is ready to do its work, we'll do all of that inside its `componentDidMount()` life cycle hook:\n\n```\nimport React, { Component } from 'react';\nimport EmbarkJS from '.artifacts/embarkjs';\n\nexport class Post extends Component {\n\n constructor(props) {\n super(props);\n this.state = {\n topic: '',\n content: ''\n };\n }\n\n async componentDidMount() {\n const ipfsHash = web3.utils.toAscii(this.props.description);\n const data = await EmbarkJS.Storage.get(ipfsHash);\n const { topic, content } = JSON.parse(data);\n\n this.setState({ topic, content });\n }\n ...\n}\n```\n\nThere's one gotcha to keep in mind here: Calling `EmbarkJS.Storage.get()` or any `EmbarkJS` function on page load can fail, because the storage system might not be fully initialized yet. This wasn't a problem for the previous `EmbarkJS.Storage.uploadText()` because we called that function well after Embark had finished initializing\n\nTheoretically however, there could be a race condition even for creating a post. To ensure that EmbarkJS is ready at any point in time, we use its `onReady()` hook. `EmbarkJS.onReady()` takes a callback which will be executed once EmbarkJS is ready to go. The best place to do this in our app is probably where we attempt to render our application, so let's wrap that `render()` call in our `App` component inside Embark's `onReady()` function.\n\n```\nEmbarkJS.onReady(() => {\n render(<App />, document.getElementById('root'));\n});\n```\n\nThis also means our app will only render when EmbarkJS is ready, which theoretically could take a little longer. However in this tutorial, chances are very low this is becoming a problem.\n\nLet's also quickly add the `owner` and creation date. The `owner` is expected to be passed down as a property. The same goes for the creation date. We just need to make sure it'll be formatted in a way the users can make sense of the data. We'll use the `dateformat` library for that and install it as a dependency like this:\n\n```\n$ npm install --save dateformat\n```\n\nOnce that is done, we can update our `Post` component's `render()` function to calculate a properly formatted date based on the `creationDate` that has been passed down through properties:\n\n```\n...\nimport dateformat from 'dateformat';\n\nexport class Post extends Component {\n ...\n render() {\n const formattedDate = dateformat(\n new Date(this.props.creationDate * 1000),\n 'yyyy-mm-dd HH:MM:ss'\n );\n return (\n <React.Fragment>\n <hr />\n <h3>{this.state.topic}</h3>\n <p>{this.state.content}</p>\n <p><small><i>created at {formattedDate} by {this.props.owner}</i></small></p>\n <button>Upvote</button>\n <button>Downvote</button>\n </React.Fragment>\n )\n }\n}\n```\n\nNotice that variables created inside `render()` can be interpolated as they are - there's no need to make them available on `props` or `state`. As a matter of fact, `props` are always considered read only in React.\n\nLet's try out our new `Post` component with some static data by adding it to our `App` component's view. Next up, we'll make this dynamic by fetching the posts from our Smart Contract.\n\n**Attention**: The hash used in this snippet might not be available in your local IPFS node, so you'll have to get hold of your own hash. This can be down by logging out the hash that is returned from IPFS and convert it to hex code.\n\n```\nexport class App extends Component {\n\n render() {\n return (\n <React.Fragment>\n <h1>DReddit</h1>\n <CreatePost />\n <Post\n description=\"0x516d655338444b53464546725369656a747751426d683377626b56707566335770636e4c715978726b516e4b5250\"\n creationDate=\"1550073772\"\n owner=\"0x00000000000\"\n />\n </React.Fragment>\n )\n }\n}\n```\n\n## Creating a List component\n\nBefore we can move on with building a component that renders a list of posts, we'll have to extend our Smart Contract with one more method. Since there's no canonical way to fetch array data from a Smart Contract, we'll be fetching the post data for each post one by one. We do that by first fetching the total number of posts and use that number to iterate over the available indices, which we can then use to fetch the actual posts.\n\nLet's introduce a method `numPosts()` in our `DReddit` Smart Contract:\n\n```\nfunction numPosts() public view returns (uint) {\n return posts.length;\n}\n```\n\n`posts.length` will increase as we're adding posts, so it will always be the single source of truth when it comes to determining indices of posts. This would be a good opportunity to write another test - we'll leave that up to you!\n\nWith that in place, we can start building a new `List` component. The `List` component maintains a list of posts to render on screen, so we can start simple again and introduce the bare minimum like this:\n\n```\nimport React, { Component } from 'react';\n\nexport class List extends Component {\n\n constructor(props) {\n super(props);\n this.state = {\n posts: []\n };\n }\n\n render() {\n return (<React.Fragment>\n {this.state.posts.map(post => {\n return (\n <Post\n key={post.id}\n description={post.description}\n creationDate={post.creationDate}\n owner={post.owner}\n />)\n })}\n </React.Fragment>\n )\n }\n}\n```\n\nThe most interesting part here is probably the `render()` method, in which we iterate over all `state.posts` (which at the moment is empty) and then render a `Post` component for every iteration. Another thing to note is that every `Post` receives a `key`. This is required in React when creating views from loops. We've never introduced a `post.id` in this tutorial, but don't worry, we'll fix that in a moment.\n\nWe can already put that in our `App` component. It won't render anything as we haven't fetched any posts yet, but that's what we'll do next.\n\n\n```\nimport { List } from './List';\n\nexport class App extends Component {\n\n render() {\n return (\n <React.Fragment>\n <h1>DReddit</h1>\n <CreatePost />\n <List />\n </React.Fragment>\n )\n }\n}\n```\n\n### Fetching posts data\n\nLet's fill our new `List` component with life! As mentioned earlier, we'll use our Smart Contract's `numPosts()` method to get hold of the total number of posts available. We then use that number to iterate over all indices and request every post individually. Since this is logic we want to execute once the `List` component is ready, we'll use its `componentDidMount()` method for that:\n\n```\nexport class List extends Component {\n ...\n async componentDidMount() {\n const totalPosts = await DReddit.methods.numPosts().call();\n\n let list = [];\n\n for (let i = 0; i < totalPosts; i++) {\n const post = DReddit.methods.posts(i).call();\n list.push(post);\n }\n\n list = await Promise.all(list);\n }\n ...\n}\n```\n\nNotice that in the above code we don't `await` the calls to every individual post. This is on purpose as we don't want to wait on each and every promise to resolve, but first collect all of the promises we need and then resolve them all in one go using `Promise.all().`\n\nLast but not least, we need to add an `id` property to every post as mentioned earlier. This is easily done by simply iterating over all posts and assigning the post's index as `id`. Once that is done, we can use `setState()` to update our component's state and render the list:\n\n```\nasync componentDidMount() {\n ...\n list = list.map((post, index) => {\n post.id = index;\n return post;\n });\n\n this.setState({ posts: list });\n}\n```\n\nThat's it! Our application now renders a list of all created posts. Unfortunately, posts are not being re-fetched automatically when adding new posts. For the time being, we'll have to reload the browser every time after adding a post. However, this we'll address now.\n\n### Reloading posts\n\nThere is certainly different ways to make the list of posts update automatically, so take the following approach with a grain of salt. What we need is a way to have the `createPost` component tell the `List` component to reload its posts. However, there's no communication layer in place when building a simple React app like this, so the most straight forward way to make this possible, is to move the logic of loading the posts in the parent component of `CreatePost` and `List` (in our case `App`), and have it pass that logic down to places where its needed. This also means we'll be fetching the list inside `App` and pass down the pure data to `List`.\n\nIf this sounds overwhelming, no worries, it's more trivial than that! Let's start by introducing a `loadPosts()` function in our `App` component. Essentially we're moving everything from `List`'s `componentDidMount()` function into `App`:\n\n```\nexport class App extends Component {\n ...\n async loadPosts() {\n const totalPosts = await DReddit.methods.numPosts().call();\n\n let list = [];\n\n if (totalPosts > 0) {\n for (let i = 0; i < totalPosts; i++) {\n const post = DReddit.methods.posts(i).call();\n list.push(post);\n }\n }\n\n list = await Promise.all(list);\n list = list.map((post, index) => {\n post.id = index;\n return post;\n });\n\n list;\n\n this.setState({ posts: list });\n }\n}\n```\n\nTo make this work we also need to introduce a `state` with the dedicated `posts`. After that, we make sure `loadPosts()` is called when `App` is mounted:\n\n```\nexport class App extends Component {\n\n constructor(props) {\n super(props);\n this.state = {\n posts: []\n };\n }\n\n async componentDidMount() {\n await this.loadPosts();\n }\n ...\n}\n```\n\nLast but not least, all we have to do is to pass the `posts` down to `List` and `loadPosts()` to `CreatePost` as a callback handler if you will:\n\n```\nrender() {\n return (\n <React.Fragment>\n <h1>DReddit</h1>\n <CreatePost afterPostHandler={this.loadPosts.bind(this)}/>\n <List posts={this.state.posts}/>\n </React.Fragment>\n )\n}\n```\n\nOnce that is done, we can consume `posts` and `afterPostHandler()` from `this.props` respectively. In `List`'s `render()` function we'll do (notice we don't rely on `this.state` anymore):\n\n```\nrender() {\n return (<React.Fragment>\n {this.props.posts.map(post => {\n ...\n })}\n </React.Fragment>\n )\n}\n```\n\nAnd in `CreatePost` we call `afterPostHandler()` after a post has been created:\n\n```\nasync createPost(event) {\n ...\n await createPost.send({from: accounts[0], gas: estimate});\n await this.props.afterPostHandler();\n\n this.setState({\n topic: '',\n content: '',\n loading: false\n });\n}\n```\n\nWonderful! The list now automatically reloads after creating posts, give it a try!\n\n## Add voting functionality\n\nThe final feature we'll be implementing is the up and down voting of posts. This is where we come back to our `Post` component that we've created earlier. In order to make this feature complete we'll have to:\n\n- Render the number of up and down votes per post\n- Add handlers for users to up and down vote\n- Determine if a user can vote on a post\n\n### Rendering number of votes\nLet's start with the first one, as it's the most trivial one. While the number of up and down votes is already attached to the data that we receive from our `DReddit` Smart Contract, it's not yet in the right format as it comes back as a string. Let's make sure we parse the up and down vote counts on posts by extending our `App`'s `loadPosts()` method like this:\n\n```\nasync loadPosts() {\n ...\n list = list.map((post, index) => {\n post.id = index;\n post.upvotes = parseInt(post.upvotes, 10);\n post.downvotes = parseInt(post.downvotes, 10);\n return post;\n });\n ...\n}\n```\n\nOnce that is done we can pass each post's `upvotes` and `downvotes` to every `Post` component via its `props` inside our `List` component:\n\n```\nexport class List extends Component {\n ...\n render() {\n return (<React.Fragment>\n {this.props.posts.map(post => {\n return (<Post\n key={post.id}\n description={post.description}\n creationDate={post.creationDate}\n upvotes={post.upvotes}\n downvotes={post.downvotes}\n owner={post.owner}\n />)\n })}\n </React.Fragment>\n )\n }\n}\n```\n\nRendering the number of `upvotes` and `downvotes` is then really just a matter of interpolating them in `Post`'s `render()` function. We're just going to add them next to the buttons, but feel free to put them somewhere else:\n\n```\nexport class Post extends Component {\n ...\n render() {\n ...\n return (\n <React.Fragment>\n ...\n {this.props.upvotes} <button>Upvote</button>\n {this.props.downvotes} <button>Downvote</button>\n </React.Fragment>\n )\n }\n}\n```\n\n### Implement up and down votes\n\nSimilar to when creating new posts, making the up and down vote buttons work requires sending transactions to our `DReddit` Smart Contract. So we'll do almost the same thing as in our `CreatePost` component, just that we're calling the Smart Contract's `vote()` method. If you recall, the `vote()` method takes a post id and the vote type, which is either `NONE`, `UPVOTE` or `DOWNVOTE` and are stored as `uint8`.\n\nIt makes sense to introduce the same representation in our app so we can use descriptive names, but rely on uint values at the same time. There are no enum data structures in JavaScript so we'll use a hash object instead:\n\n```\nconst BALLOT = {\n NONE: 0,\n UPVOTE: 1,\n DOWNVOTE: 2\n}\n```\n\nWe don't actually have the post id available in our `Post` component yet. That's easily added in our `List` component, by now you should know how to do that!\n\nWe can then add click handlers to our up and down vote buttons and pass one of the `BALLOT` types to them (notice that we added `BALLOT.NONE` only for completeness-sake but don't actually use it in our code):\n\n```\n<button onClick={e => this.vote(BALLOT.UPVOTE)}>Upvote</button>\n<button onClick={e => this.vote(BALLOT.DOWNVOTE)}>Downvote</button>\n```\n\nThe next thing we need to do is sending that vote type along with the post id to our Smart Contract:\n\n```\nasync vote(ballot) {\n const accounts = await web3.eth.getAccounts();\n const vote = DReddit.methods.vote(this.props.id, ballot);\n const estimate = await vote.estimateGas();\n\n await vote.send({from: accounts[0], gas: estimate});\n}\n```\n\nObviously, we also want to update the view when a vote has been successfully sent. Right now we're reading a post's up and down votes from its `props` and render them accordingly. However, we want to update those values as votes are coming in. For that we'll change our code to only read the up and down votes from `props` once and store them in the component's state.\n\n```\nexport class Post extends Component {\n\n constructor(props) {\n super(props);\n this.state = {\n topic: '',\n content: '',\n upvotes: this.props.upvotes,\n downvotes: this.props.downvotes\n };\n }\n ...\n}\n```\n\nWe also change the component's view to render the values from state instead of `props`:\n\n```\nrender() {\n ...\n return (\n <React.Fragment>\n ...\n {this.state.upvotes} <button ...>Upvote</button>\n {this.state.downvotes} <button ...>Downvote</button>\n </React.Fragment>\n )\n}\n```\n\n\nAfter that we can update the state with new votes using `setState()`, right after a vote has been sent:\n\n```\nasync vote(ballot) {\n ...\n this.setState({\n upvotes: this.state.upvotes + (ballot == BALLOT.UPVOTE ? 1 : 0),\n downvotes: this.state.downvotes + (ballot == BALLOT.DOWNVOTE ? 1 : 0)\n });\n}\n```\n\n**That's it!** We can now up and down vote on posts...but only once! Yes, that's right. When we try to vote multiple times on the same post, we'll actually receive an error. That's because, if you remember, there's a restriction in our Smart Contract that makes sure users can not vote on posts that they've either already voted on, or created themselves.\n\nLet's make sure this is reflected in our application's UI and wrap up this tutorial!\n\n### Use `canVote()` to disable vote buttons\n\nWe'll keep this one very simple - if a user cannot vote on a post, the voting buttons should be simply disabled. We can easily determine whether a user is allowed to vote by calling our Smart Contract's `canVote()` method. Another thing we need to consider is that we shouldn't allow a user to vote when a vote for the same post is already in flight but hasn't completed yet.\n\nLet's introduce a new state properties for that first. In general we can say that a user is allowed to vote, and that she is not submitting a vote in this very moment:\n\n```\nexport class Post extends Component {\n\n constructor(props) {\n super(props);\n this.state = {\n topic: '',\n content: '',\n upvotes: this.props.upvotes,\n downvotes: this.props.downvotes,\n canVote: true,\n submitting: false\n };\n }\n ...\n}\n```\n\nNext, we update our `Post` component's `render()` function to disable the voting buttons if a vote is in flight, or a user is simply not allowed to vote:\n\n```\nrender() {\n ...\n const disabled = this.state.submitting || !this.state.canVote;\n return (\n <React.Fragment>\n ...\n {this.state.upvotes} <button disabled={disabled} ...>Upvote</button>\n {this.state.downvotes} <button disabled={disabled} ...>Downvote</button>\n </React.Fragment>\n )\n}\n```\n\nLast but not least, we have to make sure the state properties are updated accordingly. We'll call our Smart Contract's `canVote()` method when a post is initialized:\n\n```\nexport class Post extends Component {\n ...\n async componentDidMount() {\n ...\n const canVote = await DReddit.methods.canVote(this.props.id).call();\n this.setState({ topic, content, canVote });\n }\n ...\n}\n```\n\nAnd when a vote is being made, we set `submitting` to `true` right before we send a transaction and set it back to `false` again when the transaction is done. At this point, we also know that a vote has been made on this post, so `canVote` can be set to `false` at the same time:\n\n```\nasync vote(ballot) {\n ...\n this.setState({ submitting: true });\n await vote.send({from: accounts[0], gas: estimate + 1000});\n\n this.setState({\n ...\n canVote: false,\n submitting: false\n });\n}\n```\n\n**And we're done!**\n\n## Wrapping it up\n\nCongratulations! You've completed the tutorial on building a simple decentralized Reddit application! You might have noticed that this is only the tip of the iceberg though, as there are so many things that can be done to improve and optimize this application. Here are some ideas for further exploration:\n\n- Sort the posts in reversed chronological order so that the latest post is always on top\n- Rely on Smart Contracts Events to reload list\n- Introduce routing so there can be different views for creating and viewing posts\n- Use CSS to make the application look nice\n\nWe hope you've learned that it's not too hard to build a DApp that uses IPFS and talks to Smart Contracts, and also how Embark can help you doing all of these things.\n\n**We've recorded every single step of this tutorial [in this repository](https://github.com/embarklabs/dreddit-tutorial)**, so feel free to go ahead, clone it, play with it, compare it with your work or change it to your needs. There will be more tutorials of this kind in the future, so make sure to [follow us on Twitter](https://twitter.com/EmbarkProject) as well for updates!\n\n","source":"_posts/2019-02-18-building-a-decentralized-reddit-with-embark-part-3.md","raw":"title: Building a decentralized Reddit with Embark - Part 3\nsummary: \"In this third and last part of the tutorial series about building a decentralized Reddit with Embark, we're building the front-end for our application using React and EmbarkJS.\"\ncategories:\n - tutorials\nlayout: blog-post\nauthor: pascal_precht\nalias: news/2019/02/17/building-a-decentralized-reddit-with-embark-part-3/\n---\n\nHopefully you've read [the first](/news/2019/02/04/building-a-decentralized-reddit-with-embark-part-1/) and [second part](/news/2019/02/11/building-a-decentralized-reddit-with-embark-part-2/) of this tutorial on building a decentralized Reddit application using Embark. If not, we highly recommend you doing so, because in this part, we'll be focussing on building the front-end for our application and continue where we've left off.\n\n- [**Part 1** - Setting up the project and implementing a Smart Contract](/news/2019/02/04/building-a-decentralized-reddit-with-embark-part-1/)\n- [**Part 2** - Testing the Smart Contract through EmbarkJS](/news/2019/02/11/building-a-decentralized-reddit-with-embark-part-2/)\n\nWe'll be using React as a client-side JavaScript library to build our application. However, we can use any framework of our choice, so feel free to follow along while using your favourite framework equivalents!\n\n**The code for this tutorial can be found in [this repository](https://github.com/embarklabs/dreddit-tutorial)**.\n\n## Rendering our first component\n\nAlright, before we jump straight into building components that will talk to our Smart Contract instance, let's first actually render a simple text on the screen just to make sure our setup is working correctly.\n\nFor that, what we'll do is adding React as a dependency to our project. In fact, we'll be relying on two packages - `react` and `react-dom`. The latter is needed to render components defined with React in a DOM environment, which is what a Browser essentially is.\n\nLet's add the following `dependencies` section to our projects `package.json`:\n\n```\n\"dependencies\": {\n \"react\": \"^16.4.2\",\n \"react-dom\": \"^16.4.2\"\n}\n```\n\nOnce that is done we need to actually install those dependencies. For that we simply execute the following command in our terminal of choice:\n\n```\n$ npm install\n```\n\nNow we can go ahead and actually make use of React. As Embark is framework agnostic, we won't be focussing too much on details specific to React, just the least amount that is needed to make our app work.\n\nCreating components in React is pretty straight forward. All we need to do is creating a class that extends React's `Component` type and add a `render()` method that will render the component's view.\n\nLet's create a folder for all of our components inside our projects:\n\n```\n$ mkdir app/js/components\n```\n\nNext, we create a file for our root component. We call it simply `App` and use the same file name:\n\n```\n$ touch app/js/components/App.js\n```\n\nAlright, as mentioned earlier, we really just want to render some text on the screen for starters. Here's what that could look like:\n\n```\nimport React, { Component } from 'react';\n\nexport class App extends Component {\n\n render() {\n return <h1>DReddit</h1>\n }\n}\n```\n\nThis is probably self explanatory, but all we're doing here is importing `React` and its `Component` type and create an `App` class that extends `Component`. The `render()` method will be used by React to render the component's view and has to return a template that is written in JSX syntax. JSX looks a lot like HTML just that it comes with extra syntax to embed things like control structures. We'll make use of that later!\n\nOkay now that we have this component defined, we need to tell React to actually render this particular component. For that, we head over to `app/js/index.js` and add the following code:\n\n```\nimport React from 'react';\nimport { render } from 'react-dom';\nimport { App } from './components/App';\n\nrender(<App />, document.getElementById('root'));\n```\n\nWe need to import `React` again as it has to be available in this script's scope. We also import a `render` function from `react-dom`, which is used to render our root component (`App`) into some element inside our HTML document. In this case we say that the element in which we want to render our root component is the element with the id `root`.\n\nLet's set this up really quick. In `app/index.html` add a new element with a `root` id:\n\n```\n<body>\n\t<div id=\"root\"></div>\n\t<script src=\"js/app.js\"></script>\n</body>\n```\n\nNotice that we've also moved the `script` tag inside the body tag, after the element with the `root` id. This is just one way to work around the fact that the element we're referencing inside our `render()` method is actually available in the document at the time the script is executed.\n\nThat should do it! Let's spin up Embark, we should then see our component rendered on the screen:\n\n```\n$ embark run\n```\n\n## Building a `CreatePost` component\n\nAlright, enough warm up. Time to build components that are useful. We start off with building a component that lets users create posts through our application. Similar to `App`, we'll introduce a new component `createPost` that comes with a `render()` method to display a simple form for entering data. We'll also need to add event handlers to the form so that when a user submits the form, we can actually access the data and later on send it to our Smart Contract.\n\nCreating a simple form is very straight forward:\n\n```\nimport React, { Component } from 'react';\n\nexport class CreatePost extends Component {\n\n render() {\n return (\n <form>\n <div>\n <label>Topic</label>\n <input type=\"text\" name=\"topic\" />\n </div>\n <div>\n <textarea name=\"content\"></textarea>\n </div>\n <button>Post</button>\n </form>\n )\n }\n}\n```\n\nTo actually render this component on screen, we need to make it part of our `App` component. Or, to be more specific, have the `App` component render our `CreatePost` component. For now we can simply add it to `App`'s render function like this;\n\n\n```\nimport { CreatePost } from './CreatePost';\n\nexport class App extends Component {\n\n render() {\n return (\n <React.Fragment>\n <h1>DReddit</h1>\n <CreatePost />\n </React.Fragment&>\n )\n }\n}\n```\n\nReact doesn't allow for multiple root elements in a single component's view, so we have to take advantage of `React.Fragment`. Obviously, there's not too much going on here apart from us rendering a static form. Also notice that we don't spend too much time and effort on making the form look nice as we focus on the functionality for now. Consider that homework!\n\nLet's make this form functional. First of all we want make sure that data entered into the form is available inside our component. React components maintain an object called `state` that can be used for exactly that. All we have to do is to initialize it with some initial values and update it using a `setState()` method if needed.\n\nLet's introduce `state` in our component by adding a constructor and initializing it accordingly:\n\n```\nexport class CreatePost extends Component {\n\n constructor(props) {\n super(props);\n\n this.state = {\n topic: '',\n content: '',\n loading: false\n };\n }\n ...\n}\n```\n\nNext we bind that state to our form fields:\n\n```\n<form>\n <div>\n <label>Topic</label>\n <input type=\"text\" name=\"topic\" value={this.state.topic} />\n </div>\n <div>\n <textarea name=\"content\" value={this.state.content}></textarea>\n </div>\n <button>Post</button>\n</form>\n```\n\nNo worries, we'll make use of `loading` in a second. Last but not least we want to add some event handlers so that changes in the view will be reflected back to our component's state as the user is entering data. To make sure everything works fine, we'll also add an event handler for the form submission and output the data in `state`. Here's what our `handleChange()` and `createPost()` handlers looks like:\n\n```\nexport class CreatePost extends Component {\n ...\n handleChange(field, event) {\n this.setState({\n [field]: event.target.value\n });\n }\n\n createPost(event) {\n event.preventDefault();\n console.log(this.state);\n }\n ...\n}\n```\n\nNotice how we're using `setState()` inside `handleChange()` to update whatever field name has been passed to that method. Now all we need to do is attach those handlers to our form:\n\n```\n<form onSubmit={e => createPost(e)}>\n <div>\n <label>Topic</label>\n <input\n type=\"text\"\n name=\"topic\"\n value={this.state.topic}\n onChange={e => handleChange('topic', e)} />\n </div>\n <div>\n <textarea\n name=\"content\"\n value={this.state.content}\n onChange={e => handleChange('content', e})></textarea>\n </div>\n <button type=\"submit\">Post</button>\n</form>\n```\n\nSince we're using the `onSubmit()` handler of the form, it's also important that we either add a `type=\"submit\"` to our `button` or change the button to an `<input type=\"submit\">` element. Otherwise, the form won't emit a submit event.\n\nNice! With that in place, we should see the component's `state` in the console when submitting the form! The next challenge is to use `EmbarkJS` and its APIs to make our component talk to our Smart Contract instance.\n\n### Uploading data to IPFS\n\nRecall from our [first part](/news/2019/02/04/building-a-decentralized-reddit-with-embark-part-1/#Creating-posts) of this tutorial that our `DReddit` Smart Contract comes with a `createPost()` method that takes some bytes as post data. Those bytes are actually not the post data itself, but an IPFS hash that points to the post data. In other words, we'll have to somehow create such a hash and make sure the data is uploaded to IPFS as well.\n\nLuckily, EmbarkJS comes with plenty of convenient APIs to do exactly that! `EmbarkJS.Storage.saveText()` takes a string, uploads it to IPFS and returns its hash which can then be used to create a post using our Smart Contract. One thing to keep in mind is that those APIs are asynchronous. Similar to how we wrote tests in [part two](/news/2019/02/11/building-a-decentralized-reddit-with-embark-part-2/#Testing-createPost) of this tutorial, we'll use `async/await` to write asynchronous code in a synchronous fashion.\n\n```\nasync createPost(event) {\n event.preventDefault();\n\n this.setState({\n loading: true\n });\n\n const ipfsHash = await EmbarkJS.Storage.saveText(JSON.stringify({\n topic: this.state.topic,\n content: this.state.content\n }));\n\n this.setState({\n topic: '',\n content: '',\n loading: false\n });\n}\n```\n\nWe use `JSON.stringify()` on an object that holds the `topic` and `content` of the post to be created. This is also the first time we put `loading` into action. Setting it to `true` before, and `false` after we've performed our operations lets us render a useful message as the user is waiting for updates.\n\n```\n<form onSubmit={e => createPost(e)}>\n ...\n {this.state.loading &&\n <p>Posting...</p>\n }\n</form>\n```\n\nObviously, we're not done yet though. All we do right now is uploading the post's data to IPFS and receiving the hash, but we still need to take that hash and send it to our Smart Contract using its `createPost()` method. Let's do that!\n\n### Sending transactions to create posts\n\nTo send a transaction to our Smart Contract, we can again take advantage of EmbarkJS' APIs, similar to how we did it in the [second part](/news/2019/02/11/building-a-decentralized-reddit-with-embark-part-2). We also need to get hold of an Ethereum account to send the transaction from. This will be very straight forward as we'll be just relying on the accounts that are generated by the Ethereum node that Embark spins up for us.\n\nOnce we have those things in place we can get a gas estimation for our transaction and send the data over. Here's how we retrieve our accounts, notice that `async/await` can be used here as well:\n\n```\nasync createPost(event) {\n ...\n const accounts = await web3.eth.getAccounts();\n ...\n}\n```\n\nNext up we'll import a `DReddit` Smart Contract instance from EmbarkJS and use it to get a gas estimation from `web3`. We can then use the estimation and one of our accounts to actually send the transaction:\n\n```\nimport DReddit from './artifacts/contracts/DReddit';\n...\n\nasync createPost(event) {\n ...\n const accounts = await web3.eth.getAccounts();\n const createPost = DReddit.methods.createPost(web3.utils.toHex(ipfsHash));\n const estimate = await createPost.estimateGas();\n\n await createPost.send({from: accounts[0], gas: estimate});\n ...\n}\n```\n\nSweet, with that, our `createPost` method is done! We haven't built a list of all created posts yet, but if we open up the app and create a post, we can use Embark to double check whether the transaction went through successfully. Simply watch the output in the terminal after running `embark run`. We should see a confirmation that looks something like this:\n\n```\nBlockchain> DReddit.createPost(\"0x516d5452427a47415153504552614645534173335133765a6b59436633634143776368626263387575623434374e\") | 0xbbeb9fa1eb4e3434c08b31409c137c2129de65eb335855620574c537b3004f29 | gas:136089 | blk:18455 | status:0x1\n```\n\n## Creating a Post component\n\nThe next challenge lies in fetching all created posts from our Smart Contract and IPFS so we can render them on screen. We start simple and first create a new component that will render a single post. After that we'll look into rendering a list of posts dynamically, based on the data we're fetching.\n\nAgain, our application won't look particularly pretty, we'll just focus on getting the core functionality right. A post component needs to render the post topic, its content, the owner of the post, ideally the date when it has been created, and a button to up and down vote respectively.\n\nHere's what such a component with a basic template could look like:\n\n```\nimport React, { Component } from 'react';\n\nexport class Post extends Component {\n\n render() {\n return (\n <React.Fragment>\n <hr />\n <h3>Some Topic</h3>\n <p>This is the content of a post</p>\n <p><small><i>created at 2019-02-18 by 0x00000000000000</i></small></p>\n <button>Upvote</button>\n <button>Downvote</button>\n </React.Fragment>\n )\n }\n}\n```\n\nThere are different ways to make the data being rendered dynamic. Usually, we would probably pass a one or more properties to the `Post` component that represents the entire post object and can then be displayed inside its `render()` method. However, for this tutorial we're going to choose a slightly different path. We'll make `Post` receive IPFS hash that's stored in the Smart Contract and have it resolve the data itself.\n\nLet's stay consistent with our naming and say the property we're expecting to be filled with data is called `description`, just like the one used inside the Smart Contract. We can then use `EmbarkJS.Storage.get()` with the IPFS hash to fetch the data that represents the actual post. In order to render the data inside `Post`'s view, we'll parse it and use `setState()` accordingly.\n\nTo make sure all of that happens once the component is ready to do its work, we'll do all of that inside its `componentDidMount()` life cycle hook:\n\n```\nimport React, { Component } from 'react';\nimport EmbarkJS from '.artifacts/embarkjs';\n\nexport class Post extends Component {\n\n constructor(props) {\n super(props);\n this.state = {\n topic: '',\n content: ''\n };\n }\n\n async componentDidMount() {\n const ipfsHash = web3.utils.toAscii(this.props.description);\n const data = await EmbarkJS.Storage.get(ipfsHash);\n const { topic, content } = JSON.parse(data);\n\n this.setState({ topic, content });\n }\n ...\n}\n```\n\nThere's one gotcha to keep in mind here: Calling `EmbarkJS.Storage.get()` or any `EmbarkJS` function on page load can fail, because the storage system might not be fully initialized yet. This wasn't a problem for the previous `EmbarkJS.Storage.uploadText()` because we called that function well after Embark had finished initializing\n\nTheoretically however, there could be a race condition even for creating a post. To ensure that EmbarkJS is ready at any point in time, we use its `onReady()` hook. `EmbarkJS.onReady()` takes a callback which will be executed once EmbarkJS is ready to go. The best place to do this in our app is probably where we attempt to render our application, so let's wrap that `render()` call in our `App` component inside Embark's `onReady()` function.\n\n```\nEmbarkJS.onReady(() => {\n render(<App />, document.getElementById('root'));\n});\n```\n\nThis also means our app will only render when EmbarkJS is ready, which theoretically could take a little longer. However in this tutorial, chances are very low this is becoming a problem.\n\nLet's also quickly add the `owner` and creation date. The `owner` is expected to be passed down as a property. The same goes for the creation date. We just need to make sure it'll be formatted in a way the users can make sense of the data. We'll use the `dateformat` library for that and install it as a dependency like this:\n\n```\n$ npm install --save dateformat\n```\n\nOnce that is done, we can update our `Post` component's `render()` function to calculate a properly formatted date based on the `creationDate` that has been passed down through properties:\n\n```\n...\nimport dateformat from 'dateformat';\n\nexport class Post extends Component {\n ...\n render() {\n const formattedDate = dateformat(\n new Date(this.props.creationDate * 1000),\n 'yyyy-mm-dd HH:MM:ss'\n );\n return (\n <React.Fragment>\n <hr />\n <h3>{this.state.topic}</h3>\n <p>{this.state.content}</p>\n <p><small><i>created at {formattedDate} by {this.props.owner}</i></small></p>\n <button>Upvote</button>\n <button>Downvote</button>\n </React.Fragment>\n )\n }\n}\n```\n\nNotice that variables created inside `render()` can be interpolated as they are - there's no need to make them available on `props` or `state`. As a matter of fact, `props` are always considered read only in React.\n\nLet's try out our new `Post` component with some static data by adding it to our `App` component's view. Next up, we'll make this dynamic by fetching the posts from our Smart Contract.\n\n**Attention**: The hash used in this snippet might not be available in your local IPFS node, so you'll have to get hold of your own hash. This can be down by logging out the hash that is returned from IPFS and convert it to hex code.\n\n```\nexport class App extends Component {\n\n render() {\n return (\n <React.Fragment>\n <h1>DReddit</h1>\n <CreatePost />\n <Post\n description=\"0x516d655338444b53464546725369656a747751426d683377626b56707566335770636e4c715978726b516e4b5250\"\n creationDate=\"1550073772\"\n owner=\"0x00000000000\"\n />\n </React.Fragment>\n )\n }\n}\n```\n\n## Creating a List component\n\nBefore we can move on with building a component that renders a list of posts, we'll have to extend our Smart Contract with one more method. Since there's no canonical way to fetch array data from a Smart Contract, we'll be fetching the post data for each post one by one. We do that by first fetching the total number of posts and use that number to iterate over the available indices, which we can then use to fetch the actual posts.\n\nLet's introduce a method `numPosts()` in our `DReddit` Smart Contract:\n\n```\nfunction numPosts() public view returns (uint) {\n return posts.length;\n}\n```\n\n`posts.length` will increase as we're adding posts, so it will always be the single source of truth when it comes to determining indices of posts. This would be a good opportunity to write another test - we'll leave that up to you!\n\nWith that in place, we can start building a new `List` component. The `List` component maintains a list of posts to render on screen, so we can start simple again and introduce the bare minimum like this:\n\n```\nimport React, { Component } from 'react';\n\nexport class List extends Component {\n\n constructor(props) {\n super(props);\n this.state = {\n posts: []\n };\n }\n\n render() {\n return (<React.Fragment>\n {this.state.posts.map(post => {\n return (\n <Post\n key={post.id}\n description={post.description}\n creationDate={post.creationDate}\n owner={post.owner}\n />)\n })}\n </React.Fragment>\n )\n }\n}\n```\n\nThe most interesting part here is probably the `render()` method, in which we iterate over all `state.posts` (which at the moment is empty) and then render a `Post` component for every iteration. Another thing to note is that every `Post` receives a `key`. This is required in React when creating views from loops. We've never introduced a `post.id` in this tutorial, but don't worry, we'll fix that in a moment.\n\nWe can already put that in our `App` component. It won't render anything as we haven't fetched any posts yet, but that's what we'll do next.\n\n\n```\nimport { List } from './List';\n\nexport class App extends Component {\n\n render() {\n return (\n <React.Fragment>\n <h1>DReddit</h1>\n <CreatePost />\n <List />\n </React.Fragment>\n )\n }\n}\n```\n\n### Fetching posts data\n\nLet's fill our new `List` component with life! As mentioned earlier, we'll use our Smart Contract's `numPosts()` method to get hold of the total number of posts available. We then use that number to iterate over all indices and request every post individually. Since this is logic we want to execute once the `List` component is ready, we'll use its `componentDidMount()` method for that:\n\n```\nexport class List extends Component {\n ...\n async componentDidMount() {\n const totalPosts = await DReddit.methods.numPosts().call();\n\n let list = [];\n\n for (let i = 0; i < totalPosts; i++) {\n const post = DReddit.methods.posts(i).call();\n list.push(post);\n }\n\n list = await Promise.all(list);\n }\n ...\n}\n```\n\nNotice that in the above code we don't `await` the calls to every individual post. This is on purpose as we don't want to wait on each and every promise to resolve, but first collect all of the promises we need and then resolve them all in one go using `Promise.all().`\n\nLast but not least, we need to add an `id` property to every post as mentioned earlier. This is easily done by simply iterating over all posts and assigning the post's index as `id`. Once that is done, we can use `setState()` to update our component's state and render the list:\n\n```\nasync componentDidMount() {\n ...\n list = list.map((post, index) => {\n post.id = index;\n return post;\n });\n\n this.setState({ posts: list });\n}\n```\n\nThat's it! Our application now renders a list of all created posts. Unfortunately, posts are not being re-fetched automatically when adding new posts. For the time being, we'll have to reload the browser every time after adding a post. However, this we'll address now.\n\n### Reloading posts\n\nThere is certainly different ways to make the list of posts update automatically, so take the following approach with a grain of salt. What we need is a way to have the `createPost` component tell the `List` component to reload its posts. However, there's no communication layer in place when building a simple React app like this, so the most straight forward way to make this possible, is to move the logic of loading the posts in the parent component of `CreatePost` and `List` (in our case `App`), and have it pass that logic down to places where its needed. This also means we'll be fetching the list inside `App` and pass down the pure data to `List`.\n\nIf this sounds overwhelming, no worries, it's more trivial than that! Let's start by introducing a `loadPosts()` function in our `App` component. Essentially we're moving everything from `List`'s `componentDidMount()` function into `App`:\n\n```\nexport class App extends Component {\n ...\n async loadPosts() {\n const totalPosts = await DReddit.methods.numPosts().call();\n\n let list = [];\n\n if (totalPosts > 0) {\n for (let i = 0; i < totalPosts; i++) {\n const post = DReddit.methods.posts(i).call();\n list.push(post);\n }\n }\n\n list = await Promise.all(list);\n list = list.map((post, index) => {\n post.id = index;\n return post;\n });\n\n list;\n\n this.setState({ posts: list });\n }\n}\n```\n\nTo make this work we also need to introduce a `state` with the dedicated `posts`. After that, we make sure `loadPosts()` is called when `App` is mounted:\n\n```\nexport class App extends Component {\n\n constructor(props) {\n super(props);\n this.state = {\n posts: []\n };\n }\n\n async componentDidMount() {\n await this.loadPosts();\n }\n ...\n}\n```\n\nLast but not least, all we have to do is to pass the `posts` down to `List` and `loadPosts()` to `CreatePost` as a callback handler if you will:\n\n```\nrender() {\n return (\n <React.Fragment>\n <h1>DReddit</h1>\n <CreatePost afterPostHandler={this.loadPosts.bind(this)}/>\n <List posts={this.state.posts}/>\n </React.Fragment>\n )\n}\n```\n\nOnce that is done, we can consume `posts` and `afterPostHandler()` from `this.props` respectively. In `List`'s `render()` function we'll do (notice we don't rely on `this.state` anymore):\n\n```\nrender() {\n return (<React.Fragment>\n {this.props.posts.map(post => {\n ...\n })}\n </React.Fragment>\n )\n}\n```\n\nAnd in `CreatePost` we call `afterPostHandler()` after a post has been created:\n\n```\nasync createPost(event) {\n ...\n await createPost.send({from: accounts[0], gas: estimate});\n await this.props.afterPostHandler();\n\n this.setState({\n topic: '',\n content: '',\n loading: false\n });\n}\n```\n\nWonderful! The list now automatically reloads after creating posts, give it a try!\n\n## Add voting functionality\n\nThe final feature we'll be implementing is the up and down voting of posts. This is where we come back to our `Post` component that we've created earlier. In order to make this feature complete we'll have to:\n\n- Render the number of up and down votes per post\n- Add handlers for users to up and down vote\n- Determine if a user can vote on a post\n\n### Rendering number of votes\nLet's start with the first one, as it's the most trivial one. While the number of up and down votes is already attached to the data that we receive from our `DReddit` Smart Contract, it's not yet in the right format as it comes back as a string. Let's make sure we parse the up and down vote counts on posts by extending our `App`'s `loadPosts()` method like this:\n\n```\nasync loadPosts() {\n ...\n list = list.map((post, index) => {\n post.id = index;\n post.upvotes = parseInt(post.upvotes, 10);\n post.downvotes = parseInt(post.downvotes, 10);\n return post;\n });\n ...\n}\n```\n\nOnce that is done we can pass each post's `upvotes` and `downvotes` to every `Post` component via its `props` inside our `List` component:\n\n```\nexport class List extends Component {\n ...\n render() {\n return (<React.Fragment>\n {this.props.posts.map(post => {\n return (<Post\n key={post.id}\n description={post.description}\n creationDate={post.creationDate}\n upvotes={post.upvotes}\n downvotes={post.downvotes}\n owner={post.owner}\n />)\n })}\n </React.Fragment>\n )\n }\n}\n```\n\nRendering the number of `upvotes` and `downvotes` is then really just a matter of interpolating them in `Post`'s `render()` function. We're just going to add them next to the buttons, but feel free to put them somewhere else:\n\n```\nexport class Post extends Component {\n ...\n render() {\n ...\n return (\n <React.Fragment>\n ...\n {this.props.upvotes} <button>Upvote</button>\n {this.props.downvotes} <button>Downvote</button>\n </React.Fragment>\n )\n }\n}\n```\n\n### Implement up and down votes\n\nSimilar to when creating new posts, making the up and down vote buttons work requires sending transactions to our `DReddit` Smart Contract. So we'll do almost the same thing as in our `CreatePost` component, just that we're calling the Smart Contract's `vote()` method. If you recall, the `vote()` method takes a post id and the vote type, which is either `NONE`, `UPVOTE` or `DOWNVOTE` and are stored as `uint8`.\n\nIt makes sense to introduce the same representation in our app so we can use descriptive names, but rely on uint values at the same time. There are no enum data structures in JavaScript so we'll use a hash object instead:\n\n```\nconst BALLOT = {\n NONE: 0,\n UPVOTE: 1,\n DOWNVOTE: 2\n}\n```\n\nWe don't actually have the post id available in our `Post` component yet. That's easily added in our `List` component, by now you should know how to do that!\n\nWe can then add click handlers to our up and down vote buttons and pass one of the `BALLOT` types to them (notice that we added `BALLOT.NONE` only for completeness-sake but don't actually use it in our code):\n\n```\n<button onClick={e => this.vote(BALLOT.UPVOTE)}>Upvote</button>\n<button onClick={e => this.vote(BALLOT.DOWNVOTE)}>Downvote</button>\n```\n\nThe next thing we need to do is sending that vote type along with the post id to our Smart Contract:\n\n```\nasync vote(ballot) {\n const accounts = await web3.eth.getAccounts();\n const vote = DReddit.methods.vote(this.props.id, ballot);\n const estimate = await vote.estimateGas();\n\n await vote.send({from: accounts[0], gas: estimate});\n}\n```\n\nObviously, we also want to update the view when a vote has been successfully sent. Right now we're reading a post's up and down votes from its `props` and render them accordingly. However, we want to update those values as votes are coming in. For that we'll change our code to only read the up and down votes from `props` once and store them in the component's state.\n\n```\nexport class Post extends Component {\n\n constructor(props) {\n super(props);\n this.state = {\n topic: '',\n content: '',\n upvotes: this.props.upvotes,\n downvotes: this.props.downvotes\n };\n }\n ...\n}\n```\n\nWe also change the component's view to render the values from state instead of `props`:\n\n```\nrender() {\n ...\n return (\n <React.Fragment>\n ...\n {this.state.upvotes} <button ...>Upvote</button>\n {this.state.downvotes} <button ...>Downvote</button>\n </React.Fragment>\n )\n}\n```\n\n\nAfter that we can update the state with new votes using `setState()`, right after a vote has been sent:\n\n```\nasync vote(ballot) {\n ...\n this.setState({\n upvotes: this.state.upvotes + (ballot == BALLOT.UPVOTE ? 1 : 0),\n downvotes: this.state.downvotes + (ballot == BALLOT.DOWNVOTE ? 1 : 0)\n });\n}\n```\n\n**That's it!** We can now up and down vote on posts...but only once! Yes, that's right. When we try to vote multiple times on the same post, we'll actually receive an error. That's because, if you remember, there's a restriction in our Smart Contract that makes sure users can not vote on posts that they've either already voted on, or created themselves.\n\nLet's make sure this is reflected in our application's UI and wrap up this tutorial!\n\n### Use `canVote()` to disable vote buttons\n\nWe'll keep this one very simple - if a user cannot vote on a post, the voting buttons should be simply disabled. We can easily determine whether a user is allowed to vote by calling our Smart Contract's `canVote()` method. Another thing we need to consider is that we shouldn't allow a user to vote when a vote for the same post is already in flight but hasn't completed yet.\n\nLet's introduce a new state properties for that first. In general we can say that a user is allowed to vote, and that she is not submitting a vote in this very moment:\n\n```\nexport class Post extends Component {\n\n constructor(props) {\n super(props);\n this.state = {\n topic: '',\n content: '',\n upvotes: this.props.upvotes,\n downvotes: this.props.downvotes,\n canVote: true,\n submitting: false\n };\n }\n ...\n}\n```\n\nNext, we update our `Post` component's `render()` function to disable the voting buttons if a vote is in flight, or a user is simply not allowed to vote:\n\n```\nrender() {\n ...\n const disabled = this.state.submitting || !this.state.canVote;\n return (\n <React.Fragment>\n ...\n {this.state.upvotes} <button disabled={disabled} ...>Upvote</button>\n {this.state.downvotes} <button disabled={disabled} ...>Downvote</button>\n </React.Fragment>\n )\n}\n```\n\nLast but not least, we have to make sure the state properties are updated accordingly. We'll call our Smart Contract's `canVote()` method when a post is initialized:\n\n```\nexport class Post extends Component {\n ...\n async componentDidMount() {\n ...\n const canVote = await DReddit.methods.canVote(this.props.id).call();\n this.setState({ topic, content, canVote });\n }\n ...\n}\n```\n\nAnd when a vote is being made, we set `submitting` to `true` right before we send a transaction and set it back to `false` again when the transaction is done. At this point, we also know that a vote has been made on this post, so `canVote` can be set to `false` at the same time:\n\n```\nasync vote(ballot) {\n ...\n this.setState({ submitting: true });\n await vote.send({from: accounts[0], gas: estimate + 1000});\n\n this.setState({\n ...\n canVote: false,\n submitting: false\n });\n}\n```\n\n**And we're done!**\n\n## Wrapping it up\n\nCongratulations! You've completed the tutorial on building a simple decentralized Reddit application! You might have noticed that this is only the tip of the iceberg though, as there are so many things that can be done to improve and optimize this application. Here are some ideas for further exploration:\n\n- Sort the posts in reversed chronological order so that the latest post is always on top\n- Rely on Smart Contracts Events to reload list\n- Introduce routing so there can be different views for creating and viewing posts\n- Use CSS to make the application look nice\n\nWe hope you've learned that it's not too hard to build a DApp that uses IPFS and talks to Smart Contracts, and also how Embark can help you doing all of these things.\n\n**We've recorded every single step of this tutorial [in this repository](https://github.com/embarklabs/dreddit-tutorial)**, so feel free to go ahead, clone it, play with it, compare it with your work or change it to your needs. There will be more tutorials of this kind in the future, so make sure to [follow us on Twitter](https://twitter.com/EmbarkProject) as well for updates!\n\n","slug":"building-a-decentralized-reddit-with-embark-part-3","published":1,"date":"2019-02-18T05:00:00.000Z","updated":"2020-03-03T14:55:55.030Z","_id":"ck6axlfdp0035xeegeya3hmtr","comments":1,"photos":[],"link":"","content":"<p>Hopefully you’ve read <a href=\"/news/2019/02/04/building-a-decentralized-reddit-with-embark-part-1/\">the first</a> and <a href=\"/news/2019/02/11/building-a-decentralized-reddit-with-embark-part-2/\">second part</a> of this tutorial on building a decentralized Reddit application using Embark. If not, we highly recommend you doing so, because in this part, we’ll be focussing on building the front-end for our application and continue where we’ve left off.</p>\n<ul>\n<li><a href=\"/news/2019/02/04/building-a-decentralized-reddit-with-embark-part-1/\"><strong>Part 1</strong> - Setting up the project and implementing a Smart Contract</a></li>\n<li><a href=\"/news/2019/02/11/building-a-decentralized-reddit-with-embark-part-2/\"><strong>Part 2</strong> - Testing the Smart Contract through EmbarkJS</a></li>\n</ul>\n<p>We’ll be using React as a client-side JavaScript library to build our application. However, we can use any framework of our choice, so feel free to follow along while using your favourite framework equivalents!</p>\n<p><strong>The code for this tutorial can be found in <a href=\"https://github.com/embarklabs/dreddit-tutorial\" target=\"_blank\" rel=\"noopener\">this repository</a></strong>.</p>\n<h2 id=\"Rendering-our-first-component\"><a href=\"#Rendering-our-first-component\" class=\"headerlink\" title=\"Rendering our first component\"></a>Rendering our first component</h2><p>Alright, before we jump straight into building components that will talk to our Smart Contract instance, let’s first actually render a simple text on the screen just to make sure our setup is working correctly.</p>\n<p>For that, what we’ll do is adding React as a dependency to our project. In fact, we’ll be relying on two packages - <code>react</code> and <code>react-dom</code>. The latter is needed to render components defined with React in a DOM environment, which is what a Browser essentially is.</p>\n<p>Let’s add the following <code>dependencies</code> section to our projects <code>package.json</code>:</p>\n<figure class=\"highlight plain\"><table><tr><td class=\"code\"><pre><span class=\"line\">"dependencies": {</span><br><span class=\"line\"> "react": "^16.4.2",</span><br><span class=\"line\"> "react-dom": "^16.4.2"</span><br><span class=\"line\">}</span><br></pre></td></tr></table></figure>\n\n<p>Once that is done we need to actually install those dependencies. For that we simply execute the following command in our terminal of choice:</p>\n<figure class=\"highlight plain\"><table><tr><td class=\"code\"><pre><span class=\"line\">$ npm install</span><br></pre></td></tr></table></figure>\n\n<p>Now we can go ahead and actually make use of React. As Embark is framework agnostic, we won’t be focussing too much on details specific to React, just the least amount that is needed to make our app work.</p>\n<p>Creating components in React is pretty straight forward. All we need to do is creating a class that extends React’s <code>Component</code> type and add a <code>render()</code> method that will render the component’s view.</p>\n<p>Let’s create a folder for all of our components inside our projects:</p>\n<figure class=\"highlight plain\"><table><tr><td class=\"code\"><pre><span class=\"line\">$ mkdir app/js/components</span><br></pre></td></tr></table></figure>\n\n<p>Next, we create a file for our root component. We call it simply <code>App</code> and use the same file name:</p>\n<figure class=\"highlight plain\"><table><tr><td class=\"code\"><pre><span class=\"line\">$ touch app/js/components/App.js</span><br></pre></td></tr></table></figure>\n\n<p>Alright, as mentioned earlier, we really just want to render some text on the screen for starters. Here’s what that could look like:</p>\n<figure class=\"highlight plain\"><table><tr><td class=\"code\"><pre><span class=\"line\">import React, { Component } from 'react';</span><br><span class=\"line\"></span><br><span class=\"line\">export class App extends Component {</span><br><span class=\"line\"></span><br><span class=\"line\"> render() {</span><br><span class=\"line\"> return <h1>DReddit</h1></span><br><span class=\"line\"> }</span><br><span class=\"line\">}</span><br></pre></td></tr></table></figure>\n\n<p>This is probably self explanatory, but all we’re doing here is importing <code>React</code> and its <code>Component</code> type and create an <code>App</code> class that extends <code>Component</code>. The <code>render()</code> method will be used by React to render the component’s view and has to return a template that is written in JSX syntax. JSX looks a lot like HTML just that it comes with extra syntax to embed things like control structures. We’ll make use of that later!</p>\n<p>Okay now that we have this component defined, we need to tell React to actually render this particular component. For that, we head over to <code>app/js/index.js</code> and add the following code:</p>\n<figure class=\"highlight plain\"><table><tr><td class=\"code\"><pre><span class=\"line\">import React from 'react';</span><br><span class=\"line\">import { render } from 'react-dom';</span><br><span class=\"line\">import { App } from './components/App';</span><br><span class=\"line\"></span><br><span class=\"line\">render(<App />, document.getElementById('root'));</span><br></pre></td></tr></table></figure>\n\n<p>We need to import <code>React</code> again as it has to be available in this script’s scope. We also import a <code>render</code> function from <code>react-dom</code>, which is used to render our root component (<code>App</code>) into some element inside our HTML document. In this case we say that the element in which we want to render our root component is the element with the id <code>root</code>.</p>\n<p>Let’s set this up really quick. In <code>app/index.html</code> add a new element with a <code>root</code> id:</p>\n<figure class=\"highlight plain\"><table><tr><td class=\"code\"><pre><span class=\"line\"><body></span><br><span class=\"line\">\t<div id="root"></div></span><br><span class=\"line\">\t<script src="js/app.js"></script></span><br><span class=\"line\"></body></span><br></pre></td></tr></table></figure>\n\n<p>Notice that we’ve also moved the <code>script</code> tag inside the body tag, after the element with the <code>root</code> id. This is just one way to work around the fact that the element we’re referencing inside our <code>render()</code> method is actually available in the document at the time the script is executed.</p>\n<p>That should do it! Let’s spin up Embark, we should then see our component rendered on the screen:</p>\n<figure class=\"highlight plain\"><table><tr><td class=\"code\"><pre><span class=\"line\">$ embark run</span><br></pre></td></tr></table></figure>\n\n<h2 id=\"Building-a-CreatePost-component\"><a href=\"#Building-a-CreatePost-component\" class=\"headerlink\" title=\"Building a CreatePost component\"></a>Building a <code>CreatePost</code> component</h2><p>Alright, enough warm up. Time to build components that are useful. We start off with building a component that lets users create posts through our application. Similar to <code>App</code>, we’ll introduce a new component <code>createPost</code> that comes with a <code>render()</code> method to display a simple form for entering data. We’ll also need to add event handlers to the form so that when a user submits the form, we can actually access the data and later on send it to our Smart Contract.</p>\n<p>Creating a simple form is very straight forward:</p>\n<figure class=\"highlight plain\"><table><tr><td class=\"code\"><pre><span class=\"line\">import React, { Component } from 'react';</span><br><span class=\"line\"></span><br><span class=\"line\">export class CreatePost extends Component {</span><br><span class=\"line\"></span><br><span class=\"line\"> render() {</span><br><span class=\"line\"> return (</span><br><span class=\"line\"> <form></span><br><span class=\"line\"> <div></span><br><span class=\"line\"> <label>Topic</label></span><br><span class=\"line\"> <input type="text" name="topic" /></span><br><span class=\"line\"> </div></span><br><span class=\"line\"> <div></span><br><span class=\"line\"> <textarea name="content"></textarea></span><br><span class=\"line\"> </div></span><br><span class=\"line\"> <button>Post</button></span><br><span class=\"line\"> </form></span><br><span class=\"line\"> )</span><br><span class=\"line\"> }</span><br><span class=\"line\">}</span><br></pre></td></tr></table></figure>\n\n<p>To actually render this component on screen, we need to make it part of our <code>App</code> component. Or, to be more specific, have the <code>App</code> component render our <code>CreatePost</code> component. For now we can simply add it to <code>App</code>‘s render function like this;</p>\n<figure class=\"highlight plain\"><table><tr><td class=\"code\"><pre><span class=\"line\">import { CreatePost } from './CreatePost';</span><br><span class=\"line\"></span><br><span class=\"line\">export class App extends Component {</span><br><span class=\"line\"></span><br><span class=\"line\"> render() {</span><br><span class=\"line\"> return (</span><br><span class=\"line\"> <React.Fragment></span><br><span class=\"line\"> <h1>DReddit</h1></span><br><span class=\"line\"> <CreatePost /></span><br><span class=\"line\"> </React.Fragment&></span><br><span class=\"line\"> )</span><br><span class=\"line\"> }</span><br><span class=\"line\">}</span><br></pre></td></tr></table></figure>\n\n<p>React doesn’t allow for multiple root elements in a single component’s view, so we have to take advantage of <code>React.Fragment</code>. Obviously, there’s not too much going on here apart from us rendering a static form. Also notice that we don’t spend too much time and effort on making the form look nice as we focus on the functionality for now. Consider that homework!</p>\n<p>Let’s make this form functional. First of all we want make sure that data entered into the form is available inside our component. React components maintain an object called <code>state</code> that can be used for exactly that. All we have to do is to initialize it with some initial values and update it using a <code>setState()</code> method if needed.</p>\n<p>Let’s introduce <code>state</code> in our component by adding a constructor and initializing it accordingly:</p>\n<figure class=\"highlight plain\"><table><tr><td class=\"code\"><pre><span class=\"line\">export class CreatePost extends Component {</span><br><span class=\"line\"></span><br><span class=\"line\"> constructor(props) {</span><br><span class=\"line\"> super(props);</span><br><span class=\"line\"></span><br><span class=\"line\"> this.state = {</span><br><span class=\"line\"> topic: '',</span><br><span class=\"line\"> content: '',</span><br><span class=\"line\"> loading: false</span><br><span class=\"line\"> };</span><br><span class=\"line\"> }</span><br><span class=\"line\"> ...</span><br><span class=\"line\">}</span><br></pre></td></tr></table></figure>\n\n<p>Next we bind that state to our form fields:</p>\n<figure class=\"highlight plain\"><table><tr><td class=\"code\"><pre><span class=\"line\"><form></span><br><span class=\"line\"> <div></span><br><span class=\"line\"> <label>Topic</label></span><br><span class=\"line\"> <input type="text" name="topic" value={this.state.topic} /></span><br><span class=\"line\"> </div></span><br><span class=\"line\"> <div></span><br><span class=\"line\"> <textarea name="content" value={this.state.content}></textarea></span><br><span class=\"line\"> </div></span><br><span class=\"line\"> <button>Post</button></span><br><span class=\"line\"></form></span><br></pre></td></tr></table></figure>\n\n<p>No worries, we’ll make use of <code>loading</code> in a second. Last but not least we want to add some event handlers so that changes in the view will be reflected back to our component’s state as the user is entering data. To make sure everything works fine, we’ll also add an event handler for the form submission and output the data in <code>state</code>. Here’s what our <code>handleChange()</code> and <code>createPost()</code> handlers looks like:</p>\n<figure class=\"highlight plain\"><table><tr><td class=\"code\"><pre><span class=\"line\">export class CreatePost extends Component {</span><br><span class=\"line\"> ...</span><br><span class=\"line\"> handleChange(field, event) {</span><br><span class=\"line\"> this.setState({</span><br><span class=\"line\"> [field]: event.target.value</span><br><span class=\"line\"> });</span><br><span class=\"line\"> }</span><br><span class=\"line\"></span><br><span class=\"line\"> createPost(event) {</span><br><span class=\"line\"> event.preventDefault();</span><br><span class=\"line\"> console.log(this.state);</span><br><span class=\"line\"> }</span><br><span class=\"line\"> ...</span><br><span class=\"line\">}</span><br></pre></td></tr></table></figure>\n\n<p>Notice how we’re using <code>setState()</code> inside <code>handleChange()</code> to update whatever field name has been passed to that method. Now all we need to do is attach those handlers to our form:</p>\n<figure class=\"highlight plain\"><table><tr><td class=\"code\"><pre><span class=\"line\"><form onSubmit={e => createPost(e)}></span><br><span class=\"line\"> <div></span><br><span class=\"line\"> <label>Topic</label></span><br><span class=\"line\"> <input</span><br><span class=\"line\"> type="text"</span><br><span class=\"line\"> name="topic"</span><br><span class=\"line\"> value={this.state.topic}</span><br><span class=\"line\"> onChange={e => handleChange('topic', e)} /></span><br><span class=\"line\"> </div></span><br><span class=\"line\"> <div></span><br><span class=\"line\"> <textarea</span><br><span class=\"line\"> name="content"</span><br><span class=\"line\"> value={this.state.content}</span><br><span class=\"line\"> onChange={e => handleChange('content', e})></textarea></span><br><span class=\"line\"> </div></span><br><span class=\"line\"> <button type="submit">Post</button></span><br><span class=\"line\"></form></span><br></pre></td></tr></table></figure>\n\n<p>Since we’re using the <code>onSubmit()</code> handler of the form, it’s also important that we either add a <code>type="submit"</code> to our <code>button</code> or change the button to an <code><input type="submit"></code> element. Otherwise, the form won’t emit a submit event.</p>\n<p>Nice! With that in place, we should see the component’s <code>state</code> in the console when submitting the form! The next challenge is to use <code>EmbarkJS</code> and its APIs to make our component talk to our Smart Contract instance.</p>\n<h3 id=\"Uploading-data-to-IPFS\"><a href=\"#Uploading-data-to-IPFS\" class=\"headerlink\" title=\"Uploading data to IPFS\"></a>Uploading data to IPFS</h3><p>Recall from our <a href=\"/news/2019/02/04/building-a-decentralized-reddit-with-embark-part-1/#Creating-posts\">first part</a> of this tutorial that our <code>DReddit</code> Smart Contract comes with a <code>createPost()</code> method that takes some bytes as post data. Those bytes are actually not the post data itself, but an IPFS hash that points to the post data. In other words, we’ll have to somehow create such a hash and make sure the data is uploaded to IPFS as well.</p>\n<p>Luckily, EmbarkJS comes with plenty of convenient APIs to do exactly that! <code>EmbarkJS.Storage.saveText()</code> takes a string, uploads it to IPFS and returns its hash which can then be used to create a post using our Smart Contract. One thing to keep in mind is that those APIs are asynchronous. Similar to how we wrote tests in <a href=\"/news/2019/02/11/building-a-decentralized-reddit-with-embark-part-2/#Testing-createPost\">part two</a> of this tutorial, we’ll use <code>async/await</code> to write asynchronous code in a synchronous fashion.</p>\n<figure class=\"highlight plain\"><table><tr><td class=\"code\"><pre><span class=\"line\">async createPost(event) {</span><br><span class=\"line\"> event.preventDefault();</span><br><span class=\"line\"></span><br><span class=\"line\"> this.setState({</span><br><span class=\"line\"> loading: true</span><br><span class=\"line\"> });</span><br><span class=\"line\"></span><br><span class=\"line\"> const ipfsHash = await EmbarkJS.Storage.saveText(JSON.stringify({</span><br><span class=\"line\"> topic: this.state.topic,</span><br><span class=\"line\"> content: this.state.content</span><br><span class=\"line\"> }));</span><br><span class=\"line\"></span><br><span class=\"line\"> this.setState({</span><br><span class=\"line\"> topic: '',</span><br><span class=\"line\"> content: '',</span><br><span class=\"line\"> loading: false</span><br><span class=\"line\"> });</span><br><span class=\"line\">}</span><br></pre></td></tr></table></figure>\n\n<p>We use <code>JSON.stringify()</code> on an object that holds the <code>topic</code> and <code>content</code> of the post to be created. This is also the first time we put <code>loading</code> into action. Setting it to <code>true</code> before, and <code>false</code> after we’ve performed our operations lets us render a useful message as the user is waiting for updates.</p>\n<figure class=\"highlight plain\"><table><tr><td class=\"code\"><pre><span class=\"line\"><form onSubmit={e => createPost(e)}></span><br><span class=\"line\"> ...</span><br><span class=\"line\"> {this.state.loading &&</span><br><span class=\"line\"> <p>Posting...</p></span><br><span class=\"line\"> }</span><br><span class=\"line\"></form></span><br></pre></td></tr></table></figure>\n\n<p>Obviously, we’re not done yet though. All we do right now is uploading the post’s data to IPFS and receiving the hash, but we still need to take that hash and send it to our Smart Contract using its <code>createPost()</code> method. Let’s do that!</p>\n<h3 id=\"Sending-transactions-to-create-posts\"><a href=\"#Sending-transactions-to-create-posts\" class=\"headerlink\" title=\"Sending transactions to create posts\"></a>Sending transactions to create posts</h3><p>To send a transaction to our Smart Contract, we can again take advantage of EmbarkJS’ APIs, similar to how we did it in the <a href=\"/news/2019/02/11/building-a-decentralized-reddit-with-embark-part-2\">second part</a>. We also need to get hold of an Ethereum account to send the transaction from. This will be very straight forward as we’ll be just relying on the accounts that are generated by the Ethereum node that Embark spins up for us.</p>\n<p>Once we have those things in place we can get a gas estimation for our transaction and send the data over. Here’s how we retrieve our accounts, notice that <code>async/await</code> can be used here as well:</p>\n<figure class=\"highlight plain\"><table><tr><td class=\"code\"><pre><span class=\"line\">async createPost(event) {</span><br><span class=\"line\"> ...</span><br><span class=\"line\"> const accounts = await web3.eth.getAccounts();</span><br><span class=\"line\"> ...</span><br><span class=\"line\">}</span><br></pre></td></tr></table></figure>\n\n<p>Next up we’ll import a <code>DReddit</code> Smart Contract instance from EmbarkJS and use it to get a gas estimation from <code>web3</code>. We can then use the estimation and one of our accounts to actually send the transaction:</p>\n<figure class=\"highlight plain\"><table><tr><td class=\"code\"><pre><span class=\"line\">import DReddit from './artifacts/contracts/DReddit';</span><br><span class=\"line\">...</span><br><span class=\"line\"></span><br><span class=\"line\">async createPost(event) {</span><br><span class=\"line\"> ...</span><br><span class=\"line\"> const accounts = await web3.eth.getAccounts();</span><br><span class=\"line\"> const createPost = DReddit.methods.createPost(web3.utils.toHex(ipfsHash));</span><br><span class=\"line\"> const estimate = await createPost.estimateGas();</span><br><span class=\"line\"></span><br><span class=\"line\"> await createPost.send({from: accounts[0], gas: estimate});</span><br><span class=\"line\"> ...</span><br><span class=\"line\">}</span><br></pre></td></tr></table></figure>\n\n<p>Sweet, with that, our <code>createPost</code> method is done! We haven’t built a list of all created posts yet, but if we open up the app and create a post, we can use Embark to double check whether the transaction went through successfully. Simply watch the output in the terminal after running <code>embark run</code>. We should see a confirmation that looks something like this:</p>\n<figure class=\"highlight plain\"><table><tr><td class=\"code\"><pre><span class=\"line\">Blockchain> DReddit.createPost("0x516d5452427a47415153504552614645534173335133765a6b59436633634143776368626263387575623434374e") | 0xbbeb9fa1eb4e3434c08b31409c137c2129de65eb335855620574c537b3004f29 | gas:136089 | blk:18455 | status:0x1</span><br></pre></td></tr></table></figure>\n\n<h2 id=\"Creating-a-Post-component\"><a href=\"#Creating-a-Post-component\" class=\"headerlink\" title=\"Creating a Post component\"></a>Creating a Post component</h2><p>The next challenge lies in fetching all created posts from our Smart Contract and IPFS so we can render them on screen. We start simple and first create a new component that will render a single post. After that we’ll look into rendering a list of posts dynamically, based on the data we’re fetching.</p>\n<p>Again, our application won’t look particularly pretty, we’ll just focus on getting the core functionality right. A post component needs to render the post topic, its content, the owner of the post, ideally the date when it has been created, and a button to up and down vote respectively.</p>\n<p>Here’s what such a component with a basic template could look like:</p>\n<figure class=\"highlight plain\"><table><tr><td class=\"code\"><pre><span class=\"line\">import React, { Component } from 'react';</span><br><span class=\"line\"></span><br><span class=\"line\">export class Post extends Component {</span><br><span class=\"line\"></span><br><span class=\"line\"> render() {</span><br><span class=\"line\"> return (</span><br><span class=\"line\"> <React.Fragment></span><br><span class=\"line\"> <hr /></span><br><span class=\"line\"> <h3>Some Topic</h3></span><br><span class=\"line\"> <p>This is the content of a post</p></span><br><span class=\"line\"> <p><small><i>created at 2019-02-18 by 0x00000000000000</i></small></p></span><br><span class=\"line\"> <button>Upvote</button></span><br><span class=\"line\"> <button>Downvote</button></span><br><span class=\"line\"> </React.Fragment></span><br><span class=\"line\"> )</span><br><span class=\"line\"> }</span><br><span class=\"line\">}</span><br></pre></td></tr></table></figure>\n\n<p>There are different ways to make the data being rendered dynamic. Usually, we would probably pass a one or more properties to the <code>Post</code> component that represents the entire post object and can then be displayed inside its <code>render()</code> method. However, for this tutorial we’re going to choose a slightly different path. We’ll make <code>Post</code> receive IPFS hash that’s stored in the Smart Contract and have it resolve the data itself.</p>\n<p>Let’s stay consistent with our naming and say the property we’re expecting to be filled with data is called <code>description</code>, just like the one used inside the Smart Contract. We can then use <code>EmbarkJS.Storage.get()</code> with the IPFS hash to fetch the data that represents the actual post. In order to render the data inside <code>Post</code>‘s view, we’ll parse it and use <code>setState()</code> accordingly.</p>\n<p>To make sure all of that happens once the component is ready to do its work, we’ll do all of that inside its <code>componentDidMount()</code> life cycle hook:</p>\n<figure class=\"highlight plain\"><table><tr><td class=\"code\"><pre><span class=\"line\">import React, { Component } from 'react';</span><br><span class=\"line\">import EmbarkJS from '.artifacts/embarkjs';</span><br><span class=\"line\"></span><br><span class=\"line\">export class Post extends Component {</span><br><span class=\"line\"></span><br><span class=\"line\"> constructor(props) {</span><br><span class=\"line\"> super(props);</span><br><span class=\"line\"> this.state = {</span><br><span class=\"line\"> topic: '',</span><br><span class=\"line\"> content: ''</span><br><span class=\"line\"> };</span><br><span class=\"line\"> }</span><br><span class=\"line\"></span><br><span class=\"line\"> async componentDidMount() {</span><br><span class=\"line\"> const ipfsHash = web3.utils.toAscii(this.props.description);</span><br><span class=\"line\"> const data = await EmbarkJS.Storage.get(ipfsHash);</span><br><span class=\"line\"> const { topic, content } = JSON.parse(data);</span><br><span class=\"line\"></span><br><span class=\"line\"> this.setState({ topic, content });</span><br><span class=\"line\"> }</span><br><span class=\"line\"> ...</span><br><span class=\"line\">}</span><br></pre></td></tr></table></figure>\n\n<p>There’s one gotcha to keep in mind here: Calling <code>EmbarkJS.Storage.get()</code> or any <code>EmbarkJS</code> function on page load can fail, because the storage system might not be fully initialized yet. This wasn’t a problem for the previous <code>EmbarkJS.Storage.uploadText()</code> because we called that function well after Embark had finished initializing</p>\n<p>Theoretically however, there could be a race condition even for creating a post. To ensure that EmbarkJS is ready at any point in time, we use its <code>onReady()</code> hook. <code>EmbarkJS.onReady()</code> takes a callback which will be executed once EmbarkJS is ready to go. The best place to do this in our app is probably where we attempt to render our application, so let’s wrap that <code>render()</code> call in our <code>App</code> component inside Embark’s <code>onReady()</code> function.</p>\n<figure class=\"highlight plain\"><table><tr><td class=\"code\"><pre><span class=\"line\">EmbarkJS.onReady(() => {</span><br><span class=\"line\"> render(<App />, document.getElementById('root'));</span><br><span class=\"line\">});</span><br></pre></td></tr></table></figure>\n\n<p>This also means our app will only render when EmbarkJS is ready, which theoretically could take a little longer. However in this tutorial, chances are very low this is becoming a problem.</p>\n<p>Let’s also quickly add the <code>owner</code> and creation date. The <code>owner</code> is expected to be passed down as a property. The same goes for the creation date. We just need to make sure it’ll be formatted in a way the users can make sense of the data. We’ll use the <code>dateformat</code> library for that and install it as a dependency like this:</p>\n<figure class=\"highlight plain\"><table><tr><td class=\"code\"><pre><span class=\"line\">$ npm install --save dateformat</span><br></pre></td></tr></table></figure>\n\n<p>Once that is done, we can update our <code>Post</code> component’s <code>render()</code> function to calculate a properly formatted date based on the <code>creationDate</code> that has been passed down through properties:</p>\n<figure class=\"highlight plain\"><table><tr><td class=\"code\"><pre><span class=\"line\">...</span><br><span class=\"line\">import dateformat from 'dateformat';</span><br><span class=\"line\"></span><br><span class=\"line\">export class Post extends Component {</span><br><span class=\"line\"> ...</span><br><span class=\"line\"> render() {</span><br><span class=\"line\"> const formattedDate = dateformat(</span><br><span class=\"line\"> new Date(this.props.creationDate * 1000),</span><br><span class=\"line\"> 'yyyy-mm-dd HH:MM:ss'</span><br><span class=\"line\"> );</span><br><span class=\"line\"> return (</span><br><span class=\"line\"> <React.Fragment></span><br><span class=\"line\"> <hr /></span><br><span class=\"line\"> <h3>{this.state.topic}</h3></span><br><span class=\"line\"> <p>{this.state.content}</p></span><br><span class=\"line\"> <p><small><i>created at {formattedDate} by {this.props.owner}</i></small></p></span><br><span class=\"line\"> <button>Upvote</button></span><br><span class=\"line\"> <button>Downvote</button></span><br><span class=\"line\"> </React.Fragment></span><br><span class=\"line\"> )</span><br><span class=\"line\"> }</span><br><span class=\"line\">}</span><br></pre></td></tr></table></figure>\n\n<p>Notice that variables created inside <code>render()</code> can be interpolated as they are - there’s no need to make them available on <code>props</code> or <code>state</code>. As a matter of fact, <code>props</code> are always considered read only in React.</p>\n<p>Let’s try out our new <code>Post</code> component with some static data by adding it to our <code>App</code> component’s view. Next up, we’ll make this dynamic by fetching the posts from our Smart Contract.</p>\n<p><strong>Attention</strong>: The hash used in this snippet might not be available in your local IPFS node, so you’ll have to get hold of your own hash. This can be down by logging out the hash that is returned from IPFS and convert it to hex code.</p>\n<figure class=\"highlight plain\"><table><tr><td class=\"code\"><pre><span class=\"line\">export class App extends Component {</span><br><span class=\"line\"></span><br><span class=\"line\"> render() {</span><br><span class=\"line\"> return (</span><br><span class=\"line\"> <React.Fragment></span><br><span class=\"line\"> <h1>DReddit</h1></span><br><span class=\"line\"> <CreatePost /></span><br><span class=\"line\"> <Post</span><br><span class=\"line\"> description="0x516d655338444b53464546725369656a747751426d683377626b56707566335770636e4c715978726b516e4b5250"</span><br><span class=\"line\"> creationDate="1550073772"</span><br><span class=\"line\"> owner="0x00000000000"</span><br><span class=\"line\"> /></span><br><span class=\"line\"> </React.Fragment></span><br><span class=\"line\"> )</span><br><span class=\"line\"> }</span><br><span class=\"line\">}</span><br></pre></td></tr></table></figure>\n\n<h2 id=\"Creating-a-List-component\"><a href=\"#Creating-a-List-component\" class=\"headerlink\" title=\"Creating a List component\"></a>Creating a List component</h2><p>Before we can move on with building a component that renders a list of posts, we’ll have to extend our Smart Contract with one more method. Since there’s no canonical way to fetch array data from a Smart Contract, we’ll be fetching the post data for each post one by one. We do that by first fetching the total number of posts and use that number to iterate over the available indices, which we can then use to fetch the actual posts.</p>\n<p>Let’s introduce a method <code>numPosts()</code> in our <code>DReddit</code> Smart Contract:</p>\n<figure class=\"highlight plain\"><table><tr><td class=\"code\"><pre><span class=\"line\">function numPosts() public view returns (uint) {</span><br><span class=\"line\"> return posts.length;</span><br><span class=\"line\">}</span><br></pre></td></tr></table></figure>\n\n<p><code>posts.length</code> will increase as we’re adding posts, so it will always be the single source of truth when it comes to determining indices of posts. This would be a good opportunity to write another test - we’ll leave that up to you!</p>\n<p>With that in place, we can start building a new <code>List</code> component. The <code>List</code> component maintains a list of posts to render on screen, so we can start simple again and introduce the bare minimum like this:</p>\n<figure class=\"highlight plain\"><table><tr><td class=\"code\"><pre><span class=\"line\">import React, { Component } from 'react';</span><br><span class=\"line\"></span><br><span class=\"line\">export class List extends Component {</span><br><span class=\"line\"></span><br><span class=\"line\"> constructor(props) {</span><br><span class=\"line\"> super(props);</span><br><span class=\"line\"> this.state = {</span><br><span class=\"line\"> posts: []</span><br><span class=\"line\"> };</span><br><span class=\"line\"> }</span><br><span class=\"line\"></span><br><span class=\"line\"> render() {</span><br><span class=\"line\"> return (<React.Fragment></span><br><span class=\"line\"> {this.state.posts.map(post => {</span><br><span class=\"line\"> return (</span><br><span class=\"line\"> <Post</span><br><span class=\"line\"> key={post.id}</span><br><span class=\"line\"> description={post.description}</span><br><span class=\"line\"> creationDate={post.creationDate}</span><br><span class=\"line\"> owner={post.owner}</span><br><span class=\"line\"> />)</span><br><span class=\"line\"> })}</span><br><span class=\"line\"> </React.Fragment></span><br><span class=\"line\"> )</span><br><span class=\"line\"> }</span><br><span class=\"line\">}</span><br></pre></td></tr></table></figure>\n\n<p>The most interesting part here is probably the <code>render()</code> method, in which we iterate over all <code>state.posts</code> (which at the moment is empty) and then render a <code>Post</code> component for every iteration. Another thing to note is that every <code>Post</code> receives a <code>key</code>. This is required in React when creating views from loops. We’ve never introduced a <code>post.id</code> in this tutorial, but don’t worry, we’ll fix that in a moment.</p>\n<p>We can already put that in our <code>App</code> component. It won’t render anything as we haven’t fetched any posts yet, but that’s what we’ll do next.</p>\n<figure class=\"highlight plain\"><table><tr><td class=\"code\"><pre><span class=\"line\">import { List } from './List';</span><br><span class=\"line\"></span><br><span class=\"line\">export class App extends Component {</span><br><span class=\"line\"></span><br><span class=\"line\"> render() {</span><br><span class=\"line\"> return (</span><br><span class=\"line\"> <React.Fragment></span><br><span class=\"line\"> <h1>DReddit</h1></span><br><span class=\"line\"> <CreatePost /></span><br><span class=\"line\"> <List /></span><br><span class=\"line\"> </React.Fragment></span><br><span class=\"line\"> )</span><br><span class=\"line\"> }</span><br><span class=\"line\">}</span><br></pre></td></tr></table></figure>\n\n<h3 id=\"Fetching-posts-data\"><a href=\"#Fetching-posts-data\" class=\"headerlink\" title=\"Fetching posts data\"></a>Fetching posts data</h3><p>Let’s fill our new <code>List</code> component with life! As mentioned earlier, we’ll use our Smart Contract’s <code>numPosts()</code> method to get hold of the total number of posts available. We then use that number to iterate over all indices and request every post individually. Since this is logic we want to execute once the <code>List</code> component is ready, we’ll use its <code>componentDidMount()</code> method for that:</p>\n<figure class=\"highlight plain\"><table><tr><td class=\"code\"><pre><span class=\"line\">export class List extends Component {</span><br><span class=\"line\"> ...</span><br><span class=\"line\"> async componentDidMount() {</span><br><span class=\"line\"> const totalPosts = await DReddit.methods.numPosts().call();</span><br><span class=\"line\"></span><br><span class=\"line\"> let list = [];</span><br><span class=\"line\"></span><br><span class=\"line\"> for (let i = 0; i < totalPosts; i++) {</span><br><span class=\"line\"> const post = DReddit.methods.posts(i).call();</span><br><span class=\"line\"> list.push(post);</span><br><span class=\"line\"> }</span><br><span class=\"line\"></span><br><span class=\"line\"> list = await Promise.all(list);</span><br><span class=\"line\"> }</span><br><span class=\"line\"> ...</span><br><span class=\"line\">}</span><br></pre></td></tr></table></figure>\n\n<p>Notice that in the above code we don’t <code>await</code> the calls to every individual post. This is on purpose as we don’t want to wait on each and every promise to resolve, but first collect all of the promises we need and then resolve them all in one go using <code>Promise.all().</code></p>\n<p>Last but not least, we need to add an <code>id</code> property to every post as mentioned earlier. This is easily done by simply iterating over all posts and assigning the post’s index as <code>id</code>. Once that is done, we can use <code>setState()</code> to update our component’s state and render the list:</p>\n<figure class=\"highlight plain\"><table><tr><td class=\"code\"><pre><span class=\"line\">async componentDidMount() {</span><br><span class=\"line\"> ...</span><br><span class=\"line\"> list = list.map((post, index) => {</span><br><span class=\"line\"> post.id = index;</span><br><span class=\"line\"> return post;</span><br><span class=\"line\"> });</span><br><span class=\"line\"></span><br><span class=\"line\"> this.setState({ posts: list });</span><br><span class=\"line\">}</span><br></pre></td></tr></table></figure>\n\n<p>That’s it! Our application now renders a list of all created posts. Unfortunately, posts are not being re-fetched automatically when adding new posts. For the time being, we’ll have to reload the browser every time after adding a post. However, this we’ll address now.</p>\n<h3 id=\"Reloading-posts\"><a href=\"#Reloading-posts\" class=\"headerlink\" title=\"Reloading posts\"></a>Reloading posts</h3><p>There is certainly different ways to make the list of posts update automatically, so take the following approach with a grain of salt. What we need is a way to have the <code>createPost</code> component tell the <code>List</code> component to reload its posts. However, there’s no communication layer in place when building a simple React app like this, so the most straight forward way to make this possible, is to move the logic of loading the posts in the parent component of <code>CreatePost</code> and <code>List</code> (in our case <code>App</code>), and have it pass that logic down to places where its needed. This also means we’ll be fetching the list inside <code>App</code> and pass down the pure data to <code>List</code>.</p>\n<p>If this sounds overwhelming, no worries, it’s more trivial than that! Let’s start by introducing a <code>loadPosts()</code> function in our <code>App</code> component. Essentially we’re moving everything from <code>List</code>‘s <code>componentDidMount()</code> function into <code>App</code>:</p>\n<figure class=\"highlight plain\"><table><tr><td class=\"code\"><pre><span class=\"line\">export class App extends Component {</span><br><span class=\"line\"> ...</span><br><span class=\"line\"> async loadPosts() {</span><br><span class=\"line\"> const totalPosts = await DReddit.methods.numPosts().call();</span><br><span class=\"line\"></span><br><span class=\"line\"> let list = [];</span><br><span class=\"line\"></span><br><span class=\"line\"> if (totalPosts > 0) {</span><br><span class=\"line\"> for (let i = 0; i < totalPosts; i++) {</span><br><span class=\"line\"> const post = DReddit.methods.posts(i).call();</span><br><span class=\"line\"> list.push(post);</span><br><span class=\"line\"> }</span><br><span class=\"line\"> }</span><br><span class=\"line\"></span><br><span class=\"line\"> list = await Promise.all(list);</span><br><span class=\"line\"> list = list.map((post, index) => {</span><br><span class=\"line\"> post.id = index;</span><br><span class=\"line\"> return post;</span><br><span class=\"line\"> });</span><br><span class=\"line\"></span><br><span class=\"line\"> list;</span><br><span class=\"line\"></span><br><span class=\"line\"> this.setState({ posts: list });</span><br><span class=\"line\"> }</span><br><span class=\"line\">}</span><br></pre></td></tr></table></figure>\n\n<p>To make this work we also need to introduce a <code>state</code> with the dedicated <code>posts</code>. After that, we make sure <code>loadPosts()</code> is called when <code>App</code> is mounted:</p>\n<figure class=\"highlight plain\"><table><tr><td class=\"code\"><pre><span class=\"line\">export class App extends Component {</span><br><span class=\"line\"></span><br><span class=\"line\"> constructor(props) {</span><br><span class=\"line\"> super(props);</span><br><span class=\"line\"> this.state = {</span><br><span class=\"line\"> posts: []</span><br><span class=\"line\"> };</span><br><span class=\"line\"> }</span><br><span class=\"line\"></span><br><span class=\"line\"> async componentDidMount() {</span><br><span class=\"line\"> await this.loadPosts();</span><br><span class=\"line\"> }</span><br><span class=\"line\"> ...</span><br><span class=\"line\">}</span><br></pre></td></tr></table></figure>\n\n<p>Last but not least, all we have to do is to pass the <code>posts</code> down to <code>List</code> and <code>loadPosts()</code> to <code>CreatePost</code> as a callback handler if you will:</p>\n<figure class=\"highlight plain\"><table><tr><td class=\"code\"><pre><span class=\"line\">render() {</span><br><span class=\"line\"> return (</span><br><span class=\"line\"> <React.Fragment></span><br><span class=\"line\"> <h1>DReddit</h1></span><br><span class=\"line\"> <CreatePost afterPostHandler={this.loadPosts.bind(this)}/></span><br><span class=\"line\"> <List posts={this.state.posts}/></span><br><span class=\"line\"> </React.Fragment></span><br><span class=\"line\"> )</span><br><span class=\"line\">}</span><br></pre></td></tr></table></figure>\n\n<p>Once that is done, we can consume <code>posts</code> and <code>afterPostHandler()</code> from <code>this.props</code> respectively. In <code>List</code>‘s <code>render()</code> function we’ll do (notice we don’t rely on <code>this.state</code> anymore):</p>\n<figure class=\"highlight plain\"><table><tr><td class=\"code\"><pre><span class=\"line\">render() {</span><br><span class=\"line\"> return (<React.Fragment></span><br><span class=\"line\"> {this.props.posts.map(post => {</span><br><span class=\"line\"> ...</span><br><span class=\"line\"> })}</span><br><span class=\"line\"> </React.Fragment></span><br><span class=\"line\"> )</span><br><span class=\"line\">}</span><br></pre></td></tr></table></figure>\n\n<p>And in <code>CreatePost</code> we call <code>afterPostHandler()</code> after a post has been created:</p>\n<figure class=\"highlight plain\"><table><tr><td class=\"code\"><pre><span class=\"line\">async createPost(event) {</span><br><span class=\"line\"> ...</span><br><span class=\"line\"> await createPost.send({from: accounts[0], gas: estimate});</span><br><span class=\"line\"> await this.props.afterPostHandler();</span><br><span class=\"line\"></span><br><span class=\"line\"> this.setState({</span><br><span class=\"line\"> topic: '',</span><br><span class=\"line\"> content: '',</span><br><span class=\"line\"> loading: false</span><br><span class=\"line\"> });</span><br><span class=\"line\">}</span><br></pre></td></tr></table></figure>\n\n<p>Wonderful! The list now automatically reloads after creating posts, give it a try!</p>\n<h2 id=\"Add-voting-functionality\"><a href=\"#Add-voting-functionality\" class=\"headerlink\" title=\"Add voting functionality\"></a>Add voting functionality</h2><p>The final feature we’ll be implementing is the up and down voting of posts. This is where we come back to our <code>Post</code> component that we’ve created earlier. In order to make this feature complete we’ll have to:</p>\n<ul>\n<li>Render the number of up and down votes per post</li>\n<li>Add handlers for users to up and down vote</li>\n<li>Determine if a user can vote on a post</li>\n</ul>\n<h3 id=\"Rendering-number-of-votes\"><a href=\"#Rendering-number-of-votes\" class=\"headerlink\" title=\"Rendering number of votes\"></a>Rendering number of votes</h3><p>Let’s start with the first one, as it’s the most trivial one. While the number of up and down votes is already attached to the data that we receive from our <code>DReddit</code> Smart Contract, it’s not yet in the right format as it comes back as a string. Let’s make sure we parse the up and down vote counts on posts by extending our <code>App</code>‘s <code>loadPosts()</code> method like this:</p>\n<figure class=\"highlight plain\"><table><tr><td class=\"code\"><pre><span class=\"line\">async loadPosts() {</span><br><span class=\"line\"> ...</span><br><span class=\"line\"> list = list.map((post, index) => {</span><br><span class=\"line\"> post.id = index;</span><br><span class=\"line\"> post.upvotes = parseInt(post.upvotes, 10);</span><br><span class=\"line\"> post.downvotes = parseInt(post.downvotes, 10);</span><br><span class=\"line\"> return post;</span><br><span class=\"line\"> });</span><br><span class=\"line\"> ...</span><br><span class=\"line\">}</span><br></pre></td></tr></table></figure>\n\n<p>Once that is done we can pass each post’s <code>upvotes</code> and <code>downvotes</code> to every <code>Post</code> component via its <code>props</code> inside our <code>List</code> component:</p>\n<figure class=\"highlight plain\"><table><tr><td class=\"code\"><pre><span class=\"line\">export class List extends Component {</span><br><span class=\"line\"> ...</span><br><span class=\"line\"> render() {</span><br><span class=\"line\"> return (<React.Fragment></span><br><span class=\"line\"> {this.props.posts.map(post => {</span><br><span class=\"line\"> return (<Post</span><br><span class=\"line\"> key={post.id}</span><br><span class=\"line\"> description={post.description}</span><br><span class=\"line\"> creationDate={post.creationDate}</span><br><span class=\"line\"> upvotes={post.upvotes}</span><br><span class=\"line\"> downvotes={post.downvotes}</span><br><span class=\"line\"> owner={post.owner}</span><br><span class=\"line\"> />)</span><br><span class=\"line\"> })}</span><br><span class=\"line\"> </React.Fragment></span><br><span class=\"line\"> )</span><br><span class=\"line\"> }</span><br><span class=\"line\">}</span><br></pre></td></tr></table></figure>\n\n<p>Rendering the number of <code>upvotes</code> and <code>downvotes</code> is then really just a matter of interpolating them in <code>Post</code>‘s <code>render()</code> function. We’re just going to add them next to the buttons, but feel free to put them somewhere else:</p>\n<figure class=\"highlight plain\"><table><tr><td class=\"code\"><pre><span class=\"line\">export class Post extends Component {</span><br><span class=\"line\"> ...</span><br><span class=\"line\"> render() {</span><br><span class=\"line\"> ...</span><br><span class=\"line\"> return (</span><br><span class=\"line\"> <React.Fragment></span><br><span class=\"line\"> ...</span><br><span class=\"line\"> {this.props.upvotes} <button>Upvote</button></span><br><span class=\"line\"> {this.props.downvotes} <button>Downvote</button></span><br><span class=\"line\"> </React.Fragment></span><br><span class=\"line\"> )</span><br><span class=\"line\"> }</span><br><span class=\"line\">}</span><br></pre></td></tr></table></figure>\n\n<h3 id=\"Implement-up-and-down-votes\"><a href=\"#Implement-up-and-down-votes\" class=\"headerlink\" title=\"Implement up and down votes\"></a>Implement up and down votes</h3><p>Similar to when creating new posts, making the up and down vote buttons work requires sending transactions to our <code>DReddit</code> Smart Contract. So we’ll do almost the same thing as in our <code>CreatePost</code> component, just that we’re calling the Smart Contract’s <code>vote()</code> method. If you recall, the <code>vote()</code> method takes a post id and the vote type, which is either <code>NONE</code>, <code>UPVOTE</code> or <code>DOWNVOTE</code> and are stored as <code>uint8</code>.</p>\n<p>It makes sense to introduce the same representation in our app so we can use descriptive names, but rely on uint values at the same time. There are no enum data structures in JavaScript so we’ll use a hash object instead:</p>\n<figure class=\"highlight plain\"><table><tr><td class=\"code\"><pre><span class=\"line\">const BALLOT = {</span><br><span class=\"line\"> NONE: 0,</span><br><span class=\"line\"> UPVOTE: 1,</span><br><span class=\"line\"> DOWNVOTE: 2</span><br><span class=\"line\">}</span><br></pre></td></tr></table></figure>\n\n<p>We don’t actually have the post id available in our <code>Post</code> component yet. That’s easily added in our <code>List</code> component, by now you should know how to do that!</p>\n<p>We can then add click handlers to our up and down vote buttons and pass one of the <code>BALLOT</code> types to them (notice that we added <code>BALLOT.NONE</code> only for completeness-sake but don’t actually use it in our code):</p>\n<figure class=\"highlight plain\"><table><tr><td class=\"code\"><pre><span class=\"line\"><button onClick={e => this.vote(BALLOT.UPVOTE)}>Upvote</button></span><br><span class=\"line\"><button onClick={e => this.vote(BALLOT.DOWNVOTE)}>Downvote</button></span><br></pre></td></tr></table></figure>\n\n<p>The next thing we need to do is sending that vote type along with the post id to our Smart Contract:</p>\n<figure class=\"highlight plain\"><table><tr><td class=\"code\"><pre><span class=\"line\">async vote(ballot) {</span><br><span class=\"line\"> const accounts = await web3.eth.getAccounts();</span><br><span class=\"line\"> const vote = DReddit.methods.vote(this.props.id, ballot);</span><br><span class=\"line\"> const estimate = await vote.estimateGas();</span><br><span class=\"line\"></span><br><span class=\"line\"> await vote.send({from: accounts[0], gas: estimate});</span><br><span class=\"line\">}</span><br></pre></td></tr></table></figure>\n\n<p>Obviously, we also want to update the view when a vote has been successfully sent. Right now we’re reading a post’s up and down votes from its <code>props</code> and render them accordingly. However, we want to update those values as votes are coming in. For that we’ll change our code to only read the up and down votes from <code>props</code> once and store them in the component’s state.</p>\n<figure class=\"highlight plain\"><table><tr><td class=\"code\"><pre><span class=\"line\">export class Post extends Component {</span><br><span class=\"line\"></span><br><span class=\"line\"> constructor(props) {</span><br><span class=\"line\"> super(props);</span><br><span class=\"line\"> this.state = {</span><br><span class=\"line\"> topic: '',</span><br><span class=\"line\"> content: '',</span><br><span class=\"line\"> upvotes: this.props.upvotes,</span><br><span class=\"line\"> downvotes: this.props.downvotes</span><br><span class=\"line\"> };</span><br><span class=\"line\"> }</span><br><span class=\"line\"> ...</span><br><span class=\"line\">}</span><br></pre></td></tr></table></figure>\n\n<p>We also change the component’s view to render the values from state instead of <code>props</code>:</p>\n<figure class=\"highlight plain\"><table><tr><td class=\"code\"><pre><span class=\"line\">render() {</span><br><span class=\"line\"> ...</span><br><span class=\"line\"> return (</span><br><span class=\"line\"> <React.Fragment></span><br><span class=\"line\"> ...</span><br><span class=\"line\"> {this.state.upvotes} <button ...>Upvote</button></span><br><span class=\"line\"> {this.state.downvotes} <button ...>Downvote</button></span><br><span class=\"line\"> </React.Fragment></span><br><span class=\"line\"> )</span><br><span class=\"line\">}</span><br></pre></td></tr></table></figure>\n\n\n<p>After that we can update the state with new votes using <code>setState()</code>, right after a vote has been sent:</p>\n<figure class=\"highlight plain\"><table><tr><td class=\"code\"><pre><span class=\"line\">async vote(ballot) {</span><br><span class=\"line\"> ...</span><br><span class=\"line\"> this.setState({</span><br><span class=\"line\"> upvotes: this.state.upvotes + (ballot == BALLOT.UPVOTE ? 1 : 0),</span><br><span class=\"line\"> downvotes: this.state.downvotes + (ballot == BALLOT.DOWNVOTE ? 1 : 0)</span><br><span class=\"line\"> });</span><br><span class=\"line\">}</span><br></pre></td></tr></table></figure>\n\n<p><strong>That’s it!</strong> We can now up and down vote on posts…but only once! Yes, that’s right. When we try to vote multiple times on the same post, we’ll actually receive an error. That’s because, if you remember, there’s a restriction in our Smart Contract that makes sure users can not vote on posts that they’ve either already voted on, or created themselves.</p>\n<p>Let’s make sure this is reflected in our application’s UI and wrap up this tutorial!</p>\n<h3 id=\"Use-canVote-to-disable-vote-buttons\"><a href=\"#Use-canVote-to-disable-vote-buttons\" class=\"headerlink\" title=\"Use canVote() to disable vote buttons\"></a>Use <code>canVote()</code> to disable vote buttons</h3><p>We’ll keep this one very simple - if a user cannot vote on a post, the voting buttons should be simply disabled. We can easily determine whether a user is allowed to vote by calling our Smart Contract’s <code>canVote()</code> method. Another thing we need to consider is that we shouldn’t allow a user to vote when a vote for the same post is already in flight but hasn’t completed yet.</p>\n<p>Let’s introduce a new state properties for that first. In general we can say that a user is allowed to vote, and that she is not submitting a vote in this very moment:</p>\n<figure class=\"highlight plain\"><table><tr><td class=\"code\"><pre><span class=\"line\">export class Post extends Component {</span><br><span class=\"line\"></span><br><span class=\"line\"> constructor(props) {</span><br><span class=\"line\"> super(props);</span><br><span class=\"line\"> this.state = {</span><br><span class=\"line\"> topic: '',</span><br><span class=\"line\"> content: '',</span><br><span class=\"line\"> upvotes: this.props.upvotes,</span><br><span class=\"line\"> downvotes: this.props.downvotes,</span><br><span class=\"line\"> canVote: true,</span><br><span class=\"line\"> submitting: false</span><br><span class=\"line\"> };</span><br><span class=\"line\"> }</span><br><span class=\"line\"> ...</span><br><span class=\"line\">}</span><br></pre></td></tr></table></figure>\n\n<p>Next, we update our <code>Post</code> component’s <code>render()</code> function to disable the voting buttons if a vote is in flight, or a user is simply not allowed to vote:</p>\n<figure class=\"highlight plain\"><table><tr><td class=\"code\"><pre><span class=\"line\">render() {</span><br><span class=\"line\"> ...</span><br><span class=\"line\"> const disabled = this.state.submitting || !this.state.canVote;</span><br><span class=\"line\"> return (</span><br><span class=\"line\"> <React.Fragment></span><br><span class=\"line\"> ...</span><br><span class=\"line\"> {this.state.upvotes} <button disabled={disabled} ...>Upvote</button></span><br><span class=\"line\"> {this.state.downvotes} <button disabled={disabled} ...>Downvote</button></span><br><span class=\"line\"> </React.Fragment></span><br><span class=\"line\"> )</span><br><span class=\"line\">}</span><br></pre></td></tr></table></figure>\n\n<p>Last but not least, we have to make sure the state properties are updated accordingly. We’ll call our Smart Contract’s <code>canVote()</code> method when a post is initialized:</p>\n<figure class=\"highlight plain\"><table><tr><td class=\"code\"><pre><span class=\"line\">export class Post extends Component {</span><br><span class=\"line\"> ...</span><br><span class=\"line\"> async componentDidMount() {</span><br><span class=\"line\"> ...</span><br><span class=\"line\"> const canVote = await DReddit.methods.canVote(this.props.id).call();</span><br><span class=\"line\"> this.setState({ topic, content, canVote });</span><br><span class=\"line\"> }</span><br><span class=\"line\"> ...</span><br><span class=\"line\">}</span><br></pre></td></tr></table></figure>\n\n<p>And when a vote is being made, we set <code>submitting</code> to <code>true</code> right before we send a transaction and set it back to <code>false</code> again when the transaction is done. At this point, we also know that a vote has been made on this post, so <code>canVote</code> can be set to <code>false</code> at the same time:</p>\n<figure class=\"highlight plain\"><table><tr><td class=\"code\"><pre><span class=\"line\">async vote(ballot) {</span><br><span class=\"line\"> ...</span><br><span class=\"line\"> this.setState({ submitting: true });</span><br><span class=\"line\"> await vote.send({from: accounts[0], gas: estimate + 1000});</span><br><span class=\"line\"></span><br><span class=\"line\"> this.setState({</span><br><span class=\"line\"> ...</span><br><span class=\"line\"> canVote: false,</span><br><span class=\"line\"> submitting: false</span><br><span class=\"line\"> });</span><br><span class=\"line\">}</span><br></pre></td></tr></table></figure>\n\n<p><strong>And we’re done!</strong></p>\n<h2 id=\"Wrapping-it-up\"><a href=\"#Wrapping-it-up\" class=\"headerlink\" title=\"Wrapping it up\"></a>Wrapping it up</h2><p>Congratulations! You’ve completed the tutorial on building a simple decentralized Reddit application! You might have noticed that this is only the tip of the iceberg though, as there are so many things that can be done to improve and optimize this application. Here are some ideas for further exploration:</p>\n<ul>\n<li>Sort the posts in reversed chronological order so that the latest post is always on top</li>\n<li>Rely on Smart Contracts Events to reload list</li>\n<li>Introduce routing so there can be different views for creating and viewing posts</li>\n<li>Use CSS to make the application look nice</li>\n</ul>\n<p>We hope you’ve learned that it’s not too hard to build a DApp that uses IPFS and talks to Smart Contracts, and also how Embark can help you doing all of these things.</p>\n<p><strong>We’ve recorded every single step of this tutorial <a href=\"https://github.com/embarklabs/dreddit-tutorial\" target=\"_blank\" rel=\"noopener\">in this repository</a></strong>, so feel free to go ahead, clone it, play with it, compare it with your work or change it to your needs. There will be more tutorials of this kind in the future, so make sure to <a href=\"https://twitter.com/EmbarkProject\" target=\"_blank\" rel=\"noopener\">follow us on Twitter</a> as well for updates!</p>\n","site":{"data":{"authors":{"iuri_matias":{"name":"Iuri Matias","twitter":"iurimatias","image":"https://pbs.twimg.com/profile_images/928272512181563392/iDJdvy2k_400x400.jpg"},"pascal_precht":{"name":"Pascal Precht","twitter":"pascalprecht","image":"https://pbs.twimg.com/profile_images/993785060733194241/p3oAIMDP_400x400.jpg"},"anthony_laibe":{"name":"Anthony Laibe","twitter":"a_laibe","image":"https://pbs.twimg.com/profile_images/257742900/13168239_400x400.jpg"},"jonathan_rainville":{"name":"Jonathan Rainville","twitter":"ShyolGhul","image":"https://pbs.twimg.com/profile_images/993873866878570496/-aE4byjj_400x400.jpg"},"andre_medeiros":{"name":"Andre Medeiros","twitter":"superdealloc","image":"https://pbs.twimg.com/profile_images/965722487735701504/m58KNgWN_400x400.jpg"},"eric_mastro":{"name":"Eric Mastro","twitter":"ericmastro","image":"https://avatars1.githubusercontent.com/u/5089238?s=460&v=4"},"michael_bradley":{"name":"Michael Bradley","image":"https://avatars3.githubusercontent.com/u/194260?s=460&v=4"},"richard_ramos":{"name":"Richard Ramos","twitter":"richardramos_me","image":"https://devcon.org/images/speakers/richard_ramos.jpg"},"jonny_zerah":{"name":"Jonny Zerah","twitter":"jonnyzerah","image":"https://pbs.twimg.com/profile_images/1043774340490248192/gI9aGy17_400x400.jpg"},"robin_percy":{"name":"Robin Percy","twitter":"rbin","image":"https://avatars1.githubusercontent.com/u/29288325?s=400&v=4"}},"categories":{"tutorials":"Tutorials","announcements":"Announcements"},"languages":{"en":"English"}}},"excerpt":"","more":"<p>Hopefully you’ve read <a href=\"/news/2019/02/04/building-a-decentralized-reddit-with-embark-part-1/\">the first</a> and <a href=\"/news/2019/02/11/building-a-decentralized-reddit-with-embark-part-2/\">second part</a> of this tutorial on building a decentralized Reddit application using Embark. If not, we highly recommend you doing so, because in this part, we’ll be focussing on building the front-end for our application and continue where we’ve left off.</p>\n<ul>\n<li><a href=\"/news/2019/02/04/building-a-decentralized-reddit-with-embark-part-1/\"><strong>Part 1</strong> - Setting up the project and implementing a Smart Contract</a></li>\n<li><a href=\"/news/2019/02/11/building-a-decentralized-reddit-with-embark-part-2/\"><strong>Part 2</strong> - Testing the Smart Contract through EmbarkJS</a></li>\n</ul>\n<p>We’ll be using React as a client-side JavaScript library to build our application. However, we can use any framework of our choice, so feel free to follow along while using your favourite framework equivalents!</p>\n<p><strong>The code for this tutorial can be found in <a href=\"https://github.com/embarklabs/dreddit-tutorial\" target=\"_blank\" rel=\"noopener\">this repository</a></strong>.</p>\n<h2 id=\"Rendering-our-first-component\"><a href=\"#Rendering-our-first-component\" class=\"headerlink\" title=\"Rendering our first component\"></a>Rendering our first component</h2><p>Alright, before we jump straight into building components that will talk to our Smart Contract instance, let’s first actually render a simple text on the screen just to make sure our setup is working correctly.</p>\n<p>For that, what we’ll do is adding React as a dependency to our project. In fact, we’ll be relying on two packages - <code>react</code> and <code>react-dom</code>. The latter is needed to render components defined with React in a DOM environment, which is what a Browser essentially is.</p>\n<p>Let’s add the following <code>dependencies</code> section to our projects <code>package.json</code>:</p>\n<figure class=\"highlight plain\"><table><tr><td class=\"code\"><pre><span class=\"line\">"dependencies": {</span><br><span class=\"line\"> "react": "^16.4.2",</span><br><span class=\"line\"> "react-dom": "^16.4.2"</span><br><span class=\"line\">}</span><br></pre></td></tr></table></figure>\n\n<p>Once that is done we need to actually install those dependencies. For that we simply execute the following command in our terminal of choice:</p>\n<figure class=\"highlight plain\"><table><tr><td class=\"code\"><pre><span class=\"line\">$ npm install</span><br></pre></td></tr></table></figure>\n\n<p>Now we can go ahead and actually make use of React. As Embark is framework agnostic, we won’t be focussing too much on details specific to React, just the least amount that is needed to make our app work.</p>\n<p>Creating components in React is pretty straight forward. All we need to do is creating a class that extends React’s <code>Component</code> type and add a <code>render()</code> method that will render the component’s view.</p>\n<p>Let’s create a folder for all of our components inside our projects:</p>\n<figure class=\"highlight plain\"><table><tr><td class=\"code\"><pre><span class=\"line\">$ mkdir app/js/components</span><br></pre></td></tr></table></figure>\n\n<p>Next, we create a file for our root component. We call it simply <code>App</code> and use the same file name:</p>\n<figure class=\"highlight plain\"><table><tr><td class=\"code\"><pre><span class=\"line\">$ touch app/js/components/App.js</span><br></pre></td></tr></table></figure>\n\n<p>Alright, as mentioned earlier, we really just want to render some text on the screen for starters. Here’s what that could look like:</p>\n<figure class=\"highlight plain\"><table><tr><td class=\"code\"><pre><span class=\"line\">import React, { Component } from 'react';</span><br><span class=\"line\"></span><br><span class=\"line\">export class App extends Component {</span><br><span class=\"line\"></span><br><span class=\"line\"> render() {</span><br><span class=\"line\"> return <h1>DReddit</h1></span><br><span class=\"line\"> }</span><br><span class=\"line\">}</span><br></pre></td></tr></table></figure>\n\n<p>This is probably self explanatory, but all we’re doing here is importing <code>React</code> and its <code>Component</code> type and create an <code>App</code> class that extends <code>Component</code>. The <code>render()</code> method will be used by React to render the component’s view and has to return a template that is written in JSX syntax. JSX looks a lot like HTML just that it comes with extra syntax to embed things like control structures. We’ll make use of that later!</p>\n<p>Okay now that we have this component defined, we need to tell React to actually render this particular component. For that, we head over to <code>app/js/index.js</code> and add the following code:</p>\n<figure class=\"highlight plain\"><table><tr><td class=\"code\"><pre><span class=\"line\">import React from 'react';</span><br><span class=\"line\">import { render } from 'react-dom';</span><br><span class=\"line\">import { App } from './components/App';</span><br><span class=\"line\"></span><br><span class=\"line\">render(<App />, document.getElementById('root'));</span><br></pre></td></tr></table></figure>\n\n<p>We need to import <code>React</code> again as it has to be available in this script’s scope. We also import a <code>render</code> function from <code>react-dom</code>, which is used to render our root component (<code>App</code>) into some element inside our HTML document. In this case we say that the element in which we want to render our root component is the element with the id <code>root</code>.</p>\n<p>Let’s set this up really quick. In <code>app/index.html</code> add a new element with a <code>root</code> id:</p>\n<figure class=\"highlight plain\"><table><tr><td class=\"code\"><pre><span class=\"line\"><body></span><br><span class=\"line\">\t<div id="root"></div></span><br><span class=\"line\">\t<script src="js/app.js"></script></span><br><span class=\"line\"></body></span><br></pre></td></tr></table></figure>\n\n<p>Notice that we’ve also moved the <code>script</code> tag inside the body tag, after the element with the <code>root</code> id. This is just one way to work around the fact that the element we’re referencing inside our <code>render()</code> method is actually available in the document at the time the script is executed.</p>\n<p>That should do it! Let’s spin up Embark, we should then see our component rendered on the screen:</p>\n<figure class=\"highlight plain\"><table><tr><td class=\"code\"><pre><span class=\"line\">$ embark run</span><br></pre></td></tr></table></figure>\n\n<h2 id=\"Building-a-CreatePost-component\"><a href=\"#Building-a-CreatePost-component\" class=\"headerlink\" title=\"Building a CreatePost component\"></a>Building a <code>CreatePost</code> component</h2><p>Alright, enough warm up. Time to build components that are useful. We start off with building a component that lets users create posts through our application. Similar to <code>App</code>, we’ll introduce a new component <code>createPost</code> that comes with a <code>render()</code> method to display a simple form for entering data. We’ll also need to add event handlers to the form so that when a user submits the form, we can actually access the data and later on send it to our Smart Contract.</p>\n<p>Creating a simple form is very straight forward:</p>\n<figure class=\"highlight plain\"><table><tr><td class=\"code\"><pre><span class=\"line\">import React, { Component } from 'react';</span><br><span class=\"line\"></span><br><span class=\"line\">export class CreatePost extends Component {</span><br><span class=\"line\"></span><br><span class=\"line\"> render() {</span><br><span class=\"line\"> return (</span><br><span class=\"line\"> <form></span><br><span class=\"line\"> <div></span><br><span class=\"line\"> <label>Topic</label></span><br><span class=\"line\"> <input type="text" name="topic" /></span><br><span class=\"line\"> </div></span><br><span class=\"line\"> <div></span><br><span class=\"line\"> <textarea name="content"></textarea></span><br><span class=\"line\"> </div></span><br><span class=\"line\"> <button>Post</button></span><br><span class=\"line\"> </form></span><br><span class=\"line\"> )</span><br><span class=\"line\"> }</span><br><span class=\"line\">}</span><br></pre></td></tr></table></figure>\n\n<p>To actually render this component on screen, we need to make it part of our <code>App</code> component. Or, to be more specific, have the <code>App</code> component render our <code>CreatePost</code> component. For now we can simply add it to <code>App</code>‘s render function like this;</p>\n<figure class=\"highlight plain\"><table><tr><td class=\"code\"><pre><span class=\"line\">import { CreatePost } from './CreatePost';</span><br><span class=\"line\"></span><br><span class=\"line\">export class App extends Component {</span><br><span class=\"line\"></span><br><span class=\"line\"> render() {</span><br><span class=\"line\"> return (</span><br><span class=\"line\"> <React.Fragment></span><br><span class=\"line\"> <h1>DReddit</h1></span><br><span class=\"line\"> <CreatePost /></span><br><span class=\"line\"> </React.Fragment&></span><br><span class=\"line\"> )</span><br><span class=\"line\"> }</span><br><span class=\"line\">}</span><br></pre></td></tr></table></figure>\n\n<p>React doesn’t allow for multiple root elements in a single component’s view, so we have to take advantage of <code>React.Fragment</code>. Obviously, there’s not too much going on here apart from us rendering a static form. Also notice that we don’t spend too much time and effort on making the form look nice as we focus on the functionality for now. Consider that homework!</p>\n<p>Let’s make this form functional. First of all we want make sure that data entered into the form is available inside our component. React components maintain an object called <code>state</code> that can be used for exactly that. All we have to do is to initialize it with some initial values and update it using a <code>setState()</code> method if needed.</p>\n<p>Let’s introduce <code>state</code> in our component by adding a constructor and initializing it accordingly:</p>\n<figure class=\"highlight plain\"><table><tr><td class=\"code\"><pre><span class=\"line\">export class CreatePost extends Component {</span><br><span class=\"line\"></span><br><span class=\"line\"> constructor(props) {</span><br><span class=\"line\"> super(props);</span><br><span class=\"line\"></span><br><span class=\"line\"> this.state = {</span><br><span class=\"line\"> topic: '',</span><br><span class=\"line\"> content: '',</span><br><span class=\"line\"> loading: false</span><br><span class=\"line\"> };</span><br><span class=\"line\"> }</span><br><span class=\"line\"> ...</span><br><span class=\"line\">}</span><br></pre></td></tr></table></figure>\n\n<p>Next we bind that state to our form fields:</p>\n<figure class=\"highlight plain\"><table><tr><td class=\"code\"><pre><span class=\"line\"><form></span><br><span class=\"line\"> <div></span><br><span class=\"line\"> <label>Topic</label></span><br><span class=\"line\"> <input type="text" name="topic" value={this.state.topic} /></span><br><span class=\"line\"> </div></span><br><span class=\"line\"> <div></span><br><span class=\"line\"> <textarea name="content" value={this.state.content}></textarea></span><br><span class=\"line\"> </div></span><br><span class=\"line\"> <button>Post</button></span><br><span class=\"line\"></form></span><br></pre></td></tr></table></figure>\n\n<p>No worries, we’ll make use of <code>loading</code> in a second. Last but not least we want to add some event handlers so that changes in the view will be reflected back to our component’s state as the user is entering data. To make sure everything works fine, we’ll also add an event handler for the form submission and output the data in <code>state</code>. Here’s what our <code>handleChange()</code> and <code>createPost()</code> handlers looks like:</p>\n<figure class=\"highlight plain\"><table><tr><td class=\"code\"><pre><span class=\"line\">export class CreatePost extends Component {</span><br><span class=\"line\"> ...</span><br><span class=\"line\"> handleChange(field, event) {</span><br><span class=\"line\"> this.setState({</span><br><span class=\"line\"> [field]: event.target.value</span><br><span class=\"line\"> });</span><br><span class=\"line\"> }</span><br><span class=\"line\"></span><br><span class=\"line\"> createPost(event) {</span><br><span class=\"line\"> event.preventDefault();</span><br><span class=\"line\"> console.log(this.state);</span><br><span class=\"line\"> }</span><br><span class=\"line\"> ...</span><br><span class=\"line\">}</span><br></pre></td></tr></table></figure>\n\n<p>Notice how we’re using <code>setState()</code> inside <code>handleChange()</code> to update whatever field name has been passed to that method. Now all we need to do is attach those handlers to our form:</p>\n<figure class=\"highlight plain\"><table><tr><td class=\"code\"><pre><span class=\"line\"><form onSubmit={e => createPost(e)}></span><br><span class=\"line\"> <div></span><br><span class=\"line\"> <label>Topic</label></span><br><span class=\"line\"> <input</span><br><span class=\"line\"> type="text"</span><br><span class=\"line\"> name="topic"</span><br><span class=\"line\"> value={this.state.topic}</span><br><span class=\"line\"> onChange={e => handleChange('topic', e)} /></span><br><span class=\"line\"> </div></span><br><span class=\"line\"> <div></span><br><span class=\"line\"> <textarea</span><br><span class=\"line\"> name="content"</span><br><span class=\"line\"> value={this.state.content}</span><br><span class=\"line\"> onChange={e => handleChange('content', e})></textarea></span><br><span class=\"line\"> </div></span><br><span class=\"line\"> <button type="submit">Post</button></span><br><span class=\"line\"></form></span><br></pre></td></tr></table></figure>\n\n<p>Since we’re using the <code>onSubmit()</code> handler of the form, it’s also important that we either add a <code>type="submit"</code> to our <code>button</code> or change the button to an <code><input type="submit"></code> element. Otherwise, the form won’t emit a submit event.</p>\n<p>Nice! With that in place, we should see the component’s <code>state</code> in the console when submitting the form! The next challenge is to use <code>EmbarkJS</code> and its APIs to make our component talk to our Smart Contract instance.</p>\n<h3 id=\"Uploading-data-to-IPFS\"><a href=\"#Uploading-data-to-IPFS\" class=\"headerlink\" title=\"Uploading data to IPFS\"></a>Uploading data to IPFS</h3><p>Recall from our <a href=\"/news/2019/02/04/building-a-decentralized-reddit-with-embark-part-1/#Creating-posts\">first part</a> of this tutorial that our <code>DReddit</code> Smart Contract comes with a <code>createPost()</code> method that takes some bytes as post data. Those bytes are actually not the post data itself, but an IPFS hash that points to the post data. In other words, we’ll have to somehow create such a hash and make sure the data is uploaded to IPFS as well.</p>\n<p>Luckily, EmbarkJS comes with plenty of convenient APIs to do exactly that! <code>EmbarkJS.Storage.saveText()</code> takes a string, uploads it to IPFS and returns its hash which can then be used to create a post using our Smart Contract. One thing to keep in mind is that those APIs are asynchronous. Similar to how we wrote tests in <a href=\"/news/2019/02/11/building-a-decentralized-reddit-with-embark-part-2/#Testing-createPost\">part two</a> of this tutorial, we’ll use <code>async/await</code> to write asynchronous code in a synchronous fashion.</p>\n<figure class=\"highlight plain\"><table><tr><td class=\"code\"><pre><span class=\"line\">async createPost(event) {</span><br><span class=\"line\"> event.preventDefault();</span><br><span class=\"line\"></span><br><span class=\"line\"> this.setState({</span><br><span class=\"line\"> loading: true</span><br><span class=\"line\"> });</span><br><span class=\"line\"></span><br><span class=\"line\"> const ipfsHash = await EmbarkJS.Storage.saveText(JSON.stringify({</span><br><span class=\"line\"> topic: this.state.topic,</span><br><span class=\"line\"> content: this.state.content</span><br><span class=\"line\"> }));</span><br><span class=\"line\"></span><br><span class=\"line\"> this.setState({</span><br><span class=\"line\"> topic: '',</span><br><span class=\"line\"> content: '',</span><br><span class=\"line\"> loading: false</span><br><span class=\"line\"> });</span><br><span class=\"line\">}</span><br></pre></td></tr></table></figure>\n\n<p>We use <code>JSON.stringify()</code> on an object that holds the <code>topic</code> and <code>content</code> of the post to be created. This is also the first time we put <code>loading</code> into action. Setting it to <code>true</code> before, and <code>false</code> after we’ve performed our operations lets us render a useful message as the user is waiting for updates.</p>\n<figure class=\"highlight plain\"><table><tr><td class=\"code\"><pre><span class=\"line\"><form onSubmit={e => createPost(e)}></span><br><span class=\"line\"> ...</span><br><span class=\"line\"> {this.state.loading &&</span><br><span class=\"line\"> <p>Posting...</p></span><br><span class=\"line\"> }</span><br><span class=\"line\"></form></span><br></pre></td></tr></table></figure>\n\n<p>Obviously, we’re not done yet though. All we do right now is uploading the post’s data to IPFS and receiving the hash, but we still need to take that hash and send it to our Smart Contract using its <code>createPost()</code> method. Let’s do that!</p>\n<h3 id=\"Sending-transactions-to-create-posts\"><a href=\"#Sending-transactions-to-create-posts\" class=\"headerlink\" title=\"Sending transactions to create posts\"></a>Sending transactions to create posts</h3><p>To send a transaction to our Smart Contract, we can again take advantage of EmbarkJS’ APIs, similar to how we did it in the <a href=\"/news/2019/02/11/building-a-decentralized-reddit-with-embark-part-2\">second part</a>. We also need to get hold of an Ethereum account to send the transaction from. This will be very straight forward as we’ll be just relying on the accounts that are generated by the Ethereum node that Embark spins up for us.</p>\n<p>Once we have those things in place we can get a gas estimation for our transaction and send the data over. Here’s how we retrieve our accounts, notice that <code>async/await</code> can be used here as well:</p>\n<figure class=\"highlight plain\"><table><tr><td class=\"code\"><pre><span class=\"line\">async createPost(event) {</span><br><span class=\"line\"> ...</span><br><span class=\"line\"> const accounts = await web3.eth.getAccounts();</span><br><span class=\"line\"> ...</span><br><span class=\"line\">}</span><br></pre></td></tr></table></figure>\n\n<p>Next up we’ll import a <code>DReddit</code> Smart Contract instance from EmbarkJS and use it to get a gas estimation from <code>web3</code>. We can then use the estimation and one of our accounts to actually send the transaction:</p>\n<figure class=\"highlight plain\"><table><tr><td class=\"code\"><pre><span class=\"line\">import DReddit from './artifacts/contracts/DReddit';</span><br><span class=\"line\">...</span><br><span class=\"line\"></span><br><span class=\"line\">async createPost(event) {</span><br><span class=\"line\"> ...</span><br><span class=\"line\"> const accounts = await web3.eth.getAccounts();</span><br><span class=\"line\"> const createPost = DReddit.methods.createPost(web3.utils.toHex(ipfsHash));</span><br><span class=\"line\"> const estimate = await createPost.estimateGas();</span><br><span class=\"line\"></span><br><span class=\"line\"> await createPost.send({from: accounts[0], gas: estimate});</span><br><span class=\"line\"> ...</span><br><span class=\"line\">}</span><br></pre></td></tr></table></figure>\n\n<p>Sweet, with that, our <code>createPost</code> method is done! We haven’t built a list of all created posts yet, but if we open up the app and create a post, we can use Embark to double check whether the transaction went through successfully. Simply watch the output in the terminal after running <code>embark run</code>. We should see a confirmation that looks something like this:</p>\n<figure class=\"highlight plain\"><table><tr><td class=\"code\"><pre><span class=\"line\">Blockchain> DReddit.createPost("0x516d5452427a47415153504552614645534173335133765a6b59436633634143776368626263387575623434374e") | 0xbbeb9fa1eb4e3434c08b31409c137c2129de65eb335855620574c537b3004f29 | gas:136089 | blk:18455 | status:0x1</span><br></pre></td></tr></table></figure>\n\n<h2 id=\"Creating-a-Post-component\"><a href=\"#Creating-a-Post-component\" class=\"headerlink\" title=\"Creating a Post component\"></a>Creating a Post component</h2><p>The next challenge lies in fetching all created posts from our Smart Contract and IPFS so we can render them on screen. We start simple and first create a new component that will render a single post. After that we’ll look into rendering a list of posts dynamically, based on the data we’re fetching.</p>\n<p>Again, our application won’t look particularly pretty, we’ll just focus on getting the core functionality right. A post component needs to render the post topic, its content, the owner of the post, ideally the date when it has been created, and a button to up and down vote respectively.</p>\n<p>Here’s what such a component with a basic template could look like:</p>\n<figure class=\"highlight plain\"><table><tr><td class=\"code\"><pre><span class=\"line\">import React, { Component } from 'react';</span><br><span class=\"line\"></span><br><span class=\"line\">export class Post extends Component {</span><br><span class=\"line\"></span><br><span class=\"line\"> render() {</span><br><span class=\"line\"> return (</span><br><span class=\"line\"> <React.Fragment></span><br><span class=\"line\"> <hr /></span><br><span class=\"line\"> <h3>Some Topic</h3></span><br><span class=\"line\"> <p>This is the content of a post</p></span><br><span class=\"line\"> <p><small><i>created at 2019-02-18 by 0x00000000000000</i></small></p></span><br><span class=\"line\"> <button>Upvote</button></span><br><span class=\"line\"> <button>Downvote</button></span><br><span class=\"line\"> </React.Fragment></span><br><span class=\"line\"> )</span><br><span class=\"line\"> }</span><br><span class=\"line\">}</span><br></pre></td></tr></table></figure>\n\n<p>There are different ways to make the data being rendered dynamic. Usually, we would probably pass a one or more properties to the <code>Post</code> component that represents the entire post object and can then be displayed inside its <code>render()</code> method. However, for this tutorial we’re going to choose a slightly different path. We’ll make <code>Post</code> receive IPFS hash that’s stored in the Smart Contract and have it resolve the data itself.</p>\n<p>Let’s stay consistent with our naming and say the property we’re expecting to be filled with data is called <code>description</code>, just like the one used inside the Smart Contract. We can then use <code>EmbarkJS.Storage.get()</code> with the IPFS hash to fetch the data that represents the actual post. In order to render the data inside <code>Post</code>‘s view, we’ll parse it and use <code>setState()</code> accordingly.</p>\n<p>To make sure all of that happens once the component is ready to do its work, we’ll do all of that inside its <code>componentDidMount()</code> life cycle hook:</p>\n<figure class=\"highlight plain\"><table><tr><td class=\"code\"><pre><span class=\"line\">import React, { Component } from 'react';</span><br><span class=\"line\">import EmbarkJS from '.artifacts/embarkjs';</span><br><span class=\"line\"></span><br><span class=\"line\">export class Post extends Component {</span><br><span class=\"line\"></span><br><span class=\"line\"> constructor(props) {</span><br><span class=\"line\"> super(props);</span><br><span class=\"line\"> this.state = {</span><br><span class=\"line\"> topic: '',</span><br><span class=\"line\"> content: ''</span><br><span class=\"line\"> };</span><br><span class=\"line\"> }</span><br><span class=\"line\"></span><br><span class=\"line\"> async componentDidMount() {</span><br><span class=\"line\"> const ipfsHash = web3.utils.toAscii(this.props.description);</span><br><span class=\"line\"> const data = await EmbarkJS.Storage.get(ipfsHash);</span><br><span class=\"line\"> const { topic, content } = JSON.parse(data);</span><br><span class=\"line\"></span><br><span class=\"line\"> this.setState({ topic, content });</span><br><span class=\"line\"> }</span><br><span class=\"line\"> ...</span><br><span class=\"line\">}</span><br></pre></td></tr></table></figure>\n\n<p>There’s one gotcha to keep in mind here: Calling <code>EmbarkJS.Storage.get()</code> or any <code>EmbarkJS</code> function on page load can fail, because the storage system might not be fully initialized yet. This wasn’t a problem for the previous <code>EmbarkJS.Storage.uploadText()</code> because we called that function well after Embark had finished initializing</p>\n<p>Theoretically however, there could be a race condition even for creating a post. To ensure that EmbarkJS is ready at any point in time, we use its <code>onReady()</code> hook. <code>EmbarkJS.onReady()</code> takes a callback which will be executed once EmbarkJS is ready to go. The best place to do this in our app is probably where we attempt to render our application, so let’s wrap that <code>render()</code> call in our <code>App</code> component inside Embark’s <code>onReady()</code> function.</p>\n<figure class=\"highlight plain\"><table><tr><td class=\"code\"><pre><span class=\"line\">EmbarkJS.onReady(() => {</span><br><span class=\"line\"> render(<App />, document.getElementById('root'));</span><br><span class=\"line\">});</span><br></pre></td></tr></table></figure>\n\n<p>This also means our app will only render when EmbarkJS is ready, which theoretically could take a little longer. However in this tutorial, chances are very low this is becoming a problem.</p>\n<p>Let’s also quickly add the <code>owner</code> and creation date. The <code>owner</code> is expected to be passed down as a property. The same goes for the creation date. We just need to make sure it’ll be formatted in a way the users can make sense of the data. We’ll use the <code>dateformat</code> library for that and install it as a dependency like this:</p>\n<figure class=\"highlight plain\"><table><tr><td class=\"code\"><pre><span class=\"line\">$ npm install --save dateformat</span><br></pre></td></tr></table></figure>\n\n<p>Once that is done, we can update our <code>Post</code> component’s <code>render()</code> function to calculate a properly formatted date based on the <code>creationDate</code> that has been passed down through properties:</p>\n<figure class=\"highlight plain\"><table><tr><td class=\"code\"><pre><span class=\"line\">...</span><br><span class=\"line\">import dateformat from 'dateformat';</span><br><span class=\"line\"></span><br><span class=\"line\">export class Post extends Component {</span><br><span class=\"line\"> ...</span><br><span class=\"line\"> render() {</span><br><span class=\"line\"> const formattedDate = dateformat(</span><br><span class=\"line\"> new Date(this.props.creationDate * 1000),</span><br><span class=\"line\"> 'yyyy-mm-dd HH:MM:ss'</span><br><span class=\"line\"> );</span><br><span class=\"line\"> return (</span><br><span class=\"line\"> <React.Fragment></span><br><span class=\"line\"> <hr /></span><br><span class=\"line\"> <h3>{this.state.topic}</h3></span><br><span class=\"line\"> <p>{this.state.content}</p></span><br><span class=\"line\"> <p><small><i>created at {formattedDate} by {this.props.owner}</i></small></p></span><br><span class=\"line\"> <button>Upvote</button></span><br><span class=\"line\"> <button>Downvote</button></span><br><span class=\"line\"> </React.Fragment></span><br><span class=\"line\"> )</span><br><span class=\"line\"> }</span><br><span class=\"line\">}</span><br></pre></td></tr></table></figure>\n\n<p>Notice that variables created inside <code>render()</code> can be interpolated as they are - there’s no need to make them available on <code>props</code> or <code>state</code>. As a matter of fact, <code>props</code> are always considered read only in React.</p>\n<p>Let’s try out our new <code>Post</code> component with some static data by adding it to our <code>App</code> component’s view. Next up, we’ll make this dynamic by fetching the posts from our Smart Contract.</p>\n<p><strong>Attention</strong>: The hash used in this snippet might not be available in your local IPFS node, so you’ll have to get hold of your own hash. This can be down by logging out the hash that is returned from IPFS and convert it to hex code.</p>\n<figure class=\"highlight plain\"><table><tr><td class=\"code\"><pre><span class=\"line\">export class App extends Component {</span><br><span class=\"line\"></span><br><span class=\"line\"> render() {</span><br><span class=\"line\"> return (</span><br><span class=\"line\"> <React.Fragment></span><br><span class=\"line\"> <h1>DReddit</h1></span><br><span class=\"line\"> <CreatePost /></span><br><span class=\"line\"> <Post</span><br><span class=\"line\"> description="0x516d655338444b53464546725369656a747751426d683377626b56707566335770636e4c715978726b516e4b5250"</span><br><span class=\"line\"> creationDate="1550073772"</span><br><span class=\"line\"> owner="0x00000000000"</span><br><span class=\"line\"> /></span><br><span class=\"line\"> </React.Fragment></span><br><span class=\"line\"> )</span><br><span class=\"line\"> }</span><br><span class=\"line\">}</span><br></pre></td></tr></table></figure>\n\n<h2 id=\"Creating-a-List-component\"><a href=\"#Creating-a-List-component\" class=\"headerlink\" title=\"Creating a List component\"></a>Creating a List component</h2><p>Before we can move on with building a component that renders a list of posts, we’ll have to extend our Smart Contract with one more method. Since there’s no canonical way to fetch array data from a Smart Contract, we’ll be fetching the post data for each post one by one. We do that by first fetching the total number of posts and use that number to iterate over the available indices, which we can then use to fetch the actual posts.</p>\n<p>Let’s introduce a method <code>numPosts()</code> in our <code>DReddit</code> Smart Contract:</p>\n<figure class=\"highlight plain\"><table><tr><td class=\"code\"><pre><span class=\"line\">function numPosts() public view returns (uint) {</span><br><span class=\"line\"> return posts.length;</span><br><span class=\"line\">}</span><br></pre></td></tr></table></figure>\n\n<p><code>posts.length</code> will increase as we’re adding posts, so it will always be the single source of truth when it comes to determining indices of posts. This would be a good opportunity to write another test - we’ll leave that up to you!</p>\n<p>With that in place, we can start building a new <code>List</code> component. The <code>List</code> component maintains a list of posts to render on screen, so we can start simple again and introduce the bare minimum like this:</p>\n<figure class=\"highlight plain\"><table><tr><td class=\"code\"><pre><span class=\"line\">import React, { Component } from 'react';</span><br><span class=\"line\"></span><br><span class=\"line\">export class List extends Component {</span><br><span class=\"line\"></span><br><span class=\"line\"> constructor(props) {</span><br><span class=\"line\"> super(props);</span><br><span class=\"line\"> this.state = {</span><br><span class=\"line\"> posts: []</span><br><span class=\"line\"> };</span><br><span class=\"line\"> }</span><br><span class=\"line\"></span><br><span class=\"line\"> render() {</span><br><span class=\"line\"> return (<React.Fragment></span><br><span class=\"line\"> {this.state.posts.map(post => {</span><br><span class=\"line\"> return (</span><br><span class=\"line\"> <Post</span><br><span class=\"line\"> key={post.id}</span><br><span class=\"line\"> description={post.description}</span><br><span class=\"line\"> creationDate={post.creationDate}</span><br><span class=\"line\"> owner={post.owner}</span><br><span class=\"line\"> />)</span><br><span class=\"line\"> })}</span><br><span class=\"line\"> </React.Fragment></span><br><span class=\"line\"> )</span><br><span class=\"line\"> }</span><br><span class=\"line\">}</span><br></pre></td></tr></table></figure>\n\n<p>The most interesting part here is probably the <code>render()</code> method, in which we iterate over all <code>state.posts</code> (which at the moment is empty) and then render a <code>Post</code> component for every iteration. Another thing to note is that every <code>Post</code> receives a <code>key</code>. This is required in React when creating views from loops. We’ve never introduced a <code>post.id</code> in this tutorial, but don’t worry, we’ll fix that in a moment.</p>\n<p>We can already put that in our <code>App</code> component. It won’t render anything as we haven’t fetched any posts yet, but that’s what we’ll do next.</p>\n<figure class=\"highlight plain\"><table><tr><td class=\"code\"><pre><span class=\"line\">import { List } from './List';</span><br><span class=\"line\"></span><br><span class=\"line\">export class App extends Component {</span><br><span class=\"line\"></span><br><span class=\"line\"> render() {</span><br><span class=\"line\"> return (</span><br><span class=\"line\"> <React.Fragment></span><br><span class=\"line\"> <h1>DReddit</h1></span><br><span class=\"line\"> <CreatePost /></span><br><span class=\"line\"> <List /></span><br><span class=\"line\"> </React.Fragment></span><br><span class=\"line\"> )</span><br><span class=\"line\"> }</span><br><span class=\"line\">}</span><br></pre></td></tr></table></figure>\n\n<h3 id=\"Fetching-posts-data\"><a href=\"#Fetching-posts-data\" class=\"headerlink\" title=\"Fetching posts data\"></a>Fetching posts data</h3><p>Let’s fill our new <code>List</code> component with life! As mentioned earlier, we’ll use our Smart Contract’s <code>numPosts()</code> method to get hold of the total number of posts available. We then use that number to iterate over all indices and request every post individually. Since this is logic we want to execute once the <code>List</code> component is ready, we’ll use its <code>componentDidMount()</code> method for that:</p>\n<figure class=\"highlight plain\"><table><tr><td class=\"code\"><pre><span class=\"line\">export class List extends Component {</span><br><span class=\"line\"> ...</span><br><span class=\"line\"> async componentDidMount() {</span><br><span class=\"line\"> const totalPosts = await DReddit.methods.numPosts().call();</span><br><span class=\"line\"></span><br><span class=\"line\"> let list = [];</span><br><span class=\"line\"></span><br><span class=\"line\"> for (let i = 0; i < totalPosts; i++) {</span><br><span class=\"line\"> const post = DReddit.methods.posts(i).call();</span><br><span class=\"line\"> list.push(post);</span><br><span class=\"line\"> }</span><br><span class=\"line\"></span><br><span class=\"line\"> list = await Promise.all(list);</span><br><span class=\"line\"> }</span><br><span class=\"line\"> ...</span><br><span class=\"line\">}</span><br></pre></td></tr></table></figure>\n\n<p>Notice that in the above code we don’t <code>await</code> the calls to every individual post. This is on purpose as we don’t want to wait on each and every promise to resolve, but first collect all of the promises we need and then resolve them all in one go using <code>Promise.all().</code></p>\n<p>Last but not least, we need to add an <code>id</code> property to every post as mentioned earlier. This is easily done by simply iterating over all posts and assigning the post’s index as <code>id</code>. Once that is done, we can use <code>setState()</code> to update our component’s state and render the list:</p>\n<figure class=\"highlight plain\"><table><tr><td class=\"code\"><pre><span class=\"line\">async componentDidMount() {</span><br><span class=\"line\"> ...</span><br><span class=\"line\"> list = list.map((post, index) => {</span><br><span class=\"line\"> post.id = index;</span><br><span class=\"line\"> return post;</span><br><span class=\"line\"> });</span><br><span class=\"line\"></span><br><span class=\"line\"> this.setState({ posts: list });</span><br><span class=\"line\">}</span><br></pre></td></tr></table></figure>\n\n<p>That’s it! Our application now renders a list of all created posts. Unfortunately, posts are not being re-fetched automatically when adding new posts. For the time being, we’ll have to reload the browser every time after adding a post. However, this we’ll address now.</p>\n<h3 id=\"Reloading-posts\"><a href=\"#Reloading-posts\" class=\"headerlink\" title=\"Reloading posts\"></a>Reloading posts</h3><p>There is certainly different ways to make the list of posts update automatically, so take the following approach with a grain of salt. What we need is a way to have the <code>createPost</code> component tell the <code>List</code> component to reload its posts. However, there’s no communication layer in place when building a simple React app like this, so the most straight forward way to make this possible, is to move the logic of loading the posts in the parent component of <code>CreatePost</code> and <code>List</code> (in our case <code>App</code>), and have it pass that logic down to places where its needed. This also means we’ll be fetching the list inside <code>App</code> and pass down the pure data to <code>List</code>.</p>\n<p>If this sounds overwhelming, no worries, it’s more trivial than that! Let’s start by introducing a <code>loadPosts()</code> function in our <code>App</code> component. Essentially we’re moving everything from <code>List</code>‘s <code>componentDidMount()</code> function into <code>App</code>:</p>\n<figure class=\"highlight plain\"><table><tr><td class=\"code\"><pre><span class=\"line\">export class App extends Component {</span><br><span class=\"line\"> ...</span><br><span class=\"line\"> async loadPosts() {</span><br><span class=\"line\"> const totalPosts = await DReddit.methods.numPosts().call();</span><br><span class=\"line\"></span><br><span class=\"line\"> let list = [];</span><br><span class=\"line\"></span><br><span class=\"line\"> if (totalPosts > 0) {</span><br><span class=\"line\"> for (let i = 0; i < totalPosts; i++) {</span><br><span class=\"line\"> const post = DReddit.methods.posts(i).call();</span><br><span class=\"line\"> list.push(post);</span><br><span class=\"line\"> }</span><br><span class=\"line\"> }</span><br><span class=\"line\"></span><br><span class=\"line\"> list = await Promise.all(list);</span><br><span class=\"line\"> list = list.map((post, index) => {</span><br><span class=\"line\"> post.id = index;</span><br><span class=\"line\"> return post;</span><br><span class=\"line\"> });</span><br><span class=\"line\"></span><br><span class=\"line\"> list;</span><br><span class=\"line\"></span><br><span class=\"line\"> this.setState({ posts: list });</span><br><span class=\"line\"> }</span><br><span class=\"line\">}</span><br></pre></td></tr></table></figure>\n\n<p>To make this work we also need to introduce a <code>state</code> with the dedicated <code>posts</code>. After that, we make sure <code>loadPosts()</code> is called when <code>App</code> is mounted:</p>\n<figure class=\"highlight plain\"><table><tr><td class=\"code\"><pre><span class=\"line\">export class App extends Component {</span><br><span class=\"line\"></span><br><span class=\"line\"> constructor(props) {</span><br><span class=\"line\"> super(props);</span><br><span class=\"line\"> this.state = {</span><br><span class=\"line\"> posts: []</span><br><span class=\"line\"> };</span><br><span class=\"line\"> }</span><br><span class=\"line\"></span><br><span class=\"line\"> async componentDidMount() {</span><br><span class=\"line\"> await this.loadPosts();</span><br><span class=\"line\"> }</span><br><span class=\"line\"> ...</span><br><span class=\"line\">}</span><br></pre></td></tr></table></figure>\n\n<p>Last but not least, all we have to do is to pass the <code>posts</code> down to <code>List</code> and <code>loadPosts()</code> to <code>CreatePost</code> as a callback handler if you will:</p>\n<figure class=\"highlight plain\"><table><tr><td class=\"code\"><pre><span class=\"line\">render() {</span><br><span class=\"line\"> return (</span><br><span class=\"line\"> <React.Fragment></span><br><span class=\"line\"> <h1>DReddit</h1></span><br><span class=\"line\"> <CreatePost afterPostHandler={this.loadPosts.bind(this)}/></span><br><span class=\"line\"> <List posts={this.state.posts}/></span><br><span class=\"line\"> </React.Fragment></span><br><span class=\"line\"> )</span><br><span class=\"line\">}</span><br></pre></td></tr></table></figure>\n\n<p>Once that is done, we can consume <code>posts</code> and <code>afterPostHandler()</code> from <code>this.props</code> respectively. In <code>List</code>‘s <code>render()</code> function we’ll do (notice we don’t rely on <code>this.state</code> anymore):</p>\n<figure class=\"highlight plain\"><table><tr><td class=\"code\"><pre><span class=\"line\">render() {</span><br><span class=\"line\"> return (<React.Fragment></span><br><span class=\"line\"> {this.props.posts.map(post => {</span><br><span class=\"line\"> ...</span><br><span class=\"line\"> })}</span><br><span class=\"line\"> </React.Fragment></span><br><span class=\"line\"> )</span><br><span class=\"line\">}</span><br></pre></td></tr></table></figure>\n\n<p>And in <code>CreatePost</code> we call <code>afterPostHandler()</code> after a post has been created:</p>\n<figure class=\"highlight plain\"><table><tr><td class=\"code\"><pre><span class=\"line\">async createPost(event) {</span><br><span class=\"line\"> ...</span><br><span class=\"line\"> await createPost.send({from: accounts[0], gas: estimate});</span><br><span class=\"line\"> await this.props.afterPostHandler();</span><br><span class=\"line\"></span><br><span class=\"line\"> this.setState({</span><br><span class=\"line\"> topic: '',</span><br><span class=\"line\"> content: '',</span><br><span class=\"line\"> loading: false</span><br><span class=\"line\"> });</span><br><span class=\"line\">}</span><br></pre></td></tr></table></figure>\n\n<p>Wonderful! The list now automatically reloads after creating posts, give it a try!</p>\n<h2 id=\"Add-voting-functionality\"><a href=\"#Add-voting-functionality\" class=\"headerlink\" title=\"Add voting functionality\"></a>Add voting functionality</h2><p>The final feature we’ll be implementing is the up and down voting of posts. This is where we come back to our <code>Post</code> component that we’ve created earlier. In order to make this feature complete we’ll have to:</p>\n<ul>\n<li>Render the number of up and down votes per post</li>\n<li>Add handlers for users to up and down vote</li>\n<li>Determine if a user can vote on a post</li>\n</ul>\n<h3 id=\"Rendering-number-of-votes\"><a href=\"#Rendering-number-of-votes\" class=\"headerlink\" title=\"Rendering number of votes\"></a>Rendering number of votes</h3><p>Let’s start with the first one, as it’s the most trivial one. While the number of up and down votes is already attached to the data that we receive from our <code>DReddit</code> Smart Contract, it’s not yet in the right format as it comes back as a string. Let’s make sure we parse the up and down vote counts on posts by extending our <code>App</code>‘s <code>loadPosts()</code> method like this:</p>\n<figure class=\"highlight plain\"><table><tr><td class=\"code\"><pre><span class=\"line\">async loadPosts() {</span><br><span class=\"line\"> ...</span><br><span class=\"line\"> list = list.map((post, index) => {</span><br><span class=\"line\"> post.id = index;</span><br><span class=\"line\"> post.upvotes = parseInt(post.upvotes, 10);</span><br><span class=\"line\"> post.downvotes = parseInt(post.downvotes, 10);</span><br><span class=\"line\"> return post;</span><br><span class=\"line\"> });</span><br><span class=\"line\"> ...</span><br><span class=\"line\">}</span><br></pre></td></tr></table></figure>\n\n<p>Once that is done we can pass each post’s <code>upvotes</code> and <code>downvotes</code> to every <code>Post</code> component via its <code>props</code> inside our <code>List</code> component:</p>\n<figure class=\"highlight plain\"><table><tr><td class=\"code\"><pre><span class=\"line\">export class List extends Component {</span><br><span class=\"line\"> ...</span><br><span class=\"line\"> render() {</span><br><span class=\"line\"> return (<React.Fragment></span><br><span class=\"line\"> {this.props.posts.map(post => {</span><br><span class=\"line\"> return (<Post</span><br><span class=\"line\"> key={post.id}</span><br><span class=\"line\"> description={post.description}</span><br><span class=\"line\"> creationDate={post.creationDate}</span><br><span class=\"line\"> upvotes={post.upvotes}</span><br><span class=\"line\"> downvotes={post.downvotes}</span><br><span class=\"line\"> owner={post.owner}</span><br><span class=\"line\"> />)</span><br><span class=\"line\"> })}</span><br><span class=\"line\"> </React.Fragment></span><br><span class=\"line\"> )</span><br><span class=\"line\"> }</span><br><span class=\"line\">}</span><br></pre></td></tr></table></figure>\n\n<p>Rendering the number of <code>upvotes</code> and <code>downvotes</code> is then really just a matter of interpolating them in <code>Post</code>‘s <code>render()</code> function. We’re just going to add them next to the buttons, but feel free to put them somewhere else:</p>\n<figure class=\"highlight plain\"><table><tr><td class=\"code\"><pre><span class=\"line\">export class Post extends Component {</span><br><span class=\"line\"> ...</span><br><span class=\"line\"> render() {</span><br><span class=\"line\"> ...</span><br><span class=\"line\"> return (</span><br><span class=\"line\"> <React.Fragment></span><br><span class=\"line\"> ...</span><br><span class=\"line\"> {this.props.upvotes} <button>Upvote</button></span><br><span class=\"line\"> {this.props.downvotes} <button>Downvote</button></span><br><span class=\"line\"> </React.Fragment></span><br><span class=\"line\"> )</span><br><span class=\"line\"> }</span><br><span class=\"line\">}</span><br></pre></td></tr></table></figure>\n\n<h3 id=\"Implement-up-and-down-votes\"><a href=\"#Implement-up-and-down-votes\" class=\"headerlink\" title=\"Implement up and down votes\"></a>Implement up and down votes</h3><p>Similar to when creating new posts, making the up and down vote buttons work requires sending transactions to our <code>DReddit</code> Smart Contract. So we’ll do almost the same thing as in our <code>CreatePost</code> component, just that we’re calling the Smart Contract’s <code>vote()</code> method. If you recall, the <code>vote()</code> method takes a post id and the vote type, which is either <code>NONE</code>, <code>UPVOTE</code> or <code>DOWNVOTE</code> and are stored as <code>uint8</code>.</p>\n<p>It makes sense to introduce the same representation in our app so we can use descriptive names, but rely on uint values at the same time. There are no enum data structures in JavaScript so we’ll use a hash object instead:</p>\n<figure class=\"highlight plain\"><table><tr><td class=\"code\"><pre><span class=\"line\">const BALLOT = {</span><br><span class=\"line\"> NONE: 0,</span><br><span class=\"line\"> UPVOTE: 1,</span><br><span class=\"line\"> DOWNVOTE: 2</span><br><span class=\"line\">}</span><br></pre></td></tr></table></figure>\n\n<p>We don’t actually have the post id available in our <code>Post</code> component yet. That’s easily added in our <code>List</code> component, by now you should know how to do that!</p>\n<p>We can then add click handlers to our up and down vote buttons and pass one of the <code>BALLOT</code> types to them (notice that we added <code>BALLOT.NONE</code> only for completeness-sake but don’t actually use it in our code):</p>\n<figure class=\"highlight plain\"><table><tr><td class=\"code\"><pre><span class=\"line\"><button onClick={e => this.vote(BALLOT.UPVOTE)}>Upvote</button></span><br><span class=\"line\"><button onClick={e => this.vote(BALLOT.DOWNVOTE)}>Downvote</button></span><br></pre></td></tr></table></figure>\n\n<p>The next thing we need to do is sending that vote type along with the post id to our Smart Contract:</p>\n<figure class=\"highlight plain\"><table><tr><td class=\"code\"><pre><span class=\"line\">async vote(ballot) {</span><br><span class=\"line\"> const accounts = await web3.eth.getAccounts();</span><br><span class=\"line\"> const vote = DReddit.methods.vote(this.props.id, ballot);</span><br><span class=\"line\"> const estimate = await vote.estimateGas();</span><br><span class=\"line\"></span><br><span class=\"line\"> await vote.send({from: accounts[0], gas: estimate});</span><br><span class=\"line\">}</span><br></pre></td></tr></table></figure>\n\n<p>Obviously, we also want to update the view when a vote has been successfully sent. Right now we’re reading a post’s up and down votes from its <code>props</code> and render them accordingly. However, we want to update those values as votes are coming in. For that we’ll change our code to only read the up and down votes from <code>props</code> once and store them in the component’s state.</p>\n<figure class=\"highlight plain\"><table><tr><td class=\"code\"><pre><span class=\"line\">export class Post extends Component {</span><br><span class=\"line\"></span><br><span class=\"line\"> constructor(props) {</span><br><span class=\"line\"> super(props);</span><br><span class=\"line\"> this.state = {</span><br><span class=\"line\"> topic: '',</span><br><span class=\"line\"> content: '',</span><br><span class=\"line\"> upvotes: this.props.upvotes,</span><br><span class=\"line\"> downvotes: this.props.downvotes</span><br><span class=\"line\"> };</span><br><span class=\"line\"> }</span><br><span class=\"line\"> ...</span><br><span class=\"line\">}</span><br></pre></td></tr></table></figure>\n\n<p>We also change the component’s view to render the values from state instead of <code>props</code>:</p>\n<figure class=\"highlight plain\"><table><tr><td class=\"code\"><pre><span class=\"line\">render() {</span><br><span class=\"line\"> ...</span><br><span class=\"line\"> return (</span><br><span class=\"line\"> <React.Fragment></span><br><span class=\"line\"> ...</span><br><span class=\"line\"> {this.state.upvotes} <button ...>Upvote</button></span><br><span class=\"line\"> {this.state.downvotes} <button ...>Downvote</button></span><br><span class=\"line\"> </React.Fragment></span><br><span class=\"line\"> )</span><br><span class=\"line\">}</span><br></pre></td></tr></table></figure>\n\n\n<p>After that we can update the state with new votes using <code>setState()</code>, right after a vote has been sent:</p>\n<figure class=\"highlight plain\"><table><tr><td class=\"code\"><pre><span class=\"line\">async vote(ballot) {</span><br><span class=\"line\"> ...</span><br><span class=\"line\"> this.setState({</span><br><span class=\"line\"> upvotes: this.state.upvotes + (ballot == BALLOT.UPVOTE ? 1 : 0),</span><br><span class=\"line\"> downvotes: this.state.downvotes + (ballot == BALLOT.DOWNVOTE ? 1 : 0)</span><br><span class=\"line\"> });</span><br><span class=\"line\">}</span><br></pre></td></tr></table></figure>\n\n<p><strong>That’s it!</strong> We can now up and down vote on posts…but only once! Yes, that’s right. When we try to vote multiple times on the same post, we’ll actually receive an error. That’s because, if you remember, there’s a restriction in our Smart Contract that makes sure users can not vote on posts that they’ve either already voted on, or created themselves.</p>\n<p>Let’s make sure this is reflected in our application’s UI and wrap up this tutorial!</p>\n<h3 id=\"Use-canVote-to-disable-vote-buttons\"><a href=\"#Use-canVote-to-disable-vote-buttons\" class=\"headerlink\" title=\"Use canVote() to disable vote buttons\"></a>Use <code>canVote()</code> to disable vote buttons</h3><p>We’ll keep this one very simple - if a user cannot vote on a post, the voting buttons should be simply disabled. We can easily determine whether a user is allowed to vote by calling our Smart Contract’s <code>canVote()</code> method. Another thing we need to consider is that we shouldn’t allow a user to vote when a vote for the same post is already in flight but hasn’t completed yet.</p>\n<p>Let’s introduce a new state properties for that first. In general we can say that a user is allowed to vote, and that she is not submitting a vote in this very moment:</p>\n<figure class=\"highlight plain\"><table><tr><td class=\"code\"><pre><span class=\"line\">export class Post extends Component {</span><br><span class=\"line\"></span><br><span class=\"line\"> constructor(props) {</span><br><span class=\"line\"> super(props);</span><br><span class=\"line\"> this.state = {</span><br><span class=\"line\"> topic: '',</span><br><span class=\"line\"> content: '',</span><br><span class=\"line\"> upvotes: this.props.upvotes,</span><br><span class=\"line\"> downvotes: this.props.downvotes,</span><br><span class=\"line\"> canVote: true,</span><br><span class=\"line\"> submitting: false</span><br><span class=\"line\"> };</span><br><span class=\"line\"> }</span><br><span class=\"line\"> ...</span><br><span class=\"line\">}</span><br></pre></td></tr></table></figure>\n\n<p>Next, we update our <code>Post</code> component’s <code>render()</code> function to disable the voting buttons if a vote is in flight, or a user is simply not allowed to vote:</p>\n<figure class=\"highlight plain\"><table><tr><td class=\"code\"><pre><span class=\"line\">render() {</span><br><span class=\"line\"> ...</span><br><span class=\"line\"> const disabled = this.state.submitting || !this.state.canVote;</span><br><span class=\"line\"> return (</span><br><span class=\"line\"> <React.Fragment></span><br><span class=\"line\"> ...</span><br><span class=\"line\"> {this.state.upvotes} <button disabled={disabled} ...>Upvote</button></span><br><span class=\"line\"> {this.state.downvotes} <button disabled={disabled} ...>Downvote</button></span><br><span class=\"line\"> </React.Fragment></span><br><span class=\"line\"> )</span><br><span class=\"line\">}</span><br></pre></td></tr></table></figure>\n\n<p>Last but not least, we have to make sure the state properties are updated accordingly. We’ll call our Smart Contract’s <code>canVote()</code> method when a post is initialized:</p>\n<figure class=\"highlight plain\"><table><tr><td class=\"code\"><pre><span class=\"line\">export class Post extends Component {</span><br><span class=\"line\"> ...</span><br><span class=\"line\"> async componentDidMount() {</span><br><span class=\"line\"> ...</span><br><span class=\"line\"> const canVote = await DReddit.methods.canVote(this.props.id).call();</span><br><span class=\"line\"> this.setState({ topic, content, canVote });</span><br><span class=\"line\"> }</span><br><span class=\"line\"> ...</span><br><span class=\"line\">}</span><br></pre></td></tr></table></figure>\n\n<p>And when a vote is being made, we set <code>submitting</code> to <code>true</code> right before we send a transaction and set it back to <code>false</code> again when the transaction is done. At this point, we also know that a vote has been made on this post, so <code>canVote</code> can be set to <code>false</code> at the same time:</p>\n<figure class=\"highlight plain\"><table><tr><td class=\"code\"><pre><span class=\"line\">async vote(ballot) {</span><br><span class=\"line\"> ...</span><br><span class=\"line\"> this.setState({ submitting: true });</span><br><span class=\"line\"> await vote.send({from: accounts[0], gas: estimate + 1000});</span><br><span class=\"line\"></span><br><span class=\"line\"> this.setState({</span><br><span class=\"line\"> ...</span><br><span class=\"line\"> canVote: false,</span><br><span class=\"line\"> submitting: false</span><br><span class=\"line\"> });</span><br><span class=\"line\">}</span><br></pre></td></tr></table></figure>\n\n<p><strong>And we’re done!</strong></p>\n<h2 id=\"Wrapping-it-up\"><a href=\"#Wrapping-it-up\" class=\"headerlink\" title=\"Wrapping it up\"></a>Wrapping it up</h2><p>Congratulations! You’ve completed the tutorial on building a simple decentralized Reddit application! You might have noticed that this is only the tip of the iceberg though, as there are so many things that can be done to improve and optimize this application. Here are some ideas for further exploration:</p>\n<ul>\n<li>Sort the posts in reversed chronological order so that the latest post is always on top</li>\n<li>Rely on Smart Contracts Events to reload list</li>\n<li>Introduce routing so there can be different views for creating and viewing posts</li>\n<li>Use CSS to make the application look nice</li>\n</ul>\n<p>We hope you’ve learned that it’s not too hard to build a DApp that uses IPFS and talks to Smart Contracts, and also how Embark can help you doing all of these things.</p>\n<p><strong>We’ve recorded every single step of this tutorial <a href=\"https://github.com/embarklabs/dreddit-tutorial\" target=\"_blank\" rel=\"noopener\">in this repository</a></strong>, so feel free to go ahead, clone it, play with it, compare it with your work or change it to your needs. There will be more tutorials of this kind in the future, so make sure to <a href=\"https://twitter.com/EmbarkProject\" target=\"_blank\" rel=\"noopener\">follow us on Twitter</a> as well for updates!</p>\n"},{"title":"Subspace 1.3","author":"richard_ramos","summary":"Subspace 1.3 release - new track methods trackBlock, trackBlockNumber, trackGasPrice, trackAverageBlocktime","layout":"blog-post","_content":"\nSubspace 1.3\n===\n\nNew to subspace? Check out the website at [http://subspace.embarklabs.io/](http://subspace.embarklabs.io/)\n\n### New methods available to track blocks, gas price and blocktime\n\n#### `trackBlock()`\nReturns the block information for any new block as soon as they are mined. It's the reactive equivalent to `web3.eth.getBlock(\"latest\")`.\n```js\nsubspace.trackBlock().subscribe(block => console.log(block));\n```\n\n#### `trackBlockNumber()`\nReturns the latest block number. It's the reactive equivalent to `web3.eth.getBlockNumber`.\n```js\nsubspace.trackBlockNumber().subscribe(blockNumber => console.log(blockNumber));\n```\n\n#### `trackGasPrice()`\nReturns the current gas price oracle. It's the reactive equivalent to `web3.eth.getGasPrice`.\n```js\nsubspace.trackGasPrice().subscribe(gasPrice => console.log(gasPrice));\n```\n\n#### `trackAverageBlocktime()`\nReturns the moving average block time taking in account the latest 10 blocks. The time is returned in milliseconds:\n```js\nsubspace.trackAverageBlocktime().subscribe(blocktimeMS => console.log(blocktimeMS));\n```\n\n### Bug fixes\n- Web3 subscriptions are reused, which means that calling a track method with the same parameters more than once will not create a duplicate subscription. \n\n### Contributions\n\nSubspace and the entire Embark labs organization are open source. As such we welcome contributions and input from the community using the product. \n","source":"_posts/2020-02-11-subspace-1-3.md","raw":"title: Subspace 1.3\nauthor: richard_ramos\nsummary: \"Subspace 1.3 release - new track methods trackBlock, trackBlockNumber, trackGasPrice, trackAverageBlocktime\"\ncategories:\n - announcements\n - releases\n - subspace\nlayout: blog-post\n---\n\nSubspace 1.3\n===\n\nNew to subspace? Check out the website at [http://subspace.embarklabs.io/](http://subspace.embarklabs.io/)\n\n### New methods available to track blocks, gas price and blocktime\n\n#### `trackBlock()`\nReturns the block information for any new block as soon as they are mined. It's the reactive equivalent to `web3.eth.getBlock(\"latest\")`.\n```js\nsubspace.trackBlock().subscribe(block => console.log(block));\n```\n\n#### `trackBlockNumber()`\nReturns the latest block number. It's the reactive equivalent to `web3.eth.getBlockNumber`.\n```js\nsubspace.trackBlockNumber().subscribe(blockNumber => console.log(blockNumber));\n```\n\n#### `trackGasPrice()`\nReturns the current gas price oracle. It's the reactive equivalent to `web3.eth.getGasPrice`.\n```js\nsubspace.trackGasPrice().subscribe(gasPrice => console.log(gasPrice));\n```\n\n#### `trackAverageBlocktime()`\nReturns the moving average block time taking in account the latest 10 blocks. The time is returned in milliseconds:\n```js\nsubspace.trackAverageBlocktime().subscribe(blocktimeMS => console.log(blocktimeMS));\n```\n\n### Bug fixes\n- Web3 subscriptions are reused, which means that calling a track method with the same parameters more than once will not create a duplicate subscription. \n\n### Contributions\n\nSubspace and the entire Embark labs organization are open source. As such we welcome contributions and input from the community using the product. \n","slug":"subspace-1-3","published":1,"date":"2020-02-11T05:00:00.000Z","updated":"2020-03-03T14:55:55.062Z","_id":"ck6i7o51w0000a1t48p7ihlcd","comments":1,"photos":[],"link":"","content":"<h1 id=\"Subspace-1-3\"><a href=\"#Subspace-1-3\" class=\"headerlink\" title=\"Subspace 1.3\"></a>Subspace 1.3</h1><p>New to subspace? Check out the website at <a href=\"http://subspace.embarklabs.io/\" target=\"_blank\" rel=\"noopener\">http://subspace.embarklabs.io/</a></p>\n<h3 id=\"New-methods-available-to-track-blocks-gas-price-and-blocktime\"><a href=\"#New-methods-available-to-track-blocks-gas-price-and-blocktime\" class=\"headerlink\" title=\"New methods available to track blocks, gas price and blocktime\"></a>New methods available to track blocks, gas price and blocktime</h3><h4 id=\"trackBlock\"><a href=\"#trackBlock\" class=\"headerlink\" title=\"trackBlock()\"></a><code>trackBlock()</code></h4><p>Returns the block information for any new block as soon as they are mined. It’s the reactive equivalent to <code>web3.eth.getBlock("latest")</code>.</p>\n<figure class=\"highlight js\"><table><tr><td class=\"code\"><pre><span class=\"line\">subspace.trackBlock().subscribe(<span class=\"function\"><span class=\"params\">block</span> =></span> <span class=\"built_in\">console</span>.log(block));</span><br></pre></td></tr></table></figure>\n\n<h4 id=\"trackBlockNumber\"><a href=\"#trackBlockNumber\" class=\"headerlink\" title=\"trackBlockNumber()\"></a><code>trackBlockNumber()</code></h4><p>Returns the latest block number. It’s the reactive equivalent to <code>web3.eth.getBlockNumber</code>.</p>\n<figure class=\"highlight js\"><table><tr><td class=\"code\"><pre><span class=\"line\">subspace.trackBlockNumber().subscribe(<span class=\"function\"><span class=\"params\">blockNumber</span> =></span> <span class=\"built_in\">console</span>.log(blockNumber));</span><br></pre></td></tr></table></figure>\n\n<h4 id=\"trackGasPrice\"><a href=\"#trackGasPrice\" class=\"headerlink\" title=\"trackGasPrice()\"></a><code>trackGasPrice()</code></h4><p>Returns the current gas price oracle. It’s the reactive equivalent to <code>web3.eth.getGasPrice</code>.</p>\n<figure class=\"highlight js\"><table><tr><td class=\"code\"><pre><span class=\"line\">subspace.trackGasPrice().subscribe(<span class=\"function\"><span class=\"params\">gasPrice</span> =></span> <span class=\"built_in\">console</span>.log(gasPrice));</span><br></pre></td></tr></table></figure>\n\n<h4 id=\"trackAverageBlocktime\"><a href=\"#trackAverageBlocktime\" class=\"headerlink\" title=\"trackAverageBlocktime()\"></a><code>trackAverageBlocktime()</code></h4><p>Returns the moving average block time taking in account the latest 10 blocks. The time is returned in milliseconds:</p>\n<figure class=\"highlight js\"><table><tr><td class=\"code\"><pre><span class=\"line\">subspace.trackAverageBlocktime().subscribe(<span class=\"function\"><span class=\"params\">blocktimeMS</span> =></span> <span class=\"built_in\">console</span>.log(blocktimeMS));</span><br></pre></td></tr></table></figure>\n\n<h3 id=\"Bug-fixes\"><a href=\"#Bug-fixes\" class=\"headerlink\" title=\"Bug fixes\"></a>Bug fixes</h3><ul>\n<li>Web3 subscriptions are reused, which means that calling a track method with the same parameters more than once will not create a duplicate subscription. </li>\n</ul>\n<h3 id=\"Contributions\"><a href=\"#Contributions\" class=\"headerlink\" title=\"Contributions\"></a>Contributions</h3><p>Subspace and the entire Embark labs organization are open source. As such we welcome contributions and input from the community using the product. </p>\n","site":{"data":{"authors":{"iuri_matias":{"name":"Iuri Matias","twitter":"iurimatias","image":"https://pbs.twimg.com/profile_images/928272512181563392/iDJdvy2k_400x400.jpg"},"pascal_precht":{"name":"Pascal Precht","twitter":"pascalprecht","image":"https://pbs.twimg.com/profile_images/993785060733194241/p3oAIMDP_400x400.jpg"},"anthony_laibe":{"name":"Anthony Laibe","twitter":"a_laibe","image":"https://pbs.twimg.com/profile_images/257742900/13168239_400x400.jpg"},"jonathan_rainville":{"name":"Jonathan Rainville","twitter":"ShyolGhul","image":"https://pbs.twimg.com/profile_images/993873866878570496/-aE4byjj_400x400.jpg"},"andre_medeiros":{"name":"Andre Medeiros","twitter":"superdealloc","image":"https://pbs.twimg.com/profile_images/965722487735701504/m58KNgWN_400x400.jpg"},"eric_mastro":{"name":"Eric Mastro","twitter":"ericmastro","image":"https://avatars1.githubusercontent.com/u/5089238?s=460&v=4"},"michael_bradley":{"name":"Michael Bradley","image":"https://avatars3.githubusercontent.com/u/194260?s=460&v=4"},"richard_ramos":{"name":"Richard Ramos","twitter":"richardramos_me","image":"https://devcon.org/images/speakers/richard_ramos.jpg"},"jonny_zerah":{"name":"Jonny Zerah","twitter":"jonnyzerah","image":"https://pbs.twimg.com/profile_images/1043774340490248192/gI9aGy17_400x400.jpg"},"robin_percy":{"name":"Robin Percy","twitter":"rbin","image":"https://avatars1.githubusercontent.com/u/29288325?s=400&v=4"}},"categories":{"tutorials":"Tutorials","announcements":"Announcements"},"languages":{"en":"English"}}},"excerpt":"","more":"<h1 id=\"Subspace-1-3\"><a href=\"#Subspace-1-3\" class=\"headerlink\" title=\"Subspace 1.3\"></a>Subspace 1.3</h1><p>New to subspace? Check out the website at <a href=\"http://subspace.embarklabs.io/\" target=\"_blank\" rel=\"noopener\">http://subspace.embarklabs.io/</a></p>\n<h3 id=\"New-methods-available-to-track-blocks-gas-price-and-blocktime\"><a href=\"#New-methods-available-to-track-blocks-gas-price-and-blocktime\" class=\"headerlink\" title=\"New methods available to track blocks, gas price and blocktime\"></a>New methods available to track blocks, gas price and blocktime</h3><h4 id=\"trackBlock\"><a href=\"#trackBlock\" class=\"headerlink\" title=\"trackBlock()\"></a><code>trackBlock()</code></h4><p>Returns the block information for any new block as soon as they are mined. It’s the reactive equivalent to <code>web3.eth.getBlock("latest")</code>.</p>\n<figure class=\"highlight js\"><table><tr><td class=\"code\"><pre><span class=\"line\">subspace.trackBlock().subscribe(<span class=\"function\"><span class=\"params\">block</span> =></span> <span class=\"built_in\">console</span>.log(block));</span><br></pre></td></tr></table></figure>\n\n<h4 id=\"trackBlockNumber\"><a href=\"#trackBlockNumber\" class=\"headerlink\" title=\"trackBlockNumber()\"></a><code>trackBlockNumber()</code></h4><p>Returns the latest block number. It’s the reactive equivalent to <code>web3.eth.getBlockNumber</code>.</p>\n<figure class=\"highlight js\"><table><tr><td class=\"code\"><pre><span class=\"line\">subspace.trackBlockNumber().subscribe(<span class=\"function\"><span class=\"params\">blockNumber</span> =></span> <span class=\"built_in\">console</span>.log(blockNumber));</span><br></pre></td></tr></table></figure>\n\n<h4 id=\"trackGasPrice\"><a href=\"#trackGasPrice\" class=\"headerlink\" title=\"trackGasPrice()\"></a><code>trackGasPrice()</code></h4><p>Returns the current gas price oracle. It’s the reactive equivalent to <code>web3.eth.getGasPrice</code>.</p>\n<figure class=\"highlight js\"><table><tr><td class=\"code\"><pre><span class=\"line\">subspace.trackGasPrice().subscribe(<span class=\"function\"><span class=\"params\">gasPrice</span> =></span> <span class=\"built_in\">console</span>.log(gasPrice));</span><br></pre></td></tr></table></figure>\n\n<h4 id=\"trackAverageBlocktime\"><a href=\"#trackAverageBlocktime\" class=\"headerlink\" title=\"trackAverageBlocktime()\"></a><code>trackAverageBlocktime()</code></h4><p>Returns the moving average block time taking in account the latest 10 blocks. The time is returned in milliseconds:</p>\n<figure class=\"highlight js\"><table><tr><td class=\"code\"><pre><span class=\"line\">subspace.trackAverageBlocktime().subscribe(<span class=\"function\"><span class=\"params\">blocktimeMS</span> =></span> <span class=\"built_in\">console</span>.log(blocktimeMS));</span><br></pre></td></tr></table></figure>\n\n<h3 id=\"Bug-fixes\"><a href=\"#Bug-fixes\" class=\"headerlink\" title=\"Bug fixes\"></a>Bug fixes</h3><ul>\n<li>Web3 subscriptions are reused, which means that calling a track method with the same parameters more than once will not create a duplicate subscription. </li>\n</ul>\n<h3 id=\"Contributions\"><a href=\"#Contributions\" class=\"headerlink\" title=\"Contributions\"></a>Contributions</h3><p>Subspace and the entire Embark labs organization are open source. As such we welcome contributions and input from the community using the product. </p>\n"},{"title":"Supporting Email Notifications in DApps","author":"richard_ramos","summary":"Adding Email Notifications to dapps using a decentralized infrastructure","layout":"blog-post","image":"/assets/images/embark-header_blank.jpg","_content":"\nSupporting Email Notifications in DApps\n===\n\nHaving notifications is important when the flow of your dapp is asynchronous, especially if funds are involved. As such, depending on having the user browse the dApp periodically to see if there was a change does not lead to a good user experience. \n\nUsers need to know that an action happened and their interaction with a smart contract might be necessary.\n\nIn Teller.Exchange, a decentralized fiat on-ramp and off-ramp, this situation happens: sellers need to be notified that a new trade was created, buyers need to know if their escrows were funded or released, and arbitrators want to know if they have a dispute to arbitrate.\n\nUsing browser notifications are not really a solution since most users ignore these, as well as not being available in all browsing devices. So using emails were a good alternative to solve this need, yet it must be in compliance with the Status.im principles being `Privacy` one that could be affected if we make the email notifications being a requirement for the use of Teller.Exchange\n\n```\nIV. Privacy\nPrivacy is the power to selectively reveal oneself to the world. For us, it's essential to protect privacy in both communications and transactions, as well as being a pseudo-anonymous platform. Additionally, we strive to provide the right of total anonymity.\n```\n\nTeller.Exchange was built with the idea of not requiring servers for the backend. It consists of a Frontend (HTML+JS+CSS) and this frontend interacts directly with the smart contracts, without being limited by the requirements of using centralized servers like databases, as well as minimizing the use of external APIs.\n\nIn the constant search for a balance between good UI and adhering to decentralization principals tradeoffs must be made. In order to comply with the Status Principles as well as the architecture requirements, we came up with a solution: an opt-in contract event notifier.\n\n### How does it work?\n\nThe process is relatively straight forward. In the DApp, an user enters their email, signs it using their web3 provider of choice, and then submits this information to our notifier API, associating their ETH address with an email address of their choosing. Good OpSec is of course to create a new email with no personally identifiable information, however that is entirely up to the user.\n\nAfter their signature is submitted, the user will receive a verification email, and then get a notification anytime a teller transaction involving their ETH account is confirmed on the network. \n\nFor those who make a living buying and selling crypto this is a useful service for tax reporting purposes. In our system this is an entirely voluntary process for users but you can choose how you want to integrate it into your application.\n\n### The architecture\n\nThe notifier is composed of an API and a backend service. The API allows the user to subscribe to notifications (which sends an email containing a token), verify their email by sending the token generated during subscription, as well as unsubscribing from this service.\n\nThe user address and email are stored in a mongodb collection. Although this is a centralized service, since it's opt-in, a savvy user might be able to setup and run their own instance of the backend service and this way their email address is not shared with us.\n\nThe backend service keeps track of all the events being generated in the smart contracts it watches. After a number of confirmations is reached (to avoid possible reorgs), the notification service will read the configuration for the events that were generated, prepare the email content by using templates as well as the information available in the smart contracts and send emails to the accounts involved in the transactions.\n\nBoth the API and service can be configured via a json file where the developer needs to set the contract addresses to watch, templates associated individual contract events, as well as filters to determine whether an event should be sent to an user or not.\n\nHere's an example of an event we have configured in our contract notifier. It tracks the event `Released(uint indexed escrowId, address indexed seller, address indexed buyer, bool isDispute)`, which is emitted when an escrow is released successfully (this happens when a trade goes well, or if a dispute is won by the buyer):\n\n```js\n...\n[\"0xD5baC31a10b8938dd47326f01802fa23f1032AeE\"]: {\n \"dispute-won-buyer\": {\n ABI: {\n name: \"Released\",\n type: \"event\",\n inputs: [\n { indexed: true, name: \"escrowId\", type: \"uint256\" },\n { indexed: true, name: \"seller\", type: \"address\" },\n { indexed: true, name: \"buyer\", type: \"address\" },\n { indexed: false, name: \"isDispute\", type: \"bool\" }\n ]\n },\n index: \"buyer\",\n filter: async (web3, returnValues) => returnValues.isDispute,\n template: \"dispute-won-buyer.md\"\n },\n ...\n}\n...\n```\n\nSetting up this event requires specifying the ABI, and an index to associate the user address to an event parameter. In this example the index is the `buyer`, which means that the event will verify if the `buyer` parameter matches an address stored in the mongodb collection.\n\nAfterwards, if there's a match, we can apply an additional `filter`. We can use this filter to add extra conditions to determine if an email needs to be sent. You have access in this filter to the `web3` object as well as the return values from the event. In our example we check if the `Release` was emitted due to a dispute (because we are only interested in the escrow releases product of an arbitration).\n\nFinally, there's a template file, which is used to prepare the email content. Here's an example of how they look:\n```\n---\nsubject: You won the dispute!\n---\nCongratulations, you have just won the dispute. \nThe trade is now completed. \nEnjoy your crypto. \n[See the trade]({{url}}/#/escrow/{{escrowId}})\n```\n\nThe templates can contain variables coming from the event return values, as well as extra data that can be specified in the config file (which can include calls to other smart contracts).\n\nThis configuration is easy to extend and we are considering using this service for other dApps we are building here at Status.im\n\n### Using the notification service\n\nPutting this service into practice for your application requires you to have a Sendgrid account. Other dependencies include NodeJS, Yarn and MongoDB installed. For instructions on how to install this application checkout our repository for creating this service for your own application: https://github.com/status-im/contract-notifier\n\nThe ethos of the Embark and other Status Network companies is to always build services for the public good. In that spirit we decided to make our smart contract notification service freely available to anyone interested in using it. This is an open source project and we welcome pull requests or issues to make it better.\n","source":"_posts/2020-02-17-decentralized-notifications.md","raw":"title: Supporting Email Notifications in DApps\nauthor: richard_ramos\nsummary: \"Adding Email Notifications to dapps using a decentralized infrastructure\"\ncategories:\n - dapp-development\n - tools\nlayout: blog-post\nimage: '/assets/images/embark-header_blank.jpg'\n---\n\nSupporting Email Notifications in DApps\n===\n\nHaving notifications is important when the flow of your dapp is asynchronous, especially if funds are involved. As such, depending on having the user browse the dApp periodically to see if there was a change does not lead to a good user experience. \n\nUsers need to know that an action happened and their interaction with a smart contract might be necessary.\n\nIn Teller.Exchange, a decentralized fiat on-ramp and off-ramp, this situation happens: sellers need to be notified that a new trade was created, buyers need to know if their escrows were funded or released, and arbitrators want to know if they have a dispute to arbitrate.\n\nUsing browser notifications are not really a solution since most users ignore these, as well as not being available in all browsing devices. So using emails were a good alternative to solve this need, yet it must be in compliance with the Status.im principles being `Privacy` one that could be affected if we make the email notifications being a requirement for the use of Teller.Exchange\n\n```\nIV. Privacy\nPrivacy is the power to selectively reveal oneself to the world. For us, it's essential to protect privacy in both communications and transactions, as well as being a pseudo-anonymous platform. Additionally, we strive to provide the right of total anonymity.\n```\n\nTeller.Exchange was built with the idea of not requiring servers for the backend. It consists of a Frontend (HTML+JS+CSS) and this frontend interacts directly with the smart contracts, without being limited by the requirements of using centralized servers like databases, as well as minimizing the use of external APIs.\n\nIn the constant search for a balance between good UI and adhering to decentralization principals tradeoffs must be made. In order to comply with the Status Principles as well as the architecture requirements, we came up with a solution: an opt-in contract event notifier.\n\n### How does it work?\n\nThe process is relatively straight forward. In the DApp, an user enters their email, signs it using their web3 provider of choice, and then submits this information to our notifier API, associating their ETH address with an email address of their choosing. Good OpSec is of course to create a new email with no personally identifiable information, however that is entirely up to the user.\n\nAfter their signature is submitted, the user will receive a verification email, and then get a notification anytime a teller transaction involving their ETH account is confirmed on the network. \n\nFor those who make a living buying and selling crypto this is a useful service for tax reporting purposes. In our system this is an entirely voluntary process for users but you can choose how you want to integrate it into your application.\n\n### The architecture\n\nThe notifier is composed of an API and a backend service. The API allows the user to subscribe to notifications (which sends an email containing a token), verify their email by sending the token generated during subscription, as well as unsubscribing from this service.\n\nThe user address and email are stored in a mongodb collection. Although this is a centralized service, since it's opt-in, a savvy user might be able to setup and run their own instance of the backend service and this way their email address is not shared with us.\n\nThe backend service keeps track of all the events being generated in the smart contracts it watches. After a number of confirmations is reached (to avoid possible reorgs), the notification service will read the configuration for the events that were generated, prepare the email content by using templates as well as the information available in the smart contracts and send emails to the accounts involved in the transactions.\n\nBoth the API and service can be configured via a json file where the developer needs to set the contract addresses to watch, templates associated individual contract events, as well as filters to determine whether an event should be sent to an user or not.\n\nHere's an example of an event we have configured in our contract notifier. It tracks the event `Released(uint indexed escrowId, address indexed seller, address indexed buyer, bool isDispute)`, which is emitted when an escrow is released successfully (this happens when a trade goes well, or if a dispute is won by the buyer):\n\n```js\n...\n[\"0xD5baC31a10b8938dd47326f01802fa23f1032AeE\"]: {\n \"dispute-won-buyer\": {\n ABI: {\n name: \"Released\",\n type: \"event\",\n inputs: [\n { indexed: true, name: \"escrowId\", type: \"uint256\" },\n { indexed: true, name: \"seller\", type: \"address\" },\n { indexed: true, name: \"buyer\", type: \"address\" },\n { indexed: false, name: \"isDispute\", type: \"bool\" }\n ]\n },\n index: \"buyer\",\n filter: async (web3, returnValues) => returnValues.isDispute,\n template: \"dispute-won-buyer.md\"\n },\n ...\n}\n...\n```\n\nSetting up this event requires specifying the ABI, and an index to associate the user address to an event parameter. In this example the index is the `buyer`, which means that the event will verify if the `buyer` parameter matches an address stored in the mongodb collection.\n\nAfterwards, if there's a match, we can apply an additional `filter`. We can use this filter to add extra conditions to determine if an email needs to be sent. You have access in this filter to the `web3` object as well as the return values from the event. In our example we check if the `Release` was emitted due to a dispute (because we are only interested in the escrow releases product of an arbitration).\n\nFinally, there's a template file, which is used to prepare the email content. Here's an example of how they look:\n```\n---\nsubject: You won the dispute!\n---\nCongratulations, you have just won the dispute. \nThe trade is now completed. \nEnjoy your crypto. \n[See the trade]({{url}}/#/escrow/{{escrowId}})\n```\n\nThe templates can contain variables coming from the event return values, as well as extra data that can be specified in the config file (which can include calls to other smart contracts).\n\nThis configuration is easy to extend and we are considering using this service for other dApps we are building here at Status.im\n\n### Using the notification service\n\nPutting this service into practice for your application requires you to have a Sendgrid account. Other dependencies include NodeJS, Yarn and MongoDB installed. For instructions on how to install this application checkout our repository for creating this service for your own application: https://github.com/status-im/contract-notifier\n\nThe ethos of the Embark and other Status Network companies is to always build services for the public good. In that spirit we decided to make our smart contract notification service freely available to anyone interested in using it. This is an open source project and we welcome pull requests or issues to make it better.\n","slug":"decentralized-notifications","published":1,"date":"2020-02-17T05:00:00.000Z","updated":"2020-03-03T14:55:55.063Z","_id":"ck6qmd5ol00009wt49q2u56dn","comments":1,"photos":[],"link":"","content":"<h1 id=\"Supporting-Email-Notifications-in-DApps\"><a href=\"#Supporting-Email-Notifications-in-DApps\" class=\"headerlink\" title=\"Supporting Email Notifications in DApps\"></a>Supporting Email Notifications in DApps</h1><p>Having notifications is important when the flow of your dapp is asynchronous, especially if funds are involved. As such, depending on having the user browse the dApp periodically to see if there was a change does not lead to a good user experience. </p>\n<p>Users need to know that an action happened and their interaction with a smart contract might be necessary.</p>\n<p>In Teller.Exchange, a decentralized fiat on-ramp and off-ramp, this situation happens: sellers need to be notified that a new trade was created, buyers need to know if their escrows were funded or released, and arbitrators want to know if they have a dispute to arbitrate.</p>\n<p>Using browser notifications are not really a solution since most users ignore these, as well as not being available in all browsing devices. So using emails were a good alternative to solve this need, yet it must be in compliance with the Status.im principles being <code>Privacy</code> one that could be affected if we make the email notifications being a requirement for the use of Teller.Exchange</p>\n<figure class=\"highlight plain\"><table><tr><td class=\"code\"><pre><span class=\"line\">IV. Privacy</span><br><span class=\"line\">Privacy is the power to selectively reveal oneself to the world. For us, it's essential to protect privacy in both communications and transactions, as well as being a pseudo-anonymous platform. Additionally, we strive to provide the right of total anonymity.</span><br></pre></td></tr></table></figure>\n\n<p>Teller.Exchange was built with the idea of not requiring servers for the backend. It consists of a Frontend (HTML+JS+CSS) and this frontend interacts directly with the smart contracts, without being limited by the requirements of using centralized servers like databases, as well as minimizing the use of external APIs.</p>\n<p>In the constant search for a balance between good UI and adhering to decentralization principals tradeoffs must be made. In order to comply with the Status Principles as well as the architecture requirements, we came up with a solution: an opt-in contract event notifier.</p>\n<h3 id=\"How-does-it-work\"><a href=\"#How-does-it-work\" class=\"headerlink\" title=\"How does it work?\"></a>How does it work?</h3><p>The process is relatively straight forward. In the DApp, an user enters their email, signs it using their web3 provider of choice, and then submits this information to our notifier API, associating their ETH address with an email address of their choosing. Good OpSec is of course to create a new email with no personally identifiable information, however that is entirely up to the user.</p>\n<p>After their signature is submitted, the user will receive a verification email, and then get a notification anytime a teller transaction involving their ETH account is confirmed on the network. </p>\n<p>For those who make a living buying and selling crypto this is a useful service for tax reporting purposes. In our system this is an entirely voluntary process for users but you can choose how you want to integrate it into your application.</p>\n<h3 id=\"The-architecture\"><a href=\"#The-architecture\" class=\"headerlink\" title=\"The architecture\"></a>The architecture</h3><p>The notifier is composed of an API and a backend service. The API allows the user to subscribe to notifications (which sends an email containing a token), verify their email by sending the token generated during subscription, as well as unsubscribing from this service.</p>\n<p>The user address and email are stored in a mongodb collection. Although this is a centralized service, since it’s opt-in, a savvy user might be able to setup and run their own instance of the backend service and this way their email address is not shared with us.</p>\n<p>The backend service keeps track of all the events being generated in the smart contracts it watches. After a number of confirmations is reached (to avoid possible reorgs), the notification service will read the configuration for the events that were generated, prepare the email content by using templates as well as the information available in the smart contracts and send emails to the accounts involved in the transactions.</p>\n<p>Both the API and service can be configured via a json file where the developer needs to set the contract addresses to watch, templates associated individual contract events, as well as filters to determine whether an event should be sent to an user or not.</p>\n<p>Here’s an example of an event we have configured in our contract notifier. It tracks the event <code>Released(uint indexed escrowId, address indexed seller, address indexed buyer, bool isDispute)</code>, which is emitted when an escrow is released successfully (this happens when a trade goes well, or if a dispute is won by the buyer):</p>\n<figure class=\"highlight js\"><table><tr><td class=\"code\"><pre><span class=\"line\">...</span><br><span class=\"line\">[<span class=\"string\">\"0xD5baC31a10b8938dd47326f01802fa23f1032AeE\"</span>]: {</span><br><span class=\"line\"> <span class=\"string\">\"dispute-won-buyer\"</span>: {</span><br><span class=\"line\"> ABI: {</span><br><span class=\"line\"> name: <span class=\"string\">\"Released\"</span>,</span><br><span class=\"line\"> type: <span class=\"string\">\"event\"</span>,</span><br><span class=\"line\"> inputs: [</span><br><span class=\"line\"> { <span class=\"attr\">indexed</span>: <span class=\"literal\">true</span>, <span class=\"attr\">name</span>: <span class=\"string\">\"escrowId\"</span>, <span class=\"attr\">type</span>: <span class=\"string\">\"uint256\"</span> },</span><br><span class=\"line\"> { <span class=\"attr\">indexed</span>: <span class=\"literal\">true</span>, <span class=\"attr\">name</span>: <span class=\"string\">\"seller\"</span>, <span class=\"attr\">type</span>: <span class=\"string\">\"address\"</span> },</span><br><span class=\"line\"> { <span class=\"attr\">indexed</span>: <span class=\"literal\">true</span>, <span class=\"attr\">name</span>: <span class=\"string\">\"buyer\"</span>, <span class=\"attr\">type</span>: <span class=\"string\">\"address\"</span> },</span><br><span class=\"line\"> { <span class=\"attr\">indexed</span>: <span class=\"literal\">false</span>, <span class=\"attr\">name</span>: <span class=\"string\">\"isDispute\"</span>, <span class=\"attr\">type</span>: <span class=\"string\">\"bool\"</span> }</span><br><span class=\"line\"> ]</span><br><span class=\"line\"> },</span><br><span class=\"line\"> index: <span class=\"string\">\"buyer\"</span>,</span><br><span class=\"line\"> filter: <span class=\"keyword\">async</span> (web3, returnValues) => returnValues.isDispute,</span><br><span class=\"line\"> template: <span class=\"string\">\"dispute-won-buyer.md\"</span></span><br><span class=\"line\"> },</span><br><span class=\"line\"> ...</span><br><span class=\"line\">}</span><br><span class=\"line\">...</span><br></pre></td></tr></table></figure>\n\n<p>Setting up this event requires specifying the ABI, and an index to associate the user address to an event parameter. In this example the index is the <code>buyer</code>, which means that the event will verify if the <code>buyer</code> parameter matches an address stored in the mongodb collection.</p>\n<p>Afterwards, if there’s a match, we can apply an additional <code>filter</code>. We can use this filter to add extra conditions to determine if an email needs to be sent. You have access in this filter to the <code>web3</code> object as well as the return values from the event. In our example we check if the <code>Release</code> was emitted due to a dispute (because we are only interested in the escrow releases product of an arbitration).</p>\n<p>Finally, there’s a template file, which is used to prepare the email content. Here’s an example of how they look:</p>\n<figure class=\"highlight plain\"><table><tr><td class=\"code\"><pre><span class=\"line\">---</span><br><span class=\"line\">subject: You won the dispute!</span><br><span class=\"line\">---</span><br><span class=\"line\">Congratulations, you have just won the dispute. </span><br><span class=\"line\">The trade is now completed. </span><br><span class=\"line\">Enjoy your crypto. </span><br><span class=\"line\">[See the trade]({{url}}/#/escrow/{{escrowId}})</span><br></pre></td></tr></table></figure>\n\n<p>The templates can contain variables coming from the event return values, as well as extra data that can be specified in the config file (which can include calls to other smart contracts).</p>\n<p>This configuration is easy to extend and we are considering using this service for other dApps we are building here at Status.im</p>\n<h3 id=\"Using-the-notification-service\"><a href=\"#Using-the-notification-service\" class=\"headerlink\" title=\"Using the notification service\"></a>Using the notification service</h3><p>Putting this service into practice for your application requires you to have a Sendgrid account. Other dependencies include NodeJS, Yarn and MongoDB installed. For instructions on how to install this application checkout our repository for creating this service for your own application: <a href=\"https://github.com/status-im/contract-notifier\" target=\"_blank\" rel=\"noopener\">https://github.com/status-im/contract-notifier</a></p>\n<p>The ethos of the Embark and other Status Network companies is to always build services for the public good. In that spirit we decided to make our smart contract notification service freely available to anyone interested in using it. This is an open source project and we welcome pull requests or issues to make it better.</p>\n","site":{"data":{"authors":{"iuri_matias":{"name":"Iuri Matias","twitter":"iurimatias","image":"https://pbs.twimg.com/profile_images/928272512181563392/iDJdvy2k_400x400.jpg"},"pascal_precht":{"name":"Pascal Precht","twitter":"pascalprecht","image":"https://pbs.twimg.com/profile_images/993785060733194241/p3oAIMDP_400x400.jpg"},"anthony_laibe":{"name":"Anthony Laibe","twitter":"a_laibe","image":"https://pbs.twimg.com/profile_images/257742900/13168239_400x400.jpg"},"jonathan_rainville":{"name":"Jonathan Rainville","twitter":"ShyolGhul","image":"https://pbs.twimg.com/profile_images/993873866878570496/-aE4byjj_400x400.jpg"},"andre_medeiros":{"name":"Andre Medeiros","twitter":"superdealloc","image":"https://pbs.twimg.com/profile_images/965722487735701504/m58KNgWN_400x400.jpg"},"eric_mastro":{"name":"Eric Mastro","twitter":"ericmastro","image":"https://avatars1.githubusercontent.com/u/5089238?s=460&v=4"},"michael_bradley":{"name":"Michael Bradley","image":"https://avatars3.githubusercontent.com/u/194260?s=460&v=4"},"richard_ramos":{"name":"Richard Ramos","twitter":"richardramos_me","image":"https://devcon.org/images/speakers/richard_ramos.jpg"},"jonny_zerah":{"name":"Jonny Zerah","twitter":"jonnyzerah","image":"https://pbs.twimg.com/profile_images/1043774340490248192/gI9aGy17_400x400.jpg"},"robin_percy":{"name":"Robin Percy","twitter":"rbin","image":"https://avatars1.githubusercontent.com/u/29288325?s=400&v=4"}},"categories":{"tutorials":"Tutorials","announcements":"Announcements"},"languages":{"en":"English"}}},"excerpt":"","more":"<h1 id=\"Supporting-Email-Notifications-in-DApps\"><a href=\"#Supporting-Email-Notifications-in-DApps\" class=\"headerlink\" title=\"Supporting Email Notifications in DApps\"></a>Supporting Email Notifications in DApps</h1><p>Having notifications is important when the flow of your dapp is asynchronous, especially if funds are involved. As such, depending on having the user browse the dApp periodically to see if there was a change does not lead to a good user experience. </p>\n<p>Users need to know that an action happened and their interaction with a smart contract might be necessary.</p>\n<p>In Teller.Exchange, a decentralized fiat on-ramp and off-ramp, this situation happens: sellers need to be notified that a new trade was created, buyers need to know if their escrows were funded or released, and arbitrators want to know if they have a dispute to arbitrate.</p>\n<p>Using browser notifications are not really a solution since most users ignore these, as well as not being available in all browsing devices. So using emails were a good alternative to solve this need, yet it must be in compliance with the Status.im principles being <code>Privacy</code> one that could be affected if we make the email notifications being a requirement for the use of Teller.Exchange</p>\n<figure class=\"highlight plain\"><table><tr><td class=\"code\"><pre><span class=\"line\">IV. Privacy</span><br><span class=\"line\">Privacy is the power to selectively reveal oneself to the world. For us, it's essential to protect privacy in both communications and transactions, as well as being a pseudo-anonymous platform. Additionally, we strive to provide the right of total anonymity.</span><br></pre></td></tr></table></figure>\n\n<p>Teller.Exchange was built with the idea of not requiring servers for the backend. It consists of a Frontend (HTML+JS+CSS) and this frontend interacts directly with the smart contracts, without being limited by the requirements of using centralized servers like databases, as well as minimizing the use of external APIs.</p>\n<p>In the constant search for a balance between good UI and adhering to decentralization principals tradeoffs must be made. In order to comply with the Status Principles as well as the architecture requirements, we came up with a solution: an opt-in contract event notifier.</p>\n<h3 id=\"How-does-it-work\"><a href=\"#How-does-it-work\" class=\"headerlink\" title=\"How does it work?\"></a>How does it work?</h3><p>The process is relatively straight forward. In the DApp, an user enters their email, signs it using their web3 provider of choice, and then submits this information to our notifier API, associating their ETH address with an email address of their choosing. Good OpSec is of course to create a new email with no personally identifiable information, however that is entirely up to the user.</p>\n<p>After their signature is submitted, the user will receive a verification email, and then get a notification anytime a teller transaction involving their ETH account is confirmed on the network. </p>\n<p>For those who make a living buying and selling crypto this is a useful service for tax reporting purposes. In our system this is an entirely voluntary process for users but you can choose how you want to integrate it into your application.</p>\n<h3 id=\"The-architecture\"><a href=\"#The-architecture\" class=\"headerlink\" title=\"The architecture\"></a>The architecture</h3><p>The notifier is composed of an API and a backend service. The API allows the user to subscribe to notifications (which sends an email containing a token), verify their email by sending the token generated during subscription, as well as unsubscribing from this service.</p>\n<p>The user address and email are stored in a mongodb collection. Although this is a centralized service, since it’s opt-in, a savvy user might be able to setup and run their own instance of the backend service and this way their email address is not shared with us.</p>\n<p>The backend service keeps track of all the events being generated in the smart contracts it watches. After a number of confirmations is reached (to avoid possible reorgs), the notification service will read the configuration for the events that were generated, prepare the email content by using templates as well as the information available in the smart contracts and send emails to the accounts involved in the transactions.</p>\n<p>Both the API and service can be configured via a json file where the developer needs to set the contract addresses to watch, templates associated individual contract events, as well as filters to determine whether an event should be sent to an user or not.</p>\n<p>Here’s an example of an event we have configured in our contract notifier. It tracks the event <code>Released(uint indexed escrowId, address indexed seller, address indexed buyer, bool isDispute)</code>, which is emitted when an escrow is released successfully (this happens when a trade goes well, or if a dispute is won by the buyer):</p>\n<figure class=\"highlight js\"><table><tr><td class=\"code\"><pre><span class=\"line\">...</span><br><span class=\"line\">[<span class=\"string\">\"0xD5baC31a10b8938dd47326f01802fa23f1032AeE\"</span>]: {</span><br><span class=\"line\"> <span class=\"string\">\"dispute-won-buyer\"</span>: {</span><br><span class=\"line\"> ABI: {</span><br><span class=\"line\"> name: <span class=\"string\">\"Released\"</span>,</span><br><span class=\"line\"> type: <span class=\"string\">\"event\"</span>,</span><br><span class=\"line\"> inputs: [</span><br><span class=\"line\"> { <span class=\"attr\">indexed</span>: <span class=\"literal\">true</span>, <span class=\"attr\">name</span>: <span class=\"string\">\"escrowId\"</span>, <span class=\"attr\">type</span>: <span class=\"string\">\"uint256\"</span> },</span><br><span class=\"line\"> { <span class=\"attr\">indexed</span>: <span class=\"literal\">true</span>, <span class=\"attr\">name</span>: <span class=\"string\">\"seller\"</span>, <span class=\"attr\">type</span>: <span class=\"string\">\"address\"</span> },</span><br><span class=\"line\"> { <span class=\"attr\">indexed</span>: <span class=\"literal\">true</span>, <span class=\"attr\">name</span>: <span class=\"string\">\"buyer\"</span>, <span class=\"attr\">type</span>: <span class=\"string\">\"address\"</span> },</span><br><span class=\"line\"> { <span class=\"attr\">indexed</span>: <span class=\"literal\">false</span>, <span class=\"attr\">name</span>: <span class=\"string\">\"isDispute\"</span>, <span class=\"attr\">type</span>: <span class=\"string\">\"bool\"</span> }</span><br><span class=\"line\"> ]</span><br><span class=\"line\"> },</span><br><span class=\"line\"> index: <span class=\"string\">\"buyer\"</span>,</span><br><span class=\"line\"> filter: <span class=\"keyword\">async</span> (web3, returnValues) => returnValues.isDispute,</span><br><span class=\"line\"> template: <span class=\"string\">\"dispute-won-buyer.md\"</span></span><br><span class=\"line\"> },</span><br><span class=\"line\"> ...</span><br><span class=\"line\">}</span><br><span class=\"line\">...</span><br></pre></td></tr></table></figure>\n\n<p>Setting up this event requires specifying the ABI, and an index to associate the user address to an event parameter. In this example the index is the <code>buyer</code>, which means that the event will verify if the <code>buyer</code> parameter matches an address stored in the mongodb collection.</p>\n<p>Afterwards, if there’s a match, we can apply an additional <code>filter</code>. We can use this filter to add extra conditions to determine if an email needs to be sent. You have access in this filter to the <code>web3</code> object as well as the return values from the event. In our example we check if the <code>Release</code> was emitted due to a dispute (because we are only interested in the escrow releases product of an arbitration).</p>\n<p>Finally, there’s a template file, which is used to prepare the email content. Here’s an example of how they look:</p>\n<figure class=\"highlight plain\"><table><tr><td class=\"code\"><pre><span class=\"line\">---</span><br><span class=\"line\">subject: You won the dispute!</span><br><span class=\"line\">---</span><br><span class=\"line\">Congratulations, you have just won the dispute. </span><br><span class=\"line\">The trade is now completed. </span><br><span class=\"line\">Enjoy your crypto. </span><br><span class=\"line\">[See the trade]({{url}}/#/escrow/{{escrowId}})</span><br></pre></td></tr></table></figure>\n\n<p>The templates can contain variables coming from the event return values, as well as extra data that can be specified in the config file (which can include calls to other smart contracts).</p>\n<p>This configuration is easy to extend and we are considering using this service for other dApps we are building here at Status.im</p>\n<h3 id=\"Using-the-notification-service\"><a href=\"#Using-the-notification-service\" class=\"headerlink\" title=\"Using the notification service\"></a>Using the notification service</h3><p>Putting this service into practice for your application requires you to have a Sendgrid account. Other dependencies include NodeJS, Yarn and MongoDB installed. For instructions on how to install this application checkout our repository for creating this service for your own application: <a href=\"https://github.com/status-im/contract-notifier\" target=\"_blank\" rel=\"noopener\">https://github.com/status-im/contract-notifier</a></p>\n<p>The ethos of the Embark and other Status Network companies is to always build services for the public good. In that spirit we decided to make our smart contract notification service freely available to anyone interested in using it. This is an open source project and we welcome pull requests or issues to make it better.</p>\n"},{"title":"Embark 5.2","author":"iuri_matias","summary":"Embark 5.2 release","layout":"blog-post","image":"/assets/images/embark_logo.png","_content":"\n<span class=\"o-center\">\n\n\n\n</span>\n\nEmbark 5.2\n===\n\nIn this release of Embark we introduce some new features such as [proxy contract support](#Proxy-Contract-Support) and [scripts execution](#Scripts-Runner). We're also introducing some important [deprecation warnings](#Transition-to-Embark-6-0) in preparation for Embark 6.0. We are making Embark lighter and more modular and to that end some modules that come by default will become optional plugins instead.\n\n## Proxy Contract Support\n\nProxy contracts are powerful tools usually used in more complex Dapps. They can be used for smart contracts that can be upgraded or to alleviate the deploy cost of multiple instances of a contract.\n\nHowever, interacting with Proxy contracts is usually difficult, because you have to point the base contract to the address of the Proxy for it to work.\n\nNot anymore! Embark now supports a contract configuration named `proxyFor`.\n\nWith it, you can specify that a Proxy contract is, well, a proxy *for* another one. Here's an example:\n\n```javascript\ndeploy: {\n Proxy: {\n deploy: false\n },\n BaseContract: {\n args: [\"whatever the base contract needs\"]\n },\n ContractInstance: {\n instanceOf: \"Proxy\",\n proxyFor: \"BaseContract\",\n args: [\"0x\", \"$BaseContract\"]\n }\n}\n```\n\nWith this configuration, our `ContractInstance` is an `instanceOf` `Proxy` and a `proxyFor` `BaseContract`.\nThis is why we point to `BaseContract` in the `ContractInstance` arguments.\nThe arguments themselves depend on the implementations of your `BaseContract` and `Proxy` contract.\n\nNote that you could have used `Proxy` itself as a `proxyFor` `BaseContract`, but it's usually more intuitive to use `instanceOf` and then resolve the contract instance with the new name you gave it (`ContractInstance` in this case).\n\nOnce the smart contracts are deployed, all you have to do is:\n\n```\nimport ContractInstance from 'path/to/artifacts/contracts/ContractInstance';\n```\n\nFor more information check the documentation for [Proxy Contract Support](https://framework.embarklabs.io/docs/contracts_configuration.html#Proxy-Contract-Support)\n\n## Scripts Runner\n\nEmbark uses a powerful [declarative configuration](/docs/contracts_configuration.html) of smart contracts. The parameters of smart contracts, how they relate to each other, what [actions](/docs/contracts_configuration.html#Deployment-hooks) to do when they are deployed are described in a declarative configuration file and Embark then takes care of deploying the smart contracts in a way that reflects the configuration described.\n\nAlthough this system covers the vast majority of cases, there are some situations where having the ability to execute scripts separately is useful, to that end Embark 5.2 now includes support for scripts, this can be used as migrations or as isolated scripts.\n\nA script is really just a file with an exported function that has special dependencies injected into it. Here's what it could look like:\n\n```\nmodules.exports = async ({ contracts, web3, logger}) => {\n ...\n};\n```\n\nThe injected parameters are:\n\n- `contracts` - A map object containing all of your Smart Contracts as Embark Smart Contract instances.\n- `web3` - A web3 instances to give you access to things like accounts.\n- `logger` - Embark's custom logger.\n\nScripts can be located anywhere on your machine, but should most likely live inside your project's file tree in a dedicated folder.\n\nTo run a script, use the CLI `exec` command and specify an environment as well as the script to be executed:\n\n```\n$ embark exec development scripts/001.js\n```\n\nThe command above will execute the function in `scripts/001.js` and ensures that Smart Contracts are deployed in the `development` environment.\n\nIf you have multiple scripts that should run in order, it's also possible to specify the directory in which they live in:\n\n```\n$ embark exec development scripts\n```\n\nEmbark will then find all script files inside the specified directory (in this case `scripts`) and then run them one by one. If any of the scripts fails by emitting an error, Embark will abort the execution. Scripts are executed in sequence, which means all following scripts won't be executed in case of an error.\n\n**Tracking scripts**\n\nJust like Smart Contract deployments are tracked, (migration) scripts can be tracked as well. Since scripts can be one-off operations, Embark will not track whether they have been executed by default. Users are always able to run a script using the `exec` command as discussed in the previous sections.\n\nTo have Embark \"remember\" that a certain script was already run, you can use the `--track` option of the `exec` command, which will force tracking for this particular script:\n\n```\n$ embark exec development scripts/001.js --track\n```\n\nIf we try to run the script again with the `--track` option, Embark will notice that the script has already been executed and tell us that it's \"already done\".\n\n```\n$ embark exec development scripts/001.js --track\n.. 001.js already done\n```\n\nIf however, we don't provide the `--track` flag, Embark will execute the script as usual.\n\nFor cases in which we **do** want to track a set of scripts, especially when the main use case are migration operations, we can put our scripts in a special \"migrations\" directory. All scripts inside that directory will be tracked by default.\n\nThe directory can be specified using the `migrations` property in your project's embark.json:\n\n```\n{\n ...\n migrations: 'migrations'\n}\n```\n\nIf no such property is specified, Embark will default to \"migrations\". Running any script or set of scripts is then automatically tracked.\n\nFor more information check the documentation for [Deployment scripts](https://framework.embarklabs.io/docs/executing_scripts.html)\n\n## Support using $accounts in ens registrations\n\nIt's now possible to specify an account to be registered as an ENS domain:\n\n```javascript\nconfig({\n namesystem: {\n enabled: true,\n register: {\n rootDomain: \"embark.eth\",\n subdomains: {\n \"mytoken\": \"$MyToken\",\n \"account\": \"$accounts[0]\"\n }\n }\n }\n})\n```\n\n## Improved compatibility\n\nIn the test suite, in order to improve compatbility with other tools, it is now possible to also use the `artifacts.require` as an alternative to get a smart contract instances:\n\n```javascript\nconst AnotherStorage = artifacts.require('AnotherStorage');\n```\n\n## Transition to Embark 6.0\n\nTo make Embark even lighter and faster, starting in Embark 6.0, the following will be installable plugins that will no longer come with Embark by default:\n\n* embark-geth\n* embark-graph\n* embark-ipfs\n* embark-parity\n* embark-profiler\n* embark-swarm\n* embark-whisper-geth\n* embarkjs\n* embarkjs-ens\n* embarkjs-ipfs\n* embarkjs-swarm\n* embarkjs-web3\n* embarkjs-whisper\n\nEmbark 5.2 will issue warnings about these needing to be installed & configured as plugins to make transition to Embark 6.0 easier.\n\nTo make current projects compatible, **ensure `embark` is added as a `devDependency` to your project**, as well as any plugins. For e.g\n\nIn `package.json` add `\"embark-geth\": \"^5.2.2\",` to the `devDependencies` section and in `embark.json` add `\"embark-geth\": {}` to the `plugins` section\n\n## Next\n\nStay tuned for Embark 6.0 and the latest changes happening by watching the [Embark GitHub repository](https://github.com/embarklabs/embark) and following us on the [Embark Labs Twitter](https://twitter.com/embarkproject)!\n\n## changelog\n\n**Features**\n\n* **@embark/contracts:** add proxyFor property for contracts ([2e8b255](https://github.com/embarklabs/embark/commit/2e8b255))\n* **@embark/ens:** enable the use of $accounts in registrations ([de01022](https://github.com/embarklabs/embark/commit/de01022))\n* **@embark/test-runner:** introduce artifacts.require API ([b021689](https://github.com/embarklabs/embark/commit/b021689))\n* **plugins/scripts-runner:** introduce exec command to run scripts ([40c3d98](https://github.com/embarklabs/embark/commit/40c3d98))\n* **@embark/blockchain:** make GanacheCLI the default dev blockchain ([cd934f8](https://github.com/embarklabs/embark/commit/cd934f8))\n* warn about packages not configured as plugins; make geth/parity full plugins ([d14e93c](https://github.com/embarklabs/embark/commit/d14e93c))\n\n**Bug Fixes**\n\n* **@embark/blockchain-api:** add back contract event listen and log ([5592753](https://github.com/embarklabs/embark/commit/5592753))\n* **@embark/cmd-controller:** exit build if afterDeploy is not array ([5359cc6](https://github.com/embarklabs/embark/commit/5359cc6))\n* **@embark/contracts-manager:** Remove `logger` from serialized contract ([d529420](https://github.com/embarklabs/embark/commit/d529420))\n* **@embark/contracts-manager:** always deploy contracts with deploy: true ([87a04cd](https://github.com/embarklabs/embark/commit/87a04cd))\n* **@embark/dashboard:** update dashboard's `logEntry` to match core/logger's `logFunction` ([63831f6](https://github.com/embarklabs/embark/commit/63831f6)), closes [#2184](https://github.com/embarklabs/embark/issues/2184)\n* **@embark/deployment:** fix undefined in nb arguments in deploy ([0016581](https://github.com/embarklabs/embark/commit/0016581))\n* **@embark/ens:** fix tests erroring on FIFS contract deploy ([78fc7b6](https://github.com/embarklabs/embark/commit/78fc7b6))\n* **@embark/ganache:** fix connection to other nodes from Ganache ([5531b60](https://github.com/embarklabs/embark/commit/5531b60))\n* **@embark/logger:** Remove `writeToFile` for logger `dir` ([e9be40c](https://github.com/embarklabs/embark/commit/e9be40c))\n* **@embark/proxy:** only up event listeners on available providers ([caae922](https://github.com/embarklabs/embark/commit/caae922))\n* **@embark/proxy:** up max listener for proxy request manager ([9c8837d](https://github.com/embarklabs/embark/commit/9c8837d))\n* **@embark/test-runner:** fix reporter to only catch gas for txs ([0e30bf3](https://github.com/embarklabs/embark/commit/0e30bf3))\n* **core/config:** Fix `EmbarkConfig` type ([0f59e0c](https://github.com/embarklabs/embark/commit/0f59e0c))\n* only show account warning when Geth will actually start ([f502650](https://github.com/embarklabs/embark/commit/f502650))\n* set helper methods on contracts ([7031335](https://github.com/embarklabs/embark/commit/7031335))\n* **stack/contracts-manager:** ensure custom `abiDefinition` is set properly if provided ([b4b4848](https://github.com/embarklabs/embark/commit/b4b4848))\n","source":"_posts/2020-02-19-embark-5-2-release.md","raw":"title: Embark 5.2\nauthor: iuri_matias\nsummary: \"Embark 5.2 release\"\ncategories:\n - announcements\n - releases\n - embark\nlayout: blog-post\nimage: '/assets/images/embark_logo.png'\n---\n\n<span class=\"o-center\">\n\n\n\n</span>\n\nEmbark 5.2\n===\n\nIn this release of Embark we introduce some new features such as [proxy contract support](#Proxy-Contract-Support) and [scripts execution](#Scripts-Runner). We're also introducing some important [deprecation warnings](#Transition-to-Embark-6-0) in preparation for Embark 6.0. We are making Embark lighter and more modular and to that end some modules that come by default will become optional plugins instead.\n\n## Proxy Contract Support\n\nProxy contracts are powerful tools usually used in more complex Dapps. They can be used for smart contracts that can be upgraded or to alleviate the deploy cost of multiple instances of a contract.\n\nHowever, interacting with Proxy contracts is usually difficult, because you have to point the base contract to the address of the Proxy for it to work.\n\nNot anymore! Embark now supports a contract configuration named `proxyFor`.\n\nWith it, you can specify that a Proxy contract is, well, a proxy *for* another one. Here's an example:\n\n```javascript\ndeploy: {\n Proxy: {\n deploy: false\n },\n BaseContract: {\n args: [\"whatever the base contract needs\"]\n },\n ContractInstance: {\n instanceOf: \"Proxy\",\n proxyFor: \"BaseContract\",\n args: [\"0x\", \"$BaseContract\"]\n }\n}\n```\n\nWith this configuration, our `ContractInstance` is an `instanceOf` `Proxy` and a `proxyFor` `BaseContract`.\nThis is why we point to `BaseContract` in the `ContractInstance` arguments.\nThe arguments themselves depend on the implementations of your `BaseContract` and `Proxy` contract.\n\nNote that you could have used `Proxy` itself as a `proxyFor` `BaseContract`, but it's usually more intuitive to use `instanceOf` and then resolve the contract instance with the new name you gave it (`ContractInstance` in this case).\n\nOnce the smart contracts are deployed, all you have to do is:\n\n```\nimport ContractInstance from 'path/to/artifacts/contracts/ContractInstance';\n```\n\nFor more information check the documentation for [Proxy Contract Support](https://framework.embarklabs.io/docs/contracts_configuration.html#Proxy-Contract-Support)\n\n## Scripts Runner\n\nEmbark uses a powerful [declarative configuration](/docs/contracts_configuration.html) of smart contracts. The parameters of smart contracts, how they relate to each other, what [actions](/docs/contracts_configuration.html#Deployment-hooks) to do when they are deployed are described in a declarative configuration file and Embark then takes care of deploying the smart contracts in a way that reflects the configuration described.\n\nAlthough this system covers the vast majority of cases, there are some situations where having the ability to execute scripts separately is useful, to that end Embark 5.2 now includes support for scripts, this can be used as migrations or as isolated scripts.\n\nA script is really just a file with an exported function that has special dependencies injected into it. Here's what it could look like:\n\n```\nmodules.exports = async ({ contracts, web3, logger}) => {\n ...\n};\n```\n\nThe injected parameters are:\n\n- `contracts` - A map object containing all of your Smart Contracts as Embark Smart Contract instances.\n- `web3` - A web3 instances to give you access to things like accounts.\n- `logger` - Embark's custom logger.\n\nScripts can be located anywhere on your machine, but should most likely live inside your project's file tree in a dedicated folder.\n\nTo run a script, use the CLI `exec` command and specify an environment as well as the script to be executed:\n\n```\n$ embark exec development scripts/001.js\n```\n\nThe command above will execute the function in `scripts/001.js` and ensures that Smart Contracts are deployed in the `development` environment.\n\nIf you have multiple scripts that should run in order, it's also possible to specify the directory in which they live in:\n\n```\n$ embark exec development scripts\n```\n\nEmbark will then find all script files inside the specified directory (in this case `scripts`) and then run them one by one. If any of the scripts fails by emitting an error, Embark will abort the execution. Scripts are executed in sequence, which means all following scripts won't be executed in case of an error.\n\n**Tracking scripts**\n\nJust like Smart Contract deployments are tracked, (migration) scripts can be tracked as well. Since scripts can be one-off operations, Embark will not track whether they have been executed by default. Users are always able to run a script using the `exec` command as discussed in the previous sections.\n\nTo have Embark \"remember\" that a certain script was already run, you can use the `--track` option of the `exec` command, which will force tracking for this particular script:\n\n```\n$ embark exec development scripts/001.js --track\n```\n\nIf we try to run the script again with the `--track` option, Embark will notice that the script has already been executed and tell us that it's \"already done\".\n\n```\n$ embark exec development scripts/001.js --track\n.. 001.js already done\n```\n\nIf however, we don't provide the `--track` flag, Embark will execute the script as usual.\n\nFor cases in which we **do** want to track a set of scripts, especially when the main use case are migration operations, we can put our scripts in a special \"migrations\" directory. All scripts inside that directory will be tracked by default.\n\nThe directory can be specified using the `migrations` property in your project's embark.json:\n\n```\n{\n ...\n migrations: 'migrations'\n}\n```\n\nIf no such property is specified, Embark will default to \"migrations\". Running any script or set of scripts is then automatically tracked.\n\nFor more information check the documentation for [Deployment scripts](https://framework.embarklabs.io/docs/executing_scripts.html)\n\n## Support using $accounts in ens registrations\n\nIt's now possible to specify an account to be registered as an ENS domain:\n\n```javascript\nconfig({\n namesystem: {\n enabled: true,\n register: {\n rootDomain: \"embark.eth\",\n subdomains: {\n \"mytoken\": \"$MyToken\",\n \"account\": \"$accounts[0]\"\n }\n }\n }\n})\n```\n\n## Improved compatibility\n\nIn the test suite, in order to improve compatbility with other tools, it is now possible to also use the `artifacts.require` as an alternative to get a smart contract instances:\n\n```javascript\nconst AnotherStorage = artifacts.require('AnotherStorage');\n```\n\n## Transition to Embark 6.0\n\nTo make Embark even lighter and faster, starting in Embark 6.0, the following will be installable plugins that will no longer come with Embark by default:\n\n* embark-geth\n* embark-graph\n* embark-ipfs\n* embark-parity\n* embark-profiler\n* embark-swarm\n* embark-whisper-geth\n* embarkjs\n* embarkjs-ens\n* embarkjs-ipfs\n* embarkjs-swarm\n* embarkjs-web3\n* embarkjs-whisper\n\nEmbark 5.2 will issue warnings about these needing to be installed & configured as plugins to make transition to Embark 6.0 easier.\n\nTo make current projects compatible, **ensure `embark` is added as a `devDependency` to your project**, as well as any plugins. For e.g\n\nIn `package.json` add `\"embark-geth\": \"^5.2.2\",` to the `devDependencies` section and in `embark.json` add `\"embark-geth\": {}` to the `plugins` section\n\n## Next\n\nStay tuned for Embark 6.0 and the latest changes happening by watching the [Embark GitHub repository](https://github.com/embarklabs/embark) and following us on the [Embark Labs Twitter](https://twitter.com/embarkproject)!\n\n## changelog\n\n**Features**\n\n* **@embark/contracts:** add proxyFor property for contracts ([2e8b255](https://github.com/embarklabs/embark/commit/2e8b255))\n* **@embark/ens:** enable the use of $accounts in registrations ([de01022](https://github.com/embarklabs/embark/commit/de01022))\n* **@embark/test-runner:** introduce artifacts.require API ([b021689](https://github.com/embarklabs/embark/commit/b021689))\n* **plugins/scripts-runner:** introduce exec command to run scripts ([40c3d98](https://github.com/embarklabs/embark/commit/40c3d98))\n* **@embark/blockchain:** make GanacheCLI the default dev blockchain ([cd934f8](https://github.com/embarklabs/embark/commit/cd934f8))\n* warn about packages not configured as plugins; make geth/parity full plugins ([d14e93c](https://github.com/embarklabs/embark/commit/d14e93c))\n\n**Bug Fixes**\n\n* **@embark/blockchain-api:** add back contract event listen and log ([5592753](https://github.com/embarklabs/embark/commit/5592753))\n* **@embark/cmd-controller:** exit build if afterDeploy is not array ([5359cc6](https://github.com/embarklabs/embark/commit/5359cc6))\n* **@embark/contracts-manager:** Remove `logger` from serialized contract ([d529420](https://github.com/embarklabs/embark/commit/d529420))\n* **@embark/contracts-manager:** always deploy contracts with deploy: true ([87a04cd](https://github.com/embarklabs/embark/commit/87a04cd))\n* **@embark/dashboard:** update dashboard's `logEntry` to match core/logger's `logFunction` ([63831f6](https://github.com/embarklabs/embark/commit/63831f6)), closes [#2184](https://github.com/embarklabs/embark/issues/2184)\n* **@embark/deployment:** fix undefined in nb arguments in deploy ([0016581](https://github.com/embarklabs/embark/commit/0016581))\n* **@embark/ens:** fix tests erroring on FIFS contract deploy ([78fc7b6](https://github.com/embarklabs/embark/commit/78fc7b6))\n* **@embark/ganache:** fix connection to other nodes from Ganache ([5531b60](https://github.com/embarklabs/embark/commit/5531b60))\n* **@embark/logger:** Remove `writeToFile` for logger `dir` ([e9be40c](https://github.com/embarklabs/embark/commit/e9be40c))\n* **@embark/proxy:** only up event listeners on available providers ([caae922](https://github.com/embarklabs/embark/commit/caae922))\n* **@embark/proxy:** up max listener for proxy request manager ([9c8837d](https://github.com/embarklabs/embark/commit/9c8837d))\n* **@embark/test-runner:** fix reporter to only catch gas for txs ([0e30bf3](https://github.com/embarklabs/embark/commit/0e30bf3))\n* **core/config:** Fix `EmbarkConfig` type ([0f59e0c](https://github.com/embarklabs/embark/commit/0f59e0c))\n* only show account warning when Geth will actually start ([f502650](https://github.com/embarklabs/embark/commit/f502650))\n* set helper methods on contracts ([7031335](https://github.com/embarklabs/embark/commit/7031335))\n* **stack/contracts-manager:** ensure custom `abiDefinition` is set properly if provided ([b4b4848](https://github.com/embarklabs/embark/commit/b4b4848))\n","slug":"embark-5-2-release","published":1,"date":"2020-02-19T05:00:00.000Z","updated":"2020-03-03T14:55:55.067Z","_id":"ck6tl5kxd000091t435e6378k","comments":1,"photos":[],"link":"","content":"<span class=\"o-center\">\n\n<p><img src=\"/assets/images/embark_logo.png\" alt=\"Embark Labs\"></p>\n</span>\n\n<h1 id=\"Embark-5-2\"><a href=\"#Embark-5-2\" class=\"headerlink\" title=\"Embark 5.2\"></a>Embark 5.2</h1><p>In this release of Embark we introduce some new features such as <a href=\"#Proxy-Contract-Support\">proxy contract support</a> and <a href=\"#Scripts-Runner\">scripts execution</a>. We’re also introducing some important <a href=\"#Transition-to-Embark-6-0\">deprecation warnings</a> in preparation for Embark 6.0. We are making Embark lighter and more modular and to that end some modules that come by default will become optional plugins instead.</p>\n<h2 id=\"Proxy-Contract-Support\"><a href=\"#Proxy-Contract-Support\" class=\"headerlink\" title=\"Proxy Contract Support\"></a>Proxy Contract Support</h2><p>Proxy contracts are powerful tools usually used in more complex Dapps. They can be used for smart contracts that can be upgraded or to alleviate the deploy cost of multiple instances of a contract.</p>\n<p>However, interacting with Proxy contracts is usually difficult, because you have to point the base contract to the address of the Proxy for it to work.</p>\n<p>Not anymore! Embark now supports a contract configuration named <code>proxyFor</code>.</p>\n<p>With it, you can specify that a Proxy contract is, well, a proxy <em>for</em> another one. Here’s an example:</p>\n<figure class=\"highlight javascript\"><table><tr><td class=\"code\"><pre><span class=\"line\">deploy: {</span><br><span class=\"line\"> <span class=\"built_in\">Proxy</span>: {</span><br><span class=\"line\"> deploy: <span class=\"literal\">false</span></span><br><span class=\"line\"> },</span><br><span class=\"line\"> BaseContract: {</span><br><span class=\"line\"> args: [<span class=\"string\">\"whatever the base contract needs\"</span>]</span><br><span class=\"line\"> },</span><br><span class=\"line\"> ContractInstance: {</span><br><span class=\"line\"> instanceOf: <span class=\"string\">\"Proxy\"</span>,</span><br><span class=\"line\"> proxyFor: <span class=\"string\">\"BaseContract\"</span>,</span><br><span class=\"line\"> args: [<span class=\"string\">\"0x\"</span>, <span class=\"string\">\"$BaseContract\"</span>]</span><br><span class=\"line\"> }</span><br><span class=\"line\">}</span><br></pre></td></tr></table></figure>\n\n<p>With this configuration, our <code>ContractInstance</code> is an <code>instanceOf</code> <code>Proxy</code> and a <code>proxyFor</code> <code>BaseContract</code>.<br>This is why we point to <code>BaseContract</code> in the <code>ContractInstance</code> arguments.<br>The arguments themselves depend on the implementations of your <code>BaseContract</code> and <code>Proxy</code> contract.</p>\n<p>Note that you could have used <code>Proxy</code> itself as a <code>proxyFor</code> <code>BaseContract</code>, but it’s usually more intuitive to use <code>instanceOf</code> and then resolve the contract instance with the new name you gave it (<code>ContractInstance</code> in this case).</p>\n<p>Once the smart contracts are deployed, all you have to do is:</p>\n<figure class=\"highlight plain\"><table><tr><td class=\"code\"><pre><span class=\"line\">import ContractInstance from 'path/to/artifacts/contracts/ContractInstance';</span><br></pre></td></tr></table></figure>\n\n<p>For more information check the documentation for <a href=\"https://framework.embarklabs.io/docs/contracts_configuration.html#Proxy-Contract-Support\" target=\"_blank\" rel=\"noopener\">Proxy Contract Support</a></p>\n<h2 id=\"Scripts-Runner\"><a href=\"#Scripts-Runner\" class=\"headerlink\" title=\"Scripts Runner\"></a>Scripts Runner</h2><p>Embark uses a powerful <a href=\"/docs/contracts_configuration.html\">declarative configuration</a> of smart contracts. The parameters of smart contracts, how they relate to each other, what <a href=\"/docs/contracts_configuration.html#Deployment-hooks\">actions</a> to do when they are deployed are described in a declarative configuration file and Embark then takes care of deploying the smart contracts in a way that reflects the configuration described.</p>\n<p>Although this system covers the vast majority of cases, there are some situations where having the ability to execute scripts separately is useful, to that end Embark 5.2 now includes support for scripts, this can be used as migrations or as isolated scripts.</p>\n<p>A script is really just a file with an exported function that has special dependencies injected into it. Here’s what it could look like:</p>\n<figure class=\"highlight plain\"><table><tr><td class=\"code\"><pre><span class=\"line\">modules.exports = async ({ contracts, web3, logger}) => {</span><br><span class=\"line\"> ...</span><br><span class=\"line\">};</span><br></pre></td></tr></table></figure>\n\n<p>The injected parameters are:</p>\n<ul>\n<li><code>contracts</code> - A map object containing all of your Smart Contracts as Embark Smart Contract instances.</li>\n<li><code>web3</code> - A web3 instances to give you access to things like accounts.</li>\n<li><code>logger</code> - Embark’s custom logger.</li>\n</ul>\n<p>Scripts can be located anywhere on your machine, but should most likely live inside your project’s file tree in a dedicated folder.</p>\n<p>To run a script, use the CLI <code>exec</code> command and specify an environment as well as the script to be executed:</p>\n<figure class=\"highlight plain\"><table><tr><td class=\"code\"><pre><span class=\"line\">$ embark exec development scripts/001.js</span><br></pre></td></tr></table></figure>\n\n<p>The command above will execute the function in <code>scripts/001.js</code> and ensures that Smart Contracts are deployed in the <code>development</code> environment.</p>\n<p>If you have multiple scripts that should run in order, it’s also possible to specify the directory in which they live in:</p>\n<figure class=\"highlight plain\"><table><tr><td class=\"code\"><pre><span class=\"line\">$ embark exec development scripts</span><br></pre></td></tr></table></figure>\n\n<p>Embark will then find all script files inside the specified directory (in this case <code>scripts</code>) and then run them one by one. If any of the scripts fails by emitting an error, Embark will abort the execution. Scripts are executed in sequence, which means all following scripts won’t be executed in case of an error.</p>\n<p><strong>Tracking scripts</strong></p>\n<p>Just like Smart Contract deployments are tracked, (migration) scripts can be tracked as well. Since scripts can be one-off operations, Embark will not track whether they have been executed by default. Users are always able to run a script using the <code>exec</code> command as discussed in the previous sections.</p>\n<p>To have Embark “remember” that a certain script was already run, you can use the <code>--track</code> option of the <code>exec</code> command, which will force tracking for this particular script:</p>\n<figure class=\"highlight plain\"><table><tr><td class=\"code\"><pre><span class=\"line\">$ embark exec development scripts/001.js --track</span><br></pre></td></tr></table></figure>\n\n<p>If we try to run the script again with the <code>--track</code> option, Embark will notice that the script has already been executed and tell us that it’s “already done”.</p>\n<figure class=\"highlight plain\"><table><tr><td class=\"code\"><pre><span class=\"line\">$ embark exec development scripts/001.js --track</span><br><span class=\"line\">.. 001.js already done</span><br></pre></td></tr></table></figure>\n\n<p>If however, we don’t provide the <code>--track</code> flag, Embark will execute the script as usual.</p>\n<p>For cases in which we <strong>do</strong> want to track a set of scripts, especially when the main use case are migration operations, we can put our scripts in a special “migrations” directory. All scripts inside that directory will be tracked by default.</p>\n<p>The directory can be specified using the <code>migrations</code> property in your project’s embark.json:</p>\n<figure class=\"highlight plain\"><table><tr><td class=\"code\"><pre><span class=\"line\">{</span><br><span class=\"line\"> ...</span><br><span class=\"line\"> migrations: 'migrations'</span><br><span class=\"line\">}</span><br></pre></td></tr></table></figure>\n\n<p>If no such property is specified, Embark will default to “migrations”. Running any script or set of scripts is then automatically tracked.</p>\n<p>For more information check the documentation for <a href=\"https://framework.embarklabs.io/docs/executing_scripts.html\" target=\"_blank\" rel=\"noopener\">Deployment scripts</a></p>\n<h2 id=\"Support-using-accounts-in-ens-registrations\"><a href=\"#Support-using-accounts-in-ens-registrations\" class=\"headerlink\" title=\"Support using $accounts in ens registrations\"></a>Support using $accounts in ens registrations</h2><p>It’s now possible to specify an account to be registered as an ENS domain:</p>\n<figure class=\"highlight javascript\"><table><tr><td class=\"code\"><pre><span class=\"line\">config({</span><br><span class=\"line\"> namesystem: {</span><br><span class=\"line\"> enabled: <span class=\"literal\">true</span>,</span><br><span class=\"line\"> register: {</span><br><span class=\"line\"> rootDomain: <span class=\"string\">\"embark.eth\"</span>,</span><br><span class=\"line\"> subdomains: {</span><br><span class=\"line\"> <span class=\"string\">\"mytoken\"</span>: <span class=\"string\">\"$MyToken\"</span>,</span><br><span class=\"line\"> <span class=\"string\">\"account\"</span>: <span class=\"string\">\"$accounts[0]\"</span></span><br><span class=\"line\"> }</span><br><span class=\"line\"> }</span><br><span class=\"line\"> }</span><br><span class=\"line\">})</span><br></pre></td></tr></table></figure>\n\n<h2 id=\"Improved-compatibility\"><a href=\"#Improved-compatibility\" class=\"headerlink\" title=\"Improved compatibility\"></a>Improved compatibility</h2><p>In the test suite, in order to improve compatbility with other tools, it is now possible to also use the <code>artifacts.require</code> as an alternative to get a smart contract instances:</p>\n<figure class=\"highlight javascript\"><table><tr><td class=\"code\"><pre><span class=\"line\"><span class=\"keyword\">const</span> AnotherStorage = artifacts.require(<span class=\"string\">'AnotherStorage'</span>);</span><br></pre></td></tr></table></figure>\n\n<h2 id=\"Transition-to-Embark-6-0\"><a href=\"#Transition-to-Embark-6-0\" class=\"headerlink\" title=\"Transition to Embark 6.0\"></a>Transition to Embark 6.0</h2><p>To make Embark even lighter and faster, starting in Embark 6.0, the following will be installable plugins that will no longer come with Embark by default:</p>\n<ul>\n<li>embark-geth</li>\n<li>embark-graph</li>\n<li>embark-ipfs</li>\n<li>embark-parity</li>\n<li>embark-profiler</li>\n<li>embark-swarm</li>\n<li>embark-whisper-geth</li>\n<li>embarkjs</li>\n<li>embarkjs-ens</li>\n<li>embarkjs-ipfs</li>\n<li>embarkjs-swarm</li>\n<li>embarkjs-web3</li>\n<li>embarkjs-whisper</li>\n</ul>\n<p>Embark 5.2 will issue warnings about these needing to be installed & configured as plugins to make transition to Embark 6.0 easier.</p>\n<p>To make current projects compatible, <strong>ensure <code>embark</code> is added as a <code>devDependency</code> to your project</strong>, as well as any plugins. For e.g</p>\n<p>In <code>package.json</code> add <code>"embark-geth": "^5.2.2",</code> to the <code>devDependencies</code> section and in <code>embark.json</code> add <code>"embark-geth": {}</code> to the <code>plugins</code> section</p>\n<h2 id=\"Next\"><a href=\"#Next\" class=\"headerlink\" title=\"Next\"></a>Next</h2><p>Stay tuned for Embark 6.0 and the latest changes happening by watching the <a href=\"https://github.com/embarklabs/embark\" target=\"_blank\" rel=\"noopener\">Embark GitHub repository</a> and following us on the <a href=\"https://twitter.com/embarkproject\" target=\"_blank\" rel=\"noopener\">Embark Labs Twitter</a>!</p>\n<h2 id=\"changelog\"><a href=\"#changelog\" class=\"headerlink\" title=\"changelog\"></a>changelog</h2><p><strong>Features</strong></p>\n<ul>\n<li><strong>@embark/contracts:</strong> add proxyFor property for contracts (<a href=\"https://github.com/embarklabs/embark/commit/2e8b255\" target=\"_blank\" rel=\"noopener\">2e8b255</a>)</li>\n<li><strong>@embark/ens:</strong> enable the use of $accounts in registrations (<a href=\"https://github.com/embarklabs/embark/commit/de01022\" target=\"_blank\" rel=\"noopener\">de01022</a>)</li>\n<li><strong>@embark/test-runner:</strong> introduce artifacts.require API (<a href=\"https://github.com/embarklabs/embark/commit/b021689\" target=\"_blank\" rel=\"noopener\">b021689</a>)</li>\n<li><strong>plugins/scripts-runner:</strong> introduce exec command to run scripts (<a href=\"https://github.com/embarklabs/embark/commit/40c3d98\" target=\"_blank\" rel=\"noopener\">40c3d98</a>)</li>\n<li><strong>@embark/blockchain:</strong> make GanacheCLI the default dev blockchain (<a href=\"https://github.com/embarklabs/embark/commit/cd934f8\" target=\"_blank\" rel=\"noopener\">cd934f8</a>)</li>\n<li>warn about packages not configured as plugins; make geth/parity full plugins (<a href=\"https://github.com/embarklabs/embark/commit/d14e93c\" target=\"_blank\" rel=\"noopener\">d14e93c</a>)</li>\n</ul>\n<p><strong>Bug Fixes</strong></p>\n<ul>\n<li><strong>@embark/blockchain-api:</strong> add back contract event listen and log (<a href=\"https://github.com/embarklabs/embark/commit/5592753\" target=\"_blank\" rel=\"noopener\">5592753</a>)</li>\n<li><strong>@embark/cmd-controller:</strong> exit build if afterDeploy is not array (<a href=\"https://github.com/embarklabs/embark/commit/5359cc6\" target=\"_blank\" rel=\"noopener\">5359cc6</a>)</li>\n<li><strong>@embark/contracts-manager:</strong> Remove <code>logger</code> from serialized contract (<a href=\"https://github.com/embarklabs/embark/commit/d529420\" target=\"_blank\" rel=\"noopener\">d529420</a>)</li>\n<li><strong>@embark/contracts-manager:</strong> always deploy contracts with deploy: true (<a href=\"https://github.com/embarklabs/embark/commit/87a04cd\" target=\"_blank\" rel=\"noopener\">87a04cd</a>)</li>\n<li><strong>@embark/dashboard:</strong> update dashboard’s <code>logEntry</code> to match core/logger’s <code>logFunction</code> (<a href=\"https://github.com/embarklabs/embark/commit/63831f6\" target=\"_blank\" rel=\"noopener\">63831f6</a>), closes <a href=\"https://github.com/embarklabs/embark/issues/2184\" target=\"_blank\" rel=\"noopener\">#2184</a></li>\n<li><strong>@embark/deployment:</strong> fix undefined in nb arguments in deploy (<a href=\"https://github.com/embarklabs/embark/commit/0016581\" target=\"_blank\" rel=\"noopener\">0016581</a>)</li>\n<li><strong>@embark/ens:</strong> fix tests erroring on FIFS contract deploy (<a href=\"https://github.com/embarklabs/embark/commit/78fc7b6\" target=\"_blank\" rel=\"noopener\">78fc7b6</a>)</li>\n<li><strong>@embark/ganache:</strong> fix connection to other nodes from Ganache (<a href=\"https://github.com/embarklabs/embark/commit/5531b60\" target=\"_blank\" rel=\"noopener\">5531b60</a>)</li>\n<li><strong>@embark/logger:</strong> Remove <code>writeToFile</code> for logger <code>dir</code> (<a href=\"https://github.com/embarklabs/embark/commit/e9be40c\" target=\"_blank\" rel=\"noopener\">e9be40c</a>)</li>\n<li><strong>@embark/proxy:</strong> only up event listeners on available providers (<a href=\"https://github.com/embarklabs/embark/commit/caae922\" target=\"_blank\" rel=\"noopener\">caae922</a>)</li>\n<li><strong>@embark/proxy:</strong> up max listener for proxy request manager (<a href=\"https://github.com/embarklabs/embark/commit/9c8837d\" target=\"_blank\" rel=\"noopener\">9c8837d</a>)</li>\n<li><strong>@embark/test-runner:</strong> fix reporter to only catch gas for txs (<a href=\"https://github.com/embarklabs/embark/commit/0e30bf3\" target=\"_blank\" rel=\"noopener\">0e30bf3</a>)</li>\n<li><strong>core/config:</strong> Fix <code>EmbarkConfig</code> type (<a href=\"https://github.com/embarklabs/embark/commit/0f59e0c\" target=\"_blank\" rel=\"noopener\">0f59e0c</a>)</li>\n<li>only show account warning when Geth will actually start (<a href=\"https://github.com/embarklabs/embark/commit/f502650\" target=\"_blank\" rel=\"noopener\">f502650</a>)</li>\n<li>set helper methods on contracts (<a href=\"https://github.com/embarklabs/embark/commit/7031335\" target=\"_blank\" rel=\"noopener\">7031335</a>)</li>\n<li><strong>stack/contracts-manager:</strong> ensure custom <code>abiDefinition</code> is set properly if provided (<a href=\"https://github.com/embarklabs/embark/commit/b4b4848\" target=\"_blank\" rel=\"noopener\">b4b4848</a>)</li>\n</ul>\n","site":{"data":{"authors":{"iuri_matias":{"name":"Iuri Matias","twitter":"iurimatias","image":"https://pbs.twimg.com/profile_images/928272512181563392/iDJdvy2k_400x400.jpg"},"pascal_precht":{"name":"Pascal Precht","twitter":"pascalprecht","image":"https://pbs.twimg.com/profile_images/993785060733194241/p3oAIMDP_400x400.jpg"},"anthony_laibe":{"name":"Anthony Laibe","twitter":"a_laibe","image":"https://pbs.twimg.com/profile_images/257742900/13168239_400x400.jpg"},"jonathan_rainville":{"name":"Jonathan Rainville","twitter":"ShyolGhul","image":"https://pbs.twimg.com/profile_images/993873866878570496/-aE4byjj_400x400.jpg"},"andre_medeiros":{"name":"Andre Medeiros","twitter":"superdealloc","image":"https://pbs.twimg.com/profile_images/965722487735701504/m58KNgWN_400x400.jpg"},"eric_mastro":{"name":"Eric Mastro","twitter":"ericmastro","image":"https://avatars1.githubusercontent.com/u/5089238?s=460&v=4"},"michael_bradley":{"name":"Michael Bradley","image":"https://avatars3.githubusercontent.com/u/194260?s=460&v=4"},"richard_ramos":{"name":"Richard Ramos","twitter":"richardramos_me","image":"https://devcon.org/images/speakers/richard_ramos.jpg"},"jonny_zerah":{"name":"Jonny Zerah","twitter":"jonnyzerah","image":"https://pbs.twimg.com/profile_images/1043774340490248192/gI9aGy17_400x400.jpg"},"robin_percy":{"name":"Robin Percy","twitter":"rbin","image":"https://avatars1.githubusercontent.com/u/29288325?s=400&v=4"}},"categories":{"tutorials":"Tutorials","announcements":"Announcements"},"languages":{"en":"English"}}},"excerpt":"","more":"<span class=\"o-center\">\n\n<p><img src=\"/assets/images/embark_logo.png\" alt=\"Embark Labs\"></p>\n</span>\n\n<h1 id=\"Embark-5-2\"><a href=\"#Embark-5-2\" class=\"headerlink\" title=\"Embark 5.2\"></a>Embark 5.2</h1><p>In this release of Embark we introduce some new features such as <a href=\"#Proxy-Contract-Support\">proxy contract support</a> and <a href=\"#Scripts-Runner\">scripts execution</a>. We’re also introducing some important <a href=\"#Transition-to-Embark-6-0\">deprecation warnings</a> in preparation for Embark 6.0. We are making Embark lighter and more modular and to that end some modules that come by default will become optional plugins instead.</p>\n<h2 id=\"Proxy-Contract-Support\"><a href=\"#Proxy-Contract-Support\" class=\"headerlink\" title=\"Proxy Contract Support\"></a>Proxy Contract Support</h2><p>Proxy contracts are powerful tools usually used in more complex Dapps. They can be used for smart contracts that can be upgraded or to alleviate the deploy cost of multiple instances of a contract.</p>\n<p>However, interacting with Proxy contracts is usually difficult, because you have to point the base contract to the address of the Proxy for it to work.</p>\n<p>Not anymore! Embark now supports a contract configuration named <code>proxyFor</code>.</p>\n<p>With it, you can specify that a Proxy contract is, well, a proxy <em>for</em> another one. Here’s an example:</p>\n<figure class=\"highlight javascript\"><table><tr><td class=\"code\"><pre><span class=\"line\">deploy: {</span><br><span class=\"line\"> <span class=\"built_in\">Proxy</span>: {</span><br><span class=\"line\"> deploy: <span class=\"literal\">false</span></span><br><span class=\"line\"> },</span><br><span class=\"line\"> BaseContract: {</span><br><span class=\"line\"> args: [<span class=\"string\">\"whatever the base contract needs\"</span>]</span><br><span class=\"line\"> },</span><br><span class=\"line\"> ContractInstance: {</span><br><span class=\"line\"> instanceOf: <span class=\"string\">\"Proxy\"</span>,</span><br><span class=\"line\"> proxyFor: <span class=\"string\">\"BaseContract\"</span>,</span><br><span class=\"line\"> args: [<span class=\"string\">\"0x\"</span>, <span class=\"string\">\"$BaseContract\"</span>]</span><br><span class=\"line\"> }</span><br><span class=\"line\">}</span><br></pre></td></tr></table></figure>\n\n<p>With this configuration, our <code>ContractInstance</code> is an <code>instanceOf</code> <code>Proxy</code> and a <code>proxyFor</code> <code>BaseContract</code>.<br>This is why we point to <code>BaseContract</code> in the <code>ContractInstance</code> arguments.<br>The arguments themselves depend on the implementations of your <code>BaseContract</code> and <code>Proxy</code> contract.</p>\n<p>Note that you could have used <code>Proxy</code> itself as a <code>proxyFor</code> <code>BaseContract</code>, but it’s usually more intuitive to use <code>instanceOf</code> and then resolve the contract instance with the new name you gave it (<code>ContractInstance</code> in this case).</p>\n<p>Once the smart contracts are deployed, all you have to do is:</p>\n<figure class=\"highlight plain\"><table><tr><td class=\"code\"><pre><span class=\"line\">import ContractInstance from 'path/to/artifacts/contracts/ContractInstance';</span><br></pre></td></tr></table></figure>\n\n<p>For more information check the documentation for <a href=\"https://framework.embarklabs.io/docs/contracts_configuration.html#Proxy-Contract-Support\" target=\"_blank\" rel=\"noopener\">Proxy Contract Support</a></p>\n<h2 id=\"Scripts-Runner\"><a href=\"#Scripts-Runner\" class=\"headerlink\" title=\"Scripts Runner\"></a>Scripts Runner</h2><p>Embark uses a powerful <a href=\"/docs/contracts_configuration.html\">declarative configuration</a> of smart contracts. The parameters of smart contracts, how they relate to each other, what <a href=\"/docs/contracts_configuration.html#Deployment-hooks\">actions</a> to do when they are deployed are described in a declarative configuration file and Embark then takes care of deploying the smart contracts in a way that reflects the configuration described.</p>\n<p>Although this system covers the vast majority of cases, there are some situations where having the ability to execute scripts separately is useful, to that end Embark 5.2 now includes support for scripts, this can be used as migrations or as isolated scripts.</p>\n<p>A script is really just a file with an exported function that has special dependencies injected into it. Here’s what it could look like:</p>\n<figure class=\"highlight plain\"><table><tr><td class=\"code\"><pre><span class=\"line\">modules.exports = async ({ contracts, web3, logger}) => {</span><br><span class=\"line\"> ...</span><br><span class=\"line\">};</span><br></pre></td></tr></table></figure>\n\n<p>The injected parameters are:</p>\n<ul>\n<li><code>contracts</code> - A map object containing all of your Smart Contracts as Embark Smart Contract instances.</li>\n<li><code>web3</code> - A web3 instances to give you access to things like accounts.</li>\n<li><code>logger</code> - Embark’s custom logger.</li>\n</ul>\n<p>Scripts can be located anywhere on your machine, but should most likely live inside your project’s file tree in a dedicated folder.</p>\n<p>To run a script, use the CLI <code>exec</code> command and specify an environment as well as the script to be executed:</p>\n<figure class=\"highlight plain\"><table><tr><td class=\"code\"><pre><span class=\"line\">$ embark exec development scripts/001.js</span><br></pre></td></tr></table></figure>\n\n<p>The command above will execute the function in <code>scripts/001.js</code> and ensures that Smart Contracts are deployed in the <code>development</code> environment.</p>\n<p>If you have multiple scripts that should run in order, it’s also possible to specify the directory in which they live in:</p>\n<figure class=\"highlight plain\"><table><tr><td class=\"code\"><pre><span class=\"line\">$ embark exec development scripts</span><br></pre></td></tr></table></figure>\n\n<p>Embark will then find all script files inside the specified directory (in this case <code>scripts</code>) and then run them one by one. If any of the scripts fails by emitting an error, Embark will abort the execution. Scripts are executed in sequence, which means all following scripts won’t be executed in case of an error.</p>\n<p><strong>Tracking scripts</strong></p>\n<p>Just like Smart Contract deployments are tracked, (migration) scripts can be tracked as well. Since scripts can be one-off operations, Embark will not track whether they have been executed by default. Users are always able to run a script using the <code>exec</code> command as discussed in the previous sections.</p>\n<p>To have Embark “remember” that a certain script was already run, you can use the <code>--track</code> option of the <code>exec</code> command, which will force tracking for this particular script:</p>\n<figure class=\"highlight plain\"><table><tr><td class=\"code\"><pre><span class=\"line\">$ embark exec development scripts/001.js --track</span><br></pre></td></tr></table></figure>\n\n<p>If we try to run the script again with the <code>--track</code> option, Embark will notice that the script has already been executed and tell us that it’s “already done”.</p>\n<figure class=\"highlight plain\"><table><tr><td class=\"code\"><pre><span class=\"line\">$ embark exec development scripts/001.js --track</span><br><span class=\"line\">.. 001.js already done</span><br></pre></td></tr></table></figure>\n\n<p>If however, we don’t provide the <code>--track</code> flag, Embark will execute the script as usual.</p>\n<p>For cases in which we <strong>do</strong> want to track a set of scripts, especially when the main use case are migration operations, we can put our scripts in a special “migrations” directory. All scripts inside that directory will be tracked by default.</p>\n<p>The directory can be specified using the <code>migrations</code> property in your project’s embark.json:</p>\n<figure class=\"highlight plain\"><table><tr><td class=\"code\"><pre><span class=\"line\">{</span><br><span class=\"line\"> ...</span><br><span class=\"line\"> migrations: 'migrations'</span><br><span class=\"line\">}</span><br></pre></td></tr></table></figure>\n\n<p>If no such property is specified, Embark will default to “migrations”. Running any script or set of scripts is then automatically tracked.</p>\n<p>For more information check the documentation for <a href=\"https://framework.embarklabs.io/docs/executing_scripts.html\" target=\"_blank\" rel=\"noopener\">Deployment scripts</a></p>\n<h2 id=\"Support-using-accounts-in-ens-registrations\"><a href=\"#Support-using-accounts-in-ens-registrations\" class=\"headerlink\" title=\"Support using $accounts in ens registrations\"></a>Support using $accounts in ens registrations</h2><p>It’s now possible to specify an account to be registered as an ENS domain:</p>\n<figure class=\"highlight javascript\"><table><tr><td class=\"code\"><pre><span class=\"line\">config({</span><br><span class=\"line\"> namesystem: {</span><br><span class=\"line\"> enabled: <span class=\"literal\">true</span>,</span><br><span class=\"line\"> register: {</span><br><span class=\"line\"> rootDomain: <span class=\"string\">\"embark.eth\"</span>,</span><br><span class=\"line\"> subdomains: {</span><br><span class=\"line\"> <span class=\"string\">\"mytoken\"</span>: <span class=\"string\">\"$MyToken\"</span>,</span><br><span class=\"line\"> <span class=\"string\">\"account\"</span>: <span class=\"string\">\"$accounts[0]\"</span></span><br><span class=\"line\"> }</span><br><span class=\"line\"> }</span><br><span class=\"line\"> }</span><br><span class=\"line\">})</span><br></pre></td></tr></table></figure>\n\n<h2 id=\"Improved-compatibility\"><a href=\"#Improved-compatibility\" class=\"headerlink\" title=\"Improved compatibility\"></a>Improved compatibility</h2><p>In the test suite, in order to improve compatbility with other tools, it is now possible to also use the <code>artifacts.require</code> as an alternative to get a smart contract instances:</p>\n<figure class=\"highlight javascript\"><table><tr><td class=\"code\"><pre><span class=\"line\"><span class=\"keyword\">const</span> AnotherStorage = artifacts.require(<span class=\"string\">'AnotherStorage'</span>);</span><br></pre></td></tr></table></figure>\n\n<h2 id=\"Transition-to-Embark-6-0\"><a href=\"#Transition-to-Embark-6-0\" class=\"headerlink\" title=\"Transition to Embark 6.0\"></a>Transition to Embark 6.0</h2><p>To make Embark even lighter and faster, starting in Embark 6.0, the following will be installable plugins that will no longer come with Embark by default:</p>\n<ul>\n<li>embark-geth</li>\n<li>embark-graph</li>\n<li>embark-ipfs</li>\n<li>embark-parity</li>\n<li>embark-profiler</li>\n<li>embark-swarm</li>\n<li>embark-whisper-geth</li>\n<li>embarkjs</li>\n<li>embarkjs-ens</li>\n<li>embarkjs-ipfs</li>\n<li>embarkjs-swarm</li>\n<li>embarkjs-web3</li>\n<li>embarkjs-whisper</li>\n</ul>\n<p>Embark 5.2 will issue warnings about these needing to be installed & configured as plugins to make transition to Embark 6.0 easier.</p>\n<p>To make current projects compatible, <strong>ensure <code>embark</code> is added as a <code>devDependency</code> to your project</strong>, as well as any plugins. For e.g</p>\n<p>In <code>package.json</code> add <code>"embark-geth": "^5.2.2",</code> to the <code>devDependencies</code> section and in <code>embark.json</code> add <code>"embark-geth": {}</code> to the <code>plugins</code> section</p>\n<h2 id=\"Next\"><a href=\"#Next\" class=\"headerlink\" title=\"Next\"></a>Next</h2><p>Stay tuned for Embark 6.0 and the latest changes happening by watching the <a href=\"https://github.com/embarklabs/embark\" target=\"_blank\" rel=\"noopener\">Embark GitHub repository</a> and following us on the <a href=\"https://twitter.com/embarkproject\" target=\"_blank\" rel=\"noopener\">Embark Labs Twitter</a>!</p>\n<h2 id=\"changelog\"><a href=\"#changelog\" class=\"headerlink\" title=\"changelog\"></a>changelog</h2><p><strong>Features</strong></p>\n<ul>\n<li><strong>@embark/contracts:</strong> add proxyFor property for contracts (<a href=\"https://github.com/embarklabs/embark/commit/2e8b255\" target=\"_blank\" rel=\"noopener\">2e8b255</a>)</li>\n<li><strong>@embark/ens:</strong> enable the use of $accounts in registrations (<a href=\"https://github.com/embarklabs/embark/commit/de01022\" target=\"_blank\" rel=\"noopener\">de01022</a>)</li>\n<li><strong>@embark/test-runner:</strong> introduce artifacts.require API (<a href=\"https://github.com/embarklabs/embark/commit/b021689\" target=\"_blank\" rel=\"noopener\">b021689</a>)</li>\n<li><strong>plugins/scripts-runner:</strong> introduce exec command to run scripts (<a href=\"https://github.com/embarklabs/embark/commit/40c3d98\" target=\"_blank\" rel=\"noopener\">40c3d98</a>)</li>\n<li><strong>@embark/blockchain:</strong> make GanacheCLI the default dev blockchain (<a href=\"https://github.com/embarklabs/embark/commit/cd934f8\" target=\"_blank\" rel=\"noopener\">cd934f8</a>)</li>\n<li>warn about packages not configured as plugins; make geth/parity full plugins (<a href=\"https://github.com/embarklabs/embark/commit/d14e93c\" target=\"_blank\" rel=\"noopener\">d14e93c</a>)</li>\n</ul>\n<p><strong>Bug Fixes</strong></p>\n<ul>\n<li><strong>@embark/blockchain-api:</strong> add back contract event listen and log (<a href=\"https://github.com/embarklabs/embark/commit/5592753\" target=\"_blank\" rel=\"noopener\">5592753</a>)</li>\n<li><strong>@embark/cmd-controller:</strong> exit build if afterDeploy is not array (<a href=\"https://github.com/embarklabs/embark/commit/5359cc6\" target=\"_blank\" rel=\"noopener\">5359cc6</a>)</li>\n<li><strong>@embark/contracts-manager:</strong> Remove <code>logger</code> from serialized contract (<a href=\"https://github.com/embarklabs/embark/commit/d529420\" target=\"_blank\" rel=\"noopener\">d529420</a>)</li>\n<li><strong>@embark/contracts-manager:</strong> always deploy contracts with deploy: true (<a href=\"https://github.com/embarklabs/embark/commit/87a04cd\" target=\"_blank\" rel=\"noopener\">87a04cd</a>)</li>\n<li><strong>@embark/dashboard:</strong> update dashboard’s <code>logEntry</code> to match core/logger’s <code>logFunction</code> (<a href=\"https://github.com/embarklabs/embark/commit/63831f6\" target=\"_blank\" rel=\"noopener\">63831f6</a>), closes <a href=\"https://github.com/embarklabs/embark/issues/2184\" target=\"_blank\" rel=\"noopener\">#2184</a></li>\n<li><strong>@embark/deployment:</strong> fix undefined in nb arguments in deploy (<a href=\"https://github.com/embarklabs/embark/commit/0016581\" target=\"_blank\" rel=\"noopener\">0016581</a>)</li>\n<li><strong>@embark/ens:</strong> fix tests erroring on FIFS contract deploy (<a href=\"https://github.com/embarklabs/embark/commit/78fc7b6\" target=\"_blank\" rel=\"noopener\">78fc7b6</a>)</li>\n<li><strong>@embark/ganache:</strong> fix connection to other nodes from Ganache (<a href=\"https://github.com/embarklabs/embark/commit/5531b60\" target=\"_blank\" rel=\"noopener\">5531b60</a>)</li>\n<li><strong>@embark/logger:</strong> Remove <code>writeToFile</code> for logger <code>dir</code> (<a href=\"https://github.com/embarklabs/embark/commit/e9be40c\" target=\"_blank\" rel=\"noopener\">e9be40c</a>)</li>\n<li><strong>@embark/proxy:</strong> only up event listeners on available providers (<a href=\"https://github.com/embarklabs/embark/commit/caae922\" target=\"_blank\" rel=\"noopener\">caae922</a>)</li>\n<li><strong>@embark/proxy:</strong> up max listener for proxy request manager (<a href=\"https://github.com/embarklabs/embark/commit/9c8837d\" target=\"_blank\" rel=\"noopener\">9c8837d</a>)</li>\n<li><strong>@embark/test-runner:</strong> fix reporter to only catch gas for txs (<a href=\"https://github.com/embarklabs/embark/commit/0e30bf3\" target=\"_blank\" rel=\"noopener\">0e30bf3</a>)</li>\n<li><strong>core/config:</strong> Fix <code>EmbarkConfig</code> type (<a href=\"https://github.com/embarklabs/embark/commit/0f59e0c\" target=\"_blank\" rel=\"noopener\">0f59e0c</a>)</li>\n<li>only show account warning when Geth will actually start (<a href=\"https://github.com/embarklabs/embark/commit/f502650\" target=\"_blank\" rel=\"noopener\">f502650</a>)</li>\n<li>set helper methods on contracts (<a href=\"https://github.com/embarklabs/embark/commit/7031335\" target=\"_blank\" rel=\"noopener\">7031335</a>)</li>\n<li><strong>stack/contracts-manager:</strong> ensure custom <code>abiDefinition</code> is set properly if provided (<a href=\"https://github.com/embarklabs/embark/commit/b4b4848\" target=\"_blank\" rel=\"noopener\">b4b4848</a>)</li>\n</ul>\n"},{"title":"Embark 2.5.0","summary":"Today we're excited to announce the release of Embark 2.5.0! Read on for what's in it.","author":"iuri_matias","layout":"blog-post","_content":"\n## To Update to 2.5.0\n\nEmbark's npm package has changed from `embark-framework` to `embark`, this sometimes can create conflicts. To update, first uninstall embark-framework 1 to avoid any conflicts with `npm uninstall -g embark-framework` followed by `npm install -g embark`\n\nto update from 2.4.2:\n\n```\nnpm install -g embark@2.5\n```\n\nafterwards make sure `embark version` returns `2.5.0`.\n\n## In this release\n\nThis release updates to the lastest dependencies, fixes a few things and has a lot of work under the hood necessary for future releases.\n\n## Updates\n\n* support for geth 1.6.5\n* updated to use web3.js 0.19.11\n* updated to use solc 0.4.11\n\n## Misc Bugfixes and Improvements\n\n* `embark new` will now prompt for the dapp name if not specified as `embark new <yourDappName>`\n* embark.js: `ContractName.new()` as been added as an alias for `ContractName.deploy()`\n* embark.js: a method to easily send ether to a contract has been added: `ContractName.send(value, unit, options)` e.g `ContractName.send(2, \"ether\", {from: web3.eth.accounts[1]})`\n* orbit: Fix for orbit to make it work if the blockchain component is disabled\n* orbit: Use default config for orbit it none is specified in the config file\n* Demo app now has warning message for incompatible whisper versions\n* the JSON files of the contracts are now being outputted at dist/contracts/ (experimental)\n* whisper: Dashboard now displays the whisper version of the node\n* plugin API: extensions can now also be added as directories within the dapp directory\n* plugin API: plugins can now register a component to be displayed in the dashboard. e.g:\n\n```Javascript\nembark.registerServiceCheck('PluginService', function(cb) {\n if (someFunctionThatChecksTheService()) {\n cb({name: \"MyServiceName\", status: \"on\"});\n } else {\n cb({name: \"MyServiceName\", status: \"off\"});\n }\n});\n```\n\n## Thank you\n\nA big thanks to all that contributed to this release including [Nathan Hernandez](https://github.com/nathanph), [Antonio Tenorio-Fornés](https://github.com/atfornes), [Jon Johnson](https://github.com/jonjonsonjr), Andy Nogueira, [roo2](https://github.com/roo2), [Carl Mönnig](https://github.com/carlmon), [Michael Yeates](https://github.com/michaeljyeates), [Todd Baur](https://github.com/toadkicker), [黄俊钦](https://github.com/imtypist), [Ramiro Moreira](https://github.com/RamiroMoreira), [gregg dourgarian](https://github.com/greggdourgarian)\n\n## Chatroom\n\nTo discuss about Embark or Dapp development, please [join us at the gitter channel](https://gitter.im/iurimatias/embark-framework)\n\n","source":"_posts/2017-06-28-embark-2-5-released.md","raw":"title: Embark 2.5.0\nsummary: Today we're excited to announce the release of Embark 2.5.0! Read on for what's in it.\nauthor: iuri_matias\ncategories:\n - announcements\nlayout: blog-post\n---\n\n## To Update to 2.5.0\n\nEmbark's npm package has changed from `embark-framework` to `embark`, this sometimes can create conflicts. To update, first uninstall embark-framework 1 to avoid any conflicts with `npm uninstall -g embark-framework` followed by `npm install -g embark`\n\nto update from 2.4.2:\n\n```\nnpm install -g embark@2.5\n```\n\nafterwards make sure `embark version` returns `2.5.0`.\n\n## In this release\n\nThis release updates to the lastest dependencies, fixes a few things and has a lot of work under the hood necessary for future releases.\n\n## Updates\n\n* support for geth 1.6.5\n* updated to use web3.js 0.19.11\n* updated to use solc 0.4.11\n\n## Misc Bugfixes and Improvements\n\n* `embark new` will now prompt for the dapp name if not specified as `embark new <yourDappName>`\n* embark.js: `ContractName.new()` as been added as an alias for `ContractName.deploy()`\n* embark.js: a method to easily send ether to a contract has been added: `ContractName.send(value, unit, options)` e.g `ContractName.send(2, \"ether\", {from: web3.eth.accounts[1]})`\n* orbit: Fix for orbit to make it work if the blockchain component is disabled\n* orbit: Use default config for orbit it none is specified in the config file\n* Demo app now has warning message for incompatible whisper versions\n* the JSON files of the contracts are now being outputted at dist/contracts/ (experimental)\n* whisper: Dashboard now displays the whisper version of the node\n* plugin API: extensions can now also be added as directories within the dapp directory\n* plugin API: plugins can now register a component to be displayed in the dashboard. e.g:\n\n```Javascript\nembark.registerServiceCheck('PluginService', function(cb) {\n if (someFunctionThatChecksTheService()) {\n cb({name: \"MyServiceName\", status: \"on\"});\n } else {\n cb({name: \"MyServiceName\", status: \"off\"});\n }\n});\n```\n\n## Thank you\n\nA big thanks to all that contributed to this release including [Nathan Hernandez](https://github.com/nathanph), [Antonio Tenorio-Fornés](https://github.com/atfornes), [Jon Johnson](https://github.com/jonjonsonjr), Andy Nogueira, [roo2](https://github.com/roo2), [Carl Mönnig](https://github.com/carlmon), [Michael Yeates](https://github.com/michaeljyeates), [Todd Baur](https://github.com/toadkicker), [黄俊钦](https://github.com/imtypist), [Ramiro Moreira](https://github.com/RamiroMoreira), [gregg dourgarian](https://github.com/greggdourgarian)\n\n## Chatroom\n\nTo discuss about Embark or Dapp development, please [join us at the gitter channel](https://gitter.im/iurimatias/embark-framework)\n\n","slug":"embark-2-5-released","published":1,"date":"2017-06-28T04:00:00.000Z","updated":"2020-03-03T14:55:55.017Z","comments":1,"photos":[],"link":"","_id":"ck7c0li6y00229wtr8fboevmd","content":"<h2 id=\"To-Update-to-2-5-0\"><a href=\"#To-Update-to-2-5-0\" class=\"headerlink\" title=\"To Update to 2.5.0\"></a>To Update to 2.5.0</h2><p>Embark’s npm package has changed from <code>embark-framework</code> to <code>embark</code>, this sometimes can create conflicts. To update, first uninstall embark-framework 1 to avoid any conflicts with <code>npm uninstall -g embark-framework</code> followed by <code>npm install -g embark</code></p>\n<p>to update from 2.4.2:</p>\n<figure class=\"highlight plain\"><table><tr><td class=\"code\"><pre><span class=\"line\">npm install -g embark@2.5</span><br></pre></td></tr></table></figure>\n\n<p>afterwards make sure <code>embark version</code> returns <code>2.5.0</code>.</p>\n<h2 id=\"In-this-release\"><a href=\"#In-this-release\" class=\"headerlink\" title=\"In this release\"></a>In this release</h2><p>This release updates to the lastest dependencies, fixes a few things and has a lot of work under the hood necessary for future releases.</p>\n<h2 id=\"Updates\"><a href=\"#Updates\" class=\"headerlink\" title=\"Updates\"></a>Updates</h2><ul>\n<li>support for geth 1.6.5</li>\n<li>updated to use web3.js 0.19.11</li>\n<li>updated to use solc 0.4.11</li>\n</ul>\n<h2 id=\"Misc-Bugfixes-and-Improvements\"><a href=\"#Misc-Bugfixes-and-Improvements\" class=\"headerlink\" title=\"Misc Bugfixes and Improvements\"></a>Misc Bugfixes and Improvements</h2><ul>\n<li><code>embark new</code> will now prompt for the dapp name if not specified as <code>embark new <yourDappName></code></li>\n<li>embark.js: <code>ContractName.new()</code> as been added as an alias for <code>ContractName.deploy()</code></li>\n<li>embark.js: a method to easily send ether to a contract has been added: <code>ContractName.send(value, unit, options)</code> e.g <code>ContractName.send(2, "ether", {from: web3.eth.accounts[1]})</code></li>\n<li>orbit: Fix for orbit to make it work if the blockchain component is disabled</li>\n<li>orbit: Use default config for orbit it none is specified in the config file</li>\n<li>Demo app now has warning message for incompatible whisper versions</li>\n<li>the JSON files of the contracts are now being outputted at dist/contracts/ (experimental)</li>\n<li>whisper: Dashboard now displays the whisper version of the node</li>\n<li>plugin API: extensions can now also be added as directories within the dapp directory</li>\n<li>plugin API: plugins can now register a component to be displayed in the dashboard. e.g:</li>\n</ul>\n<figure class=\"highlight javascript\"><table><tr><td class=\"code\"><pre><span class=\"line\">embark.registerServiceCheck(<span class=\"string\">'PluginService'</span>, <span class=\"function\"><span class=\"keyword\">function</span>(<span class=\"params\">cb</span>) </span>{</span><br><span class=\"line\"> <span class=\"keyword\">if</span> (someFunctionThatChecksTheService()) {</span><br><span class=\"line\"> cb({<span class=\"attr\">name</span>: <span class=\"string\">\"MyServiceName\"</span>, <span class=\"attr\">status</span>: <span class=\"string\">\"on\"</span>});</span><br><span class=\"line\"> } <span class=\"keyword\">else</span> {</span><br><span class=\"line\"> cb({<span class=\"attr\">name</span>: <span class=\"string\">\"MyServiceName\"</span>, <span class=\"attr\">status</span>: <span class=\"string\">\"off\"</span>});</span><br><span class=\"line\"> }</span><br><span class=\"line\">});</span><br></pre></td></tr></table></figure>\n\n<h2 id=\"Thank-you\"><a href=\"#Thank-you\" class=\"headerlink\" title=\"Thank you\"></a>Thank you</h2><p>A big thanks to all that contributed to this release including <a href=\"https://github.com/nathanph\" target=\"_blank\" rel=\"noopener\">Nathan Hernandez</a>, <a href=\"https://github.com/atfornes\" target=\"_blank\" rel=\"noopener\">Antonio Tenorio-Fornés</a>, <a href=\"https://github.com/jonjonsonjr\" target=\"_blank\" rel=\"noopener\">Jon Johnson</a>, Andy Nogueira, <a href=\"https://github.com/roo2\" target=\"_blank\" rel=\"noopener\">roo2</a>, <a href=\"https://github.com/carlmon\" target=\"_blank\" rel=\"noopener\">Carl Mönnig</a>, <a href=\"https://github.com/michaeljyeates\" target=\"_blank\" rel=\"noopener\">Michael Yeates</a>, <a href=\"https://github.com/toadkicker\" target=\"_blank\" rel=\"noopener\">Todd Baur</a>, <a href=\"https://github.com/imtypist\" target=\"_blank\" rel=\"noopener\">黄俊钦</a>, <a href=\"https://github.com/RamiroMoreira\" target=\"_blank\" rel=\"noopener\">Ramiro Moreira</a>, <a href=\"https://github.com/greggdourgarian\" target=\"_blank\" rel=\"noopener\">gregg dourgarian</a></p>\n<h2 id=\"Chatroom\"><a href=\"#Chatroom\" class=\"headerlink\" title=\"Chatroom\"></a>Chatroom</h2><p>To discuss about Embark or Dapp development, please <a href=\"https://gitter.im/iurimatias/embark-framework\" target=\"_blank\" rel=\"noopener\">join us at the gitter channel</a></p>\n","site":{"data":{"authors":{"iuri_matias":{"name":"Iuri Matias","twitter":"iurimatias","image":"https://pbs.twimg.com/profile_images/928272512181563392/iDJdvy2k_400x400.jpg"},"pascal_precht":{"name":"Pascal Precht","twitter":"pascalprecht","image":"https://pbs.twimg.com/profile_images/993785060733194241/p3oAIMDP_400x400.jpg"},"anthony_laibe":{"name":"Anthony Laibe","twitter":"a_laibe","image":"https://pbs.twimg.com/profile_images/257742900/13168239_400x400.jpg"},"jonathan_rainville":{"name":"Jonathan Rainville","twitter":"ShyolGhul","image":"https://pbs.twimg.com/profile_images/993873866878570496/-aE4byjj_400x400.jpg"},"andre_medeiros":{"name":"Andre Medeiros","twitter":"superdealloc","image":"https://pbs.twimg.com/profile_images/965722487735701504/m58KNgWN_400x400.jpg"},"eric_mastro":{"name":"Eric Mastro","twitter":"ericmastro","image":"https://avatars1.githubusercontent.com/u/5089238?s=460&v=4"},"michael_bradley":{"name":"Michael Bradley","image":"https://avatars3.githubusercontent.com/u/194260?s=460&v=4"},"richard_ramos":{"name":"Richard Ramos","twitter":"richardramos_me","image":"https://devcon.org/images/speakers/richard_ramos.jpg"},"jonny_zerah":{"name":"Jonny Zerah","twitter":"jonnyzerah","image":"https://pbs.twimg.com/profile_images/1043774340490248192/gI9aGy17_400x400.jpg"},"robin_percy":{"name":"Robin Percy","twitter":"rbin","image":"https://avatars1.githubusercontent.com/u/29288325?s=400&v=4"}},"categories":{"tutorials":"Tutorials","announcements":"Announcements"},"languages":{"en":"English"}}},"excerpt":"","more":"<h2 id=\"To-Update-to-2-5-0\"><a href=\"#To-Update-to-2-5-0\" class=\"headerlink\" title=\"To Update to 2.5.0\"></a>To Update to 2.5.0</h2><p>Embark’s npm package has changed from <code>embark-framework</code> to <code>embark</code>, this sometimes can create conflicts. To update, first uninstall embark-framework 1 to avoid any conflicts with <code>npm uninstall -g embark-framework</code> followed by <code>npm install -g embark</code></p>\n<p>to update from 2.4.2:</p>\n<figure class=\"highlight plain\"><table><tr><td class=\"code\"><pre><span class=\"line\">npm install -g embark@2.5</span><br></pre></td></tr></table></figure>\n\n<p>afterwards make sure <code>embark version</code> returns <code>2.5.0</code>.</p>\n<h2 id=\"In-this-release\"><a href=\"#In-this-release\" class=\"headerlink\" title=\"In this release\"></a>In this release</h2><p>This release updates to the lastest dependencies, fixes a few things and has a lot of work under the hood necessary for future releases.</p>\n<h2 id=\"Updates\"><a href=\"#Updates\" class=\"headerlink\" title=\"Updates\"></a>Updates</h2><ul>\n<li>support for geth 1.6.5</li>\n<li>updated to use web3.js 0.19.11</li>\n<li>updated to use solc 0.4.11</li>\n</ul>\n<h2 id=\"Misc-Bugfixes-and-Improvements\"><a href=\"#Misc-Bugfixes-and-Improvements\" class=\"headerlink\" title=\"Misc Bugfixes and Improvements\"></a>Misc Bugfixes and Improvements</h2><ul>\n<li><code>embark new</code> will now prompt for the dapp name if not specified as <code>embark new <yourDappName></code></li>\n<li>embark.js: <code>ContractName.new()</code> as been added as an alias for <code>ContractName.deploy()</code></li>\n<li>embark.js: a method to easily send ether to a contract has been added: <code>ContractName.send(value, unit, options)</code> e.g <code>ContractName.send(2, "ether", {from: web3.eth.accounts[1]})</code></li>\n<li>orbit: Fix for orbit to make it work if the blockchain component is disabled</li>\n<li>orbit: Use default config for orbit it none is specified in the config file</li>\n<li>Demo app now has warning message for incompatible whisper versions</li>\n<li>the JSON files of the contracts are now being outputted at dist/contracts/ (experimental)</li>\n<li>whisper: Dashboard now displays the whisper version of the node</li>\n<li>plugin API: extensions can now also be added as directories within the dapp directory</li>\n<li>plugin API: plugins can now register a component to be displayed in the dashboard. e.g:</li>\n</ul>\n<figure class=\"highlight javascript\"><table><tr><td class=\"code\"><pre><span class=\"line\">embark.registerServiceCheck(<span class=\"string\">'PluginService'</span>, <span class=\"function\"><span class=\"keyword\">function</span>(<span class=\"params\">cb</span>) </span>{</span><br><span class=\"line\"> <span class=\"keyword\">if</span> (someFunctionThatChecksTheService()) {</span><br><span class=\"line\"> cb({<span class=\"attr\">name</span>: <span class=\"string\">\"MyServiceName\"</span>, <span class=\"attr\">status</span>: <span class=\"string\">\"on\"</span>});</span><br><span class=\"line\"> } <span class=\"keyword\">else</span> {</span><br><span class=\"line\"> cb({<span class=\"attr\">name</span>: <span class=\"string\">\"MyServiceName\"</span>, <span class=\"attr\">status</span>: <span class=\"string\">\"off\"</span>});</span><br><span class=\"line\"> }</span><br><span class=\"line\">});</span><br></pre></td></tr></table></figure>\n\n<h2 id=\"Thank-you\"><a href=\"#Thank-you\" class=\"headerlink\" title=\"Thank you\"></a>Thank you</h2><p>A big thanks to all that contributed to this release including <a href=\"https://github.com/nathanph\" target=\"_blank\" rel=\"noopener\">Nathan Hernandez</a>, <a href=\"https://github.com/atfornes\" target=\"_blank\" rel=\"noopener\">Antonio Tenorio-Fornés</a>, <a href=\"https://github.com/jonjonsonjr\" target=\"_blank\" rel=\"noopener\">Jon Johnson</a>, Andy Nogueira, <a href=\"https://github.com/roo2\" target=\"_blank\" rel=\"noopener\">roo2</a>, <a href=\"https://github.com/carlmon\" target=\"_blank\" rel=\"noopener\">Carl Mönnig</a>, <a href=\"https://github.com/michaeljyeates\" target=\"_blank\" rel=\"noopener\">Michael Yeates</a>, <a href=\"https://github.com/toadkicker\" target=\"_blank\" rel=\"noopener\">Todd Baur</a>, <a href=\"https://github.com/imtypist\" target=\"_blank\" rel=\"noopener\">黄俊钦</a>, <a href=\"https://github.com/RamiroMoreira\" target=\"_blank\" rel=\"noopener\">Ramiro Moreira</a>, <a href=\"https://github.com/greggdourgarian\" target=\"_blank\" rel=\"noopener\">gregg dourgarian</a></p>\n<h2 id=\"Chatroom\"><a href=\"#Chatroom\" class=\"headerlink\" title=\"Chatroom\"></a>Chatroom</h2><p>To discuss about Embark or Dapp development, please <a href=\"https://gitter.im/iurimatias/embark-framework\" target=\"_blank\" rel=\"noopener\">join us at the gitter channel</a></p>\n"},{"title":"WebAssembly / eWasm – What, and Why?","summary":"Apparently; WebAssembly became 'the fourth language for the web' a couple of years ago.. Find out what that means for the Decentralised Web (DApps & eWasm) in this article.","author":"robin_percy","layout":"blog-post","image":"/assets/images/eWASM-header.png","_content":"\n\n\n\n> *This article is the third in my series of articles based on the frontend of the decentralised web. Throughout the series we'll look at [Web3.js](/news/2019/12/09/web3-what-are-your-options/) & accessing the Ethereum Blockchain client-side, [frontend security for DApps](/news/2020/01/30/dapp-frontend-security/), how [eWasm / WebAssembly](/news/2020/02/18/wasm-eWasm-what-and-why/) has become the \"4th language of the web\", and we'll build a realtime Blockchain explorer app with Phoenix LiveView!*\n\n## Introduction\n\nAs I mentioned in the foreword of this article series; I read recently that WebAssembly (*Wasm*) has become the *4th language for the decentralised web*, and as I took time to really consider that notion, I came up with some points both for, and against it.\n\nWebAssembly is a way of taking code written in programming languages other than JavaScript and running that code in the browser.\n\nBasically; Wasm can be summarised as an ***efficient*** binary format. This binary format serves as a compilation target, which can be compiled to **execute at native speed**, by taking advantage of common hardware capabilities available over a range of platforms – including mobile and IoT.\n\nToday, I'd like to show you what I've discovered about *Wasm*, and in keeping with my **decentralised web frontend** series; in particular – [**eWasm** (Web Assembly for Ethereum)](https://eWasm.readthedocs.io/en/mkdocs/).\n\n> ***'Ethereum flavoured WebAssembly is a proposed redesign of the Ethereum Smart Contract execution layer using a deterministic subset of WebAssembly.'***\n\n\n\n## Firstly; Wasm Goals\n\nThe original design goals of WebAssembly are the following:\n\n - Fast: executes with near native code performance, taking advantage of capabilities common to all contemporary hardware.\n - Safe: code is validated and executes in a memory-safe, sandboxed environment preventing data corruption or security breaches.\n - Well-defined: fully and precisely defines valid programs and their behaviour in a way that is easy to reason about informally and formally.\n - Hardware-independent: can be compiled on all modern architectures, desktop or mobile devices and embedded systems alike.\n - Language-independent: does not privilege any particular language, programming model, or object model.\n - Platform-independent: can be embedded in browsers, run as a stand-alone VM, or integrated in other environments.\n - Open: programs can interoperate with their environment in a simple and universal manner.\n\nAs far as I can see, Wasm has indeed achieved the above goals.\n\n\n\n## How Wasm Works\n\nWebAssembly delivers significant performance gains because modern browser engines can parse and execute its binary format an order of magnitude faster than vanilla JavaScript itself. So; you can take C/C++ code, translate it into Wasm using a compiler tool, and load the generated Wasm module into a JavaScript app, where it will be executed by the browser.\n\n\n\nFrom what I've read, I believe one of the biggest ideas behind Wasm; is to make it possible to run media-rich game engines, and support such graphics-heavy games in-browser, without the use of plug-ins. It also has non-web applications such as the Internet of Things, mobile apps and JavaScript virtual machines.\n\n<iframe width=\"100%\" height=\"300\" src=\"https://www.youtube.com/embed/MaJCfdmr9Wg\" frameborder=\"0\" allow=\"accelerometer; autoplay; encrypted-media; gyroscope; picture-in-picture\" allowfullscreen></iframe>\n\nIf you want to get started with Wasm, you can download a precompiled toolchain to compile C/C++ to WebAssembly by running the following:\n\n```bash\n$ git clone https://github.com/emscripten-core/emsdk.git\n$ cd emsdk\n$ ./emsdk install latest\n$ ./emsdk activate latest\n```\n\n\n## Wasm to eWasm (Ethereum flavoured WebAssembly)\n\nGreat! Now that we have Wasm introduced, explained, and out-of-the-way, we can move onto the (arguably) more important topic – ***eWasm***! So.. what exactly is eWasm?\n\nSimply put; eWasm is a restricted subset of Wasm to be used for Smart Contracts in Ethereum. Much like Wasm, one of the biggest goals of eWasm is to be fast & efficient. To truly distinguish Ethereum as the *\"World Computer\",* we need to have a super performant VM. The current architecture of the VM is one of the greatest blockers to raw performance. \n\nAs I mentioned in the Wasm section above; WebAssembly aims to execute at near native speed by taking advantage of common hardware capabilities available on a wide range of platforms. This will open the door for Ethereum to a wide array of uses that require performance/throughput.\n\nSecurity is another key goal. With the added performance gains from eWasm we will be able to implement parts of Ethereum such as the precompiled Smart Contract in the VM itself which will minimise our trusted computing base. WebAssembly is currently being designed as an open standard by a W3C Community Group and is actively being developed by engineers from Mozilla, Google, Microsoft, and Apple.\n\n\n\n## eWasm Goals\n\nGoals of the eWasm project:\n\n - To provide a specification of eWasm Smart Contract semantics and the Ethereum interface.\n - To provide an EVM transcompiler, preferably as an eWasm Smart Contract.\n - To provide a VM implementation for executing eWasm Smart Contracts.\n - To implement an eWasm backend in the Solidity compiler.\n - To provide a library and instructions for writing Smart Contracts in Rust.\n - To provide a library and instructions for writing Smart Contracts in C.\n - To provide a *metering injector**, preferably as an eWasm Smart Contract.\n\n**Metering injector* is a transformation tool inserting metering code to an eWasm Smart Contract.\n\n**Toolchain Compatibility:** A LLVM front-end for Wasm is part of the MVP. This will allow developers to write Smart Contracts and reuse applications written in common languages such as C/C++, go and rust.\n\n**Portability**: Wasm is targeted to be deployed in all the major web browsers which will result in it being one of the most widely deployed VM architecture. Smart Contracts compiled to eWasm will share compatibility with any standard Wasm environment. Which will make running a program either directly on Ethereum, on a cloud hosting environment, or on one's local machine - a frictionless process.\n\n**Optional And Flexible Metering:** Metering the VM adds overhead but is essential for running untrusted code. If code is trusted, then metering maybe optional. eWasm defines metering as an optional layer to accommodate for these usecases.\n\n\n## eWasm Performance\n\nThis chart shows the Wasm-based EVM setting new performance records in a typical sha1 benchmark experiment. It is shown here against *Evmone* (a C++ implementation) and *Cita-vm* (a rust implementation).\n\n \n\nI took this benchmark directly from the eWasm GitHub, I didn't run the tests myself. You can find the full details, alongside more benchmark testing [here.](https://github.com/eWasm/benchmarking#sha1)\n\n\n## eWasm and Embark\n\nWith Status / Embark being at the forefront of Decentralised technology; naturally we are very on-board with eWasm and the improvements it brings to the EVM.\n\nCheck out two of our extremely talented engineers; [Pascal](https://twitter.com/PascalPrecht) and [Eric](https://twitter.com/ericmastro) giving a talk on eWasm at Devcon 5:\n\n<iframe width=\"100%\" height=\"315\" src=\"https://www.youtube-nocookie.com/embed/t2LgFXxcFtc\" frameborder=\"0\" allow=\"accelerometer; autoplay; encrypted-media; gyroscope; picture-in-picture\" allowfullscreen></iframe>\n\n\n\n## Conclusion\n\nSince its launch a couple of years ago; *Wasm* has grown from an impressive concept into an even-more-impressive piece of technology. Alongside which a flourishing community has grown. \n\nAlthough, personally, I have my reservations in agreeing with the statement that *Wasm* is the \"most significant new technology to come to the web platform in a decade\"... It definitely **is** impressive, and I can certainly see how & why it has made a good impact, and does have a lot of devs working on relative tooling and implementations. This was an interesting (albeit old) article I just stumbled across this morning: [Life: A secure, blazing-fast, cross-platform WebAssembly VM in Go.](https://medium.com/perlin-network/life-a-secure-blazing-fast-cross-platform-webassembly-vm-in-go-ea3b31fa6e09)\n\nBetween Wasm & eWasm, I'm excited to see the performance boosts we can achieve as they grow, and as our own DApp development grows. I'd love to find an excuse to build out a big piece of technology with eWasm, but this *would* be a big project that I just don't have time for right now!\n\nThanks again for reading my series on DApp frontend. The next (and unfortunately) final article in the series will be released next week, and is sure to be a **real humdinger!** We'll be building a realtime crypto/blockchain tracker app using Elixir & [Phoenix's](https://www.phoenixframework.org/) newly popular [LiveView!](https://github.com/phoenixframework/phoenix_live_view)\n\n\n[ **- @rbin**](https://twitter.com/rbin)\n","source":"_posts/2020-02-24-wasm-ewasm-what-and-why.md","raw":"title: WebAssembly / eWasm – What, and Why?\nsummary: \"Apparently; WebAssembly became 'the fourth language for the web' a couple of years ago.. Find out what that means for the Decentralised Web (DApps & eWasm) in this article.\"\nauthor: robin_percy\ncategories:\n - tutorials\nlayout: blog-post\nimage: '/assets/images/eWASM-header.png'\n---\n\n\n\n\n> *This article is the third in my series of articles based on the frontend of the decentralised web. Throughout the series we'll look at [Web3.js](/news/2019/12/09/web3-what-are-your-options/) & accessing the Ethereum Blockchain client-side, [frontend security for DApps](/news/2020/01/30/dapp-frontend-security/), how [eWasm / WebAssembly](/news/2020/02/18/wasm-eWasm-what-and-why/) has become the \"4th language of the web\", and we'll build a realtime Blockchain explorer app with Phoenix LiveView!*\n\n## Introduction\n\nAs I mentioned in the foreword of this article series; I read recently that WebAssembly (*Wasm*) has become the *4th language for the decentralised web*, and as I took time to really consider that notion, I came up with some points both for, and against it.\n\nWebAssembly is a way of taking code written in programming languages other than JavaScript and running that code in the browser.\n\nBasically; Wasm can be summarised as an ***efficient*** binary format. This binary format serves as a compilation target, which can be compiled to **execute at native speed**, by taking advantage of common hardware capabilities available over a range of platforms – including mobile and IoT.\n\nToday, I'd like to show you what I've discovered about *Wasm*, and in keeping with my **decentralised web frontend** series; in particular – [**eWasm** (Web Assembly for Ethereum)](https://eWasm.readthedocs.io/en/mkdocs/).\n\n> ***'Ethereum flavoured WebAssembly is a proposed redesign of the Ethereum Smart Contract execution layer using a deterministic subset of WebAssembly.'***\n\n\n\n## Firstly; Wasm Goals\n\nThe original design goals of WebAssembly are the following:\n\n - Fast: executes with near native code performance, taking advantage of capabilities common to all contemporary hardware.\n - Safe: code is validated and executes in a memory-safe, sandboxed environment preventing data corruption or security breaches.\n - Well-defined: fully and precisely defines valid programs and their behaviour in a way that is easy to reason about informally and formally.\n - Hardware-independent: can be compiled on all modern architectures, desktop or mobile devices and embedded systems alike.\n - Language-independent: does not privilege any particular language, programming model, or object model.\n - Platform-independent: can be embedded in browsers, run as a stand-alone VM, or integrated in other environments.\n - Open: programs can interoperate with their environment in a simple and universal manner.\n\nAs far as I can see, Wasm has indeed achieved the above goals.\n\n\n\n## How Wasm Works\n\nWebAssembly delivers significant performance gains because modern browser engines can parse and execute its binary format an order of magnitude faster than vanilla JavaScript itself. So; you can take C/C++ code, translate it into Wasm using a compiler tool, and load the generated Wasm module into a JavaScript app, where it will be executed by the browser.\n\n\n\nFrom what I've read, I believe one of the biggest ideas behind Wasm; is to make it possible to run media-rich game engines, and support such graphics-heavy games in-browser, without the use of plug-ins. It also has non-web applications such as the Internet of Things, mobile apps and JavaScript virtual machines.\n\n<iframe width=\"100%\" height=\"300\" src=\"https://www.youtube.com/embed/MaJCfdmr9Wg\" frameborder=\"0\" allow=\"accelerometer; autoplay; encrypted-media; gyroscope; picture-in-picture\" allowfullscreen></iframe>\n\nIf you want to get started with Wasm, you can download a precompiled toolchain to compile C/C++ to WebAssembly by running the following:\n\n```bash\n$ git clone https://github.com/emscripten-core/emsdk.git\n$ cd emsdk\n$ ./emsdk install latest\n$ ./emsdk activate latest\n```\n\n\n## Wasm to eWasm (Ethereum flavoured WebAssembly)\n\nGreat! Now that we have Wasm introduced, explained, and out-of-the-way, we can move onto the (arguably) more important topic – ***eWasm***! So.. what exactly is eWasm?\n\nSimply put; eWasm is a restricted subset of Wasm to be used for Smart Contracts in Ethereum. Much like Wasm, one of the biggest goals of eWasm is to be fast & efficient. To truly distinguish Ethereum as the *\"World Computer\",* we need to have a super performant VM. The current architecture of the VM is one of the greatest blockers to raw performance. \n\nAs I mentioned in the Wasm section above; WebAssembly aims to execute at near native speed by taking advantage of common hardware capabilities available on a wide range of platforms. This will open the door for Ethereum to a wide array of uses that require performance/throughput.\n\nSecurity is another key goal. With the added performance gains from eWasm we will be able to implement parts of Ethereum such as the precompiled Smart Contract in the VM itself which will minimise our trusted computing base. WebAssembly is currently being designed as an open standard by a W3C Community Group and is actively being developed by engineers from Mozilla, Google, Microsoft, and Apple.\n\n\n\n## eWasm Goals\n\nGoals of the eWasm project:\n\n - To provide a specification of eWasm Smart Contract semantics and the Ethereum interface.\n - To provide an EVM transcompiler, preferably as an eWasm Smart Contract.\n - To provide a VM implementation for executing eWasm Smart Contracts.\n - To implement an eWasm backend in the Solidity compiler.\n - To provide a library and instructions for writing Smart Contracts in Rust.\n - To provide a library and instructions for writing Smart Contracts in C.\n - To provide a *metering injector**, preferably as an eWasm Smart Contract.\n\n**Metering injector* is a transformation tool inserting metering code to an eWasm Smart Contract.\n\n**Toolchain Compatibility:** A LLVM front-end for Wasm is part of the MVP. This will allow developers to write Smart Contracts and reuse applications written in common languages such as C/C++, go and rust.\n\n**Portability**: Wasm is targeted to be deployed in all the major web browsers which will result in it being one of the most widely deployed VM architecture. Smart Contracts compiled to eWasm will share compatibility with any standard Wasm environment. Which will make running a program either directly on Ethereum, on a cloud hosting environment, or on one's local machine - a frictionless process.\n\n**Optional And Flexible Metering:** Metering the VM adds overhead but is essential for running untrusted code. If code is trusted, then metering maybe optional. eWasm defines metering as an optional layer to accommodate for these usecases.\n\n\n## eWasm Performance\n\nThis chart shows the Wasm-based EVM setting new performance records in a typical sha1 benchmark experiment. It is shown here against *Evmone* (a C++ implementation) and *Cita-vm* (a rust implementation).\n\n \n\nI took this benchmark directly from the eWasm GitHub, I didn't run the tests myself. You can find the full details, alongside more benchmark testing [here.](https://github.com/eWasm/benchmarking#sha1)\n\n\n## eWasm and Embark\n\nWith Status / Embark being at the forefront of Decentralised technology; naturally we are very on-board with eWasm and the improvements it brings to the EVM.\n\nCheck out two of our extremely talented engineers; [Pascal](https://twitter.com/PascalPrecht) and [Eric](https://twitter.com/ericmastro) giving a talk on eWasm at Devcon 5:\n\n<iframe width=\"100%\" height=\"315\" src=\"https://www.youtube-nocookie.com/embed/t2LgFXxcFtc\" frameborder=\"0\" allow=\"accelerometer; autoplay; encrypted-media; gyroscope; picture-in-picture\" allowfullscreen></iframe>\n\n\n\n## Conclusion\n\nSince its launch a couple of years ago; *Wasm* has grown from an impressive concept into an even-more-impressive piece of technology. Alongside which a flourishing community has grown. \n\nAlthough, personally, I have my reservations in agreeing with the statement that *Wasm* is the \"most significant new technology to come to the web platform in a decade\"... It definitely **is** impressive, and I can certainly see how & why it has made a good impact, and does have a lot of devs working on relative tooling and implementations. This was an interesting (albeit old) article I just stumbled across this morning: [Life: A secure, blazing-fast, cross-platform WebAssembly VM in Go.](https://medium.com/perlin-network/life-a-secure-blazing-fast-cross-platform-webassembly-vm-in-go-ea3b31fa6e09)\n\nBetween Wasm & eWasm, I'm excited to see the performance boosts we can achieve as they grow, and as our own DApp development grows. I'd love to find an excuse to build out a big piece of technology with eWasm, but this *would* be a big project that I just don't have time for right now!\n\nThanks again for reading my series on DApp frontend. The next (and unfortunately) final article in the series will be released next week, and is sure to be a **real humdinger!** We'll be building a realtime crypto/blockchain tracker app using Elixir & [Phoenix's](https://www.phoenixframework.org/) newly popular [LiveView!](https://github.com/phoenixframework/phoenix_live_view)\n\n\n[ **- @rbin**](https://twitter.com/rbin)\n","slug":"wasm-ewasm-what-and-why","published":1,"date":"2020-02-24T05:00:00.000Z","updated":"2020-03-09T17:43:28.179Z","_id":"ck7c0li7200249wtr1c6p9m2u","comments":1,"photos":[],"link":"","content":"<p><img src=\"/assets/images/eWASM-header.png\" alt=\"eWasm\"></p>\n<blockquote>\n<p><em>This article is the third in my series of articles based on the frontend of the decentralised web. Throughout the series we’ll look at <a href=\"/news/2019/12/09/web3-what-are-your-options/\">Web3.js</a> & accessing the Ethereum Blockchain client-side, <a href=\"/news/2020/01/30/dapp-frontend-security/\">frontend security for DApps</a>, how <a href=\"/news/2020/02/18/wasm-eWasm-what-and-why/\">eWasm / WebAssembly</a> has become the “4th language of the web”, and we’ll build a realtime Blockchain explorer app with Phoenix LiveView!</em></p>\n</blockquote>\n<h2 id=\"Introduction\"><a href=\"#Introduction\" class=\"headerlink\" title=\"Introduction\"></a>Introduction</h2><p>As I mentioned in the foreword of this article series; I read recently that WebAssembly (<em>Wasm</em>) has become the <em>4th language for the decentralised web</em>, and as I took time to really consider that notion, I came up with some points both for, and against it.</p>\n<p>WebAssembly is a way of taking code written in programming languages other than JavaScript and running that code in the browser.</p>\n<p>Basically; Wasm can be summarised as an <strong><em>efficient</em></strong> binary format. This binary format serves as a compilation target, which can be compiled to <strong>execute at native speed</strong>, by taking advantage of common hardware capabilities available over a range of platforms – including mobile and IoT.</p>\n<p>Today, I’d like to show you what I’ve discovered about <em>Wasm</em>, and in keeping with my <strong>decentralised web frontend</strong> series; in particular – <a href=\"https://eWasm.readthedocs.io/en/mkdocs/\"><strong>eWasm</strong> (Web Assembly for Ethereum)</a>.</p>\n<blockquote>\n<p><strong><em>‘Ethereum flavoured WebAssembly is a proposed redesign of the Ethereum Smart Contract execution layer using a deterministic subset of WebAssembly.’</em></strong></p>\n</blockquote>\n<h2 id=\"Firstly-Wasm-Goals\"><a href=\"#Firstly-Wasm-Goals\" class=\"headerlink\" title=\"Firstly; Wasm Goals\"></a>Firstly; Wasm Goals</h2><p>The original design goals of WebAssembly are the following:</p>\n<ul>\n<li>Fast: executes with near native code performance, taking advantage of capabilities common to all contemporary hardware.</li>\n<li>Safe: code is validated and executes in a memory-safe, sandboxed environment preventing data corruption or security breaches.</li>\n<li>Well-defined: fully and precisely defines valid programs and their behaviour in a way that is easy to reason about informally and formally.</li>\n<li>Hardware-independent: can be compiled on all modern architectures, desktop or mobile devices and embedded systems alike.</li>\n<li>Language-independent: does not privilege any particular language, programming model, or object model.</li>\n<li>Platform-independent: can be embedded in browsers, run as a stand-alone VM, or integrated in other environments.</li>\n<li>Open: programs can interoperate with their environment in a simple and universal manner.</li>\n</ul>\n<p>As far as I can see, Wasm has indeed achieved the above goals.</p>\n<h2 id=\"How-Wasm-Works\"><a href=\"#How-Wasm-Works\" class=\"headerlink\" title=\"How Wasm Works\"></a>How Wasm Works</h2><p>WebAssembly delivers significant performance gains because modern browser engines can parse and execute its binary format an order of magnitude faster than vanilla JavaScript itself. So; you can take C/C++ code, translate it into Wasm using a compiler tool, and load the generated Wasm module into a JavaScript app, where it will be executed by the browser.</p>\n<p><img src=\"/assets/images/wasm_explorer_online_app.png\" alt=\"wasm editor\"></p>\n<p>From what I’ve read, I believe one of the biggest ideas behind Wasm; is to make it possible to run media-rich game engines, and support such graphics-heavy games in-browser, without the use of plug-ins. It also has non-web applications such as the Internet of Things, mobile apps and JavaScript virtual machines.</p>\n<iframe width=\"100%\" height=\"300\" src=\"https://www.youtube.com/embed/MaJCfdmr9Wg\" frameborder=\"0\" allow=\"accelerometer; autoplay; encrypted-media; gyroscope; picture-in-picture\" allowfullscreen></iframe>\n\n<p>If you want to get started with Wasm, you can download a precompiled toolchain to compile C/C++ to WebAssembly by running the following:</p>\n<figure class=\"highlight bash\"><table><tr><td class=\"code\"><pre><span class=\"line\">$ git <span class=\"built_in\">clone</span> https://github.com/emscripten-core/emsdk.git</span><br><span class=\"line\">$ <span class=\"built_in\">cd</span> emsdk</span><br><span class=\"line\">$ ./emsdk install latest</span><br><span class=\"line\">$ ./emsdk activate latest</span><br></pre></td></tr></table></figure>\n\n\n<h2 id=\"Wasm-to-eWasm-Ethereum-flavoured-WebAssembly\"><a href=\"#Wasm-to-eWasm-Ethereum-flavoured-WebAssembly\" class=\"headerlink\" title=\"Wasm to eWasm (Ethereum flavoured WebAssembly)\"></a>Wasm to eWasm (Ethereum flavoured WebAssembly)</h2><p>Great! Now that we have Wasm introduced, explained, and out-of-the-way, we can move onto the (arguably) more important topic – <strong><em>eWasm</em></strong>! So.. what exactly is eWasm?</p>\n<p>Simply put; eWasm is a restricted subset of Wasm to be used for Smart Contracts in Ethereum. Much like Wasm, one of the biggest goals of eWasm is to be fast & efficient. To truly distinguish Ethereum as the *”World Computer”,* we need to have a super performant VM. The current architecture of the VM is one of the greatest blockers to raw performance. </p>\n<p>As I mentioned in the Wasm section above; WebAssembly aims to execute at near native speed by taking advantage of common hardware capabilities available on a wide range of platforms. This will open the door for Ethereum to a wide array of uses that require performance/throughput.</p>\n<p>Security is another key goal. With the added performance gains from eWasm we will be able to implement parts of Ethereum such as the precompiled Smart Contract in the VM itself which will minimise our trusted computing base. WebAssembly is currently being designed as an open standard by a W3C Community Group and is actively being developed by engineers from Mozilla, Google, Microsoft, and Apple.</p>\n<h2 id=\"eWasm-Goals\"><a href=\"#eWasm-Goals\" class=\"headerlink\" title=\"eWasm Goals\"></a>eWasm Goals</h2><p>Goals of the eWasm project:</p>\n<ul>\n<li>To provide a specification of eWasm Smart Contract semantics and the Ethereum interface.</li>\n<li>To provide an EVM transcompiler, preferably as an eWasm Smart Contract.</li>\n<li>To provide a VM implementation for executing eWasm Smart Contracts.</li>\n<li>To implement an eWasm backend in the Solidity compiler.</li>\n<li>To provide a library and instructions for writing Smart Contracts in Rust.</li>\n<li>To provide a library and instructions for writing Smart Contracts in C.</li>\n<li>To provide a <em>metering injector*</em>, preferably as an eWasm Smart Contract.</li>\n</ul>\n<p><em>*Metering injector</em> is a transformation tool inserting metering code to an eWasm Smart Contract.</p>\n<p><strong>Toolchain Compatibility:</strong> A LLVM front-end for Wasm is part of the MVP. This will allow developers to write Smart Contracts and reuse applications written in common languages such as C/C++, go and rust.</p>\n<p><strong>Portability</strong>: Wasm is targeted to be deployed in all the major web browsers which will result in it being one of the most widely deployed VM architecture. Smart Contracts compiled to eWasm will share compatibility with any standard Wasm environment. Which will make running a program either directly on Ethereum, on a cloud hosting environment, or on one’s local machine - a frictionless process.</p>\n<p><strong>Optional And Flexible Metering:</strong> Metering the VM adds overhead but is essential for running untrusted code. If code is trusted, then metering maybe optional. eWasm defines metering as an optional layer to accommodate for these usecases.</p>\n<h2 id=\"eWasm-Performance\"><a href=\"#eWasm-Performance\" class=\"headerlink\" title=\"eWasm Performance\"></a>eWasm Performance</h2><p>This chart shows the Wasm-based EVM setting new performance records in a typical sha1 benchmark experiment. It is shown here against <em>Evmone</em> (a C++ implementation) and <em>Cita-vm</em> (a rust implementation).</p>\n<p><img src=\"/assets/images/wasm-evm-benchmarks.png\" alt=\"Wasm EVM benchmarking\"> </p>\n<p>I took this benchmark directly from the eWasm GitHub, I didn’t run the tests myself. You can find the full details, alongside more benchmark testing <a href=\"https://github.com/eWasm/benchmarking#sha1\">here.</a></p>\n<h2 id=\"eWasm-and-Embark\"><a href=\"#eWasm-and-Embark\" class=\"headerlink\" title=\"eWasm and Embark\"></a>eWasm and Embark</h2><p>With Status / Embark being at the forefront of Decentralised technology; naturally we are very on-board with eWasm and the improvements it brings to the EVM.</p>\n<p>Check out two of our extremely talented engineers; <a href=\"https://twitter.com/PascalPrecht\">Pascal</a> and <a href=\"https://twitter.com/ericmastro\">Eric</a> giving a talk on eWasm at Devcon 5:</p>\n<iframe width=\"100%\" height=\"315\" src=\"https://www.youtube-nocookie.com/embed/t2LgFXxcFtc\" frameborder=\"0\" allow=\"accelerometer; autoplay; encrypted-media; gyroscope; picture-in-picture\" allowfullscreen></iframe>\n\n\n\n<h2 id=\"Conclusion\"><a href=\"#Conclusion\" class=\"headerlink\" title=\"Conclusion\"></a>Conclusion</h2><p>Since its launch a couple of years ago; <em>Wasm</em> has grown from an impressive concept into an even-more-impressive piece of technology. Alongside which a flourishing community has grown. </p>\n<p>Although, personally, I have my reservations in agreeing with the statement that <em>Wasm</em> is the “most significant new technology to come to the web platform in a decade”… It definitely <strong>is</strong> impressive, and I can certainly see how & why it has made a good impact, and does have a lot of devs working on relative tooling and implementations. This was an interesting (albeit old) article I just stumbled across this morning: <a href=\"https://medium.com/perlin-network/life-a-secure-blazing-fast-cross-platform-webassembly-vm-in-go-ea3b31fa6e09\">Life: A secure, blazing-fast, cross-platform WebAssembly VM in Go.</a></p>\n<p>Between Wasm & eWasm, I’m excited to see the performance boosts we can achieve as they grow, and as our own DApp development grows. I’d love to find an excuse to build out a big piece of technology with eWasm, but this <em>would</em> be a big project that I just don’t have time for right now!</p>\n<p>Thanks again for reading my series on DApp frontend. The next (and unfortunately) final article in the series will be released next week, and is sure to be a <strong>real humdinger!</strong> We’ll be building a realtime crypto/blockchain tracker app using Elixir & <a href=\"https://www.phoenixframework.org/\">Phoenix’s</a> newly popular <a href=\"https://github.com/phoenixframework/phoenix_live_view\">LiveView!</a></p>\n<p><a href=\"https://twitter.com/rbin\"> <strong>- @rbin</strong></a></p>\n","site":{"data":{"authors":{"iuri_matias":{"name":"Iuri Matias","twitter":"iurimatias","image":"https://pbs.twimg.com/profile_images/928272512181563392/iDJdvy2k_400x400.jpg"},"pascal_precht":{"name":"Pascal Precht","twitter":"pascalprecht","image":"https://pbs.twimg.com/profile_images/993785060733194241/p3oAIMDP_400x400.jpg"},"anthony_laibe":{"name":"Anthony Laibe","twitter":"a_laibe","image":"https://pbs.twimg.com/profile_images/257742900/13168239_400x400.jpg"},"jonathan_rainville":{"name":"Jonathan Rainville","twitter":"ShyolGhul","image":"https://pbs.twimg.com/profile_images/993873866878570496/-aE4byjj_400x400.jpg"},"andre_medeiros":{"name":"Andre Medeiros","twitter":"superdealloc","image":"https://pbs.twimg.com/profile_images/965722487735701504/m58KNgWN_400x400.jpg"},"eric_mastro":{"name":"Eric Mastro","twitter":"ericmastro","image":"https://avatars1.githubusercontent.com/u/5089238?s=460&v=4"},"michael_bradley":{"name":"Michael Bradley","image":"https://avatars3.githubusercontent.com/u/194260?s=460&v=4"},"richard_ramos":{"name":"Richard Ramos","twitter":"richardramos_me","image":"https://devcon.org/images/speakers/richard_ramos.jpg"},"jonny_zerah":{"name":"Jonny Zerah","twitter":"jonnyzerah","image":"https://pbs.twimg.com/profile_images/1043774340490248192/gI9aGy17_400x400.jpg"},"robin_percy":{"name":"Robin Percy","twitter":"rbin","image":"https://avatars1.githubusercontent.com/u/29288325?s=400&v=4"}},"categories":{"tutorials":"Tutorials","announcements":"Announcements"},"languages":{"en":"English"}}},"excerpt":"","more":"<p><img src=\"/assets/images/eWASM-header.png\" alt=\"eWasm\"></p>\n<blockquote>\n<p><em>This article is the third in my series of articles based on the frontend of the decentralised web. Throughout the series we’ll look at <a href=\"/news/2019/12/09/web3-what-are-your-options/\">Web3.js</a> & accessing the Ethereum Blockchain client-side, <a href=\"/news/2020/01/30/dapp-frontend-security/\">frontend security for DApps</a>, how <a href=\"/news/2020/02/18/wasm-eWasm-what-and-why/\">eWasm / WebAssembly</a> has become the “4th language of the web”, and we’ll build a realtime Blockchain explorer app with Phoenix LiveView!</em></p>\n</blockquote>\n<h2 id=\"Introduction\"><a href=\"#Introduction\" class=\"headerlink\" title=\"Introduction\"></a>Introduction</h2><p>As I mentioned in the foreword of this article series; I read recently that WebAssembly (<em>Wasm</em>) has become the <em>4th language for the decentralised web</em>, and as I took time to really consider that notion, I came up with some points both for, and against it.</p>\n<p>WebAssembly is a way of taking code written in programming languages other than JavaScript and running that code in the browser.</p>\n<p>Basically; Wasm can be summarised as an <strong><em>efficient</em></strong> binary format. This binary format serves as a compilation target, which can be compiled to <strong>execute at native speed</strong>, by taking advantage of common hardware capabilities available over a range of platforms – including mobile and IoT.</p>\n<p>Today, I’d like to show you what I’ve discovered about <em>Wasm</em>, and in keeping with my <strong>decentralised web frontend</strong> series; in particular – <a href=\"https://eWasm.readthedocs.io/en/mkdocs/\"><strong>eWasm</strong> (Web Assembly for Ethereum)</a>.</p>\n<blockquote>\n<p><strong><em>‘Ethereum flavoured WebAssembly is a proposed redesign of the Ethereum Smart Contract execution layer using a deterministic subset of WebAssembly.’</em></strong></p>\n</blockquote>\n<h2 id=\"Firstly-Wasm-Goals\"><a href=\"#Firstly-Wasm-Goals\" class=\"headerlink\" title=\"Firstly; Wasm Goals\"></a>Firstly; Wasm Goals</h2><p>The original design goals of WebAssembly are the following:</p>\n<ul>\n<li>Fast: executes with near native code performance, taking advantage of capabilities common to all contemporary hardware.</li>\n<li>Safe: code is validated and executes in a memory-safe, sandboxed environment preventing data corruption or security breaches.</li>\n<li>Well-defined: fully and precisely defines valid programs and their behaviour in a way that is easy to reason about informally and formally.</li>\n<li>Hardware-independent: can be compiled on all modern architectures, desktop or mobile devices and embedded systems alike.</li>\n<li>Language-independent: does not privilege any particular language, programming model, or object model.</li>\n<li>Platform-independent: can be embedded in browsers, run as a stand-alone VM, or integrated in other environments.</li>\n<li>Open: programs can interoperate with their environment in a simple and universal manner.</li>\n</ul>\n<p>As far as I can see, Wasm has indeed achieved the above goals.</p>\n<h2 id=\"How-Wasm-Works\"><a href=\"#How-Wasm-Works\" class=\"headerlink\" title=\"How Wasm Works\"></a>How Wasm Works</h2><p>WebAssembly delivers significant performance gains because modern browser engines can parse and execute its binary format an order of magnitude faster than vanilla JavaScript itself. So; you can take C/C++ code, translate it into Wasm using a compiler tool, and load the generated Wasm module into a JavaScript app, where it will be executed by the browser.</p>\n<p><img src=\"/assets/images/wasm_explorer_online_app.png\" alt=\"wasm editor\"></p>\n<p>From what I’ve read, I believe one of the biggest ideas behind Wasm; is to make it possible to run media-rich game engines, and support such graphics-heavy games in-browser, without the use of plug-ins. It also has non-web applications such as the Internet of Things, mobile apps and JavaScript virtual machines.</p>\n<iframe width=\"100%\" height=\"300\" src=\"https://www.youtube.com/embed/MaJCfdmr9Wg\" frameborder=\"0\" allow=\"accelerometer; autoplay; encrypted-media; gyroscope; picture-in-picture\" allowfullscreen></iframe>\n\n<p>If you want to get started with Wasm, you can download a precompiled toolchain to compile C/C++ to WebAssembly by running the following:</p>\n<figure class=\"highlight bash\"><table><tr><td class=\"code\"><pre><span class=\"line\">$ git <span class=\"built_in\">clone</span> https://github.com/emscripten-core/emsdk.git</span><br><span class=\"line\">$ <span class=\"built_in\">cd</span> emsdk</span><br><span class=\"line\">$ ./emsdk install latest</span><br><span class=\"line\">$ ./emsdk activate latest</span><br></pre></td></tr></table></figure>\n\n\n<h2 id=\"Wasm-to-eWasm-Ethereum-flavoured-WebAssembly\"><a href=\"#Wasm-to-eWasm-Ethereum-flavoured-WebAssembly\" class=\"headerlink\" title=\"Wasm to eWasm (Ethereum flavoured WebAssembly)\"></a>Wasm to eWasm (Ethereum flavoured WebAssembly)</h2><p>Great! Now that we have Wasm introduced, explained, and out-of-the-way, we can move onto the (arguably) more important topic – <strong><em>eWasm</em></strong>! So.. what exactly is eWasm?</p>\n<p>Simply put; eWasm is a restricted subset of Wasm to be used for Smart Contracts in Ethereum. Much like Wasm, one of the biggest goals of eWasm is to be fast & efficient. To truly distinguish Ethereum as the *”World Computer”,* we need to have a super performant VM. The current architecture of the VM is one of the greatest blockers to raw performance. </p>\n<p>As I mentioned in the Wasm section above; WebAssembly aims to execute at near native speed by taking advantage of common hardware capabilities available on a wide range of platforms. This will open the door for Ethereum to a wide array of uses that require performance/throughput.</p>\n<p>Security is another key goal. With the added performance gains from eWasm we will be able to implement parts of Ethereum such as the precompiled Smart Contract in the VM itself which will minimise our trusted computing base. WebAssembly is currently being designed as an open standard by a W3C Community Group and is actively being developed by engineers from Mozilla, Google, Microsoft, and Apple.</p>\n<h2 id=\"eWasm-Goals\"><a href=\"#eWasm-Goals\" class=\"headerlink\" title=\"eWasm Goals\"></a>eWasm Goals</h2><p>Goals of the eWasm project:</p>\n<ul>\n<li>To provide a specification of eWasm Smart Contract semantics and the Ethereum interface.</li>\n<li>To provide an EVM transcompiler, preferably as an eWasm Smart Contract.</li>\n<li>To provide a VM implementation for executing eWasm Smart Contracts.</li>\n<li>To implement an eWasm backend in the Solidity compiler.</li>\n<li>To provide a library and instructions for writing Smart Contracts in Rust.</li>\n<li>To provide a library and instructions for writing Smart Contracts in C.</li>\n<li>To provide a <em>metering injector*</em>, preferably as an eWasm Smart Contract.</li>\n</ul>\n<p><em>*Metering injector</em> is a transformation tool inserting metering code to an eWasm Smart Contract.</p>\n<p><strong>Toolchain Compatibility:</strong> A LLVM front-end for Wasm is part of the MVP. This will allow developers to write Smart Contracts and reuse applications written in common languages such as C/C++, go and rust.</p>\n<p><strong>Portability</strong>: Wasm is targeted to be deployed in all the major web browsers which will result in it being one of the most widely deployed VM architecture. Smart Contracts compiled to eWasm will share compatibility with any standard Wasm environment. Which will make running a program either directly on Ethereum, on a cloud hosting environment, or on one’s local machine - a frictionless process.</p>\n<p><strong>Optional And Flexible Metering:</strong> Metering the VM adds overhead but is essential for running untrusted code. If code is trusted, then metering maybe optional. eWasm defines metering as an optional layer to accommodate for these usecases.</p>\n<h2 id=\"eWasm-Performance\"><a href=\"#eWasm-Performance\" class=\"headerlink\" title=\"eWasm Performance\"></a>eWasm Performance</h2><p>This chart shows the Wasm-based EVM setting new performance records in a typical sha1 benchmark experiment. It is shown here against <em>Evmone</em> (a C++ implementation) and <em>Cita-vm</em> (a rust implementation).</p>\n<p><img src=\"/assets/images/wasm-evm-benchmarks.png\" alt=\"Wasm EVM benchmarking\"> </p>\n<p>I took this benchmark directly from the eWasm GitHub, I didn’t run the tests myself. You can find the full details, alongside more benchmark testing <a href=\"https://github.com/eWasm/benchmarking#sha1\">here.</a></p>\n<h2 id=\"eWasm-and-Embark\"><a href=\"#eWasm-and-Embark\" class=\"headerlink\" title=\"eWasm and Embark\"></a>eWasm and Embark</h2><p>With Status / Embark being at the forefront of Decentralised technology; naturally we are very on-board with eWasm and the improvements it brings to the EVM.</p>\n<p>Check out two of our extremely talented engineers; <a href=\"https://twitter.com/PascalPrecht\">Pascal</a> and <a href=\"https://twitter.com/ericmastro\">Eric</a> giving a talk on eWasm at Devcon 5:</p>\n<iframe width=\"100%\" height=\"315\" src=\"https://www.youtube-nocookie.com/embed/t2LgFXxcFtc\" frameborder=\"0\" allow=\"accelerometer; autoplay; encrypted-media; gyroscope; picture-in-picture\" allowfullscreen></iframe>\n\n\n\n<h2 id=\"Conclusion\"><a href=\"#Conclusion\" class=\"headerlink\" title=\"Conclusion\"></a>Conclusion</h2><p>Since its launch a couple of years ago; <em>Wasm</em> has grown from an impressive concept into an even-more-impressive piece of technology. Alongside which a flourishing community has grown. </p>\n<p>Although, personally, I have my reservations in agreeing with the statement that <em>Wasm</em> is the “most significant new technology to come to the web platform in a decade”… It definitely <strong>is</strong> impressive, and I can certainly see how & why it has made a good impact, and does have a lot of devs working on relative tooling and implementations. This was an interesting (albeit old) article I just stumbled across this morning: <a href=\"https://medium.com/perlin-network/life-a-secure-blazing-fast-cross-platform-webassembly-vm-in-go-ea3b31fa6e09\">Life: A secure, blazing-fast, cross-platform WebAssembly VM in Go.</a></p>\n<p>Between Wasm & eWasm, I’m excited to see the performance boosts we can achieve as they grow, and as our own DApp development grows. I’d love to find an excuse to build out a big piece of technology with eWasm, but this <em>would</em> be a big project that I just don’t have time for right now!</p>\n<p>Thanks again for reading my series on DApp frontend. The next (and unfortunately) final article in the series will be released next week, and is sure to be a <strong>real humdinger!</strong> We’ll be building a realtime crypto/blockchain tracker app using Elixir & <a href=\"https://www.phoenixframework.org/\">Phoenix’s</a> newly popular <a href=\"https://github.com/phoenixframework/phoenix_live_view\">LiveView!</a></p>\n<p><a href=\"https://twitter.com/rbin\"> <strong>- @rbin</strong></a></p>\n"},{"title":"2020 Blockchain Developer Report","summary":"2020 Blockchain Developer Report was created to guage the thoughts and feelings of the blockchain developer community. Learn how devs are feeling about this space.","author":"graham_mcbain","layout":"blog-post","image":"/assets/images/Header_Banner.png","_content":"\n\n\n## Abstract\nThe blockchain developer mindset is not well understood. This survey initiative was created in an effort to shed light on the current sentiment in the blockchain developer community. The echo chamber of crypto Twitter doesn’t allow for thoughtful discussion, and we felt there was a need for a survey of the community outside of that forum. Though our sample size is small we are happy with the input we received from developers around the world. \n\nIn addition to the survey form we conducted interviews on Zoom to ask more detailed questions. This community is truly global in scope. What is most apparent from this survey is that the world of blockchain development is just getting started, and there is more we can do to make it accessible to those looking to invest their time in learning about this exciting technology. \n\nThe main takeaways of this study are:\nPopular sentiment on Crypto Twitter does not represent blockchain developer attitudes\nThere is general interest in developing across chains, and across public/enterprise blockchain platforms\nDevelopers care about decentralization, but don’t believe it is something the general public cares about at all\n\n## Methodology\nFor this inaugural survey we focused on the sentiments of developers in the Ethereum community to access the significant volume of work that occurs in Ethereum. Next year we will expand the sample to a much broader swath of the blockchain community. \n\nWe focused on three key areas of questioning in this survey: \n - Technology\n - Sentiment\n - Motivation\n\nWithin these sections we hoped to understand better how developers are spending their time and what drives them to be a part of this industry. We used a qualitative, open-ended question method in order to generate a broad range of ideas. In future studies we will use this data to develop more precise attitude and behavior measures.\n\n## Chains\nOf all respondents surveyed, a little under fifty five percent identified as exclusively developing on Ethereum. While many responded that they develop on many platforms including Ethereum, only six percent of respondents said they do no development work on Ethereum, excluding EVM compatible chains, that number drops to two percent. \n\n\n\n\nWhat was surprising was the number of people who are working on EVM compatible chains (cue RUN EVM T-Shirts.) The most popular of these were EOS and and Cosmos in that order. What was perhaps most surprising was the fact that Lightning Network was more popular than any EVM compatible platform. This is most surprising because very little effort was made to get this survey in the hands of Lightning developers. This means either Lightning devs participated at a higher per capita rate than Ethereum devs, or that many Ethereum devs are self selecting to learn about Lightning. \n\nResponses to this question show that Ethereum still dominates mindshare in the Ethereum community, but there is a diversity of effort happening. It will be interesting to see how these results develop over time, especially considering the concern around ETH2 expressed later in the survey.\n\n## Tools\nThe developer tools section was dominated by Truffle Suite with 68% of respondents saying they use it predominantly. As an early Ethereum project, this project deserves a lot of credit for making it easier to get into Ethereum development than other chains. On the framework side of things Embark came in close second with 34% of developers reporting using the toolsets. \n\n \n \nThat little green sliver is one of the more interesting findings. We anticipated that there would be some who were experimenting with Lightning development but were surprised to find that number reaching close to 10% of respondents. With the recent announcement from Lightning Labs that they are rolling out Loop, a non-custodial Bitcoin to Lighting on-ramp/off-ramp, we’re excited to see where this community goes over the next few months. It will also be useful to see how Lightning developers differ from Ethereum-only, or other EVM developers in future studies.\n\n## Motivation\n\n\n\nThere were a small number of participants who answered that their reason for being interested in blockchain development is to “make number go up”. Beyond the financial motivation, most people gave more than one answer to these questions. Among the most popular were smart contracts and their composable business logic. \n\nWhat was surprising was that philosophical reasoning wasn’t given more broadly. We had expected almost everyone to select censorship resistance and sound money for their reasoning to join crypto. As it stands only 28% gave these answers. DeFi, DAOs, and NFTs made a strong showing with close to half of responded saying they were a motivation. There seems to be a healthy mix of motivations for getting into the blockchain developer ecosystem. \n\n\n## Public/Private Chains\nPopular sentiment among the crypto community is that private chains are not really a serious endeavor. Enterprise chains have gotten off to a slow start ever since the “blockchain not Bitcoin” movement of the 2015 era. Given this, we were surprised to see a strong interest in developing for these projects. \n\n\n\nOver half of respondents indicated their interest in building on private chains, when you include those willing to do it, “for a price” that number jumps to over three quarters. The remaining quarter have varying degrees of opposition to building on private chains. We can see the arguments on Twitter forming, “what do you consider a private chain?” Though we could have done a better job clarifying, this question was intended to mean an enterprise chain. It was refreshing to see the willingness of people to work on things that are outside the overton window that crypto Twitter advocates for.\n\n\n## Perception of public sentiment\nBack in the wild days of 2017 it was believed you could take any business model, throw the word Decentralized in front of it and people would flock to you. While this may have been true in the sense that people would throw money at your ICO, it hasn’t yet proven true in the race for acquiring real users. \n\n\n\nIn our survey we saw that a majority of developers agreed that they don’t believe users care about decentralization. This has been adopted by companies like Brave and Dharma which have adopted marketing that either doesn’t mention crypto at all or mentions it as a side note. That being said, decentralization was in fact important to developers with a majority of respondents saying that while users may not care, the developers still do.\n\n\n## ETH2 perception\n\n\n\nAs should be clear from the chart, an overwhelming majority of developers in this survey are concerned about ETH2 and its implications. The people working on ETH2 are heads down solving really hard problems. However, this response speaks to the need for better communication of the work that is happening, the problems and solutions involved, timelines, and what it will mean for developers in Ethereum in time.\n\nOne interesting finding is the small minority of users who are not at all concerned about ETH2. When digging deeper on calls some engineers mentioned that they have done research and understand the complexity involved in bringing it online. Perhaps the answer is DYOR and not believing the naysayers on Twitter, or perhaps outreach and better communication to combat ETH2 critics could ease concerns.\n \n## Who are you building for?\n\n\n\nWe wanted to see what type of reach people are getting with their dapps. We were excited to see that more than a few people had over five thousand users on their platform. Over six percent of developers said they have over a thousand users. On the other side of this however over ninety percent said that they have less than a thousand daily active users on their dapps. \n\nWe’re excited to see these numbers change over the next year. There are some outlier applications like Brave with twelve million active users, but we hope to see even more breakout successes such as the recent launch of Dharma’s mainstream focused application. \n\nImpediments to blockchain development\nWe asked people what their biggest impediments are to building blockchain tools. In our Zoom interviews we had a lot of input on this question. The general feedback was that the learning required is vast. One interviewee said that learning web3 development was as difficult as learning to become a developer at all. The other interesting anecdote was the ‘analysis paralysis’ that comes from choosing which ecosystem/chain to work on. \n\n\nThis question gave the most diverse set of opinions, and many developers chose more than one response. Unsurprisingly, ‘private key management/education” eked out a win as the most popular response. We hadn’t expected regulatory clarity to be such a large issue, but it was also substantial. Though not the most popular answer, we would postulate that this is actually the part of the reason we don’t see more founders getting into crypto. It’s hard enough to build a company, let alone one that has a threat of prosecution hanging over it. \n\n\n## Conclusion\n\n## Several key findings stand out from this report:\n - Gitcoin respondents overwhelmingly selected Ethereum as the chain to work on, but also worked on other platforms including Bitcoin\n - Truffle remains the dominant developer toolkit for Ethereum, with Embark taking a smaller share of the use\n - The technical properties of blockchain are the main drivers for a developer choosing to get into the space\n - Private chains are an appealing option for developers interested in working full time in blockchain space\n - Developers are under no illusions that the public cares about decentralization, but they themselves do hold that ideal as important\n - The majority of developers surveyed are concerned about ETH2 and its implications for the future of Ethereum\n - Most dApps still have under a thousand daily active users\n - Regulatory clarity and private key management are still major impediments to the creation of dApps\n\nWhat was most interesting however was the 1:1 interviews we conducted. We spoke to devs in Russia, Japan, the US and Egypt. These less formal interviews helped put a face on the developers. What was apparent among these people was the deep passion for the potential of this technology. People all over the world are coming into crypto with open minds and open hearts.\n\nWe can often feel like getting into crypto now is getting in “late”, but nothing could be further from the truth. The developer experience is still clunky. The learning curve is still steep. The regulation is still ambiguous. There is almost no aspect of being a developer in blockchain that could be considered “mature.”\n\nGetting to peer into the mind of blockchain developers is something that needs to be done more often to ensure that we’re building the right tools to help foster growth in decentralized public development. We’re hoping to make this an annual report and welcome more input on distribution, categorization and methodology. \n\nAs the current crypto winter thaws we’re starting to see shoots of new growth. It’s an exciting time to be in cryptocurrency, even more so as a developer. Thank you to all the people who participated in this survey, and especially the team at Gitcoin for making it possible. We’re proud to be part of this ecosystem and look forward to supporting more developers as they come into the space. \n\n\n\n\n\n","source":"_posts/2020-03-04-2020-Blockchain-Developer-Survey.md","raw":"title: 2020 Blockchain Developer Report\nsummary: \"2020 Blockchain Developer Report was created to guage the thoughts and feelings of the blockchain developer community. Learn how devs are feeling about this space.\"\nauthor: graham_mcbain\ncategories:\n - Report\nlayout: blog-post\nimage: '/assets/images/Header_Banner.png'\n---\n\n\n\n## Abstract\nThe blockchain developer mindset is not well understood. This survey initiative was created in an effort to shed light on the current sentiment in the blockchain developer community. The echo chamber of crypto Twitter doesn’t allow for thoughtful discussion, and we felt there was a need for a survey of the community outside of that forum. Though our sample size is small we are happy with the input we received from developers around the world. \n\nIn addition to the survey form we conducted interviews on Zoom to ask more detailed questions. This community is truly global in scope. What is most apparent from this survey is that the world of blockchain development is just getting started, and there is more we can do to make it accessible to those looking to invest their time in learning about this exciting technology. \n\nThe main takeaways of this study are:\nPopular sentiment on Crypto Twitter does not represent blockchain developer attitudes\nThere is general interest in developing across chains, and across public/enterprise blockchain platforms\nDevelopers care about decentralization, but don’t believe it is something the general public cares about at all\n\n## Methodology\nFor this inaugural survey we focused on the sentiments of developers in the Ethereum community to access the significant volume of work that occurs in Ethereum. Next year we will expand the sample to a much broader swath of the blockchain community. \n\nWe focused on three key areas of questioning in this survey: \n - Technology\n - Sentiment\n - Motivation\n\nWithin these sections we hoped to understand better how developers are spending their time and what drives them to be a part of this industry. We used a qualitative, open-ended question method in order to generate a broad range of ideas. In future studies we will use this data to develop more precise attitude and behavior measures.\n\n## Chains\nOf all respondents surveyed, a little under fifty five percent identified as exclusively developing on Ethereum. While many responded that they develop on many platforms including Ethereum, only six percent of respondents said they do no development work on Ethereum, excluding EVM compatible chains, that number drops to two percent. \n\n\n\n\nWhat was surprising was the number of people who are working on EVM compatible chains (cue RUN EVM T-Shirts.) The most popular of these were EOS and and Cosmos in that order. What was perhaps most surprising was the fact that Lightning Network was more popular than any EVM compatible platform. This is most surprising because very little effort was made to get this survey in the hands of Lightning developers. This means either Lightning devs participated at a higher per capita rate than Ethereum devs, or that many Ethereum devs are self selecting to learn about Lightning. \n\nResponses to this question show that Ethereum still dominates mindshare in the Ethereum community, but there is a diversity of effort happening. It will be interesting to see how these results develop over time, especially considering the concern around ETH2 expressed later in the survey.\n\n## Tools\nThe developer tools section was dominated by Truffle Suite with 68% of respondents saying they use it predominantly. As an early Ethereum project, this project deserves a lot of credit for making it easier to get into Ethereum development than other chains. On the framework side of things Embark came in close second with 34% of developers reporting using the toolsets. \n\n \n \nThat little green sliver is one of the more interesting findings. We anticipated that there would be some who were experimenting with Lightning development but were surprised to find that number reaching close to 10% of respondents. With the recent announcement from Lightning Labs that they are rolling out Loop, a non-custodial Bitcoin to Lighting on-ramp/off-ramp, we’re excited to see where this community goes over the next few months. It will also be useful to see how Lightning developers differ from Ethereum-only, or other EVM developers in future studies.\n\n## Motivation\n\n\n\nThere were a small number of participants who answered that their reason for being interested in blockchain development is to “make number go up”. Beyond the financial motivation, most people gave more than one answer to these questions. Among the most popular were smart contracts and their composable business logic. \n\nWhat was surprising was that philosophical reasoning wasn’t given more broadly. We had expected almost everyone to select censorship resistance and sound money for their reasoning to join crypto. As it stands only 28% gave these answers. DeFi, DAOs, and NFTs made a strong showing with close to half of responded saying they were a motivation. There seems to be a healthy mix of motivations for getting into the blockchain developer ecosystem. \n\n\n## Public/Private Chains\nPopular sentiment among the crypto community is that private chains are not really a serious endeavor. Enterprise chains have gotten off to a slow start ever since the “blockchain not Bitcoin” movement of the 2015 era. Given this, we were surprised to see a strong interest in developing for these projects. \n\n\n\nOver half of respondents indicated their interest in building on private chains, when you include those willing to do it, “for a price” that number jumps to over three quarters. The remaining quarter have varying degrees of opposition to building on private chains. We can see the arguments on Twitter forming, “what do you consider a private chain?” Though we could have done a better job clarifying, this question was intended to mean an enterprise chain. It was refreshing to see the willingness of people to work on things that are outside the overton window that crypto Twitter advocates for.\n\n\n## Perception of public sentiment\nBack in the wild days of 2017 it was believed you could take any business model, throw the word Decentralized in front of it and people would flock to you. While this may have been true in the sense that people would throw money at your ICO, it hasn’t yet proven true in the race for acquiring real users. \n\n\n\nIn our survey we saw that a majority of developers agreed that they don’t believe users care about decentralization. This has been adopted by companies like Brave and Dharma which have adopted marketing that either doesn’t mention crypto at all or mentions it as a side note. That being said, decentralization was in fact important to developers with a majority of respondents saying that while users may not care, the developers still do.\n\n\n## ETH2 perception\n\n\n\nAs should be clear from the chart, an overwhelming majority of developers in this survey are concerned about ETH2 and its implications. The people working on ETH2 are heads down solving really hard problems. However, this response speaks to the need for better communication of the work that is happening, the problems and solutions involved, timelines, and what it will mean for developers in Ethereum in time.\n\nOne interesting finding is the small minority of users who are not at all concerned about ETH2. When digging deeper on calls some engineers mentioned that they have done research and understand the complexity involved in bringing it online. Perhaps the answer is DYOR and not believing the naysayers on Twitter, or perhaps outreach and better communication to combat ETH2 critics could ease concerns.\n \n## Who are you building for?\n\n\n\nWe wanted to see what type of reach people are getting with their dapps. We were excited to see that more than a few people had over five thousand users on their platform. Over six percent of developers said they have over a thousand users. On the other side of this however over ninety percent said that they have less than a thousand daily active users on their dapps. \n\nWe’re excited to see these numbers change over the next year. There are some outlier applications like Brave with twelve million active users, but we hope to see even more breakout successes such as the recent launch of Dharma’s mainstream focused application. \n\nImpediments to blockchain development\nWe asked people what their biggest impediments are to building blockchain tools. In our Zoom interviews we had a lot of input on this question. The general feedback was that the learning required is vast. One interviewee said that learning web3 development was as difficult as learning to become a developer at all. The other interesting anecdote was the ‘analysis paralysis’ that comes from choosing which ecosystem/chain to work on. \n\n\nThis question gave the most diverse set of opinions, and many developers chose more than one response. Unsurprisingly, ‘private key management/education” eked out a win as the most popular response. We hadn’t expected regulatory clarity to be such a large issue, but it was also substantial. Though not the most popular answer, we would postulate that this is actually the part of the reason we don’t see more founders getting into crypto. It’s hard enough to build a company, let alone one that has a threat of prosecution hanging over it. \n\n\n## Conclusion\n\n## Several key findings stand out from this report:\n - Gitcoin respondents overwhelmingly selected Ethereum as the chain to work on, but also worked on other platforms including Bitcoin\n - Truffle remains the dominant developer toolkit for Ethereum, with Embark taking a smaller share of the use\n - The technical properties of blockchain are the main drivers for a developer choosing to get into the space\n - Private chains are an appealing option for developers interested in working full time in blockchain space\n - Developers are under no illusions that the public cares about decentralization, but they themselves do hold that ideal as important\n - The majority of developers surveyed are concerned about ETH2 and its implications for the future of Ethereum\n - Most dApps still have under a thousand daily active users\n - Regulatory clarity and private key management are still major impediments to the creation of dApps\n\nWhat was most interesting however was the 1:1 interviews we conducted. We spoke to devs in Russia, Japan, the US and Egypt. These less formal interviews helped put a face on the developers. What was apparent among these people was the deep passion for the potential of this technology. People all over the world are coming into crypto with open minds and open hearts.\n\nWe can often feel like getting into crypto now is getting in “late”, but nothing could be further from the truth. The developer experience is still clunky. The learning curve is still steep. The regulation is still ambiguous. There is almost no aspect of being a developer in blockchain that could be considered “mature.”\n\nGetting to peer into the mind of blockchain developers is something that needs to be done more often to ensure that we’re building the right tools to help foster growth in decentralized public development. We’re hoping to make this an annual report and welcome more input on distribution, categorization and methodology. \n\nAs the current crypto winter thaws we’re starting to see shoots of new growth. It’s an exciting time to be in cryptocurrency, even more so as a developer. Thank you to all the people who participated in this survey, and especially the team at Gitcoin for making it possible. We’re proud to be part of this ecosystem and look forward to supporting more developers as they come into the space. \n\n\n\n\n\n","slug":"2020-Blockchain-Developer-Survey","published":1,"date":"2020-03-04T05:00:00.000Z","updated":"2020-03-09T17:43:28.180Z","comments":1,"photos":[],"link":"","_id":"ck7kr9s3d0000u0t4cd7ec10o","content":"<p><img src=\"/assets/images/Header_Banner.png\" alt=\"2020 Developer Survey\"></p>\n<h2 id=\"Abstract\"><a href=\"#Abstract\" class=\"headerlink\" title=\"Abstract\"></a>Abstract</h2><p>The blockchain developer mindset is not well understood. This survey initiative was created in an effort to shed light on the current sentiment in the blockchain developer community. The echo chamber of crypto Twitter doesn’t allow for thoughtful discussion, and we felt there was a need for a survey of the community outside of that forum. Though our sample size is small we are happy with the input we received from developers around the world. </p>\n<p>In addition to the survey form we conducted interviews on Zoom to ask more detailed questions. This community is truly global in scope. What is most apparent from this survey is that the world of blockchain development is just getting started, and there is more we can do to make it accessible to those looking to invest their time in learning about this exciting technology. </p>\n<p>The main takeaways of this study are:<br>Popular sentiment on Crypto Twitter does not represent blockchain developer attitudes<br>There is general interest in developing across chains, and across public/enterprise blockchain platforms<br>Developers care about decentralization, but don’t believe it is something the general public cares about at all</p>\n<h2 id=\"Methodology\"><a href=\"#Methodology\" class=\"headerlink\" title=\"Methodology\"></a>Methodology</h2><p>For this inaugural survey we focused on the sentiments of developers in the Ethereum community to access the significant volume of work that occurs in Ethereum. Next year we will expand the sample to a much broader swath of the blockchain community. </p>\n<p>We focused on three key areas of questioning in this survey: </p>\n<ul>\n<li>Technology</li>\n<li>Sentiment</li>\n<li>Motivation</li>\n</ul>\n<p>Within these sections we hoped to understand better how developers are spending their time and what drives them to be a part of this industry. We used a qualitative, open-ended question method in order to generate a broad range of ideas. In future studies we will use this data to develop more precise attitude and behavior measures.</p>\n<h2 id=\"Chains\"><a href=\"#Chains\" class=\"headerlink\" title=\"Chains\"></a>Chains</h2><p>Of all respondents surveyed, a little under fifty five percent identified as exclusively developing on Ethereum. While many responded that they develop on many platforms including Ethereum, only six percent of respondents said they do no development work on Ethereum, excluding EVM compatible chains, that number drops to two percent. </p>\n<p><img src=\"/assets/images/Chains.png\" alt=\"Chains\"></p>\n<p>What was surprising was the number of people who are working on EVM compatible chains (cue RUN EVM T-Shirts.) The most popular of these were EOS and and Cosmos in that order. What was perhaps most surprising was the fact that Lightning Network was more popular than any EVM compatible platform. This is most surprising because very little effort was made to get this survey in the hands of Lightning developers. This means either Lightning devs participated at a higher per capita rate than Ethereum devs, or that many Ethereum devs are self selecting to learn about Lightning. </p>\n<p>Responses to this question show that Ethereum still dominates mindshare in the Ethereum community, but there is a diversity of effort happening. It will be interesting to see how these results develop over time, especially considering the concern around ETH2 expressed later in the survey.</p>\n<h2 id=\"Tools\"><a href=\"#Tools\" class=\"headerlink\" title=\"Tools\"></a>Tools</h2><p>The developer tools section was dominated by Truffle Suite with 68% of respondents saying they use it predominantly. As an early Ethereum project, this project deserves a lot of credit for making it easier to get into Ethereum development than other chains. On the framework side of things Embark came in close second with 34% of developers reporting using the toolsets. </p>\n<p> <img src=\"/assets/images/tools.png\" alt=\"Tools\"></p>\n<p>That little green sliver is one of the more interesting findings. We anticipated that there would be some who were experimenting with Lightning development but were surprised to find that number reaching close to 10% of respondents. With the recent announcement from Lightning Labs that they are rolling out Loop, a non-custodial Bitcoin to Lighting on-ramp/off-ramp, we’re excited to see where this community goes over the next few months. It will also be useful to see how Lightning developers differ from Ethereum-only, or other EVM developers in future studies.</p>\n<h2 id=\"Motivation\"><a href=\"#Motivation\" class=\"headerlink\" title=\"Motivation\"></a>Motivation</h2><p><img src=\"/assets/images/motivations.png\" alt=\"Motivation\"></p>\n<p>There were a small number of participants who answered that their reason for being interested in blockchain development is to “make number go up”. Beyond the financial motivation, most people gave more than one answer to these questions. Among the most popular were smart contracts and their composable business logic. </p>\n<p>What was surprising was that philosophical reasoning wasn’t given more broadly. We had expected almost everyone to select censorship resistance and sound money for their reasoning to join crypto. As it stands only 28% gave these answers. DeFi, DAOs, and NFTs made a strong showing with close to half of responded saying they were a motivation. There seems to be a healthy mix of motivations for getting into the blockchain developer ecosystem. </p>\n<h2 id=\"Public-Private-Chains\"><a href=\"#Public-Private-Chains\" class=\"headerlink\" title=\"Public/Private Chains\"></a>Public/Private Chains</h2><p>Popular sentiment among the crypto community is that private chains are not really a serious endeavor. Enterprise chains have gotten off to a slow start ever since the “blockchain not Bitcoin” movement of the 2015 era. Given this, we were surprised to see a strong interest in developing for these projects. </p>\n<p><img src=\"/assets/images/Public_Private_Chains.png\" alt=\"Public/Private Chains\"></p>\n<p>Over half of respondents indicated their interest in building on private chains, when you include those willing to do it, “for a price” that number jumps to over three quarters. The remaining quarter have varying degrees of opposition to building on private chains. We can see the arguments on Twitter forming, “what do you consider a private chain?” Though we could have done a better job clarifying, this question was intended to mean an enterprise chain. It was refreshing to see the willingness of people to work on things that are outside the overton window that crypto Twitter advocates for.</p>\n<h2 id=\"Perception-of-public-sentiment\"><a href=\"#Perception-of-public-sentiment\" class=\"headerlink\" title=\"Perception of public sentiment\"></a>Perception of public sentiment</h2><p>Back in the wild days of 2017 it was believed you could take any business model, throw the word Decentralized in front of it and people would flock to you. While this may have been true in the sense that people would throw money at your ICO, it hasn’t yet proven true in the race for acquiring real users. </p>\n<p><img src=\"/assets/images/Perception_of_public_sentiment.png\" alt=\"Perception of public sentiment\"></p>\n<p>In our survey we saw that a majority of developers agreed that they don’t believe users care about decentralization. This has been adopted by companies like Brave and Dharma which have adopted marketing that either doesn’t mention crypto at all or mentions it as a side note. That being said, decentralization was in fact important to developers with a majority of respondents saying that while users may not care, the developers still do.</p>\n<h2 id=\"ETH2-perception\"><a href=\"#ETH2-perception\" class=\"headerlink\" title=\"ETH2 perception\"></a>ETH2 perception</h2><p><img src=\"/assets/images/ETH2_perception.png\" alt=\"ETH2 Perception\"></p>\n<p>As should be clear from the chart, an overwhelming majority of developers in this survey are concerned about ETH2 and its implications. The people working on ETH2 are heads down solving really hard problems. However, this response speaks to the need for better communication of the work that is happening, the problems and solutions involved, timelines, and what it will mean for developers in Ethereum in time.</p>\n<p>One interesting finding is the small minority of users who are not at all concerned about ETH2. When digging deeper on calls some engineers mentioned that they have done research and understand the complexity involved in bringing it online. Perhaps the answer is DYOR and not believing the naysayers on Twitter, or perhaps outreach and better communication to combat ETH2 critics could ease concerns.</p>\n<h2 id=\"Who-are-you-building-for\"><a href=\"#Who-are-you-building-for\" class=\"headerlink\" title=\"Who are you building for?\"></a>Who are you building for?</h2><p><img src=\"/assets/images/Who_are_you_building_for.png\" alt=\"Who are you building for?\"></p>\n<p>We wanted to see what type of reach people are getting with their dapps. We were excited to see that more than a few people had over five thousand users on their platform. Over six percent of developers said they have over a thousand users. On the other side of this however over ninety percent said that they have less than a thousand daily active users on their dapps. </p>\n<p>We’re excited to see these numbers change over the next year. There are some outlier applications like Brave with twelve million active users, but we hope to see even more breakout successes such as the recent launch of Dharma’s mainstream focused application. </p>\n<p>Impediments to blockchain development<br>We asked people what their biggest impediments are to building blockchain tools. In our Zoom interviews we had a lot of input on this question. The general feedback was that the learning required is vast. One interviewee said that learning web3 development was as difficult as learning to become a developer at all. The other interesting anecdote was the ‘analysis paralysis’ that comes from choosing which ecosystem/chain to work on. </p>\n<p>This question gave the most diverse set of opinions, and many developers chose more than one response. Unsurprisingly, ‘private key management/education” eked out a win as the most popular response. We hadn’t expected regulatory clarity to be such a large issue, but it was also substantial. Though not the most popular answer, we would postulate that this is actually the part of the reason we don’t see more founders getting into crypto. It’s hard enough to build a company, let alone one that has a threat of prosecution hanging over it. </p>\n<h2 id=\"Conclusion\"><a href=\"#Conclusion\" class=\"headerlink\" title=\"Conclusion\"></a>Conclusion</h2><h2 id=\"Several-key-findings-stand-out-from-this-report\"><a href=\"#Several-key-findings-stand-out-from-this-report\" class=\"headerlink\" title=\"Several key findings stand out from this report:\"></a>Several key findings stand out from this report:</h2><ul>\n<li>Gitcoin respondents overwhelmingly selected Ethereum as the chain to work on, but also worked on other platforms including Bitcoin</li>\n<li>Truffle remains the dominant developer toolkit for Ethereum, with Embark taking a smaller share of the use</li>\n<li>The technical properties of blockchain are the main drivers for a developer choosing to get into the space</li>\n<li>Private chains are an appealing option for developers interested in working full time in blockchain space</li>\n<li>Developers are under no illusions that the public cares about decentralization, but they themselves do hold that ideal as important</li>\n<li>The majority of developers surveyed are concerned about ETH2 and its implications for the future of Ethereum</li>\n<li>Most dApps still have under a thousand daily active users</li>\n<li>Regulatory clarity and private key management are still major impediments to the creation of dApps</li>\n</ul>\n<p>What was most interesting however was the 1:1 interviews we conducted. We spoke to devs in Russia, Japan, the US and Egypt. These less formal interviews helped put a face on the developers. What was apparent among these people was the deep passion for the potential of this technology. People all over the world are coming into crypto with open minds and open hearts.</p>\n<p>We can often feel like getting into crypto now is getting in “late”, but nothing could be further from the truth. The developer experience is still clunky. The learning curve is still steep. The regulation is still ambiguous. There is almost no aspect of being a developer in blockchain that could be considered “mature.”</p>\n<p>Getting to peer into the mind of blockchain developers is something that needs to be done more often to ensure that we’re building the right tools to help foster growth in decentralized public development. We’re hoping to make this an annual report and welcome more input on distribution, categorization and methodology. </p>\n<p>As the current crypto winter thaws we’re starting to see shoots of new growth. It’s an exciting time to be in cryptocurrency, even more so as a developer. Thank you to all the people who participated in this survey, and especially the team at Gitcoin for making it possible. We’re proud to be part of this ecosystem and look forward to supporting more developers as they come into the space. </p>\n","site":{"data":{"authors":{"iuri_matias":{"name":"Iuri Matias","twitter":"iurimatias","image":"https://pbs.twimg.com/profile_images/928272512181563392/iDJdvy2k_400x400.jpg"},"pascal_precht":{"name":"Pascal Precht","twitter":"pascalprecht","image":"https://pbs.twimg.com/profile_images/993785060733194241/p3oAIMDP_400x400.jpg"},"anthony_laibe":{"name":"Anthony Laibe","twitter":"a_laibe","image":"https://pbs.twimg.com/profile_images/257742900/13168239_400x400.jpg"},"jonathan_rainville":{"name":"Jonathan Rainville","twitter":"ShyolGhul","image":"https://pbs.twimg.com/profile_images/993873866878570496/-aE4byjj_400x400.jpg"},"andre_medeiros":{"name":"Andre Medeiros","twitter":"superdealloc","image":"https://pbs.twimg.com/profile_images/965722487735701504/m58KNgWN_400x400.jpg"},"eric_mastro":{"name":"Eric Mastro","twitter":"ericmastro","image":"https://avatars1.githubusercontent.com/u/5089238?s=460&v=4"},"michael_bradley":{"name":"Michael Bradley","image":"https://avatars3.githubusercontent.com/u/194260?s=460&v=4"},"richard_ramos":{"name":"Richard Ramos","twitter":"richardramos_me","image":"https://devcon.org/images/speakers/richard_ramos.jpg"},"jonny_zerah":{"name":"Jonny Zerah","twitter":"jonnyzerah","image":"https://pbs.twimg.com/profile_images/1043774340490248192/gI9aGy17_400x400.jpg"},"robin_percy":{"name":"Robin Percy","twitter":"rbin","image":"https://avatars1.githubusercontent.com/u/29288325?s=400&v=4"}},"categories":{"tutorials":"Tutorials","announcements":"Announcements"},"languages":{"en":"English"}}},"excerpt":"","more":"<p><img src=\"/assets/images/Header_Banner.png\" alt=\"2020 Developer Survey\"></p>\n<h2 id=\"Abstract\"><a href=\"#Abstract\" class=\"headerlink\" title=\"Abstract\"></a>Abstract</h2><p>The blockchain developer mindset is not well understood. This survey initiative was created in an effort to shed light on the current sentiment in the blockchain developer community. The echo chamber of crypto Twitter doesn’t allow for thoughtful discussion, and we felt there was a need for a survey of the community outside of that forum. Though our sample size is small we are happy with the input we received from developers around the world. </p>\n<p>In addition to the survey form we conducted interviews on Zoom to ask more detailed questions. This community is truly global in scope. What is most apparent from this survey is that the world of blockchain development is just getting started, and there is more we can do to make it accessible to those looking to invest their time in learning about this exciting technology. </p>\n<p>The main takeaways of this study are:<br>Popular sentiment on Crypto Twitter does not represent blockchain developer attitudes<br>There is general interest in developing across chains, and across public/enterprise blockchain platforms<br>Developers care about decentralization, but don’t believe it is something the general public cares about at all</p>\n<h2 id=\"Methodology\"><a href=\"#Methodology\" class=\"headerlink\" title=\"Methodology\"></a>Methodology</h2><p>For this inaugural survey we focused on the sentiments of developers in the Ethereum community to access the significant volume of work that occurs in Ethereum. Next year we will expand the sample to a much broader swath of the blockchain community. </p>\n<p>We focused on three key areas of questioning in this survey: </p>\n<ul>\n<li>Technology</li>\n<li>Sentiment</li>\n<li>Motivation</li>\n</ul>\n<p>Within these sections we hoped to understand better how developers are spending their time and what drives them to be a part of this industry. We used a qualitative, open-ended question method in order to generate a broad range of ideas. In future studies we will use this data to develop more precise attitude and behavior measures.</p>\n<h2 id=\"Chains\"><a href=\"#Chains\" class=\"headerlink\" title=\"Chains\"></a>Chains</h2><p>Of all respondents surveyed, a little under fifty five percent identified as exclusively developing on Ethereum. While many responded that they develop on many platforms including Ethereum, only six percent of respondents said they do no development work on Ethereum, excluding EVM compatible chains, that number drops to two percent. </p>\n<p><img src=\"/assets/images/Chains.png\" alt=\"Chains\"></p>\n<p>What was surprising was the number of people who are working on EVM compatible chains (cue RUN EVM T-Shirts.) The most popular of these were EOS and and Cosmos in that order. What was perhaps most surprising was the fact that Lightning Network was more popular than any EVM compatible platform. This is most surprising because very little effort was made to get this survey in the hands of Lightning developers. This means either Lightning devs participated at a higher per capita rate than Ethereum devs, or that many Ethereum devs are self selecting to learn about Lightning. </p>\n<p>Responses to this question show that Ethereum still dominates mindshare in the Ethereum community, but there is a diversity of effort happening. It will be interesting to see how these results develop over time, especially considering the concern around ETH2 expressed later in the survey.</p>\n<h2 id=\"Tools\"><a href=\"#Tools\" class=\"headerlink\" title=\"Tools\"></a>Tools</h2><p>The developer tools section was dominated by Truffle Suite with 68% of respondents saying they use it predominantly. As an early Ethereum project, this project deserves a lot of credit for making it easier to get into Ethereum development than other chains. On the framework side of things Embark came in close second with 34% of developers reporting using the toolsets. </p>\n<p> <img src=\"/assets/images/tools.png\" alt=\"Tools\"></p>\n<p>That little green sliver is one of the more interesting findings. We anticipated that there would be some who were experimenting with Lightning development but were surprised to find that number reaching close to 10% of respondents. With the recent announcement from Lightning Labs that they are rolling out Loop, a non-custodial Bitcoin to Lighting on-ramp/off-ramp, we’re excited to see where this community goes over the next few months. It will also be useful to see how Lightning developers differ from Ethereum-only, or other EVM developers in future studies.</p>\n<h2 id=\"Motivation\"><a href=\"#Motivation\" class=\"headerlink\" title=\"Motivation\"></a>Motivation</h2><p><img src=\"/assets/images/motivations.png\" alt=\"Motivation\"></p>\n<p>There were a small number of participants who answered that their reason for being interested in blockchain development is to “make number go up”. Beyond the financial motivation, most people gave more than one answer to these questions. Among the most popular were smart contracts and their composable business logic. </p>\n<p>What was surprising was that philosophical reasoning wasn’t given more broadly. We had expected almost everyone to select censorship resistance and sound money for their reasoning to join crypto. As it stands only 28% gave these answers. DeFi, DAOs, and NFTs made a strong showing with close to half of responded saying they were a motivation. There seems to be a healthy mix of motivations for getting into the blockchain developer ecosystem. </p>\n<h2 id=\"Public-Private-Chains\"><a href=\"#Public-Private-Chains\" class=\"headerlink\" title=\"Public/Private Chains\"></a>Public/Private Chains</h2><p>Popular sentiment among the crypto community is that private chains are not really a serious endeavor. Enterprise chains have gotten off to a slow start ever since the “blockchain not Bitcoin” movement of the 2015 era. Given this, we were surprised to see a strong interest in developing for these projects. </p>\n<p><img src=\"/assets/images/Public_Private_Chains.png\" alt=\"Public/Private Chains\"></p>\n<p>Over half of respondents indicated their interest in building on private chains, when you include those willing to do it, “for a price” that number jumps to over three quarters. The remaining quarter have varying degrees of opposition to building on private chains. We can see the arguments on Twitter forming, “what do you consider a private chain?” Though we could have done a better job clarifying, this question was intended to mean an enterprise chain. It was refreshing to see the willingness of people to work on things that are outside the overton window that crypto Twitter advocates for.</p>\n<h2 id=\"Perception-of-public-sentiment\"><a href=\"#Perception-of-public-sentiment\" class=\"headerlink\" title=\"Perception of public sentiment\"></a>Perception of public sentiment</h2><p>Back in the wild days of 2017 it was believed you could take any business model, throw the word Decentralized in front of it and people would flock to you. While this may have been true in the sense that people would throw money at your ICO, it hasn’t yet proven true in the race for acquiring real users. </p>\n<p><img src=\"/assets/images/Perception_of_public_sentiment.png\" alt=\"Perception of public sentiment\"></p>\n<p>In our survey we saw that a majority of developers agreed that they don’t believe users care about decentralization. This has been adopted by companies like Brave and Dharma which have adopted marketing that either doesn’t mention crypto at all or mentions it as a side note. That being said, decentralization was in fact important to developers with a majority of respondents saying that while users may not care, the developers still do.</p>\n<h2 id=\"ETH2-perception\"><a href=\"#ETH2-perception\" class=\"headerlink\" title=\"ETH2 perception\"></a>ETH2 perception</h2><p><img src=\"/assets/images/ETH2_perception.png\" alt=\"ETH2 Perception\"></p>\n<p>As should be clear from the chart, an overwhelming majority of developers in this survey are concerned about ETH2 and its implications. The people working on ETH2 are heads down solving really hard problems. However, this response speaks to the need for better communication of the work that is happening, the problems and solutions involved, timelines, and what it will mean for developers in Ethereum in time.</p>\n<p>One interesting finding is the small minority of users who are not at all concerned about ETH2. When digging deeper on calls some engineers mentioned that they have done research and understand the complexity involved in bringing it online. Perhaps the answer is DYOR and not believing the naysayers on Twitter, or perhaps outreach and better communication to combat ETH2 critics could ease concerns.</p>\n<h2 id=\"Who-are-you-building-for\"><a href=\"#Who-are-you-building-for\" class=\"headerlink\" title=\"Who are you building for?\"></a>Who are you building for?</h2><p><img src=\"/assets/images/Who_are_you_building_for.png\" alt=\"Who are you building for?\"></p>\n<p>We wanted to see what type of reach people are getting with their dapps. We were excited to see that more than a few people had over five thousand users on their platform. Over six percent of developers said they have over a thousand users. On the other side of this however over ninety percent said that they have less than a thousand daily active users on their dapps. </p>\n<p>We’re excited to see these numbers change over the next year. There are some outlier applications like Brave with twelve million active users, but we hope to see even more breakout successes such as the recent launch of Dharma’s mainstream focused application. </p>\n<p>Impediments to blockchain development<br>We asked people what their biggest impediments are to building blockchain tools. In our Zoom interviews we had a lot of input on this question. The general feedback was that the learning required is vast. One interviewee said that learning web3 development was as difficult as learning to become a developer at all. The other interesting anecdote was the ‘analysis paralysis’ that comes from choosing which ecosystem/chain to work on. </p>\n<p>This question gave the most diverse set of opinions, and many developers chose more than one response. Unsurprisingly, ‘private key management/education” eked out a win as the most popular response. We hadn’t expected regulatory clarity to be such a large issue, but it was also substantial. Though not the most popular answer, we would postulate that this is actually the part of the reason we don’t see more founders getting into crypto. It’s hard enough to build a company, let alone one that has a threat of prosecution hanging over it. </p>\n<h2 id=\"Conclusion\"><a href=\"#Conclusion\" class=\"headerlink\" title=\"Conclusion\"></a>Conclusion</h2><h2 id=\"Several-key-findings-stand-out-from-this-report\"><a href=\"#Several-key-findings-stand-out-from-this-report\" class=\"headerlink\" title=\"Several key findings stand out from this report:\"></a>Several key findings stand out from this report:</h2><ul>\n<li>Gitcoin respondents overwhelmingly selected Ethereum as the chain to work on, but also worked on other platforms including Bitcoin</li>\n<li>Truffle remains the dominant developer toolkit for Ethereum, with Embark taking a smaller share of the use</li>\n<li>The technical properties of blockchain are the main drivers for a developer choosing to get into the space</li>\n<li>Private chains are an appealing option for developers interested in working full time in blockchain space</li>\n<li>Developers are under no illusions that the public cares about decentralization, but they themselves do hold that ideal as important</li>\n<li>The majority of developers surveyed are concerned about ETH2 and its implications for the future of Ethereum</li>\n<li>Most dApps still have under a thousand daily active users</li>\n<li>Regulatory clarity and private key management are still major impediments to the creation of dApps</li>\n</ul>\n<p>What was most interesting however was the 1:1 interviews we conducted. We spoke to devs in Russia, Japan, the US and Egypt. These less formal interviews helped put a face on the developers. What was apparent among these people was the deep passion for the potential of this technology. People all over the world are coming into crypto with open minds and open hearts.</p>\n<p>We can often feel like getting into crypto now is getting in “late”, but nothing could be further from the truth. The developer experience is still clunky. The learning curve is still steep. The regulation is still ambiguous. There is almost no aspect of being a developer in blockchain that could be considered “mature.”</p>\n<p>Getting to peer into the mind of blockchain developers is something that needs to be done more often to ensure that we’re building the right tools to help foster growth in decentralized public development. We’re hoping to make this an annual report and welcome more input on distribution, categorization and methodology. </p>\n<p>As the current crypto winter thaws we’re starting to see shoots of new growth. It’s an exciting time to be in cryptocurrency, even more so as a developer. Thank you to all the people who participated in this survey, and especially the team at Gitcoin for making it possible. We’re proud to be part of this ecosystem and look forward to supporting more developers as they come into the space. </p>\n"},{"title":"Subspace 2.0","author":"richard_ramos","summary":"New components to simplify the usage of Subspace within React projects","layout":"blog-post","image":"/assets/images/subspace.jpg","_content":"\nSubspace 2.0\n===\n\nNew to subspace? Check out the website at [http://subspace.embarklabs.io/](http://subspace.embarklabs.io/)\n\n## Introducing Subspace React's components\nA new set of components were created to simplify the usage of Subspace within React projects. Learn more about them here https://subspace.embarklabs.io/react.html\n\n### Install\nYou can install it through `npm` or `yarn`:\n```\nnpm install --save @embarklabs/subspace-react web3 rxjs\n```\n\n\n### Usage\n\n#### SubspaceProvider\nTo use most of the `subspace-react` components, you need to wrap your app with the `<SubspaceProvider web3={web3} />` component. This will make Subspace available to any nested components that accesses it via the `useSubspace` hook or has been wrapped in the `withSubspace` higher order component. Any React component might use Subspace so it makes sense to add the provider near the top level of your dApp. The `SubspaceProvider` requires a web3 object\n\n```js\n// index.js\nimport React from 'react'\nimport ReactDOM from 'react-dom'\nimport MyApp from './MyApp'\nimport { SubspaceProvider } from '@embarklabs/subspace-react';\n\nconst web3 = new Web3(\"ws://localhost:8545\");\n\nconst rootElement = document.getElementById('root')\nReactDOM.render(\n <SubspaceProvider web3={web3}>\n <MyApp />\n </SubspaceProvider>,\n rootElement\n);\n```\n\n#### useSubspace\nRather than relying on global variables or passing Subspace through props, The easiest way to access Subspace features is via the `useSubspace` hook. Be sure that your entire dApp is wrapped with a `<SubspaceProvider />` to have it available througout the component tree.\n```js\n// index.js\nimport React from 'react'\nimport { useSubspace } from '@embarklabs/subspace-react';\n\nconst MyComponent = () => {\n const subspace = useSubspace();\n\n // do something....\n // subspace.trackBalance(web3.eth.defaultAccount);\n\n return ...;\n}\n\nexport default MyComponent\n```\n\n#### withSubspace\nThis higher order component is provided as an alternative to the `useSubspace` hook. This injects the `subspace` property with an already initialized Subspace instance. Just like with the hook, your entire dApp needs to be wrapped with a `<SubspaceProvider />`.\n\n```js\n// index.js\nimport React from 'react'\nimport { withSubspace } from '@embarklabs/subspace-react';\n\nconst MyComponent = (props) => {\n // do something....\n // props.subspace.trackBalance(web3.eth.defaultAccount);\n\n return ...;\n}\n\nexport default withSubspace(MyComponent);\n```\n\n\n#### observe\n\nUseful to make your component subscribe to any observable props it receives when the component is mounted and automatically unsubscribes when the component is unmounted. It can be used with any kind of observables. This component already existed in the previous version of Subspace. The only difference is that it has been moved to the `subspace-react` package. \n\n\n```js\nimport { observe } from '@embarklabs/subspace-react';\n\nconst ObserverComponent = observe(WrappedComponent);\n```\n\n##### Example usage:\n```js\nconst MyComponent = ({eventData}) => {\n // Handle initial state when no data is available\n if (!eventData) {\n return <p>No data</p>;\n }\n \n return <p>Value: {eventData.someReturnValue}</p>\n};\n\n\nconst MyEnhancedComponent = observe(MyComponent);\n\n\nconst SomeOtherComponent = () => {\n const myObservable$ = MyContractInstance.events.MyEvent.track({fromBlock: 1});\n return <MyEnhancedComponent myProp={myObservable$} />;\n}\n```\n\n\n## Breaking changes\n\n- **Peer dependencies**\nInstalling subspace requires explicitly installing `web3` and `rxjs` as peer depenencies, while before they were installed as dependencies of the package\n```js\nnpm install --save @embarklabs/subspace web3 rxjs\n```\n\n- **Web3**\nIn the previous version, Subspace received a web3.js provider in the constructor. This new version receives instead a `Web3` object:\n```js\nconst web3 = new Web3(\"http://localhost:8545\");\nconst subspace = new Subspace(web3);\n```\n\n- **`init()` is `async`.**\nThis means that you need to wait until Subspace has been initialized to use its features:\n```js\nawait subspace.init();\n```\n\n- The `observe` higher-order component was moved from the `@embarklabs/subspace` package to the new `@embarklabs/subspace-react` package.\n\n- If no call interval is specified in the Subspace options, it will use the average blocktime as the interval of time to poll the contract addresses for changes in state or balance.\n\n\n## Maintenance / Bug fixes\n- Major refactor increasing the usage of observables within the subspace package: Subjects in tracking functions were replaced by observables (they still keep the same functionality), New blocks and interval timers are done via observables.\n- Subscriptions to web3js are handled automatically depending on the number of subscribers. The subscriptions are kept if there is at least one observer subscribed to an observable, otherwise the subscription is closed and will be reopened once there's a new subscriber.\n- The checksum of the address to be tracked is performed automatically when performing balance tracking\n- Dropped the usage of `web3-utils`.\n- Simplified the logic for tracking events\n- Added Lerna to the repository to organize the different packages, as well as making the documentation part of the project\n- Updated all the examples to use the latest subspace-react components\n\n### Contributions\n\nSubspace and the entire Embark labs organization are open source. As such we welcome contributions and input from the community using the product. \n","source":"_posts/2020-03-18-subspace-2.0.md","raw":"title: Subspace 2.0\nauthor: richard_ramos\nsummary: \"New components to simplify the usage of Subspace within React projects\"\ncategories:\n - announcements\n - releases\n - subspace\nlayout: blog-post\nimage: '/assets/images/subspace.jpg'\n---\n\nSubspace 2.0\n===\n\nNew to subspace? Check out the website at [http://subspace.embarklabs.io/](http://subspace.embarklabs.io/)\n\n## Introducing Subspace React's components\nA new set of components were created to simplify the usage of Subspace within React projects. Learn more about them here https://subspace.embarklabs.io/react.html\n\n### Install\nYou can install it through `npm` or `yarn`:\n```\nnpm install --save @embarklabs/subspace-react web3 rxjs\n```\n\n\n### Usage\n\n#### SubspaceProvider\nTo use most of the `subspace-react` components, you need to wrap your app with the `<SubspaceProvider web3={web3} />` component. This will make Subspace available to any nested components that accesses it via the `useSubspace` hook or has been wrapped in the `withSubspace` higher order component. Any React component might use Subspace so it makes sense to add the provider near the top level of your dApp. The `SubspaceProvider` requires a web3 object\n\n```js\n// index.js\nimport React from 'react'\nimport ReactDOM from 'react-dom'\nimport MyApp from './MyApp'\nimport { SubspaceProvider } from '@embarklabs/subspace-react';\n\nconst web3 = new Web3(\"ws://localhost:8545\");\n\nconst rootElement = document.getElementById('root')\nReactDOM.render(\n <SubspaceProvider web3={web3}>\n <MyApp />\n </SubspaceProvider>,\n rootElement\n);\n```\n\n#### useSubspace\nRather than relying on global variables or passing Subspace through props, The easiest way to access Subspace features is via the `useSubspace` hook. Be sure that your entire dApp is wrapped with a `<SubspaceProvider />` to have it available througout the component tree.\n```js\n// index.js\nimport React from 'react'\nimport { useSubspace } from '@embarklabs/subspace-react';\n\nconst MyComponent = () => {\n const subspace = useSubspace();\n\n // do something....\n // subspace.trackBalance(web3.eth.defaultAccount);\n\n return ...;\n}\n\nexport default MyComponent\n```\n\n#### withSubspace\nThis higher order component is provided as an alternative to the `useSubspace` hook. This injects the `subspace` property with an already initialized Subspace instance. Just like with the hook, your entire dApp needs to be wrapped with a `<SubspaceProvider />`.\n\n```js\n// index.js\nimport React from 'react'\nimport { withSubspace } from '@embarklabs/subspace-react';\n\nconst MyComponent = (props) => {\n // do something....\n // props.subspace.trackBalance(web3.eth.defaultAccount);\n\n return ...;\n}\n\nexport default withSubspace(MyComponent);\n```\n\n\n#### observe\n\nUseful to make your component subscribe to any observable props it receives when the component is mounted and automatically unsubscribes when the component is unmounted. It can be used with any kind of observables. This component already existed in the previous version of Subspace. The only difference is that it has been moved to the `subspace-react` package. \n\n\n```js\nimport { observe } from '@embarklabs/subspace-react';\n\nconst ObserverComponent = observe(WrappedComponent);\n```\n\n##### Example usage:\n```js\nconst MyComponent = ({eventData}) => {\n // Handle initial state when no data is available\n if (!eventData) {\n return <p>No data</p>;\n }\n \n return <p>Value: {eventData.someReturnValue}</p>\n};\n\n\nconst MyEnhancedComponent = observe(MyComponent);\n\n\nconst SomeOtherComponent = () => {\n const myObservable$ = MyContractInstance.events.MyEvent.track({fromBlock: 1});\n return <MyEnhancedComponent myProp={myObservable$} />;\n}\n```\n\n\n## Breaking changes\n\n- **Peer dependencies**\nInstalling subspace requires explicitly installing `web3` and `rxjs` as peer depenencies, while before they were installed as dependencies of the package\n```js\nnpm install --save @embarklabs/subspace web3 rxjs\n```\n\n- **Web3**\nIn the previous version, Subspace received a web3.js provider in the constructor. This new version receives instead a `Web3` object:\n```js\nconst web3 = new Web3(\"http://localhost:8545\");\nconst subspace = new Subspace(web3);\n```\n\n- **`init()` is `async`.**\nThis means that you need to wait until Subspace has been initialized to use its features:\n```js\nawait subspace.init();\n```\n\n- The `observe` higher-order component was moved from the `@embarklabs/subspace` package to the new `@embarklabs/subspace-react` package.\n\n- If no call interval is specified in the Subspace options, it will use the average blocktime as the interval of time to poll the contract addresses for changes in state or balance.\n\n\n## Maintenance / Bug fixes\n- Major refactor increasing the usage of observables within the subspace package: Subjects in tracking functions were replaced by observables (they still keep the same functionality), New blocks and interval timers are done via observables.\n- Subscriptions to web3js are handled automatically depending on the number of subscribers. The subscriptions are kept if there is at least one observer subscribed to an observable, otherwise the subscription is closed and will be reopened once there's a new subscriber.\n- The checksum of the address to be tracked is performed automatically when performing balance tracking\n- Dropped the usage of `web3-utils`.\n- Simplified the logic for tracking events\n- Added Lerna to the repository to organize the different packages, as well as making the documentation part of the project\n- Updated all the examples to use the latest subspace-react components\n\n### Contributions\n\nSubspace and the entire Embark labs organization are open source. As such we welcome contributions and input from the community using the product. \n","slug":"subspace-2.0","published":1,"date":"2020-03-18T04:00:00.000Z","updated":"2020-03-18T17:40:25.140Z","_id":"ck7xlvisi0000l4jefdbxfbqt","comments":1,"photos":[],"link":"","content":"<h1 id=\"Subspace-2-0\"><a href=\"#Subspace-2-0\" class=\"headerlink\" title=\"Subspace 2.0\"></a>Subspace 2.0</h1><p>New to subspace? Check out the website at <a href=\"http://subspace.embarklabs.io/\">http://subspace.embarklabs.io/</a></p>\n<h2 id=\"Introducing-Subspace-React’s-components\"><a href=\"#Introducing-Subspace-React’s-components\" class=\"headerlink\" title=\"Introducing Subspace React’s components\"></a>Introducing Subspace React’s components</h2><p>A new set of components were created to simplify the usage of Subspace within React projects. Learn more about them here <a href=\"https://subspace.embarklabs.io/react.html\">https://subspace.embarklabs.io/react.html</a></p>\n<h3 id=\"Install\"><a href=\"#Install\" class=\"headerlink\" title=\"Install\"></a>Install</h3><p>You can install it through <code>npm</code> or <code>yarn</code>:</p>\n<figure class=\"highlight plain\"><table><tr><td class=\"code\"><pre><span class=\"line\">npm install --save @embarklabs/subspace-react web3 rxjs</span><br></pre></td></tr></table></figure>\n\n\n<h3 id=\"Usage\"><a href=\"#Usage\" class=\"headerlink\" title=\"Usage\"></a>Usage</h3><h4 id=\"SubspaceProvider\"><a href=\"#SubspaceProvider\" class=\"headerlink\" title=\"SubspaceProvider\"></a>SubspaceProvider</h4><p>To use most of the <code>subspace-react</code> components, you need to wrap your app with the <code><SubspaceProvider web3={web3} /></code> component. This will make Subspace available to any nested components that accesses it via the <code>useSubspace</code> hook or has been wrapped in the <code>withSubspace</code> higher order component. Any React component might use Subspace so it makes sense to add the provider near the top level of your dApp. The <code>SubspaceProvider</code> requires a web3 object</p>\n<figure class=\"highlight js\"><table><tr><td class=\"code\"><pre><span class=\"line\"><span class=\"comment\">// index.js</span></span><br><span class=\"line\"><span class=\"keyword\">import</span> React <span class=\"keyword\">from</span> <span class=\"string\">'react'</span></span><br><span class=\"line\"><span class=\"keyword\">import</span> ReactDOM <span class=\"keyword\">from</span> <span class=\"string\">'react-dom'</span></span><br><span class=\"line\"><span class=\"keyword\">import</span> MyApp <span class=\"keyword\">from</span> <span class=\"string\">'./MyApp'</span></span><br><span class=\"line\"><span class=\"keyword\">import</span> { SubspaceProvider } <span class=\"keyword\">from</span> <span class=\"string\">'@embarklabs/subspace-react'</span>;</span><br><span class=\"line\"></span><br><span class=\"line\"><span class=\"keyword\">const</span> web3 = <span class=\"keyword\">new</span> Web3(<span class=\"string\">\"ws://localhost:8545\"</span>);</span><br><span class=\"line\"></span><br><span class=\"line\"><span class=\"keyword\">const</span> rootElement = <span class=\"built_in\">document</span>.getElementById(<span class=\"string\">'root'</span>)</span><br><span class=\"line\">ReactDOM.render(</span><br><span class=\"line\"> <SubspaceProvider web3={web3}></span><br><span class=\"line\"> <MyApp /></span><br><span class=\"line\"> <<span class=\"regexp\">/SubspaceProvider>,</span></span><br><span class=\"line\"><span class=\"regexp\"> rootElement</span></span><br><span class=\"line\"><span class=\"regexp\">);</span></span><br></pre></td></tr></table></figure>\n\n<h4 id=\"useSubspace\"><a href=\"#useSubspace\" class=\"headerlink\" title=\"useSubspace\"></a>useSubspace</h4><p>Rather than relying on global variables or passing Subspace through props, The easiest way to access Subspace features is via the <code>useSubspace</code> hook. Be sure that your entire dApp is wrapped with a <code><SubspaceProvider /></code> to have it available througout the component tree.</p>\n<figure class=\"highlight js\"><table><tr><td class=\"code\"><pre><span class=\"line\"><span class=\"comment\">// index.js</span></span><br><span class=\"line\"><span class=\"keyword\">import</span> React <span class=\"keyword\">from</span> <span class=\"string\">'react'</span></span><br><span class=\"line\"><span class=\"keyword\">import</span> { useSubspace } <span class=\"keyword\">from</span> <span class=\"string\">'@embarklabs/subspace-react'</span>;</span><br><span class=\"line\"></span><br><span class=\"line\"><span class=\"keyword\">const</span> MyComponent = <span class=\"function\"><span class=\"params\">()</span> =></span> {</span><br><span class=\"line\"> <span class=\"keyword\">const</span> subspace = useSubspace();</span><br><span class=\"line\"></span><br><span class=\"line\"> <span class=\"comment\">// do something....</span></span><br><span class=\"line\"> <span class=\"comment\">// subspace.trackBalance(web3.eth.defaultAccount);</span></span><br><span class=\"line\"></span><br><span class=\"line\"> <span class=\"keyword\">return</span> ...;</span><br><span class=\"line\">}</span><br><span class=\"line\"></span><br><span class=\"line\"><span class=\"keyword\">export</span> <span class=\"keyword\">default</span> MyComponent</span><br></pre></td></tr></table></figure>\n\n<h4 id=\"withSubspace\"><a href=\"#withSubspace\" class=\"headerlink\" title=\"withSubspace\"></a>withSubspace</h4><p>This higher order component is provided as an alternative to the <code>useSubspace</code> hook. This injects the <code>subspace</code> property with an already initialized Subspace instance. Just like with the hook, your entire dApp needs to be wrapped with a <code><SubspaceProvider /></code>.</p>\n<figure class=\"highlight js\"><table><tr><td class=\"code\"><pre><span class=\"line\"><span class=\"comment\">// index.js</span></span><br><span class=\"line\"><span class=\"keyword\">import</span> React <span class=\"keyword\">from</span> <span class=\"string\">'react'</span></span><br><span class=\"line\"><span class=\"keyword\">import</span> { withSubspace } <span class=\"keyword\">from</span> <span class=\"string\">'@embarklabs/subspace-react'</span>;</span><br><span class=\"line\"></span><br><span class=\"line\"><span class=\"keyword\">const</span> MyComponent = <span class=\"function\">(<span class=\"params\">props</span>) =></span> {</span><br><span class=\"line\"> <span class=\"comment\">// do something....</span></span><br><span class=\"line\"> <span class=\"comment\">// props.subspace.trackBalance(web3.eth.defaultAccount);</span></span><br><span class=\"line\"></span><br><span class=\"line\"> <span class=\"keyword\">return</span> ...;</span><br><span class=\"line\">}</span><br><span class=\"line\"></span><br><span class=\"line\"><span class=\"keyword\">export</span> <span class=\"keyword\">default</span> withSubspace(MyComponent);</span><br></pre></td></tr></table></figure>\n\n\n<h4 id=\"observe\"><a href=\"#observe\" class=\"headerlink\" title=\"observe\"></a>observe</h4><p>Useful to make your component subscribe to any observable props it receives when the component is mounted and automatically unsubscribes when the component is unmounted. It can be used with any kind of observables. This component already existed in the previous version of Subspace. The only difference is that it has been moved to the <code>subspace-react</code> package. </p>\n<figure class=\"highlight js\"><table><tr><td class=\"code\"><pre><span class=\"line\"><span class=\"keyword\">import</span> { observe } <span class=\"keyword\">from</span> <span class=\"string\">'@embarklabs/subspace-react'</span>;</span><br><span class=\"line\"></span><br><span class=\"line\"><span class=\"keyword\">const</span> ObserverComponent = observe(WrappedComponent);</span><br></pre></td></tr></table></figure>\n\n<h5 id=\"Example-usage\"><a href=\"#Example-usage\" class=\"headerlink\" title=\"Example usage:\"></a>Example usage:</h5><figure class=\"highlight js\"><table><tr><td class=\"code\"><pre><span class=\"line\"><span class=\"keyword\">const</span> MyComponent = <span class=\"function\">(<span class=\"params\">{eventData}</span>) =></span> {</span><br><span class=\"line\"> <span class=\"comment\">// Handle initial state when no data is available</span></span><br><span class=\"line\"> <span class=\"keyword\">if</span> (!eventData) {</span><br><span class=\"line\"> <span class=\"keyword\">return</span> <span class=\"xml\"><span class=\"tag\"><<span class=\"name\">p</span>></span>No data<span class=\"tag\"></<span class=\"name\">p</span>></span></span>;</span><br><span class=\"line\"> }</span><br><span class=\"line\"> </span><br><span class=\"line\"> <span class=\"keyword\">return</span> <span class=\"xml\"><span class=\"tag\"><<span class=\"name\">p</span>></span>Value: {eventData.someReturnValue}<span class=\"tag\"></<span class=\"name\">p</span>></span></span></span><br><span class=\"line\">};</span><br><span class=\"line\"></span><br><span class=\"line\"></span><br><span class=\"line\"><span class=\"keyword\">const</span> MyEnhancedComponent = observe(MyComponent);</span><br><span class=\"line\"></span><br><span class=\"line\"></span><br><span class=\"line\"><span class=\"keyword\">const</span> SomeOtherComponent = <span class=\"function\"><span class=\"params\">()</span> =></span> {</span><br><span class=\"line\"> <span class=\"keyword\">const</span> myObservable$ = MyContractInstance.events.MyEvent.track({<span class=\"attr\">fromBlock</span>: <span class=\"number\">1</span>});</span><br><span class=\"line\"> <span class=\"keyword\">return</span> <span class=\"xml\"><span class=\"tag\"><<span class=\"name\">MyEnhancedComponent</span> <span class=\"attr\">myProp</span>=<span class=\"string\">{myObservable$}</span> /></span>;</span></span><br><span class=\"line\"><span class=\"xml\">}</span></span><br></pre></td></tr></table></figure>\n\n\n<h2 id=\"Breaking-changes\"><a href=\"#Breaking-changes\" class=\"headerlink\" title=\"Breaking changes\"></a>Breaking changes</h2><ul>\n<li><p><strong>Peer dependencies</strong><br>Installing subspace requires explicitly installing <code>web3</code> and <code>rxjs</code> as peer depenencies, while before they were installed as dependencies of the package</p>\n<figure class=\"highlight js\"><table><tr><td class=\"code\"><pre><span class=\"line\">npm install --save @embarklabs/subspace web3 rxjs</span><br></pre></td></tr></table></figure>\n</li>\n<li><p><strong>Web3</strong><br>In the previous version, Subspace received a web3.js provider in the constructor. This new version receives instead a <code>Web3</code> object:</p>\n<figure class=\"highlight js\"><table><tr><td class=\"code\"><pre><span class=\"line\"><span class=\"keyword\">const</span> web3 = <span class=\"keyword\">new</span> Web3(<span class=\"string\">\"http://localhost:8545\"</span>);</span><br><span class=\"line\"><span class=\"keyword\">const</span> subspace = <span class=\"keyword\">new</span> Subspace(web3);</span><br></pre></td></tr></table></figure>\n</li>\n<li><p><strong><code>init()</code> is <code>async</code>.</strong><br>This means that you need to wait until Subspace has been initialized to use its features:</p>\n<figure class=\"highlight js\"><table><tr><td class=\"code\"><pre><span class=\"line\"><span class=\"keyword\">await</span> subspace.init();</span><br></pre></td></tr></table></figure>\n</li>\n<li><p>The <code>observe</code> higher-order component was moved from the <code>@embarklabs/subspace</code> package to the new <code>@embarklabs/subspace-react</code> package.</p>\n</li>\n<li><p>If no call interval is specified in the Subspace options, it will use the average blocktime as the interval of time to poll the contract addresses for changes in state or balance.</p>\n</li>\n</ul>\n<h2 id=\"Maintenance-Bug-fixes\"><a href=\"#Maintenance-Bug-fixes\" class=\"headerlink\" title=\"Maintenance / Bug fixes\"></a>Maintenance / Bug fixes</h2><ul>\n<li>Major refactor increasing the usage of observables within the subspace package: Subjects in tracking functions were replaced by observables (they still keep the same functionality), New blocks and interval timers are done via observables.</li>\n<li>Subscriptions to web3js are handled automatically depending on the number of subscribers. The subscriptions are kept if there is at least one observer subscribed to an observable, otherwise the subscription is closed and will be reopened once there’s a new subscriber.</li>\n<li>The checksum of the address to be tracked is performed automatically when performing balance tracking</li>\n<li>Dropped the usage of <code>web3-utils</code>.</li>\n<li>Simplified the logic for tracking events</li>\n<li>Added Lerna to the repository to organize the different packages, as well as making the documentation part of the project</li>\n<li>Updated all the examples to use the latest subspace-react components</li>\n</ul>\n<h3 id=\"Contributions\"><a href=\"#Contributions\" class=\"headerlink\" title=\"Contributions\"></a>Contributions</h3><p>Subspace and the entire Embark labs organization are open source. As such we welcome contributions and input from the community using the product. </p>\n","site":{"data":{"authors":{"iuri_matias":{"name":"Iuri Matias","twitter":"iurimatias","image":"https://pbs.twimg.com/profile_images/928272512181563392/iDJdvy2k_400x400.jpg"},"pascal_precht":{"name":"Pascal Precht","twitter":"pascalprecht","image":"https://pbs.twimg.com/profile_images/993785060733194241/p3oAIMDP_400x400.jpg"},"anthony_laibe":{"name":"Anthony Laibe","twitter":"a_laibe","image":"https://pbs.twimg.com/profile_images/257742900/13168239_400x400.jpg"},"jonathan_rainville":{"name":"Jonathan Rainville","twitter":"ShyolGhul","image":"https://pbs.twimg.com/profile_images/993873866878570496/-aE4byjj_400x400.jpg"},"andre_medeiros":{"name":"Andre Medeiros","twitter":"superdealloc","image":"https://pbs.twimg.com/profile_images/965722487735701504/m58KNgWN_400x400.jpg"},"eric_mastro":{"name":"Eric Mastro","twitter":"ericmastro","image":"https://avatars1.githubusercontent.com/u/5089238?s=460&v=4"},"michael_bradley":{"name":"Michael Bradley","image":"https://avatars3.githubusercontent.com/u/194260?s=460&v=4"},"richard_ramos":{"name":"Richard Ramos","twitter":"richardramos_me","image":"https://devcon.org/images/speakers/richard_ramos.jpg"},"jonny_zerah":{"name":"Jonny Zerah","twitter":"jonnyzerah","image":"https://pbs.twimg.com/profile_images/1043774340490248192/gI9aGy17_400x400.jpg"},"robin_percy":{"name":"Robin Percy","twitter":"rbin","image":"https://avatars1.githubusercontent.com/u/29288325?s=400&v=4"}},"categories":{"tutorials":"Tutorials","announcements":"Announcements"},"languages":{"en":"English"}}},"excerpt":"","more":"<h1 id=\"Subspace-2-0\"><a href=\"#Subspace-2-0\" class=\"headerlink\" title=\"Subspace 2.0\"></a>Subspace 2.0</h1><p>New to subspace? Check out the website at <a href=\"http://subspace.embarklabs.io/\">http://subspace.embarklabs.io/</a></p>\n<h2 id=\"Introducing-Subspace-React’s-components\"><a href=\"#Introducing-Subspace-React’s-components\" class=\"headerlink\" title=\"Introducing Subspace React’s components\"></a>Introducing Subspace React’s components</h2><p>A new set of components were created to simplify the usage of Subspace within React projects. Learn more about them here <a href=\"https://subspace.embarklabs.io/react.html\">https://subspace.embarklabs.io/react.html</a></p>\n<h3 id=\"Install\"><a href=\"#Install\" class=\"headerlink\" title=\"Install\"></a>Install</h3><p>You can install it through <code>npm</code> or <code>yarn</code>:</p>\n<figure class=\"highlight plain\"><table><tr><td class=\"code\"><pre><span class=\"line\">npm install --save @embarklabs/subspace-react web3 rxjs</span><br></pre></td></tr></table></figure>\n\n\n<h3 id=\"Usage\"><a href=\"#Usage\" class=\"headerlink\" title=\"Usage\"></a>Usage</h3><h4 id=\"SubspaceProvider\"><a href=\"#SubspaceProvider\" class=\"headerlink\" title=\"SubspaceProvider\"></a>SubspaceProvider</h4><p>To use most of the <code>subspace-react</code> components, you need to wrap your app with the <code><SubspaceProvider web3={web3} /></code> component. This will make Subspace available to any nested components that accesses it via the <code>useSubspace</code> hook or has been wrapped in the <code>withSubspace</code> higher order component. Any React component might use Subspace so it makes sense to add the provider near the top level of your dApp. The <code>SubspaceProvider</code> requires a web3 object</p>\n<figure class=\"highlight js\"><table><tr><td class=\"code\"><pre><span class=\"line\"><span class=\"comment\">// index.js</span></span><br><span class=\"line\"><span class=\"keyword\">import</span> React <span class=\"keyword\">from</span> <span class=\"string\">'react'</span></span><br><span class=\"line\"><span class=\"keyword\">import</span> ReactDOM <span class=\"keyword\">from</span> <span class=\"string\">'react-dom'</span></span><br><span class=\"line\"><span class=\"keyword\">import</span> MyApp <span class=\"keyword\">from</span> <span class=\"string\">'./MyApp'</span></span><br><span class=\"line\"><span class=\"keyword\">import</span> { SubspaceProvider } <span class=\"keyword\">from</span> <span class=\"string\">'@embarklabs/subspace-react'</span>;</span><br><span class=\"line\"></span><br><span class=\"line\"><span class=\"keyword\">const</span> web3 = <span class=\"keyword\">new</span> Web3(<span class=\"string\">\"ws://localhost:8545\"</span>);</span><br><span class=\"line\"></span><br><span class=\"line\"><span class=\"keyword\">const</span> rootElement = <span class=\"built_in\">document</span>.getElementById(<span class=\"string\">'root'</span>)</span><br><span class=\"line\">ReactDOM.render(</span><br><span class=\"line\"> <SubspaceProvider web3={web3}></span><br><span class=\"line\"> <MyApp /></span><br><span class=\"line\"> <<span class=\"regexp\">/SubspaceProvider>,</span></span><br><span class=\"line\"><span class=\"regexp\"> rootElement</span></span><br><span class=\"line\"><span class=\"regexp\">);</span></span><br></pre></td></tr></table></figure>\n\n<h4 id=\"useSubspace\"><a href=\"#useSubspace\" class=\"headerlink\" title=\"useSubspace\"></a>useSubspace</h4><p>Rather than relying on global variables or passing Subspace through props, The easiest way to access Subspace features is via the <code>useSubspace</code> hook. Be sure that your entire dApp is wrapped with a <code><SubspaceProvider /></code> to have it available througout the component tree.</p>\n<figure class=\"highlight js\"><table><tr><td class=\"code\"><pre><span class=\"line\"><span class=\"comment\">// index.js</span></span><br><span class=\"line\"><span class=\"keyword\">import</span> React <span class=\"keyword\">from</span> <span class=\"string\">'react'</span></span><br><span class=\"line\"><span class=\"keyword\">import</span> { useSubspace } <span class=\"keyword\">from</span> <span class=\"string\">'@embarklabs/subspace-react'</span>;</span><br><span class=\"line\"></span><br><span class=\"line\"><span class=\"keyword\">const</span> MyComponent = <span class=\"function\"><span class=\"params\">()</span> =></span> {</span><br><span class=\"line\"> <span class=\"keyword\">const</span> subspace = useSubspace();</span><br><span class=\"line\"></span><br><span class=\"line\"> <span class=\"comment\">// do something....</span></span><br><span class=\"line\"> <span class=\"comment\">// subspace.trackBalance(web3.eth.defaultAccount);</span></span><br><span class=\"line\"></span><br><span class=\"line\"> <span class=\"keyword\">return</span> ...;</span><br><span class=\"line\">}</span><br><span class=\"line\"></span><br><span class=\"line\"><span class=\"keyword\">export</span> <span class=\"keyword\">default</span> MyComponent</span><br></pre></td></tr></table></figure>\n\n<h4 id=\"withSubspace\"><a href=\"#withSubspace\" class=\"headerlink\" title=\"withSubspace\"></a>withSubspace</h4><p>This higher order component is provided as an alternative to the <code>useSubspace</code> hook. This injects the <code>subspace</code> property with an already initialized Subspace instance. Just like with the hook, your entire dApp needs to be wrapped with a <code><SubspaceProvider /></code>.</p>\n<figure class=\"highlight js\"><table><tr><td class=\"code\"><pre><span class=\"line\"><span class=\"comment\">// index.js</span></span><br><span class=\"line\"><span class=\"keyword\">import</span> React <span class=\"keyword\">from</span> <span class=\"string\">'react'</span></span><br><span class=\"line\"><span class=\"keyword\">import</span> { withSubspace } <span class=\"keyword\">from</span> <span class=\"string\">'@embarklabs/subspace-react'</span>;</span><br><span class=\"line\"></span><br><span class=\"line\"><span class=\"keyword\">const</span> MyComponent = <span class=\"function\">(<span class=\"params\">props</span>) =></span> {</span><br><span class=\"line\"> <span class=\"comment\">// do something....</span></span><br><span class=\"line\"> <span class=\"comment\">// props.subspace.trackBalance(web3.eth.defaultAccount);</span></span><br><span class=\"line\"></span><br><span class=\"line\"> <span class=\"keyword\">return</span> ...;</span><br><span class=\"line\">}</span><br><span class=\"line\"></span><br><span class=\"line\"><span class=\"keyword\">export</span> <span class=\"keyword\">default</span> withSubspace(MyComponent);</span><br></pre></td></tr></table></figure>\n\n\n<h4 id=\"observe\"><a href=\"#observe\" class=\"headerlink\" title=\"observe\"></a>observe</h4><p>Useful to make your component subscribe to any observable props it receives when the component is mounted and automatically unsubscribes when the component is unmounted. It can be used with any kind of observables. This component already existed in the previous version of Subspace. The only difference is that it has been moved to the <code>subspace-react</code> package. </p>\n<figure class=\"highlight js\"><table><tr><td class=\"code\"><pre><span class=\"line\"><span class=\"keyword\">import</span> { observe } <span class=\"keyword\">from</span> <span class=\"string\">'@embarklabs/subspace-react'</span>;</span><br><span class=\"line\"></span><br><span class=\"line\"><span class=\"keyword\">const</span> ObserverComponent = observe(WrappedComponent);</span><br></pre></td></tr></table></figure>\n\n<h5 id=\"Example-usage\"><a href=\"#Example-usage\" class=\"headerlink\" title=\"Example usage:\"></a>Example usage:</h5><figure class=\"highlight js\"><table><tr><td class=\"code\"><pre><span class=\"line\"><span class=\"keyword\">const</span> MyComponent = <span class=\"function\">(<span class=\"params\">{eventData}</span>) =></span> {</span><br><span class=\"line\"> <span class=\"comment\">// Handle initial state when no data is available</span></span><br><span class=\"line\"> <span class=\"keyword\">if</span> (!eventData) {</span><br><span class=\"line\"> <span class=\"keyword\">return</span> <span class=\"xml\"><span class=\"tag\"><<span class=\"name\">p</span>></span>No data<span class=\"tag\"></<span class=\"name\">p</span>></span></span>;</span><br><span class=\"line\"> }</span><br><span class=\"line\"> </span><br><span class=\"line\"> <span class=\"keyword\">return</span> <span class=\"xml\"><span class=\"tag\"><<span class=\"name\">p</span>></span>Value: {eventData.someReturnValue}<span class=\"tag\"></<span class=\"name\">p</span>></span></span></span><br><span class=\"line\">};</span><br><span class=\"line\"></span><br><span class=\"line\"></span><br><span class=\"line\"><span class=\"keyword\">const</span> MyEnhancedComponent = observe(MyComponent);</span><br><span class=\"line\"></span><br><span class=\"line\"></span><br><span class=\"line\"><span class=\"keyword\">const</span> SomeOtherComponent = <span class=\"function\"><span class=\"params\">()</span> =></span> {</span><br><span class=\"line\"> <span class=\"keyword\">const</span> myObservable$ = MyContractInstance.events.MyEvent.track({<span class=\"attr\">fromBlock</span>: <span class=\"number\">1</span>});</span><br><span class=\"line\"> <span class=\"keyword\">return</span> <span class=\"xml\"><span class=\"tag\"><<span class=\"name\">MyEnhancedComponent</span> <span class=\"attr\">myProp</span>=<span class=\"string\">{myObservable$}</span> /></span>;</span></span><br><span class=\"line\"><span class=\"xml\">}</span></span><br></pre></td></tr></table></figure>\n\n\n<h2 id=\"Breaking-changes\"><a href=\"#Breaking-changes\" class=\"headerlink\" title=\"Breaking changes\"></a>Breaking changes</h2><ul>\n<li><p><strong>Peer dependencies</strong><br>Installing subspace requires explicitly installing <code>web3</code> and <code>rxjs</code> as peer depenencies, while before they were installed as dependencies of the package</p>\n<figure class=\"highlight js\"><table><tr><td class=\"code\"><pre><span class=\"line\">npm install --save @embarklabs/subspace web3 rxjs</span><br></pre></td></tr></table></figure>\n</li>\n<li><p><strong>Web3</strong><br>In the previous version, Subspace received a web3.js provider in the constructor. This new version receives instead a <code>Web3</code> object:</p>\n<figure class=\"highlight js\"><table><tr><td class=\"code\"><pre><span class=\"line\"><span class=\"keyword\">const</span> web3 = <span class=\"keyword\">new</span> Web3(<span class=\"string\">\"http://localhost:8545\"</span>);</span><br><span class=\"line\"><span class=\"keyword\">const</span> subspace = <span class=\"keyword\">new</span> Subspace(web3);</span><br></pre></td></tr></table></figure>\n</li>\n<li><p><strong><code>init()</code> is <code>async</code>.</strong><br>This means that you need to wait until Subspace has been initialized to use its features:</p>\n<figure class=\"highlight js\"><table><tr><td class=\"code\"><pre><span class=\"line\"><span class=\"keyword\">await</span> subspace.init();</span><br></pre></td></tr></table></figure>\n</li>\n<li><p>The <code>observe</code> higher-order component was moved from the <code>@embarklabs/subspace</code> package to the new <code>@embarklabs/subspace-react</code> package.</p>\n</li>\n<li><p>If no call interval is specified in the Subspace options, it will use the average blocktime as the interval of time to poll the contract addresses for changes in state or balance.</p>\n</li>\n</ul>\n<h2 id=\"Maintenance-Bug-fixes\"><a href=\"#Maintenance-Bug-fixes\" class=\"headerlink\" title=\"Maintenance / Bug fixes\"></a>Maintenance / Bug fixes</h2><ul>\n<li>Major refactor increasing the usage of observables within the subspace package: Subjects in tracking functions were replaced by observables (they still keep the same functionality), New blocks and interval timers are done via observables.</li>\n<li>Subscriptions to web3js are handled automatically depending on the number of subscribers. The subscriptions are kept if there is at least one observer subscribed to an observable, otherwise the subscription is closed and will be reopened once there’s a new subscriber.</li>\n<li>The checksum of the address to be tracked is performed automatically when performing balance tracking</li>\n<li>Dropped the usage of <code>web3-utils</code>.</li>\n<li>Simplified the logic for tracking events</li>\n<li>Added Lerna to the repository to organize the different packages, as well as making the documentation part of the project</li>\n<li>Updated all the examples to use the latest subspace-react components</li>\n</ul>\n<h3 id=\"Contributions\"><a href=\"#Contributions\" class=\"headerlink\" title=\"Contributions\"></a>Contributions</h3><p>Subspace and the entire Embark labs organization are open source. As such we welcome contributions and input from the community using the product. </p>\n"}],"PostAsset":[],"PostCategory":[{"post_id":"ck6axlf8m0001xeegb99lg8qp","category_id":"ck6axlf8t0004xeeg4u40b7v4","_id":"ck7c0li2x00169wtr37q9h32y"},{"post_id":"ck6axlf8w0006xeegg0byd65p","category_id":"ck6axlf8t0004xeeg4u40b7v4","_id":"ck7c0li2y00179wtrcpqr572g"},{"post_id":"ck6axlf8q0003xeeg5q8wg2vg","category_id":"ck6axlf8t0004xeeg4u40b7v4","_id":"ck7c0li2y00189wtr4m93941l"},{"post_id":"ck6axlf8z0008xeeg3f7r49jv","category_id":"ck6axlf9n000nxeeg1g8vfk0r","_id":"ck7c0li4e00199wtr7j7f3yzm"},{"post_id":"ck6axlf99000dxeeg0eiyf2dr","category_id":"ck6axlf8t0004xeeg4u40b7v4","_id":"ck7c0li4j001a9wtr7ase94p1"},{"post_id":"ck6axlf9f000fxeegann27sh0","category_id":"ck6axlf8t0004xeeg4u40b7v4","_id":"ck7c0li4l001b9wtr8uzag39d"},{"post_id":"ck6axlf9o000qxeeg6kksfhgm","category_id":"ck6axlf8t0004xeeg4u40b7v4","_id":"ck7c0li4n001c9wtr0816c2d2"},{"post_id":"ck6axlf9j000jxeegbv0yedck","category_id":"ck6axlf8t0004xeeg4u40b7v4","_id":"ck7c0li4p001d9wtrf2h6cbou"},{"post_id":"ck6axlf9j000jxeegbv0yedck","category_id":"ck6axlf9r000uxeeg34tq1cp1","_id":"ck7c0li4q001e9wtr7pryeb9o"},{"post_id":"ck6axlf9l000mxeeghhrj9kx7","category_id":"ck6axlf8t0004xeeg4u40b7v4","_id":"ck7c0li4r001f9wtrauvt2t55"},{"post_id":"ck6axlf9l000mxeeghhrj9kx7","category_id":"ck6axlf9r000uxeeg34tq1cp1","_id":"ck7c0li4r001g9wtr792ngt5o"},{"post_id":"ck6i7o51w0000a1t48p7ihlcd","category_id":"ck6axlf8t0004xeeg4u40b7v4","_id":"ck7c0li4r001h9wtr6bsk62ji"},{"post_id":"ck6i7o51w0000a1t48p7ihlcd","category_id":"ck6axlf9r000uxeeg34tq1cp1","_id":"ck7c0li4r001i9wtr973t695k"},{"post_id":"ck6i7o51w0000a1t48p7ihlcd","category_id":"ck6i7o5240001a1t4dvsofb7b","_id":"ck7c0li4s001j9wtr3hbv3rvj"},{"post_id":"ck6qmd5ol00009wt49q2u56dn","category_id":"ck6qmd5os00019wt46zeo50kg","_id":"ck7c0li4s001k9wtraka22lvz"},{"post_id":"ck6qmd5ol00009wt49q2u56dn","category_id":"ck6qmd5oy00029wt413k42tog","_id":"ck7c0li4s001l9wtrelje97bl"},{"post_id":"ck6axlfc6002cxeeg4qadgdw1","category_id":"ck6axlf9n000nxeeg1g8vfk0r","_id":"ck7c0li5c001m9wtr54yddd3v"},{"post_id":"ck6axlfc8002exeegd7j1806w","category_id":"ck6axlf9n000nxeeg1g8vfk0r","_id":"ck7c0li5g001n9wtr4edi6g7e"},{"post_id":"ck6axlfc9002gxeeg1fpufwzt","category_id":"ck6axlf9n000nxeeg1g8vfk0r","_id":"ck7c0li5h001o9wtr6mcz3ehq"},{"post_id":"ck6axlfcc002kxeeg5uuhdi3v","category_id":"ck6axlf9n000nxeeg1g8vfk0r","_id":"ck7c0li5k001p9wtr80ig9uor"},{"post_id":"ck6axlfcg002sxeeg1c8eg1x8","category_id":"ck6axlf9n000nxeeg1g8vfk0r","_id":"ck7c0li5m001q9wtrfelu8haz"},{"post_id":"ck6axlfcd002mxeegbtau5m94","category_id":"ck6axlf9n000nxeeg1g8vfk0r","_id":"ck7c0li5n001r9wtr97usgm2k"},{"post_id":"ck6axlfcf002qxeeggc41gzxp","category_id":"ck6axlf9n000nxeeg1g8vfk0r","_id":"ck7c0li5o001s9wtr1h0l4f6w"},{"post_id":"ck6axlfcb002ixeeg7m4g72bx","category_id":"ck6axlf9n000nxeeg1g8vfk0r","_id":"ck7c0li5p001t9wtr0j9q5skl"},{"post_id":"ck6axlfce002oxeeg9tdkgdxg","category_id":"ck6axlf9n000nxeeg1g8vfk0r","_id":"ck7c0li5p001u9wtrdhtz38wp"},{"post_id":"ck6axlfci002uxeeg43ke7c9c","category_id":"ck6axlf8t0004xeeg4u40b7v4","_id":"ck7c0li5q001v9wtrcx0c317j"},{"post_id":"ck6axlfd3002zxeeg6tmh86by","category_id":"ck6axlf9n000nxeeg1g8vfk0r","_id":"ck7c0li64001w9wtrfng373ox"},{"post_id":"ck6axlfd50031xeeg9uuueky8","category_id":"ck6axlf9n000nxeeg1g8vfk0r","_id":"ck7c0li64001x9wtrezz8cdty"},{"post_id":"ck6tl5kxd000091t435e6378k","category_id":"ck6axlf8t0004xeeg4u40b7v4","_id":"ck7c0li65001y9wtr52bw7xvn"},{"post_id":"ck6tl5kxd000091t435e6378k","category_id":"ck6axlf9r000uxeeg34tq1cp1","_id":"ck7c0li65001z9wtrdomf8wpq"},{"post_id":"ck6tl5kxd000091t435e6378k","category_id":"ck6sh2vay0001byt4em048cdf","_id":"ck7c0li6500209wtrgdn60lt2"},{"post_id":"ck6axlfdp0035xeegeya3hmtr","category_id":"ck6axlf9n000nxeeg1g8vfk0r","_id":"ck7c0li6p00219wtr7yxy5cyx"},{"post_id":"ck7c0li6y00229wtr8fboevmd","category_id":"ck6axlf8t0004xeeg4u40b7v4","_id":"ck7c0li6y00239wtrbnxc09so"},{"post_id":"ck7c0li7200249wtr1c6p9m2u","category_id":"ck6axlf9n000nxeeg1g8vfk0r","_id":"ck7c0li7500259wtr67sbg6gl"},{"post_id":"ck7kr9s3d0000u0t4cd7ec10o","category_id":"ck7kr9s3k0001u0t47cb19m94","_id":"ck7kr9s3u0002u0t44ld337do"},{"post_id":"ck7xlvisi0000l4jefdbxfbqt","category_id":"ck6axlf8t0004xeeg4u40b7v4","_id":"ck7xlviso0001l4je01do44ja"},{"post_id":"ck7xlvisi0000l4jefdbxfbqt","category_id":"ck6axlf9r000uxeeg34tq1cp1","_id":"ck7xlviso0002l4je1ehr5une"},{"post_id":"ck7xlvisi0000l4jefdbxfbqt","category_id":"ck6i7o5240001a1t4dvsofb7b","_id":"ck7xlvisp0003l4je63xa5bap"}],"PostTag":[],"Tag":[{"name":"announcements","_id":"ck7c0kpkq00009wtr66sf5497"},{"name":"tutorials","_id":"ck7c0kplg00029wtr9rtz5n4i"},{"name":"releases","_id":"ck7c0kpnd00049wtr9tzzhui9"},{"name":"embark","_id":"ck7c0kpne00059wtr4gfz4hw9"},{"name":"dapp-development","_id":"ck7c0kpwo000i9wtrgazmh44e"},{"name":"tools","_id":"ck7c0kpwp000j9wtr9ainclsu"},{"name":"subspace","_id":"ck7c0kpxu000q9wtr96aofyjb"}]}} |